Packages page
Overview
This topic provides information on how to use the Packages page.
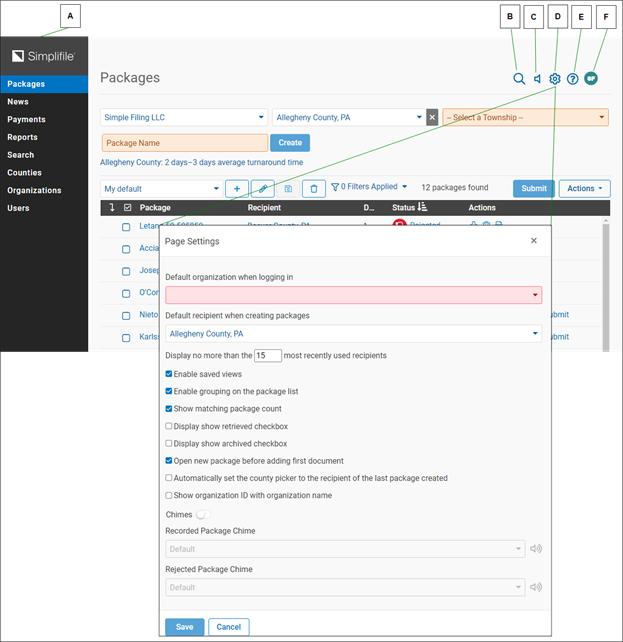
| Letter | Description |
|---|---|
|
A |
Select items in the navigation menu to move to other areas of the software you want to use. |
|
B |
Select the Search for Packages |
|
C |
Select the Enable Chimes |
|
D |
Select the Page Setting |
|
E |
Select the Help |
|
|
Select the Contact Us |
|
F |
Select the User Settings (user initials) button to open the user settings menu. This includes the Profile (opens the My Settings page), Roles (opens the My Roles page), Notifications (opens the My Notifications page), Notary (opens the Notary Setup page), Signature (opens the Click-Sign Signature page), Utilities (opens Simplifile Utilities Setup page), and Logout (logs out of Simplifile) links. |
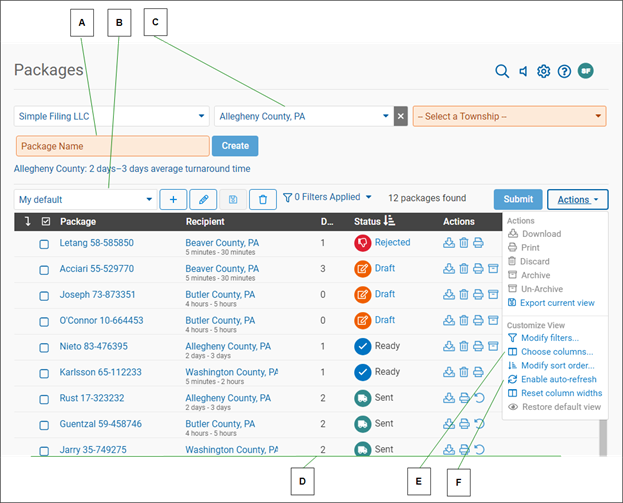
| Letter | Description |
|---|---|
|
A |
Enter the new package name. |
|
B |
Use this tool to limit the packages that display. |
|
C |
The upper right corner displays the agency where new packages will be assigned. Select here to choose the recording county (or jurisdiction) where you want to submit a package. The default or chosen county's (or jurisdiction's) estimated recording time and the number of documents in its recording queue display below the county selection box. In the Select a County dropdown field, to help users find counties (or jurisdictions) with non‑standard names in long lists of county names, we search for the text they enter at the start of every word, instead of just at the start of the full name. For example, if the user types "Crom", the county (or jurisdiction) selector will return "Town of Cromwell". Typing "Gibb" will return "Ft. Gibbon". Typing "Land Court" will return "Bureau of Conveyances (Land Court ‑ 8:01)". |
|
D |
The table includes packages from all your organizations so you can sort and filter the entire table. |
|
E |
Select here to choose the columns that display. For more information, see Change how the Packages page displays. |
|
F |
Select here to turn off automatic refresh. For more information, see Enable or disable the auto‑refresh for package list updates. |
If your only role is an eRecorder, the Packages page is your default start page.
The Packages page contains information about the packages in Simplifile and it can display the packages that you have permissions to access.
The tasks you can do with each package depend on the status of the package. For more information on statuses, see Submitter package and document statuses. Below is an example of the page with multiple packages in various states.
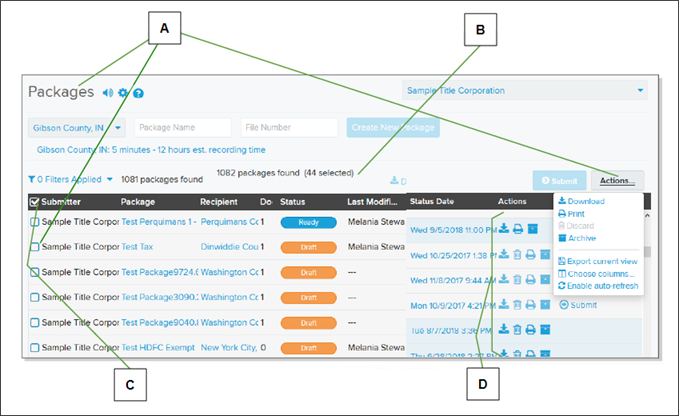
| Letter | Description |
|---|---|
|
A |
On the Packages page, mark the boxes for the packages you want to print or download. Then
select the Actions |
|
B |
The number of packages that match any search criteria and the number of packages you have marked display here. |
|
C |
Select the checkbox on the left side of the header to choose all packages displayed in the table, or the first 100 packages in the table. You can choose all packages only if the table contains fewer than 150 packages. |
|
D |
To download or print a single package, select the Download package |
On the Packages page, mark the boxes for the packages you want to print or download. Then
select the Actions ![]() dropdown button and select the Download package item or the Print package item.
dropdown button and select the Download package item or the Print package item.
To download or print a single package, select the Download package ![]() button or the Print package
button or the Print package ![]() button for the package. Depending
on the status, you may also be able to use the Delete package
button for the package. Depending
on the status, you may also be able to use the Delete package ![]() trash can button to remove a package from the list, the Archive package
trash can button to remove a package from the list, the Archive package ![]() button to archive the package, or the Unarchive package
button to archive the package, or the Unarchive package ![]() button to unarchive the package.
button to unarchive the package.
Column choice and sorting let you display only the package information you want in the order that helps you the most. Your column and sort choices are stored in Simplifile until you change them.
By default, recorded packages display on the Packages page for three days after your office prints or downloads and saves the documents in the package. When the time elapses, Simplifile removes the package from the Packages page table, but stores a copy of the package. Simplifile administrators can change the number of days recorded packages display. For more information, see Set up your organization's default number of days to display voided, billed but rejected, and recorded packages on the Packages page.
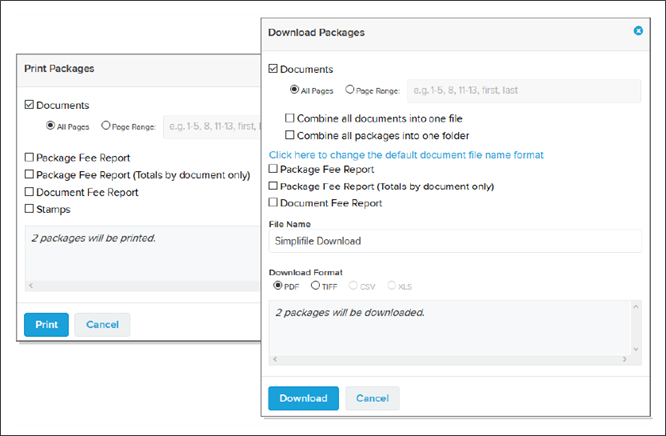
When you download or print from the Packages page. You can choose from the following options:
- Include any or all of the following reports.
- Package Fee Report. This report itemizes the fees for all documents in the package.
- Package Fee Report with totals by document only. This report shows the same information that displays on the Package Details page, including the submitter, county (or jurisdiction), and payment account name.
- Document Fee Report. This report is very similar to the Package Fee Report, but runs on a single document if you mark a single document.
- You may be able to choose to print stamps.
For downloads, you can choose from the following options:
- Change the file name of the download. Simplifile administrators can also change the default document file name format.
- Choose the document format you want.
Saving views
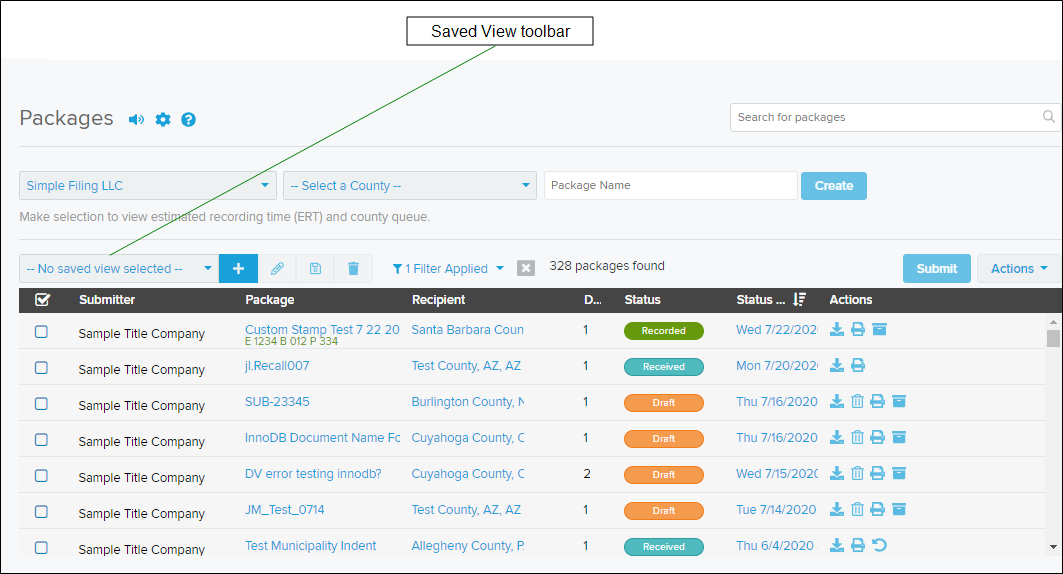
The initial view of the Saved Views toolbar appears below.

There are five parts to the Saved Views toolbar:
- View Selector (dropdown field)
- Create New View
 toolbar button
 - Edit View Name button
- Save View Changes button
- Delete View
 toolbar button
The View Selector dropdown field allows users to quickly switch between the saved views. By default, the View Selector has a single saved view called “Default”. However, users can add up to forty‑nine more saved views.

The Default saved view is enabled for all users. It contains the following settings:
- Filters
- Hide recorded, billed rejected, and voided packages after 2 days.
- Sort order
- By Submitter, in ascending order (A to Z)
- By Status, in general order of eRecording workflow (Beginning to End)
- Status Date, with those packages that have had a status update more recently appearing before those with older status updates (Newest to Oldest)
- Columns displayed
- Submitter (If the user has access to multiple organizations)
- Package Name
- County
- Document Count
- Status
- Status Date
- Actions
- Submit button
- Retrieved flag
To display the tasks you may do with the Saved Views toolbar, see Use the Saved Views toolbar below.
I want to ...
Add a document to a package
- See the Package Details page topic Add a document to the package task.
Change the layout of the Packages page
You can change the display of the Packages page. For example, you can choose the table columns whose information you want to view. If you have a large number of packages in your system, filtering can limit which packages display.
Choose the columns to display in the packages table
| Letter | Description |
|---|---|
|
A |
Select here to choose the columns to display. |
Simplifile opens with a default number of columns active on the list of packages. You can add and remove most of the columns in the packages table.
- Open the Packages page.
- Open the Columns Display and Order window. In the upper‑left corner of the package table:
- Select the Actions
 dropdown button. A menu appears.
 - Select the Choose columns item.
- Select the Actions
- Mark the boxes of the columns you want to display in the table.
These columns hold information only when you can submit a package or when a package has been recorded and stored or printed.
You can choose to display any of the following columns:
| This Column | Contains this information |
|---|---|
|
Submitter |
|
|
Package Name |
The name of the package. |
|
County |
The recording county (or jurisdiction) where you will send the package. |
|
Document Count |
The number of documents in the package. |
|
Status |
This column lets you group packages by thy type of work that is still needed for each. For more information on package statuses, see Submitter package and document statuses. |
|
Status Date |
The date and time when a change was most recently made to a package. |
|
API Package ID |
|
|
Alternate Package Name |
|
|
Remote ID |
The county transaction ID assigned when a package is submitted. |
|
Scheduled Submission Date |
|
|
Expected Submission Date |
|
|
Last Modified By |
The person who made the most recent change to the package. |
|
Last Submitted Date |
The date the last time the package was submitted. |
|
Created By |
The person or organization who created the package. |
|
Released for Recording |
The date the packages was released for recording. |
|
First Submission Date |
|
|
Actions |
The things you can do with a package (download, remove from the system, print). You cannot sort by this column. |
|
Submit (always marked) |
The Submit column is only accessible when the package is ready to be submitted. Otherwise, the column is empty. |
|
Retrieved |
A circled check mark when a package has been recorded and stored or printed, but you have chosen to retrieve the package. |
- Select the OK
 button. The Columns Display and Order window closes and changes are made to the packages table.
Move the columns in the table
- Open the Packages page.
- In the packages table column heading row, use your mouse drag and drop feature to positions the columns where you want them in the table.
Change the Packages page settings
- Open the Packages page.
- Select the Settings toolbar
 button in the upper‑right corner of the page. The Page Settings window opens.
 - Make you page setting selections.
- To choose chime sounds, do the following:
- Select the Settings toolbar button. The Page Settings window opens.
- Choose a chime sound for recorded packages, rejected packages, or both. If you do not choose a sound, Simplifile uses a default. To preview a sound, choose it from the drop‑ down list. Then select the Disable Chimes
 (speaker with sound waves) button.
- Select the Settings toolbar
- Select the OK button. The Page Settings window closes and your setting selections are activated.
Change the Packages table contents by applying filters
If you have a large number of packages in your system, you can filter the list of packages. This can limit which packages display so that you see only the packages you want. You can use the filters alone or in combination to search for the packages you want. Filters are described below.
| Letter | Description |
|---|---|
|
A |
If you are affiliated with multiple submitting organizations, use this dropdown list to choose the submitting organizations whose packages you want to display. |
|
B |
To display packages submitted to a specific recording county (or jurisdiction), use this dropdown list to enter all or part of a county (or jurisdiction) name. Then choose jurisdictions with that string of characters in the name. |
|
C |
Enter all or part of a package name to display packages with that string of characters in the name. |
|
D |
Use this dropdown list to display unretrieved documents, retrieved documents, or both. |
|
E |
Use these fields to limit packages by the number of documents in the package. |
|
F |
Use this field to choose whether the documents should be eRecorded or paper recorded. |

| Letter | Description |
|---|---|
|
A |
If you schedule submissions, you can enter dates
in the fields (or select the Calendar |
|
B |
Use this dropdown list to display packages with specific statuses. |
|
C |
To display packages most recently modified by specific submitters, use this dropdown list to find and choose the submitters. |
|
D |
To hide packages that can no longer be worked on after a number of days you specify, mark the box. Then enter the number of days. Your administrator can set a default number, but your setting here overrides the default setting. |
|
E |
To further limit packages with specific statuses, enter or choose dates for these two fields to display only packages that have had a specific status change between the two dates. |
- Open the Packages page.
- Open the filter window. Select the Filter Applied dropdown link.
- Select the filters you want to use.
- If you are affiliated with multiple organizations and want to view packages submitted by one or more specific organizations, choose the organizations you want from the dropdown list in the Submitter section.
- To view packages whose names include a specific string of characters, enter the characters in the Package Name field.
- To view packages that have been retrieved, that are un‑retrieved, or both, use the Retrieval Status dropdown list. A retrieved package is one that has been recorded and returned, and printed or downloaded by someone at your organization.
- To display packages that have a specified number of documents, use the Document Count drop‑ down list to choose whether to view packages with exactly, at least, or no more than (at most) the number of documents you choose. Then enter the number of documents.
- To display packages that are scheduled to be submitted between two specific dates, enter the dates in the Scheduled Submission Date from and to fields. You can also select the Calendar
 button and choose the dates you want.
 - To change the default number of days packages that have been recorded, are billed but rejected, or are voided display on the Packages page, mark Hide recorded, billed rejected and voided packages after X days. Then enter the number of days.
- To display packages submitted to a specific recording county (or jurisdiction), select the County field and enter all or part of a county (or jurisdiction) name. Then choose the jurisdictions whose packages you want to view.
To display packages with specific statuses, choose the statuses you want from the Package Status dropdown list.
To further limit packages with specific statuses, enter or choose dates in the Status Date fields to display only packages that have had a specific status change between the two dates.
- To display only packages most recently modified by specific people, begin typing someone’s name in the Last Modified By filter box. Then mark the boxes of the people you want. You can add multiple people from a single search.
- To display only eRecordable or only paper recordable packages, use the Submission Type dropdown list.
- When finished choosing the filter selections, in the upper‑right corner of the filter window, select the Apply Filters
 button. The filter window closes and the table in the Packages page displays the packages that meet the filter criteria.
Change the active organization temporarily from the Packages page
You can change the active organization temporarily (for the current session) from the Packages page.
- Open the Packages page.
- Select the Settings
 button at the top of the Packages page.
 - From the Default Organization dropdown list, choose the organization you want.
- Select the Switch button when it displays.
- In the list of packages, hover your mouse pointer at the end of the name of the organization you want to make the default.
- Select the Switch button when it displays.
Change the default organization from the Packages page
You can change your default organization from the Packages page.
- Open the Packages page.
- Select the Settings button at the top of the Packages page. The Page Settings window opens.
- From the Default organization when logging in dropdown list, choose the organization you work with most often.
- When the Switch button appears, select it.
Create a package
When you create a package, you choose the recording county (or jurisdiction) where you want to send the package, assign a name to the package, and add a document or document placeholder to the package. The information you use to create a package displays on the Package Details page, which is the base from which you perform most actions related to the package.
| Letter | Description |
|---|---|
|
A |
Counties (or jurisdictions) that match what you entered display in this section. |
|
B |
To choose a county (or jurisdiction), select the field. If the county (or jurisdiction) you want does not display in the list, start typing in the field to have Simplifile display counties that match what you enter. |
|
C |
Counties (or jurisdictions) that require you to complete additional steps to register display in this section. Select a county (or jurisdiction) to start the registration process. For more information, see Recording county (or jurisdiction) registration. |
After you create at least one package, Simplifile can display the recording county (or jurisdiction) you used most recently at the top of the Packages page in the first (county) dropdown field. This means you do not have to re‑enter the county if the next package you create also goes to that county. If you want this feature, your Simplifile administrator can set this up for your organization. See the Page Settings window topic Set the default organization when logging in task.
- Open the Packages page.
- If your only role is an eRecorder, the Packages page is your default start page.
- If you have multiple roles, in the navigation menu, select the Packages item.
- In the section below the Packages page title, use the dropdown fields to select the county (or jurisdiction) where you want to record the documents or select the county that displays and begin typing in the field that displays to display jurisdictions that match what you enter.
If you choose a county (or jurisdiction) that requires registration, selecting the name helps you register the county (or jurisdiction). For more information on this process, see Registering with a recording county (or jurisdiction) during package creation.
- In the Package Name field, enter a name that describes the package.
- Select the Create
 button. The Package Details page opens. For information about the Package Details page, see Package Details page. The new package is available in the Packages page.
Custom sort the packages table
You can also sort the table by most of the columns. A Sort ![]() button after a column heading indicates which heading has been used to sort the table, and the type of sort (for example, alphabetical, or lowest to highest). You can sort by multiple columns if you hold down the shift key before you select additional column headings. A number in the heading indicates which column is sorted by first, second, and so forth.
button after a column heading indicates which heading has been used to sort the table, and the type of sort (for example, alphabetical, or lowest to highest). You can sort by multiple columns if you hold down the shift key before you select additional column headings. A number in the heading indicates which column is sorted by first, second, and so forth.
Method 1 ‑ From the table
- Open the Packages page.
- In the package table:
- To sort the table by a column, select the column heading. To reverse the sort order, select the column again.
- To sort the table by multiple columns, hold down the Shift key before you select additional column headings.
- To clear the sort requests, select a single column. That column will remain the default sort order
Method 2 ‑ From the Sort window
- Open the Packages page.
- In the upper‑left corner of the packages table, select the Actions dropdown button. A menu appears.
- Choose Custom sort. The Sort window opens.
- Use the dropdown fields to make your sort selections.
- Select the Save
 button. The Sort window closes and the sort choices are made to the packages table.
Discard a package
Discarding a package removes the package and its documents from the Packages page table.
- Open the Packages page.
- If needed, use the filter to display the wanted package in the packages table.
- In the left column of the table, mark the box next to the package or packages you want to discard.
- Select the Actions dropdown button. A menu appears.
- Select the Discard
 item. The Discard Packages window opens.
 - Verify that the packages listed in the window are the packages you want to discard.
- Select the Discard
 button. The window closes and the package or packages are removed.
Download a single package from the Packages page
Downloading a package makes file of the documents contained in the package that can be used reviewing, archiving, or printing.
Download a package using the browser download tool (ZIP file)
- Open the Packages page.
- If needed, use the filter to display the wanted package in the packages table.
- Use the left column in the table to select the packages to download. Do one of the following:
- Mark the box next to the package or packages (up to 150 packages) you want to download.
- To print all the packages displayed in the table (actually this only selects up to the first 100 packages), mark the box in the left column of table header. Simplifile won’t let you mark the box if the table contains more than 150 packages.
- Select the Actions dropdown button. A menu appears.
- Select the Download option. The Download Package window opens.
- Complete the Download Packages window. For information, see Download Packages window.
Download a package using the enhanced Simplifile download tool
- Open the Packages page.
- If needed, use the filter to display the wanted package in the packages table.
- Use the left column in the table to select the packages to download. Do one of the following:
- Mark the box next to the package or packages (up to 150 packages) you want to download.
- To print all the packages displayed in the table (actually this only selects up to the first 100 packages), mark the box in the left column of table header. Simplifile won’t let you mark the box if the table contains more than 150 packages.
- Select the Actions dropdown button. A menu appears.
- Select the Download option. The Download Package window opens.
- Complete the Download Packages window. For information, see Download Packages window.
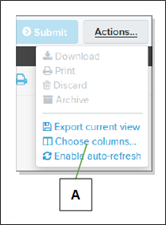
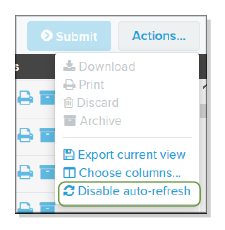
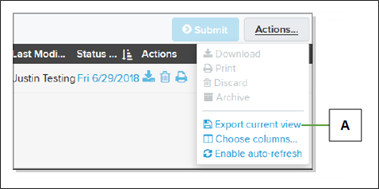
Enable or disable the auto‑refresh for package list updates
You can prevent Simplifile from automatically refreshing the Packages page. This may help if you are working through a list of rejections.
By default, Simplifile updates the Packages page every three minutes. This helps keep you current on the statuses of packages and documents, as well as on what work needs to be done. Your list of packages may seem to disappear and reappear when the update happens.
If you feel that the frequent updates interrupt your workflow, you can turn off this feature. However, if you turn the feature off, you need to manually refresh your browser page periodically to keep the list updated.
Enable (turn on) the auto‑refresh feature
- Open the Packages page.
- In the upper‑left corner of the packages table, select the Actions dropdown button. A menu appears. If the auto‑refresh feature is disabled, the Enable auto‑refresh item is displayed in the menu.
- Select the Enable auto‑refresh item. The menu closes and the auto‑refresh feature is enabled.
Disable (turn off) the auto‑refresh feature
- Open the Packages page.
- In the upper‑left corner of the packages table, select the Actions dropdown button. A menu appears. If the auto‑refresh feature is enabled, the Disable auto‑refresh item is displayed in the menu.
- Select the Disable auto‑refresh item. The menu closes and the auto‑refresh feature is disabled.
Export a packages list
You can export a list of the packages displayed on the Packages page. Simplifile presents the list as a .CSV (comma‑ separated values) file that can be opened in a spread sheet.
| Letter | Description |
|---|---|
|
A |
Select here to export the list. If too many records display, you can choose to export only a partial list or to add filters to make the list shorter. |
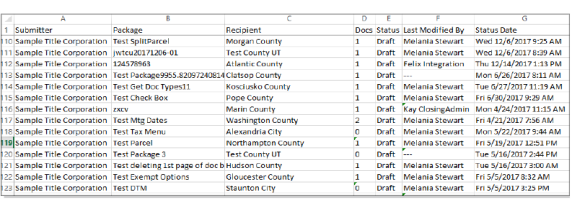
- Open the Packages page.
- Filter the packages that display until you have a list of the packages you want to export.
- In the upper‑left corner of the packages table, select the Actions dropdown button. A menu appears.
- Select the Export current view item. The current view information is download in your browser window as a CSV file.
- Follow your browser’s instructions to open or save the file.
Open the Email a download link window
The Packages page includes an Email Download Link control that is enabled when all of the following conditions have been met:
- The package was submitted by an organization that allows email download links,
- and the authenticated user has permissions to send email download links,
- and the package is in Recorded status.
Sometimes Simplifile users have a business need to send recorded documents to interested third‑parties. An easy way to do this directly from Simplifile is by sending them single‑use links via email that allows them to download the recorded documents that are selected by the user. This feature avoids problems with email attachment sizes and provides a more auditable way to see how your recorded documents have been shared.
Method 1 ‑ using the Email button in the table
- Open the Packages page.
- In the table, select the Email button in row. The Email Package Download window opens.
- Complete the Email Package Download window. For more information, see the Email Package Download Link window topic.
Method 2 ‑ using the Actions dropdown button
- Open the Packages page.
- In the table, mark the package you want to email the link to a user.
- Select the Actions dropdown button. A menu opens.
- In the menu, select the Email Download Link option. The Email Package Download window opens.
- Complete the Email Package Download window. For more information, see the Email Package Download Link window topic.
What the recipient experiences with emailed download links
When a document or package download link is emailed to someone from the Packages page or Package Details page, the recipient receives an email with similar to the one shown below.
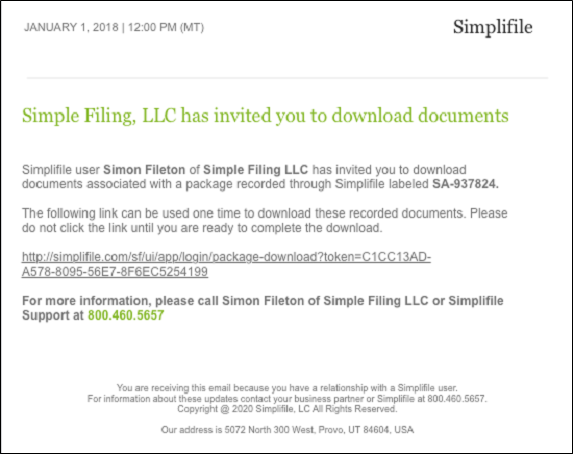
The recipient should select the link in the email when they are ready to download documents.
Selecting the link opens a web page similar to the one shown below.
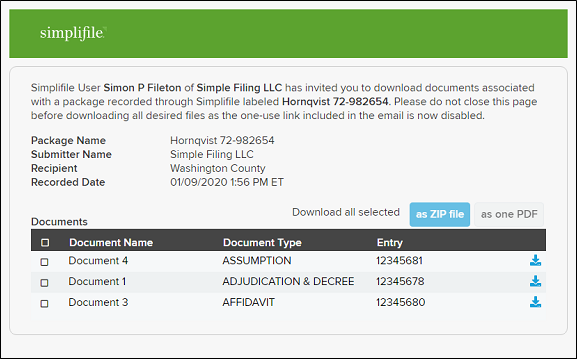
The user has three options:
- Download selected documents as a ZIP file by selecting the as ZIP file button.
- Merge selected documents into a single PDF by selecting the as one PDF button.
- Download each document individually as PDFs by selecting the download icon next to each desired document.
When the user closes the page they will no longer be able to access it. If necessary, the user who created the download link email will have to send a new one.
Print a single package from the Packages page
Printing a package makes printout or PDF of the documents in the package that can be used reviewing or archiving.
Print a package using the browser’s printer utility
- Open the Packages page.
- If needed, use the filter to display the wanted package in the packages table.
- Use the left column in the table to select the packages to print. Do one of the following:
- Mark the box next to the package or packages (up to 150 packages) you want to print.
- To print all the packages displayed in the table (actually this only selects up to the first 100 packages), mark the box in the left column of table header. Simplifile won’t let you mark the box if the table contains more than 150 packages.
- Select the Actions dropdown button. A menu appears.
- Select the Print option. The Print Package window opens.
- Complete the Print Document window. For information, see Print Packages window.
Print a package using enhanced Simplifile download tool
- Open the Packages page.
- If needed, use the filter to display the wanted package in the packages table.
- Use the left column in the table to mark the packages to print. Do one of the following:
- Mark the box next to the package or packages (up to 150 packages) you want to print.
- To print all the packages displayed in the table (actually this only selects up to the first 100 packages), mark the box in the left column of table header. Simplifile won’t let you mark the box if the table contains more than 150 packages.
- Select the Actions dropdown button. A menu appears.
- Select the Print option. The Print Package window opens.
- Complete the print job using the Print Document window. For information, see Print Packages window.
Print multiple packages from the Packages page
- Open the Packages page.
- If needed, use the filter to display the wanted package in the packages table.
- Select the packages you want to print.
- To print specific packages in the table, in the left column, mark the boxes that correspond to the packages you want to print.
- To print all the packages displayed in the table, mark the box in the table heading and when the menu appears, select the Select All item.
- Select the Actions dropdown button. A menu appears.
- Select the Print item. The Print Packages window opens.
- Complete the print job using Print Packages window. For more information, see the Print Packages window topic.
Recall a submitted package that hasn't been recorded
The package must have a Sent indicator in the Status column to be able to be recalled.
![]()
| Letter | Description |
|---|---|
| A | The Sent status indicator. |
| B | The Recall button. |
- Open the Packages page.
- If needed, use the filter to display the wanted package in the packages table.
- In the table go to the row of the sent package you want to recall.
- In the Actions column, select the Recall
 button.
If the recall is successful, the package goes back into a Ready status. After you make any necessary changes, you can resubmit the package.
Remove applied filters
Method 1
- Open the Packages page.
- Above the package table, next to the Filters Applied
 dropdown button select the Clear All Filters
  button. The Packages page table displays the results of all filters cleared.
Method 2
- Open the Packages page.
- Open the filter window. Select the Filters Applied link.
- Select the Clear All
 button.
 - Select the Apply Filters button. The filters window closes and the Packages page table displays the results of all filters cleared.
Review and repair a rejected package
Method 1 ‑ From the Packages page ‑ Quick
- Open the Packages page.
- If needed, use the filter to display the wanted package in the packages table.
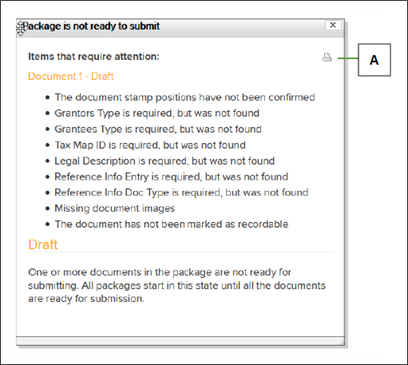
- In the Packages table select the Rejected button in the Status column of the rejected package you want to review. The Package is not ready to submit window opens.
- Select the Printer
 button. Another window opens that displays Items that require attention:
 - Review the rejection information in the window.
- To print the rejection information, use your browser’s print feature. This often is done by right‑clicking inside the window and selecting Print.
- To close the window, select the Close window
 button in upper‑right corner.
Method 2 ‑ Directly from the Packages page
- Open the Packages page.
- If needed, use the filter to display the wanted package in the packages table.
- In the Packages table, select the Rejected button in the Status column of the rejected package you want to review. The Package is not ready to submit window opens.
- Select the red Document 1 ‑ Rejected link. The Documentation Editor opens with the rejected document displayed.
- In the left panel, select the red rejection reason link (
 ). The Rejected window opens.
 - Review the rejection information in the Rejected window.
- To print the rejection reason:
- Select the Printer button. Another window opens that displays Items that require attention:
- Use your browser’s print feature. This often is done by right‑clicking inside the window and selecting Print.
- To close the window, select the Close window button in upper‑right corner.
- Select the Printer
- To close the Rejected window, select the OK button or the Close
 button in the upper‑right corner.
To pay a specific fee from a different account, choose the account from the dropdown list for the fee type. For more information, see Package management.
Method 3 ‑ From the Packages page to the Package Details page
- Open the Packages page.
- To view details about why the package was rejected, select the Rejected status of a package on the Packages page.
- Select the name of a rejected package to display its Package Details page.
- Follow the instructions reviewing and repairing a rejected package from the Package Details page. See the Package Details page topic Review and repair a rejected package task.
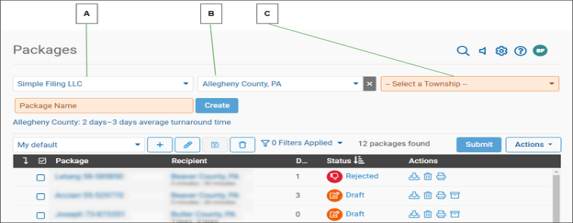
Select the county and municipality for the package list
- Open the Packages page.
- In the section below the Packages page title, use the dropdown fields to select the target county and if applicable the target municipality.
- The name of the selected county and municipality (if applicable) is displayed below the county and municipality selection area with the ERT (estimated recording time) when applicable.
Set the chime (alert) for packages
- Open the Packages page.
- Look at the Chime button. The
 button indicates the chime is enabled. The
  button indicates that the chime is disabled.
 - To change the chime setting, select the button . The button changes to indicate the new chime setting.
Submit a package or packages
| Letter | Description |
|---|---|
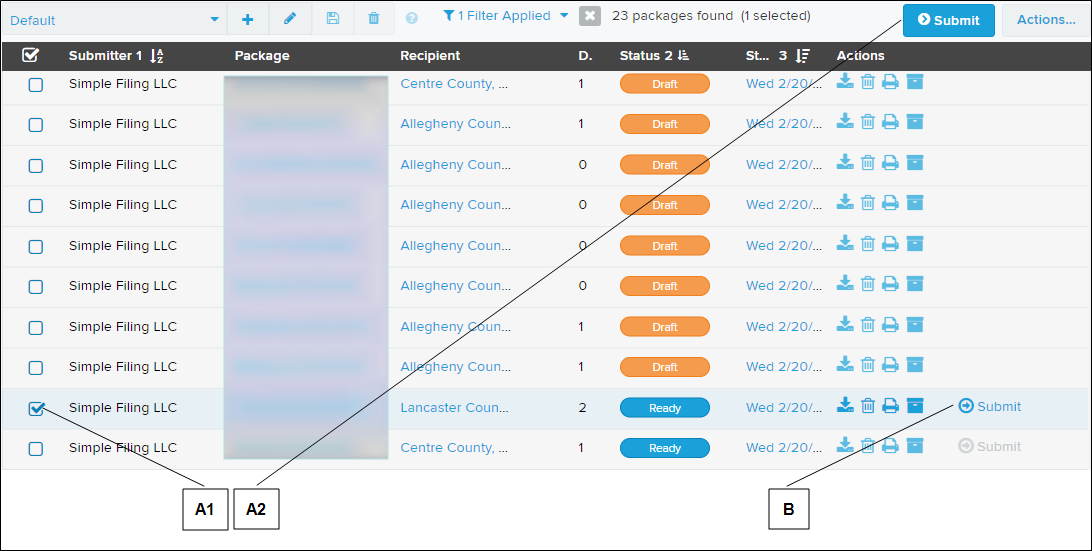
| A1 & A2 | Mark the box or boxes beside the package or packages you want to submit (A1) and select the Submit button (A2) above the table. Simplifile submits all marked packages. This method lets you submit multiple packages at the same time. |
| B | Slick the Submit button on the package row. |
When all documents have a Ready status, select the Submit button to submit the package.
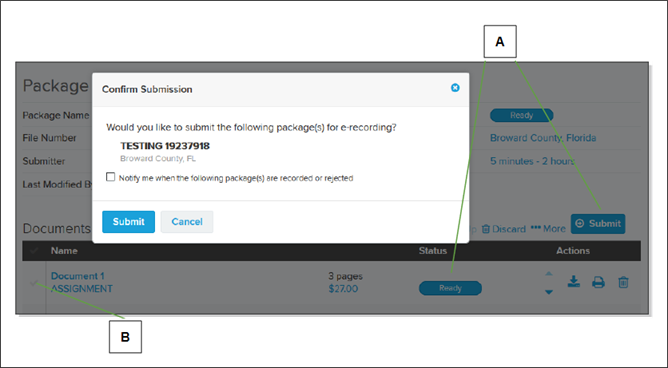
When you select to submit a package from the Packages page, the system opens a confirmation window that displays the name of each marked package and its county (or jurisdiction).
| Letter | Description |
|---|---|
| A | When all documents have a Ready status, select the Submit button to submit the package. |
| B | Because all documents in a package are submitted when you select the Submit button on the Package Details page, a marked box has no effect on whether a document is submitted as part of a package. |
- Open the Packages page.
- If needed, use the filter to display the wanted package or packages in the packages table.
- When a package it ready to be submitted (the Ready button in displayed in the Status column in the Packages page and the Release for Recording box in the Package Details page has been marked), do one of the following:
- Method 1 (Using the Submit button for single or multiple packages)
- In the left column of the table, mark the box next to the package or packages that have a status of Ready that you want to submit.
If the marked package or packages have a Ready button in the Status column and the Release for Recording box in each of the Package Details pages have been marked, the light Submit button above the packages table will turn dark blue.
If the light Submit button does not turn dark blue, select the Ready button to find out what items need attention. Often the Release for Recording box in the Package Details page has not been marked.
Resolve any items that required attention so the Submit button turns dark blue.
- Select the dark blue Submit button. The Confirm Submission window opens.
- If you want to be notified when the package is recorded or rejected, mark the Notify me when this package is recorded or rejected box.
- Select the Submit button. The window closes and the package is submitted.
- In the left column of the table, mark the box next to the package or packages that have a status of Ready that you want to submit.
- Method 2 (Using the Submit link for single packages)
- In the package row that contains a package that is ready to submit, verify that the Submit link is blue.
If the Submit link is gray, move your mouse cursor over the gray Submit link to find out what items need attention. Often the problem is that the Release for Recording box in the Package Details page has not been marked.
Resolve any items that required attention so the Submit link turns blue.
- Select the Submit link. The Confirm Submission window opens.
- If you want to be notified when the package is recorded or rejected, mark the Notify me when this package is recorded or rejected box.
- Select the Submit button. The window closes and the package is submitted.
- In the package row that contains a package that is ready to submit, verify that the Submit link is blue.
- Method 1 (Using the Submit button for single or multiple packages)
Use the Packages page to eSign a document
You many need to digitally sign a document before you submit it. This helps to verify that the document is exactly the same as its paper (hard‑copy) original. Some documents require a notary signature. You and your Simplifile administrator need to set this up. For more information, see Notary information and digital signature management.
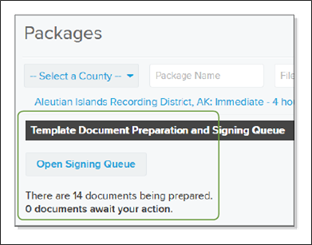
The Packages page lets you know when documents need to be signed, as shown in the example below. When you select the link to open the signing queue, The Document Preparation and Signing Queue displays the following information:
| Name | Lets you do this |
|---|---|
| Package Name | Select this link to display the Package Details page. If the name displays in green, the document has already been signed. |
| County | The name of the county (or jurisdiction) where the document will be recorded. |
| Document Name | Select this link to open the document in the Document Editor. |
| Type | The document type. |
| # Pages | The number of pages in the document. |
| Status | Select this link to display the Document History page. |
| Date | The date a signing action took place. |
| Users | The names of the people who acted on the document. |
Below is an example of the Document Preparation and Signing Queue page.
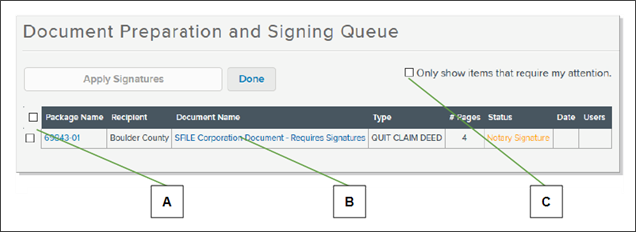
| Letter | Description |
|---|---|
| A | Mark the boxes beside the documents you want to sign and select to apply signatures or notarization. To mark all documents, mark the box beside the header. |
|
B |
Select here to open the document and verify the position of the signature. |
|
C |
Mark this box to show only the items that need your attention. |
After you apply a signature from the Document Preparation and Signing Queue page, you need to open the document and verify the placement of the signature. You can do this from the Document Preparation and Signing Queue or from the Package Details page.
Signing administrators can also sign documents as they view them. This gives other options as well. Select Signing > Sign to open the Signing page.
Simplifile administrators with the necessary permission may be able to mark a document for review. For help with this, contact your Simplifile account manager. The reviewer can do one of the following:
- Make changes and return the document to the signing queue, which strips all signatures.
- Reject the document, which removes the document from the system.
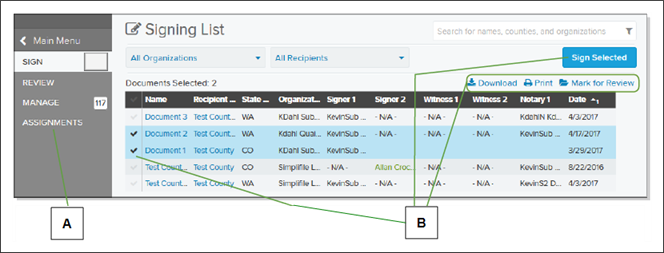
| Letter | Description |
|---|---|
| A | Administrators can use these links to perform other signing tasks. |
| B | Mark the checkbox for each document you want to work with. The document count changes to display the number of documents selected. Select the Sign Using RON button to sign only those documents. |
| C | Mark the checkbox for each document you want to work with. The document count
changes to display the number of documents selected. Select the Actions |
If you have multiple documents in your signing queue, as soon as you sign one document, the next document requiring a signature displays. Simplifile displays a notice when a document has been signed next to the document title. You can also move through the various documents without signing, if necessary.
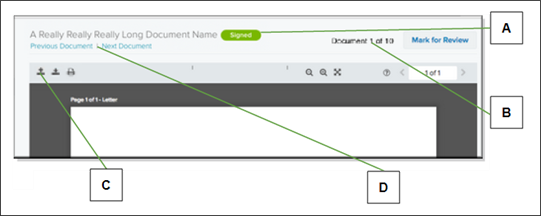
| Letter | Description |
|---|---|
| A | This notice displays after you sign a document. |
| B | This shows you which document in the queue you are currently viewing. |
| C | Select here to upload additional pages. The pages display at the end of the document. |
| D | Use these options to move from document to document in your signing queue. |
If you are the document signer
- Open the Packages page.
- Mark the boxes of the documents you want to sign.
- Depending on the task you want to complete, select the Apply Signatures button or the Apply Notarization button and verify that you want to apply the signature or notarization.
- When finished, select the Done
 button.
If you are the signing administrator
- To display the Signing page, in the navigation menu, select the Signing. > Sign item.
Check the status of a document (Specific document statuses)
Change the default file name format (Simplifile administrator task)
- See the Change Default File Format window topic.
Use the Saved Views toolbar
The Saved Views toolbar is located on the Packages page just above the table to the left.
See Saving views for information about the Saved Views toolbar.
Create a new view
The Create New View ![]() toolbar button on the Saved Views toolbar lets the user create a saved view with the current filter, sort, and column settings.
toolbar button on the Saved Views toolbar lets the user create a saved view with the current filter, sort, and column settings.
- Open the Packages page.
-
In the Saved Views toolbar, select the Create New View
toolbar button. The Create New Saved View window opens.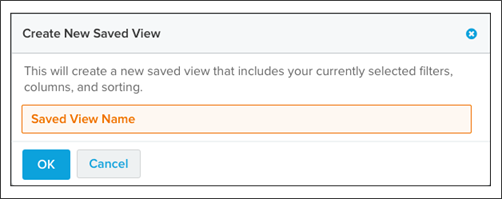
- In the Saved View Name field, enter a unique, descriptive name for the new saved view.
- Select the OK button to create the new Saved View and set it as the selected view in the View Selector dropdown field.
Edit a view name
- Open the Packages page.
- In the Saved Views toolbar, select the Edit View Name
 button. The Edit Saved View Name window opens.
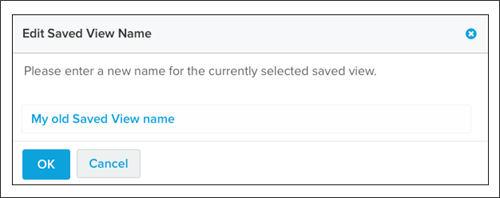
- In the field, enter an alternate name for the saved view.
- Select the OK button to change the view name and set it as the selected view in the View Selector dropdown field.
Save view changes
When users changes any settings of the currently‑selected saved view, they will have the opportunity to save these changes. If changes have been made, an asterisk symbol is added to the name in the View Selector, as shown below.

- Open the Packages page.
- In the Saved Views toolbar, select the Saved Changes
 toolbar button.
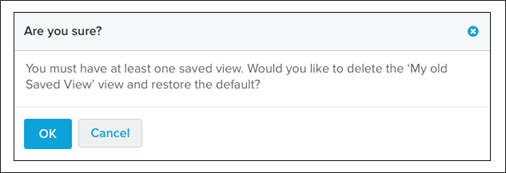
Delete View
- Open the Packages page.
- In the Saved Views toolbar, select the Delete View toolbar button.
You must always have at least one saved view. If you attempt to delete the last saved view, a window opens asking you to restore the Default view.
Restore the default view
If you modify the Default view and want to restore it to its original settings, you can.
- Open the Packages page.
- Select the Actions dropdown button. A menu opens.
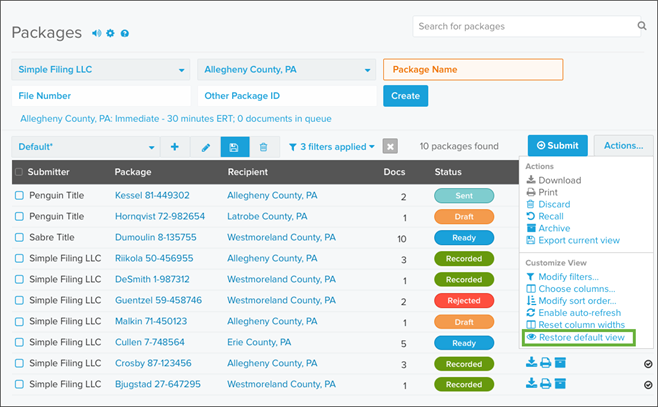
-
In the Customize View section of the dropdown list, select the Restore default view item.
The Restore Default View option is shown in the green rectangle above.
View a package’s details
- Open the Packages page.
- If needed, use the filter to display the wanted package in the packages table.
- In the row of the package you want to view, select the link in the Package column. The Package Details page opens. For information about the Package Details page, see Package Details page.
View a packages’ county (or jurisdiction) information
- Open the Packages page.
- If needed, use the filter to display the wanted package in the packages table.
- In the row of the package you want to view the county (or jurisdiction) information, select the link in the County column. The Recipient Information page opens. For information about the Recipient Information page, see Recipient Information page.
View or add comments to a package
- On the Packages page or a package search results list, select the name of the package where you want to view or add comments.
- In the navigation menu, select the Messages item.
- Scroll to the bottom to view messages from county’s (or jurisdictions).
- To add comments that only people at your location can view, select in the Internal Preparation Notes box and type your comment.
- To add comments that recording county (or jurisdiction) workers can view, select in the Comments for Recipient box and type your comment.
View the activity history of a package from the Packages page
- Open the Packages page.
- If needed, use the filter to display the wanted package in the packages table.
- Select the date link in the Status Date column for the package. The History page for the package opens.
View the Rejection information for a package
Method 1 ‑ From the Packages page ‑ Quick
- Open the Packages page.
- If needed, use the filter to display the wanted package in the packages table.
- In the Packages table select the Rejected button in the Status column of the rejected package you want to review. The Package is not ready to submit window opens.
- Select the Printer button. Another window opens that displays Items that require attention:
- Review the rejection information in the window.
- To print the rejection information, use your browser’s print feature. This often is done by right‑clicking inside the window and selecting Print.
- To close the window, select the Close window button in upper‑right corner.
View the status of a package
- Open the Packages page.
- If needed, use the filter to display the wanted package or packages in the packages table.
- In the row of the package you want to view, select the colored button in the Status column. A window opens that contains status information about the package.
Below is an example of one of the windows that opens when a status tag is selected.
Letter Description A You can print the list of items that require attention. - To close the window, select the OK button.
Archive a package from the Packages page
If you have the needed entitlements, you can archive a package from the Packages page.
- Open the Packages page.
- If needed, use the filter to display the package or packages you want.
- Do one of the following:
- To archive a single package, find the package you want and select the Archive
 button at the end of the row.
 - To archive one or more packages:
- Mark the packages you want to archive on the left side of each row
- Select the Actions dropdown button on the top right side above the packages table. A menu appears.
- Select the Archive button.
- To archive a single package, find the package you want and select the Archive
Troubleshooting ‑ Package page issues
Issue ‑ Can’t modify or delete a rejected package
Symptom ‑ Can’t modify or delete a rejected package.
Cause ‑ The ownership of the package has been changed to the county (or jurisdiction).
Solution ‑ Change the package ownership back to the submitter.
- A super user can use the Package Admin page to determine who is the current owner of the package.
- If the package is owned by the county (or jurisdiction), a super user can change the package ownership to the submitter.