Package Details page
Overview
This topic provides information on how to use the Package Details page.
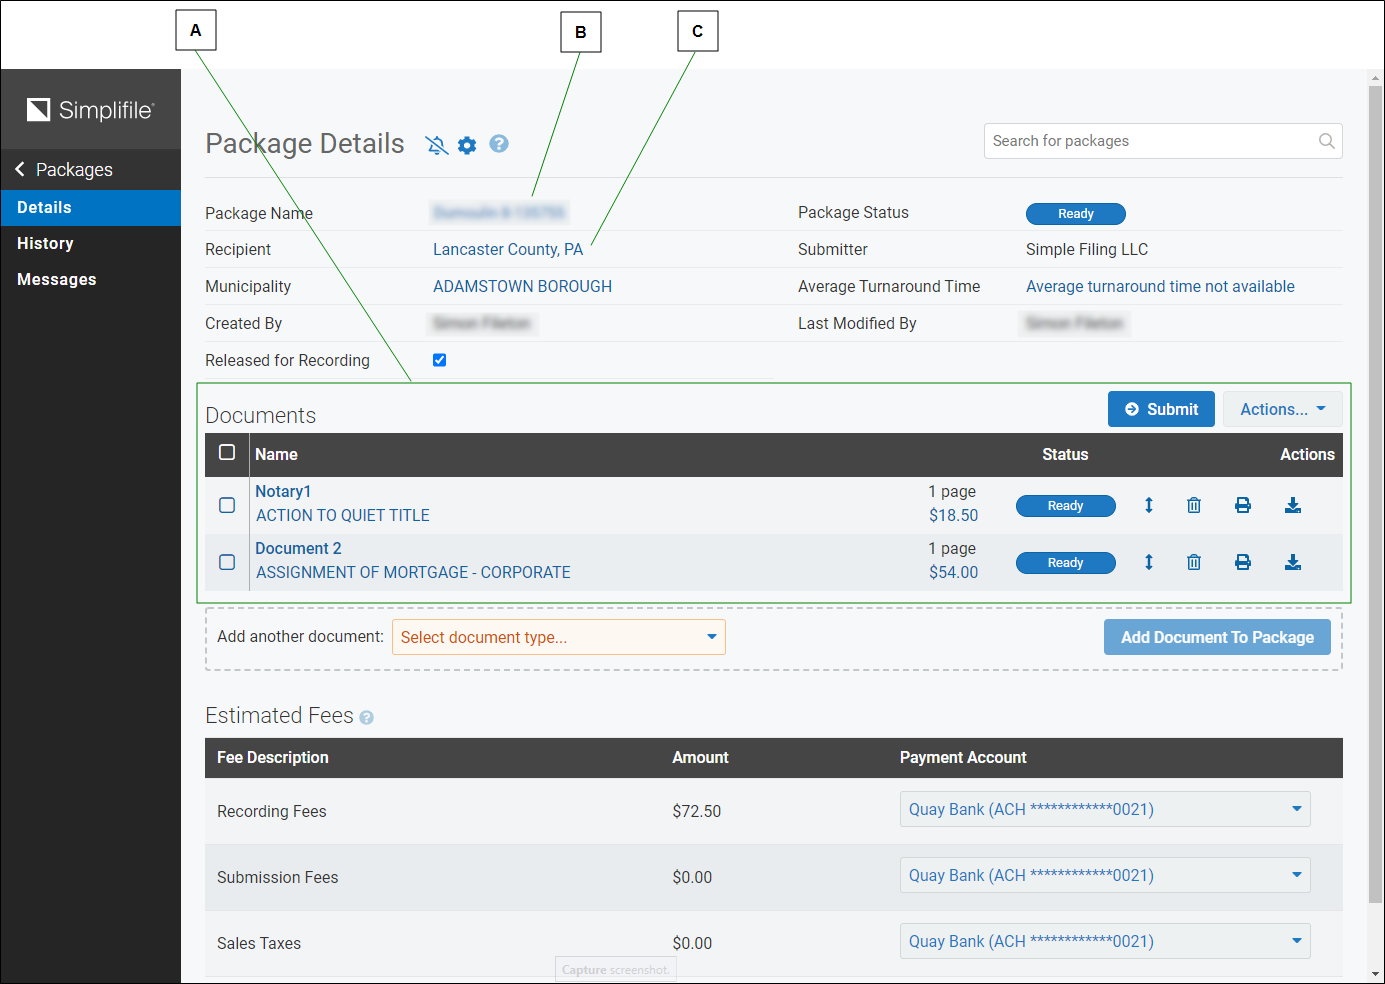
| Letter | Description |
|---|---|
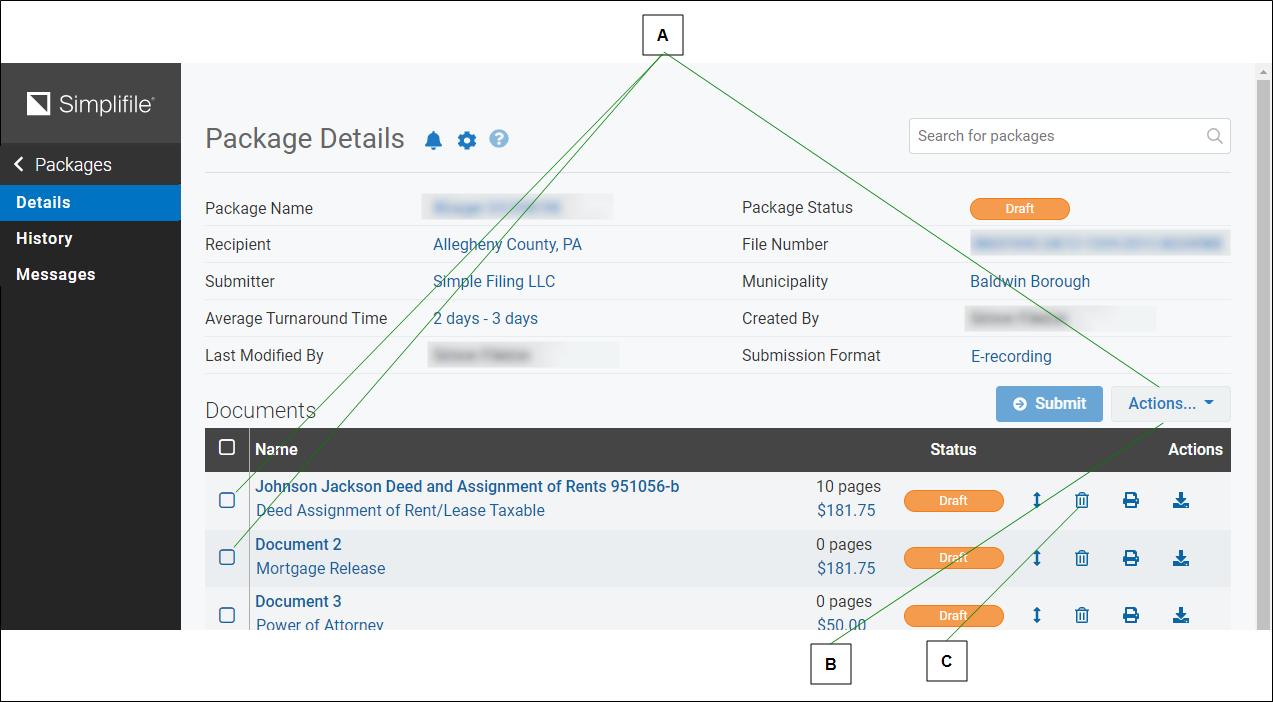
| A | Information about documents that have been added to a package display in the Documents table. See below for more information about what you can do in this table. |
| B | Select in the Package Name field to change the name of the package. |
| C | Select the County (or jurisdication) name to change the package county or jurisdication). |
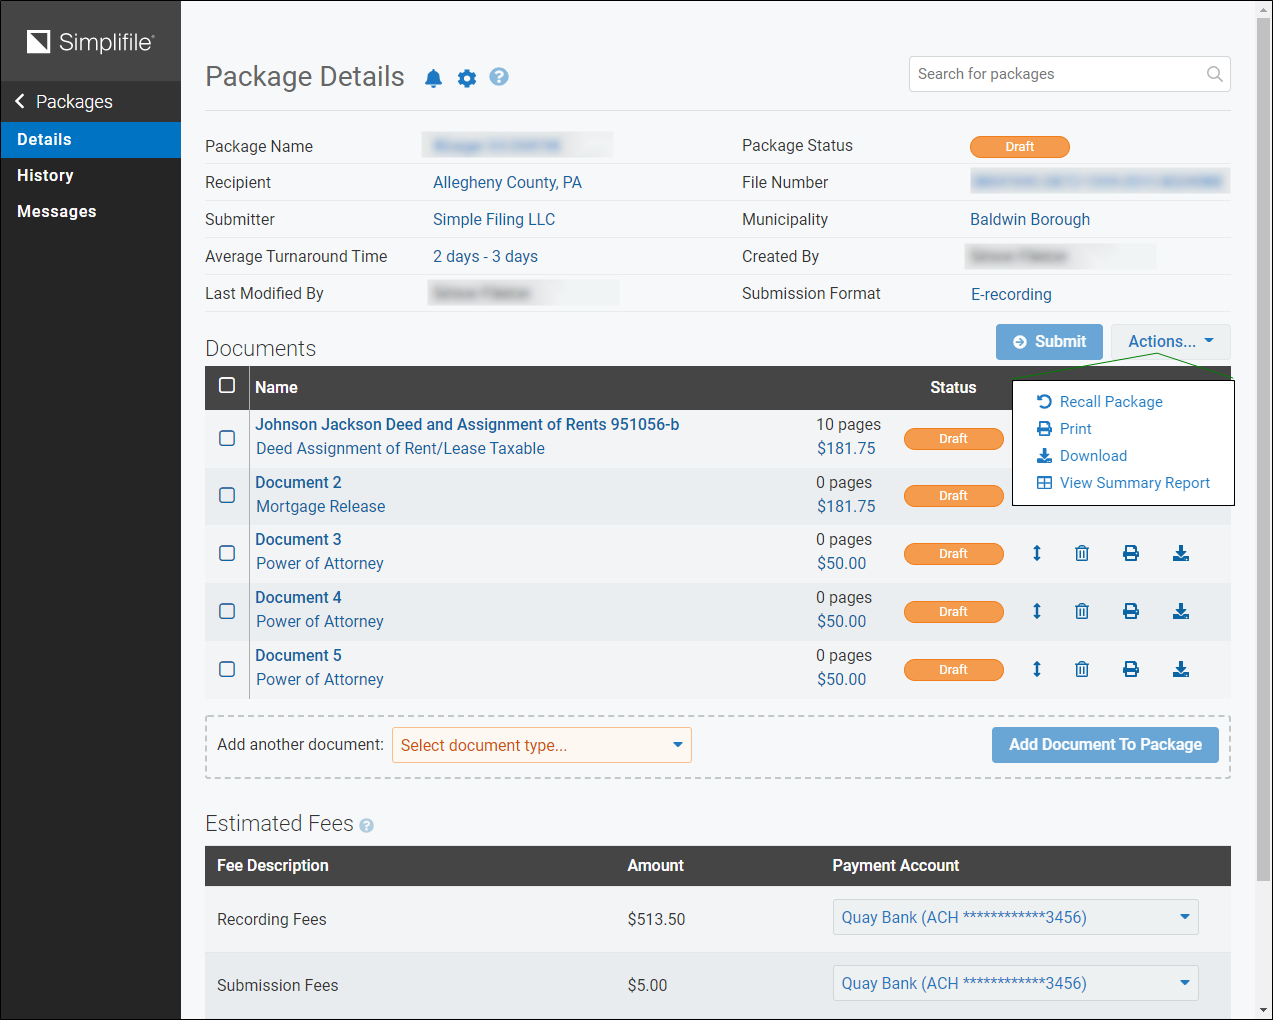
The following figure describes the Documents table on the Package Details page. The table lists documents that have been added to the package. You can do the following from the Documents table:
- Change the document type of each document.
- Change the order of the documents to make sure the county (or jurisdiction) reviews them in the correct order.
- Download, print, and remove documents from the package.
- Review the document fees.
- View the status of each document, and the tasks required to move a document from one status to another.
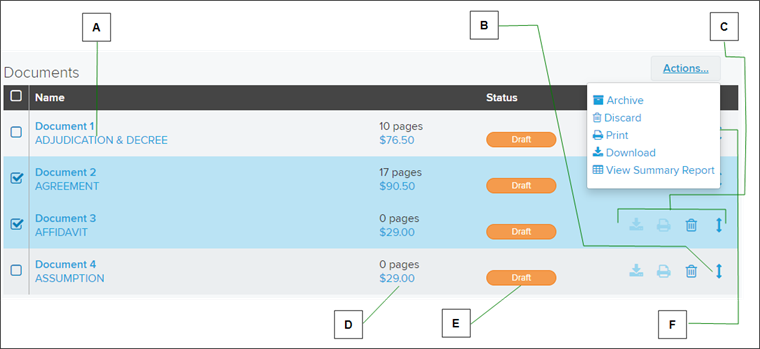
| Letter | Description |
|---|---|
|
A |
Select a document type to change the type. For more information, see Change the document type. |
|
B |
Documents display in the order in which they will be reviewed. Use the arrows to change the order of the documents. For more information, see Reorder the documents in a package. |
|
C |
Use these icons to download, print, remove, or rearrange individual documents. |
|
D |
Select a fee total to review and possibly edit fees. For more information, see Review or edit fees and payment accounts. |
|
E |
Select a document status to view a window that explains tasks you need to do to prepare the document for submission. |
|
F |
Mark the boxes for any documents in the package
that you want to manage. Then select Actions |
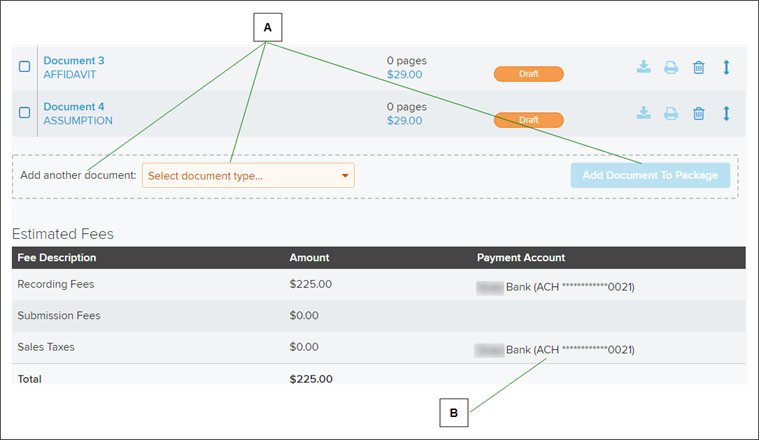
| Letter | Description |
|---|---|
|
A |
You can add a document to a package from the Package Details page. For more information, see Add a document to the package and Remove (or discard) a document from a package. |
|
B |
If your administrator has set up multiple payment accounts, you can choose from the dropdown lists the account from which a fee type should be paid. For more information, see Review or edit fees and payment accounts. For information about setting up payment accounts, see Manage Payment Accounts page. |
I want to ...
Open the Package Details page
Open the Package Details page from the Packages page
- At the top of the navigation menu, select the Simplifile logo. The Packages page opens in the right panel and the navigation menu highlights the Packages item.
- In the navigation menu, select the Packages item. The Packages page opens in the right panel.
- If needed, use the Select a County dropdown or search for the package.
- In the table, select the link for the wanted package. The Package Details page opens in the right panel and the navigation menu changes to display the packages options with the Details item selected.
Open the Package Details page from the Search Results window
- At the top of the navigation menu, select the Simplifile logo. The Packages page opens in the right panel and the navigation menu highlights the Packages item.
- In the navigation menu, select the Search item. The Search page opens in the right panel.
- Enter the search parameters in the applicable fields and select the Search button.
- When the Search Results window opens, select the wanted package link. The Search Results window closes, the Package Details window for the chosen package opens in the right panel, and the navigation menu changes to display the packages options with the Details item selected.
Open the Package Details page from the Document Editor
- From within the Document Editor, select theDone
 button at the bottom of the left panel or select the browsers back arrow icon. The Package Details page opens in the right panel and the navigation menu changes to display items specific to the package.
Add a document to the package
- Open the Package Details page. The Package Details page opens in the right panel and the navigation menu changes to display items specific to the package.
-
Under the Documents table in the Add another document field, if a dropdown field is displayed directly to the right, selected the wanted document type.
- Select the Add Document To Package
 button. The Document Editor opens.
 - Use the Document Editor to add the document and related information about the document. For more information, see the Document Editor page topic:
Change the document type
- Open the Package Details page. The Package Details page opens in the right panel and the navigation menu changes to display items specific to the package.
- In the Documents table in the row of the document you want to change, select the document type (under the document name). The Change Document Type window opens.
NOTE: The document type displays the Edit icon (
 ) and the tool tip “Click to change document type” when you can select to open the Change Document Type window.
 - Use the dropdown list in the To field to choose a different document type.
- Select the Change
 button.
 - To save the change, the Change button.
Download a document from the Document row in the Package Details page
- Open the Package Details page. The Package Details page opens in the right panel and the navigation menu changes to display items specific to the package.
- Go to the Documents table.
- In the row for the package, select the Download button. The document is downloaded using the browser’s download tool.
Download a package using the Actions dropdown button on the Package Details page
- Open the Package Details page. The Package Details page opens in the right panel and the navigation menu changes to display items specific to the package.
- Select the Actions
 dropdown button on the Documents table heading row. A menu appears.
 - Select the Download item. The Download Package window opens.
- Complete the action in the Download Package window. For information, see Download Packages window.The browser’s download tool downloads the file to the download folder. The downloaded file tag may be displayed in the bottom row of the browser window.
Open the Email package download link window
The Package Details page includes an Email Download Link control that is enabled when all of the following conditions have been met:
- The package was submitted by an organization that allows email download links,
- and the authenticated user has permissions to send email download links,
- and the package is in Recorded status.
This feature is separate from the standard recorded package notification in that this one can be triggered by a user instead of the recorded event. The function is under the Actions ... ![]() dropdown button and is labeled Email package... Selecting this button displays the Email Package Download Link window.
dropdown button and is labeled Email package... Selecting this button displays the Email Package Download Link window.
Sometimes Simplifile users have a business need to send recorded documents to interested third‑parties. An easy way to do this directly from Simplifile is by sending them single‑use links via email that allows them to download the recorded documents that are selected by the user. This feature avoids problems with email attachment sizes and provides a more auditable way to see how your recorded documents have been shared.
- Open the Package Details page. The Package Details page opens in the right panel and the navigation menu changes to display items specific to the package.
- Select the Actions dropdown button on the Documents table heading row. A menu appears.
- Select the Email package item. The Email package download link window opens.
- Complete the action in the Email package download link window. For information, see Email Package Download Link window topic.
What the recipient experiences with emailed download links
When a document or package download link is emailed to someone from the Packages page or Package Details page, the recipient receives an email with similar to the one shown below.
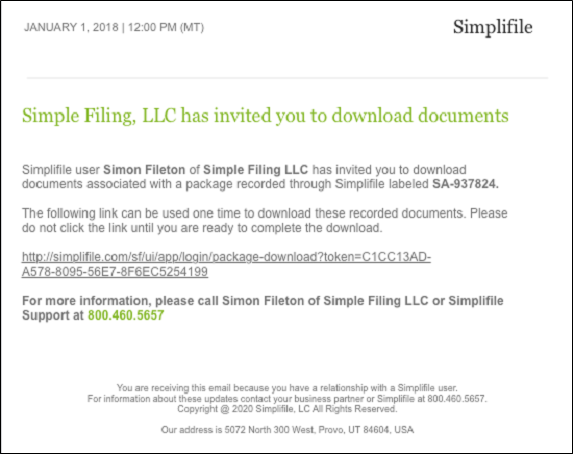
The recipient should select the link in the email when they are ready to download documents.
Selecting the link opens a web page similar to the one shown below.
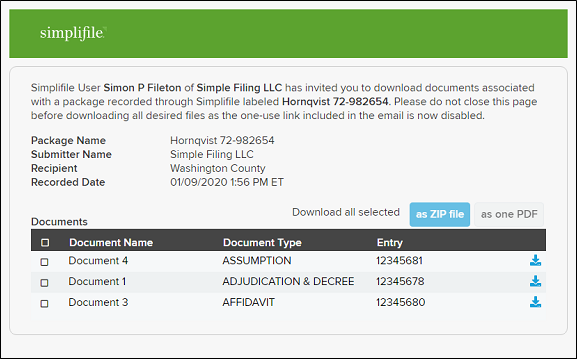
The user has three options:
- Download selected documents as a ZIP file by selecting the as ZIP file button.
- Merge selected documents into a single PDF by selecting the as one PDF button.
- Download each document individually as PDFs by selecting the download icon next to each desired document.
When the user closes the page they will no longer be able to access it. If necessary, the user who created the download link email will have to send a new one.
Print a document from the Document row in the Package Details page
- Open the Package Details page. The Package Details page opens in the right panel and the navigation menu changes to display items specific to the package.
- Go to the Documents table.
- In the row for the package, select the Print button. The browser’s print tool open.
- Print the document using the browser’s print tool.
Print a single package using the Actions dropdown button on the Package Details page
- Open the Package Details page. The Package Details page opens in the right panel and the navigation menu changes to display items specific to the package.
- Select the Actions dropdown button on the Documents table heading row. A menu appears.
- Select the Print item. The Print Package window opens.
- Complete the action in the Print Package window. For information, see Print Packages window.
Recall a submitted package that hasn't been recorded
The package must have a Sent indicator in the Package Status field to be able to be recalled.
- Open the Package Details page.
- Select the Actions dropdown button. A menu opens.
- Select the Recall Package item.
If the recall is successful, the package goes back into a Ready status. After you make any necessary changes, you can resubmit the package.
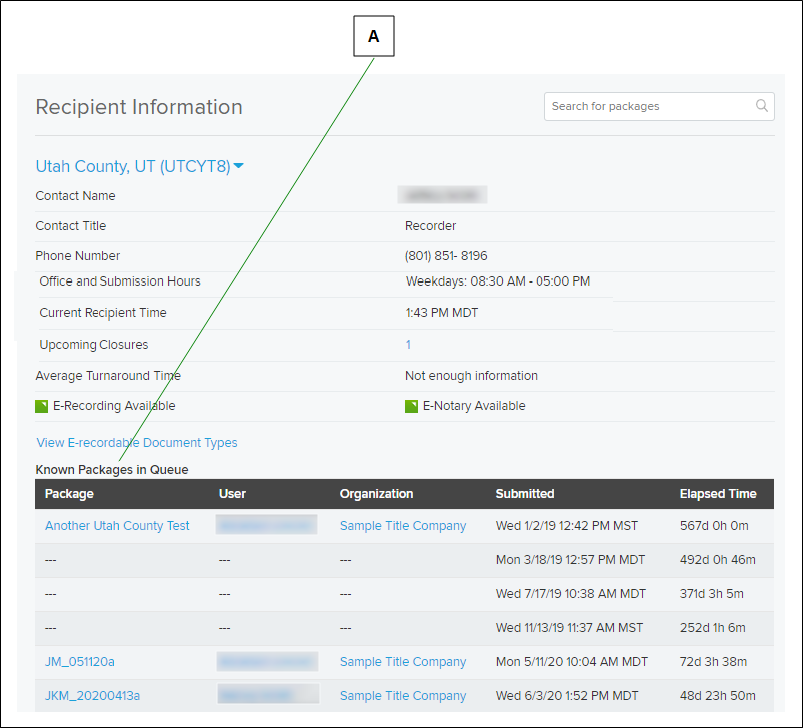
View a county's (or jurisdiction's) recording queue
You can view information about a recording county (or jurisdiction), including where your packages might be in the county's (or jurisdiction's) recording queue. Below is an example.
| Letter | Description |
|---|---|
|
A |
The Known Packages in Queue table lists the packages that are in the recording queue for this recording county (or jurisdiction). The table also shows the number of documents in each package, an estimate of how much time must pass before each package is recorded, and the date and time each package was submitted. |
- Open the wanted Package Details page. See Open the Package Details page.
- On the upper‑right side of the page, select the estimated recording time.
Remove (or discard) a document from a package
You may need to remove a document from a package. For example, you may have accidentally added a document to the wrong package. You may also want to remove a package from the system.
| Letter | Description |
|---|---|
|
A |
To remove multiple documents from a package, mark the box beside each
document you want to remove and select the Actions |
|
B |
To remove the package from the system, select the Actions |
|
C |
To remove a single document, select its Delete |
- Open the Package Details page. The Package Details page opens in the right panel and the navigation menu changes to display items specific to the package.
- Go to the document row in the Documents section.
- To remove a single document, select its Delete
 item. The task is finished.
 - To remove one or more documents:
- Mark the boxes beside the documents you want to remove from the package. To mark all boxes at once, mark the box at the top of the column of boxes.
- Select the Actions dropdown button. A menu appears.
- Select the Discard
 item.
item.
- To leave the page, use the navigation menu or select the browser’s back arrow button.
Remove (or discard) a package
- Open the Package Details page. The Package Details page opens in the right panel and the navigation menu changes to display items specific to the package.
- Leave all the boxes unmarked.
- Select the Actions dropdown button. A menu appears.
- Select the Discard item. The package is removed.
- To leave the page, use the navigation menu or select the browser’s back arrow button.
Reorder the documents in a package
When you submit a package, the recording county (or jurisdiction) reviews the package documents in the order in which they are arranged. Typically, you should try to add documents to a package in the order in which you want them to be reviewed. This means that you add first the document you want reviewed first. Documents display on the Package Details page in the order in which they will be reviewed. This lets you verify that the documents are in the right order. If they are not, you can change the order. Below is an example.
| Letter | Description |
|---|---|
| A | To move a single document one position, select and hold an arrow and reposition the row in the table. |
- Open the Package Details page. The Package Details page opens in the right panel and the navigation menu changes to display items specific to the package.
- To move a single document up or down one position, select and hold the arrows until it turns into a hand icon then move the row up or down in the table.
Request electronically certified copies
- Florida
- Charlotte
- Citrus
- Clay
- Columbia
- Duval
- Escambia
- Hardee
- Hendry
- Highlands
- Indian River
- Jackson
- Lake
- Lee
- Manatee
- Okaloosa
- Osceola
- Palm Beach
- Pasco
- Putnam
- St. John’s
- St. Lucie
- Wakulla
- South Carolina
- Greenville
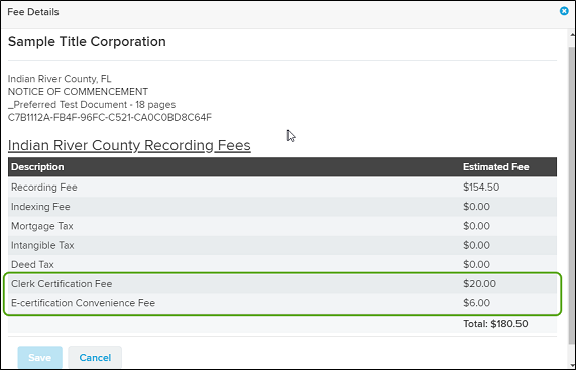
You may request electronically certified copies in an expanding number of counties. When you submit a document type that has been enabled for eCertified copies, you can check a box to request one and enter an email address. The county will send an eCertified copy when the document is recorded.
The submitter pays the county's standard certified copy fee, as well as a Simplifile convenience fee, at the same time they pay their regular recording fees. These fees will be included in the fee estimate prior to submission.
- Open the Package Details page. The Package Details page opens in the right panel and the navigation menu changes to display items specific to the package.
- In the Documents section, select the document name. The Document Editor opens.
-
In the left column, scroll down to the Request Certified Copy checkbox.
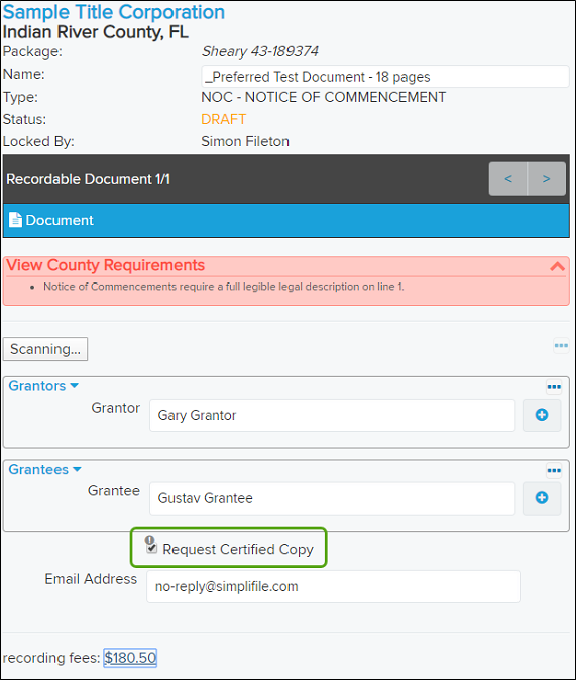
-
Select the estimated recording fees value. The FeeDetails window opens.
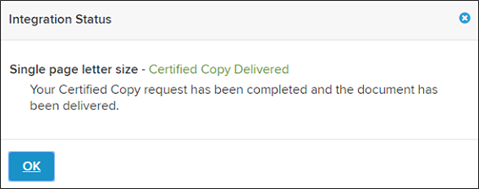
NOTE: The status of eCertified copy requests can be found on the Packages page under the option column labeled Integration Status. Use the Choose Columns option in the Actions
dropdown button to add this column.
- Request Submitted
- Request Error
- Certified Copy Delivered
Review and repair a rejected package
- Open the Package Details page. The Package Details page opens in the right panel and the navigation menu changes to display items specific to the package.
- To view details about why the package was rejected, select the Rejected
 status button of a package on the Packages page.
 - Select the name of a rejected package to display its Package Details page.
- Do any of the following:
- To pay a specific fee from a different account, choose the account from the dropdown list for the fee type. For more information, see Package management.
- To add a document to the package:
- Choose the document type.
- Select the Add Document To Package button.
- Prepare the document as described in Package creation.
- If you have the necessary permission to add or change fees for a document, select the fee amount, make any changes, and select the Close
 button.
 - To change the type of document, select the type and choose a new type from the dropdown list. Then select the Change button.
- To repair a rejected document, do the following:
- Display the document in the document editor by selecting the document name.
- If wanted, see why the document was rejected by selecting Rejection Reason.
- Make any required changes.
- When finished, mark the required boxes. For example, mark the box to show that the document is recordable.
- Select the Done
 button.
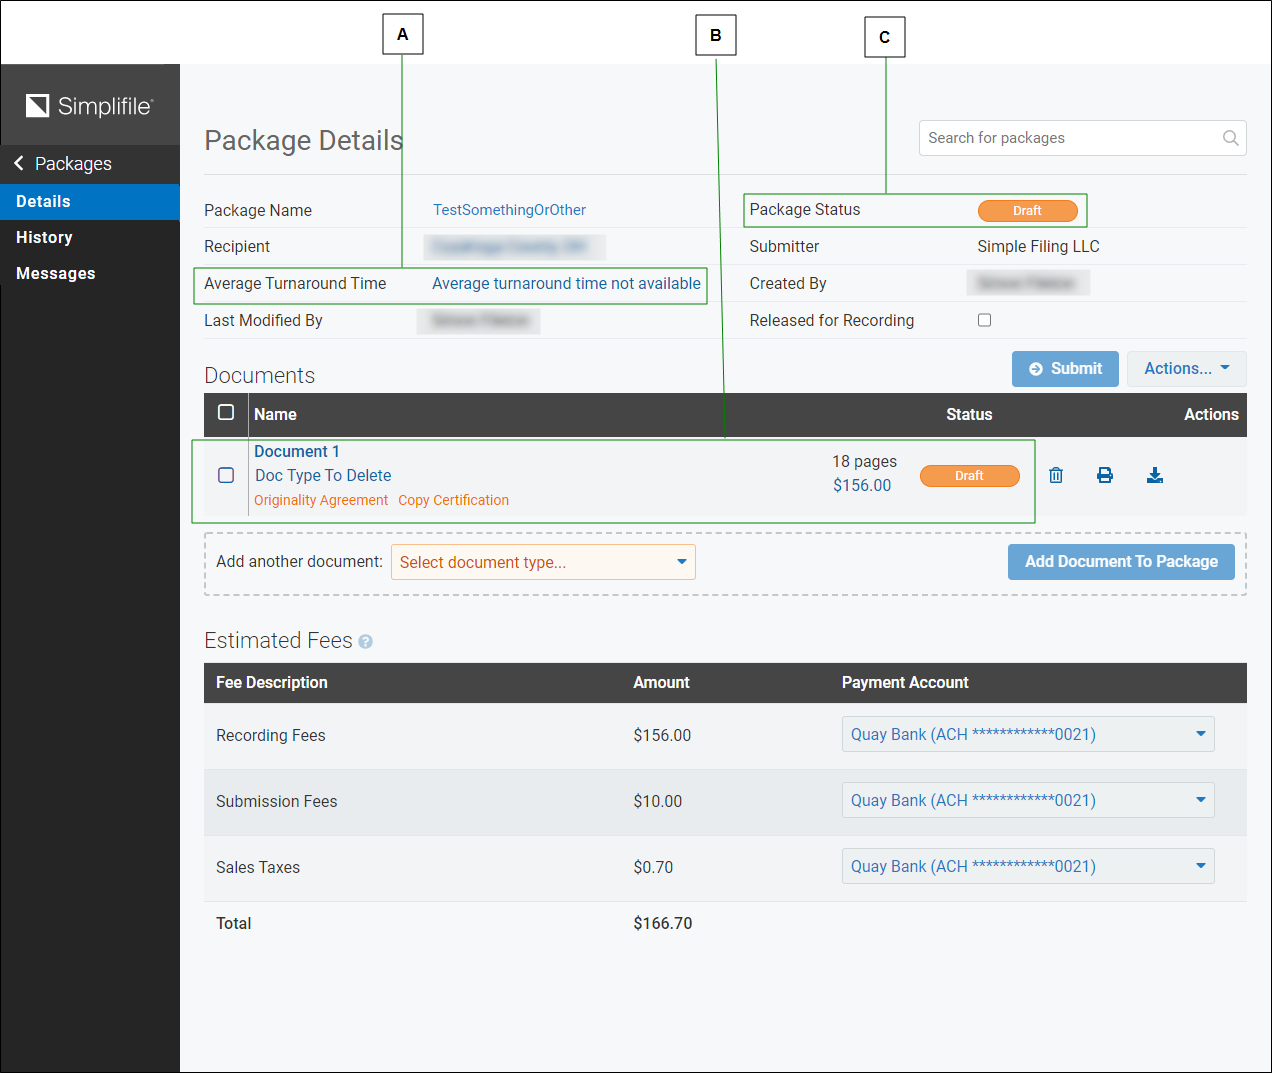
Review or edit fees and payment accounts
When you prepare a document, you verify that financial charges such as recording fees and taxes are correct. You can review the estimated fees on the Package Details page and may be able to make changes, if necessary. For recorded documents, depending on your settings, you may be able to review both the estimated fees and the final fees.
Your Simplifile administrator sets up payment accounts from which various fees should be paid. Your Simplifile administrator may also choose default accounts for each type of fee if there are multiple accounts available. For more information, see Manage Payment Accounts page. If necessary, you can choose a different payment account for any fee type that has more than one payment account set up.
The payment accounts your Simplifile administrator sets up display on the Package Details page. Below is an example.
| Letter | Description |
|---|---|
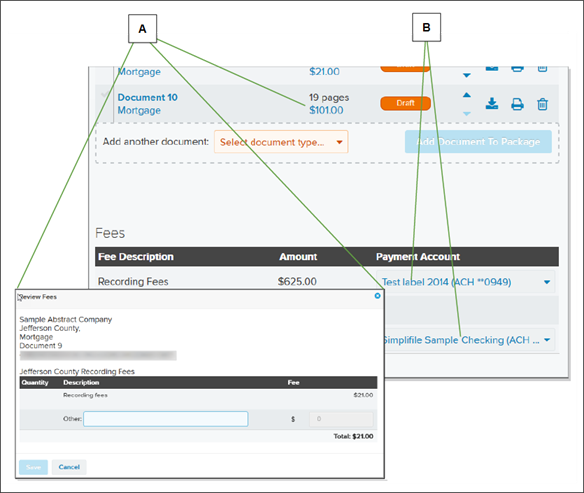
| A | Select a document fee total to review the fees for that document. You can also open the document in the document editor to review the fees. For more information, see Verifying fees. |
| B | Use any displayed dropdown lists to choose a payment account Simplifile should use to pay the associated fee. Each fee type can have its own dropdown list. |
- Open the Package Details page. The Package Details page opens in the right panel and the navigation menu changes to display items specific to the package.
- To review the fees for a document, select the dollar value fee link below the number of page. The Review Fees window opens.
In some cases, you may also be able to adjust the fees. If you do this, be sure to select the Save
 button on the Review Fees page.
 - To change which account you want to use to pay a fee for this package, in the Estimated Fees section, choose a different account from the dropdown list in the Payment Account column.
- To leave the page, use the navigation menu or select the browser’s back arrow button.
Set the notifications for a single package
You can have Simplifile send notifications when a single package with a Ready status is submitted, recorded, and rejected.
The bell button at the top of the Package Details page lets you choose who should receive notifications for the package whose details page you have opened.
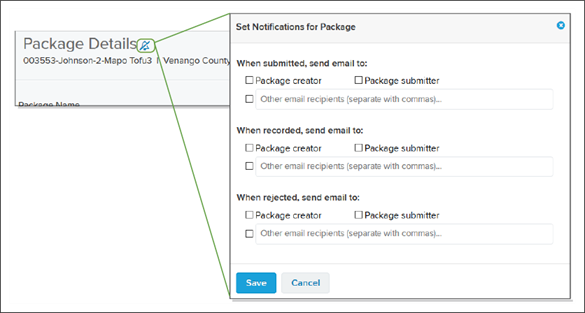
If the bell button is solid, as shown below, at least one notification has been set up for this package.
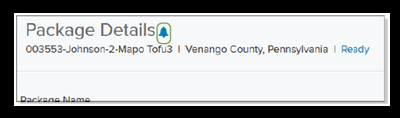
The bell button will display as solid whenever a notification for a package has been set up, regardless of who creates the notification.
Enable the notifications for a single package
- Open the Package Details page. The Package Details page opens in the right panel and the navigation menu changes to display items specific to the package.
At the top of the page to the right of “Package Details”, the Bell
 or
or  button indicates this package’s notification setting. If the Bell button is solid (), at least one notification has been set for this package.
 - Select the Bell or button to display the Set Notifications for package window.
- Do any of the following:
To send email when the package is submitted, in the When submitted, send email to section, mark the boxes of the people who should receive the email.
In the Other email recipients field enter email addresses for other people who should be notified if this package is rejected. Use commas between multiple addresses.
In the Other email recipients field enter email addresses for other people who should be notified if this package is rejected. Use commas between multiple addresses. If wanted, enter email addresses for other people who should be notified when this package is submitted in the Other email recipients field. Use commas between multiple addresses.
- To send email when the package is recorded, in the When recorded, send email to section, mark the boxes of the people who should receive the email.
In the Other email recipients field enter email addresses for other people who should be notified if this package is rejected. Use commas between multiple addresses.
- To send email if the package is rejected, in the When rejected, send email to section, mark the boxes of the people who should receive the email.
In the Other email recipients field enter email addresses for other people who should be notified if this package is rejected. Use commas between multiple addresses.
- When finished choosing who should receive notifications, select the Save button.
Disable the notifications for a single package
- Open the Package Details page. The Package Details page opens in the right panel and the navigation menu changes to display items specific to the package.
At the top of the page to the right of “Package Details”, the Bell
or button indicates this package’s notification setting. If the Bell button is solid , at least one notification has been set for this package. - Select the Bell or button . The Set Notification for Package window opens.
- Clear all of the boxes.
- When finished choosing who should receive notifications, select the Save button.
Submit a package using the Submit button the Package Details page
- Open the Package Details page. The Package Details page opens in the right panel and the navigation menu changes to display items specific to the package.
- When all of the documents in the document table contain a Ready button in the Status column and the Released for Recording box is marked, (it is a new optional box that is configured), select the Submit button above the Documents table. The Confirm Submission window opens.
- Review the information in the window.
- Verify that all necessary documents have been added. If they have not, see the Add a document to the package task.
- If any package document does not have a Ready status, select the document name and finish preparing the document for submission. For more information, see the Prepare a document for submission task.
- Verify that the displayed fees are accurate. In the Fees section, use the dropdown lists in the Payment Account column to choose the account you want to use to pay each type of fee. For more information, see the Review or edit fees and payment accounts task.
- If wanted, select the Messages item in the navigation menu and add notes in the Internal Preparation Notes box. Only staff at your agency can see these notes. To return to the Package Details page, select the Details item in the navigation menu.
- If you want to be notified when the package is recorded or rejected, mark the Notify me when this package is recorded or rejected box.
- Select the Submit button. The package is submitted and the window closes.
Toggle the package signature type between Electronic or Ink
Some customers produce documents on behalf of another organization. Sometimes they have signing authority (power of attorney) for that organization, and sometimes they do not. When they do not have signing authority, they need to create the document and send it to their client to be signed. When the Package Details page Signature Type field is set to Ink, the documents print with locations for their client to ink‑sign.
This task explains how to change a package's Signature Type.
- Open the Package Details page. The Package Details page opens in the right panel and the navigation menu changes to display items specific to the package.
-
To change the signature type, in the Signature Type field, select the entry.
- When Electronic is selected it changes to Ink.
- When Ink is selected, it changes to Electronic.
View a document in the package using the Package Editor page
- Open the Package Details page. The Package Details page opens in the right panel and the navigation menu changes to display items specific to the package.
- In the Documents table, select the document name. The Document Editor window opens with the document in the right pane.
- When finished viewing the document, select the Done button in the lower‑left corner of the left pane.
Prepare a document for submission
- See the Document Editor window topic Prepare a document for submission task.
View and print the Package Summary Status report
The Package Summary Status report gives details about each document in the package and a preliminary estimate of all fees associated with the package. Below is an example.
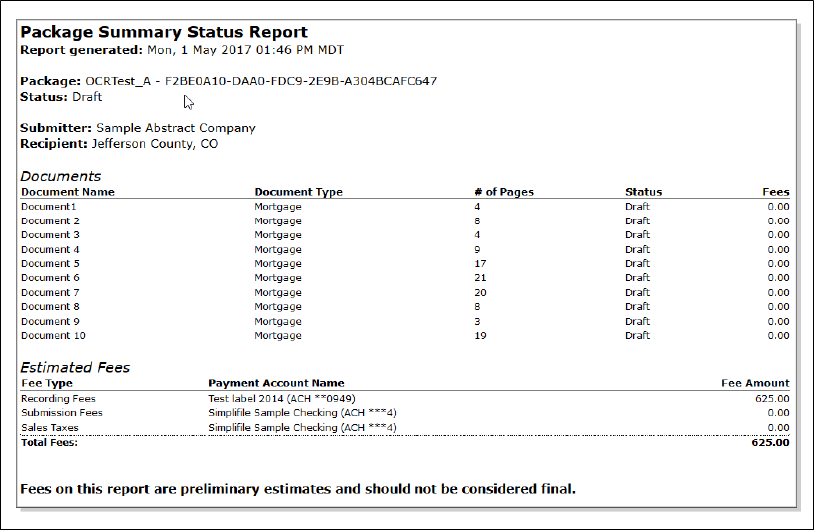
You can print this report for a package with any status except Recorded.
- Open the Package Details page.
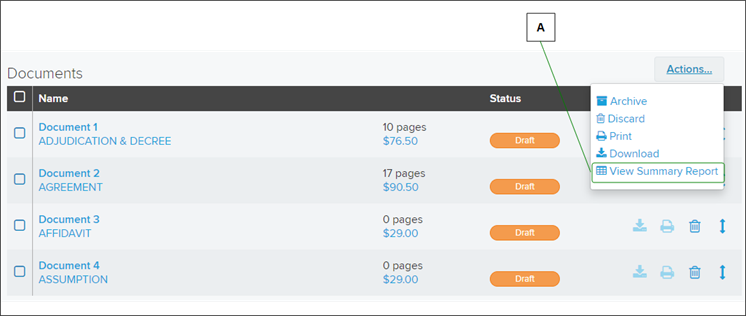
- Select the Actions dropdown button at the top of the Documents table and choose View Summary Report from the dropdown list that displays.
The report displays in a browser window.
- To print the report, use your browser’s print tool.
View or add comments to the package
- Open the Package Details page. The Package Details page opens in the right panel and the navigation menu changes to display items specific to the package.
- In the navigation menu, select the Messages item.
- Scroll to the bottom to view messages from the county (or jurisdication).
- To add comments that only people at your location can view, select in the Internal Preparation Notes box and type your comment.
- To add comments that recording county (or jurisdiction) workers can view, select in the Comments for Recipient box and type your comment.
View or add package messages and comments
From a Package Details page, you can view messages that pertain to that package. These may be notes that only your organization can see, or comments you want the county (or jurisdiction) to see. In some cases, a message may be specific to the recording county (or jurisdiction) where you submitted the package. For example, a specific county may have Internet connection difficulties that prevent the county from recording documents.
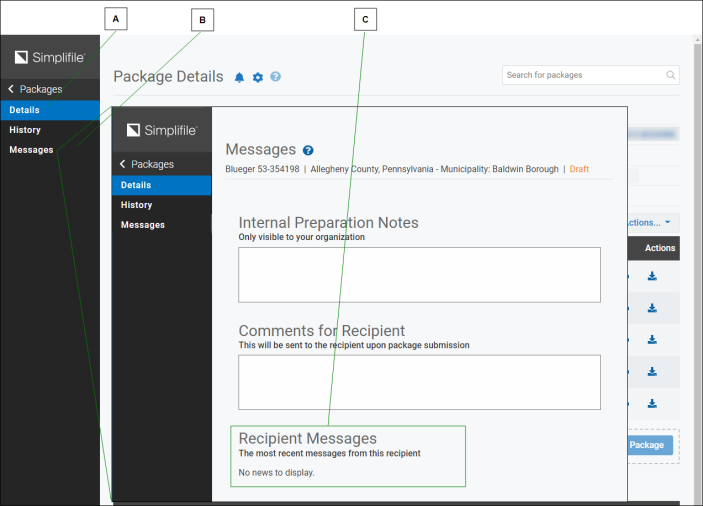
| Letter | Description |
|---|---|
| A | Select the Messages item to display the Messages page. |
| B | The number of any unread messages displays here. |
| C | Messages display at the bottom of the page. |
You can add internal comments to a Package Details page. Only people at your organization who view the Package Details page can see these comments.
If your recording county (or jurisdiction) has set it up and the recording county (or jurisdiction) allows it, you can also add comments to a Package Details page that the recording county (or jurisdiction) can see. This lets you send a message to the county (or jurisdiction).
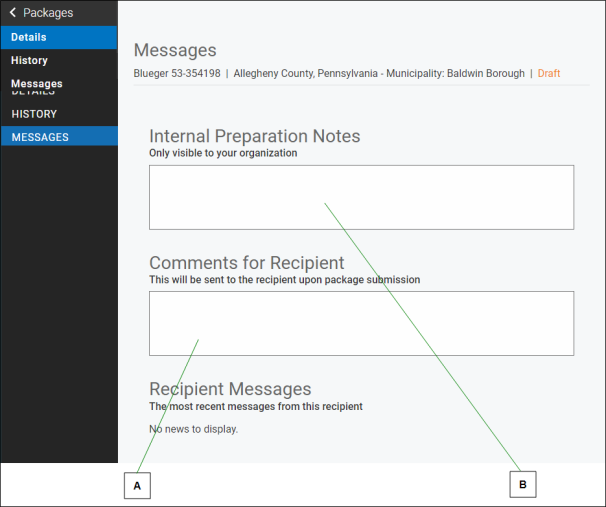
| Letter | Description |
|---|---|
| A | If your recording county (or jurisdiction) has set it up and the county (or jurisdiction) allows it, you can add comments here to send a message to the county (or jurisdiction). |
| B | You can add comments here that only people at your location can view. The recording county (or jurisdiction) will not see these comments. |
- Open the Package Details page. The Package Details page opens in the right panel and the navigation menu changes to display items specific to the package.
- In the navigation menu, select the Messages item. The Message page for the specific package is opened.
- Review the messages.
- To leave the page, use the navigation menu or select the browser’s back arrow button.
View or change a package name
You can change information if it displays in a field box when your mouse pointer passes over the information. For example, you can change the name of a document package. You can do this at any time.
- Open the Package Details page. The Package Details page opens in the right panel and the navigation menu changes to display items specific to the package.
- Select in the Package Name field.
- Change the text that displays.
- Select the Save button on the upper‑right side of the page.
View or change a package county (or jurisdication)
If necessary, you can change the recording county (or jurisdiction) where a package should be sent. When you do this, you choose a document type. This assures that the document type you submit is one the county (or jurisdiction) accepts. You can review the currently assigned county's (or jurisdiction’s) information before you make any changes. This can help verify that you need to make the change.
| Letter | Description |
|---|---|
| A | Select the county (or jurisdication) name to change the county (or jurisdication). |
- Open the Package Details page. The Package Details page opens in the right panel and the navigation menu changes to display items specific to the package.
- Select the County (or jurisdiction) name.
- When the Change County window opens, to change the county (or jurisdiction), use either the dropdown box in the New County field to choose the county (or jurisdictions) or use the New Township field to choose the new township.
- If you have already added document placeholders to the package, from each SELECT NEW DOCUMENT TYPES dropdown list that displays, choose the type of document you want to assign to each document.
You must choose a new document type for any document whose type does not exactly match a document type at the county (or jurisdiction) where you want to send the package.
- When finished, select the Save button.
View the activity history of a package
You can view a document’s activity history. This lets you view all actions taken for a document. Actions can include when the document was added or renamed, fee changes, and whether the document has been received by the recording county (or jurisdiction). Helper document histories are included in this table.
In addition to the action or event, the page can display when the action took place and who completed the action, and give details about the action. Below is an example.
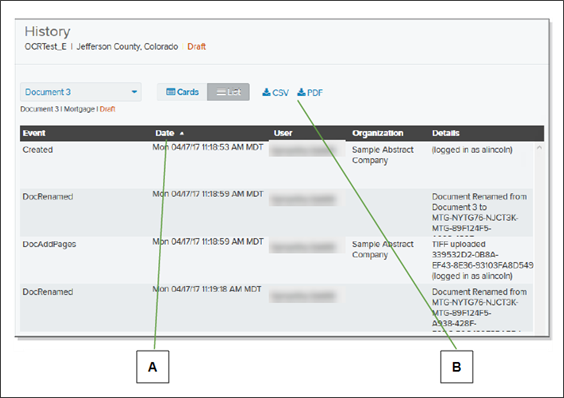
| Letter | Description |
|---|---|
| A | To sort the history items in ascending or descending order by date, select the Date column header . |
| B | You can download the document history as a CSV (Microsoft Excel) file, or as a PDF. |
You can view the document history in a card view. On this view, the events display in chronological order and are color coded by event type. Below is an example.
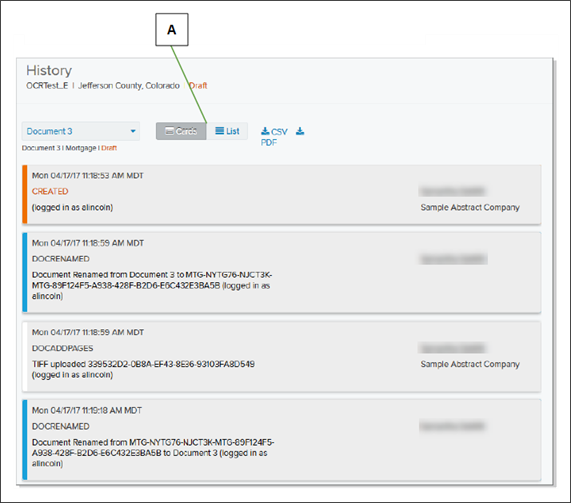
| Letter | Description |
|---|---|
|
A |
To choose to display the
Cards view select the Cards |
- Find the package whose history you want to view.
- In the navigation menu, select the History item.
- To display the Card view, above the table, select the Cards
 view button.
 - To display the List view, above the table, select the List
 view button.
View the eRecording Report of Recorded Documents
- Open the Package Details page. The Package Details page opens in the right panel and the navigation menu changes to display items specific to the package.
- Select the Actions dropdown button at the top of the Documents table. A menu appears.
- To view the eRecording Report of Recorded Documents: Itemized Fee View, select the Actions dropdown button at the top of the Documents table and choose View Itemized Report above the Documents table.
View the package recording information
If you want more detail about where a package might be in the recording process review the
- Open the Package Details page. The Package Details page opens in the right panel and the navigation menu changes to display items specific to the package.
- If you want detail about where a package might be in the recording process, review the information in the top section.
Below is an example.
| Letter | Description |
|---|---|
| A | The average turnaround time it takes for a package to record is recorded displays here. |
| B | Information about each document displays in the table, including the document status. |
| C | The package’s recording status displays here. |
View the rejection information for a package
- Open the Package Details page.
- In the Documents table Status column, select the Rejected status button. The This Package Was Rejected window opens.
- You may print the contents of the window by selecting the Print
 button.
 - To close the window, select the OK
 button.
View the status of a package from the Package Details page
- Open the Package Details page. The Package Details page opens in the right panel and the navigation menu changes to display items specific to the package.
-
In the top section, Package Status field, select the colored tag. A window opens that contains status information about the package.
Below is an example of one of the windows that opens when a status tag is selected.
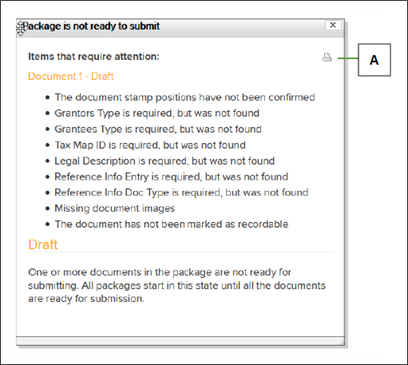
Letter Description A You can print the list of item that require attention. - To close the window, select the OK button.
Archive a package from the Package Details page
You can archive a package from the Package Details page.
- Open the Package Details page.
- You may need to select the Actions dropdown button to view the Archive item.
- Select the Archive item on the top right side above the Documents table.
Unarchive a package from the Package Details page
- Use the Simplifile Search to find and open the archived package.
- Do one of the following:
- To unarchive a single package, find the package you want and select the Unarchive icon (
 ) at the end of the row.
- To unarchive one or more packages:
- Mark the packages you want to unarchive on the left side of each row.
- Select the Actions dropdown button on the top right side above the packages table. A menu appears.
- Select the Unarchive button.
- To unarchive a single package, find the package you want and select the Unarchive icon (