eRecording administrator setup tasks (for administrators)
Overview
A Simplifile Administrator or user with the eRecording Administrator role may need to do several setup tasks before Simplifile can be used for eRecording.
Set the organizational default settings (the settings that apply to anyone who logs in to Simplifile to submit documents for eRecording) including the following:
- How passwords are managed.
- Who has access to Simplifile at your organization.
- What payment accounts will be use to pay fees.
- Notary settings.
- Choose what email messages will be receive from Simplifile
Organization default account settings
eRecording Administrators can set the organization's default account settings that affect everyone in the organization that signs in to Simplifile.
Set the scanning options
- See the Submission Preparation page topic Set the scanning options task.
Set up an insufficient fee correction amount
- See the Submission Preparation page topic Set an insufficient fee correction amount task.
Set up your organization's Document Editor defaults
- See the Submission Preparation page topic Set up your organization's Document Editor defaults task.
Allow and set up text stamps
- See the Submission Preparation page topic Allow and set up text stamps task.
Security setup
Payment accounts
You add payment account information to Simplifile to grant Simplifile the right to withdraw funds from that account. The funds are used to pay all fees accrued during the eRecording process. You must have at least one payment account enabled before you can use Simplifile to eRecord.
If desired, you can add multiple accounts. This lets you assign a different account to each type of fee. You can set a specific account to be the default from which all fees of a specific type are taken. However, you can override the default at any time. This means that you can designate any payment account in Simplifile to pay any fee for any package.
You set up and manage all accounts you want to make accessible to Simplifile for the payment of fees from the Manage Payment Accounts page. You can edit the display name (account nickname) of a payment account at any time. Below is an example of the Manage Payment Accounts page.
Open the Manage Payment Accounts page
- If you have the necessary permission, you can open the Manage Payment Accounts page. See the Open the Manage Payments Account page topic Open the Manage Payments Account page task.
Add or import a single payment account
- See the Open the Manage Payments Account page topic Add or import a single payment account task.
Import payment accounts already created for another organization
- You can import payment account information from one organization to another. To do this, you must be affiliated with at least two organizations, and have set up a payment account for at least two organizations.
See the Manage Payment Accounts page topic Import payment accounts already created for other organizations task.
Edit a payment account
- See the Manage Payment Accounts page topic Edit a payment account task.
Designate default payment accounts
- See the Designate a default payment account topic Designate a default payment account task.
Processing an ePayment
- See Pending Payments page topic Process an e‑check payment task.
Notary information and digital signature management
Some jurisdictions require digital signatures on documents. For example, a notary may need to verify that a submitted electronic document is an exact copy of the original hard copy document. A non‑notarized digital signature may also be necessary from time to time. If you have Simplifile’s eSign service enabled, notaries and other designated signers can store signatures in Simplifile to help simplify these processes. In addition, you can choose options that determine actions document signers must take.
Notaries who work at your company can register with Simplifile from within the software. Registered notaries can review or edit the notary information Simplifile has stored for them. The Click‑Sign option in Simplifile helps manage signatures of people other than notaries. You can require that notaries or other document signers use a digital signature to sign a document. You can also require that people include comments during the document review process.
Common tasks
- Designate signer options
- Add view and edit notary information within Simplifile ‑ See the View the notary journal entries topic View the notary journal entries task.
- Set up a Click‑Sign Signature ‑ See the Click‑Sign Signature page topic.
- Activate the Click‑Sign feature ‑ See the Submission Preparation page topic Enable click‑sign for copy certification.
For more information about the eSign service, talk to your Simplifile sales representative.
Designate signer options
Some recording jurisdictions require that an eRecorded document be digitally signed. This helps to verify that the document is exactly the same as its paper (hard‑copy) original.
If you have the right permission and if your organization has the eSign service activated, you can make several choices that determine actions document signers must take.
See the Document Builder Configuration page topic Configure signers and notaries task.
- Require comments when moving documents to and from review folders. This option requires reviewers at your organization to add a comment before they can move a document into or out of a review folder. For more information, see Use the Packages page to eSign a document.
- Use preset signer assignments for template documents. Use this option if you plan to use signers that Simplifile sets up for you, or if you specify signers through your Simplifile API. This setting applies to template documents.
- Require digital certificate for signers. This option requires reviewers at your organization who must sign or witness a document that does not require a notary to use a digital certificate to verify their credentials. If the person who needs to sign a document has created a click‑sign signature within Simplifile, the system accesses that signature to digitally sign the document. If the person does not have a click‑sign signature saved within Simplifile, the system adds an Electronically Signed verification to the document.
- Require digital certificate for notaries. on digital signatures, see must notarize a document to use a digital certificate to verify their credentials.
Marketing and system status notification choice
You can choose which email notifications you receive from Simplifile.
To set up eSigning notifications, see the My Notifications page topic.
I want to ...
Designate signer options
Some recording jurisdictions require that an eRecorded document be digitally signed. This helps to verify that the document is exactly the same as its paper (hard‑copy) original.
If you have the right permission and if your organization has the eSign service activated, you can make several choices that determine actions document signers must take.
- Require comments when moving documents to and from review folders. This option requires reviewers at your organization to add a comment before they can move a document into or out of a review folder. For more information, see the Packages page topic Use the Packages page to eSign a document task.
- Use preset signer assignments for template documents. Use this option if you plan to use signers that Simplifile sets up for you, or if you specify signers through your Simplifile API. This setting applies to template documents.
- Require digital certificate for signers. This option requires reviewers at your organization who must sign or witness a document that does not require a notary to use a digital certificate to verify their credentials. If the person who needs to sign a document has created a click‑sign signature within Simplifile, the system accesses that signature to digitally sign the document. If the person does not have a click‑sign signature saved within Simplifile, the system adds an Electronically Signed verification to the document.
- Require digital certificate for notaries. on digital signatures, see must notarize a document to use a digital certificate to verify their credentials.
Adding, viewing, and editing notary information within Simplifile (Notary Journal)
Anyone at your company who is a notary can register his or her notarial credentials with Simplifile. This lets the notary verify from within Simplifile that the electronic images scanned are exact copies of the paper documents they represent. This can help to streamline the eRecording process. Notaries can view or edit their notary information at any time.
Depending on your settings, you may also have access to a Notary Journal page in Simplifile. This page tracks notarial acts you perform. Below is an example.
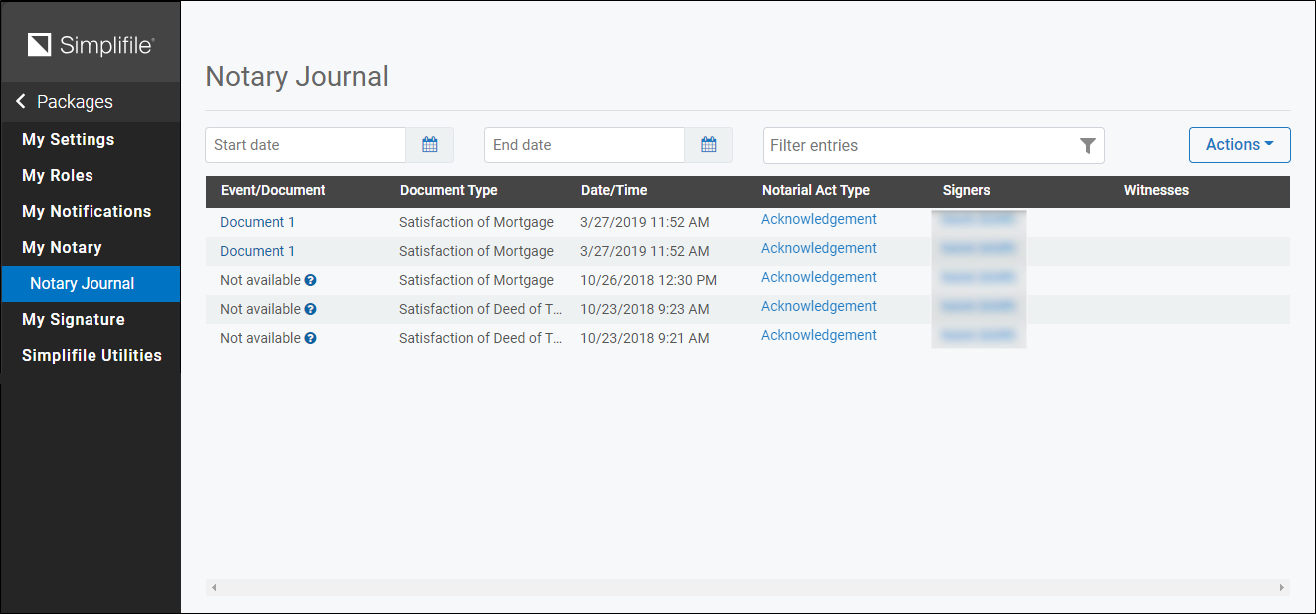
For more information on the Notary Journal, contact your Simplifile account manager.
See Notary Journal page.
- Open the Notary Journal page
- View the notary journal entries
- Remove or change notary information
Set up a Click‑Sign Signature
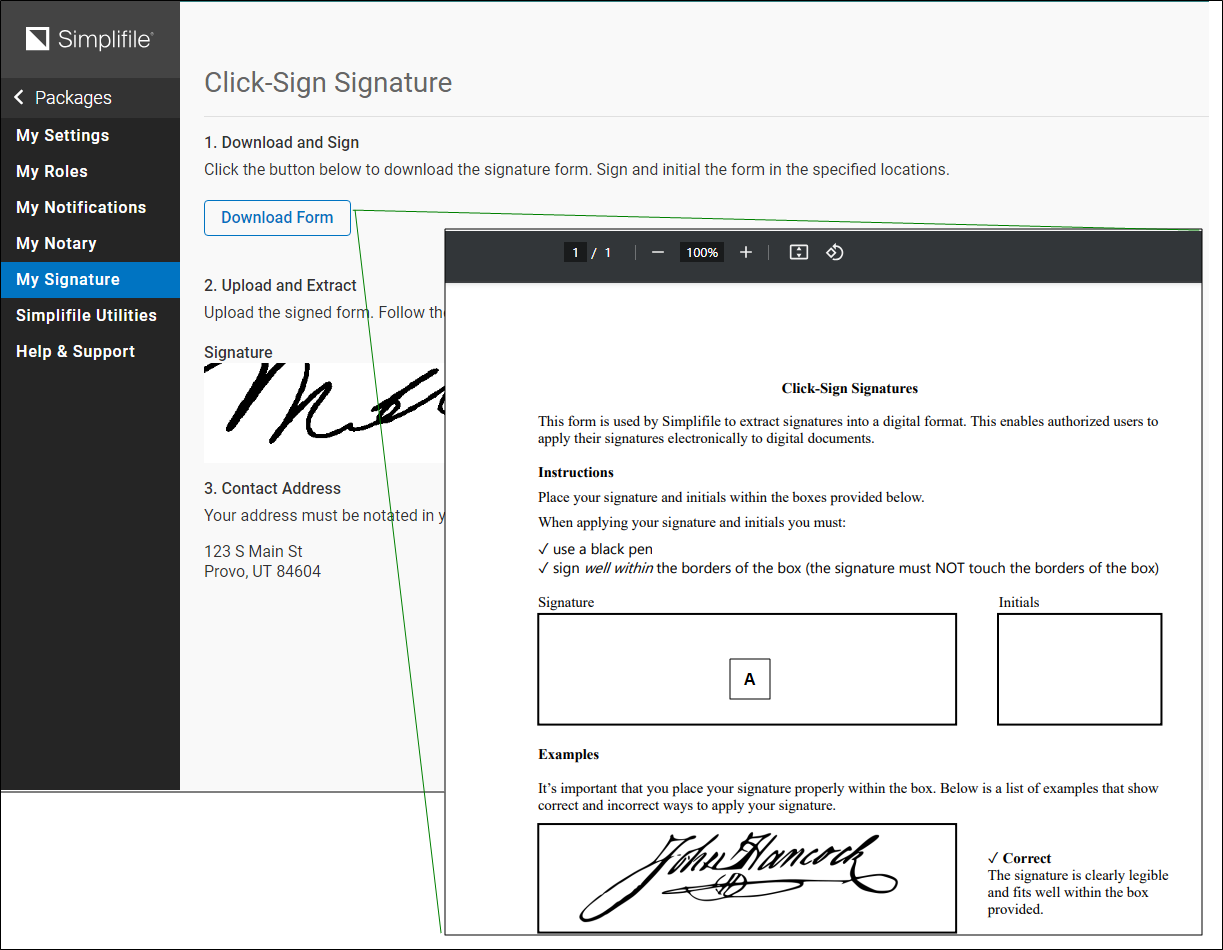
Occasionally, someone at your office other than a notary may need to provide a digital signature that Simplifile can apply to a document or a special form for a document. In Simplifile, these digital signatures are called Click‑Sign Signatures. Simplifile lets notaries and other designated signers upload a file or scan a page containing their signature.
The easiest way to make sure your signature is the correct size is to print, sign, and scan the Click‑Sign Signature form. You find this form within Simplifile.
QWEEWQ-NAV-DONE
| Letter | Description |
|---|---|
| A | After you print the form, sign in this box. Use a scanner to create a file of the form. Your scanned file must have a resolution of 300 DPI and use a TWAIN driver. Return to this page and upload the form. |
| B | Select this printer icon to print the form. |
See the Click‑Sign Signature page topic.
Activate the Click‑Sign feature
After you register your notarial status in Simplifile or set up your Click‑Sign Signature, you must turn on the Enable click‑sign for Copy Certification feature in Simplifile.
In the navigation menu, select the Organizations item. The Organizations page opens in the right panel. Select the organization name of the wanted organization. The Organization Contact Information page opens in the right panel and the navigation menu changes. In the navigation menu under the Services item, select the eRecording item. The eRecording License page open in the right panel and the navigation menu changes. In the navigation menu, select the Submission Preparation item. The Submission Preparation page opens in the right panel.
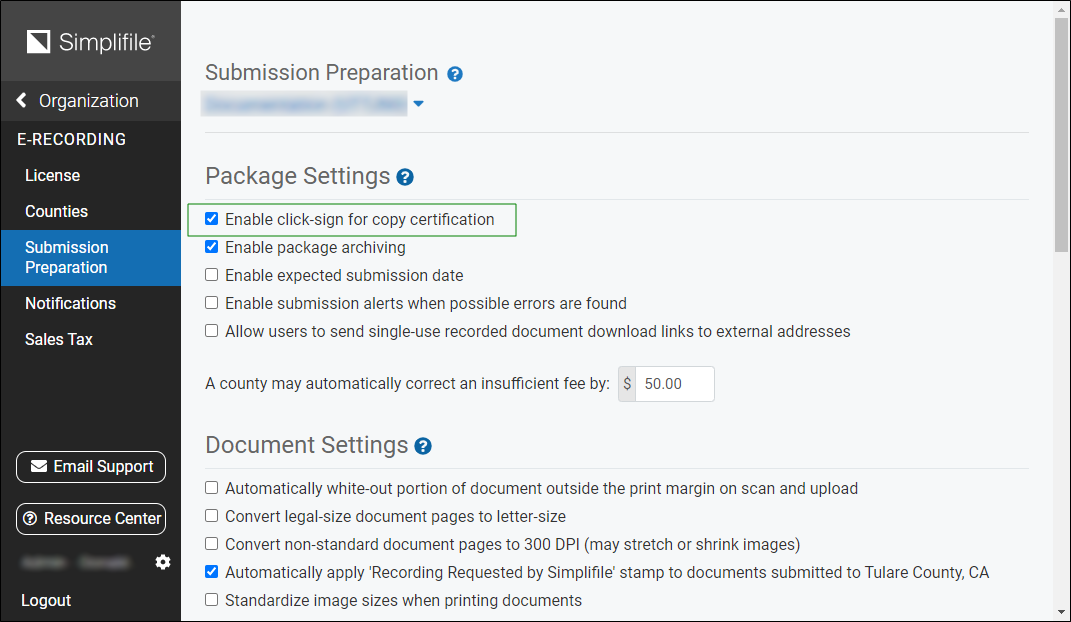
In the Package Settings section, select the Enable click‑sign for copy certification checkbox.
See the Submission Preparation page topic Package Settings section Enable click‑sign for copy certification option.
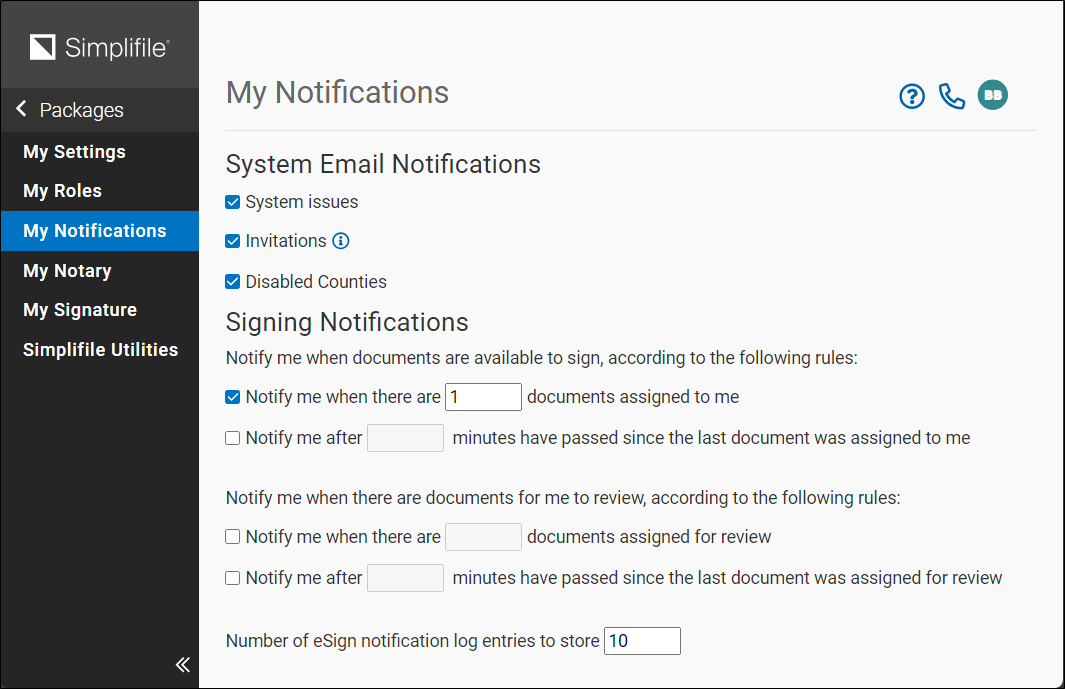
Set up eSigning notifications
If you have the necessary permission, you can have Simplifile send you an email message when you have documents available to sign. This is particularly helpful if you log in to Simplifile only to sign documents.
| Letter | Description |
|---|---|
| A | You can choose to receive notifications when you have a specified number of documents available to sign, or when a specified number of minutes have passed since a document was assigned to you. You can choose either option, or both. |
If you choose both options, both criteria must be met before Simplifile sends the notification.
To set up your eSigning notifications, see the My Notifications page topic My Notifications page task.