Document Editor page
Document Preparation
The Document Editor includes several tools opened from the left panel of a document. For example, you can add names (such as grantors and grantees) to a document. If you do this, you must follow special rules to make sure the names display correctly.
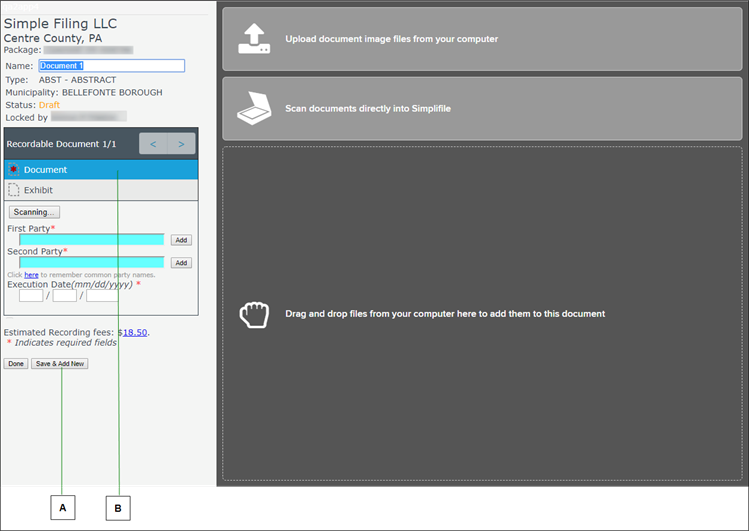
Below is an example of the Document Editor before you add an electronic document to the placeholder.
| Letter | Description |
|---|---|
|
A |
Select here to add an additional document to the package. Any preparation work you have done on the displayed document is automatically saved for you. For more information on how to prepare a document, see Document preparation |
|
B |
If multiple document types display in the Document List, one or more of the documents is a helper or supporting document allowed or required by the county (or jurisdiction) to support the main document. Be sure to select the correct document type before you upload or scan the document. |
The Document Editor displays under the following conditions:
- When you create or open a package from the Packages page, choose a document type, and select the Add Document To Package
 button (does not occur if you go straight to the Package Details page).
 - When you open a package from the Packages page and select the name of a document already assigned to the package.
You initially add a placeholder to the Document Editor. You must scan or upload an electronic version of the document before you can view it in Simplifile. The Document Editor includes several tools that help you get a document ready to submit to the recording county (or jurisdiction).
You can store certain types of information within the Document Editor so that you can more easily add the same information to many documents. You can also verify fee amounts and make changes to items (such as the number of pages in a document) to affect the fee.
If necessary, you can extract (copy) pages from a document to create a new document. You can size a document using the tools so that it prints smaller or larger than the original version. You can also set up Simplifile to always shrink all documents from one or more specific counties by a specific percentage.
You can also change a document type before you submit the package.
Using tools in the left panel
The Document Editor displays several tools on the left panel of each document. The tools displayed vary depending the type of document you are preparing and the recording county (or jurisdiction) where you plan to submit (because some jurisdictions have special requirements for document preparation).
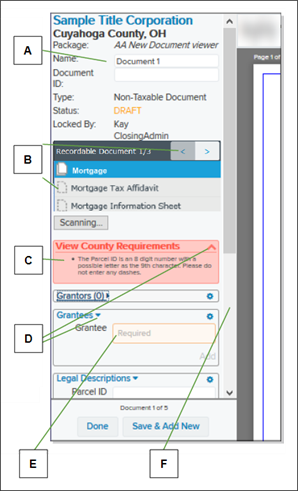
You can add stamp placeholders (ghost stamps) and information needed to prepare each document for submission, such as grantor and grantee names, book and page numbers, or instrument dates (the date on the document indicating when the document was signed). These types of preparation tools are located on the left panel. Below is an example of some of the left panel tools.
| Letter | Description |
|---|---|
|
A |
You may be able to edit some of the document information that displays here, such as the document name or ID. |
|
B |
If you have multiple recordable documents in a package, you can use arrow keys next to the list to display each document. Helper documents display in a list under the primary document. |
|
C |
Make sure to follow any requirements specified by the recording county (or jurisdiction) in the in the View County Requirements box. These requirements typically display in a colored (pink) box. |
|
D |
Select an arrow to display or hide additional information or fields. |
|
E |
Required information is easy to identify. |
|
F |
Use the scroll bar to review and update all of the information. Mark a document as recordable only when you have completed all tasks and fields. |
Enter and store names (custom forms)
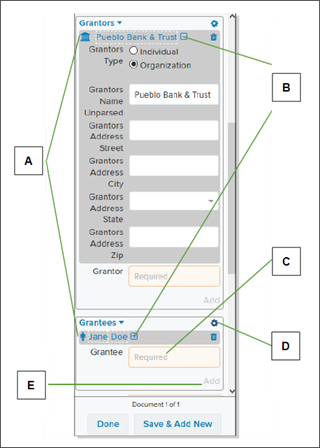
You may need to add names to a filing when you prepare a document for submission. For example, many recording jurisdictions require grantees and grantors, or mortgagees and mortgagors. You add these names as part of the workflow on the left panel of a displayed document. Below is an example.
| Letter | Description |
|---|---|
|
A |
A building icon displays next to an organization’s name. A person icon displays next to an individual’s name. |
|
B |
Select the plus sign to expand the frame and display additional fields you can use to add information about the person or business. Different information fields display for each entity type. Select the minus sign to close the information panel. |
|
C |
Begin entering a name in a name field. If the name has been added to the list of common party names, it displays in a dropdown list. You can select to choose the name. |
|
D |
Select the gear button to edit the saved list of common party names. |
|
E |
Select the Add link to add a new name to the list of common party names for future use. |
Use the following guidelines when you enter names, unless county requirements say otherwise:
- To enter a person’s name, type the name as it appears in the document—first name first, followed by any middle name or initial, and ending with the last name. Simplifile transmits the name to the recording county (or jurisdiction) in the format required.
For example, if the county requires names to be listed last name first, Simplifile transposes the name to display it last name first.
If you type:
John F. DerantisSimplifile displays:
Derantis, John F. - To enter a company name (such as a bank), surround the name with quotation marks. This lets Simplifile know that the name should be submitted exactly as entered.
For example, if you type this:
“Bank of Commerce”Simplifile displays exactly what you typed, including the quotation marks. However, the quotation marks do not display for the recording county (or jurisdiction).
In the following cases, information that has been added to a document field can be stored so that you can more quickly re‑use it in other documents:
- You can have Simplifile remember common party names. When you do this, you enter names that get used over and over and Simplifile stores them for you. In the next document you work on, when you begin entering one of the common party names in a field, Simplifile displays the name so that you can select it to enter it in the field.
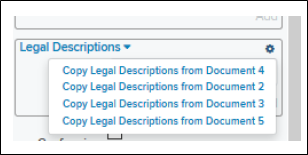
- If you have multiple documents in a package, you can copy information for certain fields from a different document in the package. If there is no information in that field in the document you try to copy from, the field stays empty. In the example below, you could copy the legal descriptions from any of the four documents in the package into the current package.
Verifying fees
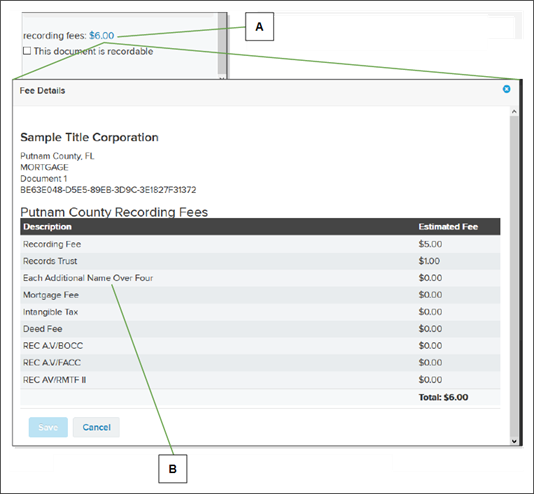
The estimated fees associated with a submitted document display near the bottom of the left column of the document display window. You may need to scroll down to see the fees.
A document’s fees are estimated based on the fee schedule each recording county (or jurisdiction) provides to Simplifile.
| Letter | Description |
|---|---|
|
A |
To review the breakdown of fees, select the fee total. |
|
B |
To change a fee, change the item that controls the fee. In the example above, a change to the number off names could change the fee. |
Document Editor toolbar
When you display a document in the Document Editor, a collection of tools displays in a toolbar at the top of the document. The tools on the toolbar can help you improve the quality of the document image make the document display correctly. For example, you can increase or decrease the contrast, remove specks and streaks, straighten or rotate a page, change page order, and make sure the document size is correct. Improving the quality of the documents may help prevent rejections and non‑compliance fees.
The toolbar can have a different appearance depending on such things as your computer screen resolution, browser size, and if a recording county (or jurisdiction) restricts the use of certain tools.
This topic includes examples of the toolbar and descriptions of the tools you may be able to use to manage your documents. It also explains how to apply a change you specify.
Example toolbar on a wider browser display

| Letter | Description |
|---|---|
|
A |
Hover your mouse pointer over a tool to view a description of the tool. |
|
B |
Tools are grouped and named to help you locate the one you want. |
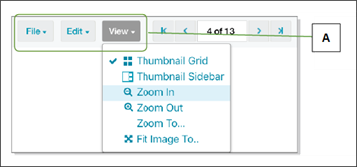
Example toolbar on a smaller browser display or lower resolution computer screen
| Letter | Description |
|---|---|
|
A |
To display tools in that category, select the button. |
Some tools are available when you right‑click a displayed document
They may let you do the following:
- Move or resize a page
- Rotate the page by 180°
- De‑skew (straighten) a page
- Change the contrast
- Erase or remove portions of a page
- Clear county or print margins
- Make basic adjustments all at once (Magic Wand)
- Delete (remove) a page
Toolbar Buttons: File Section
| Toolbar Buttons: File Section | ||
|---|---|---|
| Button | Name | Let’s you do this |
|
|
Scan |
Scan a document into Simplifile. |
|
|
Upload |
Upload a PDF or TIFF document. |
|
|
Download |
Download a document as a PDF or TIFF. Be sure to mark the format you want to use. By default, the system uses the document name as the file name. Helper documents display the helper document type in parentheses after the document name. You can rename the document. |
|
|
|
Print the document. |
|
|
Save Changes |
Save the changes you have made to the document. |
Toolbar Buttons: Edit Section
| Toolbar Buttons: Edit Section | ||
|---|---|---|
| Button | Name | Let’s you do this |
|
|
Drag / Resize (Ctrl+Y) Resize to Letter Resize to Legal |
Adjust the size of a document
|
|
|
Move Pages |
Change the order of the document’s pages. You can move either the currently displayed page or pages you choose to the new position.
To move multiple pages, select the hamburger button ( |
|
|
Rotate Page | Choose to rotate the page 180 degrees, 90 degrees clockwise, or 90 degrees counterclockwise. |
|
|
De‑skew | Straighten a document that displays at a slight angle. |
|
|
Contrast Marquee Contrast |
Adjust the document to display darker or lighter than the original scan. Two options are available:
|
|
|
Eraser Marquee Eraser |
Remove from display portions of the document. This is helpful for marks that may appear inside the county margins. Two erasers are available:
After you create the pattern, you can apply the eraser to only the displayed page, to pages you choose, or to all pages. All highlighted areas are erased. |
|
|
Magic Wand |
Make the following basic adjustments to the document, if necessary:
|
|
|
Clear County Margins Clear Print Margins |
Remove small specks or other marks in the margins of the document. Select the box to display the options.
|
|
|
Revert to Original |
Remove all changes you make to the document during a work session. A work session begins when you display a document in the Document Editor ends when you exit the Document Editor. |
|
|
Delete (trash can) |
Remove pages from the document. Select the Delete Select the the Delete |
Toolbar buttons: View section
| Toolbar Buttons: View Section | ||
|---|---|---|
| Button | Name | Let’s you do this |
|
|
Show/Hide Thumbnail Grid |
Simplifile highlights a page when you choose it.
|
|
|
Sidebar Page Display |
Display small images of the pages of a document in a fly‑out column. The sidebar remains visible until you select the button again. Any changes you make affect only the pages you choose. Simplifile highlights a page when you choose it.
|
|
|
Display Size |
Select the plus or minus magnifying glasses to enlarge or shrink the display. You can zoom all the way out to the thumbnail grid. Select the double‑headed crossed arrows to fit the image to the width of the window, display the image at letter height proportions, or display the image at legal height proportions. You can also drag and resize the body of a document. For more information, see Drag/Resize Page in this table. |
|
|
Settings |
Select the Settings button to open the Document Editor Settings page. |
Toolbar Buttons: Page Section
| Toolbar Buttons: Page Section | ||
|---|---|---|
| Button | Name | Let’s you do this |
|
|
Page Navigation |
If the document has multiple pages, display a different page of the document.
|
Toolbar Buttons: Help Section
| Toolbar Buttons: Page Section | ||
|---|---|---|
| Button | Name | Lets you do this |
|
|
Keyboard Shortcuts |
Select this button to display a list of keyboard shortcuts you can use in the Document Editor. The shortcuts may include the following: |
|
? |
Show / hide this help menu |
|
|
‑ |
Zoom Out |
|
|
+ |
Zoom In |
|
|
Alt + t |
Toggle Thumbnail View |
|
|
Ctrl + = |
Fit Image to Window Width |
|
|
Ctrl + a |
Enable Contrast |
|
|
Ctrl + Alt + t |
Toggle Expanded Thumbnail View |
|
|
Ctrl + d |
Enable De‑skew |
|
|
Ctrl + Del |
Delete Current Page |
|
|
Ctrl + e |
Enable Eraser |
|
|
Ctrl + f |
Rotate Page 180 Degrees |
|
|
Ctrl + m |
Enable Magic Wand |
|
|
Ctrl + o |
Clear Print Margins |
|
|
Ctrl + p |
Open Pan/Scale on Current Image |
|
|
Ctrl + s |
Save Current Changes to Document |
|
|
Ctrl + up |
Move Page Up One Spot |
|
|
Ctrl + z |
Revert to Original |
|
|
End |
Go to the last page |
|
|
Home |
Go to the first page |
|
I want to ...
Open the Document Editor
Method 1 ‑ Open the Documentation Editor page from the Packages page
- Open the Packages page.
- If needed, use the filter to display the wanted package.
- In the table, select the name of a package. The Package Details page opens in the right panel and the navigation menu changes to display the packages options with the Details item selected.
- Do one of the following:
- To edit an existing document in the package, in the Documents table, select the document name.
- To add a new document to the package, in the Add another document section, use the Select document type dropdown list to select the document type and select the Add Document To Package
 button.
The Document Editor opens.
Method 2 ‑ Open the Documentation Editor page from the Package Details page
- Open the Package Details page.
- Do one of the following:
- To edit an existing document in the package, in the Documents table, select the document name.
- To add a new document to the package, in the Add another document section, use the Select document type dropdown list to select the document type and select the Add Document To Package
 button.
The Document Editor opens.
Method 3 ‑ Open the Documentation Editor page from the Search Results window
- At the top of the navigation menu, select the Simplifile logo. The Packages page opens in the right panel and the navigation menu highlights the Packages item.
- In the navigation, select the Search button. The Search window opens in the right panel.
- Enter one or more search parameters in the fields.
- Select the Search button. The Search Results windows opens.
- In the Document column, select the document name of the package you want. The Package Details page opens in the right panel and the navigation menu changes to display the packages options with the Details item selected.
- Do one of the following:
- To edit an existing document in the package, in the Documents table, select the document name.
- To add a new document to the package, in the Add another document section, use the Select document type dropdown list to select the document type and select the Add Document To Package
 button.
The Document Editor opens.
Add a document to a package
- Add a document placeholder, do one of the following:
- Create a document package as described in the Packages page topic.
- Select the name of a package on the Packages page. When the Package Details page displays, choose the type of document that you want to add from the Select document type dropdown list and select the Add Document To Package
 button.
 - On the Document Editor, scroll to the bottom of the page and select the Add New Doc
 button in the bottom‑left corner. Then choose a document type to add and select the OK
  button.
The Document Editor displays.
- If more than one document displays in the document list on the left side of the editor, select the type of document you want to add.
- Do one of the following:
- Upload a document.
- Before you begin, find the digital copy of the document on your hard drive or server.
- On the display portion of the editor, select the gray Upload document image files from your computer box, or to add pages, on the left side of the editor tool bar select the Upload button.
- Locate the document and select the Open
 button.
- Scan a document.
- Before you begin, be sure your computer can access a TWAIN scanner and that you can use the scanner software.
- On the display portion of the editor, select the Scan Document box or, to add pages, select the Scan button on the left side of the editor tool bar and follow the instructions that display. Be sure to choose a TWAIN scanner and mark any options you want to use.
- Drag and drop a document.
- If a drag‑and‑drop option displays, find the digital copy of the document on your hard drive or server.
- Drag the file to the Drag & Drop box on the display portion of the editor.
- Do one of the following:
- To save your work and add another document, select the Add New Doc
 button in the lower‑left corner of the left panel.
 - To save your work and continue later, select the Done
 button in the lower‑left corner of the left panel.
- To save your work and add another document, select the Add New Doc
Add a document using the Document Editor’s Add New Doc button
- Open the Document Editor.
- In the left panel near the bottom, select the Add New Doc
 button. The Select Kind of Instrument for the New Document window opens.
 - Use the dropdown field to select the instrument type.
- Select the Select
 button. The content in the left panel updates and the right panel is ready to accept the document
 - In the right panel, do one of the following:
- Upload the document image files from your computer.
- Drag and drop files from your computer.
- Scan documents directly
- In the left panel, complete the information about the document and select the Done
 button at the bottom of the panel.
Applying a document edit
When you work in the Document Editor, the system may ask if you want to complete a change you make. In some cases, the system lets you make tool adjustments before you make a change.

| Letter | Description |
|---|---|
|
A |
You can make adjustments to some tools, such as choosing the size of the eraser. |
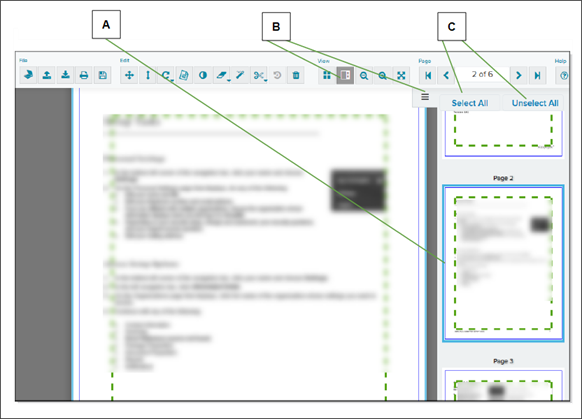
You can use several methods to choose pages where you want to apply a change. For example, you can select the Menu ![]() button or the Thumbnail Sidebar
button or the Thumbnail Sidebar ![]() button to open a fly‑out menu that displays all pages of a document on the right side. Below is an example.
button to open a fly‑out menu that displays all pages of a document on the right side. Below is an example.
| Letter | Description |
|---|---|
|
A |
Pages you select have a border in the sidebar display. |
|
B |
Select here or here to display the sidebar. |
|
C |
Instead of selecting each page, you can select these buttons to choose or un‑choose all pages. |
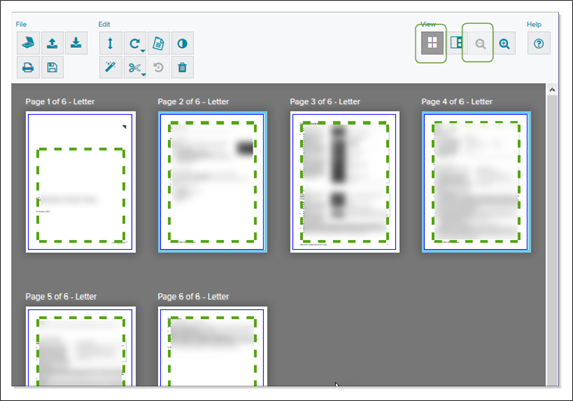
You can also select the Thumbnail Grid ![]() button or use the Zoom Out
button or use the Zoom Out ![]() button to display and choose the pages where you want to make changes. From this thumbnail display, you can choose a page, then drag it to a new position.
button to display and choose the pages where you want to make changes. From this thumbnail display, you can choose a page, then drag it to a new position.
After you choose pages, you use the options at the top of the page display to apply changes to only the current page, the chosen pages, or all pages. You may also need to specify the adjustment you want to make. Below is an example.
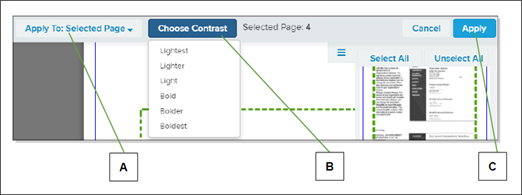
| Letter | Description |
|---|---|
|
A |
You choose whether to apply your changes to the currently displayed page, to any pages you have highlighted, or to all pages in the document. |
|
B |
Select an option to choose tool‑specific changes, such as contrast level or eraser size. |
|
C |
In most cases, you
must select the Apply |
Extract (copy) pages to create a document
If necessary, you can extract pages from one document to create a document of a type you choose. You can extract one or more pages, up to and including all of the pages. You do this from the thumbnail grid view.
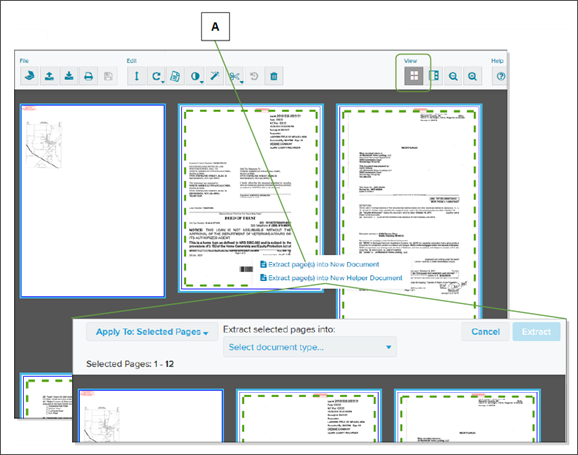
| Letter | Description |
|---|---|
|
A |
Right‑click the thumbnail grid to display the extract pages instructions. |
You can extract pages to create a full document or a helper document for the document you are working on, if that document can have helper documents. The list of document types you can choose from lists only the documents or helper documents that can be appropriately created.
- Open the document from which you want to extract (copy) the pages. Do one of the following:
- Add to a package a multi‑page document you want to split. For more information, see Document Editor page.
- On the Packages list:
- Select the package name of a package containing a multi‑page document you want to split.
- Select the document name to open it in the Document Editor.
- In the View button section, select the thumbnail display button (
 ).
). - Select to mark each page you want to extract. You can extract one, several, or all pages. A marked page has a thick colored border.
- Right‑click one of the document pages to display the extract options.
- Do one of the following:
- To create a full document, select the Extract page(s) into New Document item.
- To create a helper document, select the Extract page(s) into New Helper Document item. This option displays only if the document you are extracting pages from can have helper documents.
- From the Select document type or Select helper document type dropdown list at the top of the document, choose the type of document you want to create from the pages you marked.
- Select the Extract item.
Simplifile removes each page you marked one at a time. If you marked all of the pages, the empty document shell displays. The new document displays in the Package Details Documents list.
Prepare a document for submission
- Display a document in the Document Editor. Do one of the following:
- Add a document to a package.
- Select the name of the package that contains the document you want to prepare. When the Package Details page displays, select the name of the document you want.
- If necessary, in the Document List on the left, select the name of the document with which you want to work.
- Review the document:
- Make sure the document is readable.
- Make sure the document fits within the county’s margins (the green dotted lines).
- If necessary, move any ghost stamps (stamp placeholders that display in red) to a clear place where they do not cover any document text.
- Add text to the document.
- Use the document management tools at the top of the document to get the document ready to submit. For more information, see Using tools in the left panel and Document Editor toolbar.
- Make note of any required supporting documents in the Document table. You will need to scan or upload each one separately as part of the package.
- Select the estimated fees amount and review the fees to make sure they are correct. If possible, make any necessary changes. When you are sure the fees are correct, mark the The recording fees are correct box.
- Complete any county requirements that display on the left panel.
- Complete any necessary fields on the left panel of the page.
- When you are sure the document is ready to submit, mark the This document is recordable box. When all requirements are met, the system changes the document’s status to Ready.
- Do one of the following:
- To add another document to this package, select the Add New Doc
 button in the lower left corner of the left panel.
 - To return to the Packages page, select the Done
 button in the lower left corner of the left panel.
- To add another document to this package, select the Add New Doc
Print a document from the Document Editor
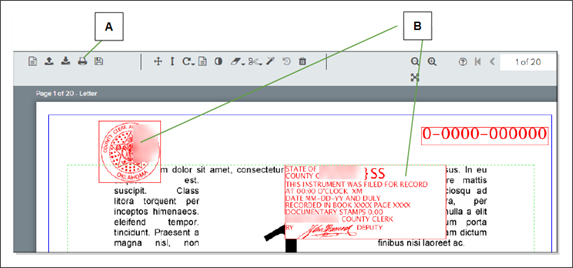
| Letter | Description |
|---|---|
|
A |
Select the printer button to download or print a copy of the document. |
|
B |
A recorded document displays the legal stamps required by your recording county (or jurisdiction). |
- Open the Document Editor and choose the document you want to print.
- In the right panel, select the Print button. The browser’s print tool opens in a separate tab.
- Print the document using the browser’s print tool.
Link Tray App
If you open the Document Editor and the Tray app not linked window opens,
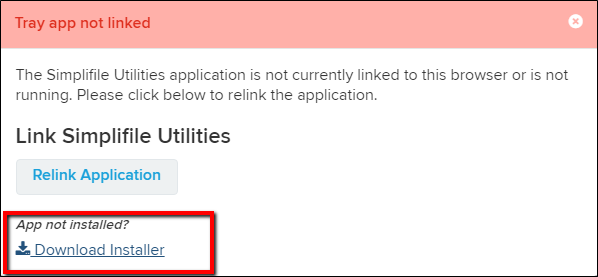
Do the following:
- Select the Download Installer link.
-
Select the Simplifile_Utilities.exe that is downloaded. The following window opens.
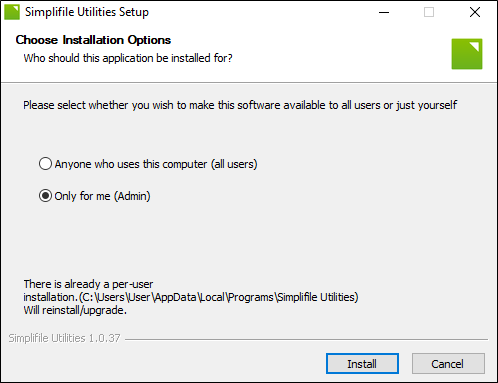
- Choose the wanted option:
- Anyone who uses this computer (all users)
- Only for me (Admin)
- Select the Install button.
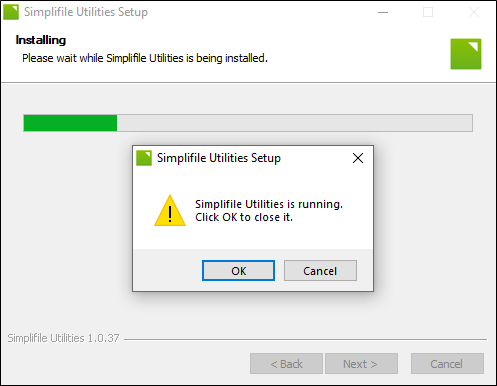
- If the Simplifile Utilities Setup window open display "Simplifile Utilities is running. Click OK to close it.", select the OK
 button to close the Simplifile Utilities.
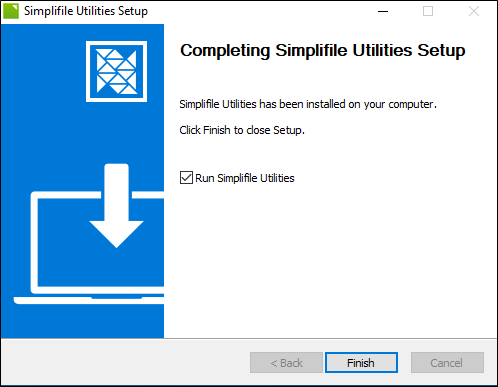
- When the Completing Simplifile Utilities Setup is displayed, select the Finish button.
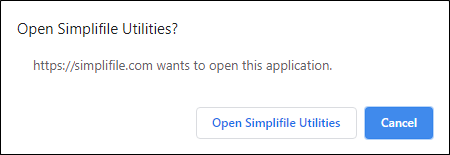
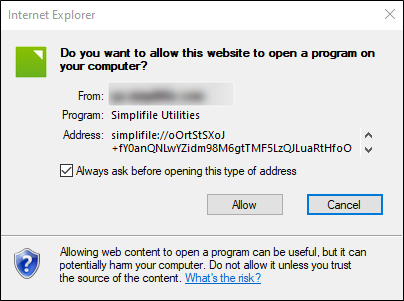
- The Open Simplifile Utilities? window opens.
If you are using Chrome, the window looks like:
If you are using Internet Explorer, the window looks like:
If you are using Edge, the window looks like:

Click the applicable button to open the Simplifile Utilities.
-
In the Simplifile Utilities Setup page, you should see a spinner next to he Link button. When the linking process completes, the page displays "Linking Successful".
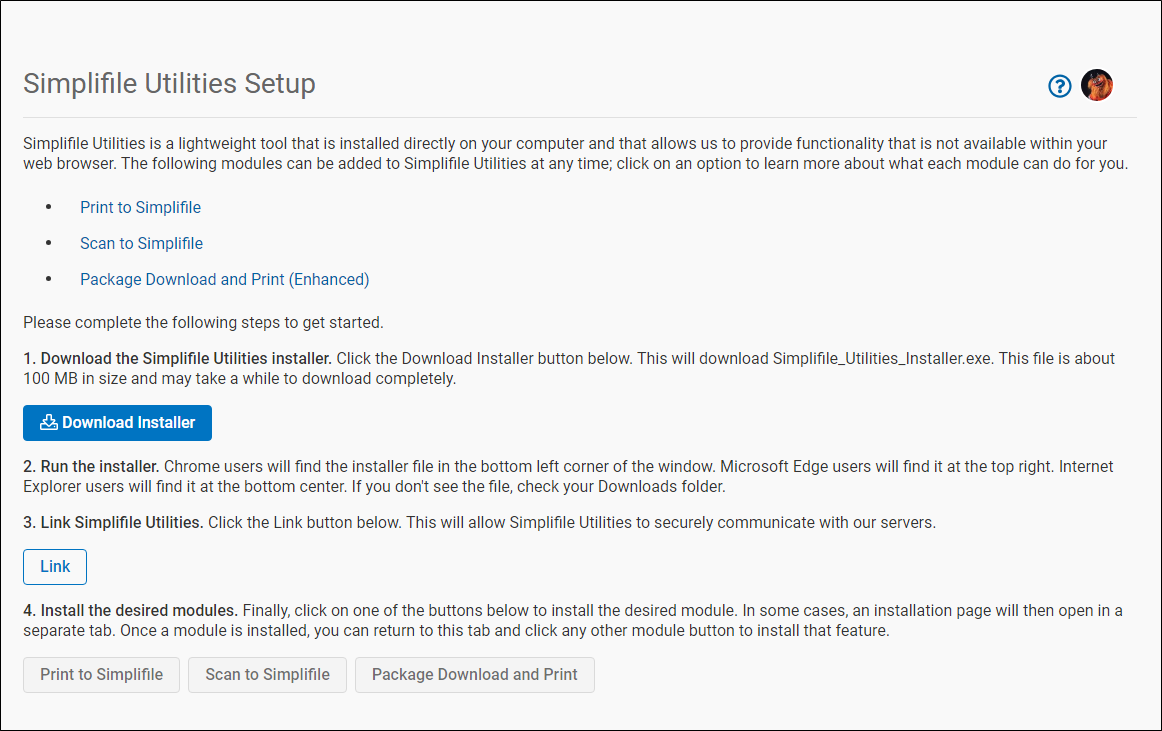
The Simplifile Utilities Tray app is now installed.
Scan or upload a document
After you have a document placeholder in Simplifile, you can do at least one of the following from the Document Editor:
- Upload a previously saved digital copy of the document into the placeholder.
- Scan the document directly into Simplifile. You may need to download and install Simplifile scanning software before you can do this. Your Simplifile administrator or IT team may need to help with this process.
- Drag and drop the document file from your computer to the Document Editor.
Follow these guidelines when you scan and save a document:
- Use a file resolution of 300 DPI.
- Scan in black and white, not color or grayscale.
- Scan as a document or text, not a photograph.
- Save the file as a TIFF or a PDF.
- Use a TWAIN driver.
You can choose scanning options if you select the large Scan Document box or the Scanning button on the left side.
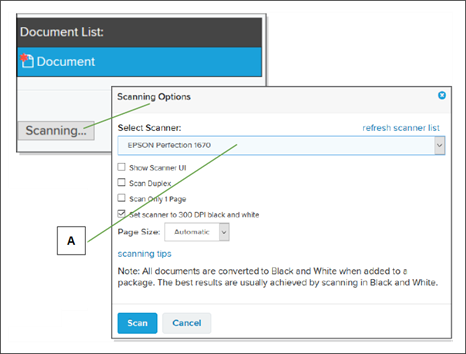
| Letter | Description |
|---|---|
|
A |
Use the dropdown list to choose from the scanners Simplifile has identified. The scanner you use must be TWAIN compatible, accessible by your computer, and turned on. |
You can choose any of the following:
- Show Scanner UI. Displays the scanner software when you begin a scan so that you can make choices about how the scan is performed.
- Scan Duplex. Tells the computer to scan both sides of any document. This option works only if your scanner supports duplex scanning.
- Scan Only 1 Page. Scans only the first page of a document.
- Set scanner to 300 DPI black and white. Applies the recommended 300 DPI and black‑and‑white settings to the scan.
- Page Size. Choose Automatic to let the system determine the size. You can also choose Letter or Legal size.
You may be able to set some of these options as defaults. For more information, see Set the scanning options.
You can upload multiple sections of a single document from the Document Editor. This combines the documents into one larger document. The first document you upload should display as the first part of the larger document, the second should display as the second part, and so forth. However, you should review the document to make sure the pages are in the correct order, and revise the order and remove unnecessary pages as needed.
Set Document Size (Complete Stamp Printing)
You can change the percentage of scale at which documents print for each county where you record documents.
This lets you choose how large the image should be before it prints. You may need to do this if you print a recorded document and find that the stamps did not print correctly. This can happen if a county (or jurisdiction) places stamps in the margins of the document. You may also work with jurisdictions that require you to scale documents before you print them, or find that a document does not fit within a county’s required margins for some reason.
For example, if you change the percentage of scale for a county to 95, Simplifile shrinks documents to 95 percent of their original size. This means that, after your document is recorded, the image shrinks by 5 percent before it prints. This can help assure that stamps are visible when you print a document.
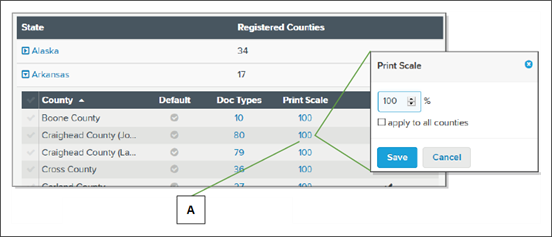
| Letter | Description |
|---|---|
|
A |
Select the number in the Print Scale column to change the amount of document shrinkage for each county. |
- In the navigation menu, select the Counties item.
- If necessary, choose the organization whose documents you want to size.
- Select the arrow beside the state of the county whose printed document size you want to change.
- Select the number in the Print Scale column for the county whose printed document size you want to change.
- In the Print Scale window that opens, enter the scale percentage you want.
For example, to print a document at 75% of its actual size, enter 75.
- To apply the percentage to all counties in all states, mark apply to all counties. If you have a large number of registered counties, this may take a few minutes.
- When finished, use the navigation menu to open the part of Simplifile you want to use next.
Use Text Stamps
Sample toolbar with text stamp tool enabled:
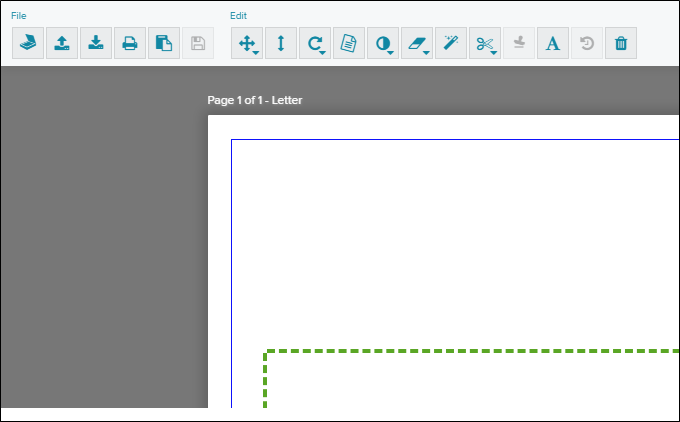
Sample Text Stamp tool usage

Add a text stamp to a document
- Begin preparing a document for submission.
- Select the Text Stamp tool to begin text entry. If the tool Is not displayed, the current county (or jurisdiction) does not allow the use of text stamps.
- Select the document in the place where you want the stamp to display.
- If needed use the Font Size selection menu to adjust the font size.
- Enter the text you want to use to stamp the document.
- To enter another text stamp, select the document in another location where you want the stamp to display.
- Select the Done
 button to exit the Text Stamp tool, or select the Clear Marks
  button to cancel the current operation and clear all existing text stamps.
Edit the text of a text stamp
- Select the Text Stamp tool. If the tool Is not displayed, the current county (or jurisdiction) does not allow the use of text stamps.
- Double‑click the stamp.
- Enter the corrected text.
- Select the Done
 button to exit the Text Stamp tool, or select the Clear Marks
  button to cancel the current operation and clear all existing text stamps.
Change the position of a text stamp
- Select the Text Stamp tool. If the tool Is not displayed, the current county (or jurisdiction) does not allow the use of text stamps.
- Move your mouse pointer over the text to display a double‑headed arrow cross.
- Select and hold the mouse pointer on the text.
- Select the Done
 button to exit the Text Stamp tool, or select the Clear Marks
  button to cancel the current operation and clear all existing text stamps.
 - Drag the text to the place where you want it to display.
- Select the Done
 button to exit the Text Stamp tool, or select the Clear Marks
  button to cancel the current operation and clear all existing text stamps.
Rotate a text stamp
- Select the Text Stamp tool. If the tool Is not displayed, the current county (or jurisdiction) does not allow the use of text stamps.
- Move your mouse pointer over the text to display Rotate Left and Rotate Right buttons.
- Select the Rotate Left of Rotate Right buttons to rotate the text in the desired direction.
- Continue selecting the Rotate Left or Rotate Right buttons to rotate the stamp further.
- Select the Done
 button to exit the Text Stamp tool, or select the Clear Marks
  button to cancel the current operation and clear all existing text stamps.
Delete a text stamp
- Select the Text Stamp tool. If the tool Is not displayed, the current county (or jurisdiction) does not allow the use of text stamps.
- Move your mouse pointer over the text to display an X button.
- Select the X button to delete the text.
- Select the Done
 button to exit the Text Stamp too l, or select the Clear Marks
  button to cancel the current operation and clear all existing text stamps.