Feature Enhancements in Version 19.1

System Performance Enhancements
(Updated on 1/11/2019)
The following updates are being applied in Encompass 19.1 to help improve Encompass system performance around Pipeline load and refresh times, loan opening times, and time to log in.
- Pipeline Performance:
- Please see the Pipeline Performance Enhancements section on the New Features and Forms page to learn more about new functionality that enables users to manually select specific (and multiple) loan folders that they want to access on their Pipeline. Rather than loading all loan folders in their Pipeline, users can select specific loan folders to view. Depending on the number of loans in the selected folders, this can result in faster Pipeline load times.
- For clients with a large number of files in a Pipeline View, they could experience slower performance in Encompass due to intermittent system “memory leaks”. The cause of these leaks has been identified and the relevant code has been updated to help prevent them. The reduction of these memory leaks results in improved performance for clients with a larger number of files in their Pipeline Views.
- Disabled user accounts belonging to users who can no longer log into Encompass have been removed from the system database that stores users’ loan access rights. This database is queried by the system each time the Pipeline is loaded.
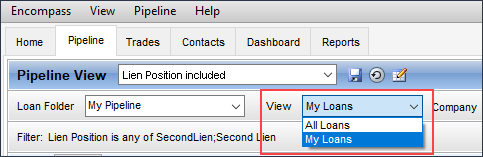
- When using the My Loans view option in the Pipeline, major updates have been made to help ensure loans are loaded significantly quicker than in earlier versions of Encompass.
- If you typically use the All Loans view when managing loans in the Pipeline, you will notice a significant improvement in the time it takes for the Pipeline to load when you switch to the My Loans view. This improved Pipeline performance can also result in improved Encompass Server performance, which results in improved overall system performance. Utilize the My Loans view to realize these enhancements.
-
Loan Open:
-
In earlier versions of Encompass, the loan data call is fully synchronous and the GetPipelineinfo call is partially asynchronous. Starting in Encompass 19.1, the GetPipelineinfo call is fully asynchronous so that the user does not have to wait as long during loan open.
-
The GetFieldIDAccess call that the Encompass system makes during the loan open process is now asynchronous, which results in faster loan open times. The compilation of business rule triggers (e.g., the GetRules method) impacting applicable loans is also now asynchronous which also reduces loan open times.
-
- Encompass Login:
-
Please see the eFolder Background Processing (Uploads and Conversions) Now Operating Correctly entry on the Fixed Issues page.
-
Updates have been made to the process that initializes the settings configured by the administrator using the Secondary Setup settings and the Itemization Fee Management settings to help reduce the time it takes to complete the Encompass user log in process.
-
The time it takes for the system to complete the Remote Server Login process has been reduced.
-
Additional Support for HELOC Loans
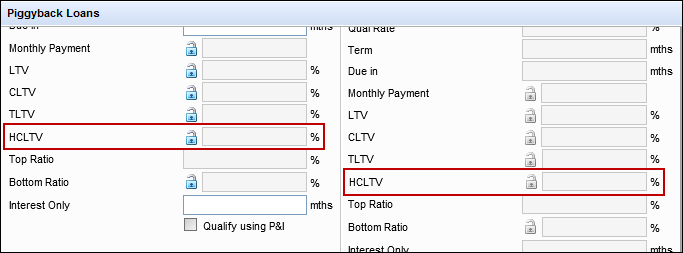
The HCLTV (field ID 1540) ratio has been added to the Piggyback Loan Tool in both the 1st Loan Position and 2nd Loan Position columns to enable loan officers to view the HELOC combined loan-to-value ratio when originating a HELOC as a piggyback with another transaction.
CBIZ-19316
Support for Submitting HELOC Loan Lock Requests
Why we made these updates: To enable HELOC parameters to be used when submitting lock requests.
To enable HELOC parameters to be used when submitting lock requests, new HELOC fields have been added to the Lock Request Form.
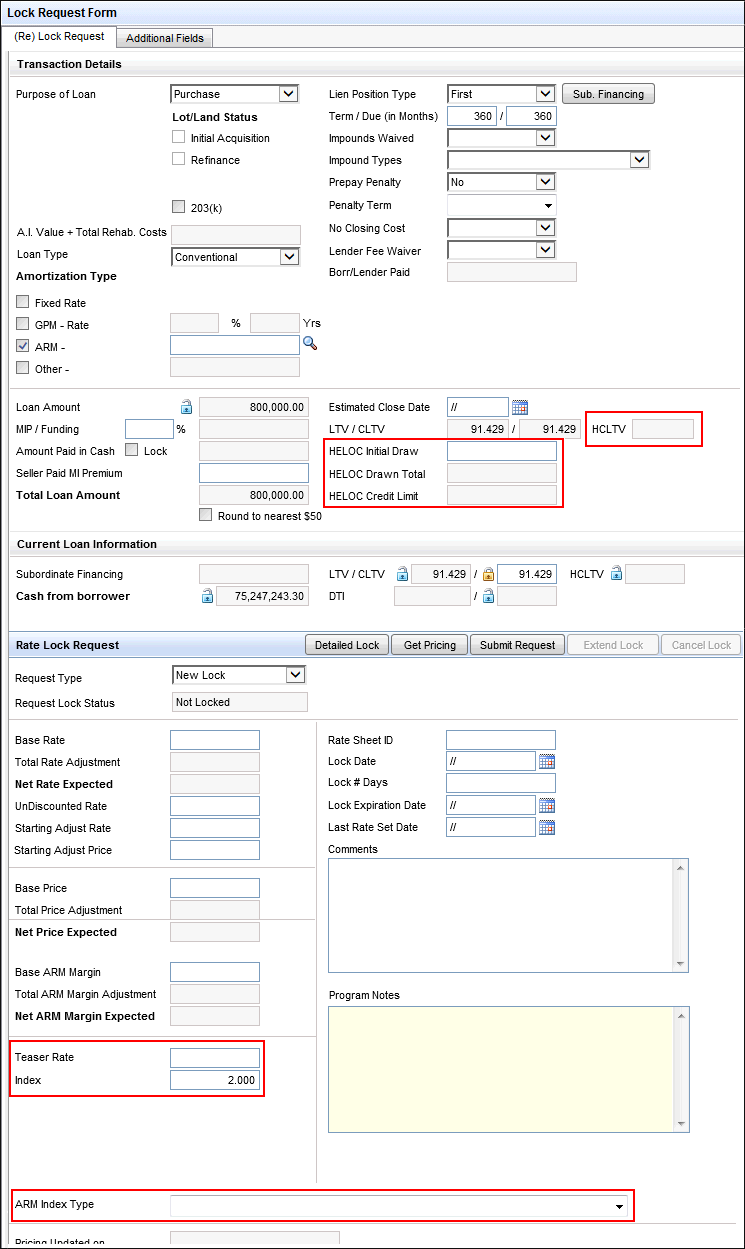
- HELOC Initial Draw (field ID 4510) – The required dollar advance, if any, after the HELOC loan is approved. It is populated from the HELOC Initial Draw (field ID 1888) field but can be manually entered.
- HELOC Credit Limit (field ID 4519) – This read-only field is the maximum amount of credit available on all HELOCs on the subject property. It is populated from the HELOC Credit Limit (field ID CASASRN.X168) field.
- HCLTV (field ID 4514) – This read-only field is the home equity combined loan to value ratio. It is populated from the HCLTV (field ID 1540) field.
- Teaser Rate (field ID 4511) – The introductory rate for the HELOC loan. It is populated from the Teaser Rate (field ID 1482) field but can be manually entered.
- Index (field ID 4513) – The basis for the rate of the loan. The index is adjusted during the life of the loan as fluctuations occur in the market rate on which the index is based. It is populated from the Index (field ID 688) field but can be manually entered.
- ARM Index Type (field ID 4512) – The benchmark interest rate to which an adjustable rate mortgage is tied to. It is populated from the ARM Index Type (field ID 1959) field but can be manually entered.
In addition, two other modifications have been implemented:
- The HELOC Actual Balance (field ID 3846) field has been renamed to HELOC Drawn Total and is now a read-only field populated from the HELOC Drawn Total (field ID CASASRN.X167) field.
- The existing HCLTV (field ID 1540) field has been added to the Current Loan Information section as a read-only field.
To enable HELOC parameters to be used when submitting lock requests, the Subordinate Mortgage Loan Amounts pop-up screen, accessed via the Sub Financing button on the Lock Request Form and the Lock Request Snapshot, has been updated.

- The Additional (field ID 3037) field has been removed.
- The 1st Mortgage (field ID 3035) field is now a read-only calculated field. It is populated from the Closed End Primary Mortgage Total (field ID 427) field on the Subordinate Mortgage Loan Amounts pop-up screen, accessed via the Sub Financing button on the 1003 Page 1.
- The 2nd Mortgage (field ID 3036) field is now a read-only calculated field. It is populated from the Closed End Subordinate Mortgage Total (field ID 428) field on the Subordinate Mortgage Loan Amounts pop-up screen, accessed via the Sub Financing button on the 1003 Page 1.
- The action buttons (OK and Cancel) have been removed because the fields on the pop-up screen can no longer be edited.
To align with changes made to field ID 420 in the Encompass 18.4 release, the Lien Position field on the Lock Request Form and Secondary Registration has been updated.
Lock Request Form
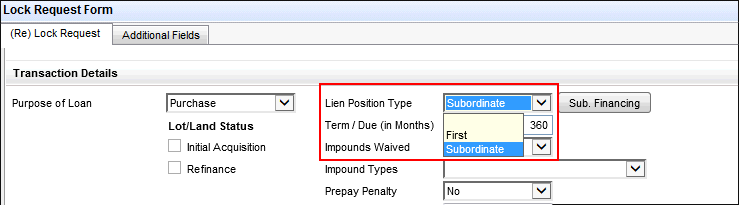
- The field label of Lien Position (field ID 2958) has been changed to Lien Position Type.
- The enumeration of “Second” has been changed to “Subordinate”.
Secondary Registration Current Loan Tab

- The field label of Lien Position (field ID 420) has been changed to Lien Position Type.
- The enumeration of “Second” has been changed to “Subordinate”.
Loan Snapshot
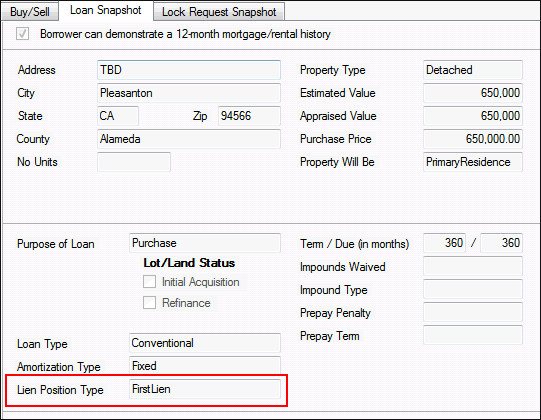
- The field label of Lien Position (field ID LOCKRATE.420) has been changed to Lien Position Type.
Lock Request Snapshot
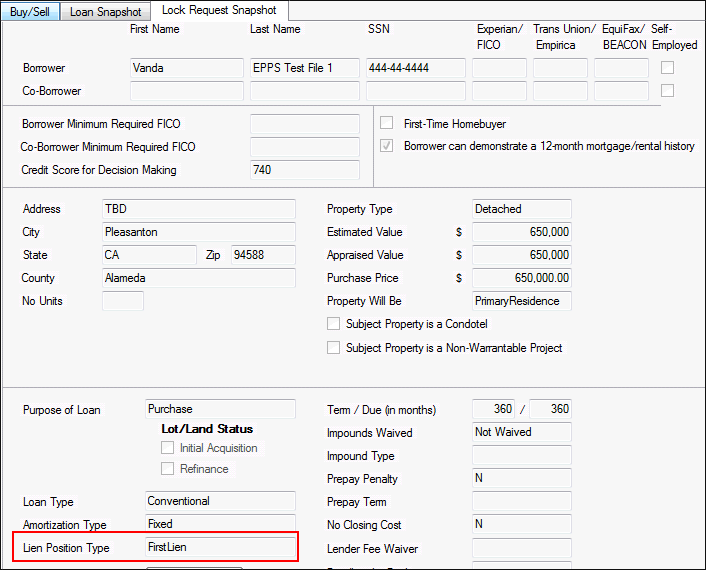
- The field label of Lien Position (field ID LOCKRATE.2958) has been changed to Lien Position Type.
To enable HELOC parameters to be used when submitting lock requests, the HELOC fields have been added to the Lock Request Snapshot.
These fields are read-only.
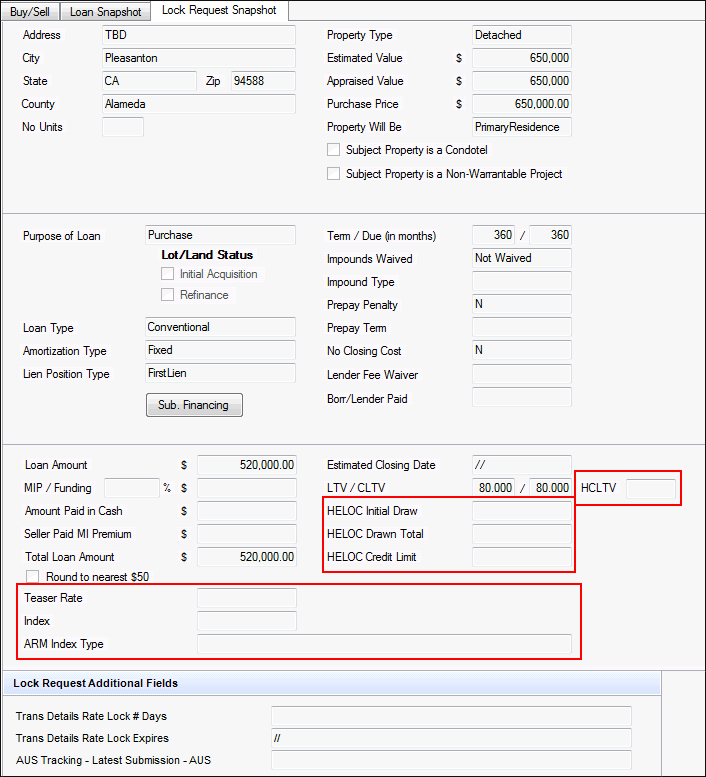
- HELOC Initial Draw (field ID 4510)
- HELOC Drawn Total (field ID 3856)
- HELOC Credit Limit (field ID 4519)
- HCLTV (field I 4514)
- Teaser Rate (field ID 4511)
- Index (field ID 4513)
- ARM Index (field ID 4512)
The new fields (HELOC Drawn Total is a pre-existing field) have also been added to the Reporting Database.
To enable HELOC parameters to be used when submitting lock requests, the lock request validation has been updated to accommodate the new HELOC fields. When the lock is confirmed (auto-lock or manually), the HELOC fields on the Lock Request Snapshot will be compared to the fields on the RegZ - LE:
- HELOC Initial Draw (field ID 4510) field to the HELOC Initial Draw (field ID 1888) field.
- HELOC Credit Limit (field ID 4519) field to the HELOC Credit Limit (field ID CASASRN.X168) field.
- HCLTV (field ID 4514) to the HCLTV (field ID 1540) field.
- Teaser Rate (field ID 4511) to the Teaser Rate (field ID 1482) field.
- Index (field ID 4513) to the Index (field ID 688) field.
- ARM Index Type (field ID 4512) to the ARM Index Type (field ID 1959) field.
If the HELOC Initial Draw, HCLTV, Teaser Rate, Index, and ARM Index Type are the same, no further action will be taken. If the fields are different:
- A confirmation window will open and display the conflicting data.
- The values on the RegZ-LE will be overridden with the values from the Lock Request Snapshot when Confirm is clicked.
Compliance Updates
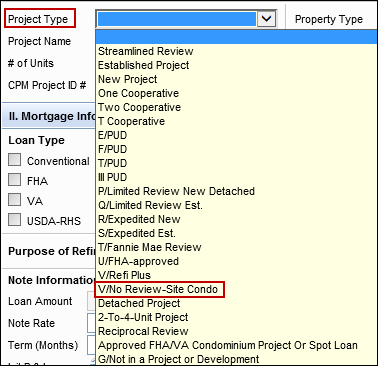
A new V/No Review-Site Condo option has been added to the Project Type (field ID 1012) dropdown list on the Transmittal Summary input form to match the options available under FNMA guidelines.
CBIZ-11399
A new Detached Condominium option has been added to the Property Type (field ID 1553) dropdown list on the Transmittal Summary input form. Selecting the Detached Condominium option results in both the 1-unit and Condominium checkboxes being selected the Transmittal Summary output form.
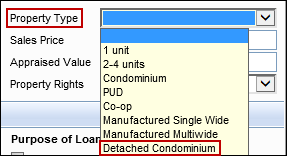
CBIZ-7741
(Updated on 3/27/2019)
Updates have been made to the calculations used to populate the Down Payment/Funds from Borrower (field IDs LE2.X2 and CD3.X105) and the Funds for Borrower (Field IDs LE2.X3 and CD3.X107) in the Calculating Cash to Close sections on the Loan Estimate Page 2 and Closing Disclosure Page 3 input forms when the Purpose of Loan (field ID 19) is Purchase, Construction, or Construction - Perm.
Previously, third-party payoff amounts were not included in the calculations for the Down Payment/Funds from Borrower or the Funds for Borrower. This caused issues for loans with purchase payoffs, as well as scenarios where the loan amount exceeded the current purchase price, for example, a 203(k) scenario.
The new calculations reflect the amount of the Sale Price (field ID L726), the Sale Price of Any Personal Property Included in the Sale (field ID L79), and Third Party Payments Not Otherwise Disclosed (field ID LE2.X29) minus the Loan Amount (field ID 2) minus the Closing Costs Financed (field ID LE2.X1 on the Loan Estimate or field ID CD3.X104 on the Closing Disclosure).
The amount of the Third Party Payments Not Otherwise Disclosed (field ID LE2.X29) now populates when the Purpose of Loan (field ID 19) is Purchase. Previously this amount was populated with 0.00 for a purchase loan.
If the loan proceeds do not cover the purchase price, personal property, payoffs and financed closing costs, the difference is reflected in the Down Payment/Funds from Borrower (field ID LE2.X2 on the Loan Estimate or field ID CD3.X105 on the Closing Disclosure). If excess funds are available, they are disclosed and reflected in the Funds for Borrower (field IDs LE2.X3 on the Loan Estimate or field ID CD3.X107 on the Closing Disclosure).
This update enables payoffs to be captured on the Calculating Cash to Close section on the Loan Estimate and Closing Disclosure. However, the payoffs are not reflected in the Details of Transaction section on input forms such as the 2015 Itemization and the 1003 Page 3. If you click the Lock icon to add the purchase payoff in the Refinance field (field ID 1092), the DU results will double the cash amount for the payoffs in the cash to close calculation. This situation will be resolved when the new version of the 1003 URLA form is released later in 2019. The new URLA separates the mortgage payoffs applicable to the subject property for a refinance loan from the non-mortgage payoff amounts.
For Purchase transactions that were disclosed prior to 19.1 with one or more payoff items included, the Down Payment/Funds from Borrower (field IDs LE2.X2 and CD3.X105), Funds for Borrower (field IDs LE2.X3 and CD3.X107), and the Third Party Payments Not Otherwise Disclosed (LE2.X29) are not editable and the existing values are retained. Click the Lock icon  to trigger the new calculation.
CBIZ-17563
In previous versions of Encompass, the Actual Received Date for the Loan Estimate (LE) was not being populated when disclosures were sent electronically prior to the borrower or co-borrower providing their consent to receive disclosures electronically, even if the consent and the received date occurred on or before the LE Due date (field ID 3143).
Starting in Encompass 19.1, when disclosures are accessed electronically by borrowers, the Actual Received Date in the LE will be populated based on whether the borrower provided eConsent prior to them accessing the disclosures or not:
- If consent is obtained prior to disclosures being sent, the Actual Received Date for the borrower and co-borrower will be populated when the borrower or co-borrower accesses the disclosure package (existing behavior) or
- If prior consent status is No or has not been received, the Actual Received Date for the borrower or co-borrower will be populated as long as both the borrower or co-borrower provide consent and accesses the disclosure package on or before the LE Due Date. This is new behavior.
- The Actual Receipt Date will be left blank in the following scenarios:
- The borrower (or co-borrower respectively) never accesses the disclosure package
- If the borrower or co-borrower accesses the disclosure package after the LE Due Date when prior consent status was No
- If there is no LE Due Date populated
Please note that this new behavior impacts electronic disclosures (i.e., esigned disclosures) only. Disclosures sent by any other method (e.g. in person, by mail, etc.) will persist as they did in earlier versions of Encompass and the Actual Received Date will be populated accordingly. For loans started in previous versions of Encompass where disclosures have not been sent, this new logic will be used. For loans started in previous versions of Encompass that do have disclosures, the previous logic will continue to be used for those loans.
Construction Loans
(Added on 12/7/2018)
New logic is being used to populate the Product description (field ID LE1.X5) when all of the following conditions are true:
-
The Construction-Perm option is selected for the Purpose of Loan (field ID 19).
-
The construction phase interest rate (field ID 1677) is equal to the permanent phase interest rate (field ID 3).
-
The total of the interest-only construction Term (field ID 1176) and the 1st adjustment period (field ID 696) is less than 24 months but not equal to 12 months.
Under these conditions, the Product field is populated with the total interest-only terms from the construction and permanent phases (field IDs 1176 and 1177), followed by the total interest-only terms from the construction phase plus the 1st Adjustment Period (field IDs 1176 and 696), followed by the rate adjustment period (field ID 694).
Examples
Loan 1:
-
Field 1176 = 12 months
-
Field 1177 = 0 months
-
Field 696 = 6 months
-
Field 694 = 18 months
Product: 1 Year Interest Only, 18 mo./18 mo. Adjustable Rate
Loan 2:
-
Field 1176 = 11 months
-
Field 1177 = 0 months
-
Field 696 = 1 month
-
Field 694 = 12 months
Product: 11 mo Interest Only, 1/1 Adjustable Rate
CBIZ-19410
Encompass Forms and Tools
On the Forms menu provided inside each loan file, the RESPA-TILA Form Version option is provided to enable users to select the version of the Encompass input forms to use for the loan file (when they are starting a new loan) or to indicate which version of the input forms are being used for the loan file (the forms being used cannot be changed once initial disclosures are sent to the borrower). To make this option more user friendly and efficient, the RESPA-TILA Form Version indicator has been moved from the very bottom of the Forms menu to the very top of the Forms menu.
To Use the RESPA-TILA Form Version:
- From the Encompass Pipeline, start a new loan file or open an existing loan file.
- Click the Forms menu option in the toolbar.

When utilizing the fee level change of circumstance process in earlier versions of Encompass to indicate why the Loan Estimate (LE) or Closing Disclosure (CD) was modified after its initial disclosure, users could not edit or select a change of circumstance reason unless a Good Faith Fee Variance Violated alert was triggered. Then users could indicate the reason in the alert and update fee change details about each changed fee. A changed circumstance reason could only be selected if there was first a fee change that triggered a Good Faith Fee Variance Violated alert. This limitation prevented users from documenting and disclosing informational only reasons on the LE or CD when no fee changes occurred.
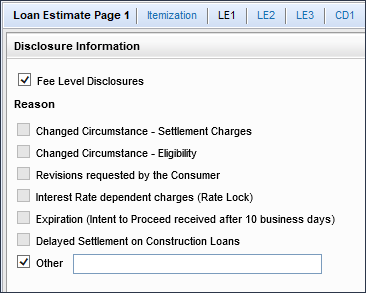
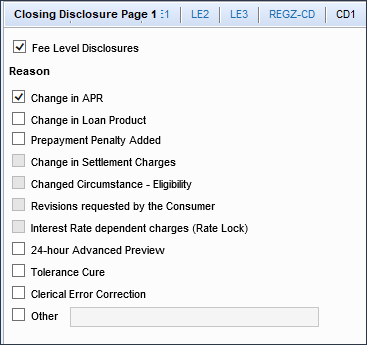
Starting in Encompass 19.1, Encompass users can now document disclosure reasons with and without a changed circumstance when doing a fee level disclosure (i.e., when the Fee Level Disclosures checkbox (field ID 4461) is selected). Certain informational disclosure reasons on the LE Page 1 and CD Page 1 are now available to select and enter details about, and they will be reflected in the Disclosure Tracking tool as applicable. This enables fee changes to continue to be documented at the fee level with the added benefit of permitting disclosure reasons to be identified at the disclosure level.
The following changed circumstance fields and reasons on the LE Page 1 and CD Page 1 are now always enabled so they can be selected to indicate a changed circumstance reason:
- Changed Circumstance (field ID 3168 and CD1.X61)
- Changes Received Date (if Changed Circumstance field is selected) (field ID 3165 and CD1.X62)
- Changed Circumstance text box and Lookup (magnifying glass) icon (if Changed Circumstance field is selected) (field ID 3169 and CD1.X64)
- Comments box (if Changed Circumstance field is selected) (field ID LE1.X86 and CD1.X65)
Reasons:
- Change in APR (field ID CD1.X52)
- Change in Loan Product (field ID CD1.X53)
- Prepayment Penalty Added (field ID CD1.X54)
- 24-hour Advanced Preview (field ID CD1.X56)
- Tolerance Cure (field ID CD1.X57)
- Clerical Error Correction (field ID CD1.X58)
- Other (field ID LE1.X84 and CD1.X59)
Note that users can still document fee changes and reasons in the Good Faith Fee Variance Violated alert just as in previous versions of Encompass. Changes made in the alert will overwrite the existing change of circumstance reasons and details on the LE Page 1 and CD Page 1. However, changes made to the LE Page 1 and CD Page 1 reasons and change of circumstance details will not be reflected in the Good Faith Fee Variance Violated alert.
(Updated on 2/6/2019)
The following options have been removed from the Offering Identifier dropdown list (field ID CASASRN.X163) on the Freddie Mac Additional Data Input Form because they are no longer supported by Freddie Mac:
-
210: Alt 97
-
220: Freddie Mac 100
-
230: Initial Int 10/20 FIXED
-
231: Initial Int 15/15 FIXED
-
232: Initial Int ARM
-
233: Initial Int ARM 10 Year
-
240: Home Possible 100
-
242: Home Possible Neighborhood Solutions 100
The remaining offerings are still available on the dropdown list:
-
241: Home Possible
-
243: Home Possible Neighborhood Solution
-
250: Home Possible Advantage
-
251: Home Possible Advantage for HFAs
-
310: Relief Refinance – Open Access
-
320: Enhanced Relief Refinance
CBIZ-17954
(Added on 12/7/2018)
The following two new fields have been added to the TPO Loan Status section on the TPO Information tool to record dates when broker requests are made for Loan Estimate forms and wholesale withdrawals.
-
Wholesale Withdrawal Requested Date (field ID TPO.X110) – Indicates the date when a broker initiated a wholesale withdrawal request from the Encompass TPO WebCenter.
-
Loan Estimate Requested Date (field ID TPO.X111) - Indicates the date when a broker requested a Loan Estimate from the Encompass TPO WebCenter.
Both of these fields are reportable in the Encompass Reporting Database and business rules can be written using the fields.
CBIZ-19486
(Added on 12/7/2018)
To assist underwriters and loan officers in quickly evaluating a loan, all loans with a ratio entered for HCLTV/HTLTV (field ID 1540) now display the ratio in the LTV numbers in the header at the top of the loan file. The HCLTV ratio displays as the third number in the sequence. The first and second numbers are the LTV ratio (field ID 353) and the CLTV ratio (field ID 976).

CBIZ-20835
(Added on 12/21/2018)
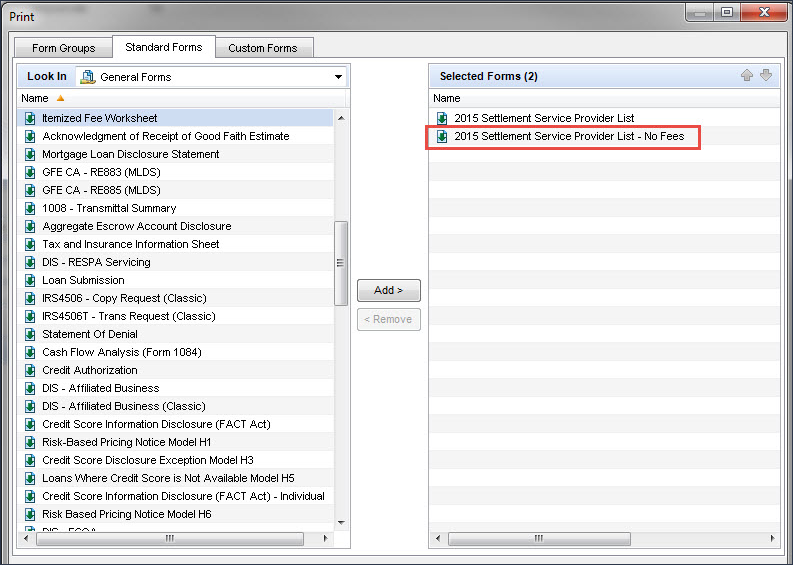
A new version of the Settlement Service Provider List printed output form is now available to generate and/or print in Encompass. The purpose of this new version is to provide a version of the Settlement Service Provider List that does not contain the Estimate column for fees in the Additional Details for Services You Can Shop For and the Additional Details for Services You Cannot Shop For sections of the form.
The title of this new form is 2015 Settlement Service Provider List - No Fees.
To access and print this form in Encompass, click the Print icon from a loan file or Pipeline view, click the Standard Forms tab, and then select General Forms from the Look In dropdown list. Locate the form in the list, and then click Add to move it to the Selected Forms list. Use the buttons at the bottom of the window to print or manage the form.
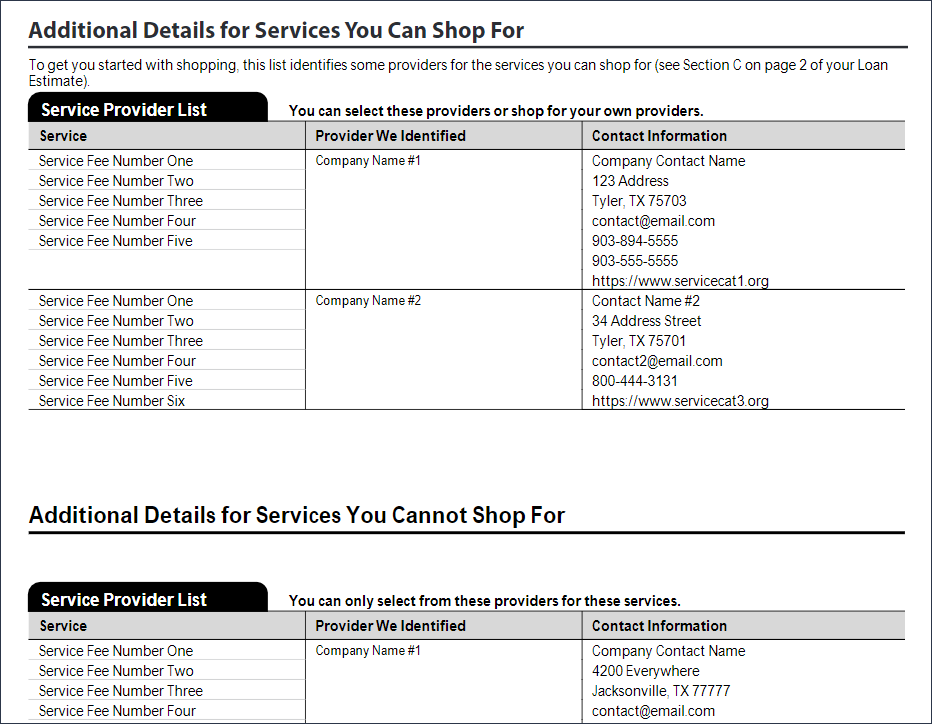
It is important to note that when this version of the form is disclosed, it is currently not tracked by the Disclosure Tracking tool automatically. If you opt to use this form and include it in a disclosure, you will need to manually create a disclosure tracking entry in the tool to track its disclosure details. The Disclosure Tracking tool will be updated to include this version of the form in a future release.
Updates to State-Specific Forms
Why we made these updates: Updates were made to the State-Specific Disclosure Information input form for various states to comply with state regulations for disclosure information, and options no longer supported by Freddie Mac have been removed from the Freddie Mac Offering Identifier dropdown list.
The following new checkboxes have been added to the Banker Application Disclosure and Fee Agreement section of the State-Specific Disclosure Information input form for New York to enable Encompass users to indicate whether payment will be received from or paid to third parties for assignment of commitments.
-
Will pay to third party for assignment of commitment (field ID DISCLOSURE.X1206)
-
Will receive form third party for assignment of commitment (field ID DISCLOSURE.X1207)
Selecting one or both of these checkboxes on the input form selects the appropriate options on page 2 or the output form.
-
I understand that you routinely assign the commitments you have issued in your own name to a third party or parties. The amount of any fee you will __ Pay To __ Receive From the third party or parties is _____.
CBIZ-18789
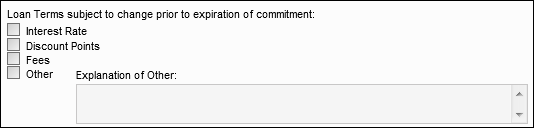
New content has been added to the Commitment Agreement section of the State-Specific Information input form for Wisconsin to disclose loan terms that are subject to change prior to the expiration of the commitment.
This section contains four checkboxes and a free-entry field.
-
Interest Rate (field ID DISCLOSURE.X477) checkbox
-
Discount Points (field ID DISCLOSURE.X481) checkbox
-
Fees (field ID DISCLOSURE.X482) checkbox
-
Other (field ID DISCLOSURE.X483 checkbox
-
Explanation of Other free entry field (field ID DISCLOSURE.X484) displays after the Other checkbox to enable the entry of a detailed description when you select the Other checkbox.
CBIZ-19184
A new Commitment Expiration Date field (field ID DISCLOSURE.X1205) has been added to the State-Specific Information input forms for Kentucky, Maryland, Vermont, Virginia, and Wisconsin to populate the expiration date to the commitment output forms for these states. Previously, the commitment forms were populated with the Mortgage Loan Commitment Expires date (field ID 1072). The creation of the new field avoids any potential conflicts between dates used on the state-specific forms and the dates used on other tools and forms in Encompass.
For loans created prior to upgrading to the Encompass 19.1 release, when a disclosure tracking entry exists, the Mortgage Loan Commitment Expires date (field ID 1072) is copied to the new Commitment Expiration Date (field ID DISCLOSURE.X1205) on the state-specific disclosure information forms listed above.
CBIZ-18034
Encompass Pipeline
Currently in Encompass, when sorting loans by the Last Finished Milestone column, all custom milestones are grouped at the top of the column (in no particular order), followed by standard milestones in ascending or descending alphabetical order. This same sorting result also occurs when sorting by the Next Expected Milestone column.
To enable users to get a more accurate sorting result when custom milestones are in use, two new Pipeline columns are now available: Last Milestone Sorted and Next Milestone Sorted. When sorting by either of these columns, the standard and custom milestones are sorted alphabetically. Custom milestones are intermingled with standard milestones accordingly and no longer grouped at the top of the columns.
Note that the Last Milestone Sorted and Next Milestone Sorted columns are not displayed in the Pipeline by default. To add these columns, right-click a Pipeline column header, select the columns in the Customize Columns window, and then click OK.
NICE-13408
(Added on 1/30/2019)
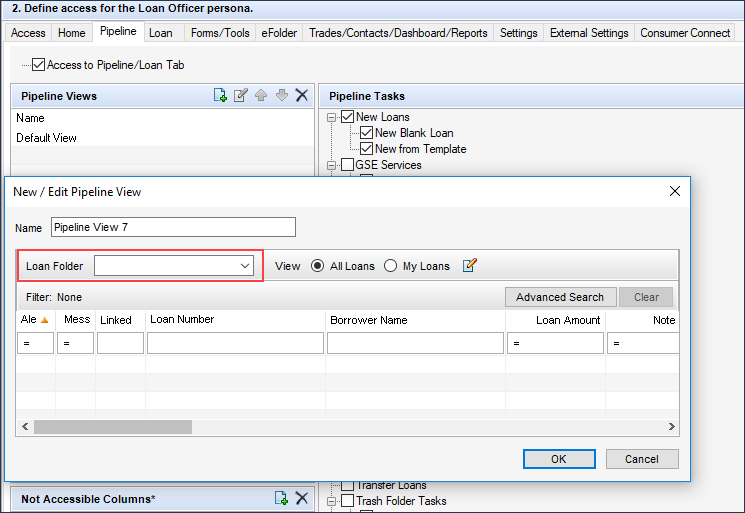
When administrators are configuring a persona, they can set up access permissions for the Pipeline. As part of this configuration, they can create the default Pipeline view that the persona will see when they log into Encompass. As part of this set up, they have the option (but it is not required) to indicate the loan folder that will be used for the default Pipeline View.
In earlier versions of Encompass, if a user was viewing a loan folder in the Pipeline and then they switched to a different Pipeline View where no loan folder was defined by the administrator, the user would see the same loan folder that they were using in the previous Pipeline View. Starting in Encompass 19.1, when a user is viewing one (or more) loan folders in the Pipeline and then switches to a different Pipeline View where no loan folder was defined by the administrator, the user will now see the loan folder that has been indicated as the Working Folder in the user's user profile (i.e., the User Details screen).
Encompass Settings
(Updated on 1/29/2019)
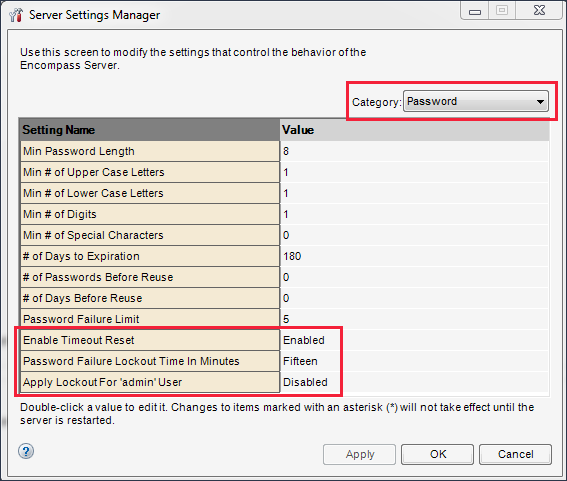
In earlier versions of Encompass, users who fail to enter the correct password when logging into Encompass a certain number of times are locked out of their accounts and must have an administrator reset the account. Starting in Encompass 19.1, administrators can now use new password policies in the Encompass Admin Tools to enable a time-based lock-out period for users (for example, 15 minutes) so that a series of failed log in attempts causes the account to be locked for a set period of time. It will then be automatically unlocked.
In addition, a new policy is also available where administrators can enable a time-based lock-out period for the user who logs into Encompass using the ‘admin’ user ID (i.e., the admin user).
This change does not impact your current password policy settings (even if they are less stringent than above). The validation is done only if you modify your password policy settings. If any of the existing policy requirements do not conform to these guidelines, a warning message will be triggered to notify the administrator that the settings should be more stringent in order to conform to best practices in security and password management and require the administrator to conform to these minimum guidelines. This will ensure that when users change their password after the subsequent expiration date, they set more stringent passwords.
In addition, once you make a change to your password policy (and thus the enforcement of the complexity rules will then be in effect), you need to ensure that all of the user passwords for the Encompass Software Development Kit (SDK) and Encompass Developer Connect API applications are also updated to meet the complexity rules so you can avoid any interruptions with these applications.
To Enable Timeout Reset and Password Failure Lockout Time:
- On your Windows task bar, click the Start menu or Start icon, navigate to the Ellie Mae Encompass program folder, and then click Admin Tools.
- Double-click Settings Manager.
- Select Password from the Category list.
- Double-click the value for the Enable Timeout Reset option, and then select Enabled. (The default value is Disabled.)
- Double-click the value for the Password Failure Lockout Time In Minutes option, and then select the number of minutes that users will be locked out of Encompass after a set number of failed log in attempts. (The number of failed log in attempts is determined by the Password Failure Limit value that has been set.)
- To enable a timeout reset for the user who has been assigned with the admin user ID (i.e., the admin user), double-click the value for the Apply Lockout For ‘admin’ User option, and then select Enabled. (The default value is Disabled.)
- The Password Failure Lockout Time In Minutes value set in step 5 will now also be applied to the admin user.
Failed log in attempts that occur during the time the user is locked out are now recorded in the System Audit Trail. All failed log in attempts will continue to be recorded in the System Audit Trail as in earlier versions of Encompass.
(Added on 12/20/2018)
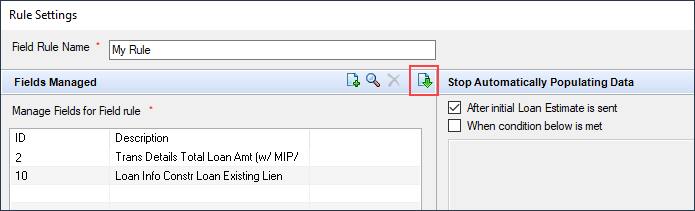
Using the Dynamic Data Management > Field Rules setting, administrators and authorized users can manage the auto-population of data for standard Encompass fields. The field rule is driven by a collection of fields chosen by the administrator or user. They can choose the fields they want for a field rule by entering the field IDs, or by importing from a Data Template or a .CSV file having field and field values. Starting in Encompass 19.1, access to the data templates that can be imported for a Field Rule is controlled by the following two settings:
- Encompass Settings > Company/User Setup > Personas > Settings > Personal Templates > Data Templates
If the administrator or authorized user has been granted persona access to personal data templates, the Import from Data Template icon will be displayed on the Add New Field Rule window and the Rule Settings window is enabled and can be used to initiate the data template import process. If persona access has not been granted, then the icon will not be available for use.
- Encompass Settings > Company/User Setup > User Groups > Loan Templates > Misc. Data Templates
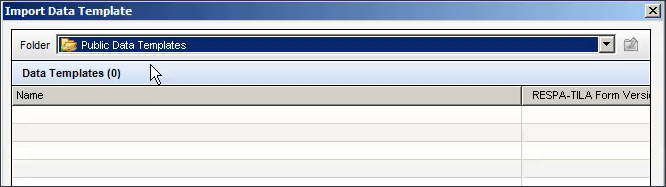
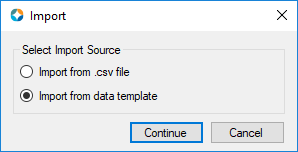
If the administrator or authorized user is not a member of a user group that has been granted access rights to public data templates, the Import from Data Template icon will be enabled on the Add New Field Rule window and the Rule Settings window, and they can select the Import from data template option, however, no public folders or templates from public folders will be displayed. Thus, the administrator or user is prevented from selecting a data template to import.
(Added on 12/20/2018)
Two new fields have been added to the Encompass Reporting Database to enable the Print Internally and Print Externally options for Post-Closing conditions in the eFolder to be reportable:
- PostCondition.PrintInternally
- PostCondition.PrintExternally
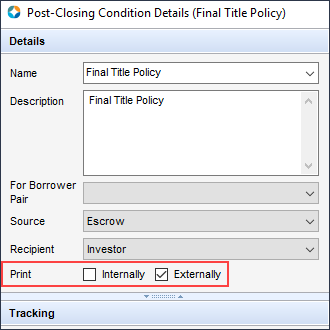

NICE-12002
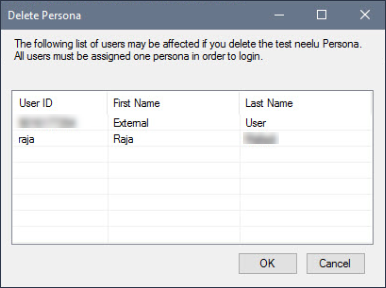
For administrators or other authorized users who go into the Personas tool and want to delete a specific persona type, the following warning message is now displayed after the user selects the persona to delete, and then clicks the Delete icon:
The following list of users may be affected if you delete the [persona type] Persona. All users must be assigned one persona in order to login.
All users who are assigned with the persona that is being deleted will be listed in the pop-up window. Please note that users listed here may also be assigned with additional personas besides the one being deleted.
Previously, the warning message provided on this pop-up window was as follows:
The following list of users have only the [persona type] persona. If you delete the [persona type] persona, remember to assign those users a new persona. Otherwise, they will not be able to login.
The message on the pop-up window has been updated to remove the statement that the persona being deleted is the only persona that is assigned to the users listed in the window.
The users in the list are assigned with the persona that is being deleted, but they may be assigned with additional personas, and they may be impacted if this is the only persona that is assigned to them. If users in the list are already assigned with a different persona, they will still be able to log into Encompass, even if the persona type in question is deleted. It is recommended that the administrator review each user in the list and confirm that they will still have a persona assigned to them if they proceed to delete the persona from the tool.
Two new options have been added to the Personas tool to enable administrators or other authorized users to grant persona access to the Freddie Mac CAC and Fannie Mae UCD Transfer options on the Encompass Pipeline menu.
The Freddie Mac CAC (Correspondent Assignment Center) integration in Encompass enables correspondent lenders to share loan data and documents with aggregators.
The Fannie Mae UCD Transfer solution in Encompass enables correspondent lenders to transfer UCD (Uniform Closing Dataset) data to an aggregator. The aggregators can then use the UCD collection solution to retrieve the UCD data.
To grant access to these options, navigate to Encompass Settings > Company/User Setup > Personas. Select a persona in the left panel, click the Pipeline tab, and then select the Freddie Mac CAC option and/or the Fannie Mae UCD Transfer option. User assigned with this persona will then be able to access these options from the Encompass Pipeline menu.
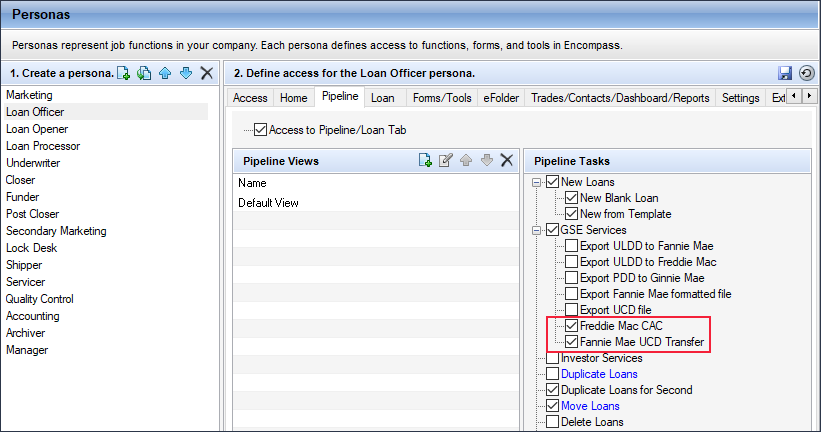
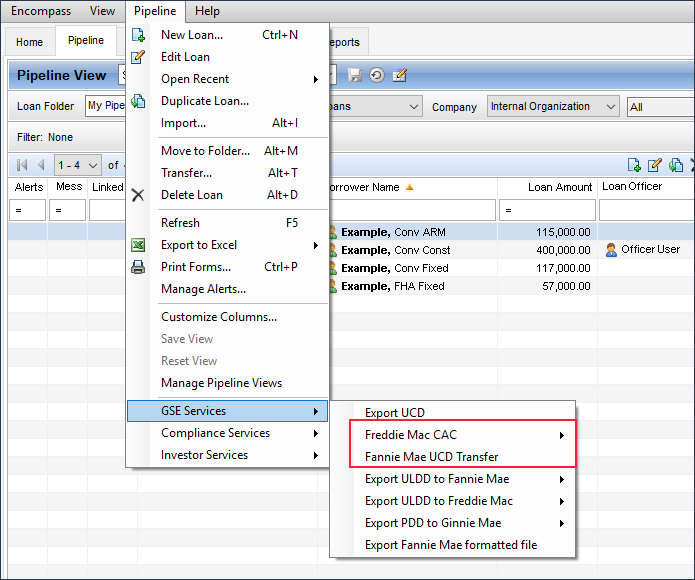
Please note that both of these Encompass Pipeline options were introduced in earlier versions of Encompass. At that time, if administrators wanted to grant persona access to these options, they would select the GSE Services option in the Personas tool. Personas with this option selected could then access both of these options on the Encompass Pipeline menu. If this option was not selected, the persona could not access either of these options. Now that these two new Personas options are available starting in Encompass 19.1, administrators must select one or both of these options in order to grant persona access to one or both of these Pipeline options.
(Added on 12/20/2018)
Starting in Encompass 19.1, a new Request Loan Estimate condition option is now provided for administrators when managing the following business rules:
- Persona Access to Loan Actions
- Loan Action Completion
- Field Data Entry
- Field Triggers
- Persona Access to Fields
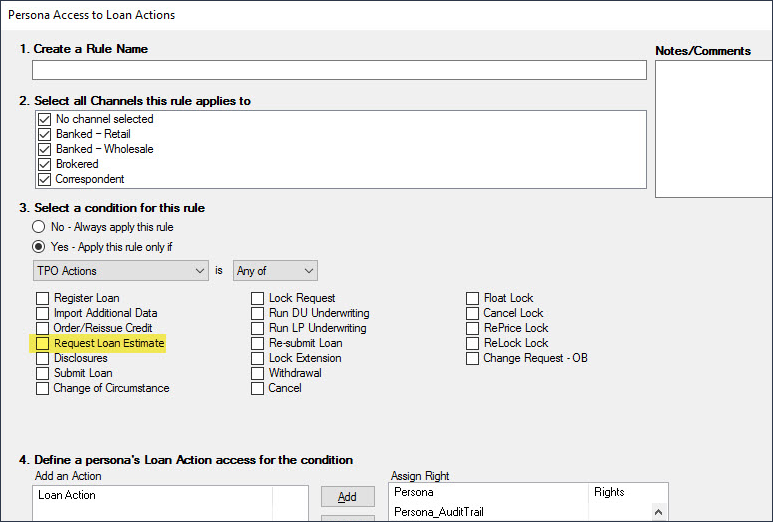
When managing these business rules, after selecting TPO Actions as a condition for the rule, administrators can now select Request Loan Estimate to manage this Encompass TPO Connect loan action. Administrators can write rules around who can access this action, when the action will be enabled in loans, and prerequisites that must be met before users can complete this action, and more.
You must create TPO document containers and TPO tasks in the eFolder before creating a Loan Action Completion rule. The Persona Access to Loan Actions rule is used to define persona-based access levels for Encompass TPO Connect site actions only.
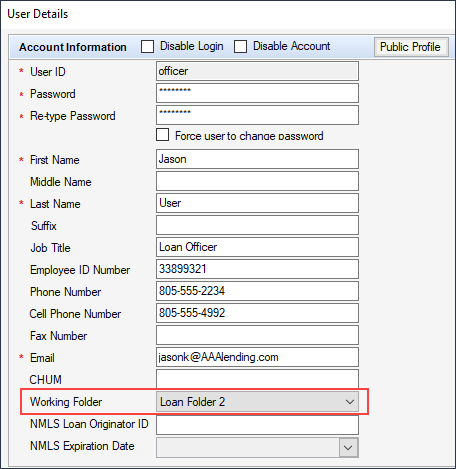
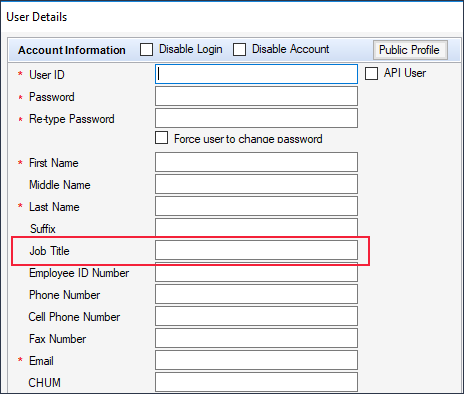
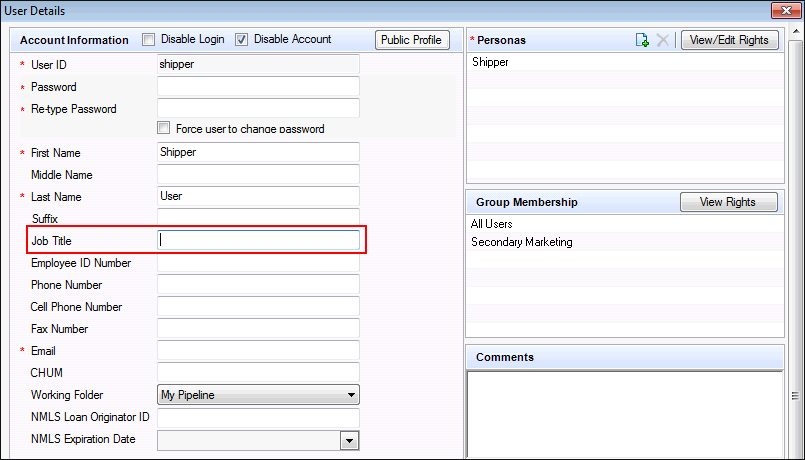
New 'Job Title' Field
A new Job Title field is now provided on the User Details screen that administrators use to create and edit users in Encompass. When using the Company/User Setup > Organization/Users setting to set up users, the new Job Title field is now provided where administrators can enter the user’s job title. This title is for informational purposes only and does not impact the user’s access to Encompass features or Persona settings.
In addition, a Job Title field is also being added to the following screens in Encompass:
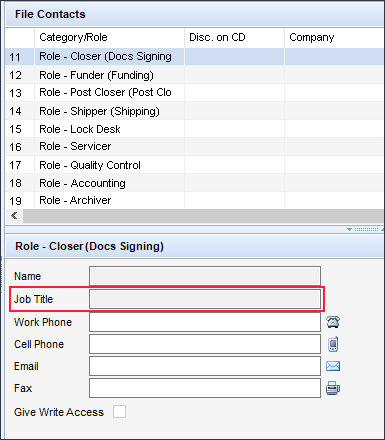
- In the File Contacts tool, a new Job Title field is provided for all of the categories/roles listed in the tool starting with the File Starter file contact up to, and including, the Title Insurance Company file contact (except for the Lender file contact). If a user’s job title has been entered in the Job Title field on the User Details screen, that title will automatically be populated to the Job Title field in the File Contacts tool when that user is assigned as a file contact.
Note that when importing a business contact into the File Contacts tool by clicking the Address Book icon and selecting a contact, the Job Title value from the User Details screen will not be imported into the Job Title field for the Appraiser, Escrow Company, and Title Insurance Company file contacts. Once imported, users can enter the title in the Job Title field for these file contacts.
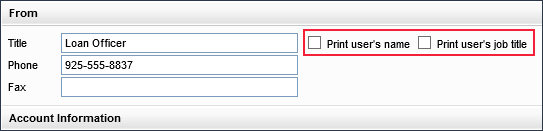
- A new Print user’s job title checkbox is now provided in the From section of the VOD, VOE, VOL, VOM, and VOR input forms. Users can select this checkbox to print the user’s job title (as entered on the User Details screen) to the Verification output form. In previous versions of Encompass, a Print user’s name as title checkbox was provided in this From section on these Verification input forms. This checkbox has been re-purposed to Print user’s name. When this checkbox is selected, the user’s first and last name will be printed to the Verification output form. Note that if a user selects a checkbox here, but a user name or job title is not entered in the User Details screen, the Title field on the Verification input form will be blanked out accordingly.
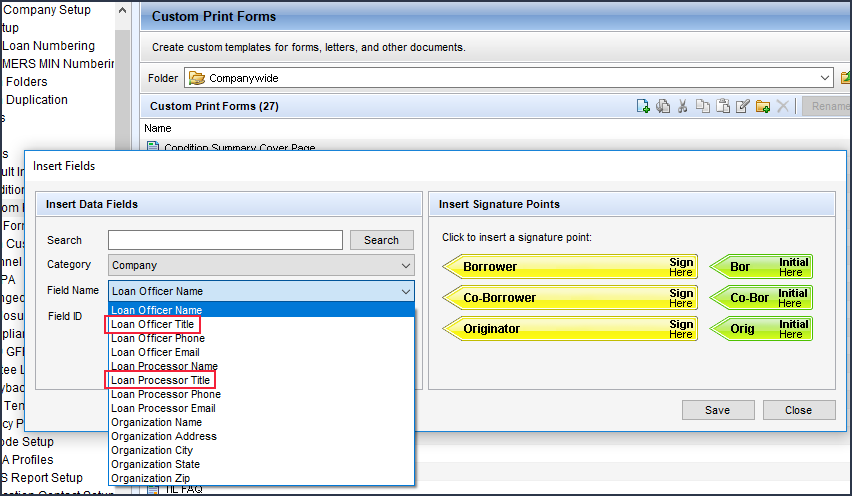
- In the Custom Print Form Settings, the following new fields are now available to be added to custom forms:
- In the Category field for ‘Company’: Loan Officer Title, Loan Processor Title
- In the Category field for ‘Loan Team Member’: Current Loan Team Member Title, Previous Loan Team Member Title, Loan Team Member Title
These new fields are now available on the Team Members tab in the Reporting Database as well. Administrators can select these fields on the Team Members tab and then add them to the Reporting Database as needed.
- The new Job Title field is also exposed in the Encompass SDK so that SDK developers have the ability to reference the Job Title field in forms, reports, and other areas in Encompass via the SDK.
In the Encompass 18.4 release, the Title/Department field in the TPO Global Lender Contacts setting and the Company Details Lender Contact tab extracted the first 30 characters of the Comments field in the User Details setting as the user’s job title or department. From this release on, the Title/Department field will use the new Job Title field in the User Details setting for the user’s job title or department.
The Job Title is a required field if you are managing lender contacts for the Encompass TPO Connect Lender Key Contacts widget.
To Access the User Details Setting:
- On the menu bar, click Encompass, and then click Settings.
- On the left panel, click Company/User Setup, and then click Organization/Users.
- In the Organization panel, locate the organization under which the user is located.
- In the Enabled Users panel, select the user you want to edit.
-
Click the Edit
 icon to access the user’s User Details screen.
Additional Functionality for Lender Key Contacts
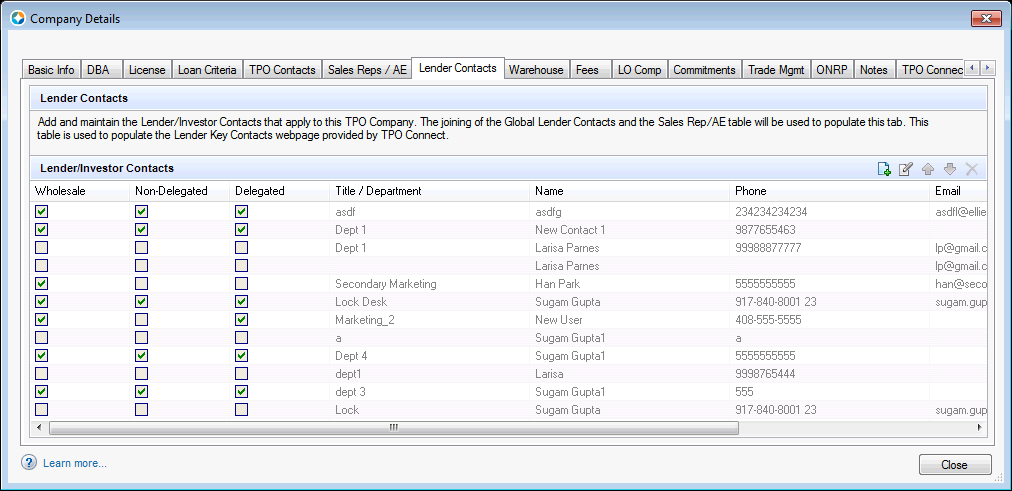
Why we made these updates: To provide additional functionality to the TPO Global Lender Contacts setting and the Company Details Lender Contacts tab.
In the Encompass 18.4 release, a new Lender Contacts tab was added to the Company Details setting. In this release, the ability to add, edit, and delete contacts that are not contained in the TPO Global Lender Contacts setting or the Company Details Sales Reps/AE tab has been added to the Lender Contacts tab.
Detailed Procedures
 icon.
icon.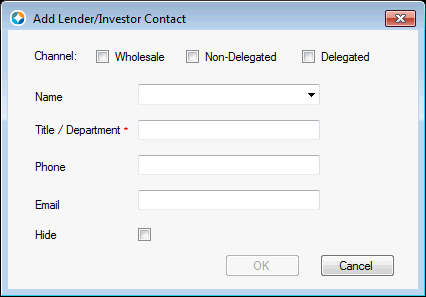
 icon.
icon. and Down
  arrows.
Support for Price Groups by Channel
Why we made these updates: To enable price groups for Wholesale and Correspondent channels to be applied separately for TPO companies for clients using Optimal Blue (OB) as their product and pricing provider.
(Updated on 12/4/2018)
Currently, price groups for different channels can be applied to a TPO company for clients using any product and pricing provider, but only OB has implemented this setting. In this release, three new Price Group fields have been added to enable multiple price groups to be applied to a TPO company.
These new price groups can only be applied if the corresponding channels have been enabled.
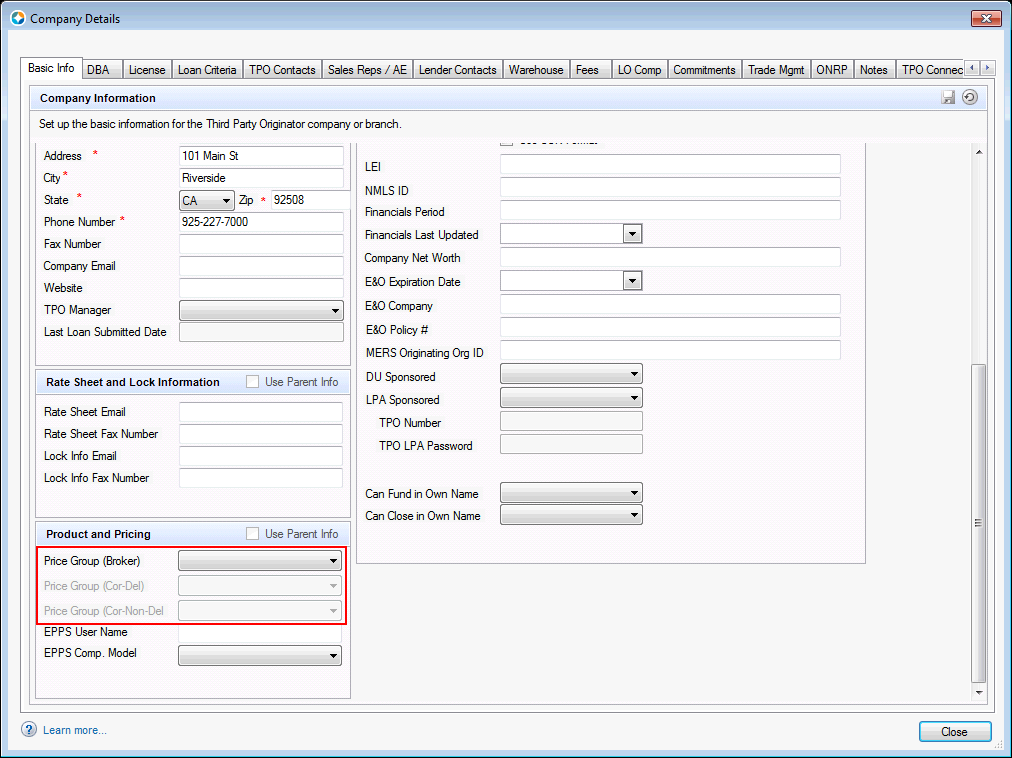
- Price Group (Broker) (field ID EPPSPriceGroupBroker)
- Price Group (Cor-Del) (field ID EPPSPriceGroupDel)
- Price Group (Cor-Non-Del) (field ID EPPS PriceGroupNonDel)
From each channel’s Price Group dropdown list, the Encompass admin can select from the available price groups.
The available price groups are managed in the TPO Settings.
These new fields have also been added to the Reporting Database.
To Access the Company Details Basic Info Tab:
- On the menu bar, click Encompass, and then click Settings.
- On the left panel, click External Company Setup, and then click Company Details.
- In the Company/Branches panel, click Third Party Originator, and then select a TPO company.
- The Company Details screen opens to the Basic Info tab.
Additional Updates to the External Company Setup Company Details Tab
(Updated on 12/19/2018)
To enable Encompass administrators (Encompass admins) to control whether TPO brokers can manage fees or request a Loan Estimate (LE) and initial disclosures (Disclosures), a new Generate Disclosures field has been added to the Company Details Basic Info tab.
This functionality will be available in Encompass TPO Connect in a future release.

From the field’s dropdown list, the Encompass admin can select whether to “Disable Fee Management” (default selection) for their brokers or enable them to “Request LE & Disclosures”.
To Access the Company Details Basic Info Tab:
- On the menu bar, click Encompass, and then click Settings.
- On the left panel, click External Company Setup, and then click Company Details.
- In the Company/Branches panel, click Third Party Originator, and then select a TPO company.
- The Company Details screen opens to the Basic Info tab.
(Updated on 1/2/2019)
To support the upcoming implementation of Multi-Factor Authentication for Encompass TPO Connect websites, a new Multi-Factor Authentication checkbox has been added to the Company Details Basic Info tab. In addition, the Disable Login checkbox has been moved from the Company Details header to the Organization section.
This functionality will be available in Encompass TPO Connect in a future release.
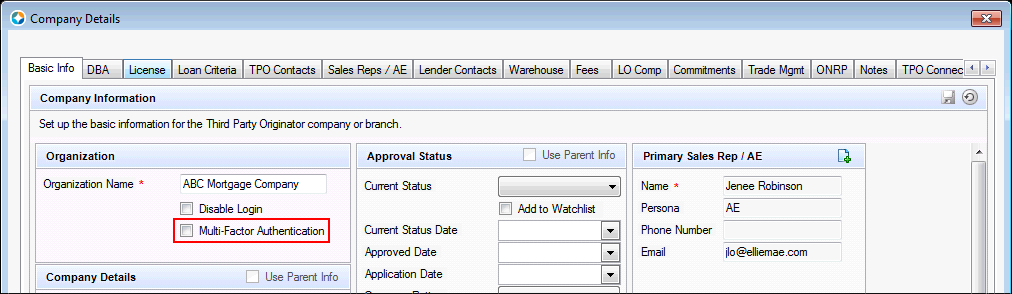
By default, the Multi-Factor Authentication checkbox is not selected. An Encompass admin must select the checkbox to require multi-factor authentication for their Encompass TPO Connect sites.
To Access the Company Details Basic Info Tab:
- On the menu bar, click Encompass, and then click Settings.
- On the left panel, click External Company Setup, and then click Company Details.
- In the Company/Branches panel, click Third Party Originator, and then select a TPO company.
- The Company Details screen opens to the Basic Info tab.
Update for Encompass Consumer Connect
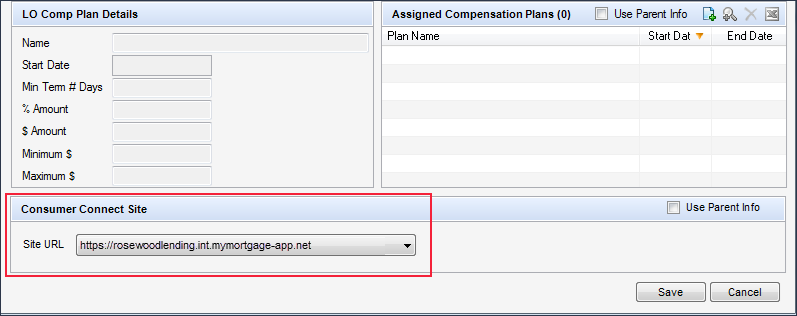
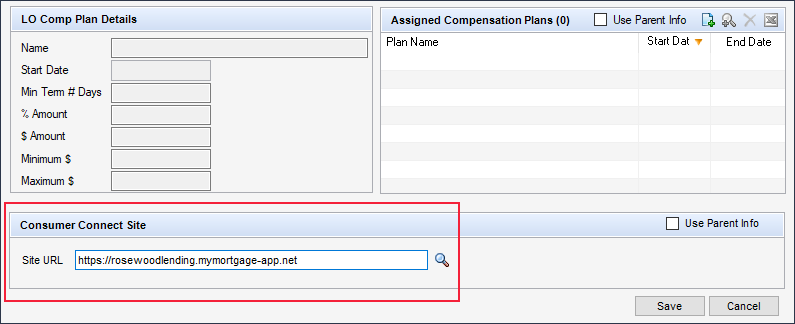
When using the Company/User Setup > Organization/Users setting to set up organizations and users in Encompass, there is a Consumer Connect Site section provided on the Organization Details and User Details screen where administrators can indicate the Encompass Consumer Connect site URL that is assigned to the organization or user. This is the site from which authorized members of the organization and authorized users can access and receive loan applications. In addition, they can send and receive loan documents using this site. In earlier versions of Encompass, administrators would utilize the dropdown list in the Site URL field and select the URL to assign to the organization or user. Starting in Encompass 19.1, the dropdown list is no longer provided. Instead, the administrator will now enter the URL of the site they want to assign in the Site URL field, and then click the Search icon (magnifying glass). Encompass Consumer Connect site URLs that match the URL entered by the administrator (either exact matches or partial matches) are listed in the new Consumer Connect Site URL pop-up window. There the administrator can search for additional sites or select a site to assign to the organization or user.
- Note that the new Consumer Connect Site URL pop-up window will not display if the user enters a partial URL in the Site URL field, and then clicks the Search icon, and the system returns only one search result or the system identifies an exact match for the URL that you are searching for. For these scenarios, the complete URL will be populated to the Site URL field on the User Details window. For all other scenarios, the new Consumer Connect Site URL pop-up window will display and there you can select a URL from the list provided or conduct a new search.
Earlier versions of Encompass:
In Encompass 19.1:
Please note, if the Use Parent Info checkbox is selected, the site URL assigned to their organization will be automatically entered in the Site URL field for the user. The field will not be editable and the Search icon will be disabled.
Title and Closing
To track the receipt and acceptance of events generated through the Encompass Title and Closing Center, the following new fields have been added to Encompass. All of the fields are date-and-time stamped and are reportable fields that can be added to the Encompass Reporting Database.
| Field Description | Field Name |
|---|---|
| Appraisal Order Sent |
AP.WF.EVNT.APODRSENT |
|
Appraisal Order Accepted |
AP.WF.EVNT.APODRACCP |
| Appraiser Sent Doc(s) for Review |
AP.WF.EVNT.DOCREVIEW |
| Appraiser Sent Data for Review | AP.WF.EVNT.DATAREVIEW |
| Title/Closing Agent Sent Doc(s) for Review | CL.WF.EVNT.DOCREVIEW |
| Title/Closing Agent Sent Data for Review |
CL.WF.EVNT.DATAREVIEW |
CBIZ-14909
Encompass Software Development Kit (SDK)
The Encompass SDK has been updated to support the new Price Group fields. Users should be able to apply a unique price group for each of the following:
- Price Group (Broker)
- Price Group (Cor-Del)
- Price Group (Cor-Non-Del)
If the SDK uses a price group that is not defined, an error will be returned calling for a defined price group.
For clients using a version of Encompass prior to 19.1, no error will be returned.
Additional Updates
(Updated on 12/27/2018)
For new installations of the Encompass Smart Client, ExpertPDF version 12 is now included in the installation package. ExpertPDF.is a .NET library that is used by Encompass to convert HTML to PDF documents. This upgraded version of ExpertPDF helps ensure that PDF files in the eFolder can be exported, converted, and managed without issue. Please note that for existing Encompass systems that are upgraded to Encompass 19.1, ExpertPDF version 12 will also be included with the upgrade.