This feature is not available in Encompass Broker Edition.
View the "Creating and Using Business Rules" Quick Reference Guide
Use the Field Data Entry tool to define and manage rules that control the
values entered into the fields on input forms. You can specify a condition
for applying the rule, required values for the field, and pre-required
fields that must be completed first.
For example, you can create a field data entry rule based on a specified loan program. You can then specify that the value for the borrower's credit score falls within a specified range.
Note: You can also create rules that define the fields that must be completed before a form button is activated. For example, you can specify the fields required prior to requesting a lock.
You can also export Field Data Entry business rules, one at a time, from an Encompass environment, save them onto your computer and then import the business rule into another Encompass environment. All Field Data Entry business rules can be exported and then imported, irrespective of their Status.
For business rule imports, if the imported rule is new, its Status will display as Inactive, by default. If the imported rule updates an existing rule in the target Encompass instance, its Status will be the same as that of the business rule being replaced.
Field Data Entry rules cannot overwrite a dropdown field or editable dropdown field.
To Create a Field Rule:
-
On the menu bar, click Encompass, and then click Settings.
-
On the left panel, click Business Rules, and then click Field Data Entry.
-
On the Field Data Entry tool, click the New icon.
 Create a Rule Name
Select all Channels this rule applies to
Note: The channel for each loan is specified on the Borrower Summary form.
Is there a condition for this rule
-
Select
No to always apply the rule.
-
Or, select Yes
to create a condition for when the rule is applied.
-
Select a category for
the condition, such as Loan Purpose.
-
Select a value for
the category, such as Purchase.
-
If you select Current Role for the category, you can configure the rule to only be applied when a specific role is assigned to finish a specific milestone. After selecting Current Role, click the Lookup icon (magnifying glass), and then select the specific role. Then select the specific milestone from the dropdown list.
Note: If you select the Advanced Conditions option, you can create expressions to define custom conditions.
Click the Find icon to select filters for the Advanced Conditions option or, for detailed instructions on how to create your own code, refer to the "Advanced Coding for Business Rules" document.
Select filters for the Advanced Conditions option
-
Select Advanced Conditions as the category condition, and then click the Find icon on the right.
-
Click the New icon to add a new filter.
Note: If you have existing filters, the New icon places the new filter at the bottom of the list. Select an existing filter and then click the Insert button to insert a new filter above the selected filter.
-
On the Add/Edit Search Filter window:
-
Type a Field to add as a filter.
-
Or, click the Find icon, select a field from the list, and click OK.
-
Or, click the Find icon, type one or more characters in the Find field and then click Find. The first occurrence of the characters in any column are found. Continue clicking Find to view additional occurrences. Select a field from the list, and click OK.
-
Select an Operator, enter (or select) a Value, and then click OK.
-
Click OK.
-
Repeat steps 2 through 5 to add more filters.
-
To use parentheses to control the order in which multiple filters are evaluated, click Parentheses, select the filters to group, click the New icon, and click OK.
-
Use the AND/OR button to determine how search filters are used together.
-
When finished, click OK.
Add and apply field
rules
-
Click Add.
-
On
the Field Rule window, type the Field ID that the Value and Pre-Required
Fields rules will apply to.
-
Or,
click Find to select the
field from an input form.
-
Select a form from the list on the left, right-click to select the field the rule will apply to, and then click OK.
-
Click
the Value Rule tab, and select
a Rule Type.
-
Range
- Type values for the Minimum and/or Maximum allowed values.
-
Dropdown
List - Click New, type the Dropdown
Option, and then click OK. Add
additional dropdown options as needed.
-
Editable
Dropdown List - Click New, type
the Dropdown Option, and then click OK.
Add additional dropdown options as needed.
-
Advanced Coding - (Available only if the rule is defined as having no conditions.) Enter code to define the valid field values. For detailed instructions on how to create your own code, refer to the "Advanced Coding for Business Rules" document.
Even though the Dropdown List and Editable Dropdown List options are provided for the Rule Type, Field Data Entry rules will not overwrite a dropdown field or editable dropdown field.
-
Click
the Pre-Required Fields tab.
-
Click Add, type
the field IDs of the fields that must be completed, and then click Add.
-
Or, click Find, select forms from the list on
the left, right-click to select the pre-required fields,
and then click OK.
Note: To select all fields on a form, click Select All. If needed, you can then right-click fields that you want to deselect.
-
When finished, click OK.
Add and apply button rules
-
On the Field Rule window, click Add.
-
On
the next Field Rule window, click Find.
-
Select a form from the list on the left, right-click to select the button the rule will apply to, and then click OK.
-
Click the Pre-Required Fields tab.
-
Click Add, type
the field IDs of the fields that must be completed, and click Add.
-
Or, click Find, select forms from the list on
the left, right-click to select the pre-required fields,
and then click OK.
Note: To select all fields on a form, click Select All. If needed, you can then right-click fields that you want to deselect.
-
When finished, click OK.
- In the Notes/Comments field, type details and helpful notes about the rule as needed.
- When finished, click Save.
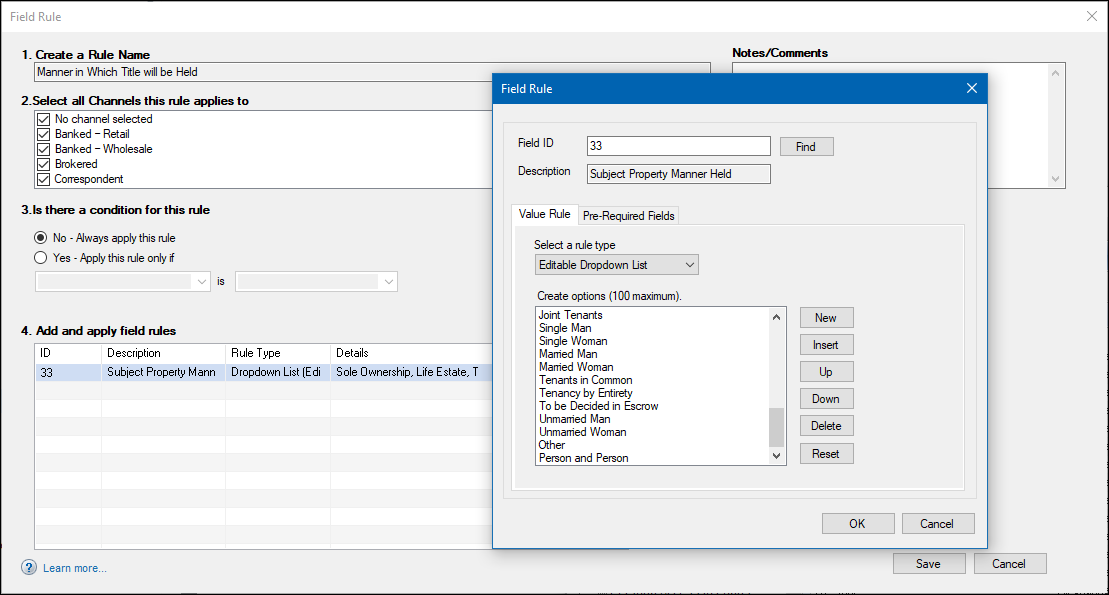
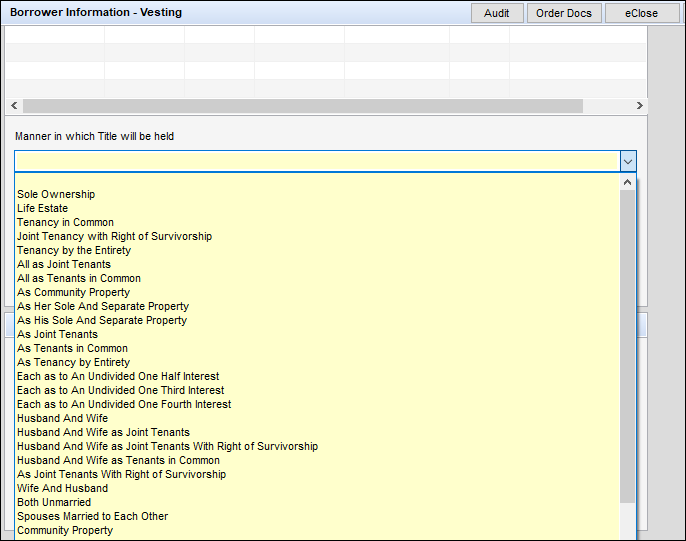
Preconfigured Manner in Which Title will be Held Rule
A preconfigured rule called Manner in Which Title will be Held is provided out of the box. This rule is intended to be applied to the Manner in which Title will be held editable drop-down field (field ID 33) on the Borrower Information - Vesting input form. Administrators can use this rule to modify the enumerations that display in this drop-down list and specify specific enumerations they want to display on the input form.
This preconfigured rule can only be applied to field 33. When managing the enumerations, click the Reset button to return the list to the default list of enumerations provided by Encompass as needed.
To create custom business rules for Manner in which Title will be held to include additional fields, you can deactivate this preconfigured rule, and then create a new custom rule using field 33