User Groups

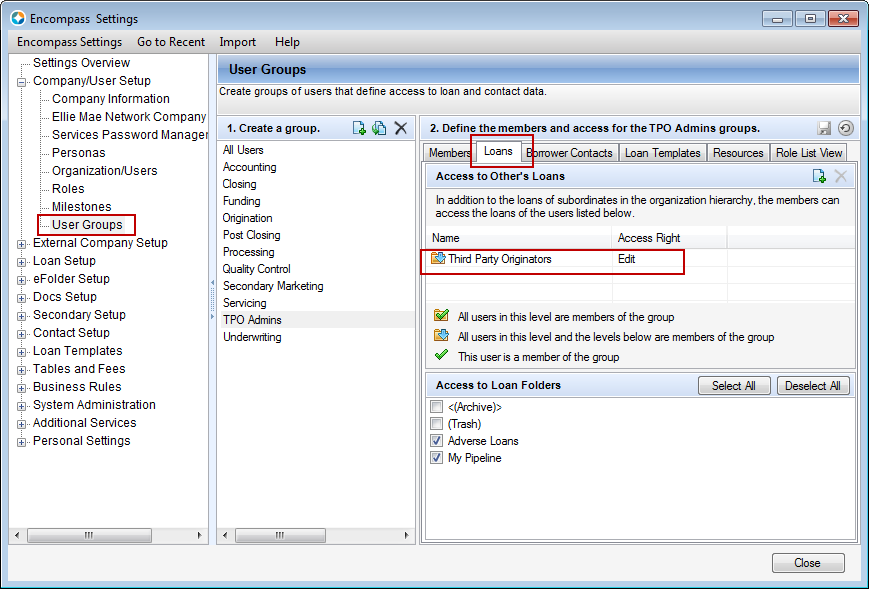
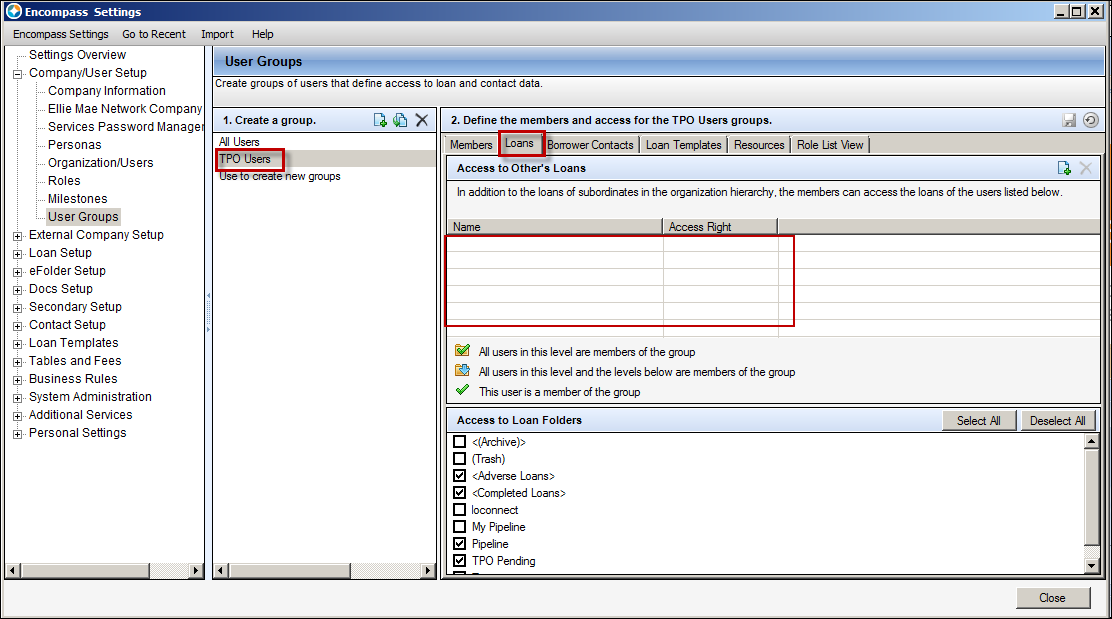
Use the User Groups tool to create groups of users that define access to loan and contact data.

Note: The All Users group is the default group that contains all of your users. You cannot delete or modify the members. You can however edit the access settings.

ClosedBest Practices and Guidelines

  • Use the All Users group to grant the minimum access that you want all users to have.

  • Create user groups to grant additional access specific to the needs of each group. For example, you could create a user group for a specific state that grants access to templates and forms used only in that state.

  • If access conflicts occur between user groups, members are granted the greatest access. For example, a user could be a member of the All Users group and a group called Branch 1. If the Branch 1 group grants access to a loan folder called "B1" (which is not granted by the All Users group), members of the Branch 1 group will be able to access the "B1" loan folder.

  • If access conflicts occur within a user group, the most specific access will take precedence. For example, if you set Edit as the Access Right to all loan programs in the Companywide Loan Program folder, but then set View Only as the Access Right to one of the individual loan programs, the access to the individual loan program will be View Only.

  • When you are presented with an option to set an Access Right, (on the Loans, Loan Templates, and Resources tabs) select Edit only for users who will create and maintain the item, such as Loan Programs, or Closing Costs templates.

  • If your company is using Encompass TPO Connect, do not add TPO administrators to the Loans tab of a user group. Doing so could give third party originators access to loans outside of their assigned organization. Refer to the Loans section below for more information.

Create a User Group

  1. On the menu bar, click Encompass, and then click Settings.

  2. On the left panel, click Company/User Setup, and then click User Groups.

  3. On the User Groups screen, click the New icon.

  4. Type a Group Name, and then click OK.

  5. Specify group members and group members' access to loan files, features, and tools, as described below.

  6. When finished, click the Save icon.

Define Group Members and Access to Data

ClosedMembers

Use the Members tab to maintain the list of members in the user group. 

  1. Click the Members tab, and then click the New icon to open the User Group Configuration window.

  2. Open the organization hierarchy to the users and organizations you want to add to the user group.

  3. Add individual users or all users in an organization as follows.

    • Individual user - Select the user, and then click the Add to Group - this level/user only icon at the upper-right of the screen.

    • Individual organization and its users -  Select an organization folder, and then click the Add to Group - this level/user only icon at the upper-right of the screen.

    • Anorganization and its users, and all organizations and users below it in the hierarchy - Select an organization folder, and then click the Add to Group - this level and below icon in the upper-right of the screen.

  4. Click OK to add the selections to the user group.

ClosedLoans

Use the Loans tab to define access to other user's loans (in addition to the access designated in each user's profile) and loan folders.

  1. Click the Loans tab, and then click the New icon.

  2. On the User Group Configuration window, open the organization hierarchy to the users and/or organization folders whose loans you want to grant access to.

  3. Select individual users and/or all users in organizations as follows.

    • Individual user - Select the user, and then click the Add to Group - this level/user only icon at the upper-right of the screen.

    • Individual organization and its users -  Select an organization folder, and then click the Add to Group - this level/user only icon on the upper-right of the screen.

    • An organization and its users, and all organizations and users below it in the hierarchy - Select an organization folder, and then click the Add to Group - this level and below icon in the upper-right of the screen.

  4. Click OK to add the selections to the user group.

  5. On the Access to Other's Loans list, select a name or organization, click the associated Access Right field, and then select View Only or Edit from the list.

  6. In the Access to Loan Folders section, select the loan folders that members of the user group can access.

ClosedImportant Note for Encompass TPO Connect Users

If your company is using Encompass TPO Connect, do not add TPO originators to the Loans tab of a user group. Doing so could give third party originators access to loans outside of their assigned organization.

User Groups only apply to Encompass users assigned with an internal persona. If a TPO Admin user group currently exists in the User Groups tool, delete it.

When you add a TPO entity (an organization or user) to the Members tab of a user group, it is a member of that group. Notice that when you click the New icon to add an entity there, the Third Party Originators folder is displayed in the User Group Configuration list, which you can expand to see all TPO organizations and all the individual users under each organization. If you want to add all TPOs to the group, then you can right-click the Third Party Originators folder, and then click Add this and children to the group in the menu. Or you can add specific organizations or specific users. When you add an organization, what you are doing effectively is adding all the users of that organization, and all the users of any sub-organizations to the group. Once a user is a member of a group, then that group will automatically appear in the user’s Settings screen ( External Company Setup > Company Details > select a company > select a user). Every TPO user must be a member of a group. Any user that is not a member of any group will not be able to see any loans in Encompass TPO Connect.

On the Loans tab, when you click the New icon to add an entity here, the Third Party Originators folder is again displayed, just like it was when adding entities to the Members tab. Here you can add any TPO entity. Once you add an entity here, then every group member (every entity in the Members tab ) will be able to access that entity’s loans in Encompass TPO Connect. For example, if you added an organization called Acme Company to the Loans tab, then every TPO that is listed in the Members tab will be able to see the Acme Company loans in Encompass TPO Connect.

Typically, clients who use Encompass TPO Connect will add the entire Third Party Originators folder to their Members tab, so that all the TPOs will be able to see their own loans (and optionally other loans in their own organization, if they have team loan view/edit access set up in their settings). This means that if any entity is then added to the Loans tab, all the TPOs in the system will be able to see the loans for that entity. Clearly, you would not want TPOs from one company being able to view loans originated by other TPO companies.

In some cases, clients may want the members of their top-level TPO company to have access to loans from other TPO companies. For example, they might have created multiple TPO "companies" in the hierarchy that belong to the same company and want them to have cross-organization loan access- in which case they’ll configure user group settings accordingly.

Finally, use the Access to Loan Folders section of the Loans tab to determine organization and user access to loans in a particular folder. If a particular loan folder is not selected here, then the group members (in the Members tab ) will not be able to view any loans in that folder.

Be sure to use caution when adding entities to the Loans tab so that you do not inadvertently grant more or less access to certain entities than you intended.

Here is an example of what NOT to do:

Again, each TPO entity must be part of a user group, otherwise the TPO entity will not have access to its own loans in Encompass TPO Connect. Typically you would achieve this by creating one default group with the full Third Party Originators hierarchy tree (and/or folder) added in the Members tab.

However, you do not want to add this same Third Party Originators hierarchy tree (and/or folder) to the Loans tab and inadvertently give third party originators access to loans outside of their assigned organization.

ClosedBorrower Contacts

Use the Borrower Contacts tab to set the access to the borrower contacts owned by members of this group, and to set access by members of the group to other user's contacts.

  1. Click the Borrower Contacts tab.

  2. Select the checkbox to make borrower contacts created by members of this group public accessible to the group members' superiors in the organization hierarchy.

    • Select View Only or Edit to set the Access Right to the public borrower contacts.
  3. To allow group members to access the borrower contacts of other users in the organization, click the New icon.

     Group members do not automatically gain access to each other's borrower contacts. Add group members to this list to grant access to their borrower contacts.

  4. On the User Group Configuration window, open the organization hierarchy to the users and/or organization folders whose contacts you want to grant access to.

  5. Select individual users and/or all users in organizations as follows.

    • Individual user - Select the user, and then click the Add to Group - this level/user only icon at the upper-right of the screen.

    • Individual organization and its users -  Select an organization folder, and then click the Add to Group - this level/user only icon at the upper-right of the screen.

    • An organization and its users, and all organizations and users below it in the hierarchy - Select an organization folder, and then click the Add to Group - this level and below icon in the upper-right of the screen.

  6. Click OK to add the selections to the user group.

  7. On the Access to Other User's Borrower Contacts list, select a name or organization, click the associated Access Right field, and then select View Only or Edit.

    If a conflict is created between the Public checkbox (access by group members' superiors) and the settings for access to other user's contacts, the greater access (Edit) will take precedence.

ClosedLoan Templates

Use the Loan Templates tab to define access to public loan templates.

  1. Click the Loan Templates tab.

  2. Click the New icon next to one of the categories of templates.

  3. On the User Group Configuration window, open the folder hierarchy to the templates and/or folders you want to grant access to.

  4. Select individual templates and/or all templates in a folder as follows.

    • Individual templates - Select the template, and then click the Add to Group - this level/user only icon at the upper right of the screen.

    • Template folders and their templates -  Select a folder, and then click the Add to Group - this level and below icon at the upper-right of the screen.

  5. Click OK to add the selections to the user group.

  6. Back on the Loan Templates tab, select one of the listed template names or folders, click the associated Access Right field, and then select View Only or Edit.

ClosedResources

Use the Resources tab to define access to public resources, including print groups, business contacts, and reports.

This Public Resources procedure below covers access definitions for all resource types except Standard Print Forms, Public Business Contact Groups, and Condition Forms. To define access to those resources, refer to the specific procedures below.

ClosedPublic Resources

  1. Click the Resources tab.

  2. Click the New icon next to one of the resource categories.

  3. On the User Group Configuration window, open the folder hierarchy to the resources and/or folders you want grant access to.

  4. Select individual resources and/or all resources in a folder as follows.

    • Individual resources - Select the resource, and then click the Add to Group - this level/user only icon on the upper-right of the screen.

    • Resource folders and their resources -  Select a folder, and then click the Add to Group - this level and below icon on the upper-right of the screen.

  5. Click OK to add the selections to the user group.
  6. Back on the Resources tab, select one of the listed resource names or folders, click the associated Access Right field, and then select View Only or Edit.

ClosedStandard Print Forms

  1. Click the Resources tab.

  2. Click the New icon next to the Standard Print Forms category.

  3. On the Standard Print Forms window, select forms from the All Standard Print Forms list, and then click the right-arrow button to move the forms to the Selected Forms list.

  4. Click OK to add the selections to the user group.

ClosedImportant Note Regarding Access to 1003 Output Form

An issue was introduced with the Encompass 18.1 February Service Pack (18.1.0.4 Server Patch 3) released on February 17, 2018 that resulted in users not being able to print (or preview) the 1003 output form.

This issue impacted only those users who had permission to access individual 1003 pages (based on the forms listed on their assigned User Group’s Resources tab) but not permission to access the 1003 – All Required Pages form options.

To resolve this issue, you must grant the user with permission to access the 1003 – All Required Pages option and the 1003 – All Required Pages (Letter) option. Adding these options enables the user to print both the legal-sized and letter-sized 1003 output form.

To Add the 1003 Form Options:

  1. Click the Resources tab.
  2. Click the New icon in the Standard Print Forms section of the panel.
  3. Click the 1003 – All Required Pages and 1003 – All Required Pages (Letter) options in the All Standard Print Forms list, and then click the right arrow button to move the form options to the Selected Forms list.
  4. Click OK. The 1003 – All Required Pages and 1003 – All Required Page (Letter) form options are added to the Standard Print Forms section (as shown below).
  5. Click the Save icon to save your changes.

ClosedPublic Business Contact Groups

Use the Public Business Contact Groups tool to create the contact groups.

  1. Click the Resources tab.

  2. Click the New icon next to the Public Business Contact Groups category.

  3. On the Public Business Contact Groups window, select groups from the All Public Business Contact Groups list, and then click the right-arrow button to move the groups to the Selected Public Business Contact Groups list.

  4. Click OK to add the selections to the user group.

  5. Back on the Resources tab, select one of the listed groups, click the associated Access Right field, and then select View Only or Edit.

ClosedCondition Forms

  1. Click the Resources tab.

  2. Click the New icon next to the Condition Forms category.

  3. On the Condition Forms window, select letters from the All Condition Forms list, and then click the right-arrow to move the letters to the Selected Forms list.

  4. Click OK to add the selections to the user group.

ClosedRole List View

Use the Role List View tab to define the users that display in selection lists, including those on milestone worksheets, Pipeline searches, and Dashboard views.

  1. Click the Role List View tab.

  2. Select a role for which to define a selection list.

  3. Select one of the three options.

    • All <role name> - All users associated with the role will display in the selection list.

    • <Role name> below in organization hierarchy -  All users associated with the role, and below the user group member in the organization hierarchy, will display in the selection list.

    • Some <Role name> - All users associated with the role, from the specified list of users, will display in the selection list.

  4. If you chose the third option, click the New icon.

  5. On the User Group Configuration window, open the organization hierarchy to the users and/or organizations you want to include in the selection list.

  6. Select individual users and/or all users in organizations as follows.

    • Individual user - Select the user, and then click the Add to Group - this level/user only icon in the upper-right of the screen.

    • Individual organization and its users -  Select an organization folder, and then click Add to Group - this level/user only icon in the upper-right of the screen.

    • Anorganization and its users, and all organizations and users below it in the hierarchy - Select an organization folder, and then click Add to Group - this level and below icon in the upper-right of the screen.

  7. Click OK to add the users to the selection list. Only users who are also associated with the selected role will display in the list.

  8. Repeat steps 2 through 7 to create selection lists for other roles.

Work with User Groups