Admin Tools: Reporting Database
Use the Reporting Database tool to create a database of the loan fields used most often in your reports. When you use the reporting database, the time required to perform a search and return results is greatly reduced.
In Encompass Banker Edition, the reporting database is also used to designate fields for which you want to create an audit trail. Whenever a change is made to one of these fields in a loan file, Encompass creates a record of the change which includes the date, the ID and name of the user who made the change, and the value the field was changed to.
-
On your Windows task bar, click the Start menu or Start icon, navigate to the Ellie Mae Encompass program folder, and then click Admin Tools.
-
Double-click Reporting Database.
-
If you are prompted to log in to the server, type the User ID, Password, and Server that you use to log in to Encompass as the Admin user.
-
-
To add fields to the reporting database, use one of the following methods:
![]() Manually select fields from the Fields section
Manually select fields from the Fields section
-
Select one or more fields from the tabs in the Fields section, and then click Add.
Note: Most of the fields on the Team Members, Milestones, Documents, Conditions, and Post-Conditions tabs will have more than one instance associated with each loan file. For example, if you select the Document Title field, a window will open from which you will select the name of a specific document.
-
To find fields on the Fields tab, type numbers or letters in the Find field. Encompass jumps to the first occurrence in the Field ID, Description, or Type columns. Click Find Next to move to subsequent occurrences.
-
If you know the field ID of one or more fields, click the New icon
 , enter the IDs manually, and then click Add.
-
![]() Import a text file that contains field information
Import a text file that contains field information
Create a text file (*.txt) that contains the required field information and then import the file into the Reporting Database. Or, you can export the fields currently listed in the Selected Fields section to a .txt file, edit the file as needed, and then import the file to the Reporting Database.
-
Click the Export icon.
-
In the Export to field, enter the file path/location where the file will be exported.
-
In the File Name field, type a file name. By default, the file name will be automatically set to Fields-[today’s date].txt.
-
Click OK, then click OK again in the confirmation window.
-
Next, open the text file.
The text file is comma-delimited, with the first line listing each header field in the Selected Fields pane of the Reporting Database (Field ID, Pair, Description, etc.) followed by each field entry that was listed.
-
Edit the file. You can change existing field information, add new field information, or deleted fields.
-
When finished, save the file.
-
Back in the Reporting Database, click the New icon.
-
In the Add Required Fields window, click Import.
-
Any new fields that were added to the text file are added to the bottom of the list in the Selected Fields pane.
-
If an invalid field ID was added in the text file, a warning window displays, listing each invalid field ID. Invalid field IDs are not added to the Selected Fields pane.
-
-
To remove a field, select a field in the Selected Fields section, and then click Remove.
-
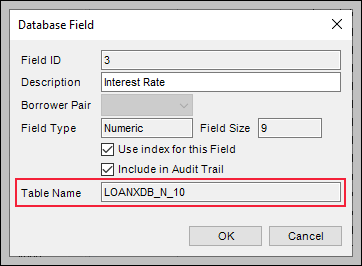
To edit a field, select a field in the Selected Fields section, and then click the Edit icon.
-
Change the field Description and Field Size as needed.
-
Use the Borrower Pair dropdown list to select the co-mortgagor pair to include in the report
-
Select the Use index for this Field checkbox to create an index for that column in the database table. This option cannot be used for fields with more than 1700 characters. If the Field Size is more than 1700, a pop-up message is displayed to alert you to this field size restriction and the Use index for this Field checkbox selection will be automatically cleared.
For fields that you commonly use to filter reports, creating indexes for those fields can reduce report generation time. When you select the Use index for this Field checkbox for a field, the reporting database creates a non-clustered index for the field, which is an index structure separate from the data stored in a table that reorders one or more selected columns. Non-clustered indexes can often help you find data quicker than searching the underlying table. However, indexes also increase the size of the database and can increase the time required to save a loan file. A warning message is provided when you select the Use index for this Field checkbox to remind you not to select this option for too many fields. It is recommended you do not select this option for more than five fields in the same table. You can view the table (Table Name) where the field is located by viewing the field details.
-
Select the Include in Audit Trail checkbox to create an audit trail for this field.
This option is available with Encompass Banker Edition only.
-
Click OK.
-
The Reset button works as a cancel or "undo" function. Click the Reset button to remove the fields that were added to Selected Fields list and return them to the Fields list. Clicking Reset also reverts changes you made to existing fields in the Selected Fields list. (If you click the Update button, the Reset button will not remove any recently added fields from the Selected Fields list or revert any changes. The Update button essentially works as a save function. Therefore, only those fields that you add to the Selected Fields list or modify after logging into the Reporting Database will be removed or reverted if you do not click the Update button beforehand.)
The Review Changes button enables you to review the new fields added to the Selected Fields list and the fields that were already in that list that you modified before clicking the Update button to save your changes and update your database.
-
The list of fields provided in the resulting Preview of Changes window lists the fields added or updated during the current user session (i.e., fields the current user has added or changed after logging into the Reporting Database and prior to clicking the Update button) and the fields added or updated by the current user or other users during their last user session (i.e., fields the current user or other user added or changed the last time they added new or updated fields to the database by clicking the Update button).
-
Refer to the Status column in the Preview of Changes window to identify fields added or updated during the current user session or the previous user session.
-
Fields with the Added status are fields added to the Selected Fields list. They have not been updated/saved to the database yet.
-
Fields with the Modified status are fields that were already in the Selected Fields list and were modified. They have not been updated/saved to the database yet.
-
If the Status column is blank, that indicates the field was added or updated by the current user or another user during the previous user session and they clicked the Update button to add/update these fields to the database.
-
Once you click the Update button, the newly added and modified fields will be updated/saved to the database. If you then click the Review Changes button, a list of fields currently in the Reporting Database is provided. The fields that previously had an Added or Modified status will be updated to a blank status.
-
-
When all selections and changes have been made, click Update to update your database.
-
Click Yes to confirm the update.
-
Click Yes or No when asked if the newly added fields should be made accessible to all personas.
-
When the database has been updated, click Yes to populate the database.
-
Click OK in response to the completion message.
If fields in the Reporting Database exceed the recommended number (1500), a warning message displays each time the administrator opens the Reporting Database, explaining that performance may be affected.