Add a User
To Add a User:
-
On the menu bar, click Encompass, and then click Settings.
-
On the left panel, click Company/User Setup, and then click Organization/Users.
-
In the upper panel, click to select an organization folder to which to add the user. You may need to expand the hierarchy to locate the folder.
-
In the lower panel, click the New icon.
When you add a user to an organization folder, keep in mind that access to other users' loan files depends on the position of the user in the hierarchy.
-
On the User Details window, the Disable Login checkbox is automatically selected if a user exceeds the allowed failed log-in attempts (as specified in the Password Management tool). Clear the checkbox to remove the restriction and allow the user to log in again.
-
Select the Disable account checkbox to deactivate the user's account, prohibiting the user from logging in.
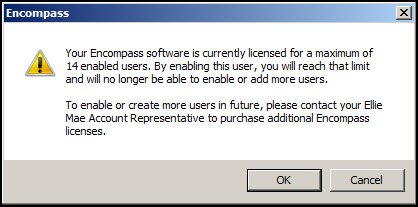
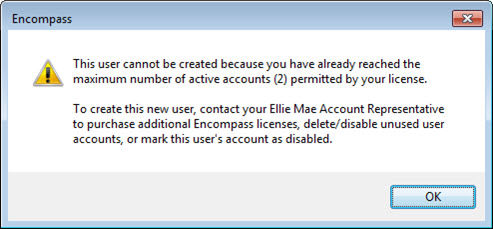
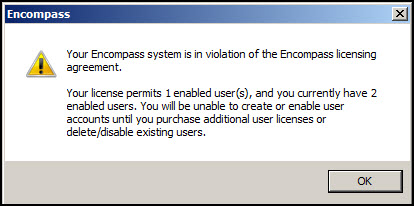
![]() Enabled User Limits Notifications
Enabled User Limits Notifications

-
On the left panel, type a User ID, and then type and re-type the user's password. The password must meet the requirements established in the Settings Manager in the Admin Tools.
- To open the Admin Tools, on your Windows task bar, click the Start menu or Start icon, navigate to the Ellie Mae Encompass program folder, and then click Admin Tools.
- Select the Force user to change password checkbox to force the user to change the password based on the requirements in the Encompass Admin Tools > Settings Manager.
This password setting is not enforced for dedicated user accounts that access Encompass via the Encompass SDK since there is no physical user in place to actually change the password if prompted. To control which dedicated user accounts in your organization can access Encompass via the SDK, it is recommended that you utilize the Disable Login or Disable Account options (discussed above) in the SDK account’s user profile.
- API User checkbox: The purpose of the API User checkbox is to provide Encompass administrators the ability to grant a Supported Encompass Partner access to their company's APIs so they can use them for the integration they are building. This checkbox is intended for use with Supported Encompass Partners only and should not be used for users within your organization. Once the Partner and the Encompass administrator complete the required process (click here), the Partner will be recognized as a Supported Encompass Partner and they will be able to access your company's APIs. The administrator will be able to assign the required privileges to this API user just as they would for any other Encompass user. However, this API user will not be able to log into any Encompass instances via Encompass and can only use the APIs.
-
After selecting the API User checkbox, the Allow Impersonation checkbox is displayed. Select this checkbox to enable other Encompass Partners or other individuals to access your company's APIs by using this Supported Encompass Partner's API user account to call the APIs.
The following workflow outlines the process for a partner to become a Supported Encompass Partner and have access to a Lender's Encompass instance via the APIs:
- Partner requests for an API Key from ICE Mortgage Technology on the ICE Mortgage Technology Partner Portal. For information on how to request for the API Key, see Marketplace API Key.
An active Marketplace Profile is required before requesting API Keys.
- Partner receives the API Key (which consists of an API Client ID and a Client Secret), which the Partner provides to the Lender. The Partner should only share the API Client ID with the Lender, not the Client Secret. The API Client ID is different from the Partner’s assigned Encompass Client ID.
- When the Lender receives the API Client ID, the Lender must create a new user profile for the Partner. The Lender takes the following steps:
- On the Organization/Users page, in the upper panel, click to select an organization folder to which to add the user. You may need to expand the hierarchy to locate the folder.
- In the lower [Enabled Users] panel, click the New icon.
- On the User Details window, in the left panel, type a User ID.
- Select the API User checkbox.
- Type the Partner's API Client ID. This is the API Client ID that has been provided to the Partner by ICE Mortgage Technology. Your company's assigned Encompass Client ID cannot be used here.
The Lender follows the remaining steps in the Add a User process below as applicable. Note that only required fields (denoted with a red asterisk) need to be provided to save this new user.- When adding a new user, the Lender is required to assign a persona to this user. The Lender can assign multiple personas, but at least one of the personas must be set up with permission to access the web version of Encompass in order for this user to access the Lender’s Encompass instance via the APIs.
To enable the web version of Encompass for a persona, in the Personas setting, select the persona, click the Access tab, select Both desktop and web versions of Encompass, and then click the Save icon.
Since the Supported Encompass Partner will be restricted from logging into Encompass, none of the access rights defined in the persona will come into play.
- When adding a new user, the Lender is required to assign a persona to this user. The Lender can assign multiple personas, but at least one of the personas must be set up with permission to access the web version of Encompass in order for this user to access the Lender’s Encompass instance via the APIs.
New users indicated as an "API User" as described here count against the Lender’s enabled user license limits as described above. After your API user has been created, notify the Supported Encompass Partner that the Partner can now access Encompass APIs.
This API User checkbox was introduced in the Encompass 18.1 Major Release.
-
Restricted to SSO Access: This checkbox indicates when the user’s Login Access level is linked to their Organization. When this checkbox is selected, the user must log into Encompass using Single Sign-On credentials with their company's identity service provider (IdP) only. They will not be permitted to log in using their Encompass user name and password credentials. When this checkbox is not selected, the user’s login access level is “Full Access” and users can log into Encompass using their Encompass user name and password credentials OR Single Sign-On credentials with their company's IdP. Refer to the Setting Up SSO in Encompass guide for complete details about setting up SSO and this checkbox.
- Type basic user information
(first name, last name, phone number, cell phone number, fax number, email, and CHUM number).
If this user is loan officer, enter the user's officer's first name, middle name, last name, and suffix for compliance with CFPB regulations.
-
Select the Working Folder that opens the first time the user accesses the Pipeline. For more information, see the Loan Folder Setup topic.
-
If this user will be originating loans, enter their Nationwide Mortgage Licensing System (NMLS) Loan Originator ID (NMLS number).
- If the user is a loan officer, this number is added to Page 3 of the 1003 application when they are assigned to the loan.
-
Optionally, type the expiration date (MM/DD/YYYY) in the NMLS Expiration Date field or click the dropdown arrow and click a date on the calendar.
- When the NMLS number expires, loan team members will not be able to assign loans in that state to the user. If a loan has already been assigned to the user and their NMLS number subsequently expires (or if the user tries to originate a new loan after the expiration date) they will not be able to enter the Subject Property State in the loan file. If the NMLS Expiration Date is left blank, Encompass assumes the NMLS number never expires.
-
If this user will perform loan officer responsibilities, click the Edit icon in the Loan Officer Active Licenses section to specify the states in which the user is licensed to originate loans. For more information, see the Loan Officer Licenses topic.
- To specify the states in which the license is applicable, select the Active checkbox for the state.
- Enter the License # (number), Issue Date, Start Date, and End Date license information. To enter data, click the row in the column and enter data in the text box provided.
- The Issue Date is the date the license is issued to the loan officer.
- The Start Date is the date that the loan officer’s license becomes associated with the company and they can start taking loan applications on behalf of the company. In most states this is referred to as the Sponsorship Date (not required in all states). Note that even if a loan officer has been issued a valid license, in many cases they can’t legally represent a new company until their license sponsorship transfers to their new employer.
- To specify an expiration date, type the expiration date (MM/DD/YYYY) or click the dropdown arrow and click a date on the calendar in the End Date column.
- When a state license expires, loan team members will not be able to assign loans in that state to the loan officer. If a loan has already been assigned to the loan officer and their license subsequently expires (or if the loan officer tries to originate a new loan after their license expires) they will not be able to enter the Subject Property State in the loan file. If the End Date field is left blank, Encompass assumes the license never expires.
- To enter the license status, click the row in the Status column, and then select an option from the dropdown list provided.
- To specify the Status Date (date that the status is in effect) and the Last Checked date (date that the status was last reviewed), type the status and/or last checked date (MM/DD/YYYY) or click the dropdown arrow and click a date on the calendar in the End Date and/or Last Checked column.
-
Click the New icon in the Personas section to assign one or more personas to the user. The persona controls the features and tasks available to the user.
- In the Persona Selection window, select personas to assign to the user and then click OK.
- Click View/Edit Rights to view the specific persona settings for the user, based on the combined rights of the assigned personas. If a user is assigned multiple personas, the greater rights are given to the user. You can also edit the rights granted by the assigned personas to meet the user's specific requirements.
-
The Group Membership list contains the user groups that the user is a member of.
- Click View Rights to view the user's specific access rights, based on the combined access of the listed user groups.
-
In the Access to Subordinates' Loans section:
- Select the Access to all loans in the same level checkbox to grant access to all loans in the same level of the organization hierarchy. Then indicate if the access is View Only or Edit.
- Select the second checkbox to allow the user to edit subordinates' loans.
-
In the Assigned Compensation Plans section:
-
Once you have created and activated a compensation plan, you can assign the plan to different loan officers. Click the New icon.
-
In the LO Compensation Plans window, click the compensation plan to apply to the loan officer.
While you can assign a compensation plan to an individual loan officer, you can also assign a compensation plan to a company or branch. With a company or branch compensation plan in place, you can then select the Use Parent Info checkbox to assign the company or branch plan to a loan officer. If you select this checkbox without first assigning a plan to the company or branch, you will receive a warning message stating that there is currently no plan to assign, but any plans that are assigned to the company or branch in the future will then be applied to the loan officer.
-
In the Details section, you can change the Start Date of the plan if necessary. By default, Encompass sets the Start Date to one day after the compensation plan was assigned to the loan officer (i.e., the "next day").
-
If there are no other plans assigned to the user, and if the Start Date occurs today (i.e., on the “current day”) or on any other day prior to today, it cannot be changed. This helps ensure the accuracy of originator compensation audit reports.
-
If the plan has not started yet, you can change the Start Date to today or any day going forward from today.
-
If another plan is already in effect, the new plan must start the next day to ensure that two plans are not being applied to the originator on the same day.
The Earliest Change Date is calculated based on the Start Date and Minimum Term # Days fields. After the plan is activated (i.e., when the plan is started), if you try to assign a new compensation plan before the minimum term of days is reached, a warning message displays indicating that the start date for the new plan occurs prior to the "earliest change date" (i.e., prior to the minimum term of days being reached). You can then continue to add a plan or cancel the operation. After the Earliest Change Date is reached, the warning message will no longer be triggered.
-
When finished, click Select.
- The compensation plan is now listed in the Assigned Compensation Plans section. Click the plan to view its details in the LO Comp Plan section. You can change the Start Date of the plan if necessary. However, if the current Start Date occurs in the past, it cannot be changed.
-
After you assign a plan, you may assign additional plans as needed. If you assign a plan with a start date that occurs prior to the Minimum Term # Days (i.e., the earliest change date), a warning message displays that states that you are assigning a plan prior to the earliest change date. You can cancel this operation or proceed with adding the plan. The end date for the current plan will be updated to one day prior to the start date of the second plan you just added.
-
-
If this user utilizes Encompass Consumer Connect websites, type the URL of the site you want to assign to the organization in the Site URL field, and then click the Search icon (magnifying glass). Encompass Consumer Connect site URLs that match the URL that you enter (either exact matches or partial matches) are listed in the Consumer Connect Site URL pop-up window. There you can search for additional sites or select a site to assign to the organization. This search option was introduced in Encompass 19.1.
-
Note that the Consumer Connect Site URL pop-up window will not display if you enter a partial URL in the Site URL field, and then click the Search icon, and the system returns only one search result or the system identifies an exact match for the URL that you are searching for. For these scenarios, the complete URL will be populated to the Site URL field. For all other scenarios, the Consumer Connect Site URL pop-up window will display and there you can select a URL from the list provided or conduct a new search.
-
Alternatively, select the Use Parent Info checkbox to populate the URL for the Encompass Consumer Connect site associated with the parent organization to this field.
-
If an Encompass Consumer Connect site is deleted, loan officers assigned to that site must be reassigned to an active Encompass Consumer Connect site. Otherwise, the borrower will see a 404: Site Not Found message after clicking the link in the notification email they receive from their loan officer.
-
Click Save.
Before requesting for an API Key, you need to:
- Create a Marketplace Activity (either system-generated on the Partner Portal, or manually added). See Create a Marketplace Activity.
- Update the following fields on the Marketplace Activity Details page:
- Marketplace Activity Status must be Registered, which requires the following entries:
- Deal Amount
- Billing Frequency
- Close Date
- Marketplace Activity Status must be Registered, which requires the following entries:
For more information, see Marketplace by ICE Mortgage Technology Guide.
- On your ICE Mortgage Technology Partner Portal home page, click the Register a Deal button.
- In the New Marketplace Activity: Partner window, enter your deal details and then click Save.
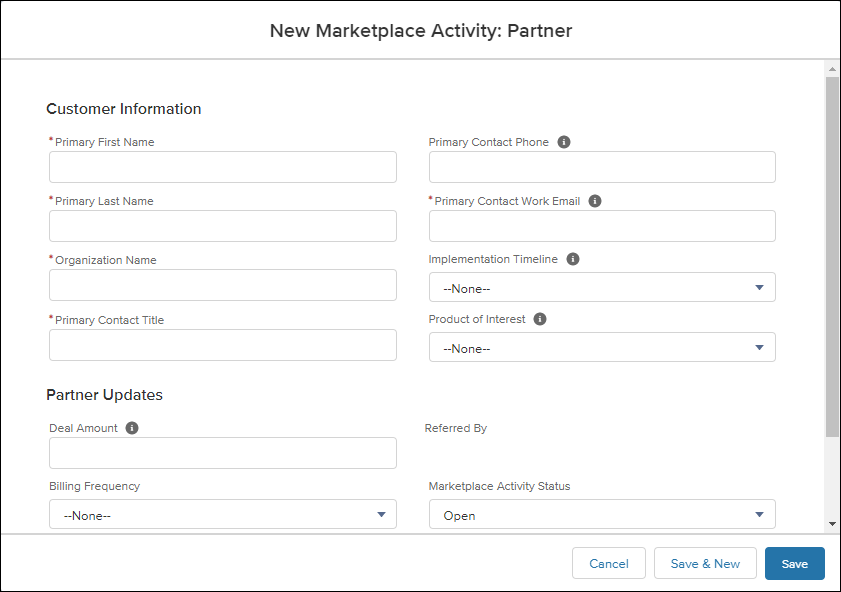
Mandatory fields are indicated with red asterisks (*).
- If you have entered incorrect information, notifications will display, and you will not be able to save the lead record. Fields with missing data will also be highlighted in red.
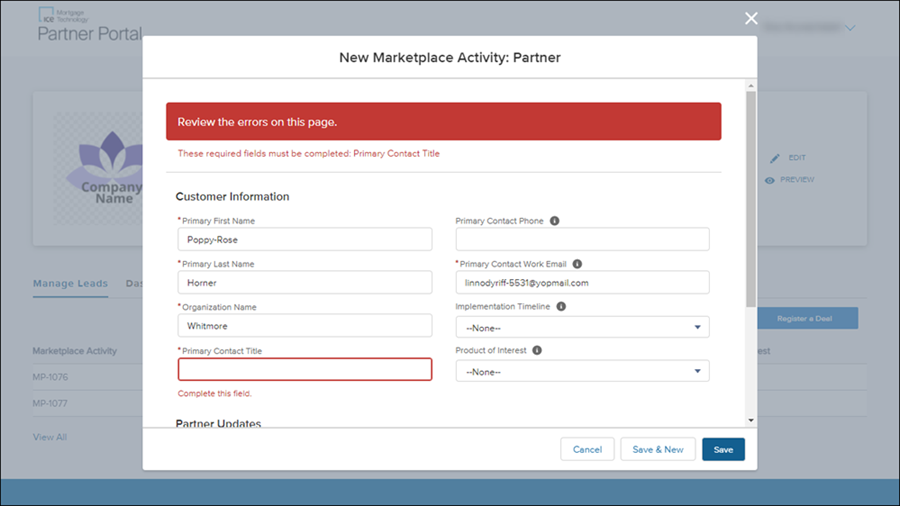
- Update the data.
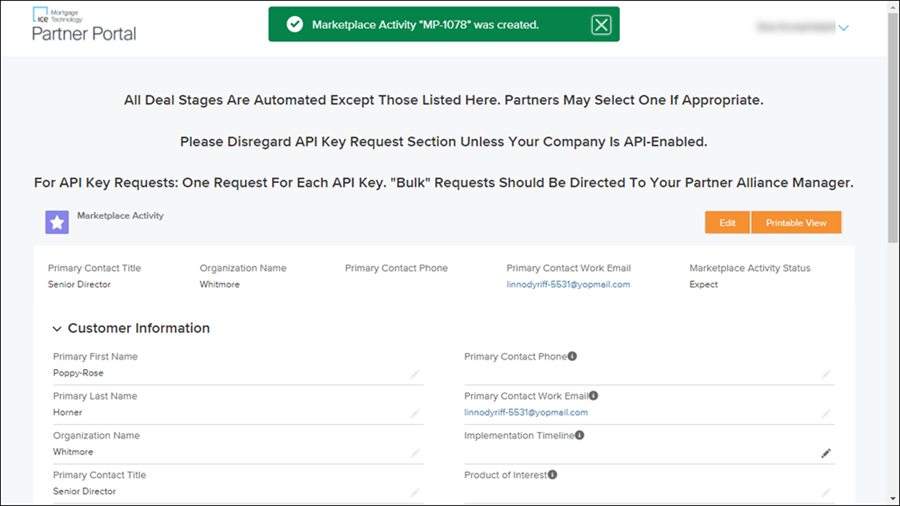
- Click Save to return to the Marketplace Activity details page.
- A confirmation message will display when the record is successfully saved. You can close the message or wait for it to stop displaying after 5 seconds.
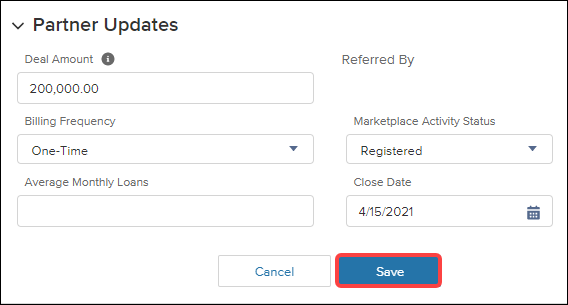
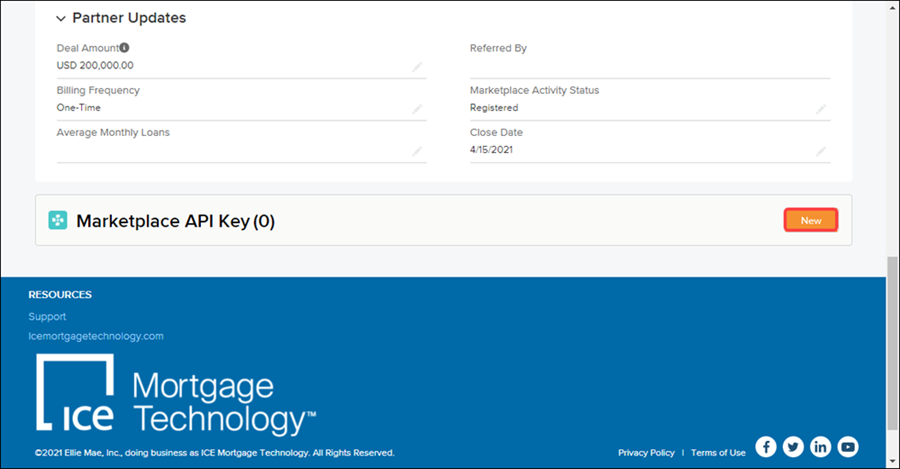
- Scroll to the bottom of your Marketplace Activity page.
- In the Partner Updates panel, use the Edit icons to enter information in the following mandatory fields:
- Marketplace Activity Status must be Registered, which requires the following entries:
- Deal Amount
- Billing Frequency
- Close Date
- Marketplace Activity Status must be Registered, which requires the following entries:

- Click the Save button.
- In the Marketplace API Key panel, click the New button.
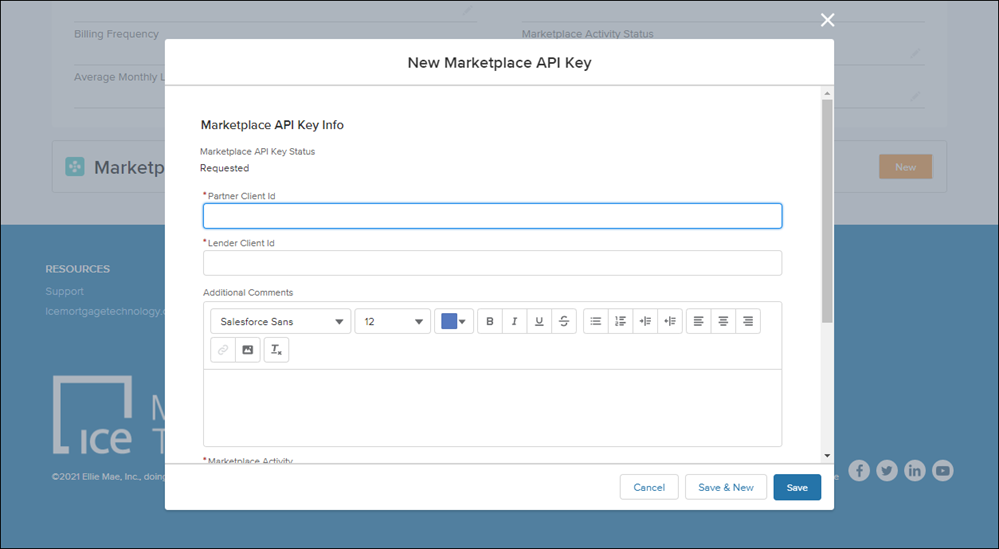
- In the New Marketplace API Key window, enter information in the mandatory fields, and click the Save button.
For the Client ID fields, type the last 8 digits of the ID without prefixes. For example, if the Client ID is TEBE12345678, type 12345678 only.
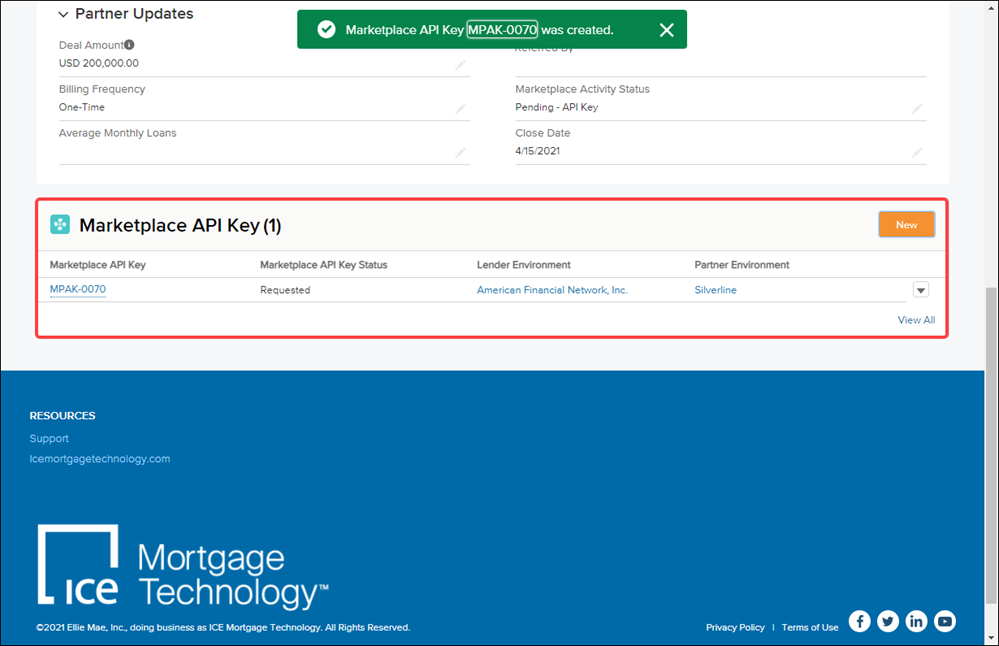
- A confirmation message displays when the API key is created. You can close the message or wait for it to stop displaying after 5 seconds.
The Marketplace API Key panel updates with the details of the created API.
The Marketplace API Key panel updates with the details of the created API.
For more information, see Marketplace by ICE Mortgage Technology Guide.
To Add a User:
-
On the menu bar, click Encompass, and then click Settings.
-
On the left panel, click Company/User Setup, and then click Organizations/Users.
-
In the upper panel, click to select an organization folder to which to add the user. You may need to expand the hierarchy to locate the folder.
-
In the lower panel, click the New icon.
When you add a user to an organization folder, keep in mind that access to other users' loan files depends on the position of the user in the hierarchy.
-
Select the Disable account checkbox to deactivate the user's account, prohibiting the user from logging in.
-
On the left panel, type a User ID, and then type and re-type the user's password. The password must meet the requirements established in the Settings Manager in the Admin Tools.
-
To open the Admin Tools, on your Windows task bar, click the Start menu or Start icon, navigate to the Ellie Mae Encompass program folder, and then click Admin Tools.
-
-
Select the Force user to change password checkbox to force the user to change the password based on the requirements in the Encompass Admin Tools > Settings Manager.
-
Type basic user information (first name, last name, phone number, cell phone number, fax number, email, and CHUM number).
If this user is loan officer, enter the user's officer's first name, middle name, last name, and suffix for compliance with CFPB regulations.
-
Select the Working Folder that opens the first time the user accesses the Pipeline. For more information, see the Loan Folder Setup topic.
-
If this user will be originating loans, enter their Nationwide Mortgage Licensing System (NMLS) Loan Originator ID (NMLS number).
-
If the user is a loan officer, this number is added to Page 3 of the 1003 application when they are assigned to the loan.
-
-
Optionally, type the expiration date (MM/DD/YYYY) in the NMLS Expiration Date field or click the dropdown arrow and click a date on the calendar.
-
When the NMLS number expires, loan team members will not be able to assign loans in that state to the user. If a loan has already been assigned to the user and their NMLS number subsequently expires (or if the user tries to originate a new loan after the expiration date) they will not be able to enter the Subject Property State in the loan file. If the NMLS Expiration Date is left blank, Encompass assumes the NMLS number never expires.
-
-
If the user will perform loan officer responsibilities, click the Edit icon in the Loan Officer Active Licenses section to specify the states in which the user is licensed to originate loans. For more information, see the Loan Officer Licenses topic.
-
To specify the states in which the license is applicable, select the Active checkbox for the state.
-
Enter the license number and other license information. To enter data in a license table column (or to select a value to populate to a column from the dropdown list or calendars provided), double-click the desired cell in the column. A text entry field, dropdown list, or date field will display.
-
-
Click the New icon in the Personas section to assign one or more personas to the user. The persona controls the features and tasks available to the user.
-
In the Persona Selection window, select personas to assign to the user and then click OK.
-
Click View/Edit Rights to view the specific persona settings for the user, based on the combined rights of the assigned personas. If a user is assigned multiple personas, the greater rights are given to the user. You can also edit the rights granted by the assigned personas to meet the user's specific requirements.
-
-
The Group Membership list contains the user groups that the user is a member of.
-
Click View Rights to view the user's specific access rights, based on the combined access of the listed user groups.
-
-
In the Access to Subordinates' Loans section:
-
Select the first checkbox to Access to all loans in the same level of the organization hierarchy. Then indicate if the access is View Only or Edit.
-
Select the second checkbox to allow the user to edit subordinates' loans.
-
-
Click Save.
 Field Help
Access to Subordinates' Loans
The user's default ability to edit loan files assigned to users at lower levels in the organization hierarchy, and to edit/view loan files assigned to users at the same level in the organization hierarchy.
See Also:
Loan Officer License Enforcement
Work with LO Compensation Plans
Assigning an LO Compensation Plan to an Organization
Assigning an LO Compensation Plan to a Lender or Broker
Encompass Consumer Connect Help Site