Send Initial Disclosures
Use the eDisclosures feature to generate initial disclosures and send them to your borrowers. In Encompass, "initial disclosures" are called "eDisclosures".
When the disclosures are sent, your borrowers are notified by email that disclosure documents are available in the Consumer Connect Borrower Portal. Borrowers can print and then return the documents by fax (using the provided fax cover sheet) or by mail, or they can provide an electronic signature and you can then retrieve the documents from the Loan Connect website.
Your Encompass administrator determines whether you can select your own packages or whether the packages are automatically selected for you. Authorized users can also reorganize, add or remove documents from the package. The documents in the package are based on the selected plan code, as well as loan-specific information (for example, the state in which the subject property is located).
For more detailed information about the eDisclosure feature and initial disclosures, see the Encompass online help.
To Generate Initial Disclosures
-
In the eFolder, click the Documents tab, and then click the eDisclosures button.
-
Select a borrower (or borrowers) from the For Borrower Pair list.
-
If you are allowed to select eDisclosure packages, the Select a Package Type section displays. Select one or more packages, and select the check boxes if you need to include the GFE, TIL, or Loan Estimate.
-
Click to select a plan code, and then click Order eDisclosures.
-
Only plan codes that match the current loan data are listed. To view all plan codes, click the Clear Filter button.
-
You can perform a search by typing data into a field above a plan code column or by selecting an option from a column's drop-down list. Only plan codes containing the specified data are displayed.
-
Click a column header to sort all plan codes in ascending or descending order based on the information in a column.
-
To add a plan code to the list, click the New icon, select an investor, and then select the plan code to add. To view a plan code's details, including the values that will be added to the loan file if selected, select the plan code, and then click the View Plan Code Details icon. For detailed instructions about working with plan codes, view the eDisclosure Plan Codes help topic.
-
For loans using the 2010 forms (i.e., loans started before October 3, 2015), if the loan file’s GFE Date (field ID 3170) is blank, a warning message displays. As stated in the message, if you click Yes, the GFE Date will be auto-populated with the current date (“today’s date”) and you can proceed to generate the eDisclosure package. If you click No, the GFE Date is left blank and you will not be able to generate an eDisclosure package until a date is supplied.
-
-
If any values in the loan file are different from the corresponding values in the selected plan code, the Plan Code Conflict window displays showing the affected fields. Conflicting loan data is identified by an alert icon.
-
Click the Import Plan Data button to overwrite the current loan data with the selected plan code data. These changes are applied to the loan immediately.
-
Click Skip Import to proceed without overwriting the loan file.
-
Click Cancel to close the Plan Code Conflict window without making any changes to the loan data. You can then update the applicable fields in the loan file to resolve any conflicts that were found.
-
-
If the Disclosures Audit window opens with a list of required issues, warnings, or recommended updates (typically due to inconsistent data), click the link in the Go to Field column to open a form with the field highlighted for data entry.
If a virtual field is included in audit results, a hyperlink will not be provided.
-
Correct the described issue, and then return to the Disclosures Audit window. Click Refresh Audit to update the Data Audit Results list.
-
You must resolve all required errors before generating initial disclosures.
-
After you update a field, the issues that are resolved are highlighted in yellow in the Disclosures Audit window.
-
Select the Always show this window on top check box to always display the Disclosure Audit window on top of all other Encompass windows.
-
Repeat steps 6-7 to correct any remaining issues.
-
Click Order eDisclosures.
-
A message displays if no packages are available based on the selection process configured by your administrator.
-
-
When the Select Documents window displays, the initial disclosures are listed in the order configured in the Stacking Template by your administrator.
-
Documents highlighted in yellow are documents that are not included in the Stacking Template, but are still intended to be sent in the eDisclosure package.
-
When an eDisclosure document package has been ordered and is then redrawn, the list of returned documents on the Select Documents window displays a Modified since last draw icon next to each document that has changed since the initial order. Users can view the list to identify changed documents to print or send instead of printing or sending the entire package. Additionally, a Removed since last draw icon displays next to documents that were included in the initial draw, but are no longer required.
-
To use a different template, select an option from the Stacking Template drop-down list.
-
To move a document up or down in the list, click to select the document and then use the up or down arrows to move the document.
-
Or, click to select a document, and then drag it to the desired location in the list.
If your administrator has not given you permission to move documents up or down in the list or to update the template, the up and down arrows and the Update Template button will not be visible.
-
- To update the selected template for all loans going forward, click the Update Template button, and then add, remove, or reorganize the documents as needed. For detailed instructions for updating the Stacking Template, view the eDisclosure Stacking Templates help topic in the Encompass online help.
-
-
Clear the check box of any document you do not want to include in the eDisclosure package.
The Signature Type column indicates whether a document is eSignable (can be signed electronically), Wet Sign Only (a paper copy must be signed and returned by mail or fax), or Informational (no signature required).
-
Click Add Additional Docs to select additional forms to add to the package.
If your administrator has not given you permission to add or remove forms from the package, the selection check boxes and the Add Additional Docs button will not be visible.
-
Address any Data Overflow alerts (if applicable).
-
To add one or more document to the Documents tab in the eFolder, select the documents, and then click Add to eFolder.
-
To preview or print the documents in the package:
-
Click Preview to view, and optionally print, the selected documents.
-
Click Print, and then click Print Selected Documents to print the selected documents.
-
Click Print, and then click Print Checklist to print an eDisclosure Documents Checklist that lists each document in the package for your reference.
-
-
Click Send to open the Send eDisclosures window.
To Send the Initial Disclosure Package:
-
Complete the To Generate Initial Disclosures section above.
The Send eDisclosure window appears.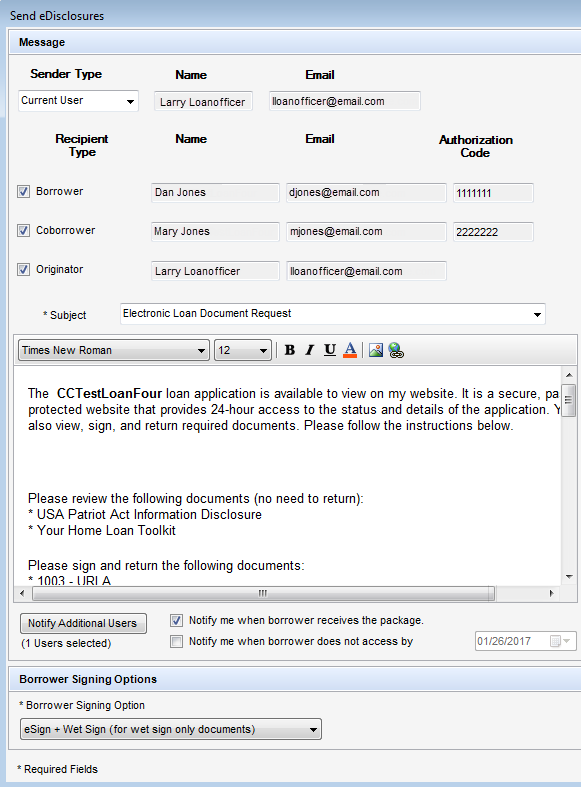
-
Select the Sender type. You can choose from the following:
- Current User
- File Starter
- Loan Officer
- Select or clear the check boxes to send the emails to the Borrower, Co-Borrower and Originator as needed.
- In the Authorization Code fields, enter a 4-to-10-digit authorization code for each of the selected recipients.
After the request is sent, the authorization code fields become read-only on the Send Consent window and on any subsequent Send windows where the fields display (for example, the Send Request, Send eDisclosure, Send files, and Send Notification Email windows). A recipient enters the authorization code only once when accessing the loan on the Consumer Connect website for the first time. The recipient does not need to enter the code again after accessing the loan for the first time.The authorization codes are not automatically sent to borrowers. The Encompass user must contact borrowers to provide them with the codes.
- On the Send Request window, modify the subject and message as needed.
-
Click the Notify Additional Users button to
 send email notifications to additional users.
-
Select the Notify me when borrower receives the package check box to receive an email notification and an Encompass notification when the borrower accesses the package on the Loan Center.
-
To be notified if the borrower does not access the loan package by a specified date, select the Notify me when the borrower does not access by check box, and then click the Calendar icon to set the date.
-
Select a Borrower Signing Option:
-
eSign (electronically sign and return) - Borrowers will access the documents from the Consumer Connect Borrower Portal and, after consenting to receive electronic disclosures, review the documents online, and then sign the documents electronically (known as eSigning). You will receive an email notification that the signed documents are available. Click the Retrieve button in the eFolder to retrieve the documents
If the eDisclosure package contains documents that can be eSigned and documents that must be wet signed, the eSign option will be replaced with an eSign + Wet Sign (for wet sign documents only) option. Borrowers will sign and return eSign documents electronically as described above, and will print sign and return the wet sign documents as described below.
- Wet Sign (print, sign, and fax) - Borrowers will retrieve the documents from the Consumer Connect Borrower Portal, print, sign, and then return the documents by fax or by mail.
Tip: If you select eSign (electronically sign and return)and the eDisclosure package contains custom forms that require a signature, be sure you have inserted eSigning signature points in the form.
-
-
If you selected eSign, select a method for the borrower to verify their identity before accessing the documents:
-
Answering security questions - When selected, the borrower will need to correctly answer 4 out of 5 questions related to their loan to access the documents.
If the borrower fails to correctly answer 4 out of the 5 questions three times, they will not be able to eSign the documents. The system automatically removes the eSigning signature points from the documents and informs the borrower that they must print, sign, and then return the documents by fax or by mail.
-
Authorization Code - Type the authorization code that the borrower and co-borrower will use to access the documents.
Be sure to provide the authorization code to the borrowers. It is not automatically sent to them and it is different than the log in password the borrower creates to log in to the Consumer Connect Borrower Portal. The borrowers have five chances to enter the correct authorization code. If they fail to do so, they will not be able to eSign the documents. After the fifth attempt, the system automatically removes the eSigning signature points from the documents and informs the borrower that they must print, wet sign, and then return the documents by fax or by mail.
-
-
If your company has enabled the eDisclosure Fulfillment service, select the check box at the top of the Fulfillment section to schedule the service for the package.
-
Enter your phone number and the phone number of the recipient. The remaining information in the section will be copied from the loan file.
-
Click Send.
A standard email containing a link to the Consumer Connect Borrower Portal is sent. The email recipients enter their login information, and then view the documents on the website.
If you previously sent eDisclosures and no loan data has changed, a message asks you to confirm that the same eDisclosure package will be sent again. If changes to the loan data have triggered a new condition, a new eDisclosure package is sent and a message does not display.
-
If you are the loan originator and the eDisclosure includes one or more forms that require the Originator's electronic signature, a message asks you to add your electronic signature to the forms.
-
Click Yes to access a secure website and electronically sign the documents before sending the eDisclosure package.
-
Click No to electronically sign the documents later.
-
If you are the loan originator and you select Yes or No, you will receive an email with a link to a secure website where you can access the documents and electronically sign them if needed.
If the subject property is located in South Carolina, the originator must electronically sign all required documents before Encompass will send the eDisclosure package to the borrower.
-
-
If you are not the loan originator and the eDisclosure includes one or more forms that require the loan originator's eSignature, a message informs you that an email will be sent to the loan originator with a link to a secure website where the loan originator can electronically sign the documents.
-
An entry is added to the Loan Log each time you send initial disclosures. Click an eDisclosures Ordered entry to view a list of the documents included in the eDisclosure package.
-