Submission Preparation page
I want to ...
Open the Submission Preparation page
- At the top of the navigation menu, select the Simplifile logo. The Packages page opens in the right panel and the navigation menu highlights the Packages item.
- In the navigation menu, select the Organizations item. The Organizations page opens in the right panel and the navigation menu changes and Organizations is selected.
- If needed, use the Search field or Filter to include the organization you want in the table.
- Select the organization name you want. The Organization Contact Information page opens in the right panel and the navigation menu changes to display the options.
- In the navigation menu select the Services > eRecording > Submission Preparation item. The Submission Preparation page opens in the right panel.
- In the various settings section, enable the options by marking the box and disable the options by clearing the box.
- When applicable enter a value or select an option.
Activate the Email Download Links setting
Sometimes Simplifile users have a business need to send recorded documents to interested third‑parties. An easy way to do this directly from Simplifile is by sending them single‑use links via email that allows them to download the recorded documents that are selected by the user. This feature avoids problems with email attachment sizes and provides a more auditable way to see how your recorded documents have been shared.
- Open the Submission Preparation page.
- In the Package Settings section, mark the Allow users to send single‑use recorded document download links to external addresses option.
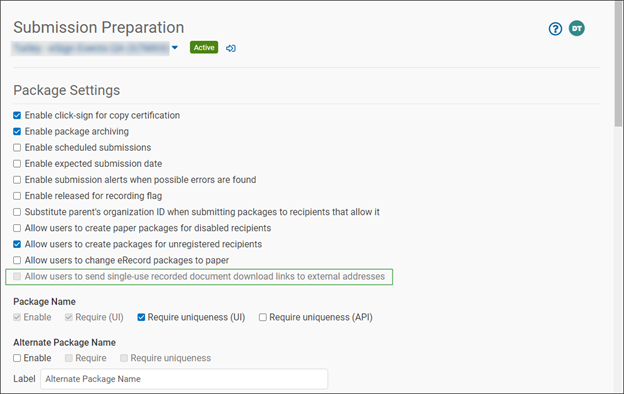
You will be presented with a notification the you must accept before the feature can be activated.
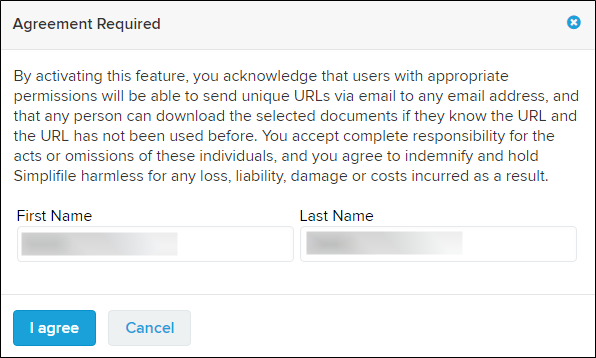
- When the Agreement Required window opens,
- Read the text.
- Enter your first and last name to record your acknowledgment.
- Select the I agree button.
What the recipient experiences with emailed download links
When a document or package download link is emailed to someone from the Packages page or Package Details page, the recipient receives an email with similar to the one shown below.
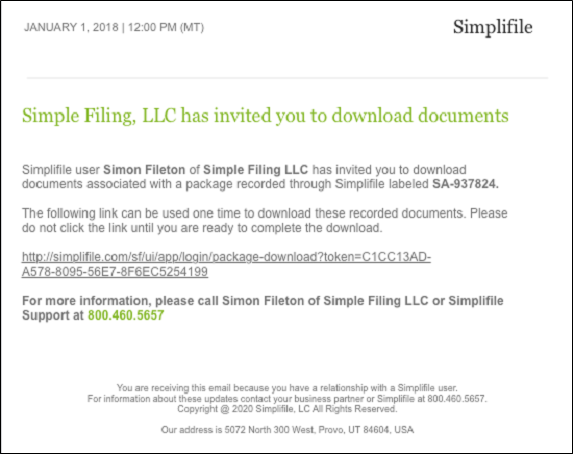
The recipient should select the link in the email when they are ready to download documents.
Selecting the link opens a web page similar to the one shown below.
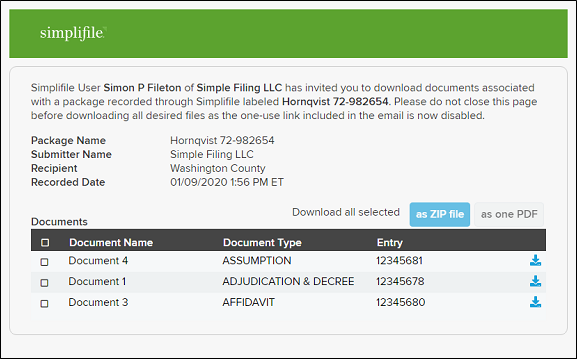
The user has three options:
- Download selected documents as a ZIP file by selecting the as ZIP file button.
- Merge selected documents into a single PDF by selecting the as one PDF button.
- Download each document individually as PDFs by selecting the download icon next to each desired document.
When the user closes the page they will no longer be able to access it. If necessary, the user who created the download link email will have to send a new one.
Adding sending permission to custom user roles
By default, only eRecording Administrators can send emailed download links. To make the feature available to other users, an administrator must add the eRecord Email External Package Link privilege to a custom role and assign the custom role to the applicable users.
For information about adding roles see the Organization Roles page topic Add a new custom role task.
Allow and set up text stamps
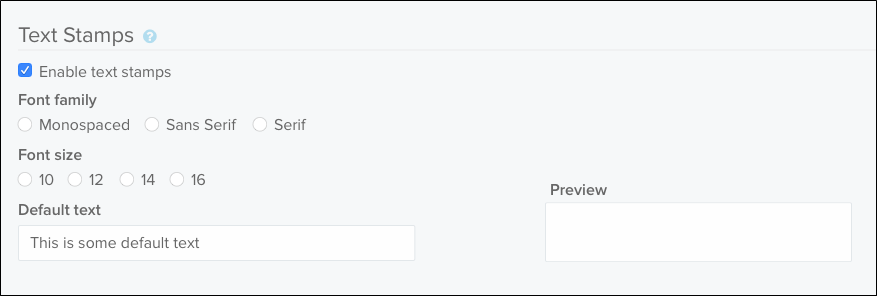
You can choose to let people add text stamps to documents. If you do this, you can choose whether the font is monospaced (similar to Courier), includes serifs (similar to Times New Roman), or does not include serifs (similar to Arial). You can also choose the size of the type and determine the default text for the stamp.
Default text you enter displays on the document editor. Document preparers can change the default text. For information about applying text stamps, see Package creation.
See the Submission Preparation page topic Set up your organization's Document Editor defaults task.
- Open the Submission Preparation page.
- Scroll to the Text Stamps section.
- Mark Enable Text Stamps.
Sending email download links
Sometimes Simplifile users have a business need to send recorded documents to interested third‑parties. An easy way to do this directly from Simplifile is by sending them single‑use links via email that allows them to download the recorded documents that are selected by the user. This feature avoids problems with email attachment sizes and provides a more auditable way to see how your recorded documents have been shared.
After an eRecording Administrator has enable email download links, an authorized user can send links from the Packages page or the Package Details page.
For more information, see the:
Set the scanning options
eRecording Administrators can make several choices that determine how documents are scanned by default into Simplifile. If you mark the option to show third‑party scanner interface, individual users can override the settings.
- Open the Submission Preparation page
- In the Scanner Settings section, set the following options:
- To show placement stamps (not actual stamps) on scanned documents, mark the Show ghost stamps on documents while scanning option.
- To scan both sides of documents, mark the Scan in duplex mode option.
- To scan documents with the bottom of the page at the top, mark the Scan upside down option.
- To open the scanner software when a user clicks to scan, mark the Show third‑party scanner interface option.
| Scanning Options | |
|---|---|
| Option | Description |
| Show ghost stamps on documents while scanning | Displays a “ghost stamp” on documents as they are scanned. A ghost stamp is a non‑official placeholder for the official stamp that the recording county (or jurisdiction) applies when the document is approved and recorded. Typically, ghost stamps display in red. Document preparers can select and drag a ghost stamp to its expected position. This lets them verify that there is enough space on the document for the official stamp. |
| Scan in duplex mode | Tells the computer to scan both sides of any document. This option works only if your scanner supports duplex scanning. |
| Scan upside down | Displays scanned documents with the bottom of the document at the top of the screen (180 degree rotation). |
| Show third‑party scanner interface | Displays the scanner software when someone begins a scan so that the person can make choices about how the scan is performed. |
Set an insufficient fee correction amount
You can set the dollar amount that recording jurisdictions which follow this policy can add to an estimated fee without rejecting a document.
The following example explains how this setting works.
Suppose you enter 50 in this field (for 50 dollars). Then someone in your office submits a package to a recording county (or jurisdiction) that rejects documents whose actual fees are more than the estimate plus the amount in this field. The estimated recording fees for the package are $250, but the actual cost to record is $289. This is over the estimate by $39, which is less than the $50 you entered in the field. This means that the county (or jurisdiction) jurisdiction has your permission to record the documents in the package and expect full payment from you.
However, suppose the actual cost to record is $310. This is over the estimate by $60, which is more than the $50 you entered in the field. Because the recording county (or jurisdiction) has agreed to reject documents whose actual fees are more than the estimate plus the amount in this field, the county (or jurisdiction) should reject the document.
- Open the Submission Preparation page
- Scroll to the Package Settings section.
- In the A county may automatically correct an insufficient fee by $ box, enter the maximum amount you want to let recording jurisdictions add to an incorrect fee.
- Enter the adjusted amount you are willing to allow in this field. Do not included a dollar sign ($) in this field. Enter only numbers.
Set up your organization's default number of days to display voided, billed but rejected, and recorded packages on the Packages page
A single option lets you set the organization default number of days Simplifile should display the following items on the Packages page:
- Voided packages
- Packages that have been billed but rejected
- Packages that have been recorded and returned, and whose documents have then been printed or downloaded
- Any other packages display on the list indefinitely
Examples:
- If you enter 7 in The number of days to display voided, billed rejected and recorded packages in the Main Menu field, a recorded package that has been printed or downloaded displays on the Packages page for seven days after the recording date.
A recorded package that has not been printed or downloaded remains on the Packages page. However, as soon as the package is either printed or downloaded, the system looks at the length of time the package has been on the list. If it has been less than seven days since recording, the package stays on the list until the seven days pass. If it has been more than seven days, the package drops off the list immediately.
- Entering 0 (zero) displays only the current workday’s items.
People at your organization can retrieve and display recorded packages that have been printed or downloaded and therefore no longer display on the Packages page. They can also set their own number of days Simplifile displays recorded, billed rejected, and voided packages. For more information, see Change the Packages table contents by applying filters.
- Open the Submission Preparation page
- Scroll to the Legacy Settings section.
- In the Display voided, billed, rejected and recorded packages on the Packages page for n days field, enter the number of days to display packages that have been:
- voided
- billed but rejected
- recorded
- returned
- downloaded or printed
Set up your organization's Document Editor defaults
The options in the Document Setting section of the Submission Preparation page affect some of the ways the Simplifile document editor handles documents. You can enable any of the options in the Fields and Links section.
You may have other options, depending on your setup.
- Open the Submission Preparation page
- Scroll to the Document Settings section.
- Enable any of the following options as wanted.
Fields and Links
| Simplifile Document Editor Options | |
|---|---|
| Option | Description |
| Automatically white out portion of document outside the print margin on scan and upload | When you first scan or upload a document, permanently removes any text or markings on a document that fall outside of the margins required by a recording county (or jurisdiction). |
| Convert legal‑size document page to letter size | Shrinks any legal‑sized document images to letter‑size (8.5” by 11”). |
| OCR document where available and auto‑populate index fields | If OCR (optical character recognition) software is installed on the computer where you scan documents, this option activates the OCR software when you perform a scan. This option also lets Simplifile automatically complete fields where possible. |
| Convert non‑standard document pages to 300 DPI (may stretch or shrink images) | As explained. |
| Default print scale | This setting changes the default print scale for all documents to whatever you enter in the field. Simplifile shrinks the document when it prints. This helps to ensure that the document with its stamps fits within a recording county's (or jurisdiction's) set margins. |
| Default file name format for downloaded packages | Selecting the link opens the Change Default File Name Format window. |
| Document naming convention | Select from “Document” + counter, (Package name+counter, or Uploaded file name. |
Package Settings
Settings included in this section relate to features that can be configured on a package level.
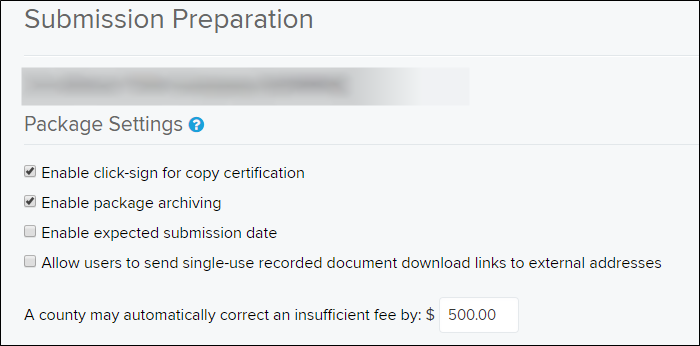
Allow users to send single‑use recorded document download links to external addresses
This setting determines whether users are able to send recorded documents via email to third‑parties that do not have Simplifile user accounts. For information about inviting third‑parties to download recorded documents, see the Email Package Download Link window topic Email a package download link task.
Default: unchecked
Enable click‑sign for copy certification
This setting allows users to upload a digitized signature that is automatically applied to a helper document called a copy certification if such is required by the target county (or jurisdiction). Users upload their signatures via their user profile.
Default: checked
Enabled expected submission date
This setting determines whether the package‑level “Expected Submission Date” field is available. This field allows user to enter a text string that indicates when they intend to send a package for recording. It does not actually affect the package in any way.
Default: unchecked
Settings included in this section relate to features that can be configured on a package level.

Document Settings
Document settings relate to the handling of individual documents, including editing tools and default file naming conventions.

Automatically white‑out portion of document outside the print margin on scan and upload
Determines whether all content that falls outside of the county's (or jurisdiction's) print margins will be erased automatically. If this is not selected, users will have the opportunity to clear margins manually before submitting, either by erasing stray text and marks or by moving or re‑sizing the image.
Default: unchecked
Convert legal‑size document pages to letter‑size
When enabled, the size of each page is checked automatically to determine its size and, if oversized pages are found, they are shrunk to letter size. This can be useful if users primarily submit letter‑sized documents, but when a legal‑sized page is thrown in by the person who created the document.
Default: unchecked
Require users to check "This document is recordable" flag even when county (or jurisdiction) does not require it
A flag is found in the document indexing pane that must be checked by the user before a package can be submitted for eRecording, if the target county (or jurisdiction) requires it to be displayed. If this setting is enabled, users will have to check this box regardless of the county's (or jurisdiction’s) preference.
Default: Unchecked
Default print scale
In some cases, county’s (or jurisdictions) will add a recording stamp to a document that falls outside the submitter’s print margin. This setting allows the user to choose to automatically shrink the recorded image to a given percentage of the original size if they consistently see this problem.
Default: 100%
Default file name format for downloaded packages
When a user downloads documents from Simplifile, included files are named with the Document Name. For example, if the document is named “My special deed of trust”, the downloaded file will be named “My special deed of trust.pdf”. However, some users prefer a different naming convention, often determined by the system‑of‑record into which recorded documents are imported. To accommodate this, submitters can configure a default naming convention that differs from our standard.
Submitters can choose any of the following elements in any order to be included in the file name.
- Counter
- Document Name
- Document Type Name
- Package Name
- Recording Date
They must also indicate the character used to separate each element. Valid values include the following:
- Hyphen
- Underscore
- Space
Document naming convention
When a document is added to a package, it is automatically assigned a document name. By default, this value is the word “Document” followed by the number of documents in the file. As an example, the first document added to the package is named “Document 1”.
Submitters can change this default to one of two other options:
- (Package name) + counter
- Uploaded file name
Report Settings
The Reports Settings section defines two values that can be shown on the Banking Export Report.

Text Stamps
Text Stamps allow users to overlay text on a document image. These stamps are stored independently of the document but are included on the image that is sent to the county (or jurisdiction). Some submitters do not want their users to have access to this tool.
Scanner Settings
Legacy Settings
This section contains settings that affect an old version of the Packages page. They do not affect the current version. These are made available to those users who have not yet upgraded to the latest version.

Sound an alert when packages are recorded or rejected
The old version of the Packages page required that this be set at the organization‑level, while the current version moves this setting to the user‑level. This setting is only used by submitters who have users who have not upgraded to the latest version of the Packages page.
Default: checked
Go directly to Package Details after created a new package
The old version of the Packages page allowed users to choose to go to a Choose a Document Type page after selecting the Create ![]() button. After choosing the document type for the first document in the package, the user would be taken directly to Document Editor. The current version requires all users to go directly to the Package Details page after selecting the Create button.
button. After choosing the document type for the first document in the package, the user would be taken directly to Document Editor. The current version requires all users to go directly to the Package Details page after selecting the Create button.
Default: checked
Display voided, billed rejected, and recorded packages on the Packages page for n days
The old version of the Packages page required this value to be set at the organization‑level. The new page allows this to be set at the user‑level on the filter pane. This setting is only used by submitters who have users who have not upgraded to the latest version of the Packages page.