Setup tasks for recipients
Overview
You or your administrator may need to do some setup tasks before you can use Simplifile for eRecording. You need to have the appropriate permission before you can complete these tasks.
- Before a person can work with documents submitted for eRecording, that person must have a user account in Simplifile.
- You can add a digital signature to Simplifile that the system can automatically apply to approved documents.
- Document reviewers need to be able to choose from a list of rejection reasons so that submitters know why a document was returned without being recorded.
Contact information
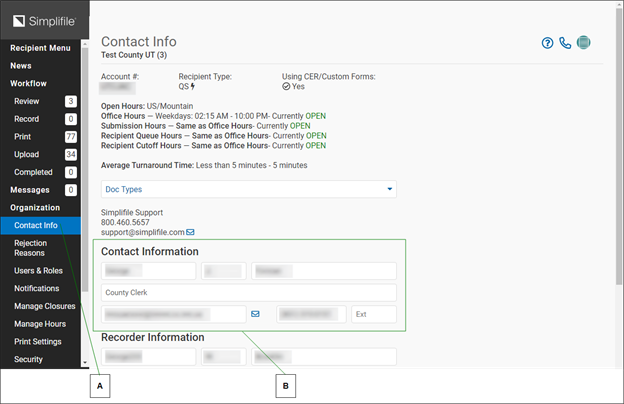
The Contact Info page displays information about your organization, including its hours, document types accepted, and the name, title, and contact information for the main contact person and the primary recorder at your location. If you are affiliated with multiple organizations, you can use a dropdown list to change which organization’s information displays.
Use this page to edit the Contact Information and the Recorder Information.
The bottom of the page displays the organization’s address, telephone and fax numbers, and web page address, if applicable. Below is a partial example.
| Letter | Description |
|---|---|
| A | The contact person can choose Account > Contact Info at any time to edit the contact information on this page. |
| B | The contact person’s account is set up when your recording site begins its relationship with Simplifile. This person can then manage other user accounts. |
For more information about the Contact Info page, see the Contact Info page (Administrator Role) topic.
Office hours
If desired, you can identify the holidays when your office is closed. You can also set the hours when your office is open; when your recording, print, and upload queues are available; and when you will accept document submissions.
You can choose which holidays affect your company’s interaction with submitters. By default, Simplifile manages holiday closure notifications for you by posting notices to tell your submitters when your company closes for a holiday.
On a closed day, your company does not receive any documents from Simplifile. Instead, submitted documents are held and submitted on your next open business day.
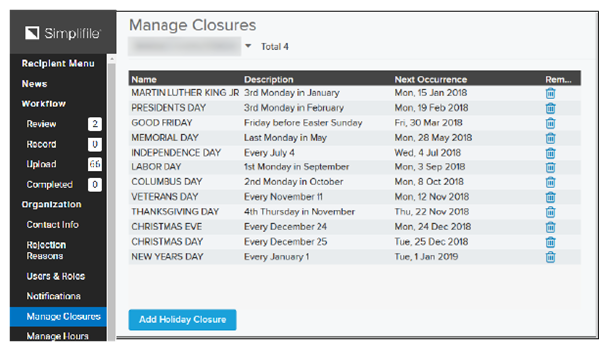
- For information about managing closures, see the Manage Closures page (Administrator Role) topic.
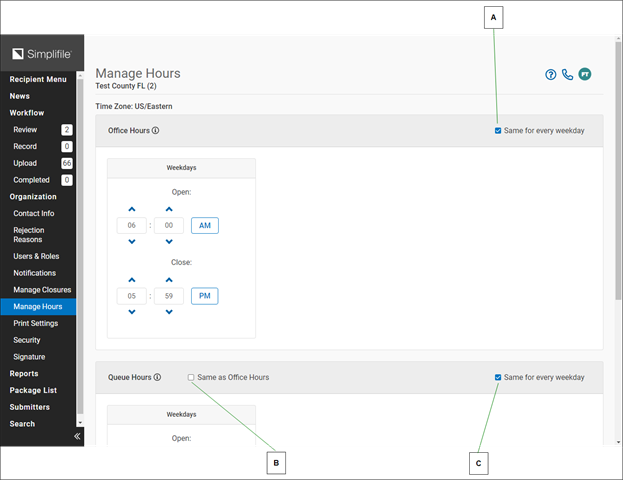
Setting office, queue, and submission hours
If desired, you can set weekly hours for your office, as well as for your queues and submitters. The queue hours determine when your recording, print, and upload queues are open. The submission hours indicate when documents can be submitted.
| Letter | Description |
|---|---|
| A | Clear this box in a category to set the open hours for each weekday for the category. You can also set a given weekday in the category as closed. |
| B | Mark this box in a category to have Simplifile use the settings you made in the Office Hours section for this category. |
| C | Mark this box in a category to set the hours for that category once and have Simplifile use the same settings for each day of the week. |
- For information about managing closures, see the Manage Hours page (Administrator Role) topic.
User accounts
Anyone at your organization who uses Simplifile needs to have a Simplifile user account. This lets multiple people log in to Simplifile at the same time and work on document review and approval without duplicating or counteracting each others work.
When you have the necessary permission and add a user to Simplifile, you use the person’s email address to assign one or more roles to that person. Roles determine who can use specific features of Simplifile. The Add User process also lets you enter the person’s name, title, and telephone number, if desired.
When you add a new user, that person gets an email invitation. He or she clicks on a link that takes them to Simplifile, where they log in to accept or reject the invitation.
- For more information about user accounts, see the Users & Roles page (Recipient Organization Administrator Role) topic.
Organizations and user roles
You can view information about the employees at your organization who use Simplifile. For each employee, you can see the contact information and Simplifile access roles. This information is organized and accessible in multiple ways to help you find what you need as quickly as possible.
Each organization has its own Users & Roles page. This page includes the following tabs:
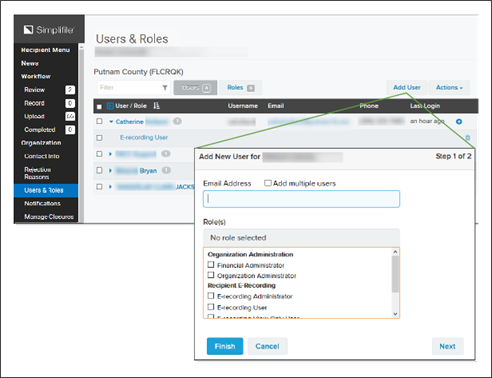
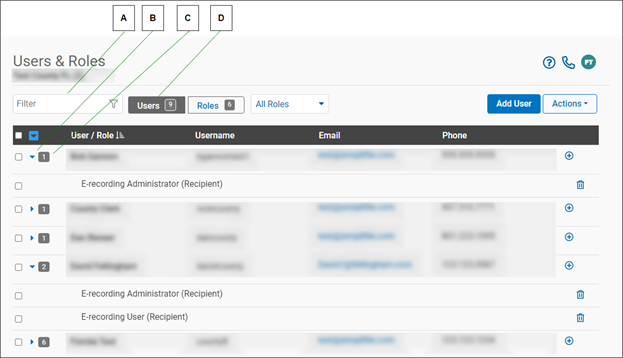
- The Users tab displays all Simplifile users at that organization and their roles. Below is an example of the Users tab. The username displays first, with the person’s roles displayed beneath.
.
| Letter | Description |
|---|---|
| A | When you type in the Filter field, Simplifile displays only those users whose name, username, or email address contain the characters you enter. |
| B | Select the arrow beside a person’s name to show or hide that person’s roles. The arrow points right if roles are hidden. |
| C | The number beside each name indicates how many roles a person has. |
| D | The number indicates how many roles this organization has to assign. |
- The Roles tab displays all roles and the users at the organization who hold them. Below is an example of the Roles tab. The roles display first, with the names of the people who hold the role displayed beneath

| Letter | Description |
|---|---|
| A | When you type in the Filter field, Simplifile displays only those users whose name, username, or email address contain the characters you enter. |
| B | Select the arrow beside arrow to show or hide the users assigned to the role. The arrow points right if users are hidden. |
| C | When sorted by role, the number beside each role indicates how many users have been assigned to the role. |
| D | The number indicates how many roles this organization has to assign. |
| E | Select the Actions |
- For more information about the Users & Roles page, see the Users & Roles page (Recipient Organization Administrator Role) topic and following tasks:
Adding and removing roles
Adding roles
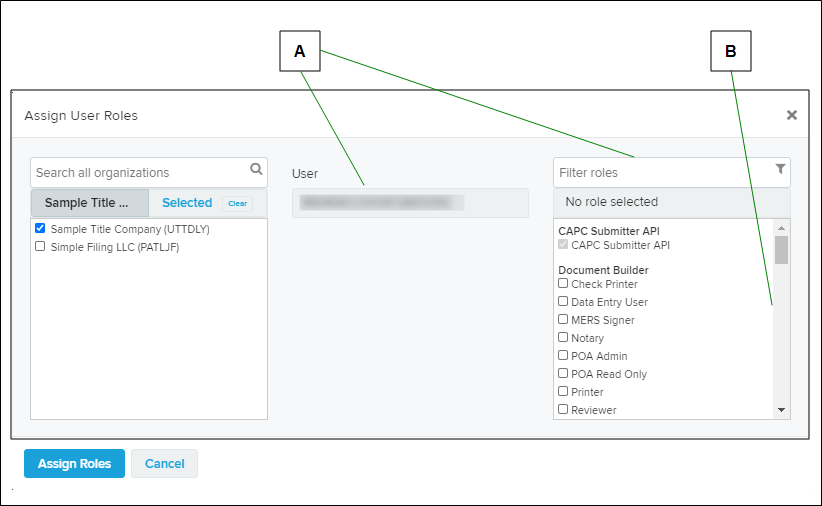
Administrators can add roles to individuals or groups of users. When you select an add icon ( ) or mark boxes and use the Actions options to add user roles, an Assign User Roles window box displays.
| Letter | Description |
|---|---|
| A | You can use the search fields above the lists to find specific users and roles. Each list lets you choose one or more items. |
| B | If necessary, use a scroll bar to find the user names and roles you want to assign. |
If you select an add icon or mark boxes and use the Actions options to open the Assign User Roles window, the people or roles whose add icon you select or whose boxes you mark are automatically marked when the window opens. You can change the marked boxes as desired.
- For more information about adding roles, see the Manage User page topic Add a role to one or more users task.
Removing Roles
You can remove a user role. This removes the permissions for that role. In other words, the person from whom you remove the role will no longer be able to perform the tasks related to that role.
- For more information about removing roles, see the Manage User page topic Remove a role from one or more users task and Remove a role from one user using the trash can icontask.
Managing roles from the Manage User page Users tab
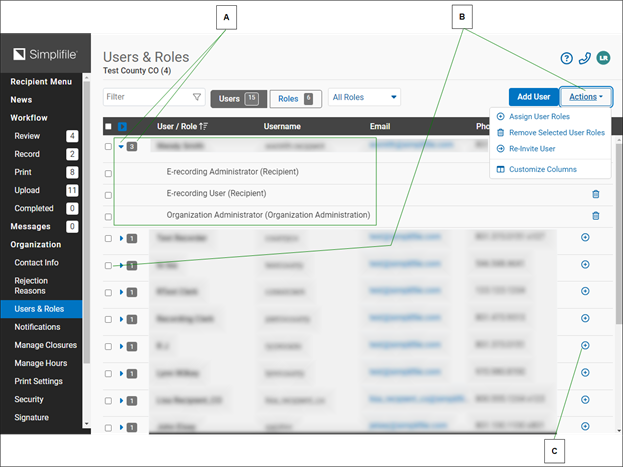
The Users tab on the Users & Roles page displays all Simplifile users at an organization, with their roles under their names. You can add and remove roles for individual users or for a group of users on this page. You can also send a user an email message. Below is an example of the Users tab.
| Letter | Description |
|---|---|
| A | If a user has multiple roles, the number of roles displays after the username. Select the arrowhead in front of the username to display the roles assigned to the user. |
| B | To add or remove more than one role at a time, mark boxes beside user names or roles and select the Actions |
| C | If someone has been invited to join you as you work with Simplifile, that person has a Pending label. An orange number indicates how many invited persons have rejected your invitation. Use the Actions dropdown list to re‑invite users. |
| D | Select an add |
- For more information about managing roles from the User tab, see the Manage User page topic.
Managing roles from the Users & Roles page Roles tab
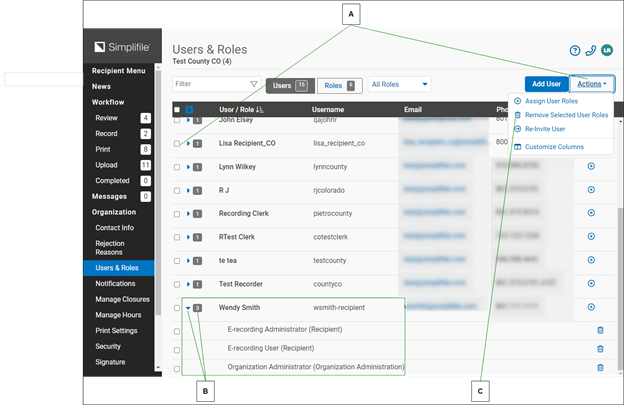
The Roles tab displays all roles that have been assigned to any Simplifile user at the organization, with the names of those who hold the role under each role. You can add and remove a role from all users or from individual users on this page. You can also send a user an email message. Below is an example of the page.
| Letter | Description |
|---|---|
| A | To add or remove more than one role at a time, mark boxes beside user names or roles and select the Actions To mark all user roles, mark the box in the table header. To mark all users with a role, mark the role name. |
| B | If a role has been assigned to multiple users, the number of users displays after the role name. Select the arrowhead in front of the role name to display the users who have the roles. |
| C | Select an add icon to add a role. Select a Delete |
For more information about managing roles from the Roles tab, see the Manage User page topic.
Submitter management
You can view the contact information for the submitters who send you packages. Depending on your setup, you can do the following:
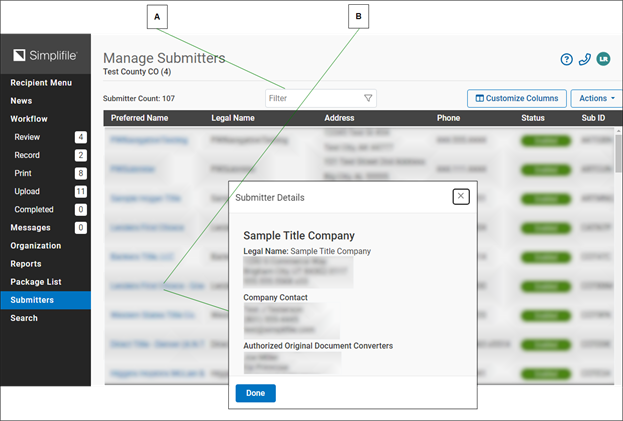
| Letter | Description |
|---|---|
| A | To search for a specific submitter, enter information in the Filter field. |
| B | To display company contact information for that submitter, select a submitter name. To view information about that status for that organization, hover the cursor over a status indicator. |
- For more information, see the Manage Submitters page topic.
Password Policy
Setting the Password Policy
Password policy settings affect everyone at your institution who uses Simplifile.
The first step is to enable the password policy for Simplifile. After you do this, you can determine how often people at your organization must change their passwords, and how many recent passwords must not be reused.
You can also activate a second level of password protection by requiring Simplifile users to set up security questions Simplifile can use to verify identity when a password reset is required. After you do this, the first time someone logs in, that person must provide answers to several questions—some that Simplifile can use to verify the person’s identity online, and one that Simplifile Support can use to verify the person’s identity if the person calls in.
Another security measure you can activate is to require administrators at your company to enter a temporary code once a month to verify their access to Simplifile.
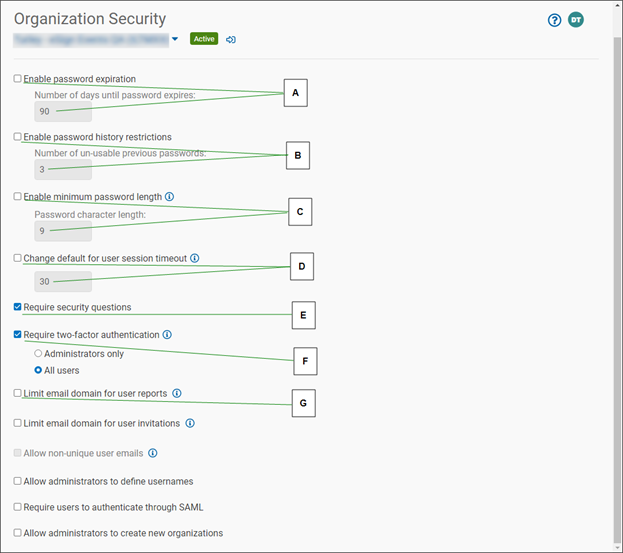
| Letter | Description |
|---|---|
| A | Mark the Enable password expiration box and enter the number of days that must pass before someone's password expires. |
| B | Mark the Enable password history restrictions box to set how may passwords must be used before a password can be used again. In the box, enter the number of passwords that must be changed before a password can be reused. |
| C | To set a minimum password length, mark the Enable minimum password length checkbox and enter the value in the Password character length field. |
| D | To change the default for the session timeout, mark the Change default for user session timeout checkbox and enter the value in the field. |
| E | To require uses to choose questions and answers that identify them when they reset passwords or call Support, mark the Require security questions box. |
| F | To require only administrators or all users to use two-factor authentication, mark the Require two factor authentication box and choose either the Administrators only or All users option. |
| G | To limit the email domains (the part of the email address after the @ symbol), users can have in their Simplifile accounts, mark the Limit email domain for user reports checkbox then enter the email domains you want to allow. Check the plus sign (+) to add additional domains. |
Setting your security questions and answers
Each person chooses the security questions they want to answer from a predetermined set of 26, and can change their security questions and answers at any time. Answers to the questions are encrypted and securely stored.
For more information, see:
- The My Settings page topic Change your identity verification questions task and Change your support access question task.
- The Security Questions window.
- The Customer Support Question window.
Click‑Sign Signature setup and modification
If you need to sign a document, you may be able to do so electronically instead of with a pen on a printed page. To do this, you need to set up a digital signature called a click‑sign signature that Simplifile can apply to the document. This lets you select a button to automatically apply your digital signature where it is needed.
You can upload a file or scan a page containing your signature from within Simplifile. You can repeat this process at any time to modify your click‑sign signature, if necessary.
To open the Click-Sign Signature page, see the Click‑Sign Signature page topic 1 ‑ Open the Click‑Sign Signature page task.
The easiest way to make sure your signature is the correct size is to scan it and upload it into Simplifile.
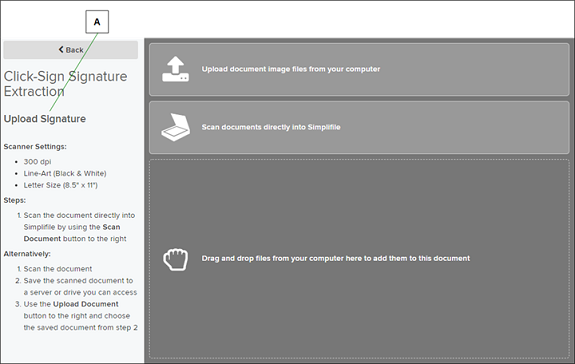
| Letter | Description |
|---|---|
| A | Follow the instructions that display when you select to add or modify a click‑sign signature. |
Use black ink and a medium or bold pen to sign the paper you will upload. This helps assure that your signature is dark and clear enough for the computer to read easily.
For more information, see Click‑Sign Signature page (Administrator Role).
Rejection reason setup
An administrator can use the Rejection Reasons page in Simplifile to set up the reasons a reviewer can use. When a reviewer rejects a document, that reviewer chooses the reasons. When the submitter gets the rejected document, the rejection reasons indicate what issues need to be addressed before the document is resubmitted for eRecording.
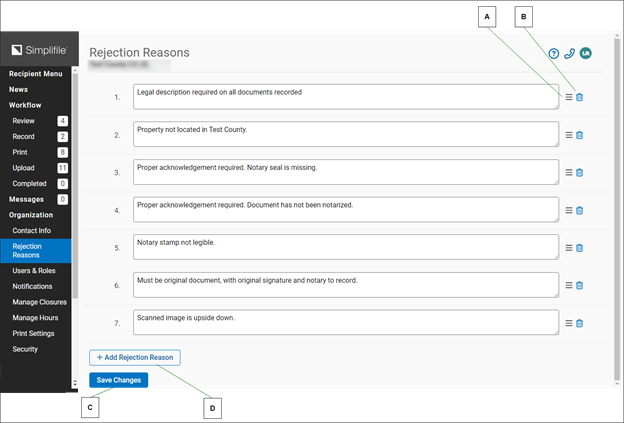
| Letter | Description |
|---|---|
| A | Select the icon for a rejection reason to remove that reason from the list. |
| B | Select and hold, then drag a rejection reason to change its order in the list. The number automatically changes to indicate the new position of the reason. |
| C | Select here when you finish to save your rejection reason changes. |
| D | Select here to add a new rejection reason. This opens a new numbered field where you can add the reason you want to use. |
- For more information, see the Rejection Reasons page (Administrator Role) topic.