Rejection Reasons page (Administrator Role)
Overview
This topic provides information on how to use the Rejection Reasons page.
Administrators can use the Rejection Reasons page in Simplifile to set up the reasons a reviewer can use.
When a reviewer rejects a document, that reviewer chooses the reasons. When the submitter gets the rejected document, the rejection reasons indicate what issues need to be addressed before the document is resubmitted for eRecording.
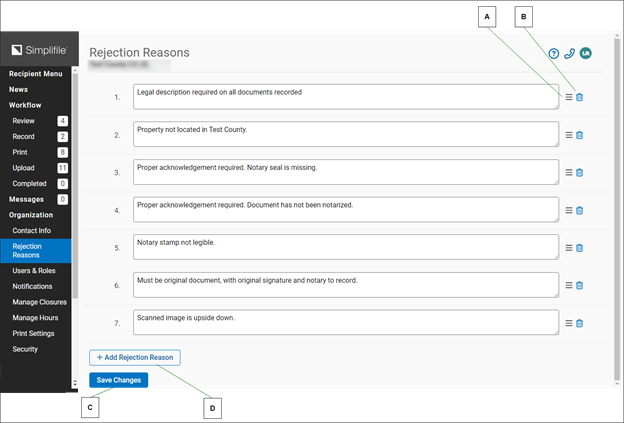
| Letter | Description |
|---|---|
| A | Select and hold, then drag a rejection reason to change its order in the list. The number automatically changes to indicate the new position of the reason. |
| B | Select the garbage can icon for a rejection reason to remove that reason from the list. |
| C | Select here when you finish to save your rejection reason changes. |
| D | Select here to add a new rejection reason. This opens a new numbered field where you can add the reason you want to use. |
I want to ...
Edit an existing rejection reason
- Open the Rejection Reason page.
- In the dropdown list near the top left corner, choose the recording county.
- Select in the Rejection Reason field and make any desired changes.
- When finished , select the Save Changes button.
Add a rejection reason
- Open the Rejection Reason page.
- In the dropdown list near the top left corner, choose the recording county.
- Scroll to the bottom of the page.
- Select theAdd New
 button. A new field displays.
 - Enter the reason in the new field.
- When finished , select the Save Changes button.
Re‑order the rejection reasons
- Open the Rejection Reason page.
- In the dropdown list near the top left corner, choose the recording county.
- Select and hold, then drag the reason to its new location.
- When finished , select the Save Changes button.
Remove a rejection reason
- Open the Rejection Reason page.
- In the dropdown list near the top left corner, choose the recording county.
- Select the trash can
 icon for the reason.
 - When finished , select the Save Changes button.