Users & Roles page (Recipient Organization Administrator Role)
Overview
This topic provides information on how to use the Users & Roles page.
You can view information about the employees at your organization who use Simplifile. For each employee, you can see the contact information and Simplifile access roles. This information is organized and accessible in multiple ways to help you find what you need as quickly as possible.
Each organization has its own Users & Roles page. This page includes the following tabs:
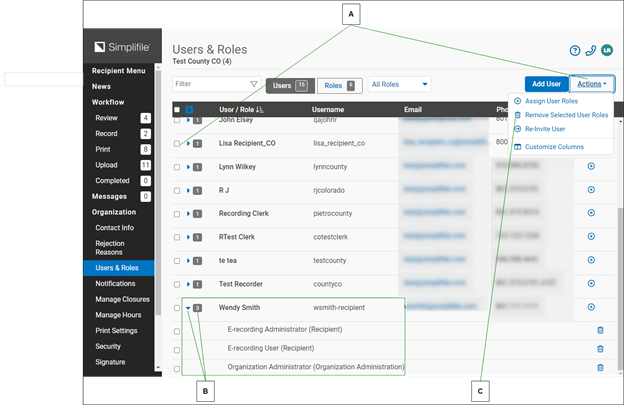
- The Users tab displays all Simplifile users at that organization and their roles. Below is an example of the Users tab. The username displays first, with the person’s roles displayed beneath.
- The Roles tab displays all roles and the users at the organization who hold them. Below is an example of the Roles tab. The roles display first, with the names of the people who hold the role displayed
Users tab
The Users tab on the Users & Roles page displays all Simplifile users at an organization, with their roles under their names. You can add and remove roles for individual users or for a group of users on this page. You can also send a user an email message. Below are examples of the Users & Roles page Users tab with explanations.
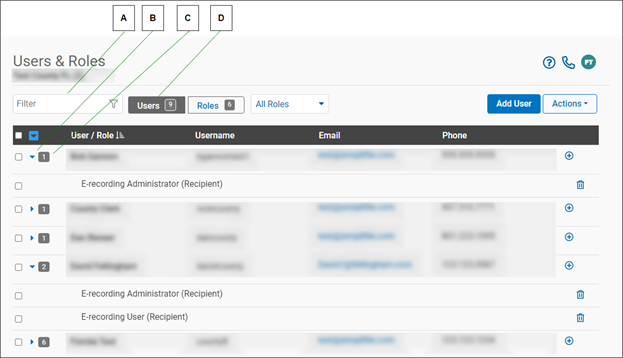
| Letter | Description |
|---|---|
| A | When you type in the Filter field, Simplifile displays only those users whose name, username, or email address contain the characters you enter. |
| B | The number indicates how many roles this organization has to assign. |
| C | Select the arrow beside a person’s name to show or hide that person’s roles. The arrow points right if roles are hidden. |
| D | The number beside each name indicates how many roles a person has. |
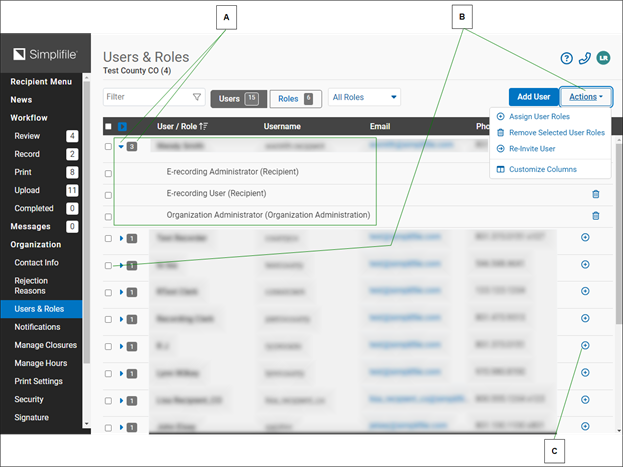
| Letter | Description |
|---|---|
| A | If a user has multiple roles, the number of roles displays after the username. Select the arrowhead in front of the username to display the roles assigned to the user. |
| B | To add or remove more than one role at a time, mark boxes beside user names or roles and select the Actions |
| C | Select an add |
When you have the necessary permission and add a user to Simplifile, you use the person’s email address to assign one or more roles to that person. Roles determine who can use specific features of Simplifile. The Add User process also lets you enter the person’s name, title, and telephone number, if desired.
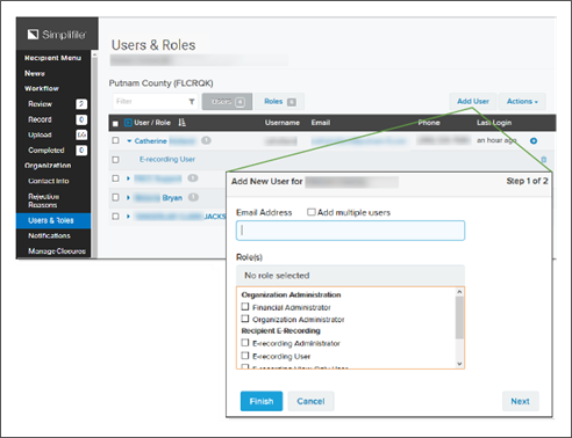
When you add a new user, that person gets an email invitation. He or she clicks on a link that takes them to Simplifile, where they log in to accept or reject the invitation.
NOTE: People can change their own passwords by scrolling to the bottom of the navigation menu and selecting their name, and then selecting the Change Password![]() button in the Personal Application Settings section of the My Settings page. For more information, see the My Settings page topic Change your password task.
button in the Personal Application Settings section of the My Settings page. For more information, see the My Settings page topic Change your password task.
Roles tab
The Roles tab displays all roles that have been assigned to any Simplifile user at the organization, with the names of those who hold the role under each role. You can add and remove a role from all users or from individual users on this page. You can also send a user an email message. Below is are examples of the Users & Roles page Roles tab with explanations.
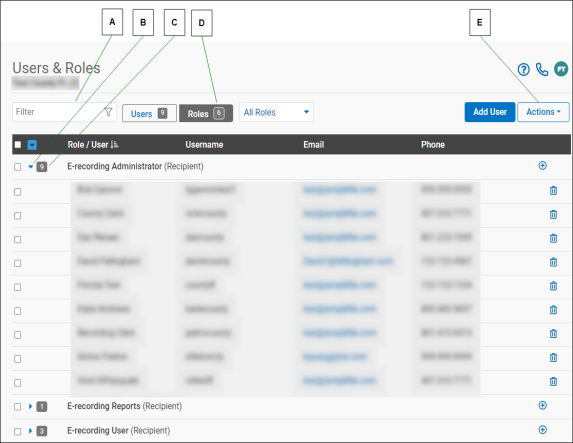
| Letter | Description |
|---|---|
| A | When you type in the Filter field, Simplifile displays only those users whose name, username, or email address contain the characters you enter. |
| B | The number indicates how many roles this organization has to assign. |
| C | When sorted by role, the number beside each role indicates how many users have been assigned to the role. |
| D | Select the Actions |
| Letter | Description |
|---|---|
| A | To add or remove more than one role at a time, mark boxes beside user names or roles and select the Actions To mark all user roles, mark the box in the table header. To mark all users with a role, mark the role name. |
| B | If a role has been assigned to multiple users, the number of users displays after the role name. Select the arrowhead in front of the role name to display the users who have the roles. |
| C | Select an add icon to add a role. If you remove the last role for a user in an organization, Simplifile removes the user from the organization. |
I want to ...
I want to ... from the Actions dropdown button
Assign User Roles
- Open the Users & Roles page.
- In the dropdown list near the top left corner, choose the recording county.
- If needed, user the Filter dropdown field to display the wanted user or users.
- Select the Actions
 dropdown button. A menu appears.
 - Select the Assign User Roles item. The Assign User Roles window opens.
- If needed, use the Search all user field to filter the list.
- Select (mark) a user or users.
- If needed, use the Filter Roles field to filter the list.
- Select (mark) the roles applicable to the selected user or users.
- Select the Assign Roles button.
Remove Selected User Roles
- Open the Users & Roles page.
- In the dropdown list near the top left corner, choose the recording county.
- If needed, user the Filter field to display the wanted user or users.
- Select the Actions dropdown button. A menu appears.
- Select the Remove Selected User Roles item. The Remove User Roles window opens.
- Read the message and if you want to remove the user roles, select the Confirm button.
Re‑Invite User
- Open the Users & Roles page.
- In the dropdown list near the top left corner, choose the recording county.
- If needed, user the Filter field to display the wanted user or users.
- Select the items you want to re‑invite.
- Select the Actions dropdown button. A menu appears.
- Select the Re‑invite User item.
Customize Columns
- Open the Users & Roles page.
- Select the Actions dropdown button. A menu appears.
- Select the Customize Columns item. The Columns to Display window opens.
- Mark the columns you want to display. Clear the columns you don't want to appear.
- Select the Save
 button.
I want to ... from the Users tab
The Users tab on the Users & Roles page displays all Simplifile users at an organization, with their roles under their names. You can add and remove roles for individual users or for a group of users on this page. You can also send a user an email message. Below is an example of the Users tab.
Add a user account
- Open the Users & Roles page.
- In the dropdown list near the top left corner, choose the recording county.
- Select the Users tab.
- Select the Add User
 button.
 - Enter the email address of the person you want to add.
- Mark at least one role for the person.
- If desired, select the Next
 button and add the person’s name, title, and telephone number.
 - When you are ready, select the Finish button.
Add multiple user accounts at the same time
- Open the Users & Roles page.
- In the dropdown list near the top left corner, choose the recording county.
- Select the Users tab.
- Select the Add User button.
- Mark Add multiple users.
- In the Email Address field, enter as many email addresses as needed. Separate email addresses with commas. You can drag the corner of the box to make it larger, if necessary
- Mark the roles you want to assign to all the users whose email addresses you entered.
- When you are ready, select the Finish button.
Add a role to a user account from the Users tab
- Open the Users & Roles page.
- In the dropdown list near the top left corner, choose the recording county.
- Select the Users tab.
- If needed, user the Filter field to display the wanted user.
- In the table, select the Assign User Roles (
 ) button at the right side of the row. The Assign User Roles window opens.
 - Complete the Assign User Roles window. For more information, see Assign User Roles window (Administrator).
Remove a user account
- Open the Users & Roles page.
- In the dropdown list near the top left corner, choose the recording county.
- Select the Users tab.
- Select the arrow beside the person’s name to display the person’s roles.
- Select the trash can
 icon for each role you want to remove.
Re‑invite a user
- Open the Users & Roles page.
- In the dropdown list near the top left corner, choose the recording county.
- Select the Users tab.
- Mark the person's name.
- From the Actions dropdown list, choose Re‑invite user.
Send an email to a user
- Open the Users & Roles page.
- In the dropdown list near the top left corner, choose the recording county.
- Select the Users tab.
- Mark the person's name.
- From the Actions dropdown list, choose Send email.
I want to ... from the Roles tab
Display all of a user’s roles
- Open the Users & Roles page.
- In the dropdown list near the top left corner, choose the recording county.
- Select the Roles tab.
- Select the arrow beside the user’s name.
Display all users who hold a specific role
- Open the Users & Roles page.
- Select the Roles tab.
- Select the arrow beside the role.
Add a role to one or more users
Method 1 ‑ Using the Actions dropdown button
- Open the Users & Roles page.
- In the dropdown list near the top left corner, choose the recording county.
- Select the Roles tab.
- Open the Add Role window.
- Select the Actions dropdown button. A menu displays.
- Select the Assign User roles item.
- Select the Actions
- Use the dropdown lists to choose the roles you want to assign, and to whom.
- Select the Assign Roles button.
Method 2‑ Using the Add icon at the end of a row
- Open the Users & Roles page.
- In the dropdown list near the top left corner, choose the recording county.
- Select the Roles tab.
- Open the Add Role window.
- Select the Add icon (
 ) at the end of a row.
- Select the Add icon (
- Use the dropdown lists to choose the roles you want to assign, and to whom.
- Select the Assign Roles button.
Remove a role from one or more users
- Open the Users & Roles page.
- In the dropdown list near the top left corner, choose the recording county.
- Select the Roles tab.
- Mark the boxes of the roles you want to remove.
- Select the Actions dropdown button. A menu displays.
- Select the Remove Selected User Roles item. The Remove User Role window opens.
- Review the information to verify it is the role you want to remove.
- If it is the role you want to remove, select the Confirm button.
Remove a role from one user using the trash can icon
- Open the Users & Roles page.
- In the dropdown list near the top left corner, choose the recording county.
- Select the Roles tab.
- Expand the role to display the assigned users.
- Select the trash can icon at the right side of the user row to remove the role from the user.
- Review the information to verify it is the role you want to remove.
- If it is the role you want to remove, select the Confirm button.