Encompass Updates and Enhancements to Features - 24.1 Major Release
This section discusses the updates and enhancements to existing forms, features, services, or settings that are provided in this release.
User Interface
Pipeline view management support has been added to the web version of Encompass. With this update, users are able to modify, manage, set as default, and create new Pipeline views. Additionally, users are able to save a company view as a personal view and set a company view as the default view.
To Save a Pipeline View:
After making customizations to a Pipeline view, you can save the view so it can be quickly accessed later. When there are unsaved changes, an asterisk is displayed next to the Pipeline name.
-
Select the Down Arrow
 next to the Pipeline view name to expand the Pipeline list.
 -
Select the Menu
 icon next to the Pipeline view name, and then select Save view.
-
To save the changes as a different view, select Save as. Enter the name for the new view, indicate if you want to set the view as the default, and then select Save.
-
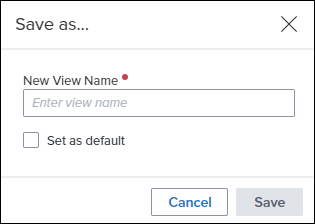
Selecting Save as for a Company View enables the user to save a company view as a personal view, which can then be modified as needed.
To Set a Default Pipeline View:
-
To set a view as a Pipeline default, select the Down Arrow
 next to the Pipeline view name to expand the Pipeline list.
 -
Select the Menu
 icon next to the Pipeline view name you want to set as the default, and then select Set as default.
To Rename a Pipeline View:
-
Select the Down Arrow
 next to the Pipeline view name to expand the Pipeline list.
 -
Select the Menu
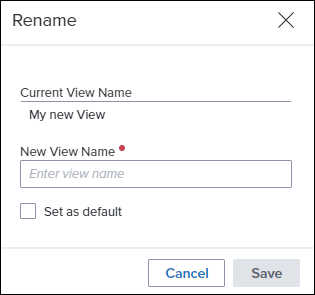
 icon next to the Pipeline view name you want to rename, and then select Rename.
 -
Enter the new view name, indicate if you want to set this view as the default, and then select Save.
To Delete a Pipeline View:
-
Select the Down Arrow
 next to the Pipeline view name to expand the Pipeline list.
 -
Select the Menu
 icon next to the Pipeline view name you want to delete, and then select Delete.
 -
On the confirmation window, select Yes,
ENCW-67001, ENCW-96498, ENCW-71341
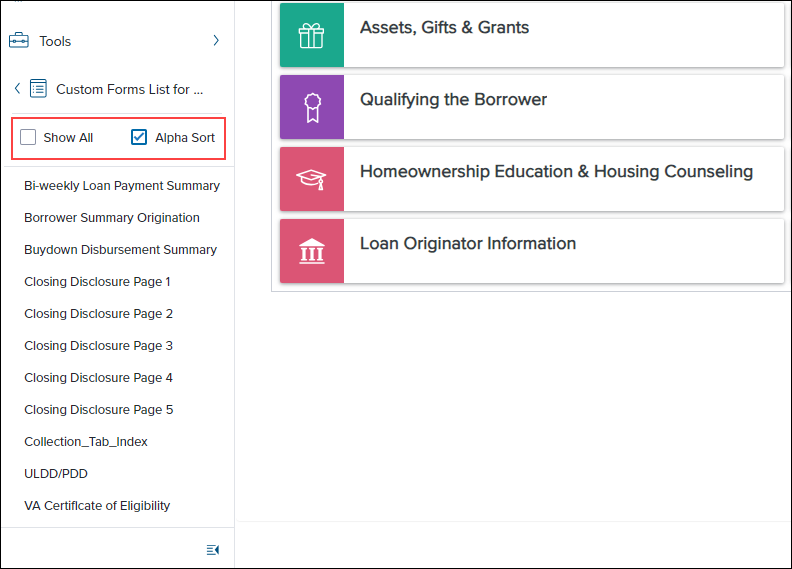
For users who have access to forms or tools (based on their persona) provided in the left navigation menu in a custom item set, new Show All and Alpha Sort options are now provided. When using the left navigation menu to view a custom item set that lists forms or tools:
-
The forms or tools are listed in the order configured by the administrator in the custom item set by default.
-
Users can select the Alpha Sort checkbox to display the list of forms or tools in alphanumeric order. Clearing this checkbox will return this list to the default order configured by the administrator.
-
Users can select the Show All checkbox to display all the standard and custom forms or tools that they have access to (based on their persona) in addition to forms or tools provided in the custom item set. Clearing this checkbox returns this list to displaying only the forms or tools provided in the custom item set.
Default Custom Item Form List Order

Alpha Sort Order of Custom Item Form List
ENCW-89121
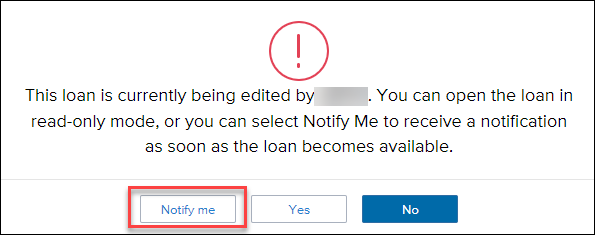
A new Notify Me feature is now available which enables users to receive a notification when a locked loan becomes available. When a user attempts to open a loan that is already opened by another user, the new Notify Me option is provided in the pop-up message window that displays, giving the user the option view the loan in read only mode. After a user selects the Notify Me button in this pop-up window, they can move on to other tasks. Once the loan is closed and becomes available, the user receives a notification in Encompass that the loan is available, and they can then open the loan from the notification.
To Enable the Notify Me Feature:
-
From the Encompass Admin Portal in the web version of Encompass, select Company/User Setup on the left navigation menu.
-
Select Notify Me, and then toggle the Notify Me option to On.

To Use the Notify Me Feature
-
When opening a loan that is already opened by another user, select Notify Me in the pop-up window to be notified once the loan is available.
-
When the loan becomes available, a notification is displayed in the top right corner. Select Open Loan to open the loan file.

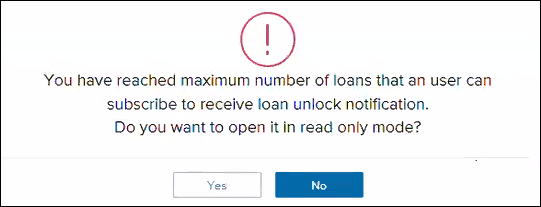
Maximum Notify Me User Limit
The Notify Me feature is limited to one user at a time per loan. If more than one user attempts to use the Notify Me feature, the following message displays:
Notify Me requests are only valid while the user is logged in. If the user logs out, any pending Notify Me requests are discarded.
ENCW-89081
New disclosure compliance alerts have been added to the web version of Encompass. The alerts, which are set up and managed in the Encompass Settings > Alerts tool in the desktop version of Encompass and triggered in loan files, enable lenders to ensure all required data is complete for sending disclosures.
These alerts enable users to satisfy required fields in order to indicate that the loan is ready for disclosure. When these alerts are triggered in the loan file, the required completion fields are listed. Once these fields are populated, the Disclosure Ready Date on the alert screen in the loan file will be populated. For information on configuring these alerts, refer to the Encompass 24.1 release notes.
The following alerts are available when configured by an administrator:
-
Three-Day Disclosure Requirements
-
At App Disclosure Requirements
-
Redisclose Loan Estimate (Rate Lock)
-
Redisclose Loan Estimate (Changed Circumstance)
To Manage Disclosure Alerts:
-
From a loan in the web version of Encompass, select the Alerts tab.
-
Select one of the disclosure alerts to view the details of the alert.
-
Enter any data missing in the Fields Needed for Completion section, and then select Update. Once the required fields are fulfilled, the Disclosure Ready Date field is populated.
Alert Example:

Important Notes:
-
When a loan is duplicated or borrowers are swapped:
-
The date fields in the Fields Needed for Completion list are cleared out and the system re-checks the loan to determine if it meets the alert requirements.
-
Disclosure Tracking logs are not re-checked prior to the system reviewing the loan again for the alert requirements. Even if initial disclosures have been sent and a Disclosure Tracking record has been created, the date fields are cleared.
-
If borrowers are swapped in the loan after initial disclosures have been sent, a redisclosure is required.
-
-
When working with the At App Disclosure Requirements, Redisclose Loan Estimate (Rate Lock), and Redisclose Loan Estimate (Changed Circumstance) alert, additional fields are included in the Fields Needed for Completion list if the Disclosure Fulfillment service is running for the Encompass instance. These fields are:
-
Field ID 5012 - Scheduled Fulfillment Date
-
Shipping To*
-
URLA.X197 - Borrower Street Address (Mailing Address)
-
1417 - Borrower City (Mailing Address)
-
1418 - Borrower State (Mailing Address)
-
1419 - Borrower ZIP Code (Mailing Address)
-
FR0126 - Borrower Current Street Address
-
FR0106 - Borrower Current City
-
FR0108 - Borrower Current ZIP Code
*Only one group of these Shipping To fields in the loan must be completed to satisfy the alert requirements. Either all of the FR0xxx fields or all of the other group of Shipping To fields
-
-
Shipping From
-
3343 - Lender Current Street Address
-
3344 - Lender Current City
-
3345 - Lender Current State
-
3346 - Lender Current ZIP Code
If the service is stopped at any time, these fields will no longer be displayed in the list.
-
-
ENCW-82315
Encompass eFolder
The eFolder is now available in Encompass for users who utilize the new document viewer. The eFolder provides a central location for Electronic Document Management (EDM) within Encompass, allowing you to access and manage the electronic files, documents, and conditions associated with a loan. The eFolder tracks document-related activities wherever they take place. For example, if you order a credit report from the Borrower Summary form, the request is recorded in the eFolder, and the report can be stored in a Document Folder. The eFolder in the web version of Encompass provides all of the features and functionality provided in the desktop version of Encompass, along with an enhanced user experience and usability.
For detailed information about the eFolder, please review the eFolder User Guide.
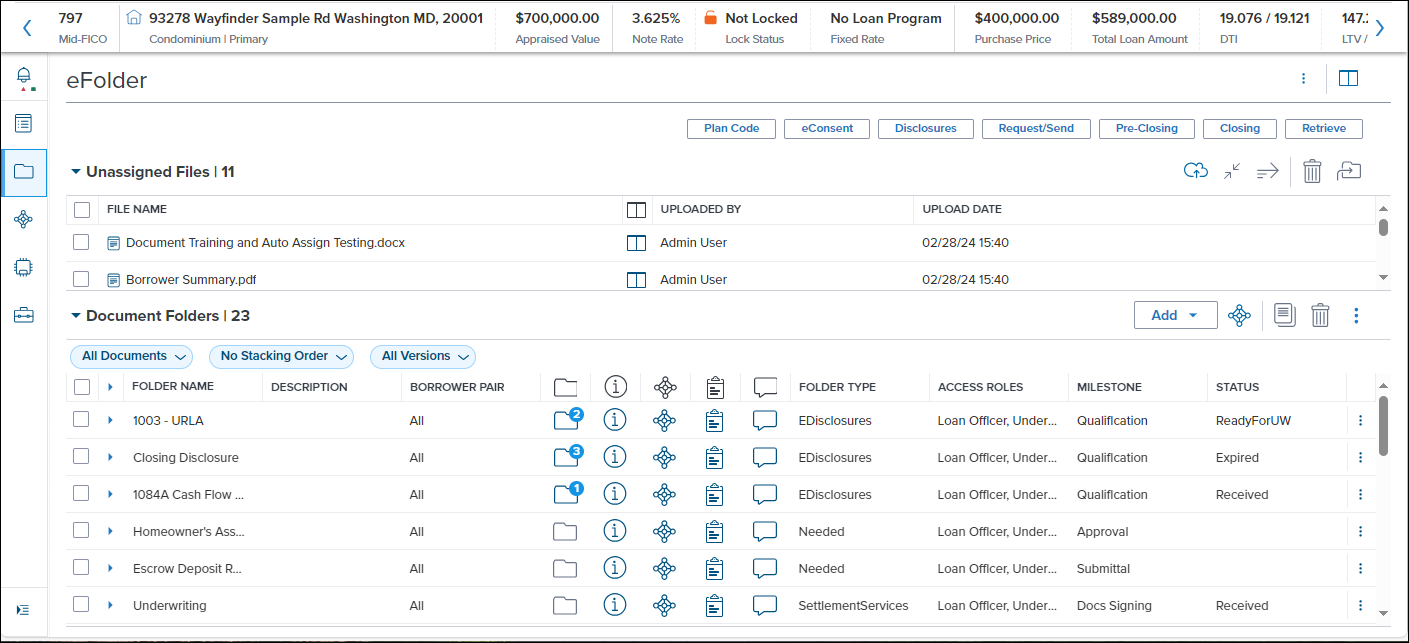
The new eFolder option in the left navigation window in the web version of Encompass may be visible in some pre-release 24.1 test instances. However, it is not intended for use until the production release of Encompass 24.1 on April 6. Only then will all eFolder functionality be available.
DOCP-50991
Starting in this 24.1 release, Encompass users can now generate initial disclosures and send them to borrowers.
When the disclosures are sent, your borrowers are notified by email that disclosure documents are available in Encompass Consumer Connect (or the Loan Connect). Borrowers can print and then return the documents by fax (using the provided fax cover sheet) or by mail, or they can provide an electronic signature and you can then retrieve the documents from an Encompass Consumer Connect website or the Loan Connect.
Your Encompass administrator determines whether you can select your own packages or whether the packages are automatically selected for you. Authorized users can also reorganize, add or remove documents from the package. The documents in the package are based on the selected plan code, as well as loan-specific information (for example, the state in which the subject property is located).
Use the new Disclosures button provided in the eFolder to begin the process of generating initial disclosures. Refer to the Send Initial Disclosures online help topic for step-by-step instructions for generating and sending initial disclosures.

Prerequisites in Encompass for Sending Disclosures
-
You must be using Encompass 24.1 or later.
-
The Encompass instance must have the Consumer Connect Borrower Account Linking feature (OTP) enabled for the lender to send eConsent, disclosures or other files. This is a limited availability feature that must be requested through the ICE Mortgage Technology Resource Center. More information on this feature can be found In the Borrower Account Authentication and Loan Linking guide.
-
In the desktop version of Encompass:
-
In Encompass Settings, ensure that the loan officer user is associated with your company's published Encompass Consumer Connect site. Use the Company/User Setup > Organization/Users setting to open the loan officer's User Details pop-up window, and then set the Site URL for the site in the Consumer Connect Site section.
-
In Encompass Settings, use the options in the Docs Setup settings to create and manage the eDisclosures that will be provided to users when they generate and send disclosure packages.
-
In Encompass Settings, use the eFolder Setup > Documents setting to add Encompass standard and custom forms to a predefined disclosure package.
-
Use the Personas settings to grant permission to access and work with disclosures, disclosure plan codes, and disclosure stacking templates when generating disclosure packages.
-
NDE-15950, ENCW-73994
Disclosure Tracking
The Disclosure Tracking tool is now available in the web version of Encompass. The Disclosure Tracking tool provides disclosure timelines and tracking dates, the disclosure history, and the latest disclosure details. Use this tool to log tracking entries for the Loan Estimate, Closing Disclosure, Settlement Service Provider, and Safe Harbor disclosures.
To Open the Disclosure Tracking Tool:
-
From a loan in the web version of Encompass, select Tools from the left navigation menu.
-
Select Disclosure Tracking.
Compliance Timeline:
The Compliance Timeline calculates important time periods and dates according to RESPA regulations. All fields, with the exception of the Estimated Closing Date, are read-only and calculated automatically.
LE Tracking: The LE Tracking section is used to track when the initial and revised Loan Estimate is sent and received by the borrower. All fields are read-only.
CD Tracking: The CD Tracking section is used to track when the initial and revised Closing Disclosure is sent and received by the borrower. All fields are read-only.
Other Tracking: The Other Tracking section is used to capture the date on which the Affiliated Business Disclosure, CHARM Booklet, HUD Special Booklet, HELOC Brochure, and other documents are sent to the borrower.
Disclosure History: The Disclosure History section contains a tracking entry for each disclosure that is sent to a borrower. Each entry displays in a separate row with columns for the following information:
-
Sent Date
-
Method used to send the disclosure
-
User who sent the disclosure
-
Number of printed forms in the disclosure package
-
Individual columns indicating whether the LE, CD, Safe Harbor, and Provider List were included in the package
-
Borrower Pair the package was sent to
-
Whether the disclosure included in the timeline
-
Disclosure Type (initial or revised)
An entry can be added to the Disclosure History using three different methods. Entries can be added automatically or manually.
Automated Disclosure History Entry:
A Disclosure History entry is automatically added when:
-
A document that is included in the Disclosure Tracking settings is requested from the borrower using the eFolder.
-
A document that is included in the Disclosure Tracking settings is sent to the borrower as part of an initial disclosure package using the eFolder.
-
A document that is included in the Disclosure Tracking settings is printed using the eFolder.
To Manually Add a Disclosure History Entry:
-
In the Disclosure History section, select Add.
-
When prompted, select one or more disclosure types: Disclosure, Settlement Service Provider List, Settlement Service Provider List - No Fees, or Safe Harbor.
-
When Disclosure is selected, select LE or CD to indicate whether the Loan Estimate or Closing Disclosure is being disclosed.

-
-
Select Add.
To Exclude a Disclosure History Entry:
After an entry is added to the Disclosure History, it cannot be deleted. However, you can exclude an old or invalid entry so it is not included in the Compliance Timeline, LE Tracking, or CD Tracking sections. When a Loan Estimate or Closing Disclosure is excluded, the Disclosure Tracking summary dates are re-calculated. If the Loan Estimate or Closing Disclosure is the most recently disclosed version, the Last Disclosed fee in the Fee Details window on the Fee Itemization and the disclosure date fields on the Loan Estimate or Closing Disclosure forms are updated to reflect the removal of the disclosure.
A Loan Estimate cannot be excluded from the timeline when the Intent to Proceed checkbox is selected on the Disclosure Details pop-up window. The Intent to Proceed checkbox must be cleared before the first Loan Estimate can be excluded from the timeline. A Loan Estimate tracking entry that is excluded from the timeline can be modified, but the Intent to Proceed checkbox cannot be selected.
-
Select an entry from the Disclosure History list.
-
Select Exclude From Timeline.
-
The entry is still visible in the Disclosure History, but it is no longer included in the Compliance Timeline, LE Tracking, or CD Tracking sections.
-
To add an excluded entry back to the timeline, select the entry and click Include in Timeline.
When an excluded entry is included again, it retains the same values it had before being excluded. The disclosures are re-evaluated to determine the Disclosure Tracking dates. If a Loan Estimate or Closing Disclosure is included, and it is the most recently disclosed version of the Loan Estimate or Closing Disclosure, the Last Disclosed fee in the Fee Details window on the 2015 Itemization and the disclosure date fields on the Loan Estimate or Closing Disclosure input form are updated to reflect the removal of the disclosure.
-
ENCW-84142
A new Withdraw Consent option has been added to each eConsent request on the eConsent Status slide out panel for team members who are authorized to withdraw eConsent requests. This authorization is defined by the administrator as detailed in the Encompass 24.1 release notes. In addition, a new Withdrawn By column has been added, and details the Encompass user ID of the user who has withdrawn the eConsent.
To Withdraw eConsent:
-
From a loan, select Tools in the left menu and then select Disclosure Tracking.
-
Select the Search
 icon next to the eConsent field in the Compliance Timeline column.
 -
On the eConsent Status slide out menu, select the Menu
 icon at the end of the entry you want to withdraw consent from.
 -
Select Withdraw Consent.
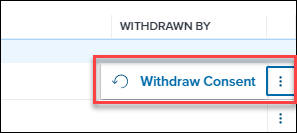
The source is column is updated based on where the eConsent withdrawal was performed. The user ID of the user who has withdrawn the eConsent is detailed in the Withdrawn By column:

When the Withdraw Consent button is selected, the eConsent agreement is withdrawn and the eConsent Status is updated to Rejected.

ENCW-94461
Forms & Tools Enhancements
The new Project Review tool is now available in Encompass. Use this tool to capture condominium details for a subject property that can then be used for the project approval process (similar to Fannie Mae's Condo Project ManagerTM and Freddie Mac's Condo Project Advisor® tools).
To Enter Project Information:
-
From a loan file , select the Tools tab in the left navigation menu.
-
Select Project Review.
The following fields are provided on this input tool to enable loan team members to manually enter pertinent data for the project:
-
Condo Approved - This checkbox is selected when the project is approved.
-
Project Type - Select the type of project for the subject property from the dropdown list provided.
-
Project Review Status - Current status of the project review.
-
Project Reviewer - Individual or agency reviewing the project.
-
Project Doc Expiration Date - Date the project's approval is set to expire if not renewed.
-
Project # of Units - Number of units being purchased. All units as a total for condo association.
-
Units Sold - Number of units which are actually sold to date.
-
CPM ID - The ID number for the condominium project. The number is used to determine whether the project acceptance by Fannie Mae is still valid and has not been rescinded or modified.
-
HUD Condo ID - FHA-assigned seven-character condominium project ID. The first character of the Condo ID specifies the HUD Homeownership Center (HOC) jurisdiction for the condominium project.
-
Condo EIN - The tax identification number (ID) or Employer Identification Number (EIN) for the condo association.
ENCW-94462
A new Property Disaster Declarations section has been added to the Property Information input form to enable users to create multiple records of disasters affecting a property on different dates if needed. Select the Disaster Declared checkbox (field ID 4953) at the top of the section to indicate that the property has been affected by a disaster.

Multiple records can be created for disasters in a manner similar to the records created for the Verification of Employment (VOE) or Verification of Liabilities (VOL) verification forms. To add records for disasters, select the Disaster Declarations button at the top of the section to open the Disaster Declaration page.
On the Disaster Declaration page, select Create Record to add an entry. Each time you add an entry, it displays in a new entry on the left side. Each record includes a new collection of fields that are editable and do not have any logic or validations. The fields in the panel to the right of the record entries are based on the FEMA Web Declaration Areas defined at: https://www.fema.gov/openfema-data-page/disaster-declarations-summaries-v2
-
FEMA Declaration String (field ID FEMA0101)
-
Disaster Number (field ID FEMA0102)
-
Declaration Type (field ID FEMA0103)
-
Declaration Date (field ID FEMA0104)
-
Fiscal Year Declared (field ID FEMA0105)
-
Incident Type (field ID FEMA0106)
-
Declaration Title (field ID FEMA0107)
-
IH Program Declared (field ID FEMA0108)
-
IA Program Declared (field ID FEMA0109)
-
PA Program Declared (field ID FEMA0110)
-
HM Program Declared (field ID FEMA0111)
-
Incident Begin Date (field ID FEMA0112)
-
Incident End Date (field ID FEMA0113)
-
Disaster Closeout Date (field ID FEMA0114)
-
Declaration Request Number (field ID FEMA0115)
-
Last IA Filing Date (field ID FEMA0116)
-
Last Refresh Date (field ID FEMA0117)
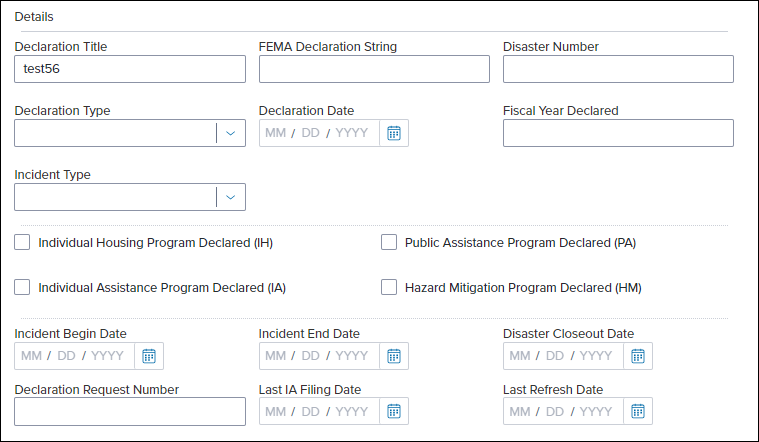
Users can remove entries by selecting the Delete  button.
The top three entries on the pop-up window are copied to the Property Information form. If there are fewer than three (3) entries, then only the number of entries on the loan display in this section.
ENCW-92440
A new Loan Information section has been added to the RegZ input form. This section contains fields found on the RegZ - CD input form in the desktop version of Encompass. This section displays the loan number, MERS information, loan dates, rescission information, and closing related information.
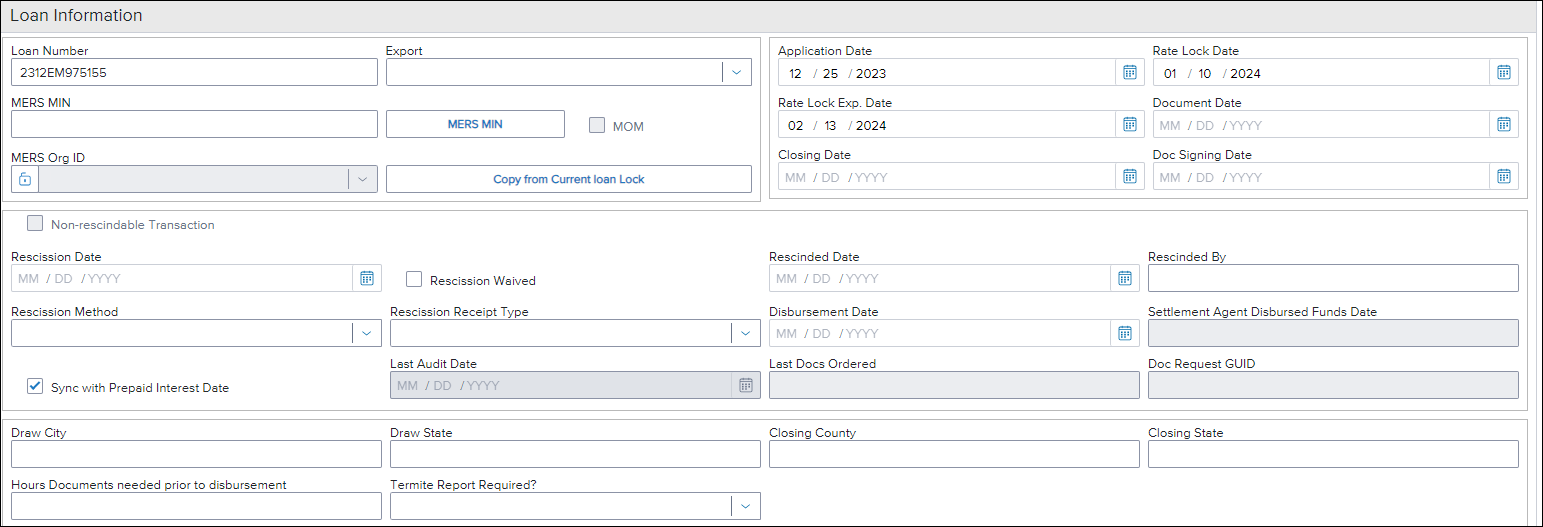
A new Initial Disclosure section has also been added to the RegZ form. This section contains information about initial disclosures sent on the loan using the Send Disclosures feature. When initial disclosures have been sent, the fields are populated with data pertaining to that action.

Note: These fields are specific to the web version of Encompass and are note updated when the initial disclosure process is performed from the desktop version of Encompass.
ENCW-82331, ENCW-89082, ENCW-99669
The 2018 version of the HMDA information form has been added to the web version of Encompass. Use the HMDA Information input form to provide required information for government monitoring of loan applications. The Home Mortgage Disclosure Act (HMDA) requires lending institutions to report public loan data that can be used to determine whether financial institutions are serving the housing needs of their communities, to help public officials to distribute public investment funds to attract private investment to areas where it is needed, and to identify possible discriminatory lending patterns.
The Apply Partial Exemption and Recalculate HMDA options will be added in a future release.
To Access the HMDA Information Form:
-
From a loan, select the Forms option in the left navigation menu.
-
Select HMDA Information.

For this initial release, two of the three forms from the desktop version of Encompass are available on the web.
-
2018 HMDA Originated/Adverse Action Loans - This form displays information that is reported for a loan that is originated by your company and receiving a credit decision in 2018 or later. The tab displays when any option except 6. Purchased is selected for the Action Taken (field ID 1393).
-
Repurchased Loans - This form displays information that is reported for a loan that is purchased by your company in 2018 or later. The form displays when you select the Repurchased Loans button at the top right of the form. This button is only enabled when a value is entered in the Repurchase Date (field ID 3312).
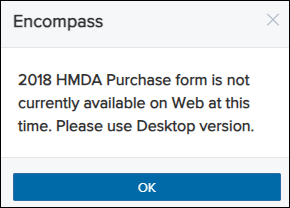
Currently, the HMDA Purchased input form is not available in the web version of Encompass. When attempting to view the Purchased Loans form by selecting 6. Purchased Loan in the Action Taken field, users are presented with the following message:
ENCW-83454
The Fee Variance Worksheet has been added to the web version of Encompass. Use the Fee Variance Worksheet to view differences between fees currently entered on the Fee Itemization form, fees disclosed on the Loan Estimate, and fees disclosed on the Closing Disclosure. The Fee Variance Worksheet is populated when the initial Loan Estimate is disclosed to the borrower. It is updated when fees change on the 2015 Itemization, when the Closing Disclosure is disclosed, and when the Loan Estimate or Closing Disclosure are redisclosed.
The first five sections of the worksheet are used to identify potential tolerance violations by viewing differences between disclosed fees and fees that have since been updated on the Fee Itemization. When all disclosures have been sent to the borrower and the loan is ready to close, the Tolerance Cure section at the bottom of the worksheet calculates any variance that exceeds the tolerance limit and provides fields where you can enter the amount applied toward the cure and describe how the cure was addressed.
To Access the Fee Variance Worksheet Tool:
-
From a loan, select the Tools option in the left navigation menu.
-
Select Fee Variance Worksheet.
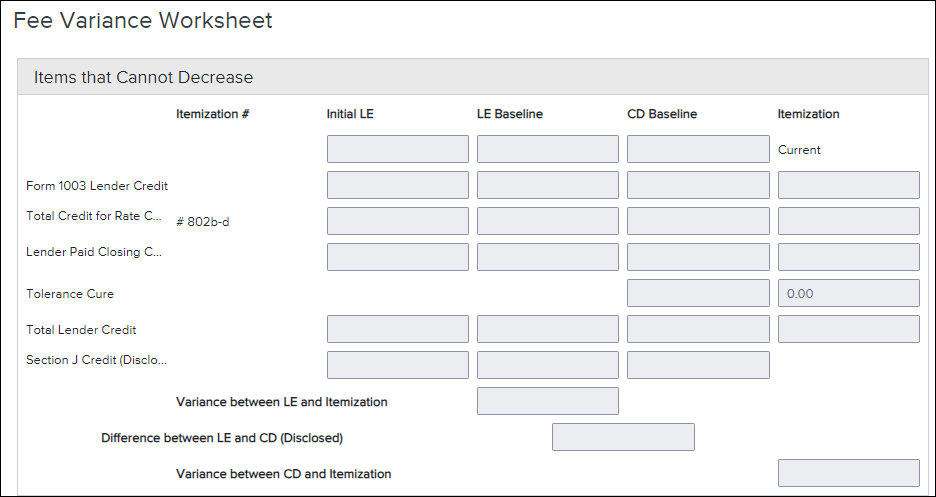
Fee Variance Alert
When a variance condition occurs, the web version of Encompass displays the Good Faith Fee Variance Violated alert.
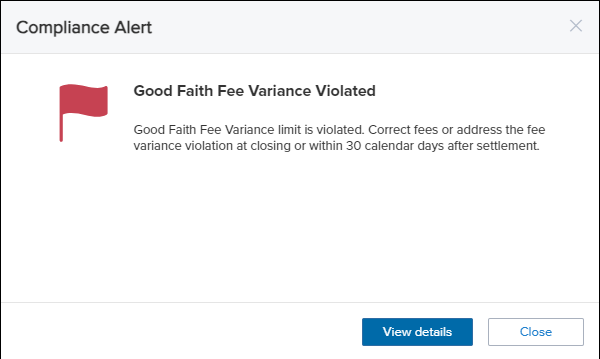
The alert triggers when one of the following conditions occurs:
-
In the Items that Cannot Decrease category, a credit is decreased or removed.
-
In the Charges that Cannot Increase category, a charge is increased or added, or an amount is added in one of the baseline adjustment fields for this category.
-
In the Charges that in Total Cannot Increase more than 10% category, the total for fees in the category increases beyond 10% of the baseline (i.e. the legal limit) or an amount that exceeds the 10% limit is added to one of the baseline adjustment fields for this category.
Select View Details to view information related to the variance and the fields that triggered the violation. To fix the violation, select Cure Variance on the alert and provide details on the Good Faith Fee Variance Resolution pop-up window.

ENCW-61333
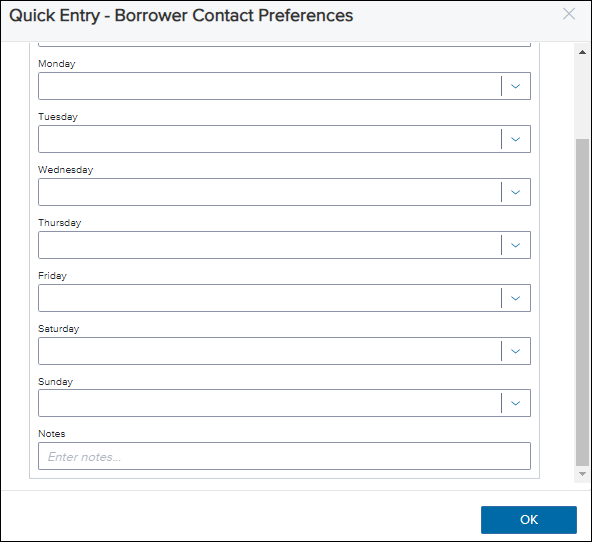
The Borrower/Co-Borrower Contact Preferences window has been updated to display one column of fields instead of two. Additionally, a new Notes field has been added to this window, where you can add additional information about the borrower contact preferences such as a set time to contact them, whether to use the mobile phone vs. home phone, or any other preference information that cannot otherwise be indicted in the pop-up window. This new field is available in the contact preferences for the borrower (field ID 5013), co-borrower (field ID 5014), and non-borrowing owner (field ID NBOC0141).
Old Window:

New Window:
ENCW-100090, ENCW-101142, ENCW-95553
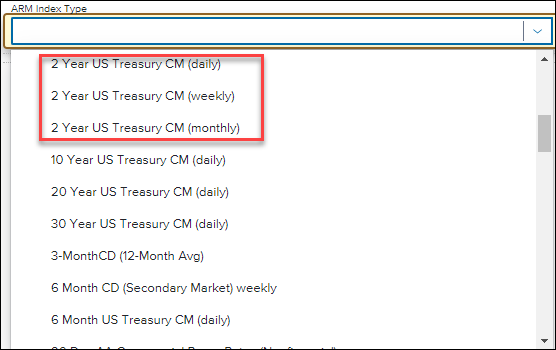
The following new options are now provided in the ARM Index Type dropdown field (field ID 1959) provided on the HELOC Program (and other) forms:
-
2 Year US Treasury CM (daily)
-
2 Year US Treasury CM (weekly)
-
2 Year US Treasury CM (monthly)
These new options are also now provided with the following dropdown fields:
-
ARM Index Type dropdown field (field ID 4512) on the Lock Request input form
-
ARM Index Type dropdown field (field ID 1959) on the State Specific Information - New York form
ENCW-94859, ENCW-94441
The following label changes have been made for three Freddie Mac options in the ARM Index Type dropdown field (field IDs 1959, 4512, LE2.X96) per Freddie Mac’s guidance:
-
Freddie Mac PMMS US 15-Year Fixed Rate changed to Freddie Mac PMMS US 15-Year FRM
-
Freddie Mac PMMS US 30-Year Fixed Rate changed to Freddie Mac PMMS US 30-Year FRM
-
Freddie Mac PMMS US 5-Year Adjustable Rate changed to Freddie Mac PMMS US 5-Year ARM (Retired)

ENCW-100088
A new checkbox is now provided to indicate that the lot for a construction loan is owned free and clear. The Lot Owned Free and Clear (field ID 5015) is read-only by default, but is enabled for editing when the Refinance checkbox is selected first. The new checkbox is located in the Lot/Land Status section on the Application View > Loan Information form and on the Construction Management > Loan Information form.

ENCW-100451, ENCW-100810
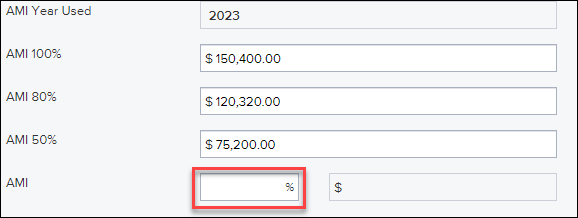
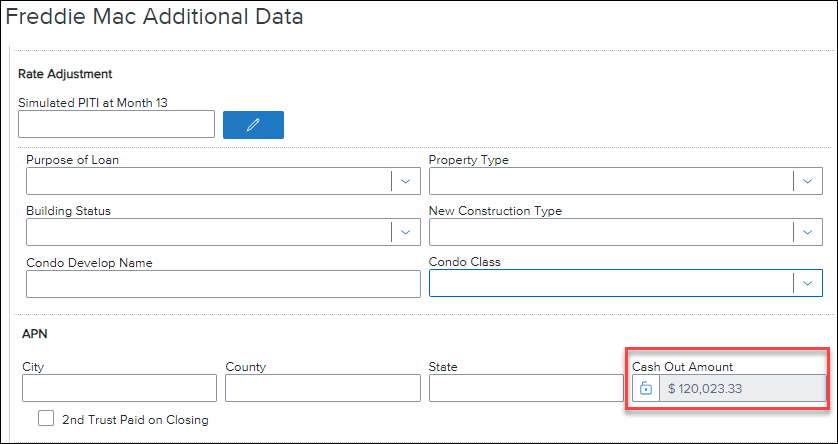
A new AMI Year Used field (field ID 4970) has been added to the Affordable Loan Eligibility section on the following input forms:
- Borrower Summary - Origination
- Fannie Mae Additional Data
- Freddie Mac Additional Data
When the administrator has enabled the Area Median Income setting in the Encompass Admin Tools > Settings Manager, the AMI data for the loan is automatically populated when the subject property ZIP code (field ID 15) is entered for a loan. Encompass queries the Area Median Income (AMI) Limits table in the Encompass Settings > Tables and Fees and applies the most current year's AMI limits. The AMI Year Used field indicates the year of the AMI limits used for the loan.

For information on enabling the Area Median Income setting, view the New Encompass Admin Tools Settings for Automated Data Completion entry in the Encompass release notes.
ENCW-99640
As part of Fannie Mae's ULDD Phase 5(1) specification updates, a new field to capture the Servicing Transfer Effective Date (field ID ULDD.X200) has been added to the ULDD/PDD’s Fannie Mae tab.

The following fields have been added to the Freddie Mac tab on the ULDD/PDD input form.
- Document Custodian ID (field ID ULDD.X114)
- Servicer ID (field ID ULDD.X116)
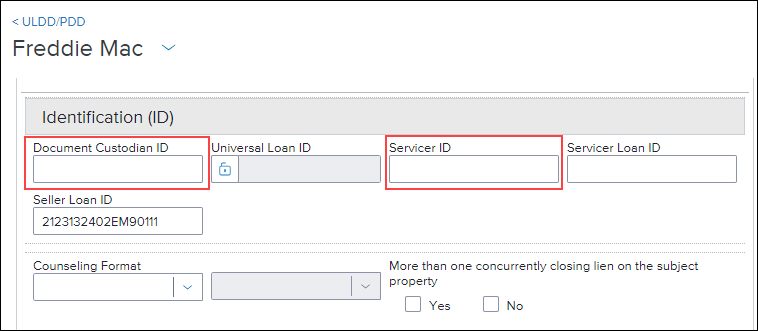
These fields were already provided on other input forms in previous versions of Encompass.
The Supplemental Insurance field (field ID URLA.X144) is now included in the Total Estimated Monthly Payment section (in the 1400. Total Estimated Settlement Charges section) of the Fee Itemization input form. This field is read-only on this form and populated based on the value entered in the Supplemental Insurance (field ID URLA.X144) field on other input forms like the Application View > Loan Information Supplemental Property Insurance quick entry window.
ENCW-100093
Two existing fields have been added to the Borrower Summary - Origination form:
- Borrower First-Time Homebuyer (field ID 4973)
- Co-Borrower First-Time Homebuyer (field ID 4974)
These borrower-level fields were already available on the ULDD/PDD input forms, so they have been added to the Borrower Summary - Origination input form to ensure first-time homebuyer data is displayed consistently within the loan.
ENCW-97109
Workflow Management
A new Notification Templates feature has been added to enable administrators to define email notification templates. These templates can then be invoked by a workflow rule to send an email notification when a selected triggering event occurs. Administrators can define template names, email recipient roles, a subject, and email body. The email subject and body can include field IDs so that the messages can dynamically populate loan data. Additionally, up to three email address can be added to the recipient list.
Once the templates have been configured, they can be sent as a result of a workflow rule.
To Configure the Sender Information:
To send notifications, the sender information must first be configured. (In a future update, the sender information will be optional.)
Adding a Sender Email is a multi-step process that involves editing your email domain's DNS records within a set period of time. After following the steps below, the Domain Verification Configuration Records email will be sent to the email address you enter. Follow the instructions in the email to complete the change within 72 hours of receiving the email.
You will need access to edit your email domain's DNS records. If you do not have access to edit your email DNS, you can forward the Domain Verification Configuration Records email to the person who does.
-
From the Encompass Admin Portal, select Workflow Management from the left navigation menu, and then select Notifications Templates.
-
Select Sender Configuration to expand the sender options.
-
Enter the email address that will be used to send notifications to the Add Email Address, and then select Send Verification.

To Add and Configure a Notification Template:
-
From the Encompass Admin Portal, select Workflow Management from the left navigation menu, and then select Notifications Templates.
- Select New Template.
- Enter the template name (required) and description (optional).
- The Notification Type field defaults to Encompass Internal Users as that is the only option for the initial release.
- In the Additional Emails section, select the send type, and define the email address to send to.
- You can select to send a regular email, a blind carbon copy (bcc), or carbon copy (cc).
-
In the Subject field, enter the subject for your email.
-
Use the editor to create an email. To add a field to the email, select Insert Field <>. This option is used to automatically populate the message with specific fields from the scenario data.
-
Select a field name to insert, and then select Apply. When the email is sent, these fields display the details from the loan.
-
When you are finished editing the email, select Save.
ENCW-83453
A new Scheduler Templates feature has been added to enable administrators to define schedulers that can be started or canceled by workflow rules. Schedulers can be used to configure events and automation based on the passage of time. Scheduler templates can be used in conjunction with a workflow rule to manage loan processes with specific timing requirements without opening the loan. Scheduler templates must be configured before they can be used before a workflow rule.
To Add and Configure a Scheduler Template:
-
From the Encompass Admin Portal, select Workflow management from the left navigation menu and then select Scheduler Templates.
- Select New Template.
- Enter the template name (required) and description (optional).
- In the Scheduler Configuration section, select the Calendar Type.
- Encompass Compliance calendars are used to determine which dates will be included in the Completion Date calculation.
- Select the Time Zone that the Scheduler will use.
- Enter the number of days for the timer in the Complete Duration.
- The Interval field currently only supports "Days" and is selected by default.
- Select Before or After to indicate if the scheduler is complete before or after the event date specified in the From field.
- Select Loan Data in the From field to start the scheduler based on an Encompass date field value
- When Loan Data is selected, you must enter a field id in the Date Field ID field that the completion date will be calculated from.
- Select Event Date in the From field to start the scheduler based on when the Workflow Rule is executed.
- Specify the time of day that the scheduler will complete in the Complete at (Time of day) field.
- Select Save
ENCW-83455
A new Automation Audit feature has been added to the application launcher. This new feature enables administrators to view the status of attempted workflow rule automation for a specific loan or type of resulting action. Lenders can also see active schedulers, and their projected completion date/time, on a specific loan.
To Search the Automation Audit by Loan:
-
From the web version of Encompass, select the App Launcher
 and then select Automation Audit.
 -
Enter the loan GUID in the Loan GUID field, and select Search.
-
To view any active schedulers on the loan, select Active Schedulers to expand the section. The name of any active schedulers and the projected completion date and time display.
Any actions on the loan that a workflow rule attempted to execute are displayed in the Attempted Actions section. The workflow rule name, attempted action, attempted action status, status details, and the execution date are displayed. As with many tables in the web version of Encompass, users can sort and search by various columns listed in the Attempted Actions section.

To Search by Attempted Action:
-
From the web version of Encompass, select the App Launcher
 and then select Automation Audit.
 -
Select Search by Attempted Action.
-
Select the desired action from the Attempted Action dropdown list.
-
Select the date range from the Date Range field, and then select Search.
Once the search has completed, a count by status (statuses that display vary by attempted action) displays on the left side. A list of the action attempts is displayed, grouped by workflow rule name. Also listed is the success rate and number of attempts for each workflow rule name.
Select the Arrow  on the status on the left side to view details of all the attempts that resulted in that status. For example, to view the list of attempted actions that failed, you would select the Arrow
  in the box listing the number of fails.

You can also select a workflow rule name on the right side of the search results to view details of every attempt for the specified action in the search period for that workflow rule.
ENCW-91867
A new Scheduler Completed triggering event has been added to Workflow Rules to work with the Start Scheduler resulting action. The triggering action enables the workflow engine to listen for the "completed" event produced by the scheduler service for your selected scheduler template.
To Select Scheduler Completed for the Triggering Event:
- From the Triggering Event tab on a workflow rule, select Scheduler Completed from the Triggering Event field.
- In the Select Scheduler field, select the scheduler that the rule should monitor for completion.
Only active scheduler templates will be available for selection in workflow rules.
ENCW-81944
A new Send Disclosures resulting action has been added to workflow rules which enables administrators to send disclosure packages when the workflow rule is triggered. This resulting action requires information loan fields for necessary information, such as the plan code, borrower email address, etc. Some of these fields are new in the Encompass 24.1 release as detailed in the New Disclosure Features section of the desktop version of Encompass 24.1 release notes. Additionally, the configuration defined in the Encompass Settings > Docs Setup > eDisclosure Packages settings configured in the desktop version of Encompass is used to determine the package type and document settings for each package. See the eDisclosure Packages online help topic for instructions for configuring the eDisclosure Packages portion in the desktop version of Encompass.
When this action is triggered on a loan, an attempt to disclose to all borrower pairs on the loan is automatically attempted at that time. This will also honor any Encompass Compliance Service (ECS) review settings that have been configured.
To Select Send Disclosures for the Resulting Action:
- From the Result tab on a workflow rule, select Send Disclosures in the Resulting action field and then select Add.
- Enter a description in the Description field, if desired. This description displays under the specific resulting action in the Added Resulting Actions section.
- In the Advanced Conditions field, define any conditions that, when met, enable the configured automation to execute. To validate the condition, select Validate.
- The conditions syntax utilizes the Visual Basic .NET programming language. For information on how this syntax works, see the Advanced Coding for Business Rules guide.
Nested actions should be utilized to make your users aware of the results of the attempted automation.
No other options are configured in the workflow rule. Refer to eDisclosure settings and Documents settings to determine how disclosures are generated on loans.
ENCW-81948
Nested Resulting Actions are now supported for Workflow Rules. With the introduction of this feature, lenders can create a task, send a notification, or start a scheduler based off the success or failure of an attempt of certain resulting actions. Nested actions are initially supported for the Send Disclosure resulting action.
To configure a Nested Action
- From the Result tab on a workflow rule, select the Menu
 next to a resulting action that supports nested actions.
 - Select Add Nested.

- A new entry is created under the resulting action labeled Select Nested Action. Select On Success to execute the action when the parent action is successful, or select On Failure to execute the action when the parent action is unsuccessful.
- Select Create Task, Start Scheduler, or Sent notification from the Resulting Nested Action field.
- Enter a description for the nested action, if desired. This description displays under the specific nested action in the Added Resulting Actions section.
- Based on the selected Resulting Nested Action in step three, select the task, scheduler or notification to use for the action.
Multiple On Success or On Failure nested actions can be added to a resulting action that supports this feature.
ENCW-82550
Advanced Conditions support has been added to enable lenders to define advanced conditions under each resulting action in a workflow rule. This enables administrators to manage small processes with branching logic within a single rule. These conditions are configured using the same structure as the Advanced Conditions section on the Conditions tab for workflow rules.
The conditions syntax utilizes the Visual Basic .NET programming language. For information on how this syntax works, see the Advanced Coding for Business Rules guide.

ENCW-91926
A new Send Notification resulting action is available. This resulting action enables a workflow rule to invoke a specific email notification template when the rule is triggered. Notification Templates must be defined before configuring this resulting action. See the Notification Templates Feature Added section above for directions on configuring notification templates.
To Select Send Notification for the Resulting Action:
- From the Result tab on a workflow rule, select Send Notification in the Resulting Action field and then select Add.
- Enter a description in the Description field, if desired. This description displays under the specific resulting action in the Added Resulting Actions section.
- In the Advanced Conditions field, define any conditions that, when met, enable the configured automation to execute. You can leave this blank to send the notification anytime your triggering event occurs on a loan.
- To validate the condition, select Validate.
- The conditions syntax utilizes the Visual Basic .NET programming language. For information on how this syntax works, see the Advanced Coding for Business Rules guide.
- To define the notification template to use, select Select template.
- On the Select Notification Template window, select the template from the list of active notification templates, and then select Apply.
ENCW-81949
A new Start Scheduler resulting action has been added to workflow rules which enables administrators to invoke the scheduler service to start the specified scheduler template.
To Select Start Scheduler as the Resulting Action:
- From the Result tab on a workflow rule, select Start Scheduler in the Resulting action field and then select Add.
- Enter a description for the resulting action in the Description field, if desired . This description displays under the specific resulting action in the Added Resulting Actions section.
- In the Advanced Conditions field, define any conditions that, when met, enable configured automation to execute.
- The conditions syntax utilizes the Visual Basic .NET programming language. For information on how this syntax works, see the Advanced Coding for Business Rules guide.
-
Select the scheduler template you want to be started in the Select Scheduler field.
- Only scheduler templates marked as "Active" are available for selection in workflow rules.
ENCW-82592
A new Cancel Scheduler resulting action has been added to workflow rules which enables administrators to "cancel" the specified scheduler template if it is no longer needed on a given loan. If the scheduler is not running on the loan the scheduler service will ignore the request
To Select Cancel Scheduler as the Resulting Action:
- From the Result tab on a workflow rule, select Cancel Scheduler in the Resulting action field and then select Add.
- Enter a description for the resulting action in the Description field, if desired. This description displays under the specific resulting action in the Added Resulting Actions section.
- In the Advanced Conditions field, define any conditions that, when met, enable the configured automation to execute.
- The conditions syntax utilizes the Visual Basic .NET programming language. For information on how this syntax works, see the Advanced Coding for Business Rules guide.
-
Select the scheduler you want to cancel in the Select Scheduler field.
- Only scheduler templates marked as "Active" are available for selection in workflow rules.
ENCW-82592
A new setting has been added to provide more control of when a Due Date is calculated for a task. This new setting enables administrators to choose to have task due dates calculated at the time the task is created or only when the task is moved to the In Progress status.
To Select a Due Date Calculation Basis:
- From the Encompass Admin Portal, select Workflow Management from the left navigation menu and then select Task Global Settings.
- Select Task Creation Date to indicate that the due date should be calculated based on when the task is created. Select In-Progress Status to indicate that the due date should be calculated based on when the loan is moved to the In Progress status.
- Select Save.
ENCW-94159
A new Group Assignment option has been added to the task and task group templates configuration page to enable a task or task group to be assigned to an Encompass user group when the task or task group is created on a loan. This option enables lenders to create shared task pipelines for teams within their organization. Previously, administrators were only able to assign tasks to an Encompass role.
To Assign a Task Template to a User Group:
- From the Encompass Admin Portal, select Workflow Management, and then select Task Templates.
- Create a task or select a task to edit from the left panel, and then select Edit
 on the right side.
 - On the Edit Task page, navigate to the Assignment section, and then select Group Assignment.
- Select a user group to assign the task to when the task is added to a loan.
- Select Save.
ENCW-94125
Tasks Pipeline
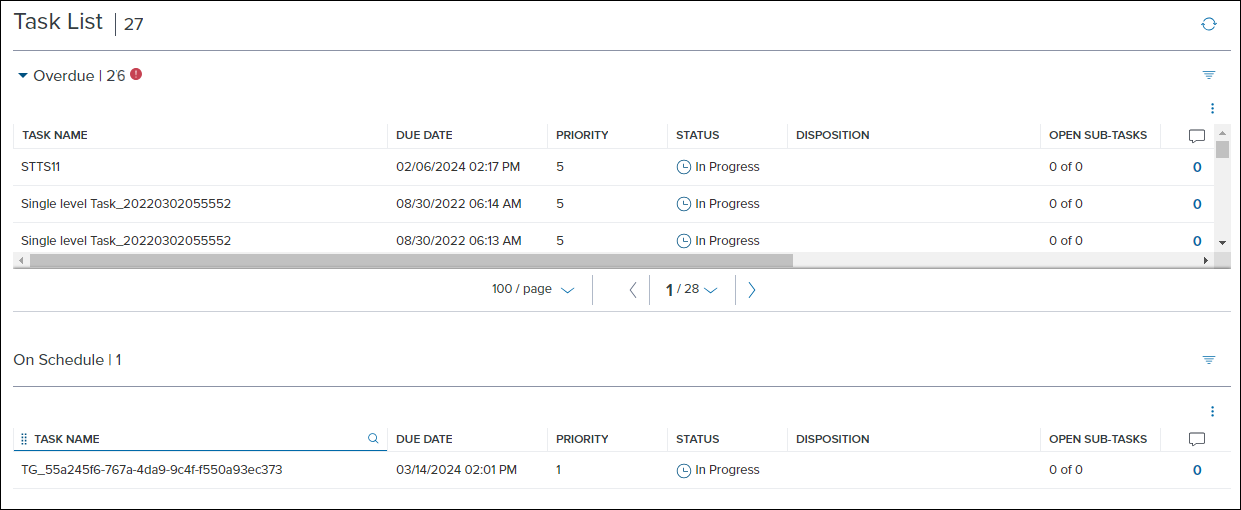
The Tasks pipeline has been redesigned to display tasks organized by due date and then priority. Tasks are grouped to display overdue tasks first, followed by tasks that are on schedule. This updated view enables users to quickly identify tasks that need attention first. Users can still sort and access their tasks from this view as before, but independent filters can be added to each section.
ENCW-81945
Services Management
A new Vendor Allocation feature has been added which enables administrators to configure rules to allocate service orders across multiple providers. Vendor allocations can be configured for the Flood, Fraud/ Audit Services, and Mortgage Insurance categories. When this option is enabled, users are presented with one vendor for the corresponding category when they place a manual order. The vendor displayed changes dynamically based on the allocation percentages defined by the administrator. Automated orders can also be configured to utilize Vendor Allocation rules.
To Add a Vendor Allocation Rule:
-
From the Encompass Admin Portal, select Services from the left navigation menu and then select Vendor Allocation.
-
Select Add Allocation Rule.
-
Select a category in the Category field.
-
To add a provider, select Add in the Authorized Providers section.
-
Select the provider from the dropdown list, and then select Add.
-
Repeat steps four and five until all providers have been added.
-
In the Allocation % column, enter the percentage each provider should receive. The total Allocation percentage must add up to 100%.
- In the Readiness Condition section, define the conditions that, when met, will cause the authorized user to see this service in their order options.
- The conditions syntax utilizes the Visual Basic .NET programming language. For information on how this syntax works, see the Advanced Coding for Business Rules guide. Additionally, you can use the Query Builder to define the conditions.
- In the Additional Required Fields section, select Add to define a required field ID that must be present on the loan.
- If you need to add more than one field, select Add Another for each field you need to add.
- To add authorized users who can override the vendor allocated provider selection, select Add in the Authorized Users section.
-
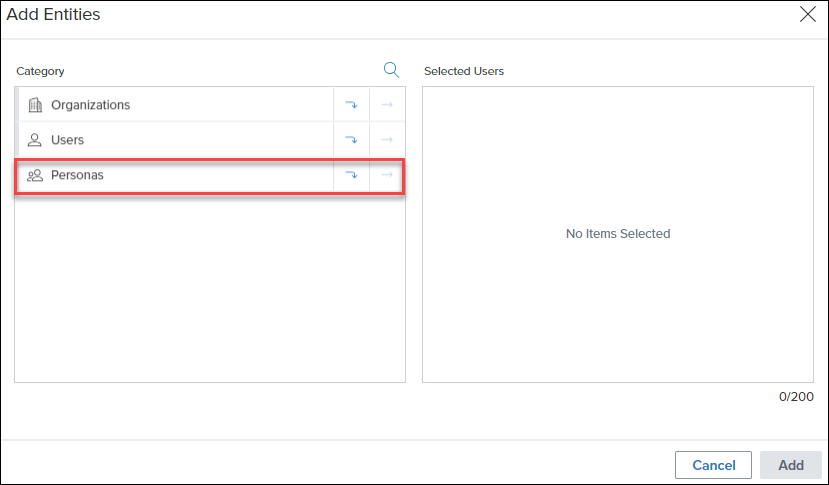
On the Add Entities window, navigate through the Category options to select the Users who will use this setup. To move to a category, select the Down Arrow
 icon. To move an individual user to the Selected Users column, select the Move Arrow
 icon. To search for a specific user, select the Search
  icon.
icon.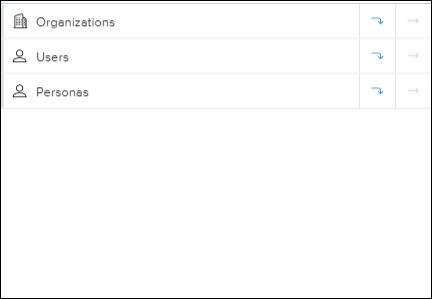
Administrators can select up to 200 users at a time on the Add Entities window before adding them to the Authorized Users list. Once added, the administrator can return to the Add Entities window if they need to add more users.
-
Once your users or organizations are listed in the Selected Users column, select Add.
If you need to edit the Vendor Allocation setup for a category, you can select Edit  on the card for that category on the main Vendor Allocation page. You can also delete an existing Vendor Allocation setup by selecting Delete
 .
.
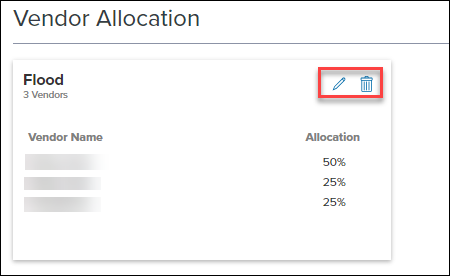
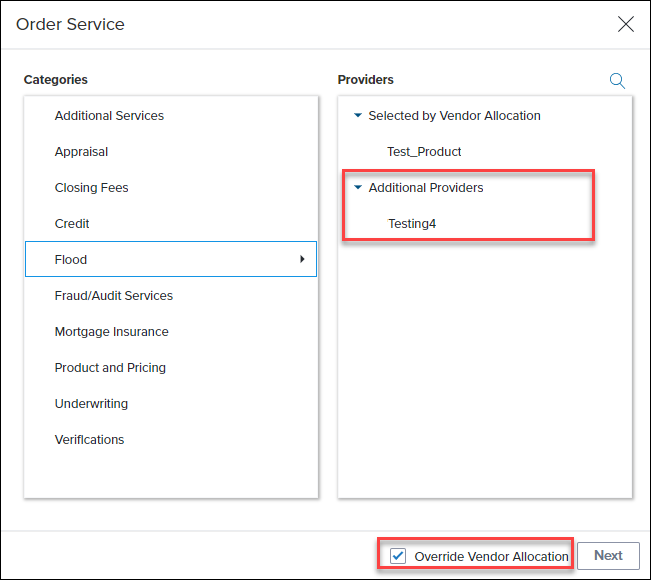
When a Vendor Allocation setup is configured for a category, and a user places a manual order for that category, the user is presented with one of the vendors selected by the system in accordance with the allocation percentages. If the user needs to place an order with another authorized vendor and the user is also designated as an authorized user in step 10 above, they can select the Override Vendor Allocation option to view additional providers. When the override option is selected, the user is able to select from any of the vendors that are included in the vendor allocation setup.
Example of Override Vendor Allocation Option:
ASO-15203
Vendor Allocation support has been added to automated rules for services to enable administrators to utilize existing Vendor Allocation setups with automated orders. To accommodate this change, a new Select using Vendor Allocation option has been added to the When rule conditions are met.. section.

When this option is selected, the Service Orders section displays the allocation percentage for each vendor in a new Allocation % column. If a vendor that isn't part of the Vendor Allocation setup is added to the Service Orders section, a Warning  is displayed in the Allocation % column to indicate that the vendor will not be used for the automation rule.
ASO-15763
The Services Management landing page has been updated to move several service setup items to a new menu. With the initial redesign, the configuration options for a partner configuration were displayed on the partner card. These configuration items, aside from the Service Setup option, have now been moved to a menu on the card. This change ensures that additional options can be added in one central location. To access these new options, select the Menu  icon on the card.
Old Card View:
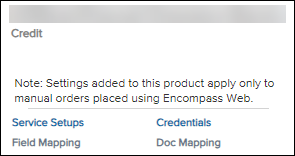
New Card View with Menu:

ASO-15645
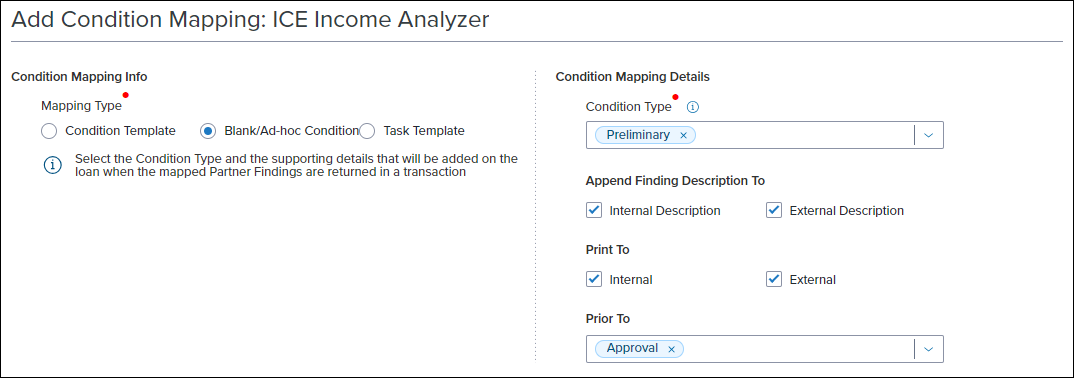
A new Condition Mapping feature has been added to the web version of Encompass. This feature enables administrators to map service order findings to conditions or tasks on a loan for partner integrations that support this feature. You can map findings to a condition template, a blank/ad-hoc condition, or a task template.
To Add Condition Mapping to a Provider:
-
Log into the web version of Encompass as an administrator.
-
From the Encompass Admin Portal, select Services Management.
-
Locate the service card for the partner you want to configure, select the Menu
 , and then select Condition Mapping.
 -
Select Add Condition Mapping to open the Add Condition Mapping page.
-
Select the condition type or task that will be added on the loan when the mapped findings are returned in the Mapping Type field.
-
In the Condition Mapping Details selection, select the specific details for the selection made in the previous step. This section is populated dynamically to support the three options in the Condition Mapping Info section.
-
When Condition Template is selected, you must select a Condition Template for the mapping. Additionally you can select to append the findings description to the internal and external description on the condition.
-
When Blank/Ad-hoc Condition is selected, you must select the Condition Type. Additionally you can select to append the findings description to the internal and external description, select to print to internal or external documents, and select the milestone before which the conditions must be resolved in the Prior To field.
-
When Task Template is selected, you must select a Task Template for mapping. Additionally you can select to append the findings description to the task description.
-
-
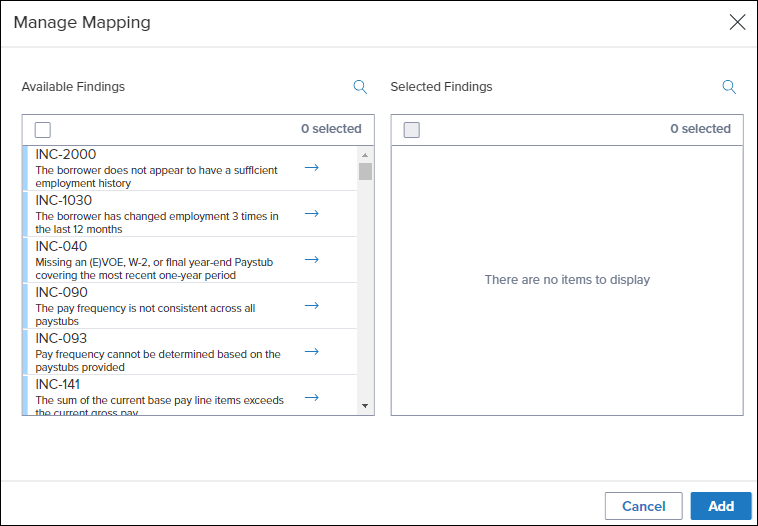
In the Provider Findings section, select Manage Mapping.
-
Select the findings to map to the condition or task from the list of available findings. To map the findings to the condition or task, select the Arrow
 .
. -
If you want to add more than one finding to a condition or task, select the name of each finding that you want to add, and then select the Arrow

-
-
Select Add.
-
Select Save.
The available findings listed in the Manage Mapping window originate from the provider. If you need assistance with understanding which findings to use for your mapping, contact the provider.
Once a condition mapping has been added, the details of the condition mapping are displayed on the main Conditions Mapping page. This page displays the Encompass Condition name, Provider Findings mapped to the condition, and the condition mapping type.
-
To edit an existing mapping, select the Menu
 to the right side of the entry you want to edit, and select Edit
  .
. -
To delete an existing mapping select the Menu
 to the right side of the entry you want to edit, and select Delete
  .
.
ASO-12918
A change has been made which enables administrators to add an entire persona to the list of authorized users when configuring a service setup. This update makes it easier to enable a targeted group of users, determined by persona, as authorized users for a specific service management setup.
ASO-15245
GSE Integrations and Services
The following GSE Integrations and Services updates are included with this release:
-
Underwriting Center: Updates to accessibility and Dual AUS buttons
For more information see the Release Notes for the GSE Integrations and Services 24.1 Major Release.
GSE-31158, GSE-31135
MI Center
The following Rate Quote Comparison updates are included in this release:
-
New MI Center Rate Quote Comparison Settings: Use this page to manage default behaviors on the Rate Quote Comparison page. With this release, you can only manage the default sort order for the quotes which are returned. Additional options will be available in future Encompass releases.

- Compare Rate Quotes: Data now displays from the most recent collection of rate quotes. Select the Compare Rate Quotes button to view new menu options - New Quotesand View Quotes from <date time> to view latest, specific rate quotes.
Only the most recent collection of quotes is available to view. For example, if the Compare Rate Quotes feature is executed five times, only the 5th and most recent one is displayed.

TQL-37411, TQL-39507
A new Coverage Activation panel has been added to the Order Summary page. When you select the Activate Coverage button and the event completes, the Order Summary page updates with new activation information such as activation status, an activation message from the MI provider, and the activation date and time.
Activation is available when:
* Loan has closing date <= current date
* Order in view has had fees imported to the loan

TQL-37322, TQL-39803
Underwriting Center
New Encompass users can access ICE Mortgage Analyzers directly within Encompass and enjoy better efficiency and user experience. By automating the traditional manual process of collecting loan information, lenders can use the ICE Mortgage Analyzers to accelerate their loan review process. It is recommended that you engage the ICE Mortgage Technology Professional Services team to assist with the perquisites and configuration for the ICE Mortgage Analyzers. Please contact your Encompass relationship manager for more information.
Please note, the ICE Mortgage Analyzers and the Compare and Import tool features described below are intended for use for new Encompass users only. Current users who select the Analyzers button in the Underwriting Center will receive an error that prevents them from proceeding due to an issue introduced in Encompass 24.1. This issue will be addressed in a future Encompass release.
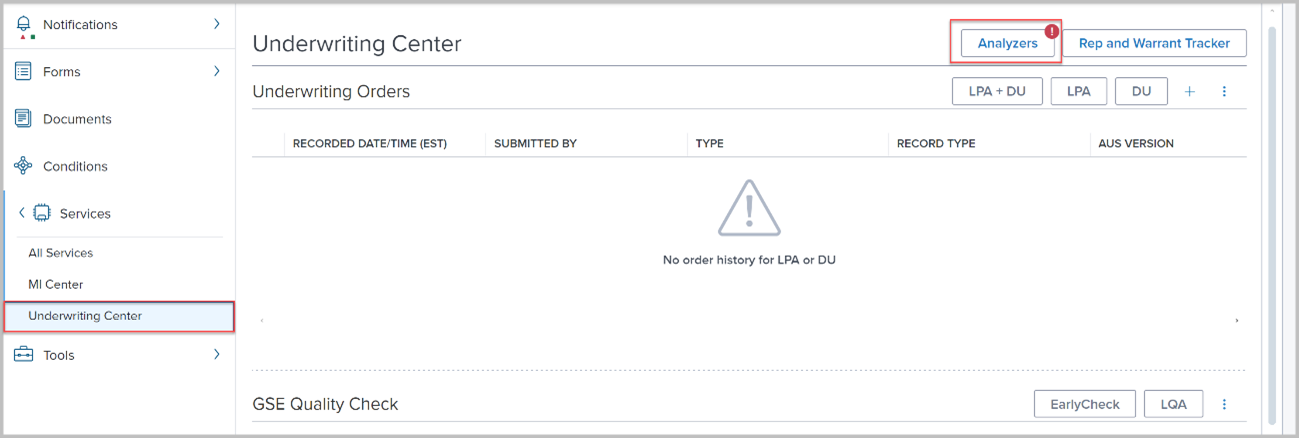
To access analyzers, navigate to the Underwriting Center, opening the Analyzers pane, and then select Income or Credit Analyzer.
Prerequisites
The following prerequisites must be completed in order to utilize Mortgage Analyzers in Encompass:
-
Your Encompass instance must be enabled for integration with Mortgage Analyzers (instance level validation)
-
Encompass loan must be mirrored in Mortgage Analyzers (loan level validation)
-
Workspace assigned to the user role must contain Mortgage Analyzers (user level validation)
AIQA-6591
An Encompass user's persona must be configured in the desktop version of Encompass in order to access Mortgage Analyzers in Encompass.
-
On the Encompass menu bar, click Encompass, and then click Settings.
-
On the left panel, click Company/User Setup, and then click Personas.
-
Select the Persona in the left panel.
-
Select the Data & Document Automation and Mortgage Analyzers tab.
-
Select Access to Mortgage Analyzers.

-
Click the Save icon to save your changes.
Please note, the ICE Mortgage Analyzers are intended for use for new Encompass users only. Current users who select the Analyzers button in the Underwriting Center will receive an error that prevents them from proceeding due to an issue introduced in Encompass 24.1. This issue will be addressed in a future Encompass release.
To Access Mortgage Analyzers in Encompass:
-
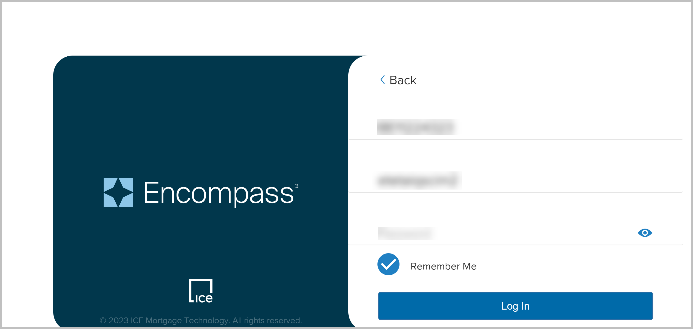
Log into the web version of Encompass.
-
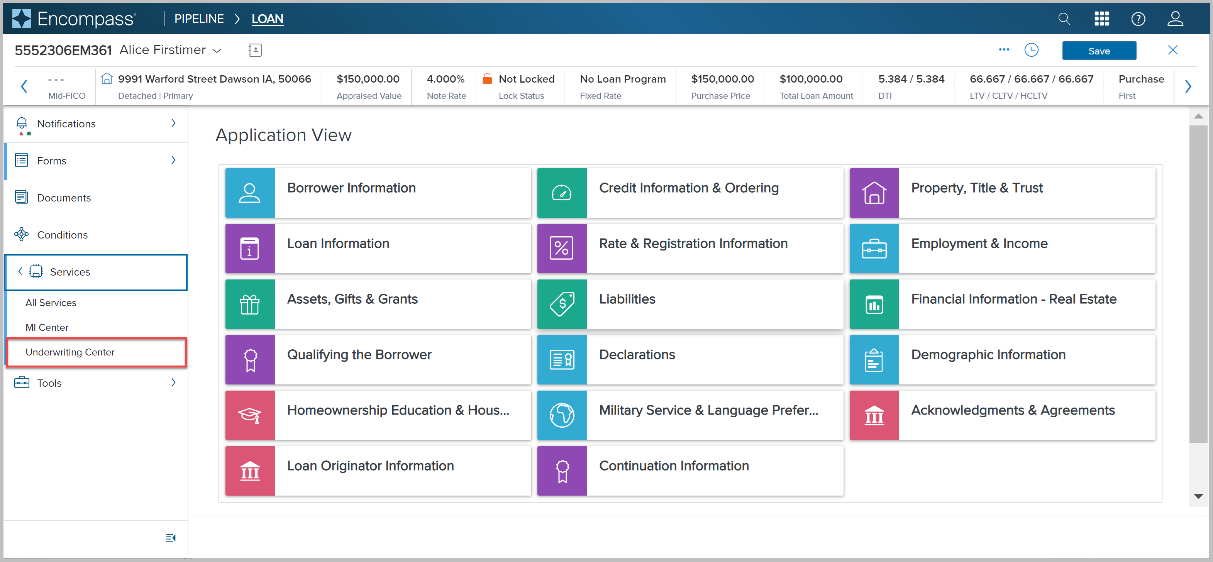
Select a loan in the Pipeline to open it.

-
Select Services in the left navigation menu.

-
Select Underwriting Center.
-
Select the Analyzers button.
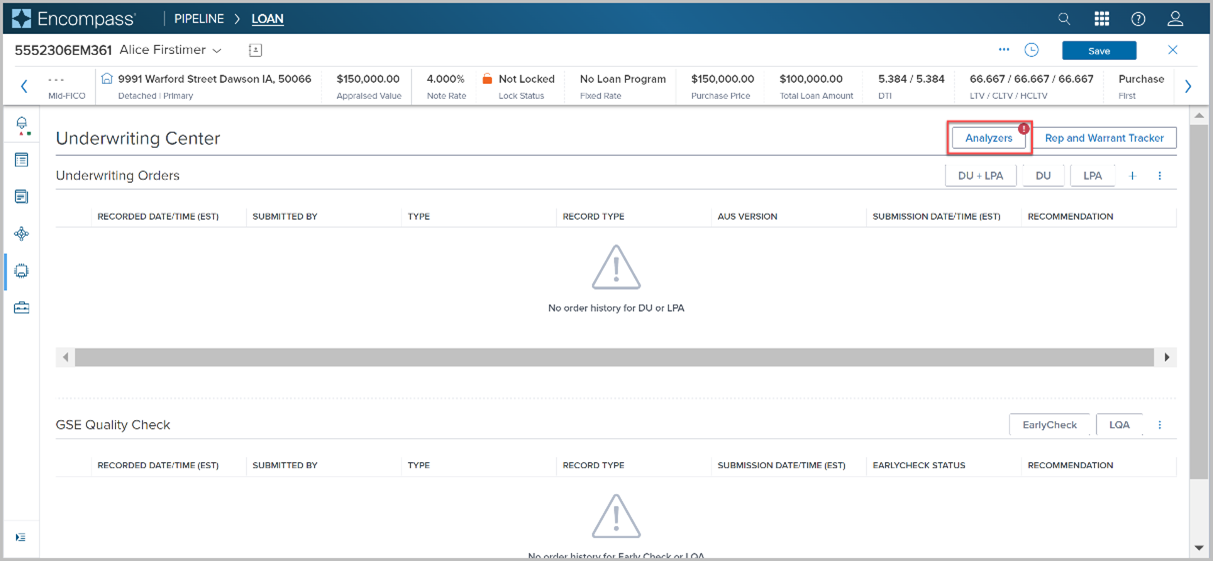
The Analyzers button launches a slide out menu where you can find applications arranged in the following categories:
-
Data Perfection: Business Association, Data Mapper, Filed Documents
-
Analyzers: Income Analyzer, Credit Analyzer
-
Tools: Audit Log, Data Inspector

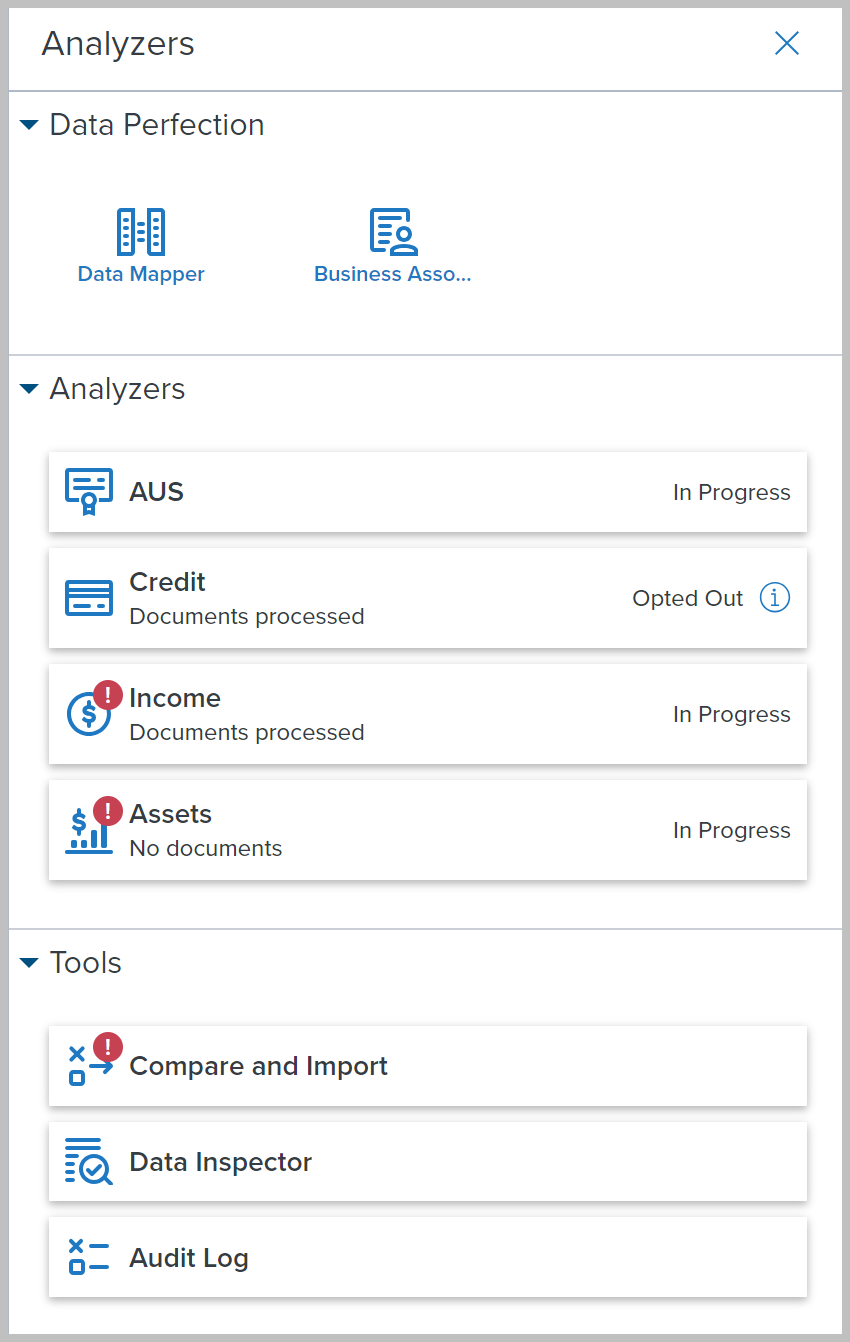
The appearance of the Analyzers button changes based on the status of the Analyzers:
-
When the Analyzers have been run and there are no exceptions, and there is at least one Analyzer that is not opted out, then the Analyzers button is displayed normally. The Analyzers button can be clicked, and the Analyzers will display with no exceptions when clicked from the menu.
-
When the Analyzers are ineligible or all of them are opted out, then a gray dot displays on the Analyzers button. Select the button to view the reasons why the Analyzers are ineligible.


-
When the Analyzers have been run and there are exceptions, an exclamation point displays on the Analyzers button. Click the button to access the Analyzers in order to view exceptions.


Exceptions in Data Perfection apps are also reflected on the Analyzers button.
AIQA-94
The Analyzers menu provides users with useful information for quick and easy insight into analyzers and supporting applications.
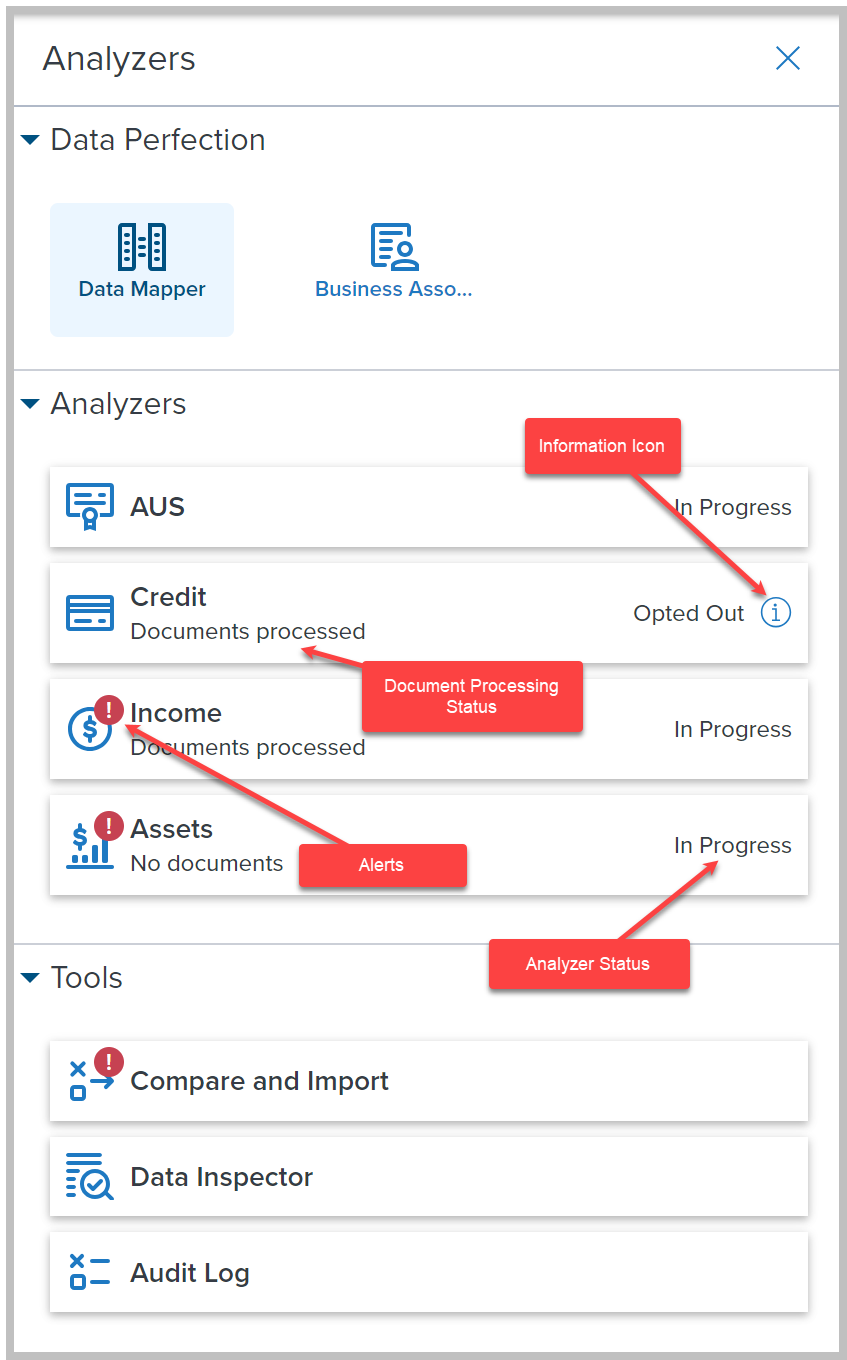
-
Categories: Applications are split into categories like Data Perfection, Analyzers, and Tools
-
Analyzers status: Status of each Analyzer is displayed in the respective Analyzer tab
-
Document processing status: Processing status of the Analyzer-specific documents
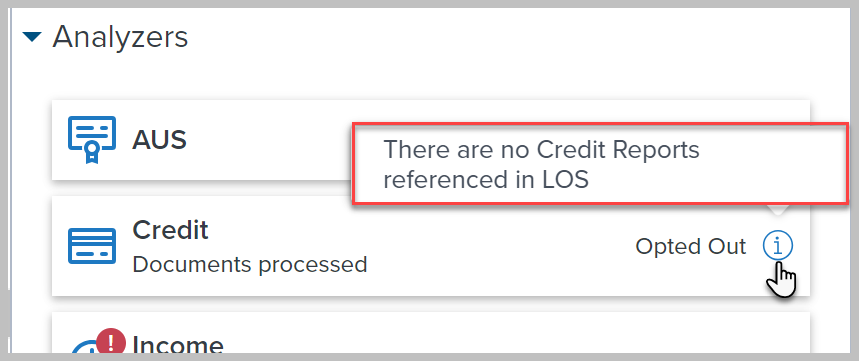
-
Information icon: An information icon is displayed when required. Select the icon to display the message.
-
Alerts: Alerts are indicated by the exclamation mark that indicates issues requiring the underwriter’s attention.
Typically, underwriters would start with checking alerts coming from Data Perfection apps to ensure that Mortgage Analyzers can use perfected data.
User authentication is required to log in to Encompass and access Mortgage Analyzers with the intended privileges. It is recommended that you engage the ICE Mortgage Technology Professional Services team to assist with the perquisites and configuration for the ICE Mortgage Analyzers. Please contact your Encompass relationship manager for more information.
-
The client must create and complete user profiles from their Identity Provider (IdP).
-
The client IdP pushes user profiles to Encompass through a System for Cross-domain Identity Management (SCIM) interface to create SSO (Single Sign-On) User account. SCIM makes user data more secure and simplifies the user experience by automating the user identity lifecycle management process.
-
The SSO User created through SCIM is listed in the Site Admin portal. When an SSO user is created, Site Admin administrators can assign a user role to the SSO User. When the role is assigned, Mortgage Analyzers in Encompass recognize and honor the SSO user privileges based on the assigned user role.
Notes:
-
SSO Users are used only for launching Mortgage Analyzers in Encompass.
-
Site User account must be used to launch Mortgage Analyzers in the Analyzers Portal. Administrators can create Site User accounts in Site Admin.
Standalone Mortgage Analyzers can be accessed by site users logging in to the Analyzers Portal. Site User accounts are created in the Site Admin application by the Site Admin administrator. Additionally, site users must be given a role with necessary privileges.
Embedded Analyzers are accessible via the Encompass Underwriting Center. Embedded Analyzers are accessible for SSO users with appropriate role and privileges.
Both standalone and embedded Analyzers provide the same features and functionality. The differences are:
-
The left navigation pane is displayed in standalone Analyzers while it is not displayed in the embedded Analyzers
-
Breadcrumbs are displayed on the top left of the page with standalone Analyzers while they are not displayed in the embedded Analyzers


The aforementioned differences apply to applications accessible via the Analyzers button in the Underwriting Center in web version of Encompass.
GSE-27018
The Compare and Import tool provides an easy way for Encompass users to compare the income data stated on the Loan Application and the income calculated by the Income Analyzer.
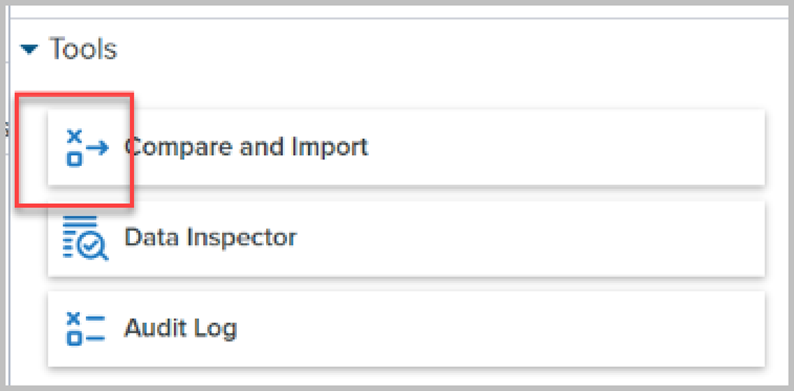
Encompass users can access the tool by going to the Underwriting Center, opening the Analyzers pane, and then selecting the Compare and Import tool.
Please note, the Compare and Import tool is intended for use for new Encompass users only. Current users who select the Analyzers button in the Underwriting Center will receive an error that prevents them from proceeding due to an issue introduced in Encompass 24.1. This issue will be addressed in a future Encompass release.
Data from the loan application and Income Analyzer is displayed in two columns for a clear and consistent view.
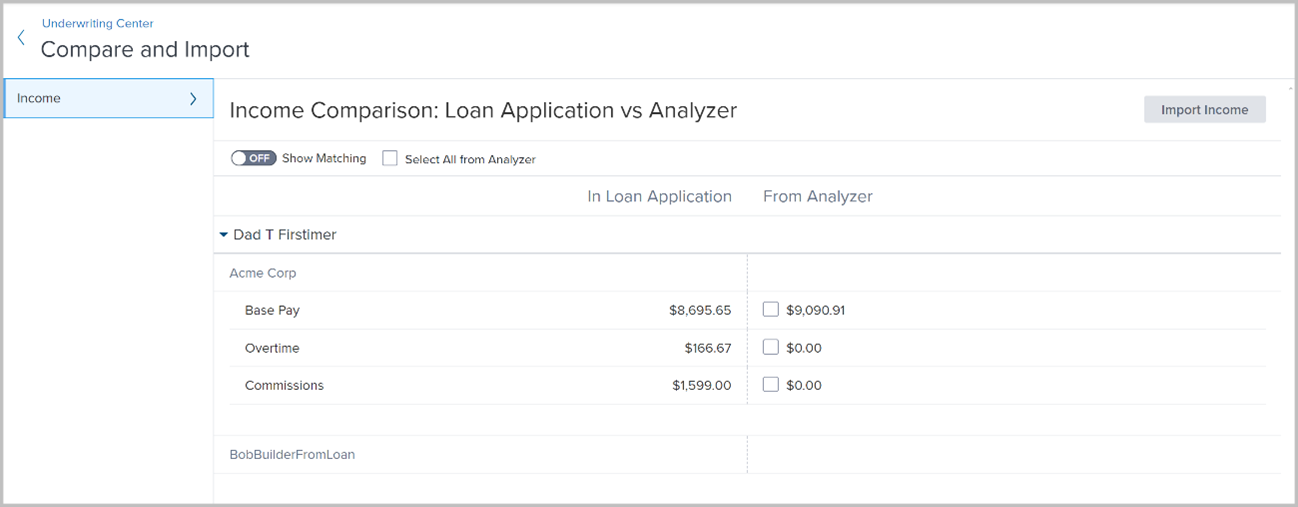
By default, the tool displays only the values where a mismatch was detected. Users can switch the Show Matching toggle to On to display all data, including the values that are identical both on the Loan Application and in the Income Analyzer columns.

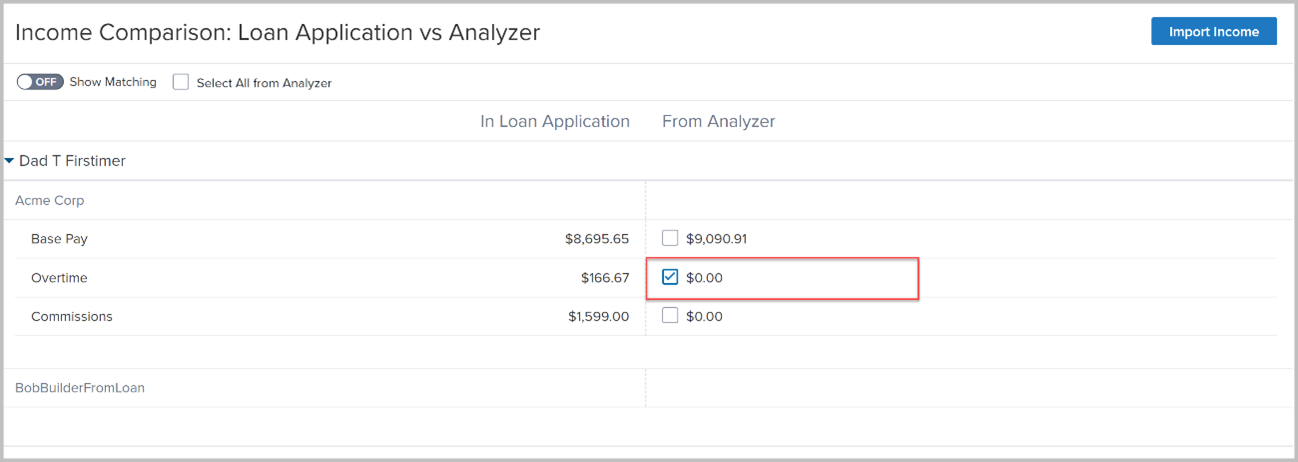
When mismatches occur, users can decide if they want to use the Loan Application values or the values calculated by the Income Analyzer.
To use the analyzer-calculated value, a relevant checkbox for the value must be selected.
Users can also select all analyzer-calculated data by selecting the Select All from Analyzer checkbox.
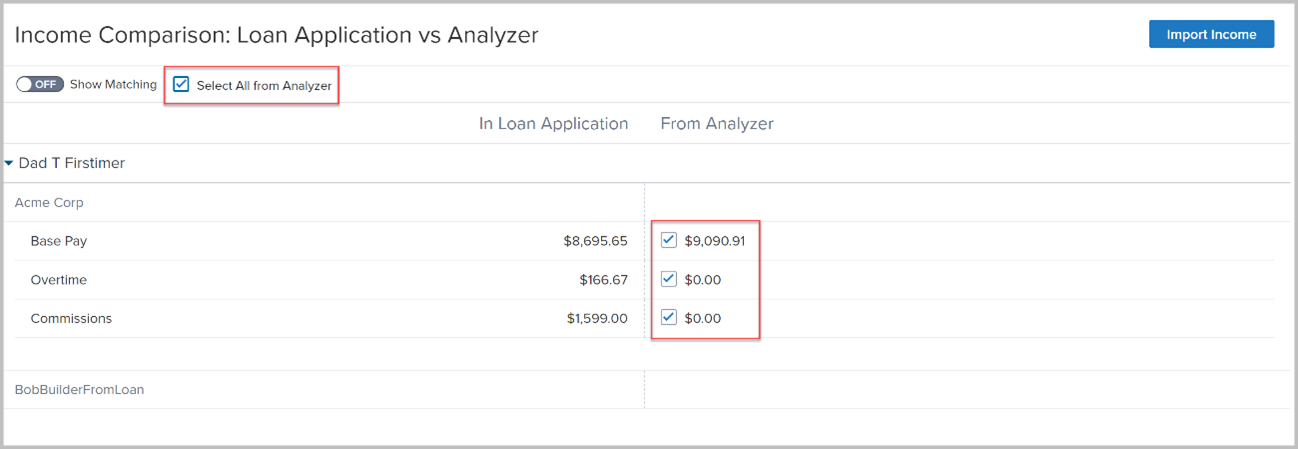
When one or more analyzer-calculated data is selected, the Import Income button becomes active. Users can select it to import values from the Income Analyzer and use them in the underwriting process rather than the values stated on the Loan Application.
Notes:
-
When income data is imported to Encompass, the Income Worksheet is generated in the Income Analyzer.
-
Encompass only displays data (income records) that is selected in the Income Analyzer. If Encompass has income record that is not selected in the Income Analyzer, it will not be listed in the comparison table.
ENCW-93745
Feature Enhancements
A new Show Fulfilled Data option has been added to the Milestone Worksheet. This option enables users to view all required milestone items that have already been completed on the milestone. When the Show Fulfilled Data option is selected, the following indicators enable users to differentiate what has been fulfilled already:
-
Documents have a Yes indicator in the Received column.
-
Completed tasks have a line through them.
-
Fulfilled fields show the field value.
To Use the Show Fulfilled Data Option:
-
From a loan, select the Milestone Timeline
 icon and then select Milestone Details
 .
. -
Select Show Fulfilled Data.

ENCW-93622
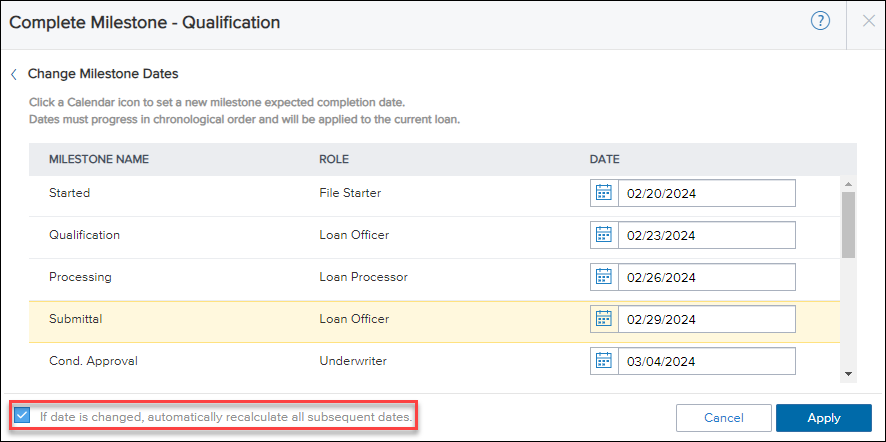
An option has been added to the Change Milestone Dates window which enables the system to automatically recalculate the expected completion date for all unfinished milestones. When a user utilizes the If date is changed, automatically recalculate all subsequent dates option, the date is recalculated based on your administrator's settings in the Milestone settings. If this checkbox is selected, only the dates for the milestones that occur after that milestone are recalculated.
If this checkbox is not selected (or cleared), the expected completion date for all other unfinished milestones in the milestone template will not be recalculated when you change a milestone's expected completion date. This enables you to change a date without affecting any other dates.
To Select the New Option:
-
From the Milestone Worksheet on a loan file, select Change Milestone Date.
-
On the Change Milestone Dates window, select If date is changed, automatically recalculate all subsequent dates.
ENCW-94689
A change has been made to the Milestone Worksheet to accommodate scenarios where a user doesn't need to be assigned to a milestone. The user or user group selection option is now hidden on the Milestone Worksheet for any milestone where the administrator has configured the milestone to not have a role associated with it and assigning a loan member to the milestone is also not required.
ENCW-95943
Mobile View Updates
A new Preferred Contact Method section has been added to the Application View / Borrower Information form for the mobile view of the web version of Encompass. As with the non-mobile view, these fields enable users to enter information about the preferred methods for contacting a borrower or co-borrower (email, phone, text, etc.) along with the best time to reach them.

ENCW-94585
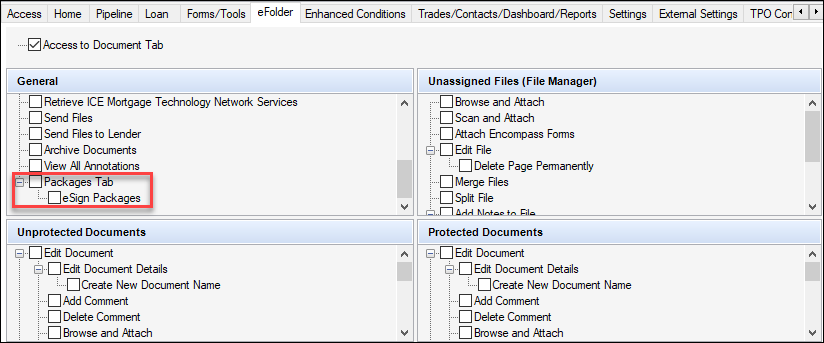
The View Packages option for the mobile view is now visible based on the persona settings for the user. The View Packages option is now visible when the Packages Tab and eSign Packages options are both enabled for the user's persona on the eFolder tab in the Encompass Settings > Company/User Setup > Personas setting in the desktop version of Encompass.
These two settings are in the General section on the eFolder tab as seen below:
ENCW-98986
Fixed Issues
Why we made these updates: The following issues were fixed to improve usability and to help ensure the web version of Encompass and the Web Input Form Builder is operating as expected. The issues that are chosen to be fixed are based on the severity of their impact to clients and client feedback.
New field enumerations were introduced in the VA Purpose of Loan dropdown field (field ID VASUMM.X155) on the VA 26-1820 Loan Disbursement input form in Encompass 23.1. By design, this dropdown field was displayed on the input form in loans with an Application Date (field ID 745) and GFE Application date (field ID 3142) on or after 4/1/2023. For loans with an Application Date or GFE Application Date prior to 4/1/2023, the Purpose of Loan dropdown field (field ID 28) with different enumerations was used on this form.
Starting in Encompass 24.1, the VA Purpose of Loan field (field ID VASUMM.X155) is used on the VA 26-1820 Loan Disbursement input form in new loans by default (i.e., field 745 and field 3142 are both blank).
-
In loans where field 745 and 3142 use dates on or after 4/1/2023, the VA Purpose of Loan field (field ID VASUMM.X155) is used on the form.
-
In loans where field 745 or 3142 use dates prior to 4/1/2023, the Purpose of Loan (field ID 28) dropdown field is used on the form.
-
In existing loans that are accessed after upgrading to Encompass 24.1, if field 745 is blank and field 3142 uses a date on or after 4/1/2023, field VASUMM.X155 will now be used on the form. (In previous versions of Encompass, field 28 would have been used on the form in this scenario.)
Field ID VASUMM.X155:

ENCW-96162
In previous versions of Encompass, the Discount Points field (field ID 1093) was not calculating seller obligated discount points correctly. When the discount points entered on line 802e on the Fee Itemization were seller obligated, these discount points were not applied to the Discount Points calculation for field 1093. As a result, when the seller obligated fees were more than the borrower obligated fees, the Estimated Closing Costs field (field ID 137) was being cleared out and the cash to close amount was then overstated. This issue has been addressed. Seller-obligated fees for line 802e, f, g, and h are now excluded from the Total Seller Amount when Encompass compares borrower obligated closing costs to seller obligated closing costs. In addition, the Discount Points field (field ID 1046) on the FHA Maximum Mortgage and Cash Needed Worksheet has been updated so that when the discount points are seller obligated, field 1046 is cleared out/blank.
For existing, non-active (field ID 1393) loans created prior to Encompass 24.1, fields 137, 1046, and 1093 are locked so they retain their current values. (If you unlock any of those fields on a non-active loan, the new logic will apply on the non-active loan.) For active (field ID 1393) loans created prior to Encompass 24.1, these fields will be locked only if initial disclosures have been sent. If no disclosures have been sent, the fields are recalculated using the new logic described above the next time the loan file is opened.
ENCW-100194
An issue was discovered which affected environments that used a custom Loan Left Navigation configuration where the initial item in the navigation list was a custom item set. When this scenario occurred, the custom item set would sometimes collapse when navigating between items in the custom item set. This issue has been fixed, and now the custom item set remains expanded while navigating between items in the custom item set.
ENCW-96163
An issue was discovered where the indicator in the Itemize Credits checkbox would be cleared after selecting it, saving the loan, and then navigating away from the Fee Itemization form. This issue has been fixed, and now the value in the Itemize Credits checkbox is retained after the user selects the checkbox and saves the loan.
ENCW-94731
An issue was discovered where sometimes the navigation link used to return to a previous screen while working within a task workspace would send the user to a different location in the loan. This issue has been fixed, and now selecting the Workflow Tasks link to return to the task workspace works as expected.

ENCW-89098
An issue was discovered where the value in the Monthly Ins. Taxes, Assoc Dues, Etc. field (field ID FM0021) was left justified and overlapped with the dollar sign at the beginning of the field. This issue made it difficult to read the value in the field. This issue has been fixed, and now the data is displayed so that it clearly legible.

ENCW-83300
| Next Section: Updates and Enhancements to Encompass Web Input Form Builder | 
|
|

|
Previous Section: Introduction |
