Send Initial Disclosures
Working with Disclosure Fulfillment Service
Use the Disclosures feature in the eFolder to generate initial disclosures and send them to your borrowers.
When the disclosures are sent, your borrowers are notified by email that disclosure documents are available in Encompass Consumer Connect (or Loan Connect). Borrowers can print and then return the documents by fax (using the provided fax cover sheet) or by mail, or they can provide an electronic signature and upload the documents in the Encompass Consumer Connect or Loan Connect site. Then you can retrieve the documents from the eFolder.
Your Encompass administrator determines whether you can select your own packages or whether the packages are automatically selected for you. Authorized users can also reorganize, add or remove documents from the package. The documents in the package are based on the selected plan code, as well as loan-specific information (for example, the state in which the subject property is located).
In addition, there are prerequisites that must be met in order to access the eFolder. Please review the eFolder help topic to review these prerequisites.
To Generate Initial Disclosures
-
In the eFolder, select the Disclosures button.
-
Select a borrower (or borrowers) from the Borrower Pair list.
-
Select the type of borrower signing required for the disclosures.
- eSign + Ink Sign: If the package contains documents that can be eSigned and documents that must be ink-signed, use the eSign + Ink Sign (for ink sign documents only) option. Borrowers access the documents from the Encompass Consumer Connect website and, after consenting to receive electronic disclosures, review the documents online, and then sign the documents electronically (known as eSigning). Borrowers will sign and return eSign documents electronically, and then upload the document in the website or print, sign, and return the ink sign documents as described below. You receive an email notification that the signed documents are available. Click the Retrieve button in the eFolder to retrieve the documents.
-
Ink Sign Only: Borrowers retrieve the documents from the Encompass Consumer Connect website, print, sign, and then return the documents by fax or by mail. Borrowers may also upload these documents to the Encompass Consumer Connect website.
-
Select Loan Data from the Data Type list.
-
Select a plan code from the Plan Code list, and then click Next.
-
Only plan codes that match the current loan data are listed by default. To view all plan codes, select Show All.
-
The Show All link only displays if a plan code had been previously selected for this loan. In this case, only the selected plan code is displayed unless the Show All link is selected. If no plan code was previously selected, plan codes that matched the current loan data are listed by default. You can delete the applied filters or select Clear to display the entire plan code list.
-
-
You can perform a search by typing data into a field above a plan code column or by selecting an option from a column's dropdown list. Only plan codes containing the specified data are displayed.
-
-
Select Next.
-
Encompass performs an audit of the loan data. If any values in the loan file are different from the corresponding values in the selected plan code, the Plan Code Conflicts panel displays showing the affected fields. Conflicting loan data is identified by an alert icon.

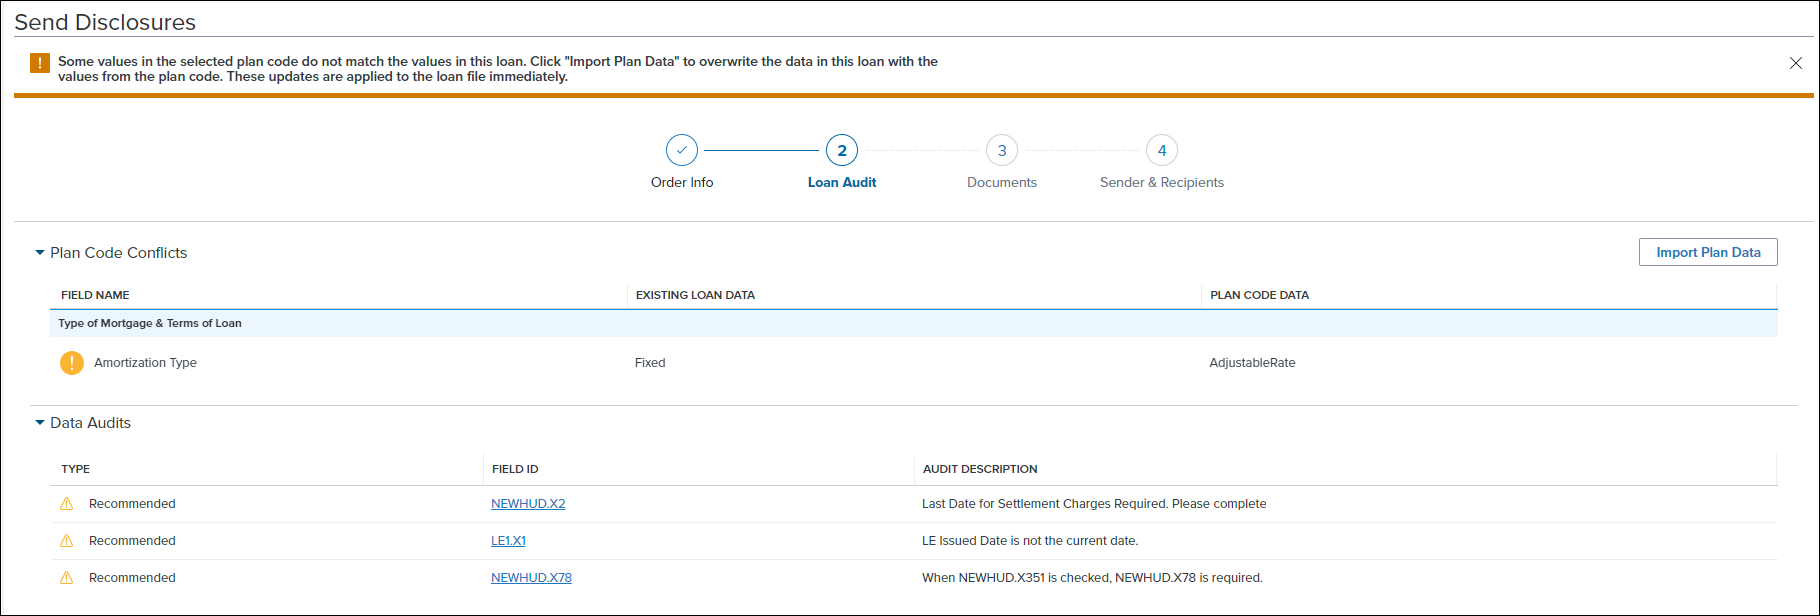
-
Select the Import Plan Data button to overwrite the current loan data with the selected plan code data. These changes are applied to the loan immediately.
-
-
If the Data Audit panel lists required issues, warnings, or recommended updates (typically due to inconsistent data), select the line item or the field ID link to open a form with the field highlighted for data entry.
-
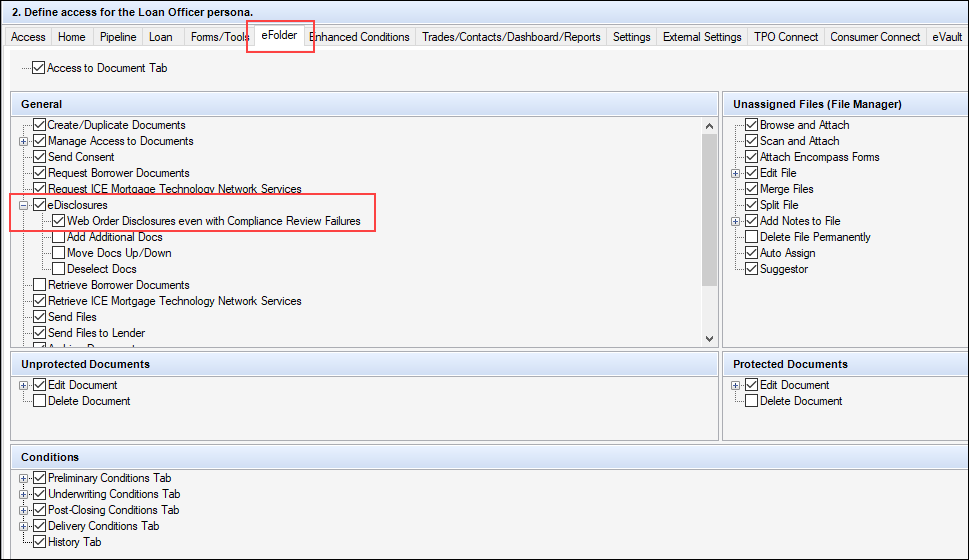
Administrators in the desktop version of Encompass can use the Include Compliance Report With Data Audit option in the Docs Setup > eDisclosure Packages setting to incorporate the Mavent compliance report into the data audit. When this option is being used, users ordering disclosures in the Encompass web interface can view the compliance report information, including FAIL and WARNING alerts (if any), on the Loan Audit screen by selecting the Compliance Report button.

-
Administrators in the desktop version of Encompass can also enable users that are ordering disclosures in the Encompass web interface to proceed with sending disclosures even if there are Compliance Review failures present. This Personas setting is provided in the Company/User Setup > Personas > eFolder tab.
-
Loan Form Printing Rules also appear on the Loan Audit Screen when triggered.
-
If a virtual field is included in audit results, a hyperlink is not provided.
-
Correct the described issue or issues. Once all the desired issues have been addressed, select Apply to update the loan and re-run the audit.
-
You must resolve all required errors before generating initial disclosures.
-
Repeat step 8 to correct any remaining issues.
-
Select Next.
-
When the Documents window displays, the initial disclosures are listed in the order configured in the Stacking Template by your administrator.
-
Documents with a yellow warning
 icon are documents that are not included in the Stacking Template, but are still intended to be sent in the disclosure package.
 -
When a disclosure document package has been ordered and is then redrawn, the list of returned documents on the Select Documents window displays a Modified since last draw
 icon next to each document that has changed since the initial order. Users can view the list to identify changed documents to print or send instead of printing or sending the entire package. Additionally, a Removed since last draw icon displays next to documents that were included in the initial draw, but are no longer required.
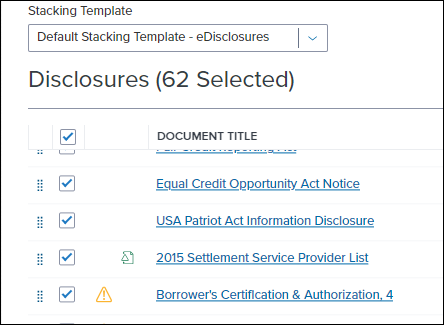
-
To use a different template, select an option from the Stacking Template dropdown list.
-
To move a document up or down in the list, select the handle
 icon for the document, and then drag it to the desired location in the list.
-
-
All selected documents will be sent in the disclosure package. Clear the checkbox of any document you do not want to include in the disclosure package.
The Signature Type column indicates whether a document is eSignable (can be signed electronically), Ink Sign Only (a paper copy must be signed and returned by mail or fax), or Informational (no signature required).
-
Select Add to eFolder to add electronic copies of the selected documents to the loan file's eFolder.
-
Select Add Additional Documents to select additional forms to add to the package.
If your administrator has not given you permission to add or remove forms from the package, the selection checkboxes and the Add Additional Docs button will not be visible.
-
Address any Data Overflow alerts (if applicable). These alerts are indicated by a yellow flag as shown below. Select the icon to view the overflow details.
![]()
-
To add one or more documents to the Document Folders section of the eFolder, select the documents, and then select Add to eFolder.
-
To preview the documents in the package:
-
Select the title of the document to preview the selected documents.
-
-
Select Next to proceed to send the eDisclosures.
To Send the Initial Disclosure Package:
-
Complete the To Generate Initial Disclosures section above.
-
On the Send Disclosures screen, select the sender type from the Role dropdown list. This selection determines the name and email address that is used in the email that is sent to the recipient. You can choose from the following:
-
Current User
-
Loan Officer
-
File Starter
-
-
Select an option for notifying the sender:
-
When borrower receives requests for documents - The sender of the email receives an electronic verification in Encompass that the recipient has opened the document request email message.
-
When borrower does not access by - Select this option to be notified if the borrower does not access the loan package by a specified date, and then select the Calendar icon to set the date.
-
-
In the Recipients section, select the Edit Message link to change the Subject text and enter or edit a message, if needed.
-
Select a template from the Email Template list to apply to the message.
-
Templates control the email content and formatting. Your Encompass administrator creates the templates in the efolder Setup > Notification Templates setting in Encompass Settings.
-
-
Add or edit the Subject for the email message.
-
Add or edit the body of the email message, if necessary.
-
Select the Save button to save your changes and return to the Send Disclosures screen.
-
-
Review the email and phone number of the recipients. If you modify the email or phone number, these modified values are not copied to the loan file. The remaining information in the section will be copied from the loan file.
-
If your company has enabled the Disclosure Fulfillment service, review the scheduled fulfillment date and shipping information, and then modify if needed.
-
Select Send.
-
A standard email containing a link to an Encompass Consumer Connect or Loan Connect website is sent. The email recipients create their own login information, log in to the website, and then view the documents on the website.
-
-
If you are the loan originator and the eDisclosure includes one or more forms that require the Originator's electronic signature, you will receive an email with a link to a secure website where you can access the documents and electronically sign them if needed.