Work with loans
 Overview
Overview
Simplifile provides a way for you to share all necessary documents with your settlement agent, including the ability to prepare and agree on all fees contained in your loan’s disclosure document. Simplifile can also store contact information for other mortgage team members, and lets you track who does what during loan preparation and when they do it.
Simplifile’s navigation menu lets you choose to view loans of various statuses. You can view loans that are Pre‑Close, Post‑Close, or Archived.
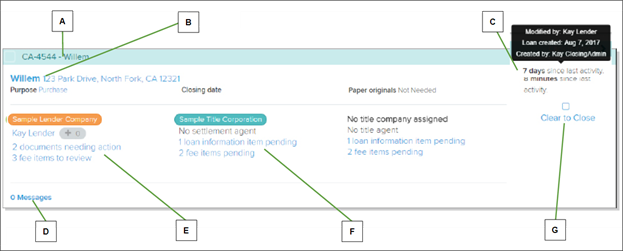
You can select either the Cards view or the List view ( ) to choose to display loans as cards or in a list. The card views can include the information shown in the following example.
| Letter | Description |
|---|---|
| A | The loan ID displays in the card header. |
| B | The borrower’s last name displays before the property address. |
| C | The last updated information displays here. Hover your mouse pointer over the last activity information to display the name of the updater and the date of the update. |
| D | Message notifications display here. Select to go to the Messages page. |
| E | Lender company and assigned lender user names display here, along with incomplete tasks. |
| F | Settlement company and assigned agent names display here, along with incomplete tasks. |
|
G |
Status change tools display here when appropriate. |
Your company name in orange means you have tasks to complete for this loan. Likewise, a settlement company name in blue means the agent has tasks to complete. If a collaborator’s tasks are complete or there are no tasks for a company, the company name displays in green.
The list view of a loan may display the following:
- Loan number
- Last name of borrower
- Purpose of the loan
- Settlement company assigned to the loan
- Created, closing, and disbursement dates for the loan
- Loan officer and settlement agents assigned to the loan
- Whether paper documents are required
- Number of loan items that are pending or that need review
- Number of title‑related documents that need action
- Date of last activity on the loan
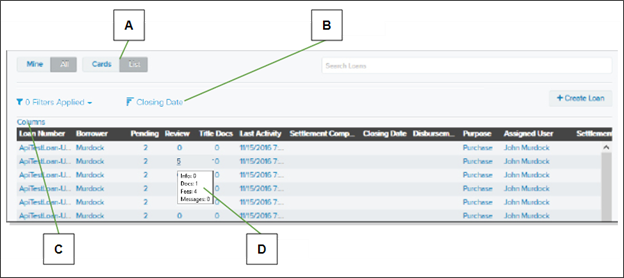
You can choose the columns that display and in what order. You may need to scroll to see all of the columns. Below is an example.
| Letter | Description |
|---|---|
| A | Select the List view button to display loan information as a table. To view loan information in the card view (as shown on the previous page), select the Cards view button. |
| B | Select here to sort the displayed loans by various dates. |
| C | Select here to choose which columns display and in what order. |
| D | Hover your mouse pointer over a number to view how many items have the column name status. For example, numbers in the Review column indicate how many of each item type you need to review. |
You can search for specific loans in the system. You can also use filters to limit what loans display.
Select links in either view to access the details page for the type of item you selected. For example, select the borrower name to open the Contacts page, or select a Pending or Review number to open the Loan Information page.
As you collaborate on a loan, the system notifies you of the loan’s progress. You and the settlement agent assigned to a specific loan can message each other.
An up‑arrow ( ) on a Pre‑Close loan page indicates that the loan was initiated by a settlement agent and you
have limited feature access. You must select the icon to accept the loan and enable full Simplifile Collaboration.
For more information, see Loan acceptance or talk to your Simplifile representative
) on a Pre‑Close loan page indicates that the loan was initiated by a settlement agent and you
have limited feature access. You must select the icon to accept the loan and enable full Simplifile Collaboration.
For more information, see Loan acceptance or talk to your Simplifile representative
Find a Loan
Find a Loan
Any time the loan statuses display in the navigation menu, you can select one of the statuses to view loans with that status. The system highlights the status in the navigation menu so that you know the status of the displayed loans.
In both the Card and List views of any status, you can search for a specific loan. On the List view, you can choose which columns display, and the order of the display. You can also use several filters to limit which loans display. This can help you more easily find the loan you want.
Searching for a loan
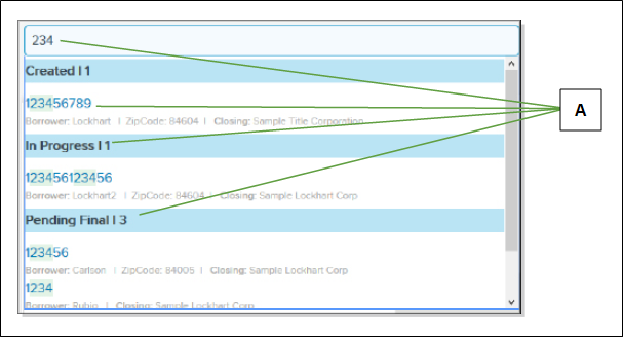
You can use the Search loans tool to look for a specific loan. The Search loans tool searches loans of all statuses, regardless of what is displayed in the window. You can search using any loan attributes, such as the loan number, the name of the borrower, or the zip code. Below is an example.
| Letter | Description |
|---|---|
| A | The dropdown list displays any loan with a field that contains the information you enter in the Search loans field. Headings group the loans by status. Enter text or numbers until you see the loan you want in the dropdown list. Then select the loan. This displays the Loan Information page for the loan. |
The Search Loans field displays at the top of the card view and the list view. It also displays in the upper right corner of each page of a loan (the Loan Info, Documents, Disclosures, Contacts, Messages, and Activity pages).
How to search for a loan
- In the Search loans field, begin to enter information you want to use as a search term. Keep entering information until the loan you want displays in the dropdown list.
You can enter information from any field on the Loan Information page. For example, enter the loan purpose, the city, or the status.
- When you see the loan you want, do one of the following:
- Review the information that displays.
- Select the card header or the loan number to display the Loan Information page. You can then use the links on the navigation menu to access all loan information.
Choosing list view columns and display order
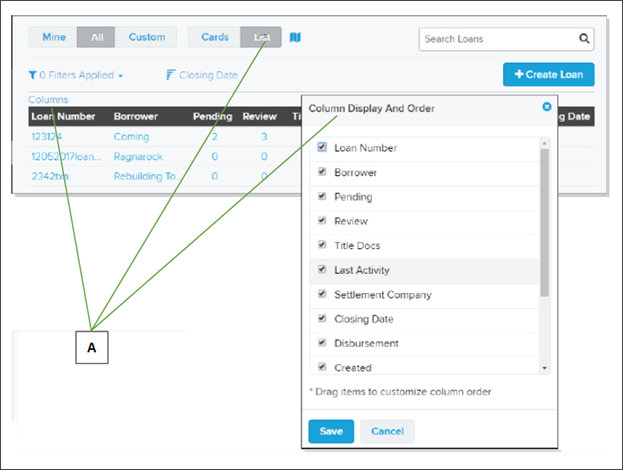
On the list view, you can choose which columns display, and in what order. This lets you view only the information you want, and see first the information that is more important to you.
| Letter | Description |
|---|---|
| A | First display the List view. Then select the Columns button above the table to display the Column Display and Order window. |
How to choose list view columns and display order
- At the top of the Loans list, select the List view to display the list view.
- Above the list of loans at the left side, select the Columns button to open the Column Display and Order window.
- Mark the boxes of the columns you want to display.
The columns you can choose can include the following:
- Loan Number
- Borrower (borrower’s last name)
- Pending (number of collaboration items that need the settlement agent’s review)
- Review (number of collaboration items that need your review)
- Title Docs (number of title‑related documents that need action)
- Last Activity (date and time of last activity on the loan)
- Settlement Company (agency you assigned to the loan)
- Closing Date
- Disbursement (date funds were released)
- Created (date loan record was started in Simplifile)
- Purpose (refinance or purchase)
- Paper Original (whether documents must have ink signatures instead of electronic signatures)
- Assigned User (lender user handling the loan)
- Settlement Agent
- To change the column order, in the window, select a column name and drag it to the position where you want it to display. For example, drag Pending to the second position from the top to have the Pending column display in the second column from the left.
- When you finish, select the Save
 button.
Filtering the Loan Display
Filtering the Loan Display
You can sort the loan list by date or by borrower last name. Simplifile also provides several filters that let you limit which loans display. You can use the filters alone or in combination to search for the loans you want. Filters are described below.
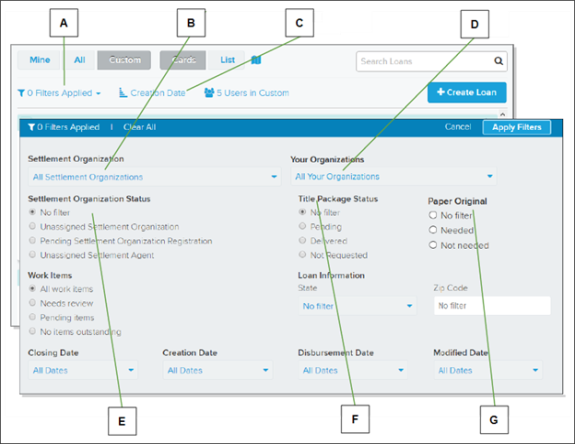
| Letter | Description |
|---|---|
| A | Select here to display or hide the loan filter window. |
| B | Use this dropdown list to display only loans assigned to a specific settlement organization. |
| C | Select here to sort the loans by various dates or by borrower last name. |
| D | If available, use this dropdown list to choose which organization’s loans should display. |
| E | View loans with unassigned or pending settlement organizations, or that have not been assigned to a settlement agent. |
| F | View loans based on the status of the preliminary title package. |
|
G |
View loans based on whether paper originals are needed. |
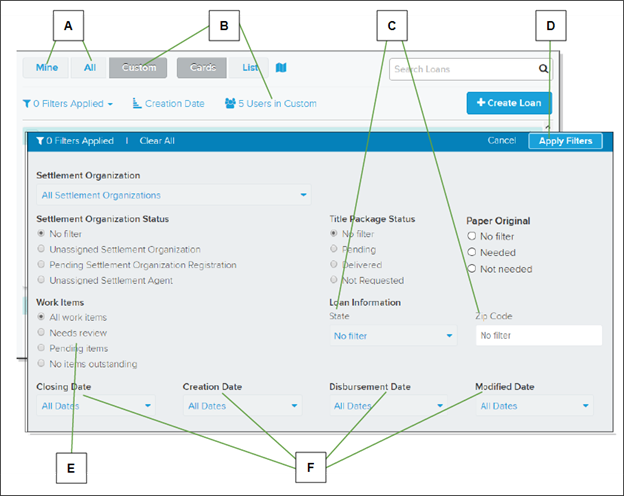
| Letter | Description |
|---|---|
|
A |
You can display loans assigned to you, or all loans. |
|
B |
Select the Custom |
|
C |
Use the State and Zip Code fields to limit the loan display by geographic area. |
|
D |
Be sure to apply the filters before you leave the window. |
|
E |
Choose to view loans with items that need review, that are pending collaborator action, or that do not need attention. |
|
F |
Use any of the date dropdown lists along the bottom of the window to limit the loan display by set date ranges. Options may include Today, Yesterday, This Week, Last Week, Next Week, This Month, Last Month, Next Month, This Year, and Last Year, depending on the date type chosen. |
How to filter the loan display
- To view loans with a specific status, in the navigation menu, select the status you want.
- To view only loans assigned to you, at the top of the page, select the Mine view.
- To create a custom list of one or more lender users whose loans you want to view, do one of the following:
- To set up a custom list, select the Custom
 view button and mark the agents whose loans you want to view.
 - To edit a custom user list, select the XX Users in Custom link and mark the lender users whose loans you want to view. Select the X at the end of the number selected bar to clear all check marks.
- To set up a custom list, select the Custom
- To sort the loans by date or borrower last name, select the sort icon (
 ) and choose a sort order.
 - Select the Apply Filters
 button to do any of the following:
- To view loans assigned to settlement organizations, choose the organizations you want from the dropdown list in the Settlement Organization section.
- If you are affiliated with multiple organizations and want to view loans assigned to specific organizations, choose the organizations you want from the dropdown list in the Your Organizations section.
- To view loans with unassigned or pending settlement organizations or loans that have not been assigned to a settlement agent, mark an option in the Settlement Organization Status section.
- To display loans with a specific preliminary title package status, mark an option in the Title Package Status section.
- To display loans based on whether items need attention, mark an option in the Work Items section. If Any displays, select it to limit the display by type of item.
- To display loans with missing file numbers or unassigned settlement agents, mark one or both options in the Loan Information section.
- To display loans for properties in a specific state, choose the state from the State dropdown list.
- To display loans for properties with a specific zip code, enter the zip code in the Zip Code field.
- Use the Date dropdown lists at the bottom of the window to specify set date ranges to display.
- When you finish choosing filters, select the Apply Filters button.
QUICK TIP: To remove all filters, select the X Filters Applied button and select Clear All  button in the filters header.
Loan Template Application
Loan Template Application
If your administrator has set it up, you can apply a template to a new or existing loan. This is helpful if you often use the same information and documents when you create a loan.
A template completes some fields and may include documents and messages your administrator has added. You can then add, edit, and collaborate on fees in the same way as you do when you create a loan from scratch. You must complete all required fields before you can apply the template. For information on template setup, see Loan template creation.
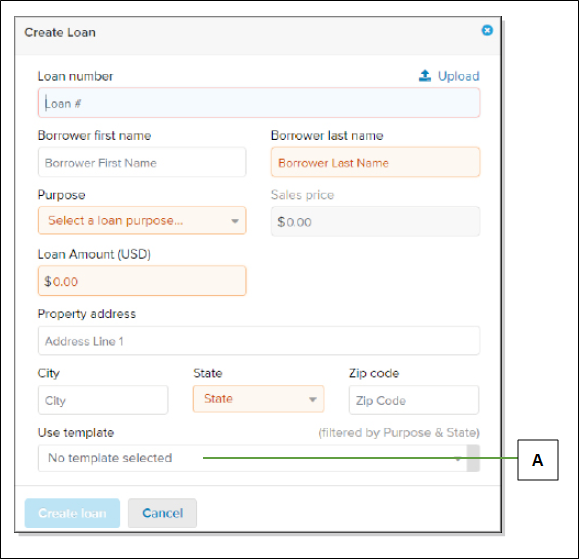
| Letter | Description |
|---|---|
| A | If a template exists in the system, you can choose the template from this dropdown list. This applies the template to the loan. For more information on loan creation, see Loan creation. |
You can apply a template to an existing loan.
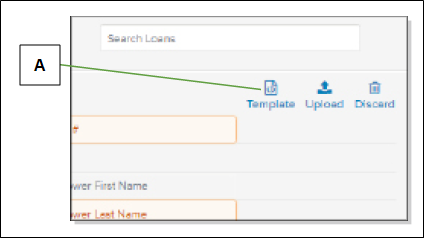
| Letter | Description |
|---|---|
| A | Use the Template link on the Loan Information page to apply a template to a existing loan. |
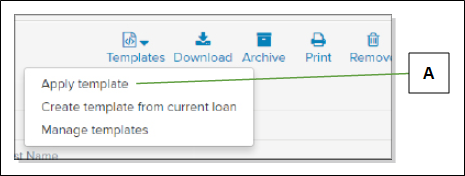
A lender who clicks the Template icon sees one of the following window, depending on whether that lender has administrative rights.
| Letter | Description |
|---|---|
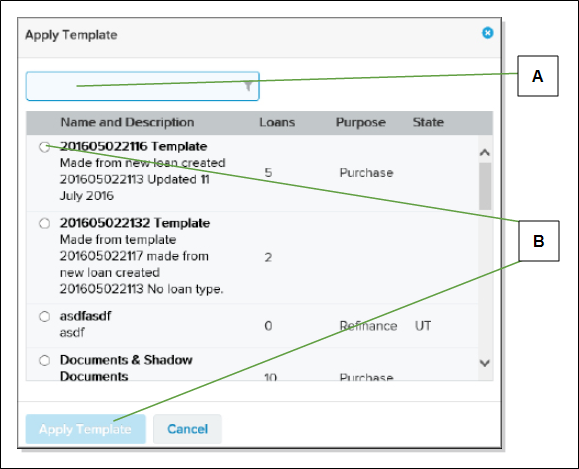
| A | To apply a template, an administrator would choose Apply Template from the menu to display the Loan Templates window (shown next). For information on creating or managing templates, see Loan template creation. |
| Letter | Description |
|---|---|
|
A |
Use this field to filter the list of templates. |
| B | When the Apply Templates window displays, mark the template you want to use and select the Apply Template  button at the bottom. button at the bottom. |
How to apply a template to a loan
- Find the loan where you want to apply a template. For more information, see Find a Loan.
- Select the card header or the loan number of the loan to display the Loan Information page.
- In the upper right corner, select the Templates
 button.
 - Mark the template you want to apply. You can use the Filter field to search for a template.
- Select the Apply template item in the lower left corner.
Set up and use notifications and emails
Set up and use notifications and emails
An administrator can make default notification settings that affect user accounts created in Simplifile after the settings are made. Administrators can also create groups to receive specific notifications. If you do not create a group, the setting for that notification applies to all lender users with Simplifile accounts.
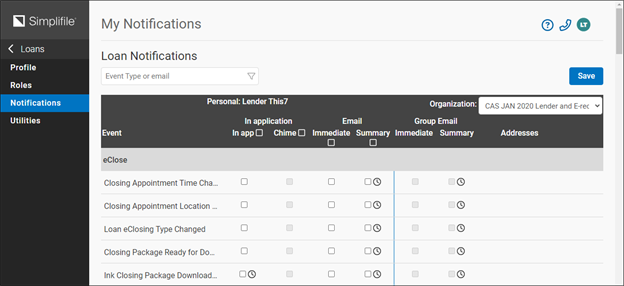
You can override the organization settings to choose whether to be notified for specified events, and determine how you want to be notified. You can also choose whether you want to receive marketing and system status notifications. Organization‑level changes made after you make choices do not affect your choices.
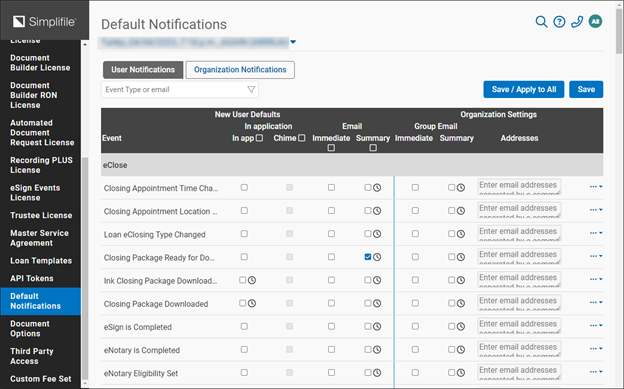
You can remind lender users at your organization to assign a settlement company to loans. If you turn on this option, for any loan that does not have an assigned settlement company, Simplifile sends an email to any lender users assigned to the loan at hour intervals you choose. For example, you can choose a 24 hour interval to send the email reminder once a day. You can also send the reminder to email addresses of people other than lender users assigned to a loan.
When you choose a settlement company to handle a new loan, Simplifile can send a Loan Creation notification to the settlement administrator. This lets the administrator know a loan is available and needs attention. During collaboration, you can receive notifications in additional circumstances, including the following:
- The loan is assigned to an agent.
- There is a change in a loan‑related date.
- The agent adds, removes, or changes fees or documents for the loan.
- The agent sends a message about the loan.
- The status of the loan changes.
You can choose whether to be notified for these and for other events, and determine how you want to be notified. You can also choose whether you want to receive marketing and system status notifications.
Simplifile sends most notifications immediately. However, Simplifile delays sending notifications about fee changes on the Disclosures page. This prevents multiple notifications from arriving in quick sequence, which can be disruptive.
Instead, Simplifile groups fee change notifications for that loan into a single email and sends the email when you do one of the following:
- Leave the Disclosures page open for 20 minutes without working on it.
- Leave the loan and return to the main list of loans.
- Log out of Simplifile.
For more information on the Disclosures page, see Collaborate on disclosures and fees.
If you prefer, you can choose to receive a loan summary email that comes after fifteen minutes of inactivity on a loan. This email lists fee changes as well as the following:
- Loan agent assignment
- Uploaded documents
- New loan messages
- Loan status and date changes
Notifications that come as email messages include a link that accesses the loan record to which the email refers.
Notifications that come within Simplifile display as banners on the screen. They can appear on any loan page. Below is an example.
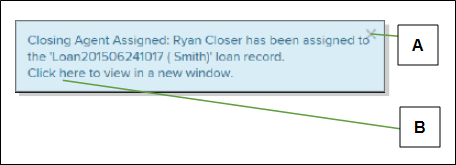
| Letter | Description |
|---|---|
| A | Select the X in the upper right corner to close the banner. |
| B | Select the "Click here" to view in an new window. |
How to set up and use notifications and emails
- To set up notifications, do one of the following:
- If you are a lender user, in the upper-right corner select the round user icon to open the menu and select the Notifications item.
- If you are an administrator, on the navigation menu, select the Organizations item. Select the name of the organization whose default notifications you want to set. In the navigation menu, select the Default Notifications item.
- If you are a lender user, for the marketing and system status notifications, mark the boxes if you want to receive the notifications.
- For each notification event, mark the following
boxes:
- To receive notifications in your email in‑box, mark the box in the eMail column.
- To receive notifications as banners within Simplifile, mark the box in the In‑App column.
- To have your computer sound a chime when the event takes place, mark the box in the Chime column.
- To mark all boxes in a column, mark the box in the column header.
- If you are an administrator, do any or all of the following:
- To send a reminder to lender users assigned to a loan when a settlement organization has not yet been assigned, mark the box under Settlement Organization not assigned email reminder. Then enter the number of hours that should pass between reminders. If desired, enter in the Also notify box the email addresses of people other than lender users assigned to the loan who should receive this reminder.
- To send notifications for a specific event to a group of people instead of to all of your lender users with Simplifile accounts, enter the email addresses of the people in the Group field, separated with commas.
- If a banner displays, do any of the following:
- Select the banner to view its full content.
- Select the X in the upper right corner to close the banner.
- If you receive an email message about a loan, select the link in the message to review the loan.
Add people to a loan’s emailing list
Add people to a loan’s emailing list
Typically, Simplifile sends notifications to the lender who creates the loan record and the settlement agent who handles the loan. If wanted, you can add email addresses to a loan record so that Simplifile can send additional notifications. The agent cannot see these email addresses.
The people whose email addresses you add do not need to be able to access Simplifile to receive email notifications. However, without Simplifile access, people who receive email notifications about a Simplifile loan cannot use Simplifile to view loan records and documents.
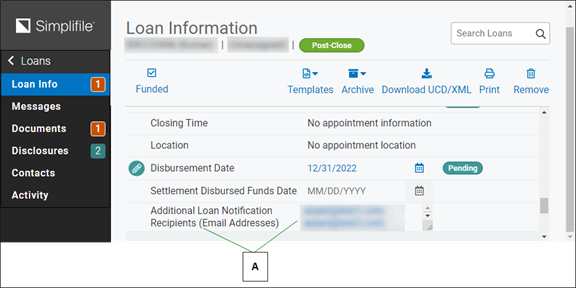
| Letter | Description |
|---|---|
| A | You can add up to 50 additional email addresses. Separate multiple emails with a comma. Drag the lower right corner to make the field larger. |
How to add people to a loan’s emailing list
- Find the loan whose notifications you want to send to additional people. For more information, see Find a Loan.
- Select the card header or the loan number to open the Loan Information page.
- In the Additional Loan Notification Recipients field at the bottom of the page, enter the email addresses of the people you want to add to the email list.
If you add more than one email address, separate the addresses with commas. You can add up to 50 email addresses.
Add a date to a loan
Add a date to a loan
The Loan Information page includes fields for dates, such as the dates for closing and fund disbursement. You can enter these dates manually or choose a date from a calendar.
Manual date entry
You can select in a date field and enter a date manually, if desired. You can use numerals to enter a date in the numerical MM/DD/YYYY format (for example, 03/25/2016). Be sure to use double digits for the month and date. This means that, if the month or date is a single digit, you must start the month or date with a zero ( 0 ). For example, April would be 04.
The Date Picker calendar
When you select the calendar icon ( ) beside a date field, a small calendar pops up. You can find the date you want on the calendar and then select the date to display the date in the field. The calendar is called a date picker.
Below is an example of the date picker.
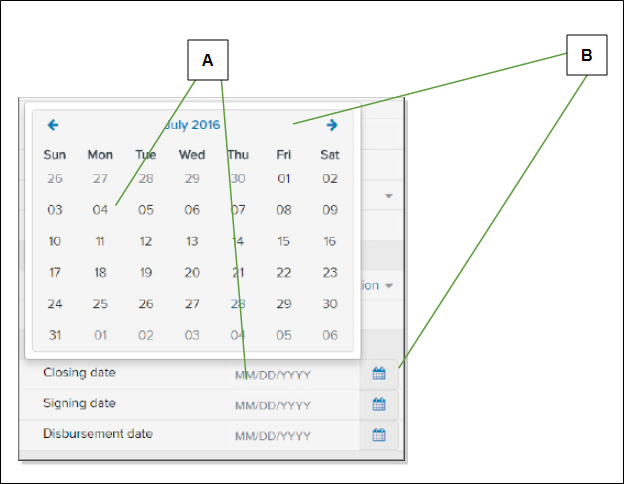
| Letter | Description |
|---|---|
| A | Select a date in the calendar to enter that date in the field in the MM/DD/YYYY format. After a date displays, you can select in the field to edit the date. |
| B | Select the calendar icon to toggle the calendar open and closed. |
You can do any of the following to move around in the date picker calendar:
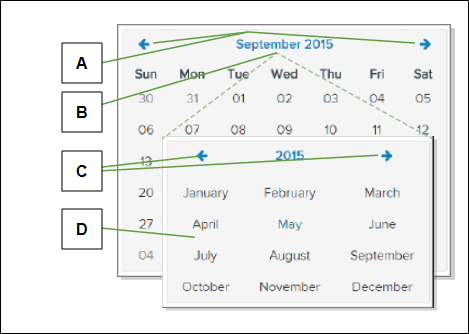
| Letter | Description |
|---|---|
| A | Select the left or right arrow to move to the month before or after the displayed month. |
| B | Select the month to display a list of months you can choose. |
| C | From the list of months, select the arrows to move to the year before or after the displayed year. |
| D | From the list of months, select a month to display the calendar for that month of the displayed year. |
When the date you want displays, select it to place the date in the date field.
List view export
List view export
You can export the loan information that displays on the list view. You can do the following:
- Export everything in the table.
- Use filters to display the loans you want to export.
- Mark specific loans to export.
You can open or save the information as a CSV file.
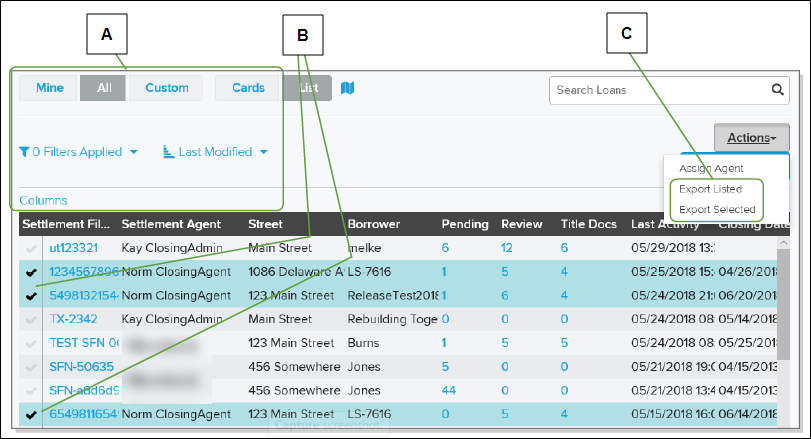
| Letter | Description |
|---|---|
| A | Use the filter tools to display the loans whose information you want to export. |
| B | Mark boxes for the loans whose information you want to export. |
| C | When you are ready, select the Actions  dropdown button and use the dropdown list to choose whether to export information for all of the listed loans or for only the loans whose boxes are marked. dropdown button and use the dropdown list to choose whether to export information for all of the listed loans or for only the loans whose boxes are marked. |
How to export loan information from the list view
- In the navigation menu, select a loan status to display loans with that status.
- If necessary, select the List view at the top of the list page.
- If desired, do any of the following to limit the loans that display:
- Choose columns and their display order for the list table. For more information, see Choosing list view columns and display order.
- Choose filters to apply to limit which loans display. For more information, see Filtering the Loan Display.
- To choose specific loans, mark the boxes in the left column for each loan you want.
- When you are ready, select the Actions dropdown button and do one of the following:
- To export information for all of the loans listed, select the Export Listed item.
- To export information for the loans whose boxes you marked, select the Export Selected item.
- Follow your browser’s instructions to open, save, or print the information.
Review, change, save, or print basic loan information
Review, change, save, or print basic loan information
To review or update general information about a loan, select the card header or the number of the loan on either the card view or the list view. This opens the Loan Information page. The navigation menu changes to give you options for adding documents and reviewing information about the loan. Below is a partial example.
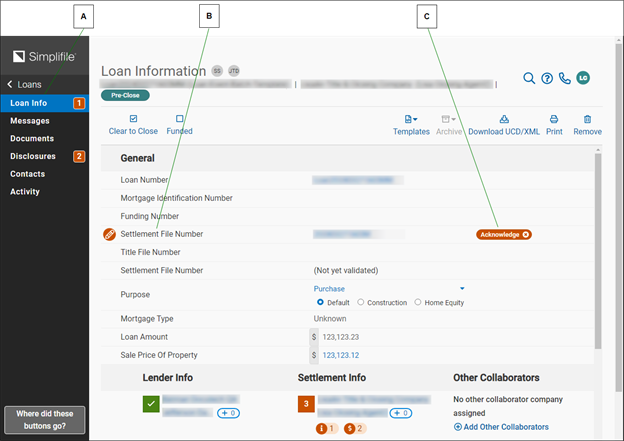
| Letter | Description |
|---|---|
| A | Use these links to work with the loan. For more information, see other sections of this user guide. |
| B | The agent must supply a file number before you can collaborate on this loan. You cannot edit this number. |
| C | Changes the agent makes that you must accept are marked Acknowledge. The number of these items may display in the navigation menu. |
| D | Changes you make to this page are marked Pending until the agent accepts them. The number of these may display in the navigation menu. |
You may need to acknowledge or edit information the agent provides on the Loan Information page. For example, you may need to acknowledge the addition of a closing date.
If a number displays in an orange box in the navigation menu beside a page name, that many items need your attention on that page of the loan record. Items on the Loan Information page that need your attention are identified with an Acknowledge button. Items you can edit are marked with an edit icon ( ).
).
You can save or print a copy of the information that displays on the Loan Information page. Below is an example of the way this information prints.
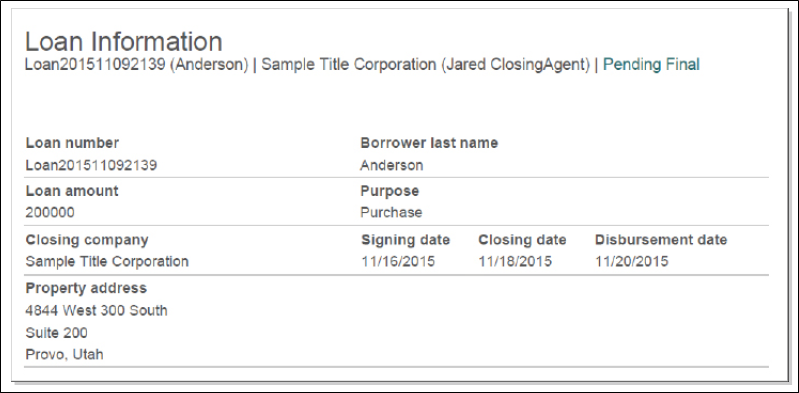
How to review, change, save, or print loan information
- Find the loan whose information you want to review, save or print. For more information, see Find a Loan.
- Select the card header or the loan number to display the Loan Information page.
- If desired, acknowledge or edit any changes made by your collaborator.
- In the upper right corner, select the Print button.
- In the Print options window, mark Information.
- Select the Print button.
Cancel or re‑assign a loan
Cancel or re‑assign a loan
After you create a loan, you assign that loan to a settlement company. Then the settlement administrator assigns the loan to an agent. You can archive a loan to stop its progress through the system.
If necessary, you can unassign a loan from any settlement company and leave the Settlement Company field empty, You can also choose a different settlement company to handle the loan. If you do either of these, any agent who was assigned to work on the loan is also unassigned and can no longer access the loan in Simplifile. The system sends an email to the original settlement company to let them know that the loan has been reassigned.
You cannot unassign a loan with a Post‑Close or Archived status.
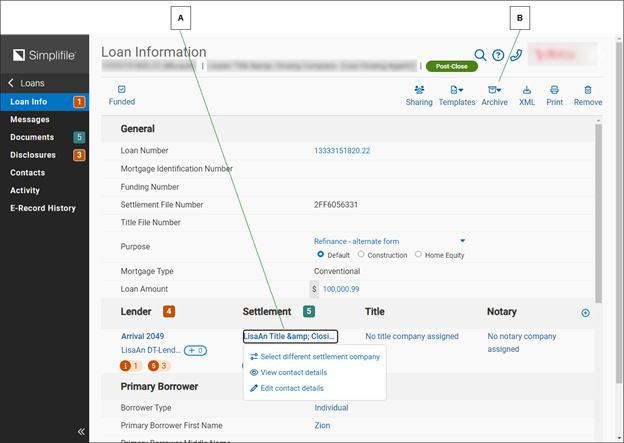
| Letter | Description |
|---|---|
| A | To take back a loan from a settlement company or re‑assign it, select the name of the company and choose from the options that display. You may need to reload the browser page to see the change. |
| B | You can archive a loan at any time to stop its progress through the system. |
How to cancel or re‑assign a loan
- Find the loan you want to cancel or re‑assign. For more information, see Find a Loan.
- Select the card header or the loan number to display the Loan Information page.
- To unassign the loan from the designated
settlement agency, select the name of the
settlement company in the Settlement Info
section. Then do one of the following in the dropdown
list that displays:
- To leave the loan without a settlement agency, choose Unassign company.
- To choose a different agency, choose Select different Settlement company. Then choose the agency you want from the dropdown list that displays.
- To archive a loan to stop its progress through the system, select the Archive
 button in the upper right corner.
 - To re‑activate an archived loan and return it to the status it had before it was archived, select the Unarchive item on the Card view.
Review current tasks
Review current tasks
During collaboration, you and the agent work together to gather all the necessary loan information and store it in Simplifile, where you can each work with specific pieces of information, as needed. You can add documents and fees. As you collaborate, the card view of a loan tracks the tasks you need to complete. Below is an example.
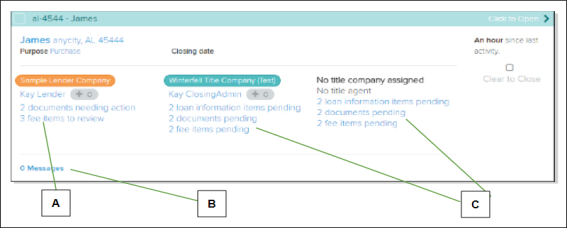
| Letter | Description |
|---|---|
| A | Select information items to go to the loan page where you can complete the necessary task. |
| B | You can message collaborators from within Simplifile to ask about work that needs to be completed. For more information on messaging, see Communicate with settlement agents. |
| C | The loan card lists tasks that need to be performed by your collaborators. |
The types of information that can display on a loan card view include the following:
- Loan information changes. You can review any changes the agent has made to the loan. This task links to the Loan Information page. For more information, see List view export.
- The number of documents you need to upload. This task links to the Documents page. For more information, see Work with loan‑related documents.
- The number of fee items you need to review. This task links to the Disclosures page. For more information, see Working with a new or changed fee.
- The number of fee items the agent needs to review. This task links to the Disclosures page. For more information, see Adding or editing a fee.
- The status of the preliminary title package. The card view displays whether the preliminary title package has been requested, whether there are title documents pending delivery, or if the preliminary title package has been delivered. If you need to take action, the task links to the Documents page. For more information, see Reviewing and adding loan‑related documents.
The navigation menu of the Loan Information page tracks the number of tasks you need to complete. You can select a loan area to display the page where you can complete tasks for that area. Below is an example that shows the Documents page of a loan.
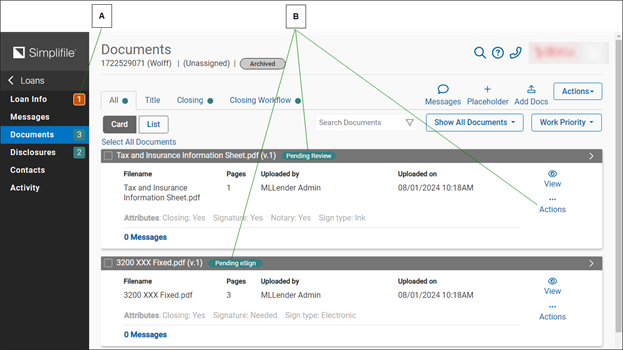
| Letter | Description |
|---|---|
| A | The number of items that need attention display at the right of each area. Orange items indicate that you have tasks to complete in that area. If all lender tasks are complete for an area or that area has no lender tasks, the number of any items the agent needs to review display in blue. |
| B | Cards for each document display on the Documents page. Colored instructions indicate who should complete the document task (orange for you, blue for agents). Select the icons at the right of each card to complete a task. For more information about working with loan documents, see Reviewing and adding loan‑related documents. |
Below is an example that shows task notifications on the Disclosures page of a loan.
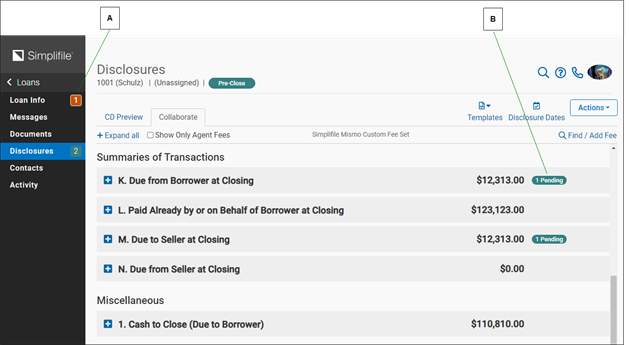
| Letter | Description |
|---|---|
| A | The number of items that need attention display at the right of each area. Orange items indicate that you have tasks to complete in that area. If all lender tasks are complete for an area or that area has no lender tasks, the number of any items the agent needs to review display in blue. |
| B | Colored instructions indicate who should complete the disclosure task (orange for you, blue for agents). For more information on working with disclosure documents, see Collaborate on disclosures and fees. |
Communicate with settlement agents
Communicate with settlement agents
You and the settlement agent can use the Messages feature to communicate within Simplifile. You can work with messages in the following ways:
- View the most recent message on the loan card.
- Create and view messages about individual fee items on the Disclosures page. If a message exists, a blue speech icon (
 ) displays. The number indicates how many messages you have. Select the icon to display the messages.
 - To add a message to a fee, select the Menu
 (ellipsis) button at the end of the line and choose Chat About This Fee to open the message box.
 - On the Documents page, select the Messages link at the bottom of a document card to create and view messages about individual documents.
- Create and view messages about a specific document, placeholder, or document version on the document Messages page accessed from the navigation menu after you select a document card header.
- Create and view general messages on the Messages page accessed from the navigation menu when a document page is not open. All loan‑related messages, including those that are created and display on other Simplifile pages (as described above), display on the main Messages page. An example displays on the next page.
In some places, multiple messages scroll up and older messages are hidden. You can use the elevator bar to view these messages.
Below is an example of the messages area on a Pre‑Close loan card.
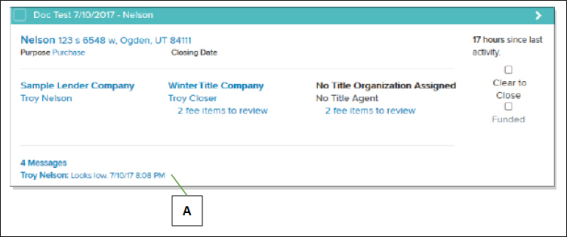
| Letter | Description |
|---|---|
| A | The most recent message displays, along with the name of the person who posted the message and a count of the number of messages relating to this loan. Select the link to view the Messages page (shown on the next page of this guide). |
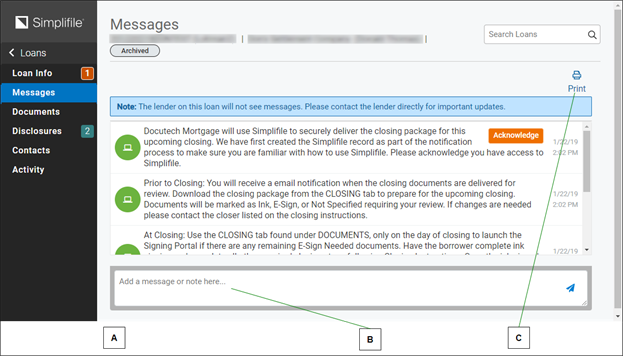
Select the Messages link on a loan’s card view or the Messages link in the navigation menu to display all of the messages for a specific loan. Below is an example of the Messages page.
| Letter | Description |
|---|---|
| A | On the Messages page, the name of the fee type or document displays for fee‑ or document‑related messages. If you select a name, the appropriate loan page opens (such as Disclosures or Documents) and displays the message box. |
| B | Select here to add a message. Mark the box to require your collaborator to acknowledge they read the message. |
| C | Select here to print messages, as well as loan information, documents, and fee disclosures. |
You can select a fee name to respond to a fee message. Simplifile opens the Disclosures page and expands the section where the fee is located as well as the message box for the fee. You can then quickly send a reply.
Similarly, you can select a document name to respond to a document message. Simplifile opens the Document page. Select Messages in the document’s navigation menu to access all of the document’s messages and send a reply.
The Messages page shows whether a message has been acknowledged, requires acknowledgment from you, or is pending acknowledgment from your collaborator.
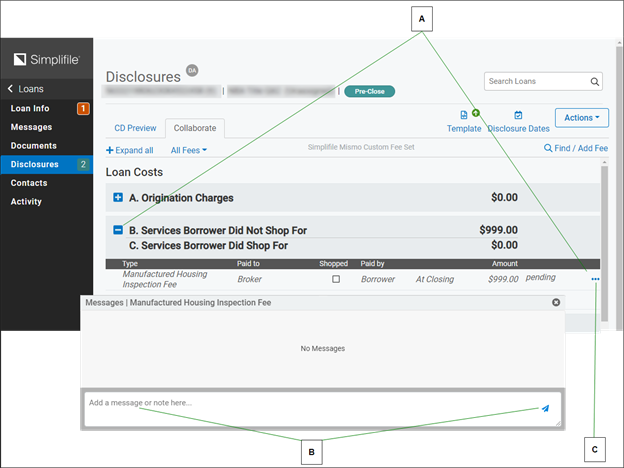
You can send messages to the agent from the Disclosures page. A numbered text balloon icon () displays if messages exist about a fee. Below is an example of the page.
| Letter | Description |
|---|---|
| A | You must expand the fee item sections to find the text balloons that contain numbers. This lets you see where the messages are, and how many you have for each fee item. |
| B | To create a new message string or respond to an existing message, select the Menu (ellipsis) button at the end of the fee line, choose Chat About This Fee, and enter your message. You can also select an existing text balloon. Require an acknowledgment, if desired. Select Add to send the message. |
| C | To read existing messages and respond, select the text balloon. |
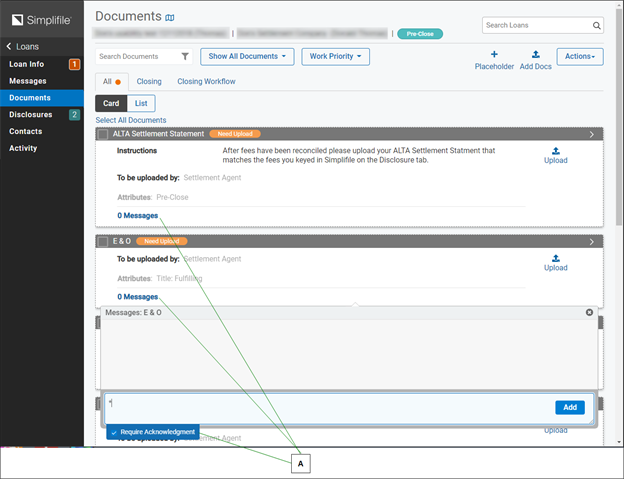
You can send messages from the Documents page about any document. Below is an example of the page.
| Letter | Description |
|---|---|
| A | Select the number of messages at the bottom of any document card to send a message about that document. Require an acknowledgment, if desired. Select Add to send the message. |
How to communicate with a settlement agent
- Find the loan card for the loan whose agent you want to message. For more information, see Work with loans.
- On the Loan card, view the message summary area.
- Do one of the following to display the Messages page:
- Select the message summary area.
- Select the loan header to open the Loan Information page. Then select the Messages item on the navigation menu.
- To send a message, do the following:
- Add the text of the message in the Add a message or note here field.
- If you want the lender to acknowledge that he or she saw the message, mark Require Acknowledgment.
- Select the Add button to send the message.
- To review or send messages about a fee, do the following:
- Open the loan with the fee you want to discuss.
- On the navigation menu, select the Disclosures item.
- If necessary, expand the list of fees so you can find the one you want. You can select the Expand all button at the top of the page or select a plus sign to expand a single section.
- Select a text balloon () to review or create a message for a fee. If no balloon displays, select the Menu (ellipsis) button and choose Chat About This Fee.
- In the Add a message or note here box at the bottom of the Message box, add the text of the message you want to send.
- Select the Add button to send the message.
- To review or send messages about a document, do the following:
- Open the loan with the document you want to discuss.
- On the navigation menu, select the Documents item.
- Select the Messages link at the bottom of the document card you want to discuss.
- Enter the text of the message in the Add a message or note here field for the document.
- Select the Add button to send the message.
View and add additional mortgage team contacts
View and add additional mortgage team contacts
You can message a settlement agent from the loan record card view in Simplifile and from the Disclosures page of a loan record. In addition, the Contacts page can display contact information for any valid MISMO party associated with the mortgage.
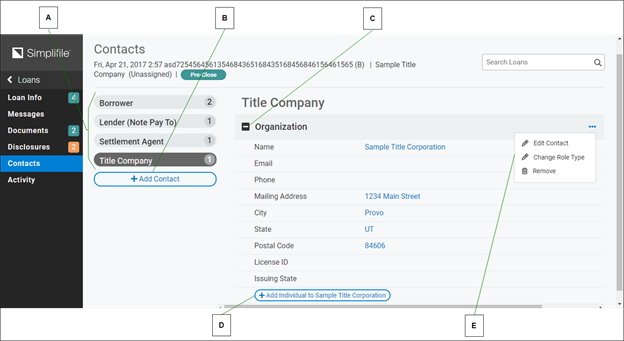
If an uploaded UCD file contains this information, Simplifile automatically adds it to the loan. However, both the lender and the agent can change existing information and add contacts to the loan. Below is an example of the Contacts page.
| Letter | Description |
|---|---|
| A | Select a button to display information about organizations and people involved with the loan. |
| B | To add a new contact, select the Add New Contact button and complete the fields on the window that displays. See the following page for examples. |
| C | Select a plus or minus sign to display or hide details about the organization or person. |
| D | To add a borrower or a person related to an institution (such as your primary contact at a company), select the Add Individual button and complete the fields on the window that displays. See the following page for an example. |
| E | Select the Menu (ellipsis) button at the far right of the header to
change the role type or remove or edit the contact,
if necessary. If you change the role type for the
Borrower, Settlement Agent, or Lender (Note Pay
To), the system creates a duplicate contact with the
same information but a different role type. |
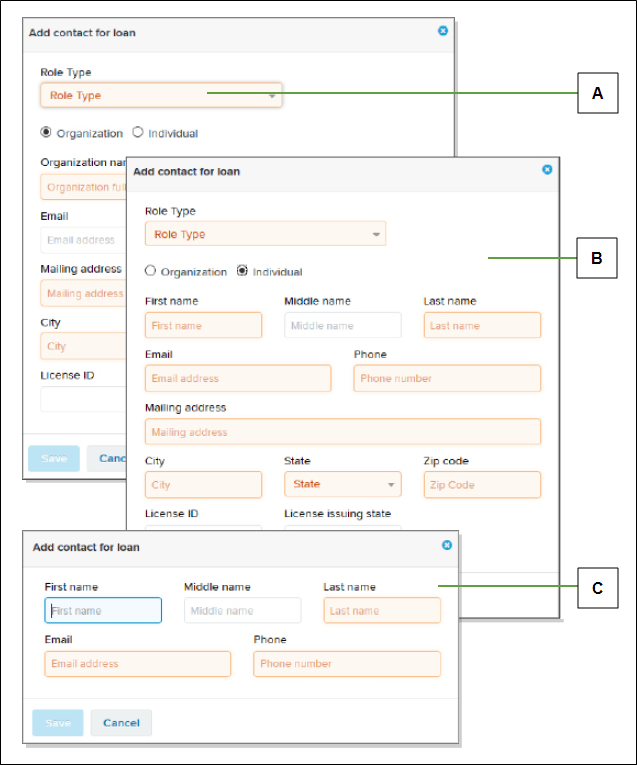
| Letter | Description |
|---|---|
| A | The role type you choose here displays as a button on the Contacts page. |
| B | The fields that display depend on whether you choose to add an organization or an individual. |
| C | Fewer fields are required when you add an individual to the page. |
How to view and add mortgage team member contact information
- Find the loan whose action history you want to download. For more information, see Work with loans.
- On the navigation menu, select the Contacts item.
- On the left side of the Contacts page, select the type of contact whose information you want to view. For example, to view contact information for the settlement agent, select the Settlement Agent type.
- To add a contact type, select the + Add Contact button at the
bottom of the column and complete the following
fields in the window that displays:
- Use the Role Type field to choose a role for the contact you want to add.
- Choose whether the contact is an individual or an organization.
- Do one of the following:
- If the contact is an organization, add at least the organization name and mailing address.
- If the contact is an individual, add at least the name, email address, telephone number, and mailing address.
- When you finish, select the Save button.
- To add an individual (such as a borrower or contact person) to a contact type, do the following:
- Select the button at the left to display the contact type’s information, or add a new organization (as described in the previous step of this task).
- If necessary, select the plus sign beside the contact type’s name to display the contact type’s information.
- Select the Add Individual button at the bottom of the contact type’s information.
- Add the name, email address, and telephone number of the person you want to add as a contact.
- Select the Save button.
QUICK TIP: To remove or edit a contact, display the information
for that contact. Then select the Menu (ellipsis) button in the
upper right corner and choose what you want to do.
QUICK TIP: To remove or edit a contact, display the information
for that contact. Then select the Menu (ellipsis) button in the
upper right corner and choose what you want to do.
Grant third‑party access
Grant third‑party access
You may want to add entities other than your own company and a settlement agency to a loan. You can grant limited loan access at an organizational level to additional parties such as the following:
|
|
|
|
|
|
|
|
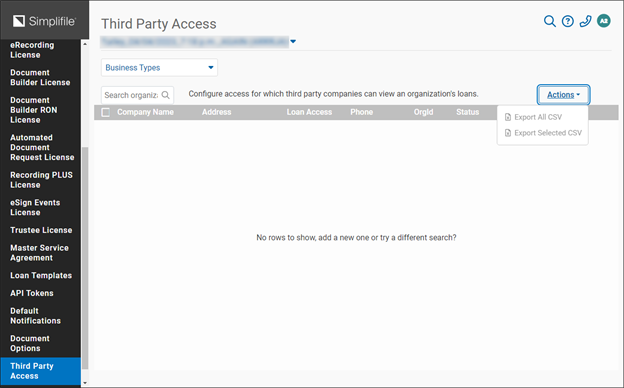
You add third parties on the Contacts page. When you select the third party on that page to display information about that party, if you chose Manual on the Third Party Access page, you have the option to enable collaboration.
After you enable collaboration or if you chose Auto add to all loans on the Third Party Access page, the third party tab on the Contacts page shows that the third party organization has been enabled for collaboration.
The Loan Information page displays a Sharing icon ( ) that lets you see the number of third party organizations you have enabled. Select the Sharing icon to display a window that lists the organizations. Below is an example.
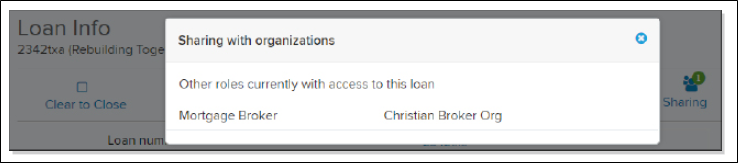
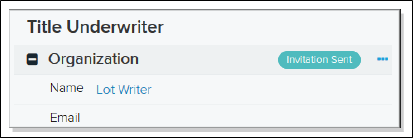
If you add a third‑party contact who has not yet set up an account with Simplifile, the system sends that third party an invitation. You can see the status of that contact on the Contacts page and when you select the Sharing icon on the Loan Information page, as shown below
How to grant third‑party access
- On the navigation menu, select the Organizations item.
- On the Organizations page that displays, select the name of the organization where you want to set up third‑party access.
- On the navigation menu, select the Third Party Access item.
- You can grant third‑party access to any entity that has been added to the Simplifile network.
- If desired, select in the Search org field and begin entering part of the name of the third party you want. Simplifile displays only entities that contain the information you enter.
- Do one of the following:
- If there is no dropdown option in the Loan Access column for the entity you want, the third party is not yet part of the Simplifile network. Select Invite to invite the third party to join Simplifile.
- If a dropdown option does display in the Loan Access column, choose the kind of access you want for that entity. You can grant any of the following access types:
- None. The entity will have no access to any Simplifile loans.
- Auto add to all loans. Whenever the entity is added to a Contact page, the entity will automatically have limited access to see the loan.
- Manual. Whenever the entity is added to a Contact page, you can select the Enable Collaboration button on the information tab for this entity to let this entity have limited access to see the loan.
View or download loan activity histories
View or download loan activity histories
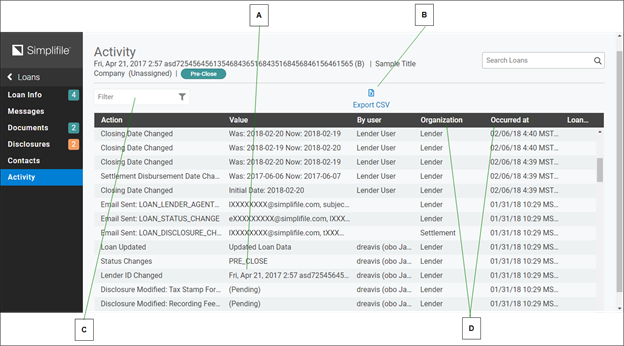
The Activity page lets you view actions that have occurred in Simplifile for a specific loan. Actions recorded include actions performed by both you and the settlement agent. You can see what happened (the action), the specifics of the action (the value), who performed the action (the user), whether the actor was the lender or the closer, and the date and time when the action occurred. Initially, the most recent actions display at the top of the list. Below is an example.
| Letter | Description |
|---|---|
| A | Hover your mouse pointer over an item to see details of that item. This is particularly helpful if the text has been shortened (truncated), as indicated by a Menu (ellipsis) button displays at the end of the text. |
| B | You can export the activity log as a CSV (comma separated values) report. |
| C | To find an action quickly, begin entering information in the Filter field. Any loan action containing the text or numbers you enter displays in the list of actions. |
| D | Select any header item to sort the list by those column entries. The arrow that displays indicates the direction of the sort (for example, A to Z, or Z to A). Select the header again to reverse the direction of the sort. |
How to view or download a loan’s activity history
QUICK TIP: If you cannot see all of the text in a column, a Menu (ellipsis) button displays at the end of the text . Hover your mouse pointer over an item to see all of the text.
- Find the loan whose action history you want to download. For more information, see Find a Loan.
- On the navigation menu, select the Activity item.
- Do any or all of the following, as desired.
- To find an action, begin entering information in the Filter field.
- To sort the list by a specific column, select the column header.
- To download the activity history as a file with comma‑separated values, select the Export CSV button in the upper right corner. Then follow your browser’s instructions to save or open the file.
Select the header again to reverse the direction of the sort.