Loan template creation
 Overview
Overview
Administrators with the necessary permissions can use basic information, documents you typically associate with any existing loan, and standard fee items to create a loan template in Simplifile. This can help prevent the need to re‑enter the same information or add the same documents to every loan, which can help streamline your loan creation process. A template can also serve as a sort of checklist for your settlement agents to let them know what they need to provide as you collaborate on loan fees and documents.
You can create a loan template from an existing loan, by copying an existing template, or from scratch. The creation method displays in the template’s activity log.
A loan template can consist of as much or as little information as you choose. A complete template would include the Loan Information page, any documents or document placeholders you want to include, and a Disclosures page with as many or as few fee items as desired.
Loan Info Template
Loan Info Template
When you choose to create a template, you give the template a name and a description. A clear and unique template name can help people know when to use that template. For example, you could include the loan purpose in the template to help people choose a template that applies information specifically for that purpose.
You can also add additional loan notification recipients, if desired. This sends notifications about any loan that uses this template to people other than the loan creator and its assigned settlement agent. For more information, see Add people to a loan’s emailing list.
After you create the basic template shell or if you choose to edit an existing template, a Loan Info template editing page displays.
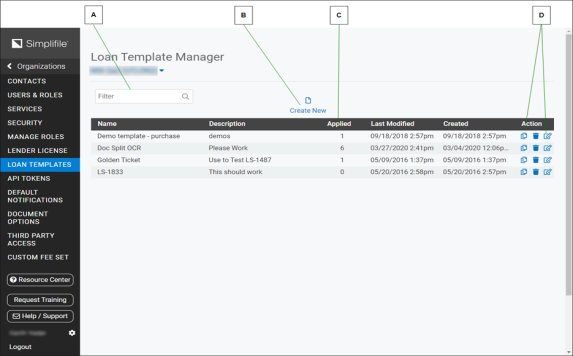
From the Loan Information page Templates icon you can also choose to manage templates. This opens the Loan Template Manager page, where you can create, copy, edit, and remove loan templates.
| Letter | Description |
|---|---|
| A | You can enter letters and numbers in the Filter field to display only templates whose names or descriptions contain what you enter. |
| B | Select here to create a template. |
| C | The number of times a template has been applied to a loan displays in the Applied column. |
| D | To copy a template, select the Copy icon. To edit an existing template, select the Edit icon. |
How to create or edit a template shell
- Select the Organizations item in the navigation menu.
- Select the name of the organization whose templates you want to work with.
- In the navigation menu, select the Templates item.
- Do one of the following:
- Create a loan you want to use as a template.
- Open an existing loan you want to use as a template. The loan should have many fields that you always complete in the same way.
- To create a template from scratch or by copying an existing template, open any loan.
- To edit an existing template, open any loan.
- In the upper right corner of the Loan Information page, select the Template
 button and do one of the following:
- To create a template from the open loan, select the Create template from current loan item.
- To edit an existing template or create a template from scratch or by copying an existing template, select the Manage templates item. When the Loan Template Manager page opens, do one of the following:
- To edit a template, select the Edit
 button. Then continue with the How to complete a Loan Info template.
 - To create a template from scratch, select the Create New
 button.
 - To copy a template and edit its information to create a new template, select the template’s Copy
 buttonand verify that you want to copy the template.
- To edit a template, select the Edit
- Add a name and description for the template and select the Create Template
 button.
 - Continue with How to complete a Loan Info template.
QUICK TIP: You can select a template trash can  button in the Loan Template Manager page to remove the template from the system.
How to complete a Loan Info template
QUICK TIP: You can select a template trash can button in the Loan Template Manager page to remove the template from the system.
- Complete How to create or edit a template shell to display the Loan Info | Template being edited page.
- Complete or edit the following fields, as necessary:
- Loan purpose. Use the dropdown list to choose whether the template is for Purchase or Refinance loans. Then indicate whether this is a default, construction, or home equity type loan.
- Template Name. Edit the template name, if desired.
- Description. Edit the template description, if desired.
- Jurisdiction. Choose whether the property address on loans using this template maps to a county (or jurisdiction) that has eRecording available.
- Paper Original. Choose whether loans using this template require settlement or title companies to mail paper originals.
- Additional Loan Notification Recipients. To send notifications about this loan to people other than the loan creator and the settlement agent, enter email addresses in this field. For more information, see Add people to a loan’s emailing list.
- Assign a settlement company and a title company, if desired.
- If you are affiliated with multiple settlement agencies, select the No settlement company assigned link and choose the agency where loans that use this template should be sent. You may also be able to use a No title company assigned link to choose a title company.
- If desired, select the Messages item on the navigation menu and enter a message you want users to see when they first access any loan that uses this template. For more information, see Communicate with settlement agents.
- To add documents to your template, see Document Template.
- To add fees to your template, see Disclosures template.
Document Template
Document Template
Administrators can include documents when they add or edit a loan template. This helps improve your workflow by letting you add any standard loan‑related documents once instead of on each loan. You can also add and edit document placeholders. A document placeholder lets you and the agent know that a specific type of document needs to be added to a loan created from this template.
Adding a document
When you select the Add Docs  button on a template, a window displays. You use the Choose Files to Upload
  button to find and add
files to upload. The files must be saved on a drive you can access from your computer. You can add multiple files at the
same time.
The files you choose display on the Add Documents window. You must then choose a document type for each
displayed document before you can complete the upload.
button to find and add
files to upload. The files must be saved on a drive you can access from your computer. You can add multiple files at the
same time.
The files you choose display on the Add Documents window. You must then choose a document type for each
displayed document before you can complete the upload.
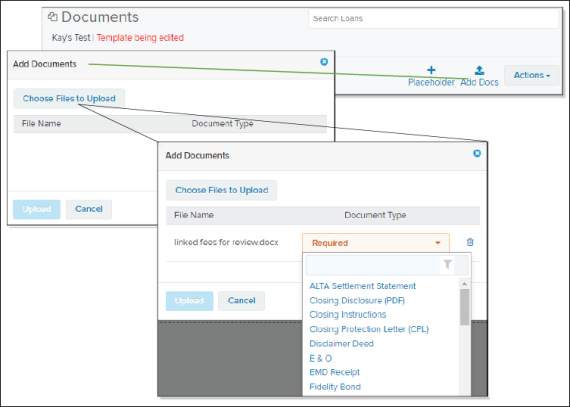
For more information about loan‑related documents, see Loan template creation.
Adding a document placeholder
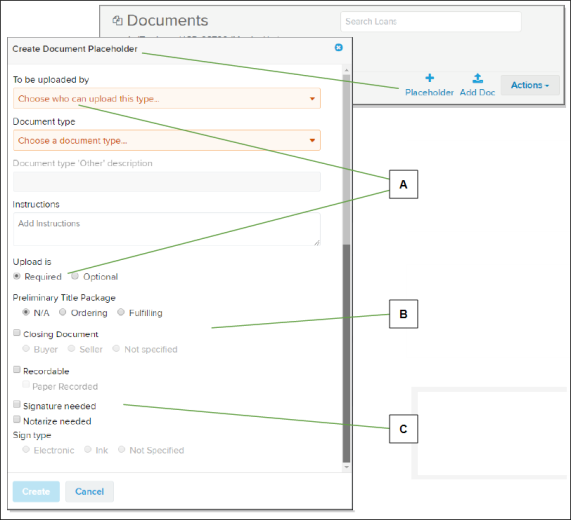
When you select the Placeholder  button, the Create Document Placeholder window displays.
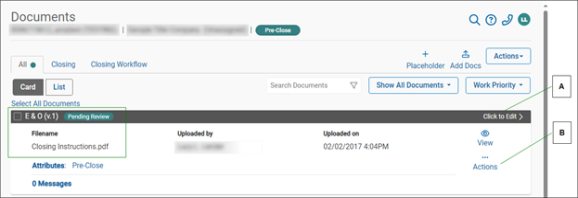
A placeholder displays instructions instead of information about the document.
| Letter | Description |
|---|---|
| A | Select here to make changes to the placeholder. |
| B | Select here to remove the placeholder. When you create a loan from this template, the Upload icon displays here. |
When created, you can select a placeholder header to make changes in its settings.
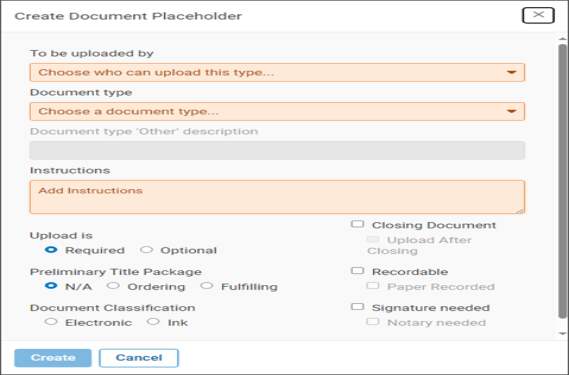
How to add or edit a documents template
QUICK TIP: You can add or remove any document or document
placeholder from any template when you edit that
template. To delete multiple documents, mark the
boxes on the document cards. Then select the Actions  dropdown button in the upper right corner and select the Delete
Documents item.
dropdown button in the upper right corner and select the Delete
Documents item.
- Open the template where you want to work with documents and placeholders. For instructions, see Loan Info Template.
- Select the Documents item on the navigation menu.
- Do the following to add a document to the template.
- Select the Add Docs button.
- When the Add Documents window displays, select the Choose Files to Upload button.
- Follow your browser’s instructions to find the file you want to add.
- Use the Required dropdown list to assign a document type to the document you want to upload.
- Repeat until you add all the documents you want.
- When you finish, follow your browser’s instructions to find the file you want to add.
- Select the Add Docs
- Do the following to add a placeholder for each document you want to include on all loans that use this template:
- Select the Placeholder button.
- From the To be uploaded by dropdown list, choose who should upload the document.
- Choose the type of document to upload.
- Add Instructions. This information displays on the placeholder card on the Documents page.
- Choose whether the document is Required or Optional.
- In the Preliminary Title Package area, choose whether you are ordering the preliminary title package or the document is fulfilling the preliminary title package request.
- Mark whether the document is a closing document and, if so, whether it is for the buyer, the seller, or not specified.
- Mark whether the document is recordable and, if so, whether it must be recorded using paper copies.
Whether a signature and notarization are required, and whether they must be electronic or inked (wet). The electronic/ink requirement applies to one or both options.
- When you finish, select the Create
 button.
- Select the Placeholder
- To edit a document placeholder, select its card heading.
Disclosures template
Disclosures template
Most of the tools you use to add or edit a Disclosures page template are described in the Disclosures section of this guide. For more information, see Collaborate on disclosures and fees . However, lender administrators may be able to see and use some extra tools, such as those described in the figure below.

| Letter | Description |
|---|---|
| A | Select the letter to choose who should complete the fee information. An S means that the settlement agent should complete the field. An L means that the lender should complete the field. |
| B | Use a dropdown list to change the contents of a field. Select the x beside a field to leave the field blank. |
| C | You can leave a payment amount field blank. |

| Letter | Description |
|---|---|
| A | After you save a fee that needs input from the settlement agent, the S or L icon designating who should complete the information is larger and in a different color. Empty fields display a question mark icon. The field displays the same way to the settlement agent. |
| B | Select any field, including one with a question mark icon, to edit the fee. |
How to add or edit a Disclosures template
- Open the template where you want to work with disclosures. For instructions, see Loan Info Template.
- Select the Disclosures item on the navigation menu.
- Enter or edit the fees that you want to include on all loans that use this template. You cannot add read‑only fees. For more information, see Adding or editing a fee.
Template action history
Template action history
A template’s Activity page lets you view actions that have occurred in Simplifile for a specific template. You can see what happened (the Action), the specifics of the action (the Value), who performed the action (the user), the organization that took the action, and the date and time when the action occurred. The most recent actions display at the top of the list. Below is an example.
How to view or download a template action history
-
In the upper right corner of the Loan Information page, select the Template button and choose Manage templates from the dropdown list.
- On the Loan Template Manager page, select the Edit button for the template whose action history you want to view or download.
- In the navigation menu, select the Activity item.
- To download the action history, select the Export CVS
 button in the upper right corner of the Activity page.
 - Follow your browser’s instructions to open and/or save your file.