Loan closing, funding, and archiving
 Overview
Overview
During collaboration, you and the settlement agent work together to gather the necessary documents for closing. When everything is ready, the agent goes through the closing process with the buyer, and funds are disbursed. You may want to use the Net Funds tab to display credits and debits that affect the final amount.
The agent submits the finalized loan records to be recorded. If the loan is recorded through Simplifile, the system tracks and displays the status of the loan as it goes through the recording process. You can also view details of that process. When the documents are recorded, you can archive the loan records.
Cleared to Close
Cleared to Close
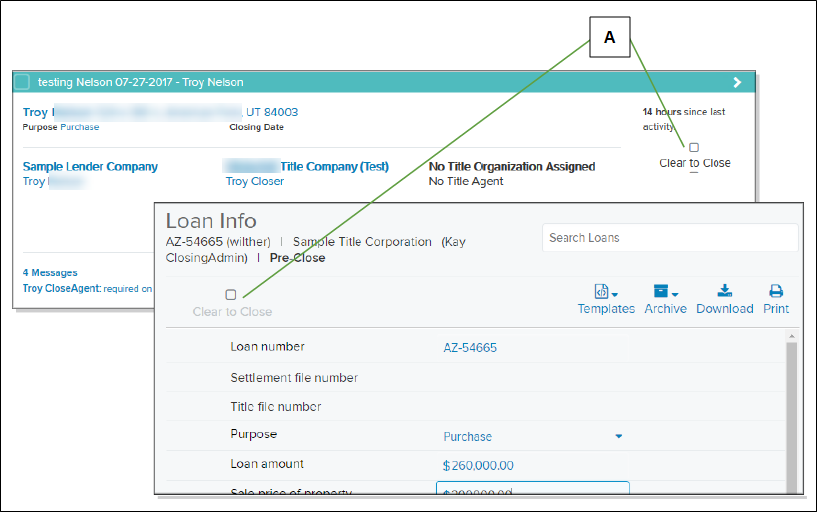
When you collaborate to prepare a loan, you also verify fees. When you feel sure that all documents are gathered and all amounts are presented correctly on the documents, you or the settlement agent mark the loan as cleared to close. Simplifile saves this information in the loan record and notifies the agent that the documents are ready for closing.
| Letter | Description |
|---|---|
| A | Mark one of these boxes when all of the loan‑related documents, including the disclosure, are verified as accurate. |
How to close a loan record
- Display the loan card or the Loan Information page of the loan you want to prepare for closing.
- Mark Clear to Close.
The agent takes the documents through the closing process and notifies you when the process is complete.
Fee Locking
Fee Locking
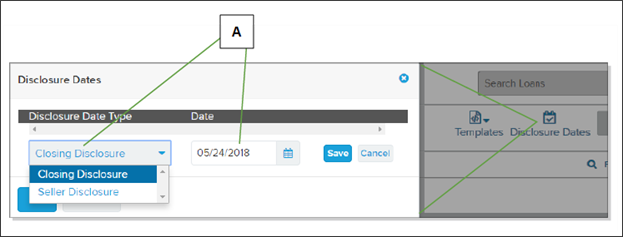
If you use a custom fee set and marked in that fee set fee items you want to lock after the disclosure date is set, you can use the Disclosure Dates  button on the Disclosures page to enter the disclosure date and lock the fee items. Users can no longer edit the specified fees after you enter the date.
| Letter | Description |
|---|---|
| A | To prevent users from editing any fee items marked as Locked after disclosure in the custom fee set applied to the loan. Choose the disclosure type you want from the dropdown list. Then add the date and save the information. |
For more information about custom fee sets, see Custom fee sets.
How to lock fees by posting a disclosure date
- Display the Disclosures page of the loan whose fees you want to lock.
- Select the Disclosure Dates button in the upper right corner.
- In the window that displays, select the Add new date link.
- From the dropdown list, choose the type of disclosure for which you want to add the date.
- Enter the date you want to use.
- Repeat steps 3 through 5 to add another date.
- select the OK
 button.
Fund disbursal
Fund disbursal
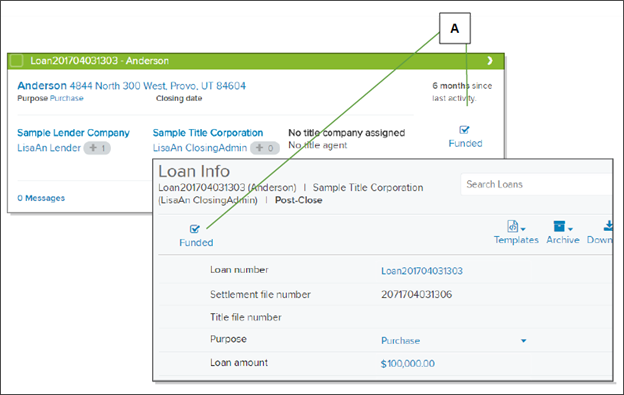
After a successful closing, you or the agent disperse the funds for the loan. Then you need to mark the loan as Funded within Simplifile. This signals Simplifile to move the loan to the Post‑Close stage and notifies the settlement agent that the loan documents are ready to be recorded.
| Letter | Description |
|---|---|
| A | Mark one of these boxes when the loan funds have been disbursed. |
How to fund a loan record
- After a loan closes and you disburse funds for a loan, display the Loan Information page of the loan you want to mark as funded.
- In the Settlement disbursement date field, enter the date you expect to release the funds.
-
After you and the agent collaborate on and finalize the date, mark Funded.
The system moves the loan record to the Post‑Close stage.
The settlement agent can now record the documents.
Net Funds
Net Funds
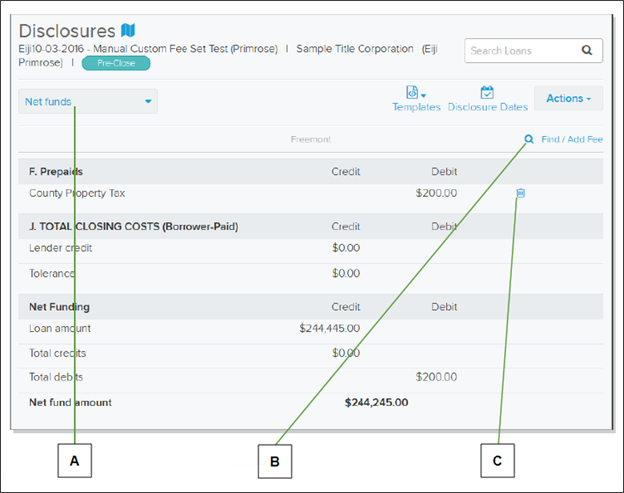
You can use the Net Funds tab to display the credits and debits that affect the payment amount in your funding wire. This can make it easier for the settlement agent to reconcile the payment. Below is an example of the tab.
| Letter | Description |
|---|---|
| A | Choose Net Funds from this dropdown list. |
| B | Select here to add a fee to the tab. |
| C | Select the Delete  trash can button to remove a fee from the tab. trash can button to remove a fee from the tab. |
Typically, you identify the fees that affect your net funds when you set up a custom fee set. This lets you automatically add credits and debits to a loan’s Net Funds tab when you create a loan using the custom fee set. For more information, see Custom fee setup and editing within Simplifile.
You and the settlement agent can also add fees to the Net Funds tab manually. Fees added manually by either collaborator can be removed by either collaborator.
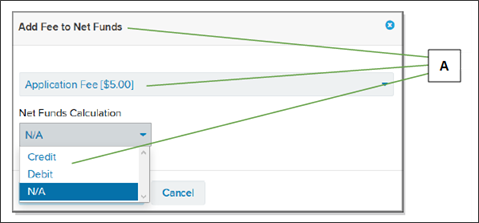
| Letter | Description |
|---|---|
| A | Use the Find / Add Fee option on the Net Funds tab to choose the fee and indicate whether the fee is a debit or a credit before adding the fee. |
You and the settlement agent can change the designation of a net funds fee from the Disclosures page. To do this, select the Menu  (ellipsis) button at the end of the fee row and choose Credit, Debit, or Not included from the dropdown list that displays. A plus or minus next to the NF indicates the fee’s current net funds designation.
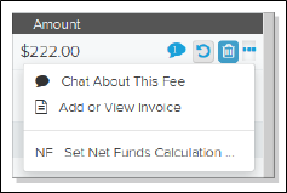
How to work with net funds
QUICK TIP: Select a trash can  icon to remove a fee from the tab.
- Display the Loan Information page of the loan where you want to work with net funds.
- On the navigation menu, select the Disclosures item.
- Verify that the fees you want to apply as net
funds are marked correctly. To do this, select the Menu (ellipsis) button at the end of each fee row and choose
Set Net Funds Calculation. Then choose the
appropriate designation.
- Select the Net Funds tab.
- To add a fee, do the following:
- Select the Find / Add Fee button.
- From the Item Type dropdown list, choose the type of fee you want to add.
- From the Net Funds Calculation dropdown list, choose whether the fee is a credit or debit.
- Select the Add Fee to Net Funds button.
Recording Process Statuses
Recording Process Statuses
After your loan is submitted for recording, Simplifile can track the progress of each document through the recording process. For example, Document cards display recording process information.
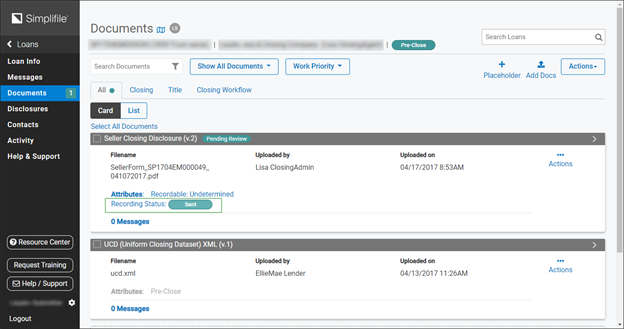
You can select the document eRecord link in the navigation menu to access additional recording information. Below are examples.
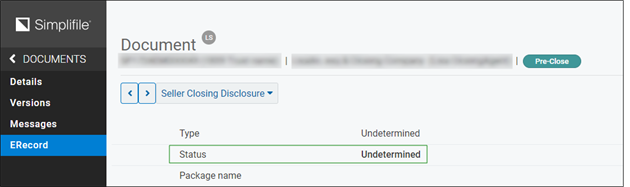
If your documents are eRecorded through Simplifile, you may see the following statuses:
- Started means that the eRecording process has begun. Your settlement agent has received the documents.
- Draft means that your package is being worked on. This can include creating a package, adding the documents to the package, and verifying that each document is prepared according to the recording county's (or jurisdiction’s) requirements.
- Sent indicates that your agent has sent the package containing the loan documents to the recording county (or jurisdiction).
- Rejected means that the recording county (or jurisdiction) found problems with at least one of the documents submitted as part of the package. The county (or jurisdiction) should indicate what the agent needs to do to solve the problems You can view the rejection reasons. After problems are solved, the agent must resubmit the package. You may be able to select a link to see the reasons the loan documents were rejected.
- Recorded means that the loan documents have been recorded. Your settlement agent can now return the documents to you. Once you receive the final documents, you should mark the loan record as Archived.
eRecord History Review
eRecord History Review
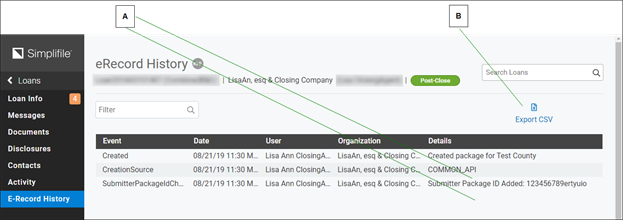
You can use the eRecord History link in the navigation menu of a Loan Information page to view details about the eRecording process. You can save these details as a CSV file. Below is an example.
| Letter | Description |
|---|---|
| A | Hover you mouse pointer over any item that does not completely display to show all of the text below the item. |
| B | Select here to export the eRecord history as a comma separated values (CSV) file. |
How to view a loan’s eRecord history
- Display the Loan Information page of the loan whose eRecord history you want to view.
The loan must have a Post‑Close status and the recording process must have already started.
- In the navigation menu, select the eRecord History item.
- To export the eRecord history as a comma separated values (CSV) file, select Export CSV in the upper right corner.
Loan archiving
Loan archiving
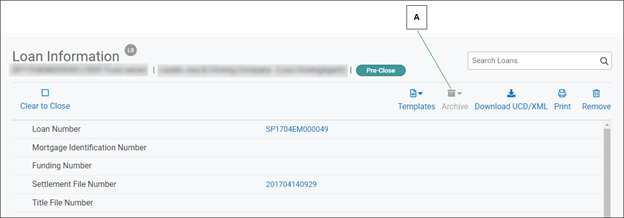
When all loan documents have been recorded, they are marked as Recorded in Simplifile. The settlement agent returns the final title policy to you. You can then mark the loan in Simplifile as archived and choose the reason for the archive.
An archived loan is no longer active. The loan information is removed from the active lists but can be reviewed from the Archived link on the navigation menu, if necessary. The archive reason displays in the header of the card.
| Letter | Description |
|---|---|
| A | Select this icon when the loan documents have been recorded and returned to you. |
To re‑activate an archived loan and return it to the status it held before it was archived, select the Unarchive button on the Loan Information page. You can also unarchive a loan by updating either the disbursement or closing date to a future date.
How to archive a loan record
- Display the Loan Information page of the loan you want to archive.
- Select the Archive
 button and choose the reason for the archive.