Work with loan‑related documents
 Overview
Overview
Both you and the settlement agent can add documents to a loan. An upload or a placeholder creation begins the document collaboration process. You need to review and acknowledge or request a change to a document before collaboration can continue.
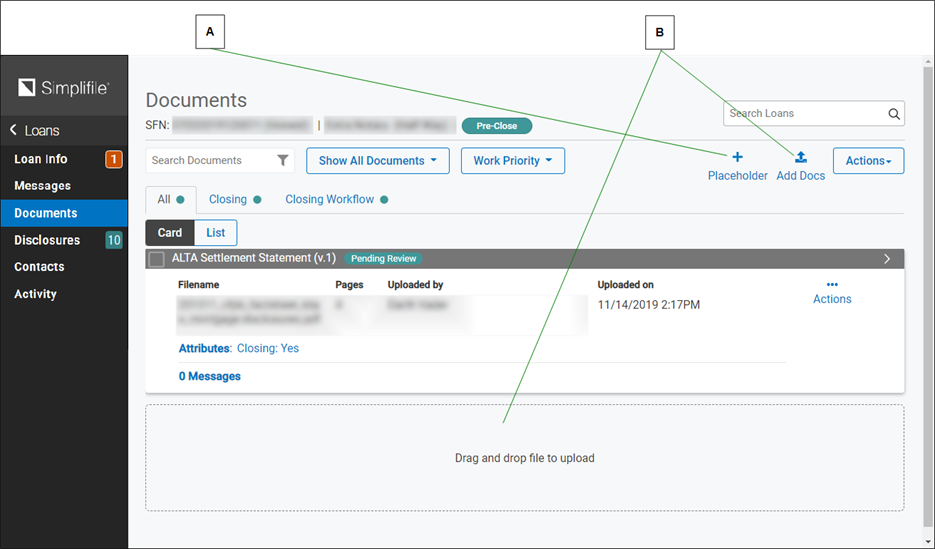
| Letter | Description |
|---|---|
|
A |
Select here to add a document placeholder. |
|
B |
Select here to add a document. You can also drag and drop a file from your computer to the area at the bottom of the document list to add it as a document. |
If necessary, you can change a document type. You can save, view, or print documents that you or the agent add to a loan. After both you and the settlement agent acknowledge a document, either of you can request another change or review without having to upload a new version of the document.
Reviewing and adding loan‑related documents
The Documents page lets you add loan‑related documents to Simplifile, and review documents the agent provides. Supported file types include .doc and .docx, .emf, .html, .jpeg and .jpg, .pdf, .tif and .tiff, .txt, .xps, .xml, .xlsx and .xls, .gif,
.zip, and .gz. You can upload multiple documents at a time, drag and drop a document file, or add a zipped file containing multiple documents, if necessary (for example, as a lender package). Below is an example of the Documents page.
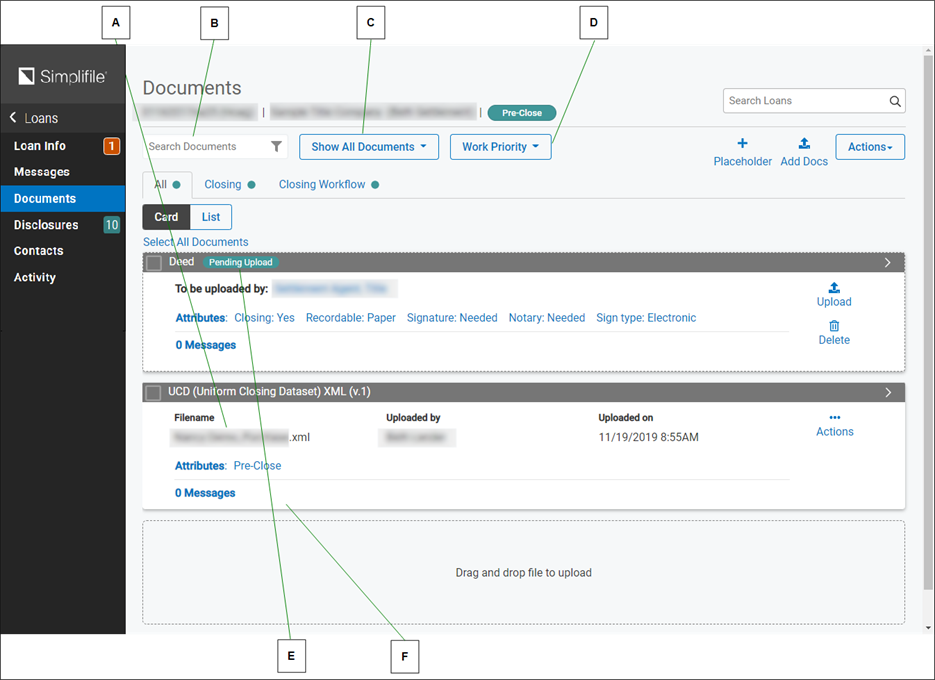
| Letter | Description |
|---|---|
|
A |
Cards containing information about documents attached to a loan display on this page. |
|
B |
Enter characters here to display only documents and placeholders whose type or file name contain the characters you enter. |
|
C |
Select here to limit the display by responsibility, to show only title‑related documents, or to show documents with no outstanding items. |
|
D |
Select here to sort documents by modification date or by title. You can sort in ascending or descending order. |
|
E |
A blue label means your collaborator needs to perform an action. An orange label means you need to perform an action. |
|
F |
Select a message area on a document or placeholder to view or send a message about a specific document. For more information, see Communicate with settlement agents. |
Documents you need to work on display at the top of the list, followed by documents waiting for your collaborator. Documents acknowledged by both are listed at the bottom. You can download one or more documents to review them.
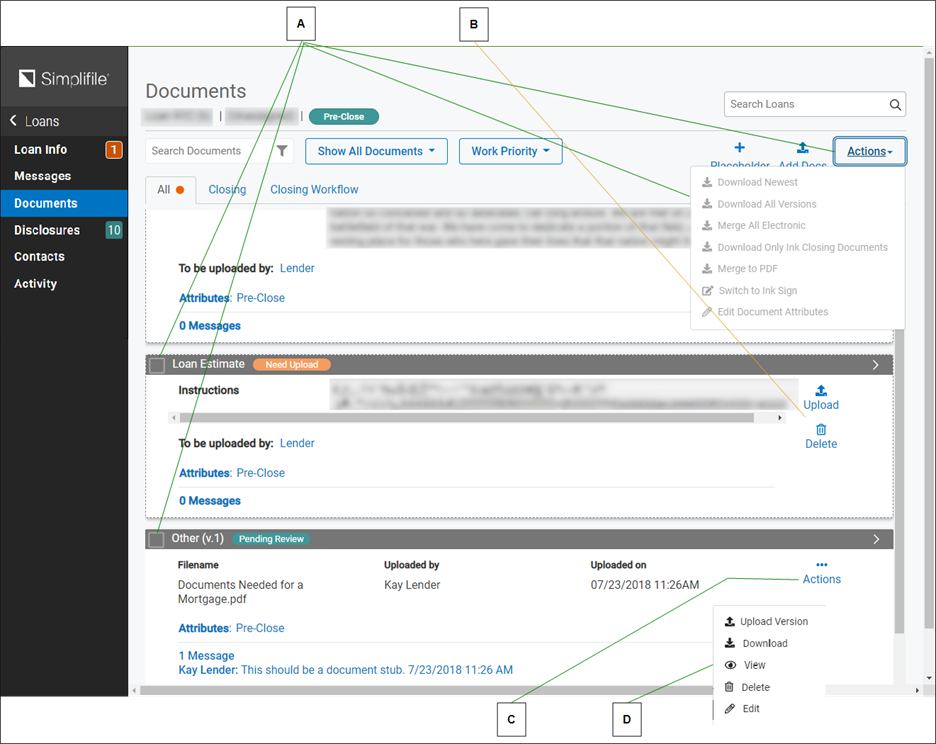
| Letter | Description |
|---|---|
|
A |
Mark the boxes of uploaded documents and select the Actions |
|
B |
Use these icons to acknowledge a document or send a document to your collaborator for review. The document card and the loan action history track all actions taken. |
|
C |
Select the Actions |
|
D |
If the View option displays, you can open the document in your browser. |
Documents you add must be saved on a drive you can access from your computer. You can add multiple files at the same time. If you choose an invoice document type, you can apply the invoice to a specific loan fee. For more information on invoices, see Collaborate on disclosures and fees.
You can add documents or document placeholders to a loan. A placeholder lets you and your collaborator know that a specific type of document needs to be added to a loan. Whoever actually uploads a document uploads a version of that document. You and your collaborator can upload multiple versions, if necessary. This lets you have multiple versions of a document available for reference. Whoever uploads a document can delete that document, if necessary.
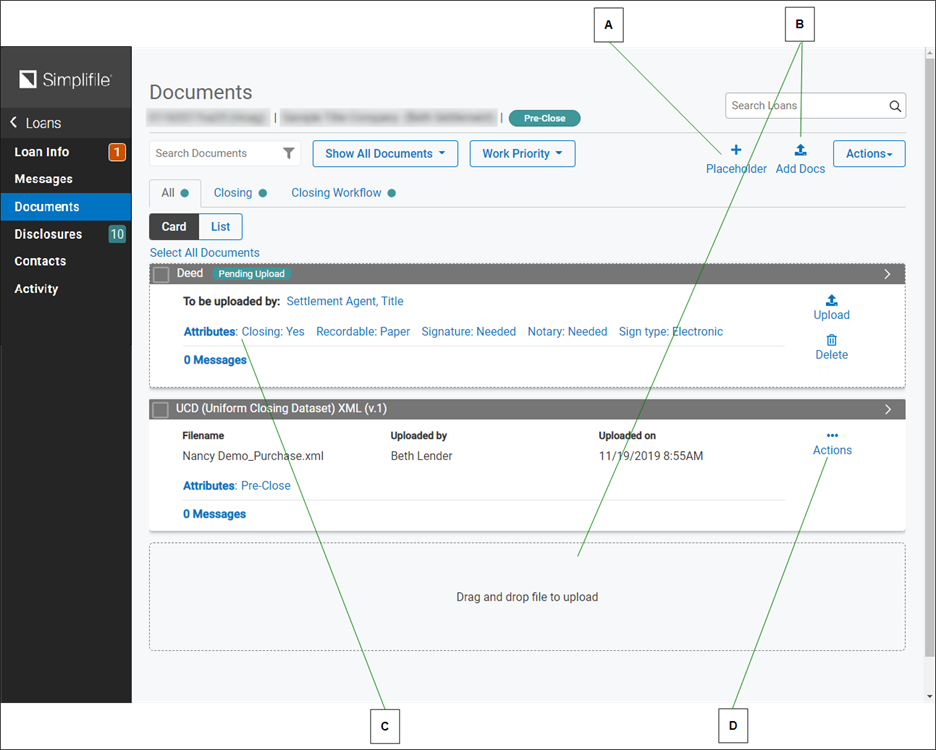
| Letter | Description |
|---|---|
|
A |
Select here to add a document placeholder. |
|
B |
Select here to add a document. You can also drag and drop a file from your computer to the area at the bottom of the document list to add it as a document. |
|
C |
Select here to specify attributes such as whether a document is part of a title order or order fulfillment, a closing document, requires paper recording, or requires signatures and notarization. |
|
D |
You can select here to perform additional actions such as requesting a new version of a document from your collaborator or downloading an existing document. |
The names of the files you choose display on the Upload Documents window. Whether you upload documents or drag them from your folder, you must choose a document type for each document before you can complete the addition.
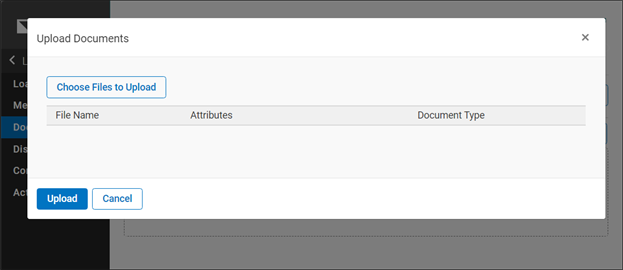
Depending on the document type and on your permission, you may also be able to set some document attributes.
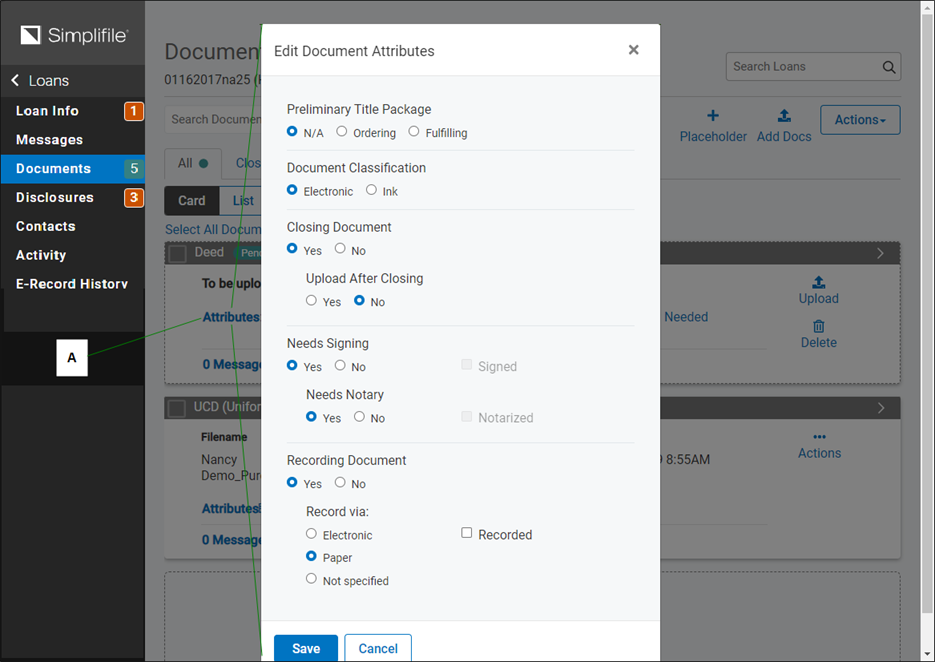
| Letter | Description |
|---|---|
|
A |
If the Attributes options display on a document card, you can specify attributes such as whether a document you uploaded is part of a title order or order fulfillment; a closing document; or requires paper recording, signatures, or notarization. |
If you mark multiple documents and use the Actions  dropdown button to choose to edit document attributes, the attribute editing window lets you specify whether to set or ignore each attribute for all the documents you marked. Below is an example.
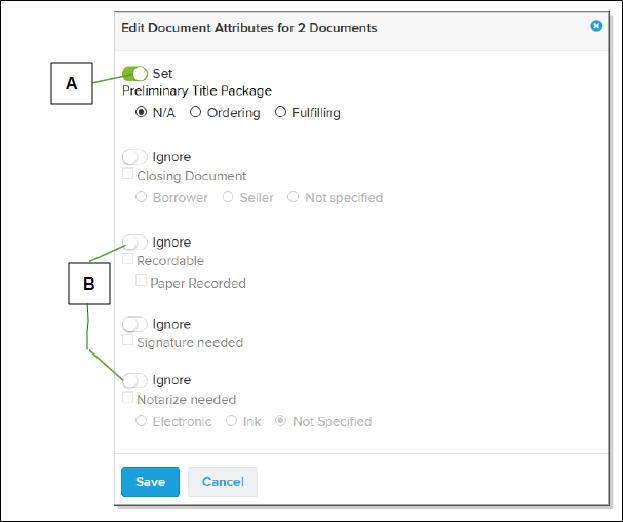
| Letter | Description |
|---|---|
|
A |
Assign an attribute the Set option to change the attributes of all the documents you marked to whatever you choose in the window. |
|
B |
An attribute assigned the Ignore option does not change that attribute for any of the documents you marked. |
How to review and add a document to a loan
QUICK TIP: To download a file, select the download icon ( ) for the file.
- Find the loan where you want to add a document. For more information, see Work with loans.
- If necessary, select the card header or the loan number to display the Loan Information page.
- On the navigation menu, select the Documents item.
- If desired, use the following options to locate documents:
- Enter characters in the Search Documents field to display only documents whose type or file name contain the characters you enter.
- Use the Show all documents dropdown list to filter the items that display.
- Use the Work Priority dropdown list to sort the display by date or title.
- If document attributes display, select them to make changes. You can indicate any or all of the following:
- Whether a document is part of a preliminary title package order or fulfills such an order.
- Whether a document is a closing document, and whether it is for a borrower or seller.
- Whether a document is recordable, and whether it must be paper recorded.
- Whether a signature and notarization are required, and whether they must be electronic or inked (wet). The electronic/ink requirement applies to one or both options.
- To add a document in addition to those required by instruction boxes, do the following:
- In the upper right corner, select the Add Docs
 button to display the Add Document window.
 - Use the Choose a document type dropdown list to find the type of document you want to upload.
- When you find the type of document you want, select it.
- Select the Choose File
 button and follow the prompts to find and upload the file you want.
- In the upper right corner, select the Add Docs
Edit the attributes of several documents at the same time
- Mark the boxes on the document cards or, to choose all the documents, select the Select All Documents button.
- Select the Actions dropdown button in the top right corner and choose
Edit Document Attributes.
- For each attribute you want to apply, select the Ignore button. This changes the option to Set and lets you choose the value you want to apply. Leave attributes with the Ignore option to leave them as they already are.
Adding a document placeholder
Adding a document placeholder
A document placeholder lets you and your collaborator know that a specific type of document needs to be added to a loan. Whoever actually uploads the document uploads a version of that document. For more information, see Adding a version of a document. You can also add a document placeholder to a loan template. The person who uploads a document can delete that document, if necessary.
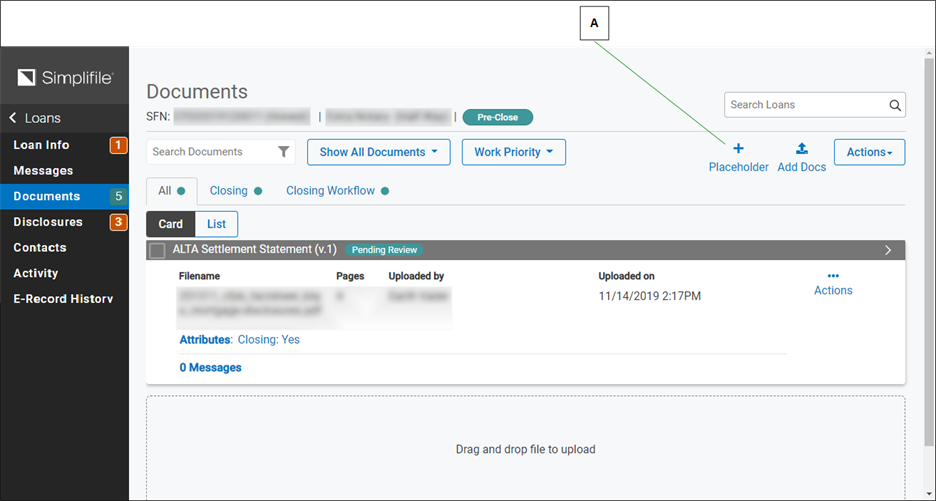
| Letter | Description |
|---|---|
|
A |
Select here to add a document placeholder. |
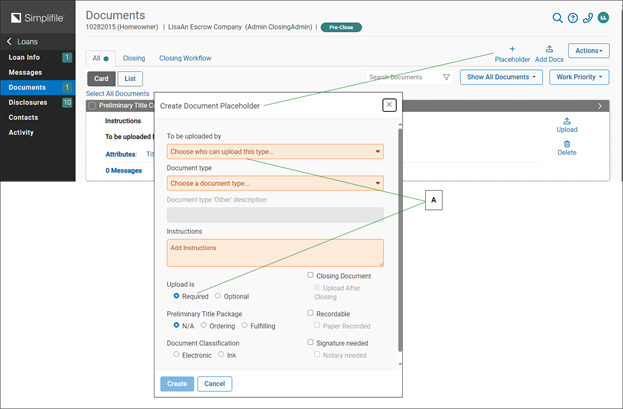
When you select the Placeholder link, the Create Document Placeholder window displays.
| Letter | Description |
|---|---|
|
A |
You can dictate who must upload the document and indicate whether the document is required or optional for the loan. |
Information about documents related to title display on a loan’s card view.
- If a placeholder exists for a title request, Prelim Title Package Not Requested displays. The lender will see a prompt to upload the title request.
- If a title request has been uploaded, Prelim Title Package Pending displays. The agent will see a prompt to upload any documents required for title delivery.
- When documents required for title delivery have been uploaded, Prelim Title Package Delivered displays.
How to add a document placeholder to a loan
- If necessary, access the Loan Information page for the loan where you want to add a document placeholder. For more information, see Work with loans.
- On the navigation menu, select the Documents item.
- Select the Placeholder button.
- Choose whether the lender or the settlement agent should be responsible to upload the document.
- Choose the type of document to upload.
- If desired, add instructions. This information will display on the placeholder card on the Documents page.
- Choose any or all of the following:
- Whether the document is Required or Optional.
- If the document is related to the preliminary title package, whether it is part of the order or the fulfillment.
- Whether the document is a closing document and, if so, whether it is for the borrower, the seller, or not specified.
- Whether the document is recordable and, if so, whether it must be recorded using paper copies.
- Whether a signature and notarization are required, and whether they must be electronic or inked (wet). The electronic/ink requirement applies to one or both options.
- When you finish, select the Create
 button.
Adding a version of a document
Adding a version of a document
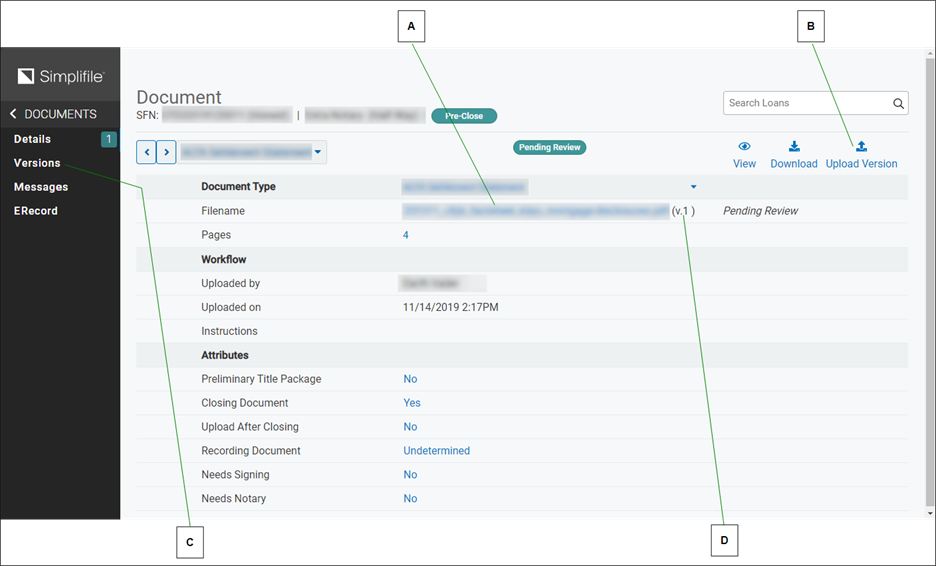
To replace a placeholder with an actual document, you upload a version of the document. You can also upload a version of a document if you want to save multiple versions of a document. This lets you track changes either you or your collaborator makes. Version numbers display in the document header after the document name. After a document or a document placeholder is initially added to a loan, you access versions by selecting the title bar of the document card.
Placeholders are not considered document versions.
| Letter | Description |
|---|---|
|
A |
Use these icons to acknowledge a document version or ask the agent for a review. You must add a revision reason if you want a review. |
|
B |
You can upload a version of a document to remove a placeholder or to keep all versions of a document. |
|
C |
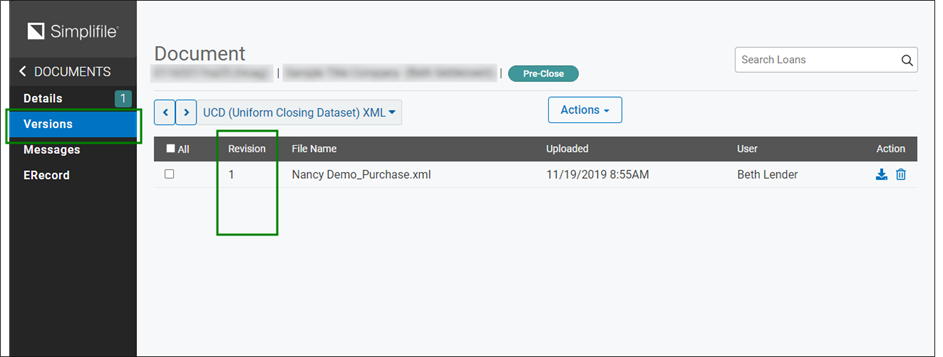
Use the VERSIONS link to view more information about the various files uploaded as this document (as shown on the next page). |
|
D |
Simplifile tracks the number of documents uploaded. The most recent document is listed here, with the version number after the file name. |
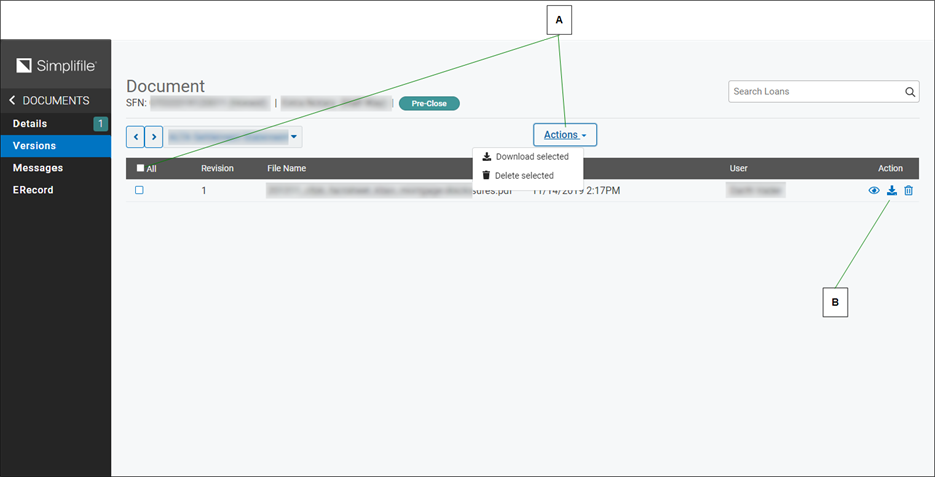
The Document Versions page lists all versions of a document, with the most recent version at the top.
| Letter | Description |
|---|---|
|
A |
Mark the boxes of the document versions you want to download or remove from the loan. Then select the Actions |
|
B |
Use these icons to view or remove individual document versions. You can remove a document if you uploaded it. |
How to add a version of a document to a loan
- Find the loan where you want to add a version of a document. For more information, see Work with loans.
- Select the card header or the loan number to display the Loan Information page.
- On the navigation menu, select the Documents item.
- Select the header bar of the placeholder or document card where you want to upload a version of that document.
- Select the Upload Version
 button.
 - Follow your browser’s instructions to find and upload the document.
Reverting to a previous version of a document
Reverting to a previous version of a document
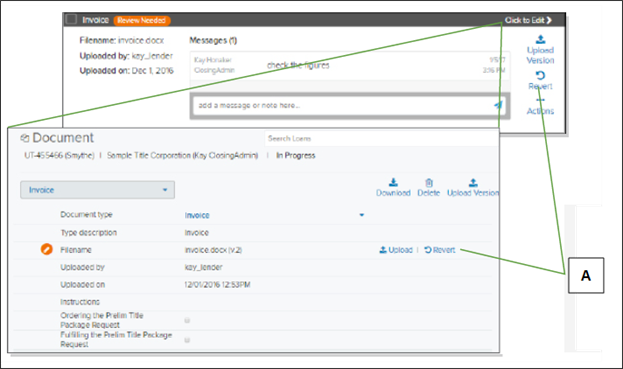
If necessary, you can revert to a previous version of a document you upload or to a document placeholder. For example, suppose that you upload a document, and then find it necessary to upload a new version of that document. If your collaborator does not acknowledge the new version but instead returns it to you for review, you have the option to upload another version or revert to the previous version. Below is an example.
| Letter | Description |
|---|---|
|
A |
The option to revert displays on the document card and on the document page that displays when you select the document card header. |
When you select the Revert button, the next previous version becomes the current version and Simplifile removes the most recent version of the document. If the document started as a placeholder, the reversion can remove all versions and leave only the placeholder.
Changing a document type
Changing a document type
If necessary, you can change the document type assigned to an uploaded file. This is helpful if someone who uploads a file chooses the wrong document type.
Simplifile will accept only document types with valid file extensions.
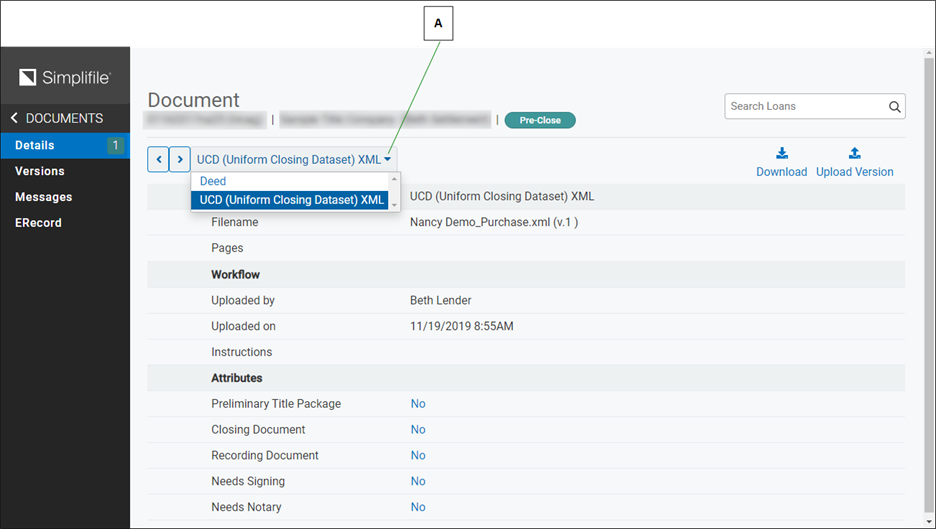
| Letter | Description |
|---|---|
|
A |
Choose a new document type from the dropdown list. |
How to change a document type
- Find the loan where you want to change a document type. For more information, see Work with loans.
- Select the card header or the loan number to display the Loan Information page.
- On the navigation menu, select the Documents item.
- Select the header of the document card where you want to change the document type.
- Use the dropdown list to choose the type of document you want.
- If you are requesting the preliminary title package, mark Ordering the Prelim Title Package Request.
- If the document is part of the preliminary title package, mark Fulfilling the Prelim Title Package Request.
- Select the Save
 button.
List of common documents
List of common documents
The main document Simplifile uses is a Uniform Closing Dataset file (UCD.xml). The Federal Housing Finance Agency (FHFA) directed the development of this common industry dataset. The UCD attempts to standardize the data that is required for loan estimates and closing disclosures. It should follow MISMO 3.3 standards. For more information on disclosure items, see Collaborate on disclosures and fees.
The data in an uploaded UCD.xml document automatically populates many Loan Information page and Disclosures page fields. Uploaded data overrides any existing data in the Loan Information page fields. Any fields on the Disclosures page with overwritten data are marked as changed: the information is labeled Pending if you uploaded the document, or as Review Needed if your collaborator uploaded the document.
Either you or the settlement agent can upload a UCD.xml file. Below are some of the additional document types both you and the agent can upload. This is not an exhaustive list.
- Closing Disclosure. This document provides information that helps buyers understand all of the costs related to a loan transaction, including the seller’s terms. If a borrower requests privacy, the seller receives a separate Seller Closing Disclosure that includes only information pertinent to the seller.
This document must be uploaded as a PDF.
- Loan Estimate. This document provides information that helps explain the key features, costs, and risks of a specific loan.
- Sales Contract (Purchase Agreement). A document that, depending on factors including the state where the real estate transaction is taking place, may be short with the intent to open negotiations or may be a complete contract that contains all information pertaining to the sale and which lacks only signatures.
Additional document types the lender may upload can include the following:
- Closing Instructions. This document provides an overview of the agreement between the lender and the settlement agent that lists the requirements and responsibilities for each step in the closing process. The list typically includes the information, documents, and proceeds the lender agrees to provide to the agent and the settlement services the agent agrees to provide for the lender.
Some loan types and states have specific requirements that may be included in an additional related document.
- Information Request. This term identifies any written request for information relating to a loan. An information request requires a written response that acknowledges receipt of the request followed by a search for the information and either a delivery of that information or a written notice that the information is not available.
- Lender Package. This is a set of documents that may include other documents listed here. For example, a lender package may include closing instructions, a list of fees charged, borrower financial documents, and a property appraisal, as well as other documents the settlement agent might need.
- An Executed or Fully Executed Lender Package, generally uploaded by the agent, includes all signed and notarized (fully executed) lender and title documents.
Additional documents the agent may upload can include the following:
- Closing Protection Letter (CPL). This document is a legal agreement between the lender and the title insurance underwriter. It guarantees that the title agent will handle the lender’s funds and documents properly.
- Earnest Money Deposit Receipt (EMD). A title company generates this document when it receives the executed purchase agreement and earnest money check.
- Error and Omissions Compliance Agreement (E & O). This agreement protects the title insurer if any clerical or typographical errors occur during the execution of the title documents. The document assures that borrowers and lenders will work together to make any necessary corrections to the title documents.
- Executed or Fully Executed Lender Package. This package includes all signed and notarized (fully executed) lender and title documents.
- Fidelity Bond. This document is business insurance that protects high‑money industries against employee misconduct such as fraud or theft.
- Final Title (Final Title Insurance Policy). This document protects the lender against any property loss or encumbrances due to liens or defects in title to a property. It guarantees a free and clear title after close of escrow.
- Grant Deed. This conveyance document transfers a real property title from one party to another. Common granting deeds include the following:
- General Warranty Deed. Assures that the property title is free from encumbrances.
- Special Warranty Deed. Assures that the current property owner (the seller) has had no title issues while owning the property.
- Sole and Separate Deed. Used in community property states when a married person or a person with a registered domestic partner buys real property in only his or her name.
- Disclaimer Deed. Used in community property states when a married person or a person with a registered domestic partner relinquishes any claim to a certain real estate property to the other spouse or partner. This gives the other spouse or partner sole and separate ownership. The signer becomes the grantor while the spouse receiving the deed becomes the grantee.
If someone owns real property before marriage or acquires real estate as sole and separate property after marriage, the spouse must execute a disclaimer deed.
- Quitclaim Deed. Used to state that a person releases any claim or potential claim to a specific real property.
- Mechanics Lien Waiver. This document guarantees that no work or improvements have been done to a real property in the 120 days before closing. It is used to establish that the mechanic has received full payment for any work done on the property.
- Preliminary Title Commitment/Binder. A group of documents that include preliminary findings after escrow is opened and a title search is done. They can include the unexecuted title policy as well as any liens, exceptions, and encumbrances on a property that must be addressed before closing.
- Recording Package. A group of all lender and title documents that have been processed by the appropriate recording county (or jurisdiction).
- Settlement Statement. This document itemizes all fees and charges made to both borrowers and sellers in a real estate transaction loan.
The American Land and Title Association (ALTA) Settlement Statement is a standardized form developed by ALTA and required by the Real Estate Settlement Procedures Act (RESPA).
- Wiring Instructions. If real estate funds will be delivered using a wire transfer, these instructions provide the information necessary for the funds to be properly removed from one account and sent and deposited to another.
Viewing, saving, or printing loan document
Viewing, saving, or printing loan documents
You can use the Print icon on the Loan Information page to open or save documents.
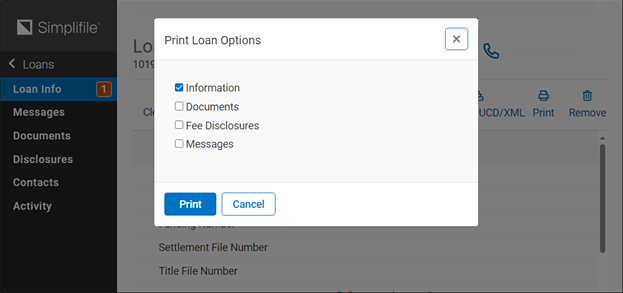
| Letter | Description |
|---|---|
|
A |
Select the Print icon to open the Print Loan Options window. Mark the items to be printed and select the Print button. |
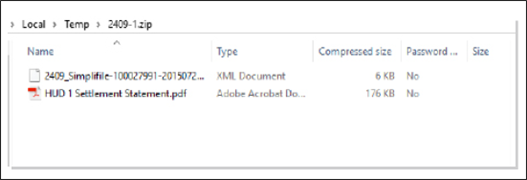
If you choose to save the documents, all documents are gathered into a zipped folder. The system saves each document in the zipped file as a separate document.
If you choose to open the zipped folder, the contents display in your computer’s file management system. Below is an example of how Windows displays the zipped files.
You can also view and save documents from the Documents page. You may be able to view a document without downloading it first.
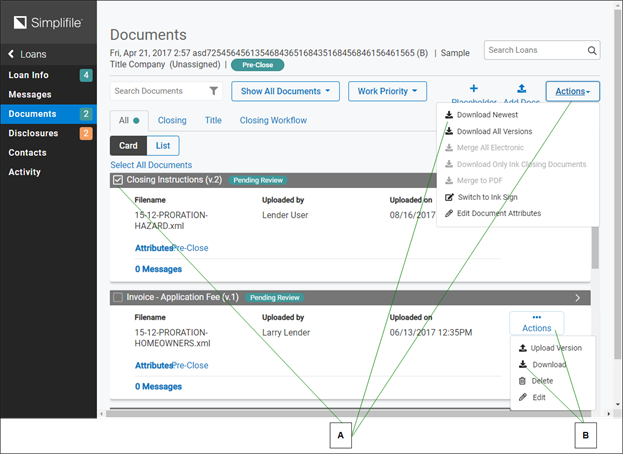
| Letter | Description |
|---|---|
| A | Select the Actions dropdown button on a document card to open and save a document (Download), add a version of the document (Upload Version), or remove a document from the loan (Delete). If the View icon displays, select it to open the document in a separate tab. |
| B | To download multiple documents into a zipped folder, mark the boxes of the documents you want. Then select the Actions dropdown button above the list of documents and choose to download only the newest versions or all versions of the documents you marked. |
How to view, save, or print loan documents
QUICK TIP: Select the Actions dropdown button on a document card to remove that document from Simplifile. You can remove only documents you have uploaded.
QUICK TIP: If you have documents that must be eRecorded or that must be ink signed and/or notarized, you can select the Actions dropdown button and choose to download the most current versions of all electronic or all ink required documents.
From the Loan Information page:
- In the upper right corner, select the Print button.
- In the Print options window, mark the Documents checkbox.
- Select the Print button.
Simplifile downloads all of the documents for this loan into a zipped folder.
QUICK TIP: If an eye icon (
 ) displays, select the icon to view the document in a separate browser tab.
 - Follow your browser’s method to save the zipped folder.
- Find the zipped folder and extract the files.
From the Documents page
- If necessary, in the navigation menu, select the Documents item.
- To view, save, or print a single document, select the Actions dropdown button on the document card. Then use the icons in the dropdown list to do any of the following, as available:
- Select the Download Newest
 item to open or save the newest document.
 - Select the Download All Versions
 item to open or save all the versions of the document.
 - Select the Upload Version item to upload the document.
- Use the Delete
 item to remove the document from the loan.
- Select the Download Newest
- To view, save or print multiple documents, do the following:
- Mark the box in the left corner of the document card of each document you want to access.
- Select the Actions dropdown button at the top right of the page, above the document cards.
- To download only the newest versions of the documents you marked, Select the Download Newest item.
- To download all versions of the documents you marked, select the Download All Versions item.
- Follow your browser’s method to open or save the files.
- Find the zipped folder and extract the files.
Re‑opening a document for collaboration
Re‑opening a document for collaboration
After both you and the settlement agent acknowledge a document, collaboration on that document is typically complete. However, you or the agent can re‑initiate the collaborative process on that document, if needed.
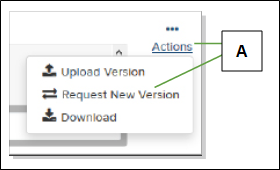
| Letter | Description |
|---|---|
|
A |
Use the Actions tools to request a new version of an acknowledged document. |
The system sends a message to the agent explaining the re‑opening. When you or the agent accesses the loan, the navigation menu indicates that action is required in the Documents section of the loan.
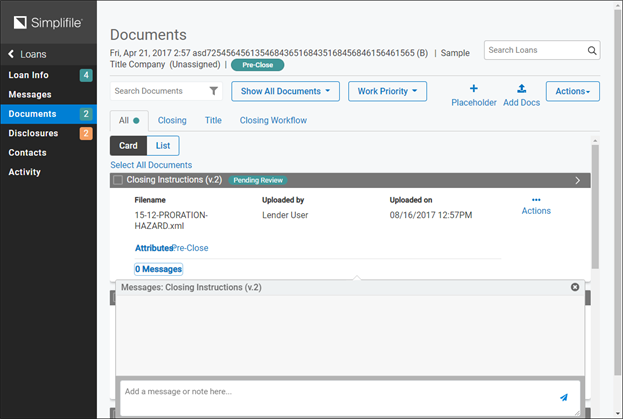
How to re‑open a document for collaboration
- If necessary, access the Loan Information page for the loan whose document you want to re‑open for collaboration. For more information, see Work with loans.
- On the navigation menu, select the Documents item.
- On the card for the document you want to re‑open for collaboration, select the Actions dropdown button on the upper right corner.
- Select the Request New Version item.
- Add a reason for the request.
- To require the collaborator to acknowledge the request, mark Require Acknowledgment.
- Select the Send
 button.
The collaborator can choose to upload a new version of the document, revert to the original version, or clear the request. For more information on reverting, see Reverting to a previous version of a document.
- Continue with collaboration as you would for any other document.
Re‑opening a document for collaboration
Re‑opening a document for collaboration
After both you and the settlement agent acknowledge a document, collaboration on that document is typically complete. However, you or the agent can re‑initiate the collaborative process on that document, if needed.
| Letter | Description |
|---|---|
|
A |
Use the Actions tools to request a new version of an acknowledged document. |
The system sends a message to the agent explaining the re‑opening. When you or the agent accesses the loan, the navigation menu indicates that action is required in the Documents section of the loan.
How to re‑open a document for collaboration
- If necessary, access the Loan Information page for the loan whose document you want to re‑open for collaboration. For more information, see Work with loans.
- On the navigation menu, select the Documents item.
- On the card for the document you want to re‑open for collaboration, select the Actions dropdown button on the upper right corner.
- Select the Request New Version item.
- Add a reason for the request.
- To require the collaborator to acknowledge the request, mark Require Acknowledgment.
- Select the Send button.
The collaborator can choose to upload a new version of the document, revert to the original version, or clear the request. For more information on reverting, see Reverting to a previous version of a document.
- Continue with collaboration as you would for any other document.
Adding a document
Adding a document
When you select the Add Docs button on a template, a window displays. You use the Choose Files to Upload  button to find and add files to upload. The files must be saved on a drive you can access from your computer. You can add multiple files at the same time.
The files you choose display on the Add Documents window. You must then choose a document type for each displayed document before you can complete the upload.
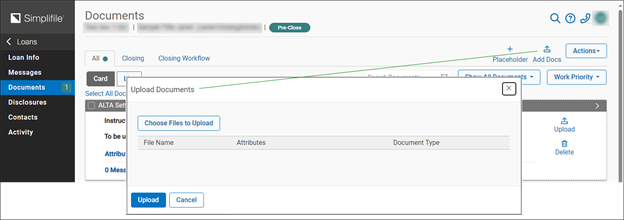
For more information about loan‑related documents, see Work with loan‑related documents.
Adding a document placeholder
Adding a document placeholder
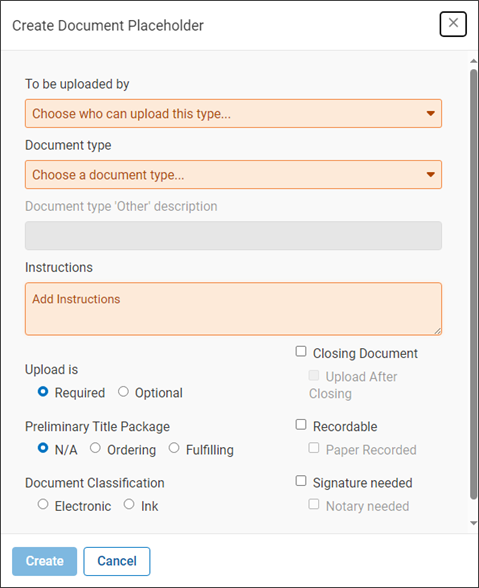
When you select the Placeholder link, the Create Document Placeholder window displays.
| Letter | Description |
|---|---|
|
A |
You can dictate who must upload the document and indicate whether the document is required or optional for the loan. |
A placeholder displays instructions instead of information about the document.
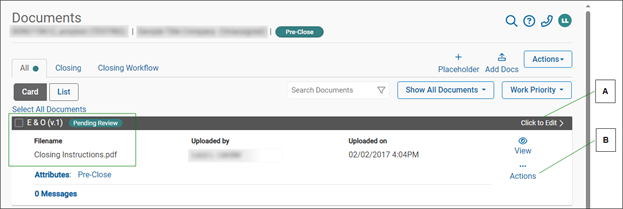
| Letter | Description |
|---|---|
| A | Select here to make changes
to the placeholder. When you create a loan from this template, the Upload icon displays here. |
| B | Select here to open a menu that contains Upload Version, Download, View, Delete, and Edit. |
When created, you can select a placeholder header to make changes in its settings.
How to add or edit a documents template
QUICK TIP: You can add or remove any document or document
placeholder from any template when you edit that
template. To delete multiple documents, mark the
boxes on the document cards. Then select the Actions dropdown button in the upper right corner and choose the Delete
Documents item.
- Open the template where you want to work with documents and placeholders. For instructions, see Loan Info Template.
- Select the Documents item on the navigation menu.
- Do the following to add a document to the template.
- Select the Add Docs button in the upper right corner.
- When the Add Documents window displays, select the Choose Files to Upload button.
- Follow your browser’s instructions to find the file you want to add.
- Use the Required dropdown list to assign a document type to the document you want to upload.
- Repeat until you add all the documents you want.
- When you finish, select the Follow your browser’s instructions to find the file you want to add link.
- Select the Add Docs
- Do the following to add a placeholder for each document you want to include on all loans that use this template:
- Select the Placeholder button.
- From the To be uploaded by dropdown list, choose who should upload the document.
- Choose the type of document to upload.
- Add Instructions. This information displays on the placeholder card on the Documents page.
- Choose whether the document is Required or Optional.
- In the Preliminary Title Package area, choose whether you are ordering the preliminary title package or the document is fulfilling the preliminary title package request.
- Mark whether the document is a closing document and, if so, whether it is for the buyer, the seller, or not specified.
- Mark whether the document is recordable and, if so, whether it must be recorded using paper copies.
Whether a signature and notarization are required, and whether they must be electronic or inked (wet). The electronic/ink requirement applies to one or both options.
- When you finish, select the Create button.
- To edit a document placeholder, select its card heading.
Disclosures template
Disclosures template
Most of the tools you use to add or edit a Disclosures page template are described in the Disclosures section of this guide. For more information, see Collaborate on disclosures and fees. However, lender administrators may be able to see and use some extra tools, such as those described in the figure below.

| Letter | Description |
|---|---|
| A | Select the letter to choose who should complete the fee information. An S means that the settlement agent should complete the field. An L means that the lender should complete the field. |
| B | Use a dropdown list to change the contents of a field. Select the x beside a field to leave the field blank. |
| C | You can leave a payment amount field blank. |

| Letter | Description |
|---|---|
| A | After you save a fee that needs input from the settlement agent, the S or L icon designating who should complete the information is larger and in a different color. Empty fields display a question mark icon. The field displays the same way to the settlement agent. |
| B | Select any field, including one with a question mark icon, to edit the fee. |
How to add or edit a Disclosures template
- Open the template where you want to work with disclosures. For instructions, see Loan Info Template.
- Select the Disclosures item on the navigation menu.
- Enter or edit the fees that you want to include on all loans that use this template. You cannot add read‑only fees. For more information, see Adding or editing a fee.