Loan creation
Overview
If your company has the necessary Simplifile service, you can create loan records within Simplifile and assign them to lenders. You may also be able to create multiple loans at the same time with a batch import.
Someone at your company must create a loan record in Simplifile for each of your settlement‑initiated loans. Basic loan information displays in the card view and the list view (as described in Work with loans, and on the Loan Information page.
To begin the collaboration process, you invite a lender company to work on the loan. When you do this, the loan displays in the lender’s work queue, and the lender receives a notification that a new loan has been initiated and needs attention. Collaboration then continues as described in Work with loans.
Basic Loan Information
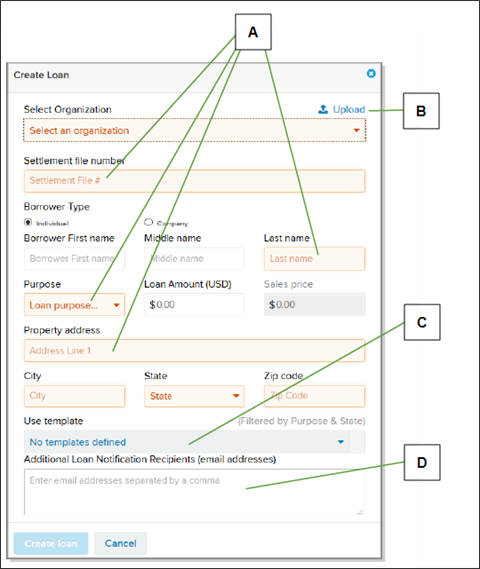
You add initial basic information in a window when you create a loan record in Simplifile. You can manually add this information, or you can upload the information in a Uniform Closing Dataset (UCD) as an .xml file. After a loan has been created, a lender can also upload a UCD file.
The UCD file helps standardize the data required for closing disclosures and should follow MISMO 3.3 standards. The data in an uploaded UCD file automatically populates many Loan Information page and Disclosures page fields. Uploaded data overrides any existing data in the loan record, including from a template. Templates can also add documents and messages to a loan record. For more information, see Template creation and use. For more information on disclosure items, see Collaborate on disclosures.
You can add email addresses to Simplifile to have Simplifile send notifications about a loan to people other than the assigned lender users and settlement agents. You can do this when you first create a loan and on the Loan Information page.
| Letter | Description |
|---|---|
|
A |
When you select the Create Loan |
|
B |
If you have the necessary permission, you can upload a UCD.xml file to create a loan. |
|
C |
If your administrator has created loan templates, you may be able to apply a template and automatically fill some of the loan record fields. |
|
D |
You can add email addresses that should receive notifications about this loan here or on the Loan Information page. For more information about how this works, see Add people to a loan’s emailing list. |
After you enter basic information and select to create the loan, the Loan Information page displays. Below is an example.
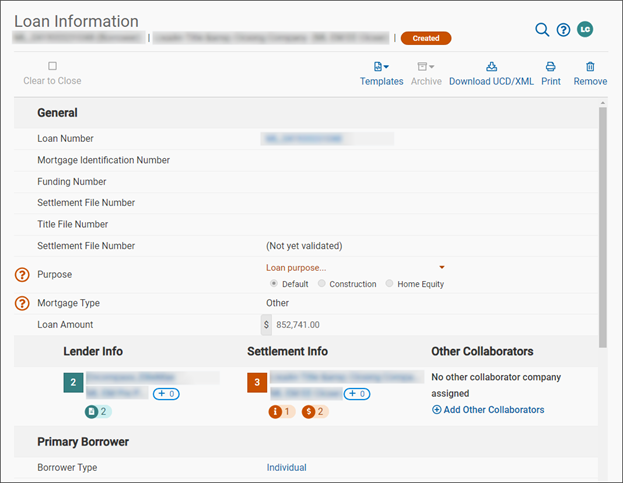
You complete or edit the fields on the Loan Information page, as necessary. This can include assigning a loan to a specific title company, if desired. You can do this at any time. Title agents can perform such tasks as uploading documents and sending you messages about a loan.
Simplifile automatically saves a loan record with a Pre-Close status when you create a loan. As soon as you choose a lender company, the loan status changes to Pre‑Close. Simplifile notifies the lender company that a new loan needs attention.
The system displays the correct recording county (or jurisdiction) based on the provided zip code. If more than one county (or jurisdiction) is in that zip code, you can choose the recording county (or jurisdiction) you want. The system also displays whether that county (or jurisdiction) accepts eRecording and e‑notarization through Simplifile. If yes, the eRecording and e‑notary icons beside the county (or jurisdiction) name display in bright green. Hover your mouse pointer over the icon to see the status.
If you often use the same information and documents for your loans, you can create a loan template and use it to apply that information to each loan. For more information, see Template creation and use.
How to create a loan in Simplifile
- In the upper right corner, select the Create Loan
 button to display the Create Loan window.
 - Complete at least the following required fields:
- Select Organization. Use the dropdown list to choose the organization that is creating this loan.
- Settlement File #. Enter an identifying number for the loan.
- Borrower name. Enter at least the last name of the primary person who has applied for the loan.
- Purpose. Use the dropdown list to choose the reason for the loan. This can affect the fees you charge for this loan.
- Property address, City, State, and Zip code. Enter the address of the property being purchased.
- If a dropdown list displays for the Recording Jurisdiction field, choose the recording county (or jurisdiction), if desired.
- If your administrator has set up templates and you want to use a template to create your loan, choose the template from the dropdown list. For more information about templates, see Template creation and use.
- To send notifications about this loan to people other than the loan officers and agents assigned to the loan, enter their email addresses in the Additional Loan Notification Recipients field. Separate multiple email addresses with commas. You can also add addresses on the Loan Information page.
- When you finish, select the blue Create loan button.
- Continue with the steps in the next table.
How to add additional basic information to a loan
- Do one of the following to display the Loan Information page:
- Create a loan, as described in How to create a loan in Simplifile.
- Select the loan card header or a loan number.
- Complete the following, as needed:
Lender Info. Select the No lender company assigned item and select the lender company you want to handle this loan. You can use a zip code, address, or company name as a search term.
If the company is not in the list, you can select the +Add Company button and supply location and contact information to request that it be added. .
- Settlement Info. By default, the loan creator is assigned as the settlement agent. If desired, select the +0 icon and use the dropdown list to choose the agents you want. For more information, see Agent Assignment.
Title Info. If desired, add a title company.
- Primary borrower first and middle name.
- Closing date. Enter the date when the loan will close in MM/DD/YYYY format, or use the date picker to choose the date.
- Settlement Disbursement date. Enter the date when the loan will be funded in MM/DD/YYYY format, or use the date picker to choose the date.
- Additional Loan Notification Recipients. Enter the email addresses of people (other than its assigned loan officers and agents) who should receive notifications about this loan. Separate multiple email addresses with commas.
Agent Assignment
By default, when you create a loan in Simplifile, that loan record is assigned to you. Your name displays on the card view, the list view, and the Loan Information page as the assignee. Both you and the lender can see the current assignees.
Multiple agents can be assigned to the same loan. The name of each assigned agent displays in the Settlement assignment section of the Loan Information page and on the Contacts list for the loan. The loan displays in each assigned agent’s list of loans. The assigned agents also display to the lender.
Only assigned agents see the loan in their work queues and receive notifications about a loan, unless you add them in the Additional Loan Notification Recipients field. For more information, see Collaboration preparation.
How to manage agent assignments
- Do one of the following to display the Loan Information page for the loan where you want to manage agent assignments:
- Create a loan, as described in Loan creation.
- Select the loan card header or a loan number.
- In the Settlement Info section, select the Add
 button .
 - To add or remove agents on the loan, do the following:
- Mark the names of the agents you want to assign to the loan.
Clear the names of the agents you want to remove from the loan.
You can use the field to search for an agent.
Lending Agent Request and Review
You may be able to choose specific lending agents you want to work on your loan. When you do this, Simplifile notifies each agent and their lender administrators. A lender administrator can approve or remove a requested lending agent from the loan. Settlement managers can review request statuses.
You can add lending agents to specific lender organizations. Then, when you assign a loan to that organization, the preferred lending agent names display in the Lender Info section preferred agent dropdown list so you can choose them easily.
Managers can view the Preferred Agents page to add a preferred lending agent to an organization. Managers can also check the status of preferred agent requests. Below is an example of the page.
How to set up and manage preferred lending agents
- Select the Card
 view button or the loan number of the loan where you want to request preferred lending agents.
 - When the Loan Information page displays, if necessary, under the Lender heading select the No lender company assigned link and choose the lender organization where the agent works. You can also select a displayed lender and choose a different lender company, if desired.
- In the Lender section, select the add icon (
 ) and choose the agents you want from the dropdown list that displays.
 - Select outside the list to continue.
- To review the agents you use or have requested, select the add icon ( ) and then select Manage.
You can also select the Organizations item in the left navigation menu, choose the organization whose requests you want to view, and select Preferred Agents in the left navigation menu.
If necessary, you can use the Filter Preferred Agents field to search for specific agents.
Loan Order Submission
You must invite a lending company to collaborate with you on each loan you create in Simplifile. When you choose a lender in the Loan Info section of the Loan Information page, Simplifile sends a notification to the lender administrators at that company to let them know a loan needs attention and gives the loan a Pre‑Close status.
If desired, you or the lending company can also assign a loan to a specific title company. Title agents can perform such tasks as uploading documents and sending you messages about a loan.
If the lender you want to collaborate with does not display in the dropdown list, you can request that the company be added. To do this, select the Add Company button at the bottom of the dropdown window and complete the fields in the window that displays. You must provide the organization name and address as well as the name, email address, and telephone number of the primary contact at the organization.
The lender and title company names display on the Loan Information page, the loan card, and the list view. If a company needs to be approved, it displays in italics until it is added to Simplifile. Then Simplifile automatically adds the company to the loan record and notifies the settlement or title administrator so that he or she can assign an agent to the loan and collaboration can continue.
How to submit a loan order
- Select the card header or the loan number of the loan you want to submit to a lender.
- When the Loan Information page displays, go to the Lender section and select the No lender company assigned link.
- Choose the lender company you want from the list that displays. Begin entering information in the field to display companies you can choose.
- If the lender company you want does not display in the list, do the following:
- Select the Add company item at the bottom of the dropdown box and complete the following fields in the window that displays:
- Organization Name. Enter the name of the lender company you want to add.
- Branch Street Address. Enter the street address of the lender company location you want to add.
- City, State, Zip Code. Complete these fields for the lender company location you want to add.
- Primary Contact. Add the name and contact information for the person who is your primary contact at the lender company location you want to add.
- Select the Finish button.
- Select the Add company item at the bottom of the dropdown box and complete the following fields in the window that displays:
Batch Import for Loan Creation
If you have the necessary permission, you may be able to import into Simplifile information from a .csv (comma delimited) file to create multiple loans at the same time. If you can do this task, a Batch Import button displays at the bottom of the Create Loan window. Simply select the button and follow your browser’s instructions to upload the .csv file.
The system notifies you when the import is complete. You can then use the Simplifile Batch Import report to view details. For more information, Batch Import for Loan Creation.
For more information about this feature, talk to your Simplifile account manager.