Collaborate on disclosures
Overview
The Disclosures page lets you view, edit, add, and remove fees for closing disclosures. If you or the lender uploads a Uniform Closing Dataset file (UCD.xml) that contains the uniform closing data, Simplifile automatically extracts the fee information from the file and displays it on this page. Fee categories include loan costs and transaction summaries. As you collaborate, changes on this page pass back and forth between you and the lender until both of you have accepted all of the fees.
Below and on the next page are partial examples of a Disclosures page.
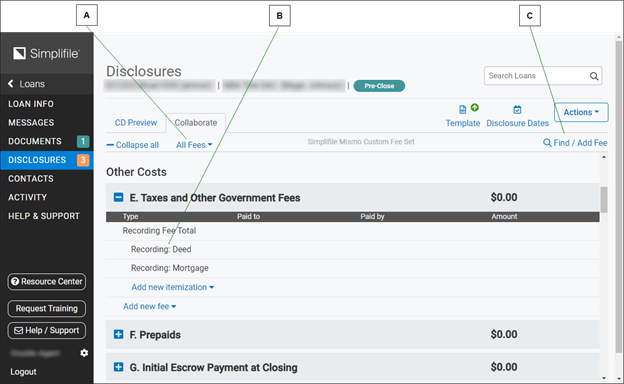
| Letter | Description |
|---|---|
| A | Select here to choose what fees to display, or to display a CD form preview. |
| B | Any field in an expanded list that you can edit displays the Edit
|
| C | Select here to find any fee. You may be able to add the fee from the search. |
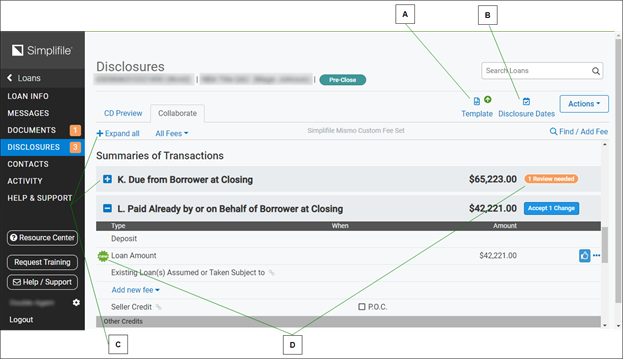
| Letter | Description |
|---|---|
| A | Select here to work with loan templates. For more information, see Template creation and use. |
| B | If your lender uses a custom fee set and locks any fees after a disclosure date is added to the Disclosures page, the dates display here. |
| C | Select a header with a plus sign ( |
| D | You need to review items that the lender has added, changed, or proposed that you remove. For more information, see Working with a new or changed fee. |
This section includes the following topics:
Editing or adding a fee
A new disclosure document lists fees that MISMO requires. The fields describing these fees must be completed and accepted by both collaborators before closing. Required fields display in color. Both you and the lender may be able to add additional fees. Use any of the following tips as you edit or propose new fees:
- You must edit or remove any fee with the orange Question Mark
 button. The lender has added these fees, but you must supply information in the fields marked with a question mark.

To remove this type of fee, do not enter zero in the amount field. Use a trash can ![]() icon or the reset X. Otherwise, the fee remains on the disclosure document as an incomplete fee item.
icon or the reset X. Otherwise, the fee remains on the disclosure document as an incomplete fee item.
-
Select any field with the Edit
 button to add or change information. The Edit button displays when you hover your mouse pointer over a field. If the button does not display, you cannot edit the field.
In the following example, the Mortgage Insurance Premium item has no content. This indicates that the fee is required but is not yet part of the disclosure document. If you select the item, the system displays the fields you should populate with data. For more information on the types of data you can add for each fee type, see Table of fee type fields.

-
Select the Add new fee dropdown button at the bottom of any section or sub‑section to access fields that let you add a new fee to that section.
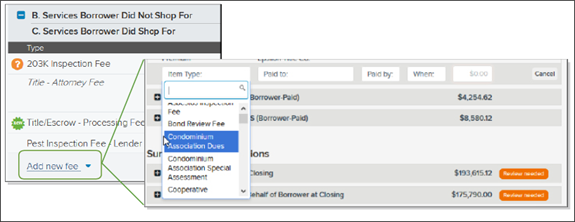
You can add only the fee types listed in the Item Type dropdown boxes. Dropdown lists for item types contain only the types of fees that are supported by the UCD standard and/or are part of the lender’s custom fee set for that section and sub‑section, and do not include read‑only fees.
For a list of common disclosure information items you can add, see Disclosure items (for settlement agents and lenders).
-
You can split a new or existing fee in sections A through H between two entities. This is helpful when the Paid by and Paid to fields are different. For additional information about split fees in sections B and C, see Splitting shopped for/not shopped for fees.
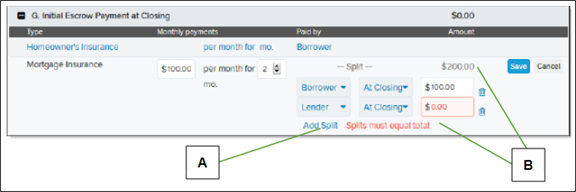
Letter Description A Select the Add Split link below any existing or newly added fee to display additional Paid by, When, and fee amount fields. B The amounts in all split fee amount fields must equal the total fee amount. -
You can break fees in specific sections (A, B, C, E, H) into smaller fees to itemize a fee. Your administrator must set this up. Canceling an itemization cancels the whole fee. Marking a fee as shopped/not shopped marks all the itemizations as well as the total. For more information, see Itemizing fees.
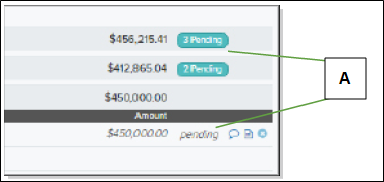
| Letter | Description |
|---|---|
| A | When you add or change a fee, Simplifile marks both the section and the fee within the section as pending. The fee label displays in italics until the lender accepts it or proposes a change. Numbers on the Pending labels tell you how many items the lender needs to review. |
The Close ![]() button displays at the end of a fee, you can select the x to remove all of the information about that fee. However, if the fee is a static or MISMO‑required fee, the fee remains on the Disclosures page.
button displays at the end of a fee, you can select the x to remove all of the information about that fee. However, if the fee is a static or MISMO‑required fee, the fee remains on the Disclosures page.

How to edit or add a fee
- Find the loan where you want to add or edit a fee. For more information, see Find a loan.
- On the left navigation menu, select the Disclosures item to display the Disclosures page.
- Find the section that should list the fee you want to add or edit.
- If necessary, select the section header to display all of the fees in that section.
- Do one of the following:
- To add or change information about an existing fee type, hover the mouse pointer over the field you want to edit. If the Edit button displays, select the field. You can edit a field that displays the Edit button.
- To add a completely new fee, select the Add new fee item at the bottom of the section. Select or tab between each field and either enter the appropriate information or choose the appropriate response from the dropdown list that displays.
- If the Close
 button displays at the end of a fee, selecting the button recommends that all of the fee information be reset to empty.
- To add or change information about an existing fee type, hover the mouse pointer over the field you want to edit. If the Edit
- When you finish, select the Add
 button.
QUICK TIP: You must provide information for fees that display the orange Question Mark ![]() button.
button.
Choosing fees to display
You can view all loan‑related fees on the Disclosures page, or limit the fee display to specific subsets. For example, you can display only those fees for which your agency is responsible, or only net funds data.
| You can select plus and minus signs beside individual fee categories to expand or hide each category, or you can select once to expand or collapse all fee categories on the page. |
| Use the dropdown list to choose the fees you want to view, or to view a preview of the CD. |
You can also display a preview of pages 2 and 3 of the closing disclosure document (CD).
| The CD Preview option displays an un‑editable version of the fees as they will print in the final CD. Select a fee name on the preview to return to that fee in the editable version of the CD (the Disclosures page). You can also download and print the CD, or add it to the loan as a document. |
How to display agent fees or a CD preview
- Find the loan where you want to add or edit a fee. For more information, see Find a loan.
- On the left navigation menu, select the Disclosures item to display the Disclosures page.
- In the fees dropdown list under the page heading, do one of the following:
- To view all fees currently entered in Simplifile for this loan, select All fees ‑ CD.
- To display only fees your agency should work with, select Agent fees ‑ CD.
- To view net funding details, select Net Funds.
- To view a preview of the closing disclosure form, choose CD Preview. Select the name of a fee to return to the Disclosures page.
QUICK TIP: To add a CD preview to the loan as a document, select the Add To Documents ![]() button in the upper left above the display. The system adds the CD as a PDF. You can select Documents in the left navigation menu to access the CD PDF. Repeat the process at any time to add an updated PDF of the CD to the loan.
button in the upper left above the display. The system adds the CD as a PDF. You can select Documents in the left navigation menu to access the CD PDF. Repeat the process at any time to add an updated PDF of the CD to the loan.
Locating and adding a fee with the Find/Add Fee feature
Most fees have specific names that must be used when a fee is included on the Disclosures page (for example, they have default MISMO names or come from a default or custom fee set). They must also be placed in specific sections of the Disclosures page.
You can search for individual fees. Then you can use the specified fee name and add or edit the fee immediately. Alternatively, you can note the name and location so that you can more easily find the fee later on the Disclosures page, without having to open each section and search manually.
The Find/Add Fee on Loan window lets you identify fees and the sections where the fee should display.
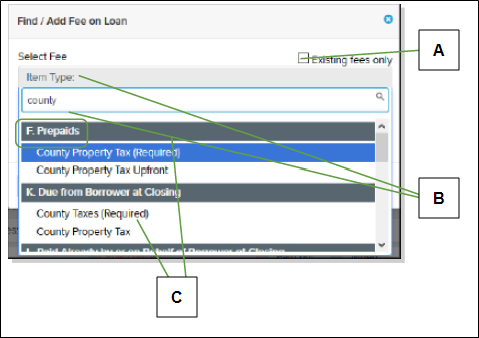
| Letter | Description |
|---|---|
| A | To display only fees that have already been added to the Disclosure page, mark this box. |
| B | Select the Item Type field to access the search field and enter the characters you want to find. |
| C | The dropdown list displays the fees whose names and descriptions contain the characters you entered, and shows which sections contain the fees. You may be able to add a single fee in more than one section. |
If a fee has already been added to the loan, you can immediately edit the fee.
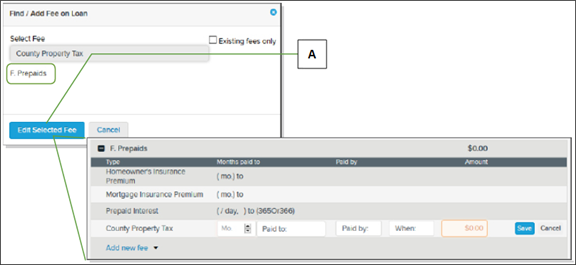
| Letter | Description |
|---|---|
| A | Select the Edit Selected Fee button to open the fee on the Disclosures page so that you can edit it. For more information on editing a fee, see Editing or adding a fee. |
If the fee has not yet been added to the Disclosures page, you can immediately add the fee.
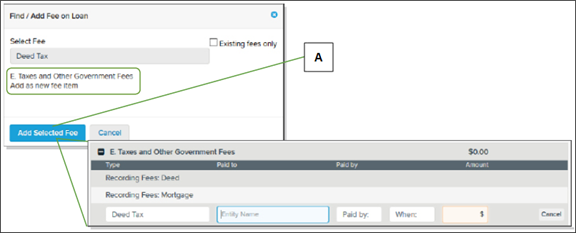
| Letter | Description |
|---|---|
| A | Select the Add Selected Fee |
You can also simply make a note of the name of the fee and the section where it should be located. Then you can go into the Disclosures page at a later time and edit or add the fee, if desired.
How to use Find / Add Fee
- Open the Loan Information page for the l the loan where you want to add or edit a fee. For more information, see Find a loan.
- On the left navigation menu, select the Disclosures item to display the Disclosures page.
- Select the Find / Add Fee
 link at the top of the page.
 - On the Find/Add Fee on Loan window that displays, in the dropdown window, select the Item Type item.
- Enter at least four sequential characters from the fee you want to find. Simplifile searches the fee name and description to find the characters you enter.
- If necessary, use the scroll bar to find the fee in the section where you want to add the fee.
- When you find the fee you want, select the name of the fee.
- Do one of the following:
- If the fee has already been added to the loan, select the Edit Selected Fee
 button to edit the fee.
 - If the has not yet been added to the loan, select the Edit Selected Fee button to add the fee to the loan.
- Make a note of the name of the fee and its location so that you can find the fee and edit or add it later.
- If the fee has already been added to the loan, select the Edit Selected Fee
- On the Disclosures page, complete the necessary fields to add or edit the fee. For more information on what items include which fields, see the Table of fee type fields.
Working with fee invoices
In Simplifile, you can add invoices to fees paid to third part providers. This lets you finalize and approve these fees and helps provide a complete audit trail for lenders. All uploaded invoices display on both the Disclosures page and the Documents page.
You can upload an invoice for a fee on the Disclosures page.
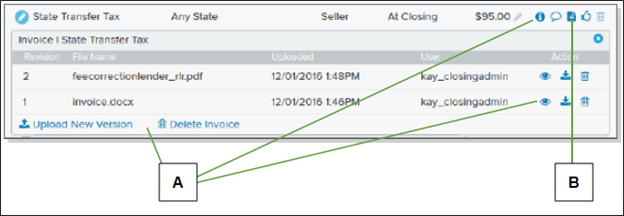
| Letter | Description |
|---|---|
| A | Use the icons and tools on an invoice dropdown panel to work with the invoice. |
| B | Select the Invoice |
You can also upload an invoice and link the invoice to the appropriate fee from the Documents page.
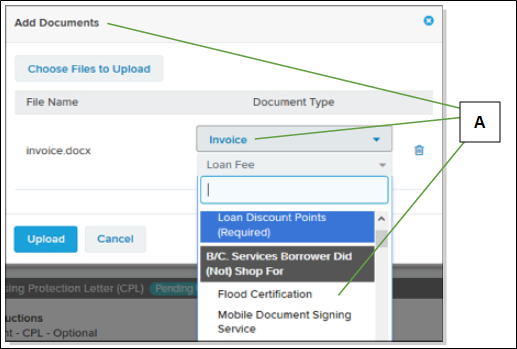
| Letter | Description |
|---|---|
| A | The Add Documents window lets you choose Invoice as a document type and then choose the fee for which you want to attach the invoice. |
After you upload an invoice, you can do with that invoice anything you can do with any other document in Simplifile. For example, you can upload a different version of an invoice, mark an invoice for review, and approve the invoice. For more information, see Work with loan‑related documents.
How to work with a fee invoice from the Disclosures page
QUICK TIP: If a fee has an invoice, the Invoice ![]() button displays in blue instead of clear.
button displays in blue instead of clear.
- Open the Loan Information page for the loan where you want to add a fee invoice. For more information, see Find a loan.
- On the left navigation menu, select the Disclosures item to open the Disclosures page.
- Find the fee for which you want to work with invoices and select its Invoice
 button.
 - Do any of the following, as needed:
- To upload an invoice for the fee, select Upload Invoice under the fee name. Then follow your browser’s instructions to find and upload the invoice.
- To download or save an invoice, select the Download
 button.
 - To view a PDF invoice, select the View
 button.
 - To upload a new version of the invoice, select Upload New Version.
How to add an invoice to a fee from the Documents page
- Open the Loan Information page for the loan where you want to add a fee invoice. For more information, see Find a loan.
- On the left navigation menu, select the Documents item to open the Documents page.
- In the upper right corner, select the Add Docs
 button.
 - Select the Choose Files to Upload
 button.
 - Follow your browser’s instructions to find and choose the invoice.
- From the Required dropdown list, choose the Invoice item.
- From the Loan Fee dropdown list, choose the fee for this invoice.
- Select the Upload
 button.
Table of fee type fields
The type of fee you add determines the type of information you need to provide. You can begin typing in any Item Type field to display all appropriate items whose names or descriptions contain the typed sequence of letters. Descriptions display in window when you hover your mouse pointer over the item name.
For example, if you type “appr” in the Item Type field for section A. Origination Charges, the window displays these items:
- Appraisal Desk Review Fee
- Appraisal Field Review Fee
- Assumption Fee
- Automated Underwriting Fee
- Manual Underwriting Fee
The description for Assumption Fee includes the word “approving.” The description for Automated Underwriting Fee includes the word “approve.” The description for Manual Underwriting Fee includes the words “appraisal” and “approve.”
- Make sure you do not accidentally choose the same party in the Paid to and Paid by fields.
- For most fee types, if a fee is designated to be paid by someone other than the borrower or the seller, you cannot choose when the fee will be paid.
- If you see Add Split, you can select it to display fields that let you add additional Paid By information for a single fee. This lets fee payment come from multiple sources.
- Any custom label you add takes the place of the fee label already on the Disclosures page.
- Custom fee sets can change options for a section. For example, a lender fee set can make a fee read‑only for settlement agents.
| For this type of fee | Complete these fields |
|---|---|
| A. Origination Charges |
Points:
Other origination charges:
|
|
B. Services Borrower Did Not Shop For C. Services Borrower Did Shop For For more information on sections B and C, see Using sections B and C (shopped for/not shopped for). H. Other fees |
The Shopped box determines whether a shopped/not shopped fee displays in section B or section C. Mark the Title box if a fee relates to the property title. In section H, you can also mark a fee as optional. |
| E. Taxes and Other Government Fees |
All recording fees display as itemizations in section E. The section E Recording Fee Total field is the sum of all of the itemized fees (including Deed and Mortgage). The total is not editable in Simplifile. However, you can use a UCD to add a different Recording Fee Total. If you do this but the Recording Fee Total added does not equal the itemizations in the section, Simplifile automatically adds an Other itemized fee type to make up the difference. This assures that the sum is always correct. |
|
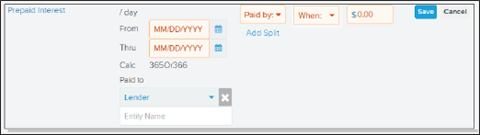
F. Prepaids |
Mo. (month) is the number of months for which monies have been received.
|
|
G. Initial Escrow Payment at Closing Simplifile multiplies the amount of the monthly payment by the number of months chosen to figure the total amount due. |
If the loan must meet GSE requirements, choose At Closing from the When dropdown list. |
|
J. Total Closing Costs: Lender Credits |
|
|
K. Due from Borrower at Closing |
|
|
K . Due from Borrower at Closing: Adjustments L. Paid Already by or on Behalf of Borrower at Closing (all except Adjustments for Items Unpaid by Seller) M. Due to Seller at Closing. |
If the item type you choose comes from a specific source, you may need to enter the name of the entity providing the funds. For example, if a gift provides the funds, you would enter the name of the giver. Fees marked as paid outside of closing (P.O.C.) are not included in the section total. |
|
N. Due from Seller at Closing |
Fees marked as paid outside of closing (P.O.C.) are not included in the section total. |
|
K. Due from Borrower at Closing: Adjustments for Items Paid by Seller in Advance L. Paid Already By or on Behalf of Borrower at Closing: Adjustments for Items Unpaid by Seller M. Due to Seller at Closing: Adjustments for Items Paid by Seller in Advance N. Due from Seller at Closing: Adjustments for Items Unpaid by Seller Enter the From and Thru dates and the total amount paid. The system uses your total to assure that the amount matches the fee from your LOS. This avoids rounding issues. |
Calendar dates mark the start and end times for which items are paid. The first day is not included in the count. For example, from June 1 to June 2 is one day, June 2 to June 3 is one day, and so forth, which gives a day count of from June 1 to June 10 a total of 9 days. If a disbursement date is specified for a loan, the system may include that date in a From or Thru field as appropriate. |


Using sections B and C (shopped for/not shopped for)
In Simplifile, the shopped for/not shopped for sections display as one section on a Disclosures page. This makes it easier to enter these fees. If you have shopped for/not shopped for fees that are paid for by two separate entities, Simplifile follows rules to handle the shopped for/not shopped for status.
Entering shopped for/not shopped for fees
On a Disclosures document, the fees that a buyer cannot (or did not) shop for display in section B. The fees that the buyer can (or did) shop for display in section C. To simplify how these fees are entered, the two sections appear to be combined in Simplifile. They will, however, display separately when the document is printed or downloaded. This lets the lender choose the shopped for/not shopped for status after the fee is entered.

| Letter | Description |
|---|---|
| A | The B and C sections display together in Simplifile but will be correctly separated when you export or print the document. |
| B | Mark this box to display the fee as one the buyer can or did shop for. If you cannot mark the box, the fee has been set up as un‑editable, or cannot be marked Shopped. |
Splitting shopped for/not shopped for fees
You may need to designate a shopped for/not shopped for fee that is paid in part by both the seller and the buyer. A split is easily identifiable, as are the parties involved and the time and amount of the payment.
Simplifile handles the shopped/not shopped status of such split fees as described below.
- If you have more than one fee with the same item type and the same label and the shopped for/not shopped for status is changed for one of the fees, all of the fees are given the changed shopped/not shopped status.
- If a fee is added to section B or section C and there is already a fee in the section with the same item type and the same label, Simplifile gives the existing fee the same shopped for/not shopped for status as the newly added fee.
If the shopped for/not shopped for status for either fee changes, the status for both fees changes.
If you remove a split, you must correct the fee amount in the remaining fee item.
Working with linked fees
On a disclosure document, any contractual adjustments entered in section K (Due from Borrower at Closing) must also display in section M (Due to Seller at Closing). In other words, an item listed in section K must have an identical listing in section M.
Similarly, adjustments entered in section L (Paid Already by or on Behalf of Borrower at Closing) must also display in section N (Due from Seller at Closing). In other words, an item listed in section L must have an identical listing in section N.
Depending on the fee set used for a loan, Simplifile may automatically add some fees entered in sections K or L to sections M and N. Simplifile links the fees for you so you do not have to enter them twice. Any fees you add to these sections after a loan is created are automatically linked. The Link ![]() button indicates a fee that has a linked relationship with another fee.
button indicates a fee that has a linked relationship with another fee.
Any fees in the K through N sections marked as paid outside of closing (POC) are not included in the section totals in the closing disclosure document.
Itemizing fees
If your administrator has set it up, you can break a fee into smaller fees so that each smaller fee has its own line and amount due. For example, you could break an appraisal fee into a desk review fee and a management company fee. Below is an example.
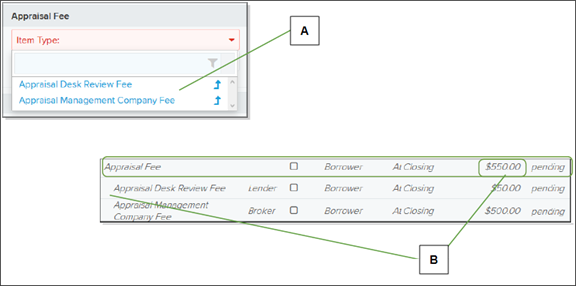
| Letter | Description |
|---|---|
| A | When you add a fee that has been set up for itemization, you add each smaller fee one at a time. |
| B | The sum of the itemized fees displays in the main fee line. The itemizations are indented under the main fee. |
Working with a new or changed fee
The Disclosures page displays Review Needed beside a collapsed fee item type to let you know that an added, changed, or proposed fee removal needs your attention. Select the header of a section that displays a plus sign to expand that section and display the fees specific to that section. These changes have been proposed, and you need to review them. You can accept all changes in a section, or you can accept individual fees within a section. If necessary, you can message the lender from a specific fee. Below are examples of these and other options.
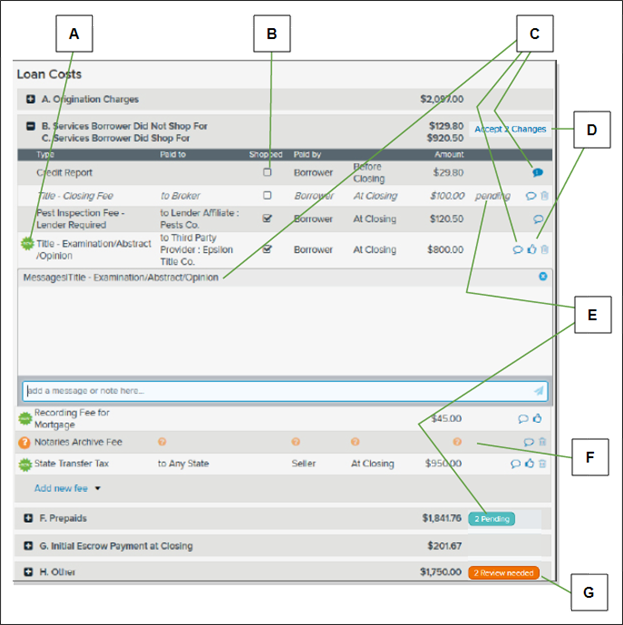
| Letter | Description |
|---|---|
| A | The New icon beside an item in an expanded section indicates a fee the lender has added. |
| B | These boxes designate fees the borrower can (or did) shop for. |
| C | Select a bubble with a number |
| D | To accept all changes in a section, select the section’s Accept Changes button. To accept only a single fee, select the fee’s thumbs up icon. |
| E | A fee or section where you have changed information displays a pending label. |
| F | A fee whose fields you must complete displays question mark icons. |
| G | If a section has new or changed fees, Review Needed displays. |
The figure below describes other icons you may see.
| Letter | Description |
|---|---|
|
A |
The Edit |
|
B |
Any changed items displays the Information |
|
C |
The circled trash can |
|
D |
Select the Menu |
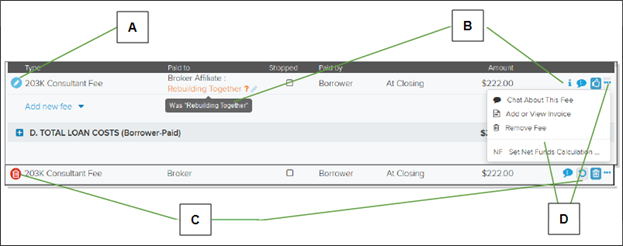
- If a lender dictates a fee, the fee is added directly to the loan and should be acknowledged. You can view the fee but you cannot propose a change to the fee.
- If you edit fields in a fee with a Review Needed label, Simplifile considers any fields you do not edit as accepted. Only the fields you change will be sent to the lender for review.
- If you add a fee in the B/C (Shopped For) section and then the lender both edits the amount and changes the shopped/not shopped checkbox, the fee displays as both a new fee and a deleted fee. Both collaborators need to accept both entries.
How to collaborate on fees
- Find the loan where you want to collaborate on fees. For more information, see Find a loan.
- On the left navigation menu, select the Disclosures item.
- Select any section that displays Review Needed.
For example, select the Origination Charges plus sign to display all fees related to loan origination.
- Review any proposed new, edited, or proposed deleted fees.
If an item has been edited, you can select the Information
 button to view the item’s field values before the change.
 - Do any of the following:
- To accept an individual fee addition or change, select its Thumbs Up
 button.
 - To propose a change, edit the fields where you want to propose a change and select the Save
 button.
If you edit fields in a fee with a Review Needed label, only the fields you change will be sent to the lender for review.
- To propose the removal of a fee, select the Menu
 (ellipsis) button at the end of the line and choose Remove Fee.
This strikes out the fee until the lender accepts the change or proposes a different change.
- To propose to set a required fee to zero, Select the Menu (ellipsis) button at the end of the line and choose Clear Required Fee Values.
- To propose the rejection of a removal, select the Undelete
 button.
 - To view or add an invoice for a fee, select the Menu (ellipsis) button and choose Add or View Invoice.
- To message the lender about a specific fee, select the Menu (ellipsis) button and choose Chat About This Fee. Enter the message in the Add a message or note here field. If desired, require an acknowledgment. Select the Add button to send the message.
You can select a bubble with a number
 button to display messages from your collaborator for that fee.
 - To accept all changes in a section, select Accept # Changes.
- To accept an individual fee addition or change, select its Thumbs Up
- Continue the collaboration process until both sides accept all items (that is, no sections are marked Pending or Review needed or have question mark icons).
| Pending | You added, changed, or proposed removal of a fee. The lender needs to review it. |
| Review Needed | The lender has added, changed, or proposed removal of a fee. You need to review it. |
| Accept Changes | You agree to all changes in the section. |
|
|
Indicates an added fee. |
|
|
Indicates a changed fee. |
|
|
Indicates required information. |
|
|
Select to view an item’s values before it was changed. |
|
|
Indicates a proposed removal. |
|
|
Select to accept an addition or change. |
|
|
Select to propose a removal. |
|
|
Select to propose restoration of a proposed removal. |
|
|
Select to view or attach an invoice to the fee. |
|
|
Select to send a message to the lender. |
|
|
Select to propose that all information about a specific fee be cleared. |
|
|
Select to change the net fund value for the fee. |