Updates and Enhancements for Encompass - 25.1 Major Release
This section discusses the updates and enhancements to existing forms, features, services, or settings that are provided in this release.
Encompass Forms & Tools
New LDP / SAM checkboxes (5042, 5043) have replaced the previous LDP / SAM checkboxes (3026, 3027) on the FHA Management input form and the HUD-92900LT FHA Loan Transmittal input form. The new version of these checkboxes are borrower-level fields, while the older checkboxes were loan-level fields. This means that the selections made in these Yes/No fields are now specific to each borrower within the loan rather than being specific to the loan.
This update was made to resolve issues that occurred in past versions of Encompass in loans with multiple borrower pairs when different selections were made for these checkboxes for different borrowers and co-borrowers. Now that these fields are borrower-level, when selections are made for borrower pair 1, those selections are not carried over to borrower pair 2.
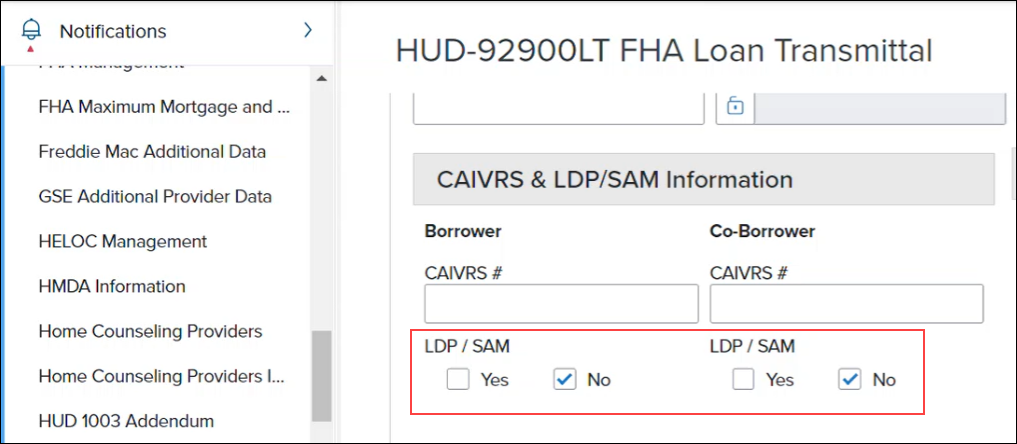
For existing loans (all loan statuses) created prior to Encompass 25.1, the selections made in the loan-level 3026 and 3027 checkboxes are retained and copied to the new 5042 and 5043 checkboxes for borrower pair 1 borrower and the borrower pair 2 co-borrower.
The Product and Pricing Provider ID field (5029), which was introduced in Encompass 24.3 to capture and validate the pricing provider used for the loan when product and pricing is ordered, has been updated so that the ID in the field is not copied over to a new loan when the loan is duplicated. If field 5029 is populated with a provider ID in the original loan, and then that loan is duplicated, field 5029 will be empty in the new duplicated loan.
Note, this field is not visible on any Encompass input forms or tools. It has been added to the Encompass Reporting Database and may be added to custom input forms.
New Fields in Encompass
To support FDIC’s requirements for lenders to gather specific information relating to Government Identification, the following new fields have been added to the Borrower Summary - Origination and Borrower Summary - Processing input forms:
-
Government ID (5053) [borrower]
-
Government ID Type (5055) [borrower]
-
Other Description (5057) [borrower]
-
Government ID (5054) [co-borrower]
-
Government ID Type (5056) [co-borrower]
-
Other Description (5058) [co-borrower]
New Employer Alias fields have been added to the Employer Information section of the Verification of Employment (VOE) input form to provide fields where the company’s alternate name or AKA can be entered. This helps ensure users receive the employment rep and warrants since it will be easier to match the borrower’s employer to the correct business.
-
Employer Alias 1 (BE0082) [for borrower]
-
Employer Alias 2 (BE0083) [for borrower]
-
Employer Alias 1 (CE0082) [for co-borrower]
-
Employer Alias 2 (CE0083) [for co-borrower]
Additional asset fields have been added to the Verification of Gifts and Grants (VOGG) input form:
-
Amt Applied to Down Payment (URLARGG0123)
-
Amt Applied to Closing Costs (URLARGG0124)

The following fields have been added to the State-Specific Disclosure Information input form for Mississippi:
-
Lock-in Terms and Conditions (DISCLOSURE.X277)
-
Lock-in Refund Conditions (DISCLOSURE.X189)
These fields were added to ensure that lenders can provide refundable condition information for rate locks and disclose the Rate Lock Agreement correctly for loans in Mississippi.
Note that these fields already existed in previous versions of Encompass and were (and continue to be) provided on other State-Specific Disclosure Information input forms for other states.
A new lock validation timestamp field (5059) is now provided to capture the date/time when the Rate Lock Validation Status field (4788) is updated to Needs Validation.
-
The current server date and time in UTC format will populate field 5059.
-
If field 4788 is cleared, field 5059 is also cleared.
This new field (5059) is not visible on any Encompass input forms or tools, but it is available in the Encompass Reporting Database , so it can be added to custom input forms.
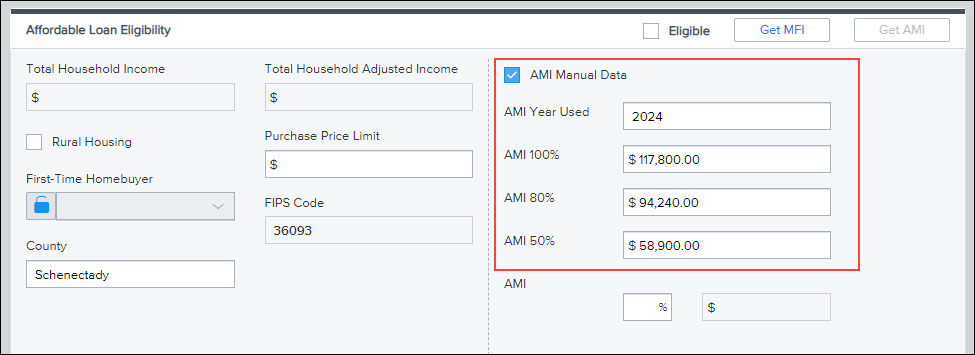
A new AMI Manual Data checkbox (5027) is now provided in the Affordable Loan Eligibility section of the Borrower Summary - Origination input form that can be used to manually enter the year and values to use for the Area Median Income (AMI) limits in the AMI % fields on the form. This option is provided to give users a way to use the AMI dataset year that is compliant with the GSE investor’s AMI dataset when that year’s data is not accessible from the loan file or from the Affordable Lending tables in Encompass Settings.
Encompass provides the current year’s dataset in the Encompass Settings > Tables and Fees > Affordable Lending > AMI Limits setting. Users can click the Get AMI button to populate the AMI Year Used and AMI 100%, 80%, and 50% fields with this data. In addition, administrators can enable the Automated Data Completion settings in Encompass Admin Tools to automatically populate these fields with the current year’s AMI limits without clicking the Get AMI button. These fields are set to read-only when they are populated.
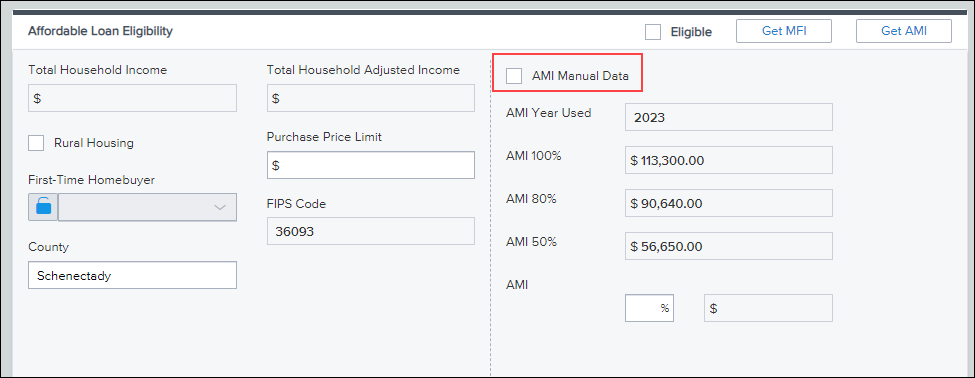
To manually change the AMI year to use, select the AMI Manual Data checkbox. This activates the read-only fields and deactivates the automated completion calculations and the Get AMI button. Users can then manually enter the year to use for AMI limits in the AMI Year Used field and then manually enter the AMI 100%, AMI 80%, and AMI 50% limits based on the AMI data provided by Fannie Mae and Freddie Mac.
A new feature has been added to the Select Loan Program Template window, enabling users to adjust the column width for columns in the Loan Programs section. To adjust the column width, select and hold the column divider and then drag the divider left or right to the desired position. When using a mouse to select the column divider, the mouse icon changes as seen in the image below:
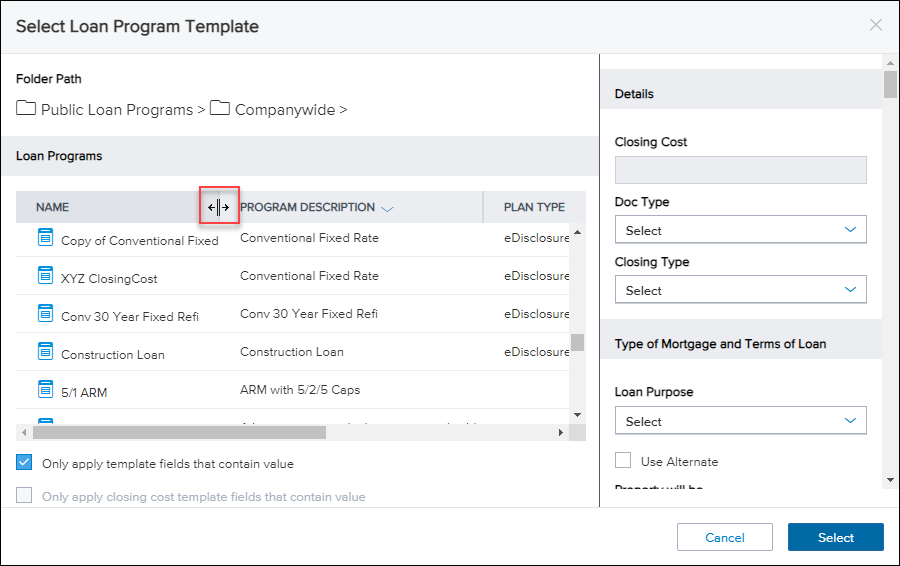
Note: The initial integration of this feature is not available for touch controls.
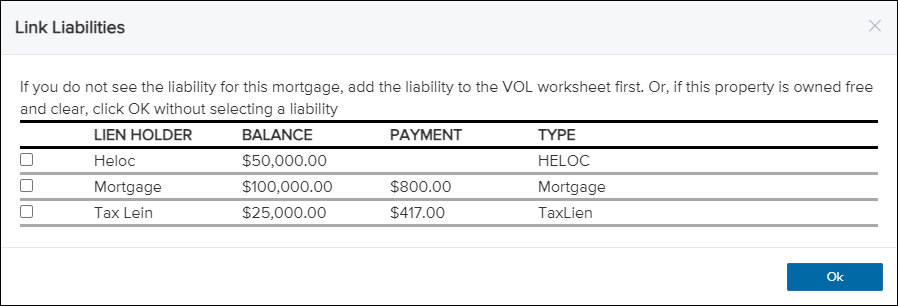
A change has been made to the Link Liabilities window on the Application View > Financial Information - Real Estate page which enables more flexibility in the liabilities that can be linked to a mortgage. With this update, all liabilities that have been added to a loan file, regardless of the account type, can be selected on this screen. Previously, users were only able to link liabilities with the Mortgage or HELOC account types.
Example of Link Liabilities Screen with Multiple Account Types
A change has been made to enable the Milestone Completion Missing Required Data window to display a wider range of fields when those fields are required and missing data. The following pages / windows are now included on this window when completing a milestone:
| Affiliated Business Arrangement | Milestone Worksheet | Disclosure Tracking |
| Request for Transcript of Tax | Settlement Service Provider List | Borrower Information - Vesting |
| Buydown Type Window | Lock Request Detailed Lock Window | Home Counseling Providers |
| Scheduler Events | ATR/QM Detailed Eligibility Window | Property Information Disaster Declaration Window |
| HELOC Program Example Schedule Window | HELOC Program HELOC Table Window | Funding Worksheet |
| ARM Type Window | County Lookup Window |
The FHA Tracking form has been added to the FHA Management form in the Encompass web interface. Use the FHA Tracking form to record and manage FHA-related loan information. Users can also select the LDP Search or SAM Search links to search the government websites that list borrowers who are disqualified from receiving FHA Loans.
To Access the FHA Tracking Form and Perform an LDP or SAM Search:
-
From a loan, select Forms from the left navigation menu and then select FHA Management.
-
Select the Tracking card.
-
Select LDP Search or SAM Search and follow the instructions on the website to search for the loan’s borrower and co-borrower.
-
After completing the search, select the appropriate checkboxes for the borrower and co-borrower to indicate whether they were found in the LDP or SAM search as an individual who has been disqualified from receiving FHA loans.
-
Enter the Date and type your Encompass user ID in the By field.
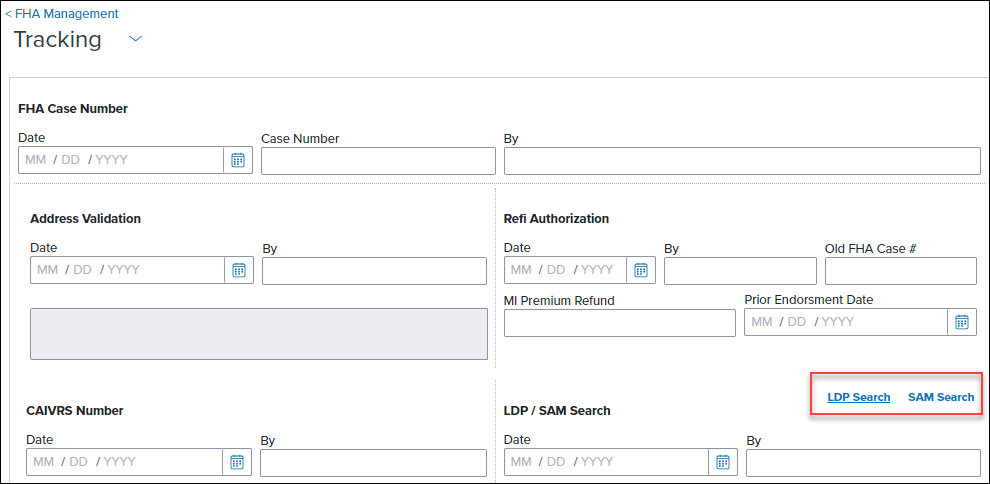
Note: The other button functions found on the tracking tab in the Encompass desktop interface are not available in the Encompass web interface.
The VA Tracking form has been added to the VA Management form in the Encompass web interface. Use the VA Tracking form to track the dates and events associated with the VA loan. Users can also access the System for Award Management (SAM) website.
To Access the VA Tracking Form:
-
From a loan, select Forms from the left navigation menu and then select VA Management.
-
Select the Tracking card.
-
Select GSA Search to access the SAM Website.
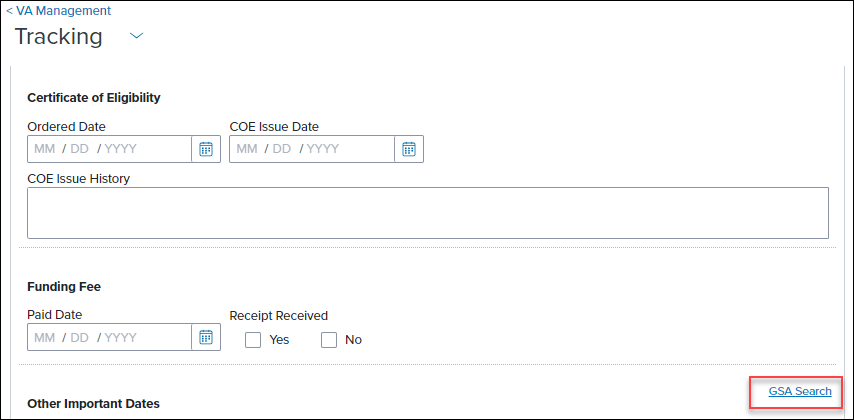
Note: The other button functions found on the tracking tab in the Encompass desktop interface are not available in the Encompass web interface.
ICE Mortgage Technology is discontinuing the use of ElevatedSandboxFeatures and will use an improved method to retrieve the authentication token. The new approach involves calling authObj.getAccessToken() through the SSF API. This updated token retrieval method is now used for the TPO Information and Correspondent Purchase Advice tools.
GSE Service & Integrations
For more GSE Integrations and Services 25.1 updates, see the GSE Release Notes.
On the Application View > Military Service & Language Preference and HUD-92900LT FHA Loan Transmittal input forms, the verbiage for the checkbox that users select to 1) indicate the borrower or co-borrower (or their deceased spouse) is currently serving on active military duty and 2) to activate the date field where the user can then enter the projected expiration date of service or tour has been updated to help clarify what the date field is intended for. The updated verbiage for fields URLA.X123 and URLA.X126 is shown here:
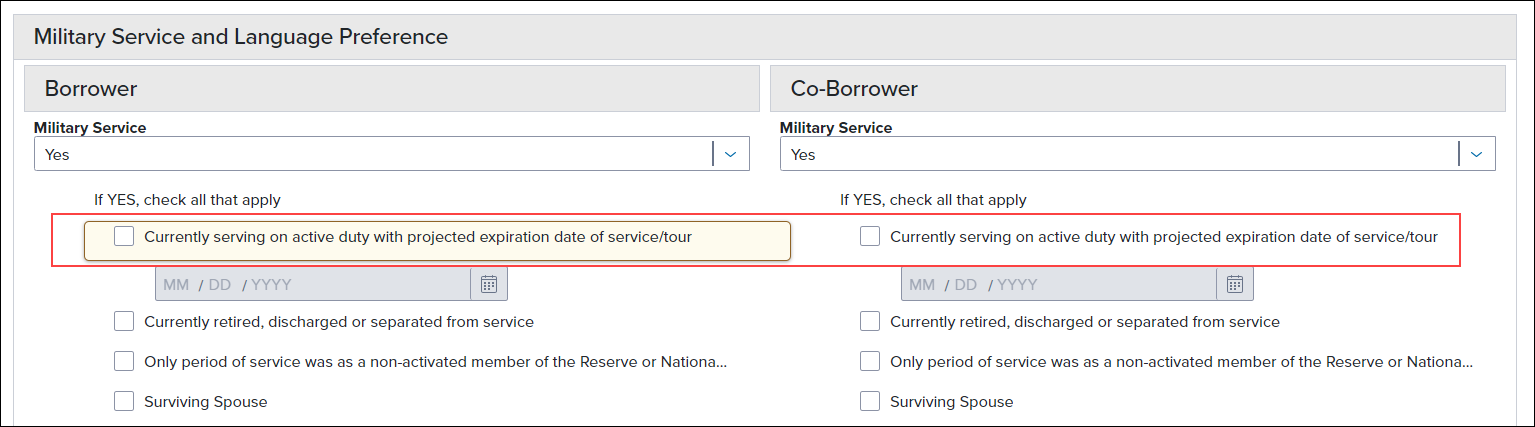
Previously the verbiage used here was Currently serving on active duty Expiration Date of Service/Tour.
This new verbiage now aligns better with the verbiage provided for these military service checkboxes and fields on the 1003 Part 1 printed output form. This update to the input form is intended to make it clear that this date field should only be activated/populated if the individual is currently actively serving and NOT currently retired, discharged, or separated from the service. In previous versions of Encompass, some users incorrectly entered an expiration date for active service when the borrower, co-borrower, or deceased spouse was retired, discharged, or separated from the service, which led to data quality errors (DQC0590) being returned by Freddie Mac during underwriting.
New fields have been added to Encompass to support the Freddie Mac Asset and Income Modeler (AIM) and Fannie Mae’s Income Calculator respectively. These fields are not currently visible on existing Encompass input forms, but they are included in the Encompass Reporting Database and can be added to custom input forms that are available in the Encompass Reporting Database.
-
Freddie Mac AIM Check Integrator (FAC0001)
-
Freddie Mac Verification Report Identifier (FAC0002)
-
Fannie Mae Income Calculator Belongs To (FANNIEIC0001)
-
Fannie Mae Verification Report Identifier (FANNIEIC0002)
These fields are targeted to be provided on the GSE Additional Provider Data input form in a future Encompass release.
As part of an initiative that has been ongoing for the past few years (and per Freddie Mac's guidance), updates have been made to the Freddie Mac Additional Data input form to remove fields that are no longer needed because they are available on other input forms. The remaining fields on the form have been reorganized in the remaining sections.
Fields Removed from Freddie Mac Additional Data Input Form
Per Freddie Mac’s guidance, the following fields have been removed the Freddie Mac Additional Data input form. These fields remain in the Encompass Reporting Database, so they can be added to custom input forms if needed.
| Field Name | Field ID |
|---|---|
| Lender | |
| Fin. Concessions | CASASRN.X20 |
| Purpose of Loan | CASASRN.X29 |
| Property Type | CASASRN.X14 |
| Rate Adjustment | |
| Orig Int Rate | CASASRN.X142 |
| Simulated PITI at mnth 13 | CASASRN.X15 |
| Mortgage Insurance Information | |
| MI Refundable Option | CASASRN.X146 |
| Renewal Type | CASASRN.X148 |
| Payment Option | CASASRN.X152 |
| Years of Coverage | CASASRN.X156 |
| MI Coverage | 430 |
| Renewal Option | CASASRN.X150 |
| Payment Frequency | CASASRN.X154 |
| Premium Source | CASASRN.X158 |
| Loss Coverage Est. | CASASRN.X160 |
| Lender Registration # | CASASRN.X161 |
| Duty to Serve & Existing Energy Improvements | |
| Show all VOL [button] | |
| Affordable Loan Eligibility | |
| Eligible | 4968 |
| FFIEC MFI [button] | |
| Get AMI [button] | |
| Total Household Income | USDA.X222 |
| Total Household Adjusted Income | USDA.X223 |
| Rural Housing | 3850 |
| First-Time Homebuyer | 934 |
| Purchase Price Limit | 4969 |
| County | 13 |
| FIPS Code | HMDA.X111 |
| AMI Year Used | 4970 |
| AMI 100% | MORNET.X30 |
| AMI 80% | 4971 |
| AMI 50% | 4972 |
| AMI Percent | 4985 |
| AMI Amount | 4986 |
| Manual Year | 5027 |
| MSA Name | 5017 |
| MSA Number | 699 |
| Actual MFI Year | 5018 |
| Estimated MFI Year | 5019 |
| Actual MFI 100% | 5020 |
| Estimated MFI 100% | 5021 |
| MFI Manual Data | 5028 |
| Non-Occupant Present Housing Expense | CASASRN.X131 |
| Non-Occupant Non-Housing Debt | CASASRN.X174 |
| FHA/VA Originate ID | CASASRN.X27 |
| Size of Household | CASASRN.X145 |
| FHA Lender Identifier | 1059 |
| FHA Sponsor Identifier | 1060 |
| Alimony as Income Reduction | CASASRN.X159 |
| Special Instructions | CASASRN.X100 |
| Special Instructions | CASASRN.X101 |
| Special Instructions | CASASRN.X102 |
| Special Instructions | CASASRN.X103 |
| Special Instructions | CASASRN.X104 |
| Freddie Field #3 | CASASRN.X162 |
| Broker Originated | CASASRN.X165 |
| Amount of Financed MI | CASASRN.X169 |
| Borrower Field #1 | CASASRN.X170 |
| Borrower Field #2 | CASASRN.X171 |
| Co-Bor. Field #1 | CASASRN.X180 |
| Co-Bor. Field #2 | CASASRN.X181 |
| Long Legal Description | CASASRN.X41 |
| All Monthly Payments | CASASRN.X99 |
| Present Housing Expense | CASASRN.X16 |
| No-Appraisal MAF | CASASRN.X164 |
| Collateral Rep & Warrant | CASASRN.X33 |
| Risk Class | CASASRN.X34 |
| HELOC Drawn Total | CASASRN.X167 |
| HELOC Credit Limit | CASASRN.X168 |
| CHOICERenoEXpressInProgress | CASASRN.X223 |
Freddie Mac published an Amendment to v5.4.00 on July 8, 2024. This amendment includes support for three new enumerations for the Loan Program Identifier. The following new fields have been added to the Freddie Mac Additional Data input form to support the new LPIs:
-
Assumption FRE Owned Loan (CASASRN.X222) - New option to select the new LPI enumeration to be used by loan servicers to assess creditworthiness for mortgage assumptions.
-
CHOICERenovationInProgress (CASASRN.X224) - New option provided in the CHOICE In Progress section of the form to select this new CHOICE LPI while also being able to select additional CHOICE products (CASASRN.X212).
In addition, the following field labels have been updated to more closely align the field label with the expected property ID users should enter in this field and include in the loan data submitted to Freddie Mac’s Loan Product Advisor (LPA):
-
The Loan Prospector ID field (CASASRN.X200) is now labeled Loan Product Advisor ID.
-
The Inspection ID field (CASASRN.X220) is now labeled Property Data Identifier.
-
The Building Status field (601) is now labeled Construction Status.
-
The Offering Identifier field (CASASRN.X209) is now labeled Program Identifier.
-
The Correspondent Assignment Name field (CASASRN.X35) is now labeled Loan Assignment Name.
-
The Correspondent Assignment ID (CASASRN.X203) is now labeled Loan Assignment ID.
ENCW-110614
Updates to ULDD/PDD Input Form
A new MI Interest Rate Adjustment Percent field (ULDD.FNM.X7) has been added to the Fannie Mae tab on the ULDD/PDD input form. This new field replaces the MI Interest Rate Adjustment Percent field (ULDD.X217) that was added to the Freddie Mac and Fannie Mae tabs on the ULDD/PDD input form in Encompass 24.3. Since Fannie Mae has special requirements for the MI Interest Rate Adjustment Percent value, a unique field for this value was needed for the Fannie Mae tab on the ULDD/PDD input form.
For existing loans, the value from the Fannie Mae tab (ULDD.X217) is copied to the new field on the Fannie Mae tab (ULDD.FNM.X7) in Encompass 25.1. The value is rounded to two decimals. If a value greater than 10.00 was in ULDD.X217, the value in the new ULDD.FNM.X7 field will be updated to 0.00.
Negative values are now permitted in the Rate Spread field (ULDD.FNM.HMDA.X15) on the Fannie Mae ULDD input form. In previous versions of Encompass, if the rate spread (HMDA.X15) for the loan was a negative amount, the rate spread on the Fannie Mae ULDD input form would populate to 0.00 rather than the negative value.
The value in the FRE Condominium Project Identifier field (CASASRN.X221) on the Project Review tool is now automatically populated to the CPA Project Assessment Request Identifier field (ULDD.FRE.X1) on the Freddie Mac ULDD/PDD input form. Any time a value is entered, modified, or deleted from the FRE Condominium Project Identifier field, that value is updated (or deleted) in the CPA Project Assessment Request Identifier field on the ULDD/PDD input form.
Note that if a value is entered, modified, or deleted from the CPA Project Assessment Request Identifier field on the ULDD/PDD input form, the value in the FRE Condominium Project Identifier field on the Project Review tool is not updated (or deleted).
This update helps ensure that users utilizing Fredde Mac’s Condominium Project Advisor Platform can capture the Project Identifier number accurately on the ULDD/PDD input form and send it to LSA/LQA for delivery.
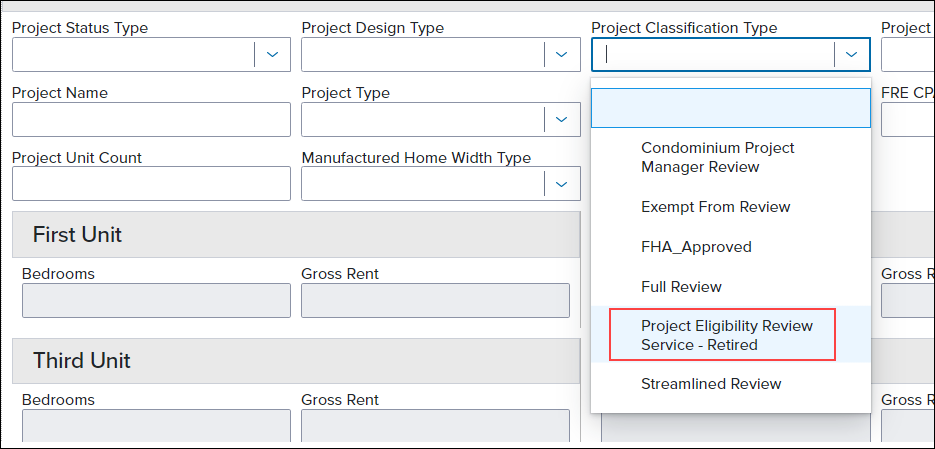
Per ULDD Phase 4a and 5 specifications, the following enumerations provided in dropdown lists on the ULDD/PDD input form are now indicated as Retired. The enumerations are still provided in these dropdown lists, but a Retired indicator is now displayed next to it.
| Field Label | Field ID | Retired Enumeration |
|---|---|---|
| Project Classification Type [Freddie Mac] | ULDD.X141 | Project Eligibility Review Service |
| Loan Program Identifier [Freddie Mac] |
ULDD.FRE.LoanProgramIdentifier ULDD.FRE.LoanProgramIdentifier2 ULDD.FRE.LoanProgramIdentifier3 ULDD.FRE.LoanProgramIdentifier4 ULDD.FRE.LoanProgramIdentifier5 |
Alt97 BuilderOrDeveloperAffiliated CHOICERenovationMortgageWithRecourse DisasterReliefProgram FREOwnedCondoProject HomePossible3PercentCash HomePossible97 HomePossibleAdvantage HomePossibleMCM3PercentCash HomePossibleMCM97 HomePossibleNeighborhoodSolution3PercentCash HomePossibleNeighborhoodSolution97 HomePossibleNeighborhoodSolutionMCMCS3PercentCash HomePossibleNeighborhoodSolutionMCMCS97 HomePossibleNeighborhoodSolutionMortgage Negotiated97PercentLTVLoanProgram NeighborhoodChampions NewlyBuiltHomeMortgage RecourseGuaranteedByThirdParty ShortTermStandBy SolarInitiative |
| Investor Collateral Program ID [Freddie Mac] | ULDD.X95 |
Form 2070 Form 2075 Property Inspection Alternative |
| Investor Collateral Program ID [Fannie Mae] | ULDD.X38 |
DU Refi Plus Property Fieldwork Review Level 1 Property Inspection Waiver Property Inspection Waiver |
| Property Valuation Method Type [Freddie Mac] | ULDD.X29 | Prior Appraisal Used |
| Property Estate Type [Fannie Mae] | ULDD.X197 | Other |
Example:
ENCW-112936, CBIZ-56297
Updates for ICE Mortgage Analyzers Integrations
New document expiration date fields have been added to the Underwriter Summary Page 2 input tool:
-
Credit Expiration Date (ANALYZER.X19)
-
Income Expiration Date (ANALYZER.X20)
-
Asset Expiration Date (ANALYZER.X21)
-
Collateral Expiration Date (ANALYZER.X22)
-
Overall Expiration Date (ANALYZER.X23)
By default, these fields can be updated manually. Alternatively, some of these fields can be updated automatically by the system based on information provided by ICE Mortgage Analyzers.
To make these fields read-only so users cannot make manual updates, administrators can set up and activate Persona Access to Fields business rules for these fields. If the fields are not set to read-only, data that is manually entered may be overwritten by system data from analyzers.
For users utilizing analyzer data for these fields, the analyzers will use extracted dates, compile those dates, and then provide the oldest document date to set the document expiration date for a file. Documents reviewed will include paystubs, bank statements, credit reports, and other documents used for the loan decision making process.
These dates will be compiled by the ICE Mortgage Analyzers and sent back to the fields (as described below) on the Underwriter Summary Page 2.
-
Credit Expiration - Analyzers will update
-
Income Expiration - Analyzers will update
-
Asset Expiration - Analyzers will update
-
Collateral Expiration - This field will not be updated by analyzers
-
Overall Expiration - This field will not be updated by analyzers
Asset Analyzer is now available in the Analyzers section of the Underwriting Center in the Encompass web interface, giving users the ability to review and import asset details from the Asset Analyzer in Encompass. The status of the analyzer and the red alerts are displayed in a way similar to the Income and Credit Analyzers provided in previous versions of Encompass.
To View Asset Analyzer in Encompass:
-
Select the Analyzers button in the Underwriting Center.
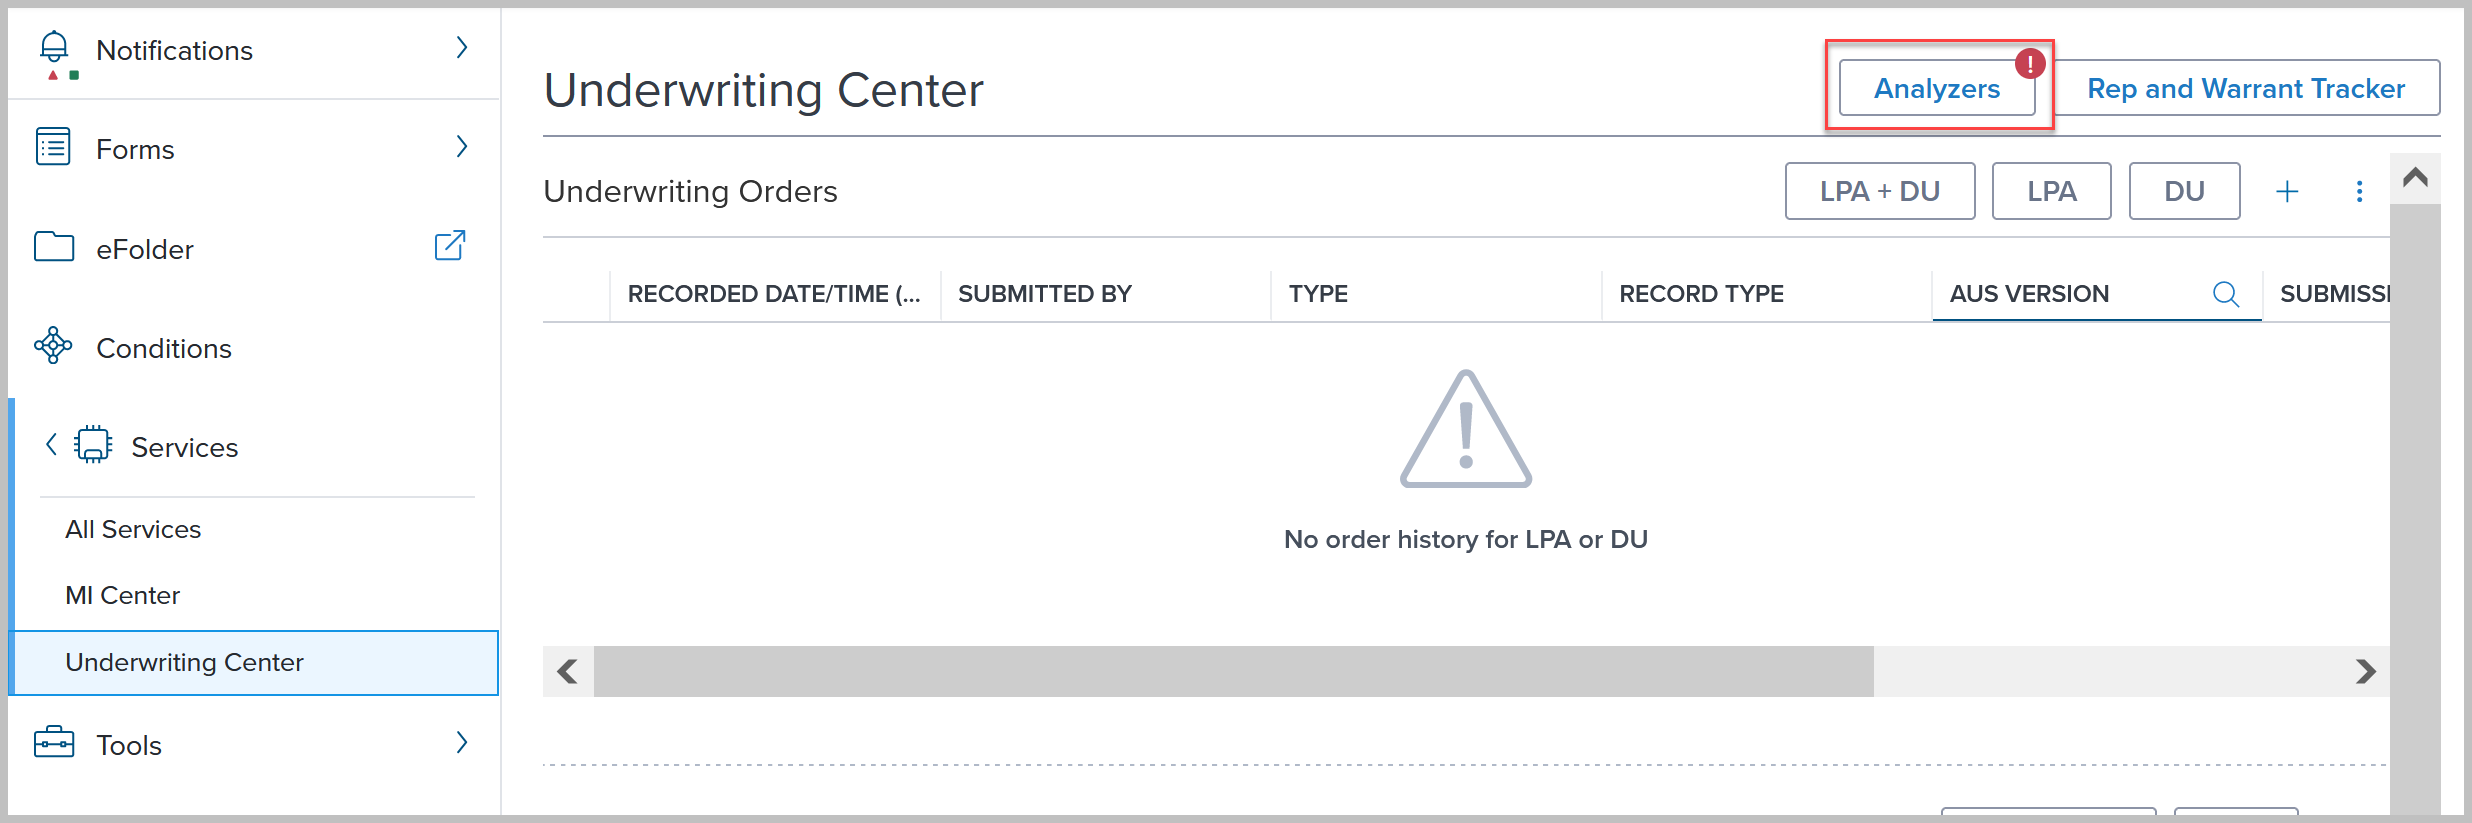
-
Select the Assets label in the Analyzers pane.
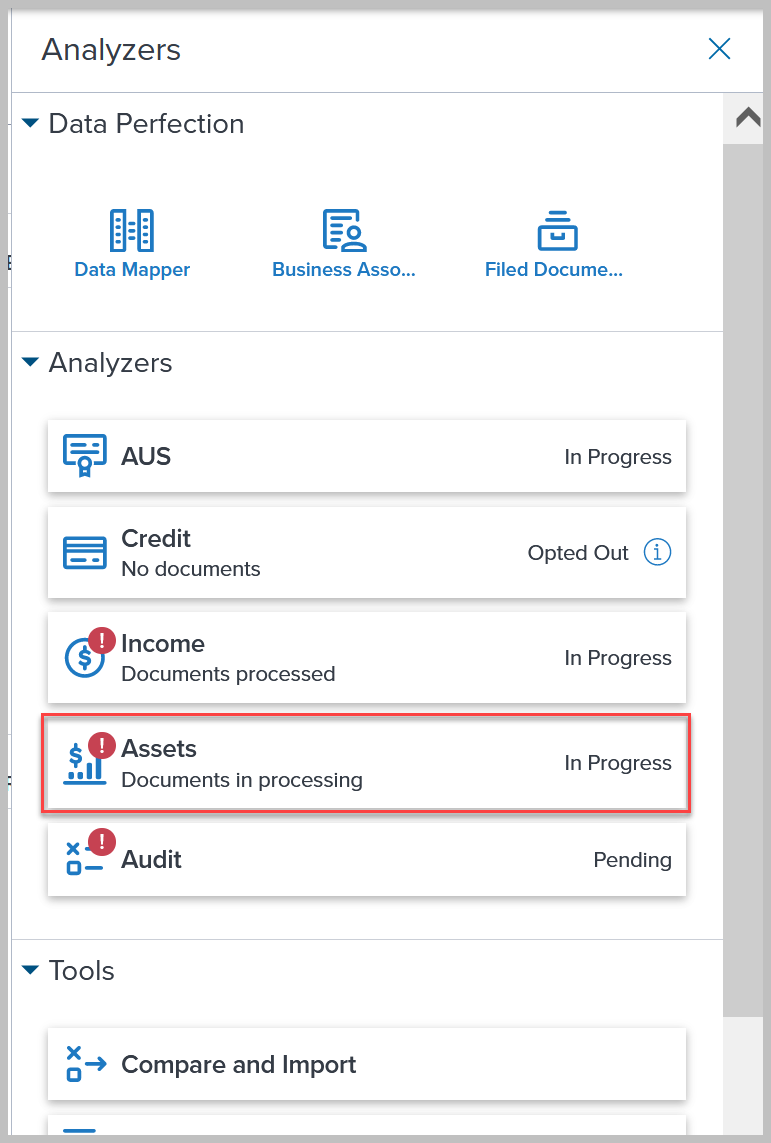
Assets data from the analyzer is displayed.
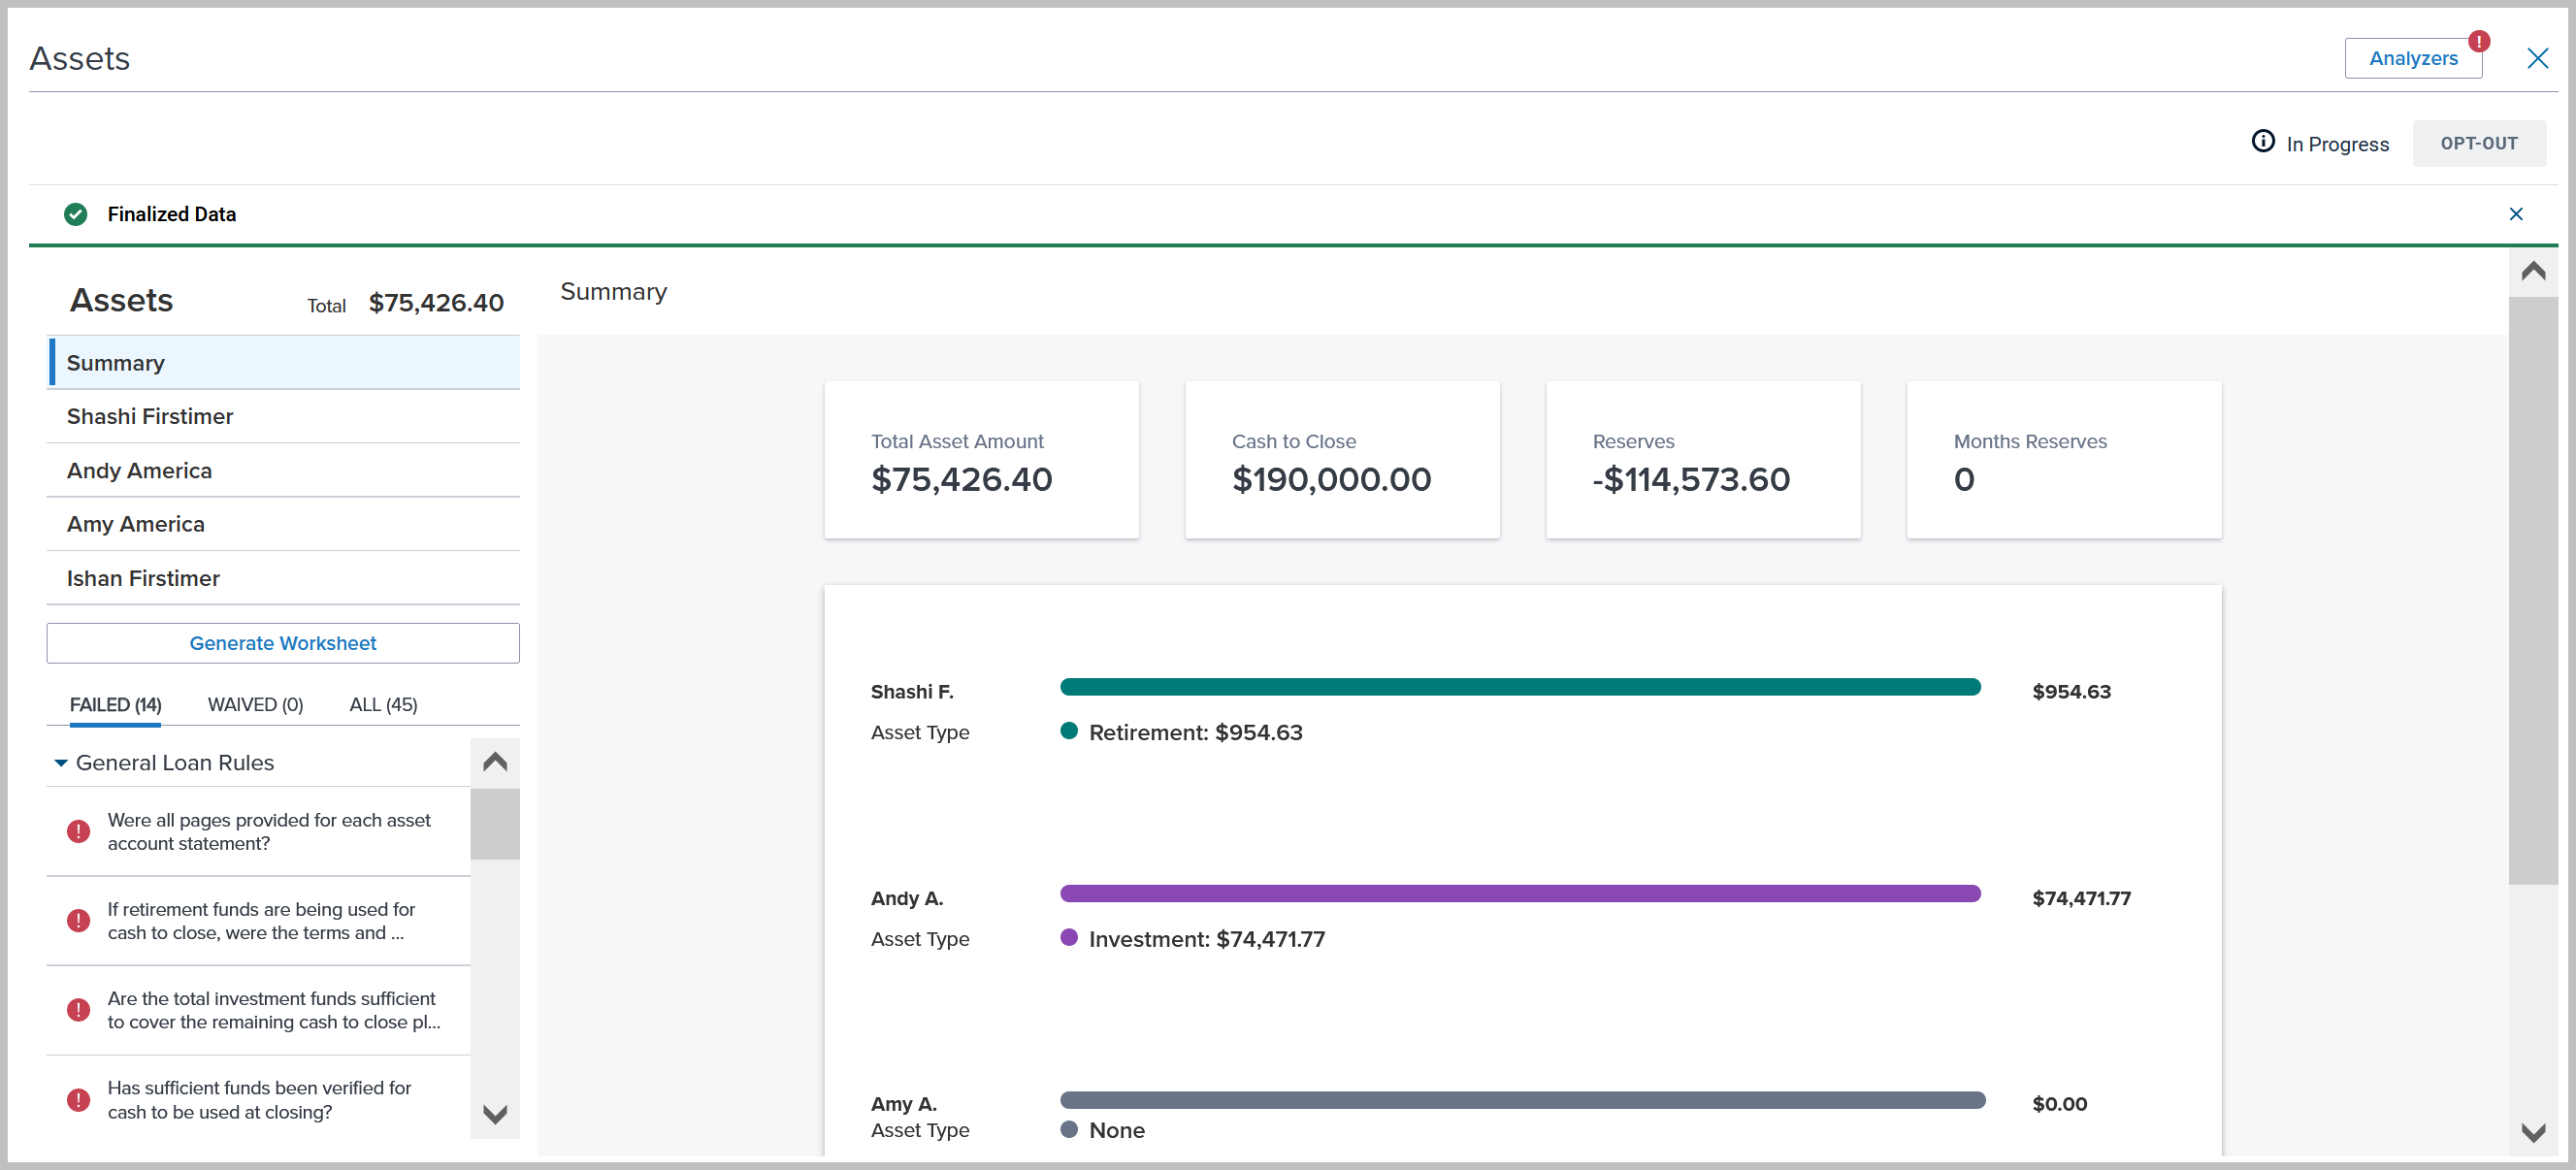
The asset data can be viewed in the Compare and Import tool in Encompass. A new Asset section is provided in the Compare and Import tool where users can import asset data into the loan file in Encompass. The Compare and Import tool provides an easy way for Encompass users to compare the asset data in the loan application and the asset data calculated by the Asset Analyzer. The tool displays a comprehensive variety of asset types supported under Depository, Investment, and Retirement categories.
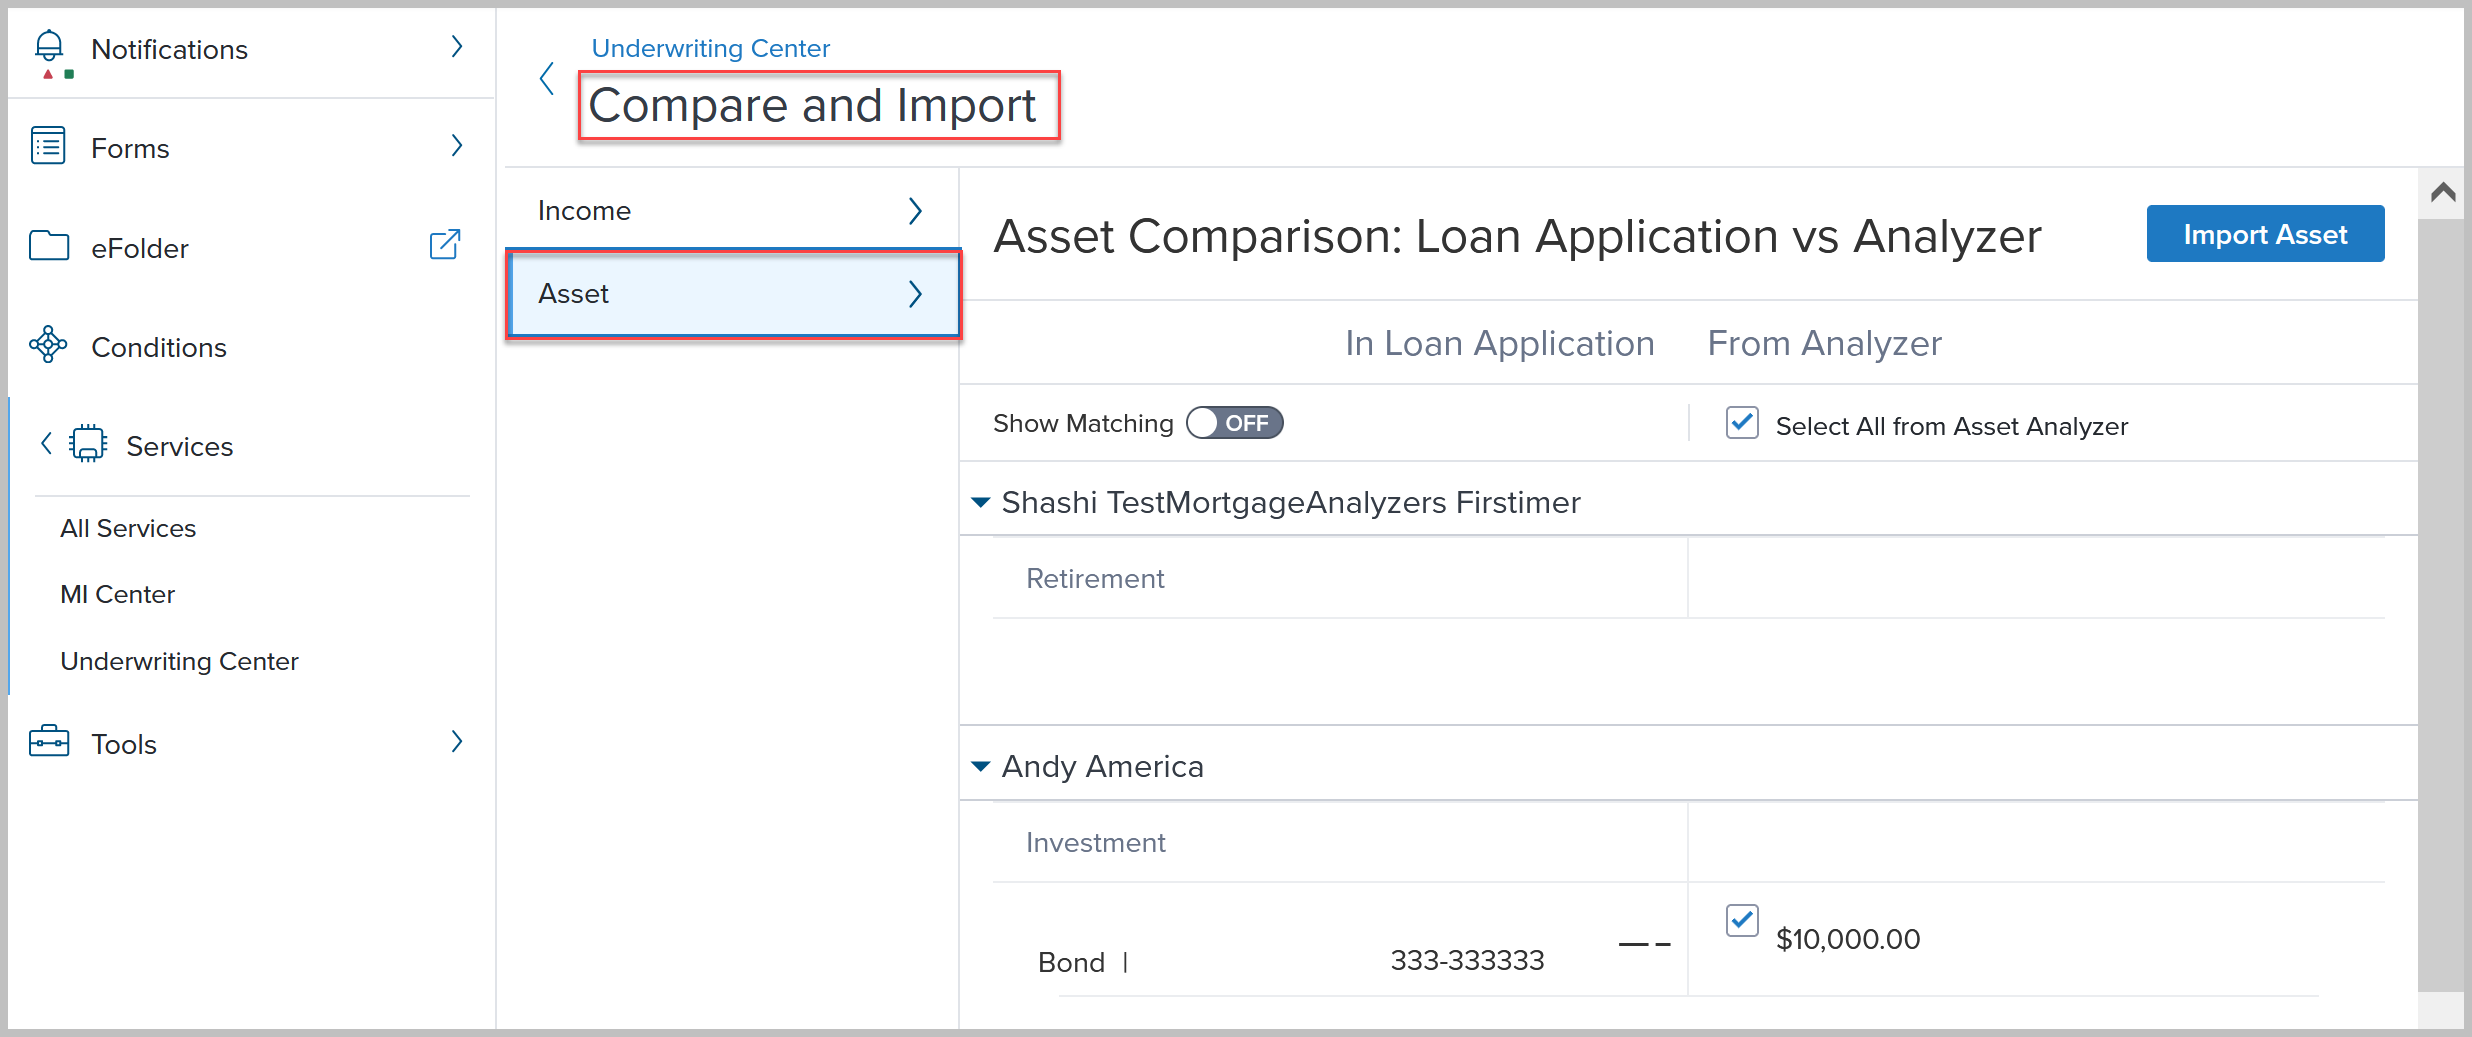
Data from the loan application and Asset Analyzer is displayed on the page in two columns for a clear and consistent comparison view.
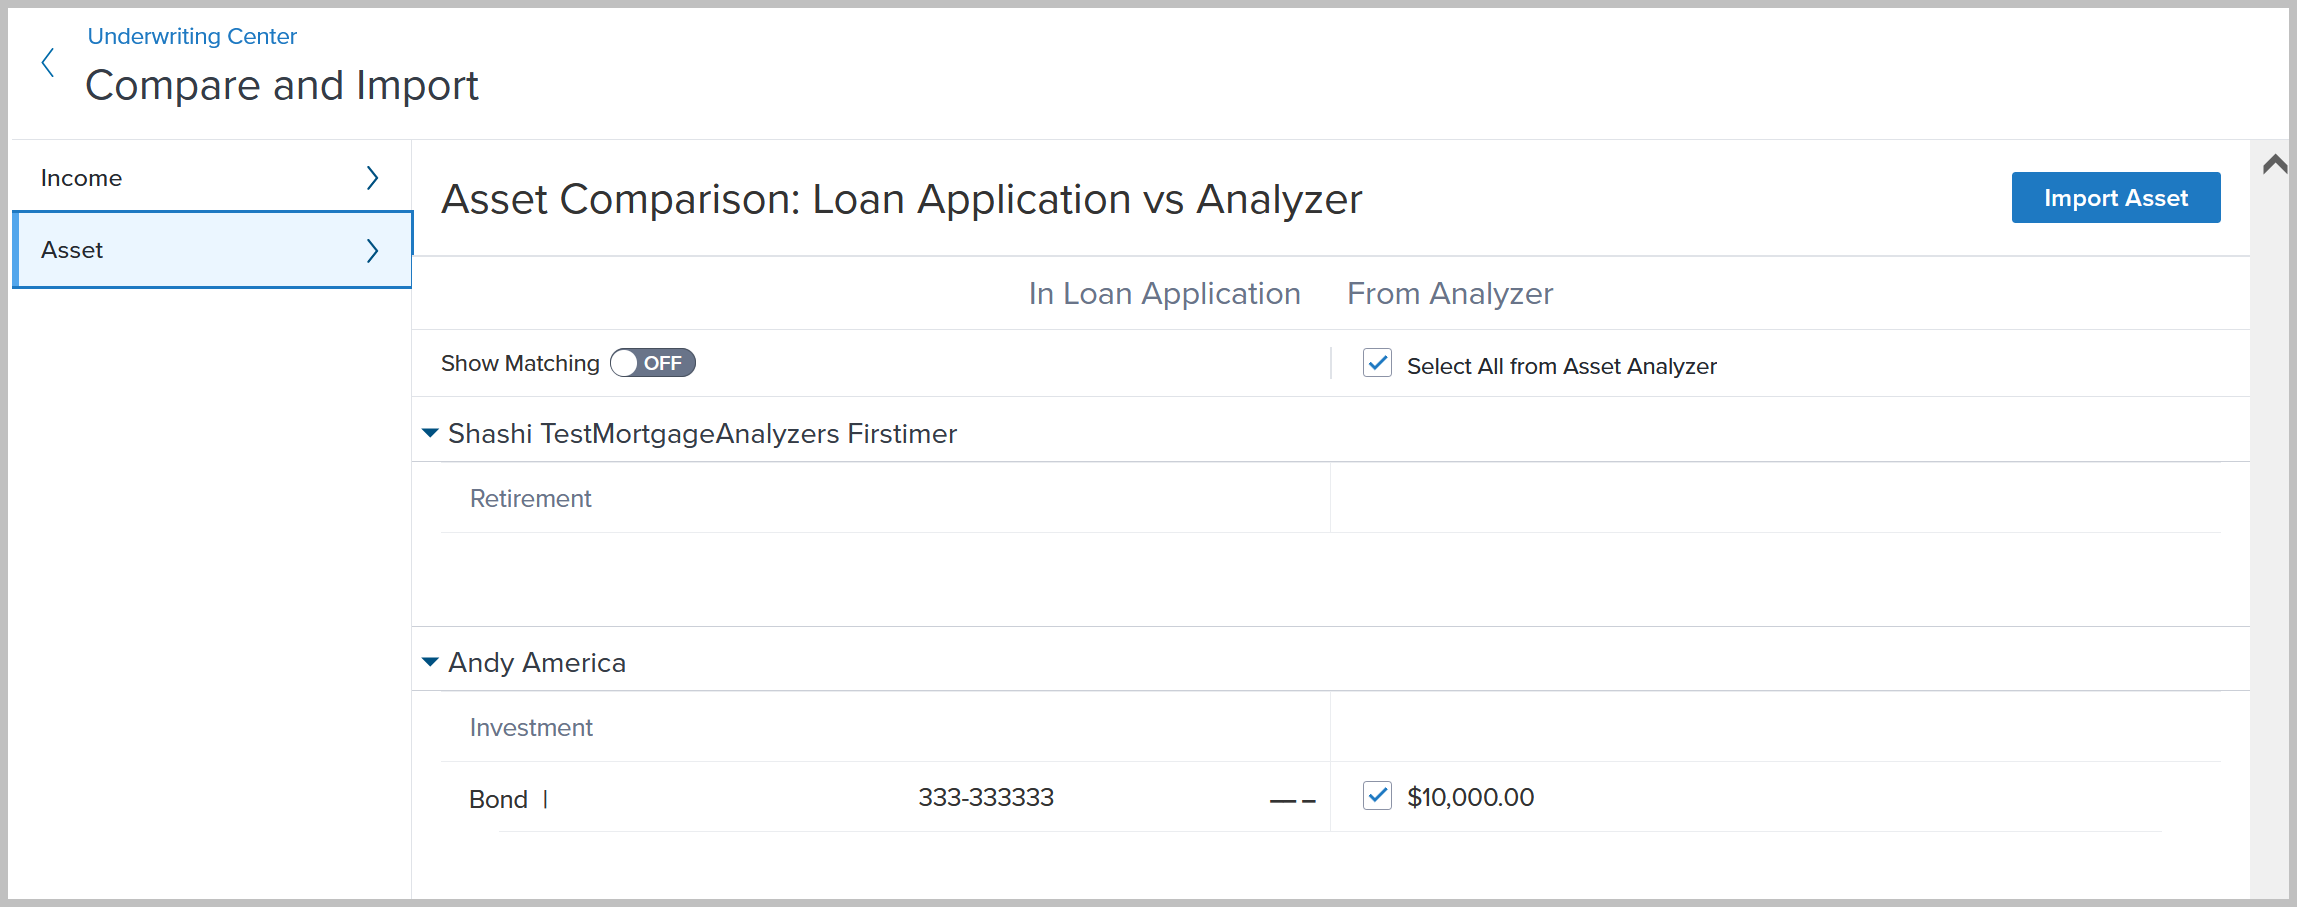
Asset data is displayed for each borrower in dedicated expandable tables.
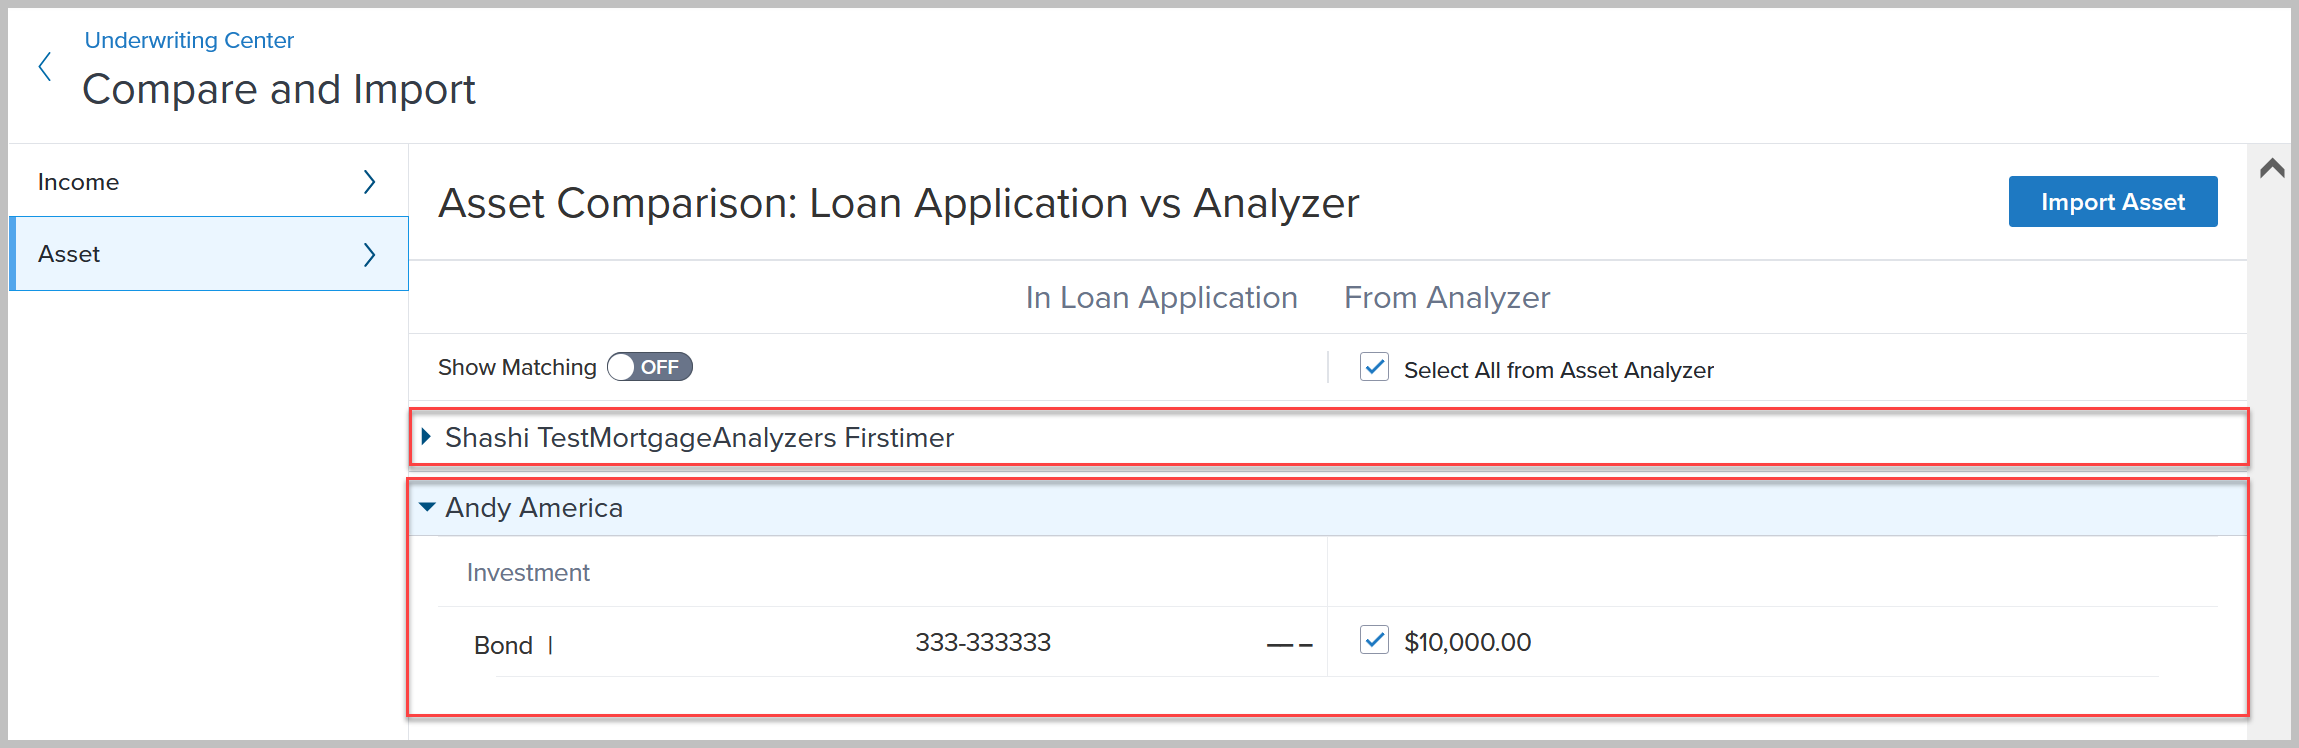
By default, the tool displays only the values where a mismatch is detected. Users can switch the Show Matching toggle to ON to display all data, including the values that are identical between the loan application and the asset analyzer.

When a mismatch occurs users can decide if they want to use the loan application data or the data from the Asset Analyzer. The following types of data from the asset analyzer can be imported into the loan application in Encompass:
-
Amount
-
Account Number
-
Financial Institution Name
-
Type of Asset
To select the Asset Analyzer value to import, select the relevant checkbox for each item.
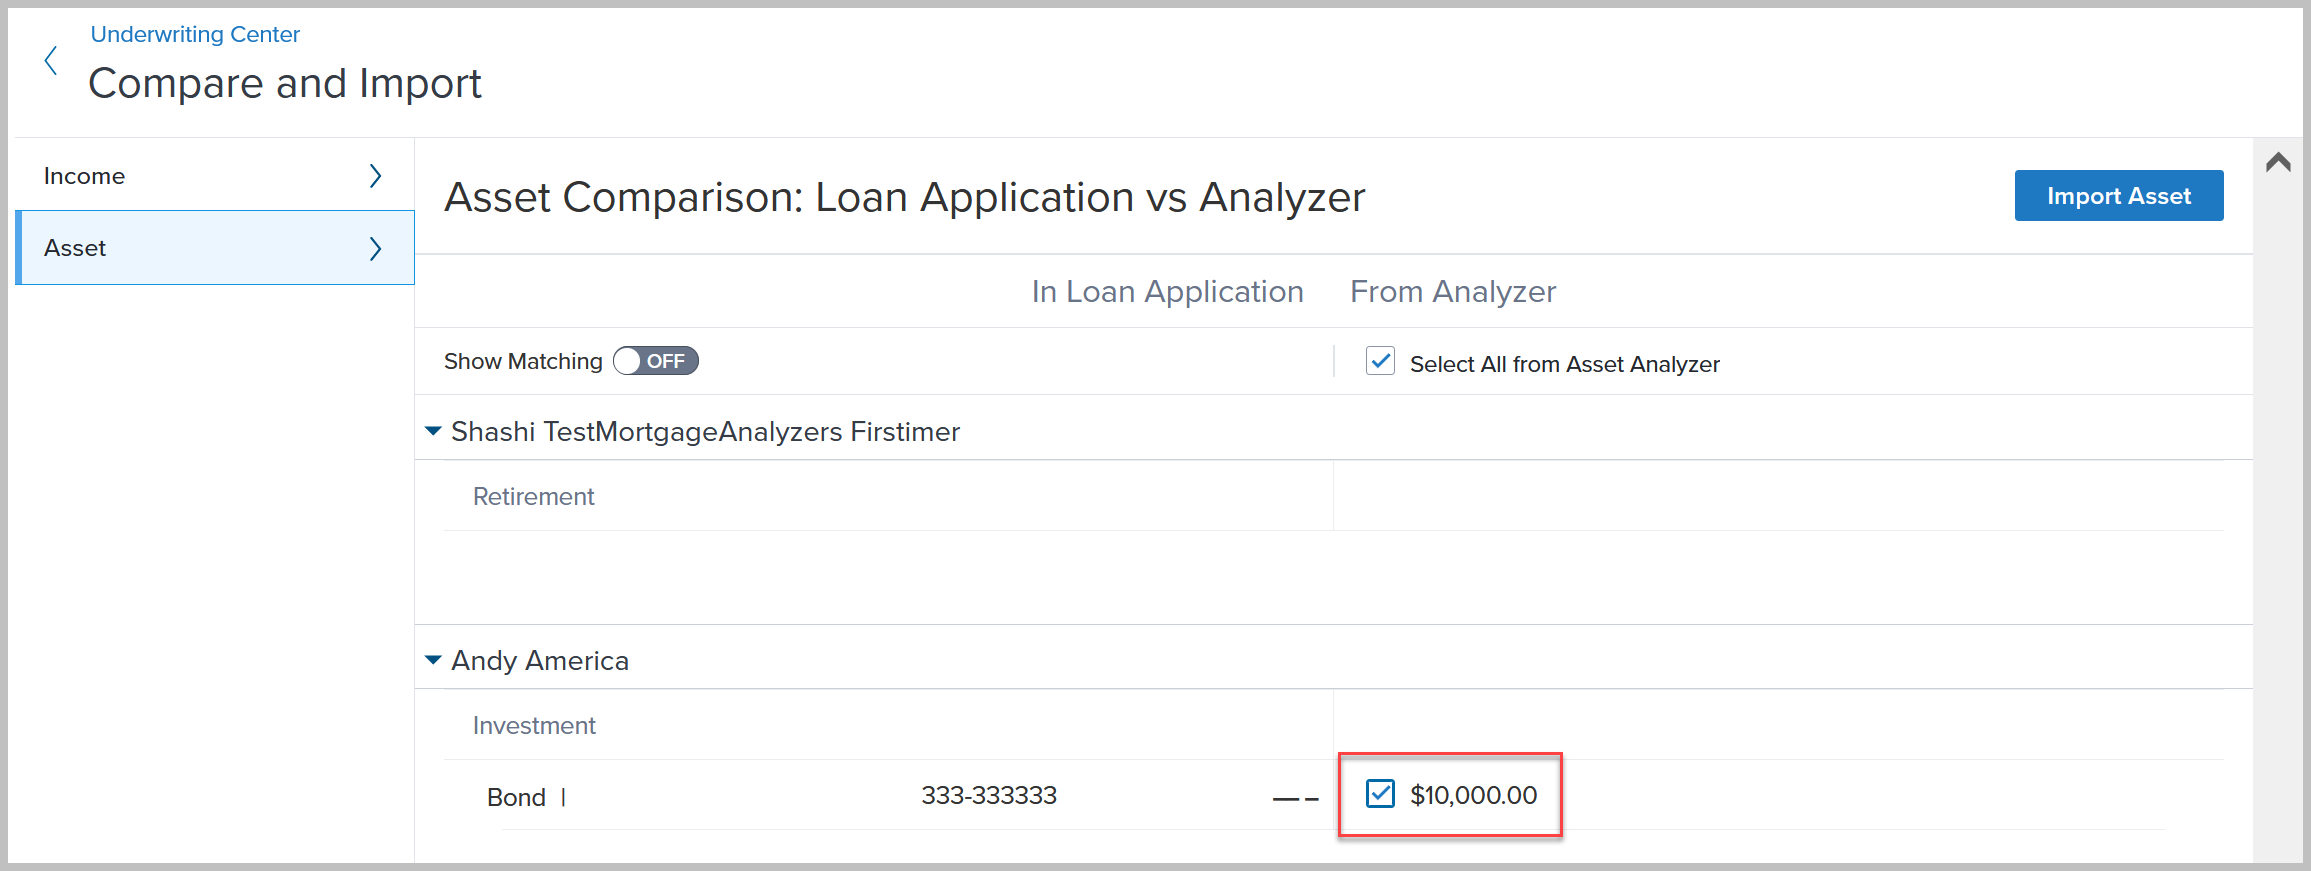
Users can also select all analyzer-calculated data by selecting the Select All from Asset Analyzer checkbox.
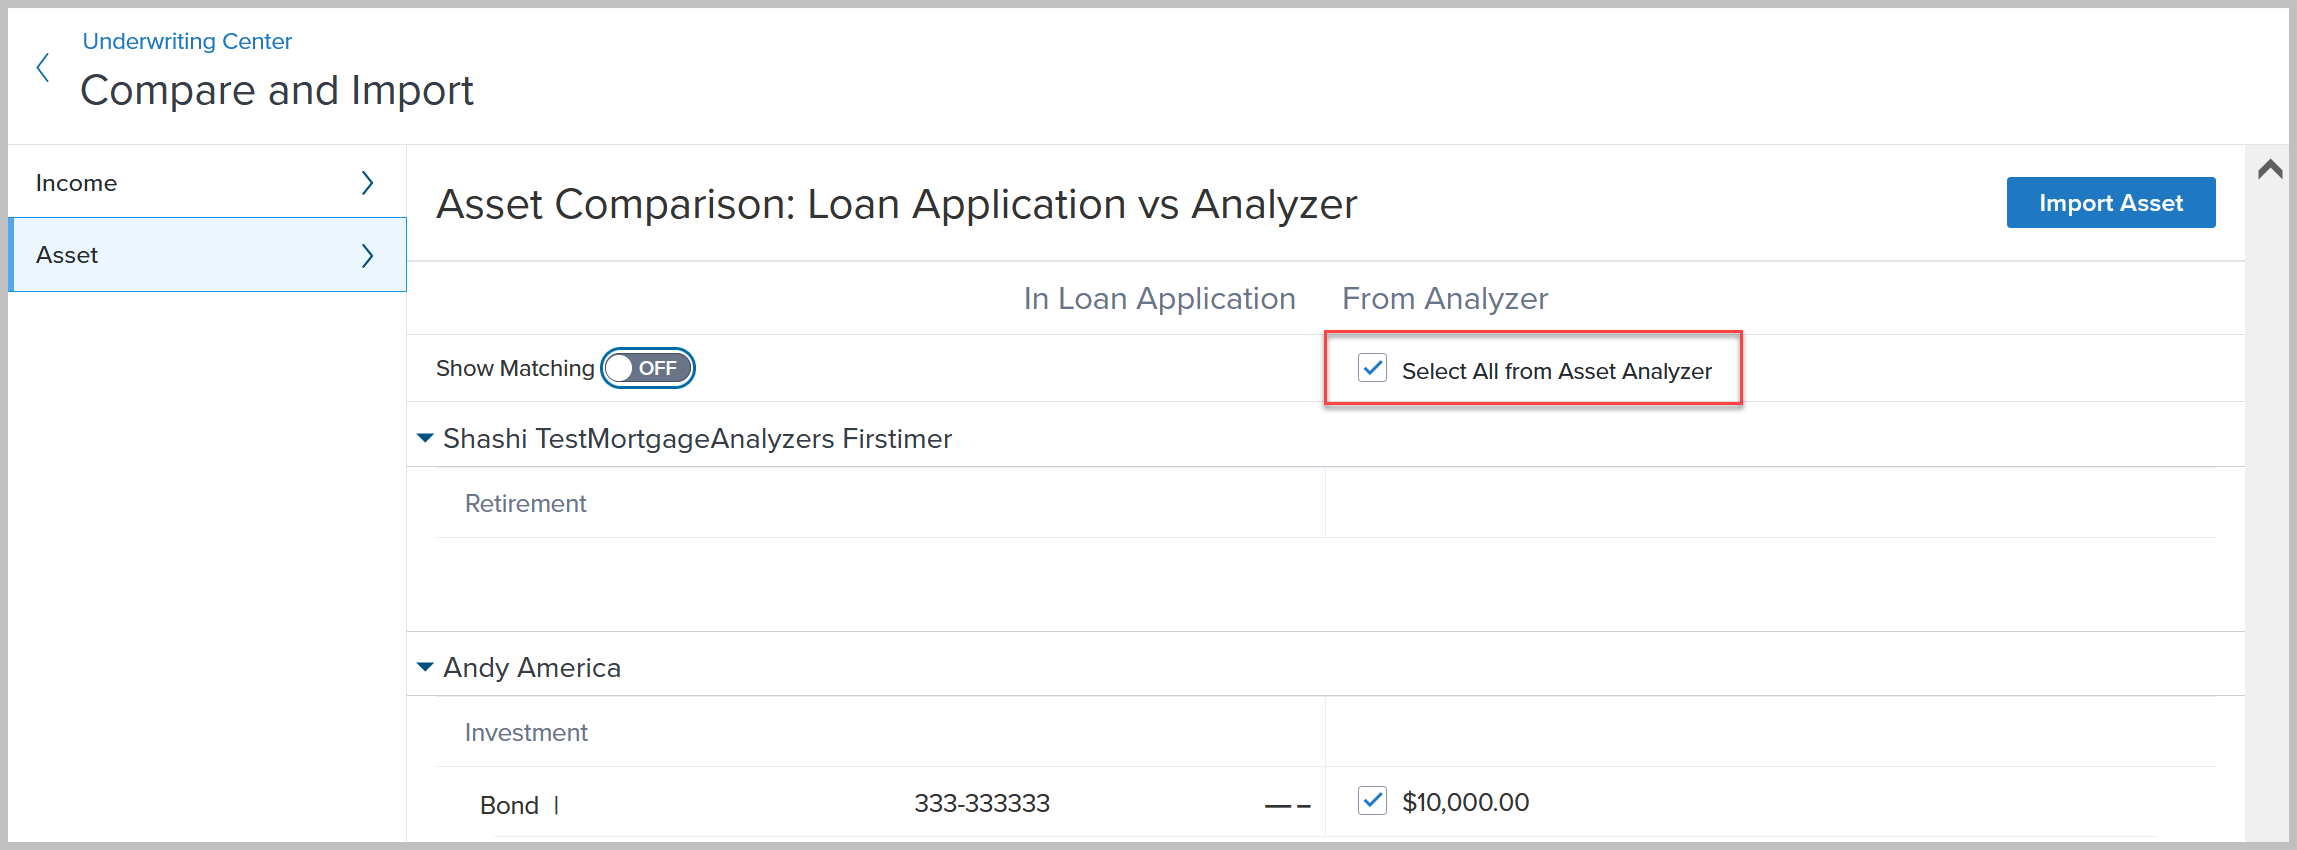
When one or more analyzer-calculated data is selected, the Import Asset button is activated. Click the button to import data from the asset analyzer and use it in the underwriting process rather than the data stated on the loan application.
Select the Save button to save the imported data in the loan application
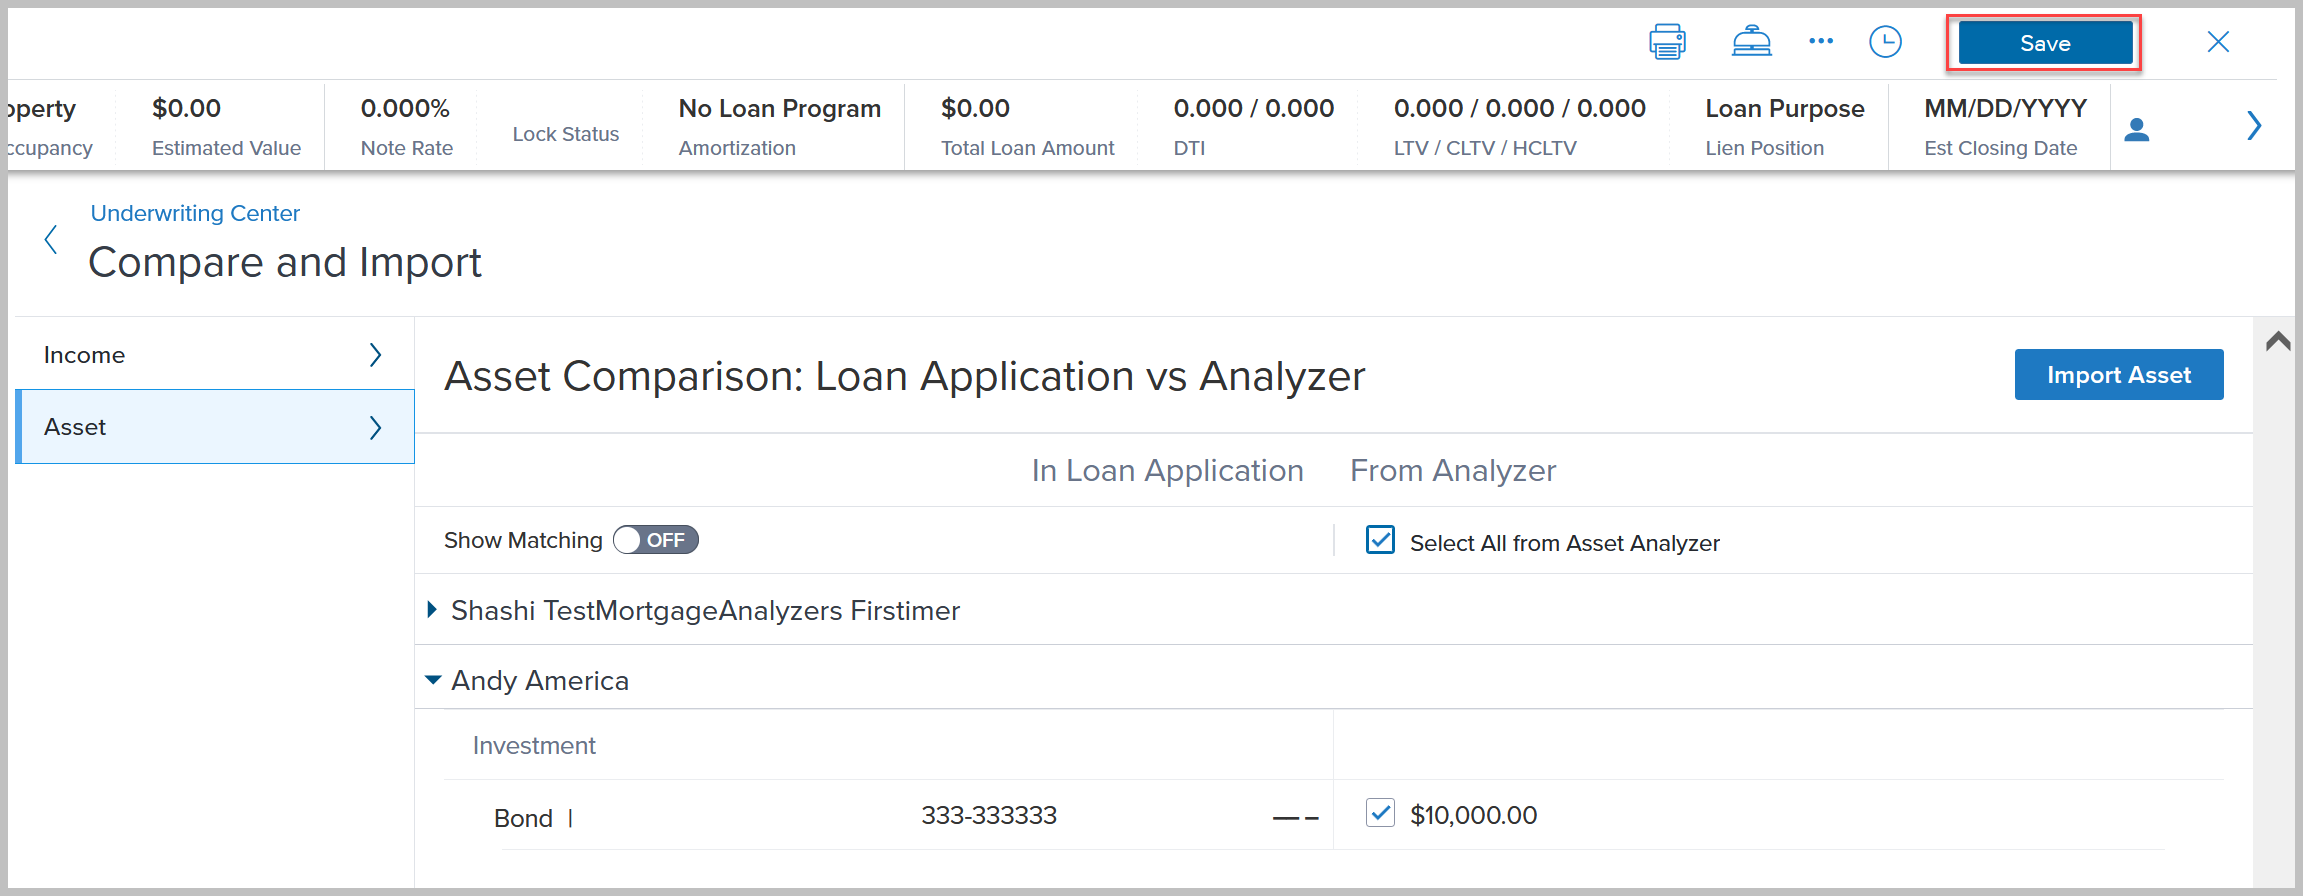
All the accounts from the Depository section in Encompass are displayed. The selected accounts from the Asset Analyzer are displayed too. While some accounts match already, some others may not. If an account from the Asset Analyzer is not matched and is imported, it becomes a new entry in Encompass.
Additional Notes:
-
Asset Analyzer must be set up within the Analyzer settings by the administrator.
-
Persona rights options must be set to display the Analyzers panel in the Underwriting Center.
-
Persona rights are required to import the analyzer data to Encompass.
-
Import Data: The button is activated if access is granted to mortgage analyzers and it is allowed for the persona
-
Select All From Asset Analyzer: Users can select the checkbox to import all data into Encompass
ENCW-97451, ENCW-109640, ENCW-112481
For companies that have purchased the ICE Mortgage Analyzers, new fields are being introduced in the Encompass Reporting Database that are intended to be used with advanced business rules for analyzer fields so that lenders can exclude loans from analyzers based on specific conditions and provide a reason for the exclusion.
Please note:
-
These fields are not available on any standard Encompass input forms or tools. They are provided in the Encompass Reporting Database only. They may be added to custom input forms.
-
These fields may be added to business rules in Encompass 25.1, but the rules will not be enforced until additional functionality is added in a future Encompass release.
| Field Description | Field ID |
|---|---|
| AUS Analyzer Exclusion Indicator | ANALYZER.X28 |
| AUS Analyzer Exclusion Reason | ANALYZER.X29 |
| Audit Analyzer Exclusion Indicator | ANALYZER.X30 |
| Audit Analyzer Exclusion Reason | ANALYZER.X31 |
| Credit Analyzer Exclusion Indicator | ANALYZER.X32 |
| Credit Analyzer Exclusion Reason | ANALYZER.X33 |
| Income Analyzer Exclusion Indicator | ANALYZER.X34 |
| Income Analyzer Exclusion Reason | ANALYZER.X35 |
| Asset Analyzer Exclusion Indicator | ANALYZER.X36 |
| Asset Analyzer Exclusion Reason | ANALYZER.X37 |
| Collateral Analyzer Exclusion Indicator | ANALYZER.X38 |
| Collateral Analyzer Exclusion Reason | ANALYZER.X39 |
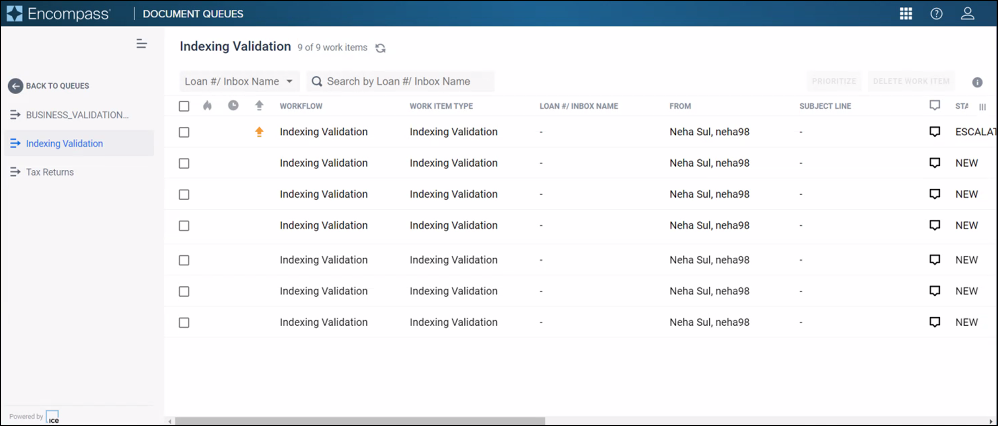
In Encompass 25.1, the Data & Document Automation queues can now be launched directly from Encompass by selecting the new Queues icon in the App Launcher. User access to the queues, as well as the specific Queues icon(s) that display in the App Launcher, are based on the user profile created in the Data & Document Automation application by the administrator. For example, if the user is configured with access to Document Queues, then the Document Queues icon is displayed (as shown in the example below). If they are configured with access to Work Item queues, then the Work Item Queues icon displays in the App Launcher.
In order for a user to access the Data & Document Automation (DDA) work item queues, the administrator must set up them up as a new Data & Document Automation site user and configure their user credentials with access to queues. Once configured, the user can log into the Data & Document Automation web or desktop application- or now Encompass - and then access the Data & Document Automation queues.
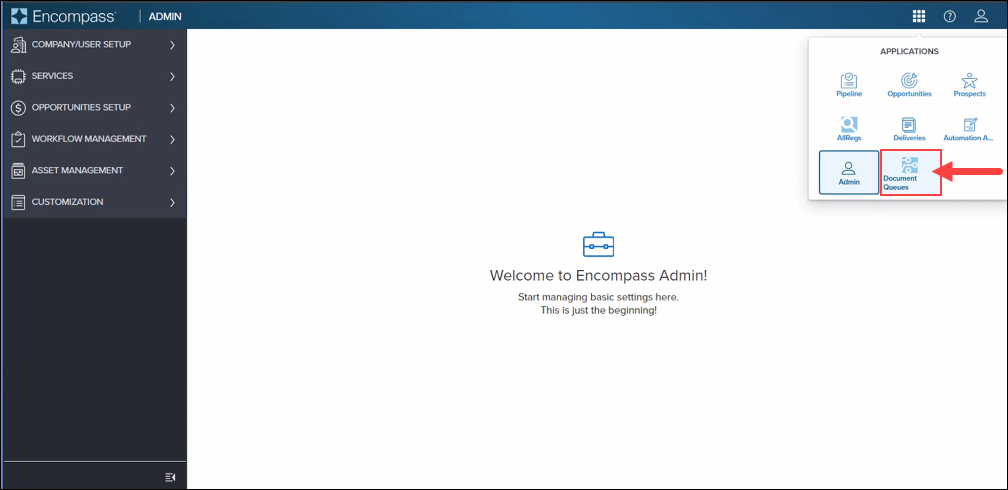
The user profile in Data & Document Automation requires access to at least one queue.
ENCW-111226, AIQP-52640
Updates for Correspondent Lending
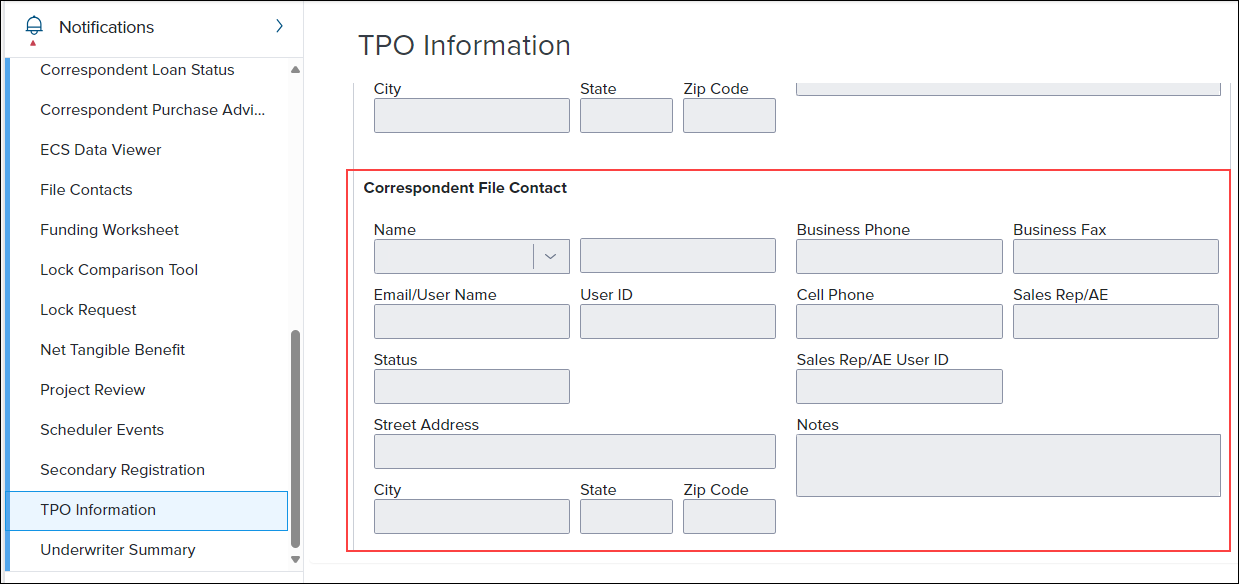
In the Encompass Settings > Company/User Setup > Roles setting in the Encompass desktop interface, a new TPO Correspondent option is now provided in the Role Mapping section. Here you can select the role in the external TPO company that will carry out TPO Correspondent tasks. Once a role is selected, users will then be able to select a TPO Correspondent user on the TPO Information tool.
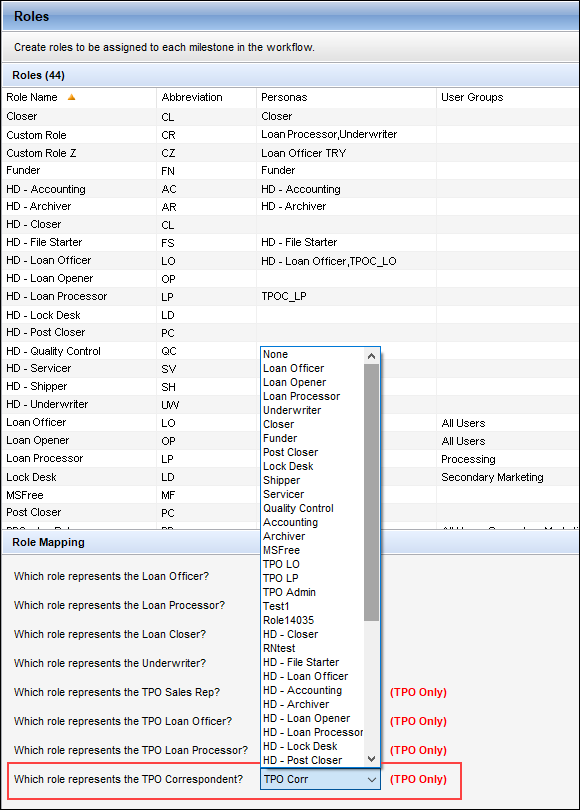
When the loan channel (2626) for the loan is Correspondent, users can select a company from the Name dropdown (TPO.X14) in the Company Information section of the TPO Information tool. Once the company is selected, users can then select contact information for the loan officer, loan processor, and now, a correspondent file contact on the tool. When a new TPO Correspondent role has been selected in the Roles setting, the Name dropdown list in the Correspondent File Contact section of the TPO Information tool is populated with the list of users assigned to personas for the mapped TPO Correspondent role under the selected TPO organization.
A new field, Commitment Rate Set Date (5044), has been added to the Encompass Reporting Database. While this field is available in the Encompass Reporting Database, it is intended for future functionality that will be provided in an upcoming Encompass release. At that time, this field will be added to the Correspondent Loan Status tool where it will capture the date when the interest rate for a correspondent loan was last set without changing the last rate set date (3253) for the borrower. More information will be provided when this field is made available on the the Correspondent Loan Status tool.
In Encompass 24.2 fields were added to capture valuation data used by correspondent lenders to provide support for multiple appraisals, ordering, and data persistence at an order level and workflow support at an order level. These fields are part of the existing Correspondent Appraisal Valuation collection that enables Encompass Partner Connect to support this workflow. One of the fields added to the collection at that time was the Correspondent LCA Score field (VAL00A017).
In this Encompass 25.1 release, the Correspondent LCA Score field has been updated from an integer field to a decimal field. The number entered in the field will now be rounded to two decimal places.
Please note that these Correspondent Appraisal Valuation collection fields are not visible on existing Encompass input forms, but they can be added to custom input forms and are available in the Encompass Reporting Database.
For clients who already added field VAL00A017 to the Selected Fields panel in the Reporting Database in previous releases, there is additional action required after upgrading to this new Encompass release before the values in this field will be in decimal format. After upgrading, the administrator must remove field VAL00A017 from the Reporting Database’s Selected Fields panel, and then click Update to update the Reporting Database. Then, they must add field VAL00A017 back to the Selected Fields panel, and then click Update again. Only then will values in the LCA Score field be rounded to two decimal places.
Electronic Document Management (EDM)
Updates to the eFolder
The following updates have been made to the eFolder user experience.
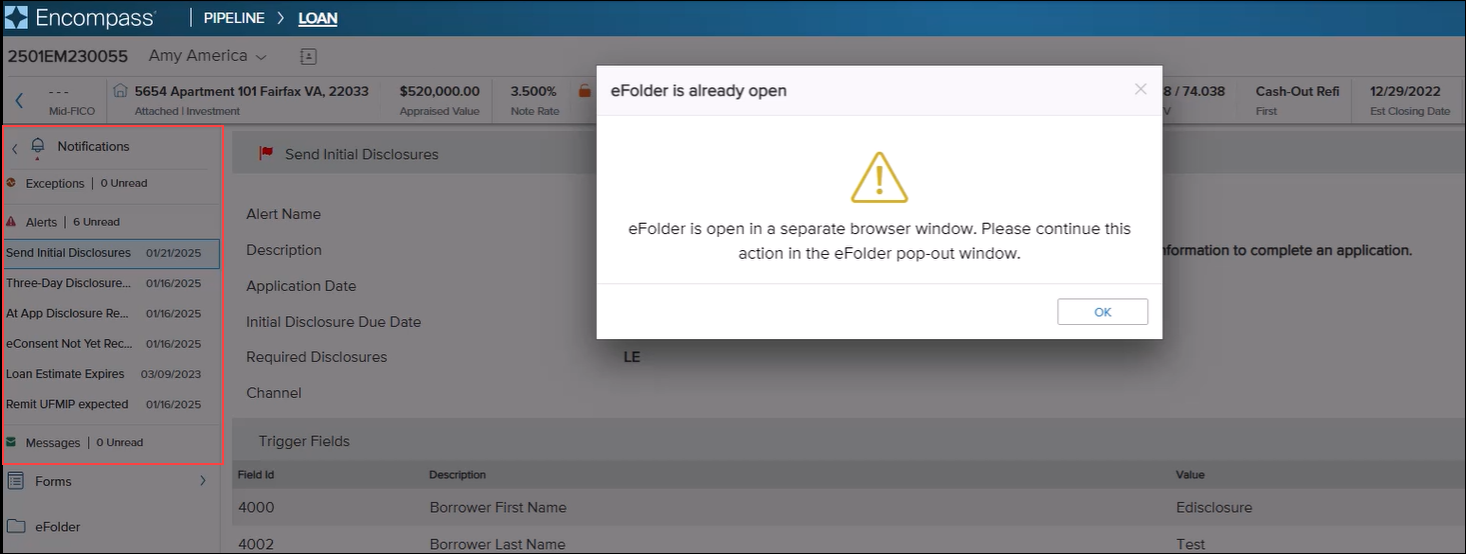
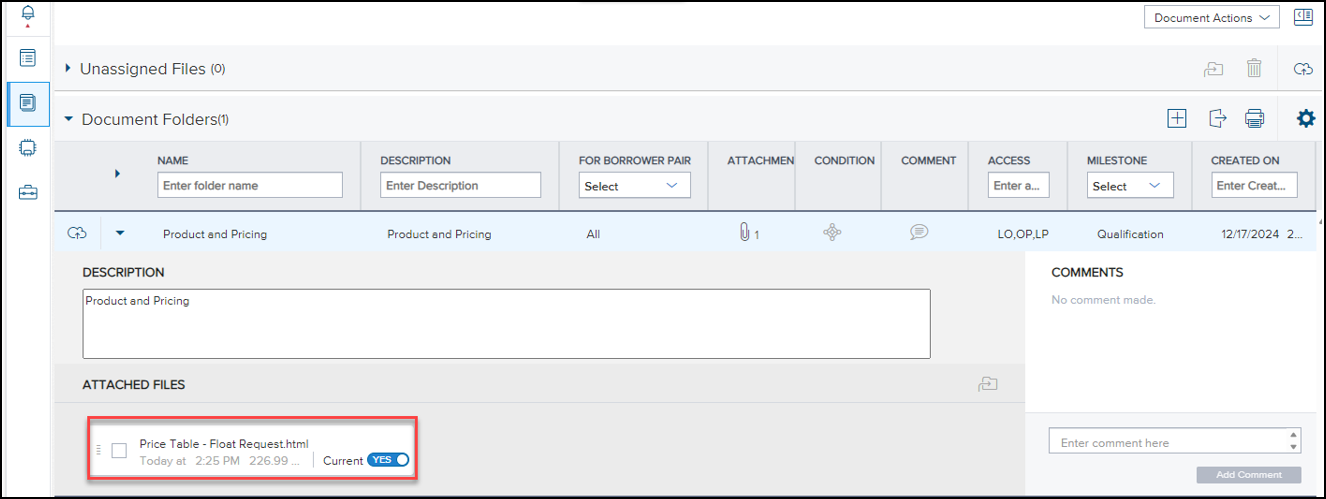
Users can now select a new eFolder pop-out icon to open the eFolder in a separate browser window. This enables users to keep the eFolder open while then working in different areas of the loan in scenarios like these:
-
A user is reviewing documents in the eFolder while also reviewing forms or tools for data completion.
-
Users can update the status of the document folders after data completion
-
Users can add documents to the eFolder while working in the loan as they review areas like services and forms.
The left navigation panel must be expanded (not collapsed) to select the pop-out icon.
When the eFolder is open in the pop-out browser window, a warning message will display to notify the user that the eFolder is already open when the user selects alerts or messages in the Notifications panel that call the eFolder. Here are some examples of alerts and messages that trigger this pop-up warning message:
Alerts
-
Send Initial Disclosures > and then user selects the Send Initial Disclosures button
-
eConsent not received > and then user selects the Request eConsent or eConsent Status button
Messages
-
[x] loan document(s) retrieved
-
Loan document uploaded
-
Loan document(s) retrieval failed
Important Considerations
There are scenarios where users will need to either refresh their browser or close the eFolder pop-out window and then pop-out the eFolder again to see the most updates information for conditions and services. Future Encompass releases will address this so that the most updated information and statuses are always presented in the eFolder pop-out window for these items.
Conditions:
When the following changes are made on the Conditions page, they are not immediately reflected in the eFolder pop-out window:
-
When a file is attached to a document folder.
-
When the following edits are made to files (in the Document Viewer):
-
An image or PDF file is rotated
-
A page is deleted.
-
Annotations are added/edited/deleted
-
Thumbnail views
-
Services:
Any changes to a service are not immediately reflected in the eFolder pop-out window.
After selecting one or more document folders or files in the eFolder's Side-by-Side View, the document folder selections now persist after switching to the Landing View (and vice versa). Previously, the document folder selections were not retained after switching to a different view and you would need to select the document folders again in the new view.
Side-by-Side View
Landing View
DOCP-68583
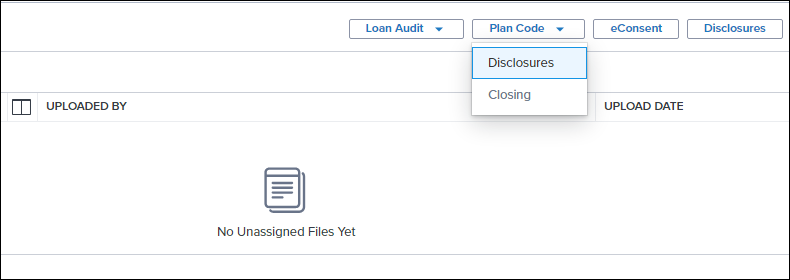
Authorized users can now select the Plan Code button when working in the eFolder and then selecting the type of plan code to apply: Disclosures plan codes to use when generating initial disclosures or Closing plan codes to apply when ordering closing documents. In previous releases, the Plan Code button was available to open the Plan Codes screen, but users would need to then select the type of plan code before selecting the plan code. Now, this designation is made earlier in the process to improve efficiency.
DOCP-67929
When a document folder is pinned in the eFolder's Landing View, the pinned icon indicating the folder is pinned is now displayed for the document folders when the view is switched to the eFolder's Side-by-Side View too. The pinned icon continues to display consistently when the view is switched from Side-by-Side to Landing view. Previously, the pinned icons were not persisting between both views and users would need to pin the document folders again.
Landing View
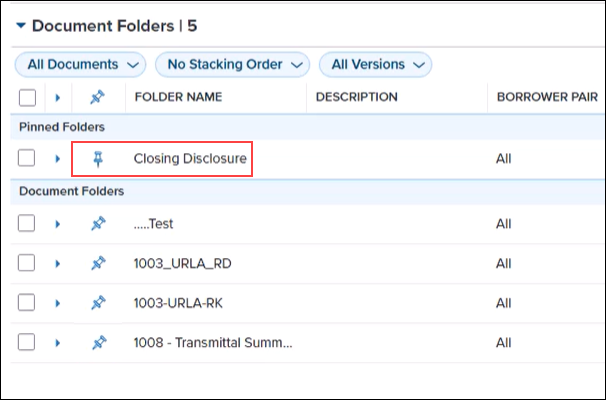
Side-by-Side View
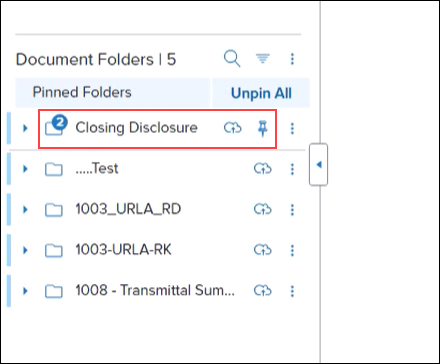
Note that the pinned document folders persist only during the current eFolder session. Once you leave or close the eFolder, the pins are not retained in either eFolder view.
DOCP-68582
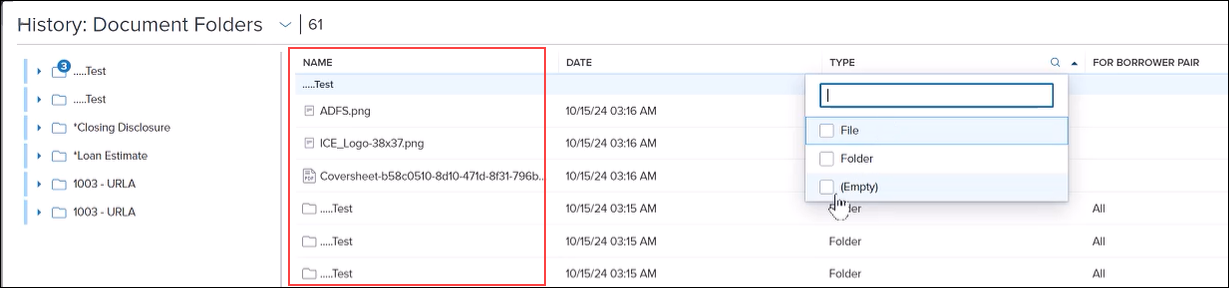
Updates have been made to the eFolder History panel to improve how users can filter the data that is displayed:
-
A new Name column is now provided in the far left of the table. This column lists each file available in the History panel.
-
Users can now select multiple options from each column heading to filter the data displayed in the eFolder History panel. Select the Search icon (magnifying glass) to display the list of filter options for the column, and then select the item(s) to display.
After re-sizing the column-width in the Document Folders or Unassigned Files tables in the eFolder, that width is now retained for the column when additional columns are added or removed from the table, when the position of the re-sized column changes, or when the user navigates to a different screen in the eFolder and then returns to the tables.
DOCP-71306
To view document folder details in the eFolder, users select the Information icon for the folder, and then the details are displayed in a slide-out panel on the right side of the screen. When this happens, the spinner that displays to indicate the document folder details are loading no longer displays in the middle of the eFolder and now displays in the slide out panel. When updates are made in the document details slide-out panel, the spinner no lo longer displays in the middle of the eFolder either. After changes are saved, a notification confirmation message displays in the slide out panel. This enhancement enables users to continue to work in the eFolder while document details are loading in the panel. Previously, users had to wait until the loading had completed before they could continue working in the eFolder.
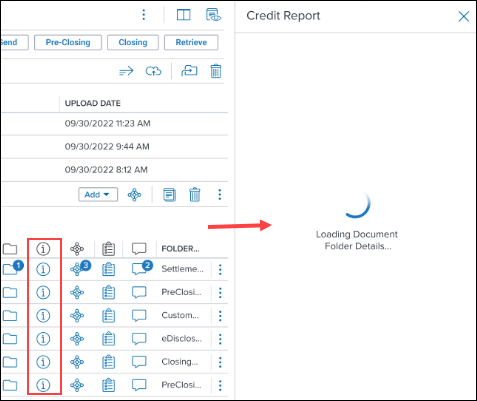
DOCP-68579, DOCP-71099
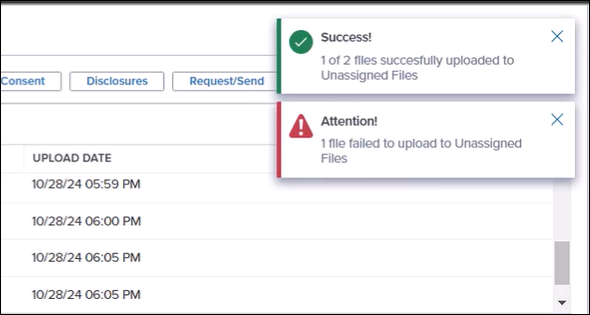
Encrypted or password protected files are not supported in eFolder. When a user attempts to upload an encrypted or password-protected PDF file, a new message in red is now displayed during the upload process to notify the users about this non-support and the file is not uploaded.
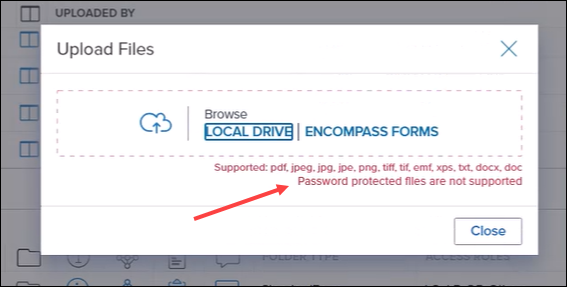
If a user is uploading multiple files and encrypted or password protected PDF files are included in the upload, the file upload process continues (so the supported files can be uploaded) but a warning notification message in the eFolder is displayed to notify the user of the PDF files that did not upload since they are not supported.
Please note that encrypted or password-protected DOC or DOCX files may still be uploaded at this time. These types of files will not be permitted to be uploaded in a future Encompass update.
DOCP-68228
Updates to Document Workflows
When a loan officer performs any of the document actions below that contains a document requiring an electronic signature from the loan officer, a new pop-up window giving them an opportunity to sign those documents immediately is now provided:
-
Send Disclosures (i.e., select the Disclosures button)
-
Request/Send documents
-
Send Pre-Closing documents
-
Send Closing documents
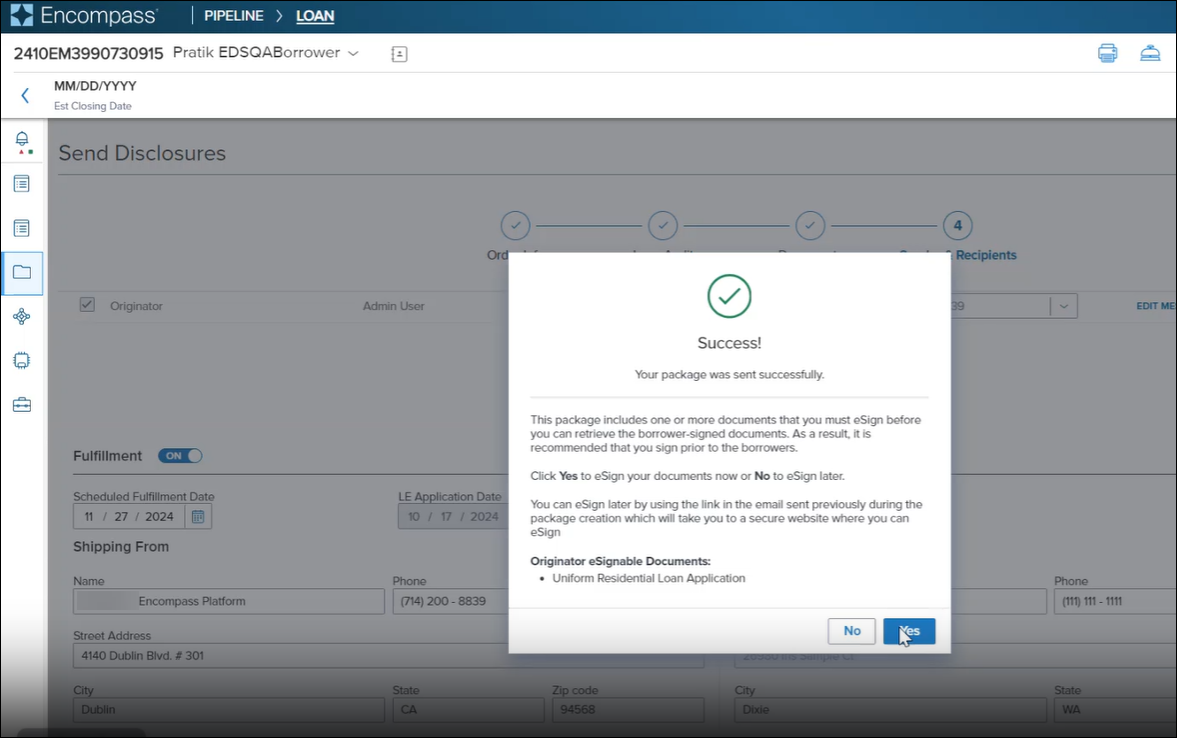
Once the loan officer eSigns the documents (or elects to not eSign at that time), the document send or request process will then be completed.
DOCP-66811
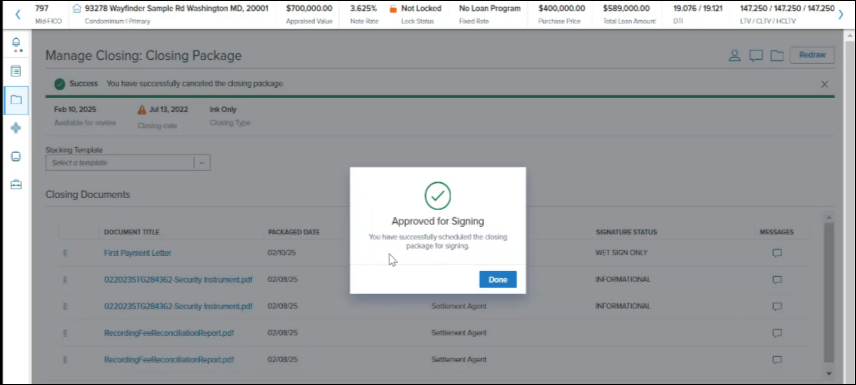
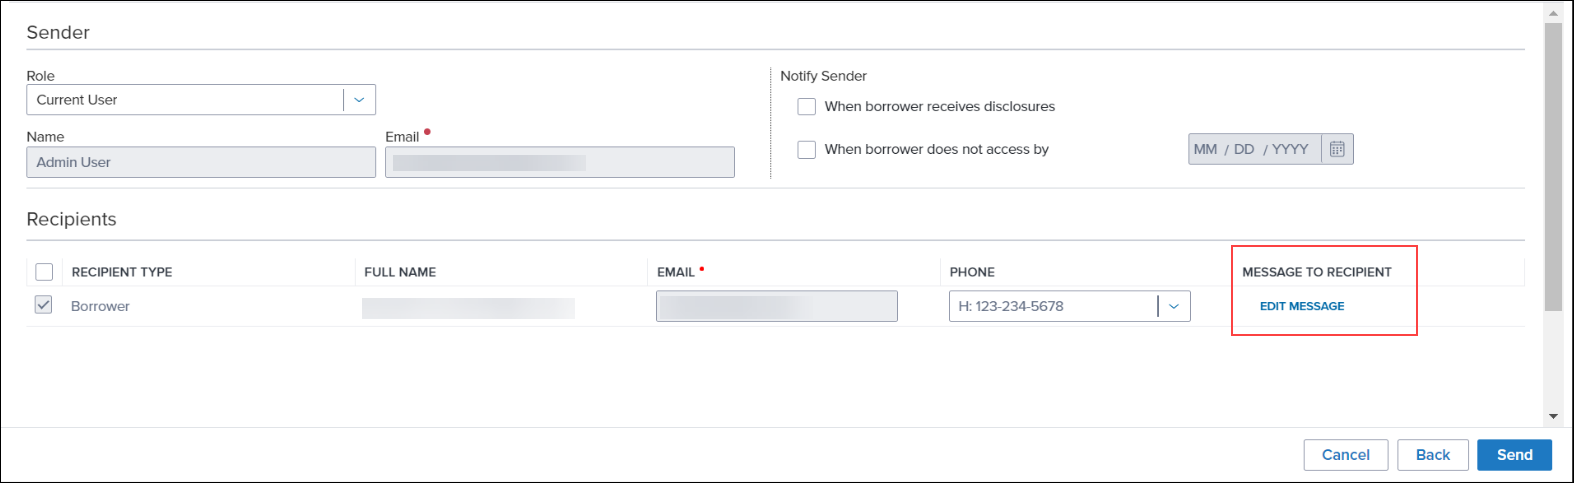
Updates have been made for the Approve for Signing portion of eClosing to give users the ability to specify the sender of eClose packages, add customized information to the email sent to a specific recipient, and get notified when a package has or has not been received or viewed by the borrower. These are all options currently available in all other document workflows in Encompass and now eClosing has the same options.
In previous versions of Encompass, the Approve for Signing options were provided in a small slide-out panel on the right side of the page where users could select the date to make the package available for signing and set the package expiration date. Now the Approve for Signing options are provided on a full page and more options are now provided.
In addition to the package available for signing and the package expiration date fields, users can select the Sender information, if and when the sender will receive status notifications, and they can modify the email message that is sent to the recipient when the document package is sent.
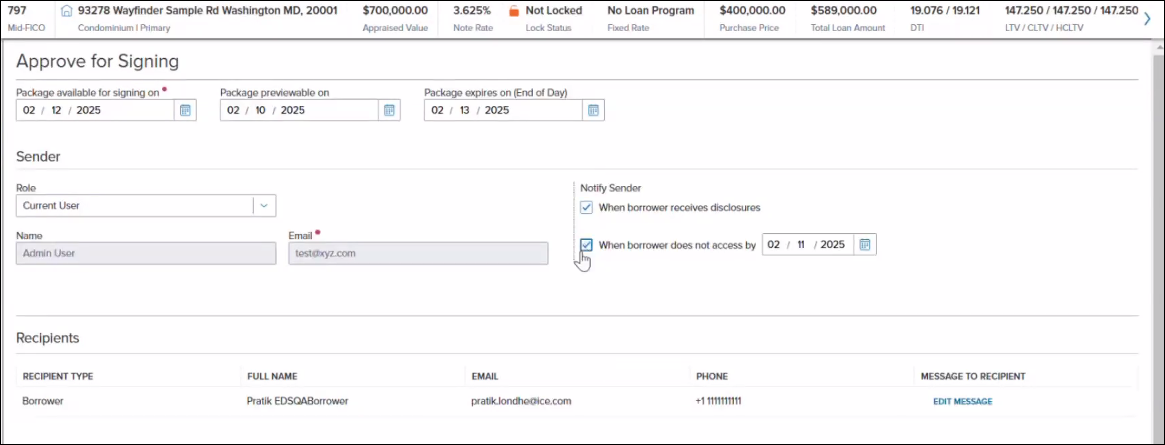
When the package is sent, confirmation that the package was sent successfully (or not) is displayed. When successful, the user is returned to the Manage Closing: Closing Package page.
DOCP-63099
To support the MERS transaction types introduced to streamline updating the Secured and Delegatee for Transfer parties, the Encompass eVault has been updated with new eNote Transfer Transaction types. When executing a transfer in the eFolder, the needed data entry selections to accommodate these new transfer transaction types are now available as well.
![]()
The new transfer types added to the Transfer Action Type dropdown field are Transfer of Control and Location with Secured Party and Transfer of Control with Secured Party. These new transfer types are optional and not required for an eNote transfer.
![]()
In addition, these new transfer transaction options- New Secured Party Delegatee Transfer Name and New Delegatee for Transfer Name- are now available to select for the following Transfer Action Types:
-
Transfer of Control, Transfer of Control and Servicing Agent, Transfer of Control and Location, Transfer of All: New Delegatee for Transfer Name
-
Transfer of Control and Location with Secured Party and Transfer of Control with Secured Party: New Secured Party Delegatee Transfer Name and New Delegatee for Transfer Name
![]()
DOCP-64131
When automated disclosures and automated document requests workflows are being used in Encompass, the default notification template indicated in the Encompass Settings > eFolder Setup > Notification Templates setting is now used for the email notifications sent to borrowers and other recipients. Previously, the generic, system-generated email template was used for the notifications sent for these workflows.
Encompass Settings
When a loan is archived in the Encompass web interface, it can now be tracked in the Tools > Audit Trail in the Encompass desktop interface. The Audit Trail tool can be used to view and export a history of the changes made to this field in the loan file, including who updated the field and when.
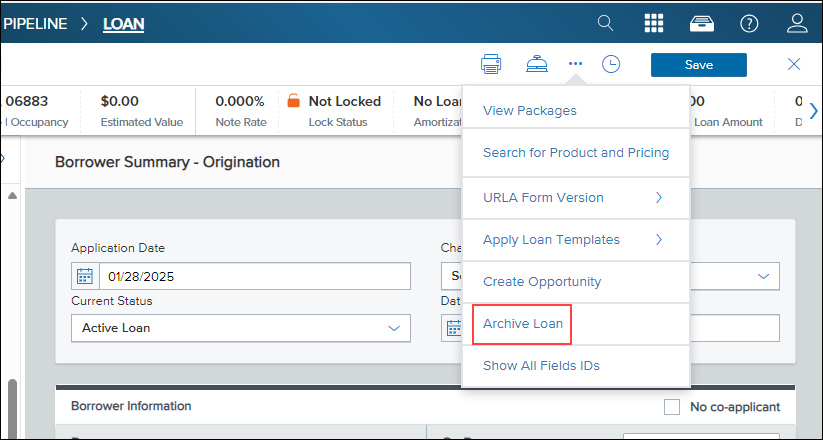
In the Encompass desktop interface, users can select the Archived checkbox (5016) provided in each loan file to archive the loan.
To make the Archived checkbox data available in the Audit Trail tool, add field 5016 to the Selected Fields panel in the Encompass Reporting Database. When adding the field, select the Include in Audit Trail checkbox. Please refer to the Important Notes below for more details.
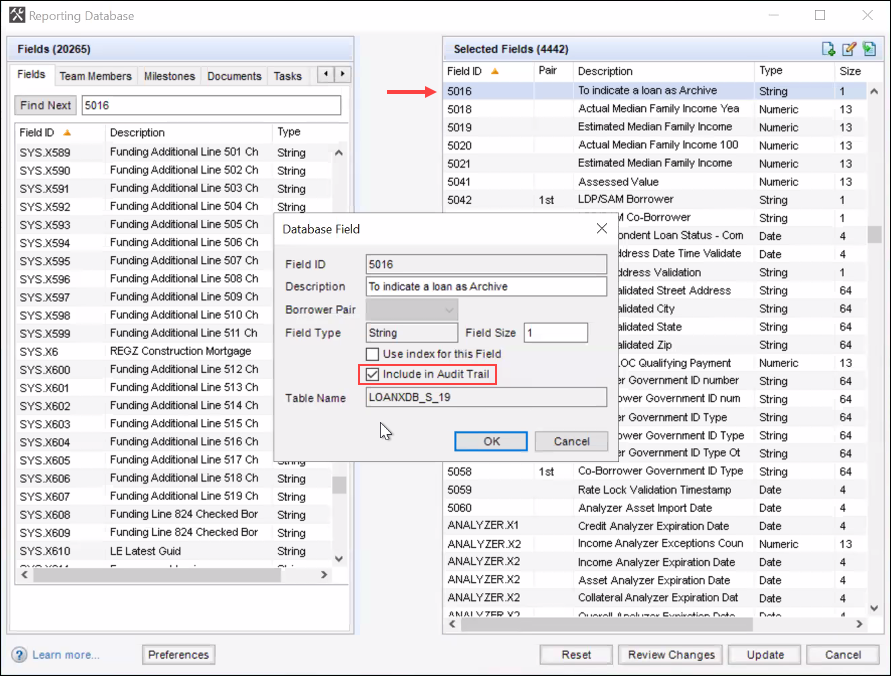
Important Notes
-
If field 5016 has already been in the Selected Fields column in the Encompass Reporting Database and it was set to Include in Audit Trail since Encompass 24.2 or earlier, no action is needed. Starting in Encompass 25.1, up-to-date and accurate information will now be available in the Encompass Pipeline, Reports, and Dashboards and previous Audit Trail data will be retained.
-
If you removed field 5016 from the Encompass Reporting Database prior to Encompass 24.3, you can now add field 5016 to Encompass Reporting Database and set it to Include in Audit Trail in Encompass 25.1 if you want to include this field in the Audit Trail.
-
Field 5016 only needs to be in the Selected Fields column in the Encompass Reporting Database if you want to include it in the Audit Trail. Even if you do not add the field there, the data for field 5016 will still be available in the Encompass Pipeline, Reports, and Dashboards starting in Encompass 25.1.
-
Audit Trail data will only account for manual updates to field 5016. It will exclude updates from the ICE job that automatically sets the field status if the loan has not been modified in the past three years and updates to the field that are logged when moving loans into an Archive folder.
Refer to KA 000115710 - Updates to field 5016 (loan Archive indicator) in 24.3 & 25.1 for more information.
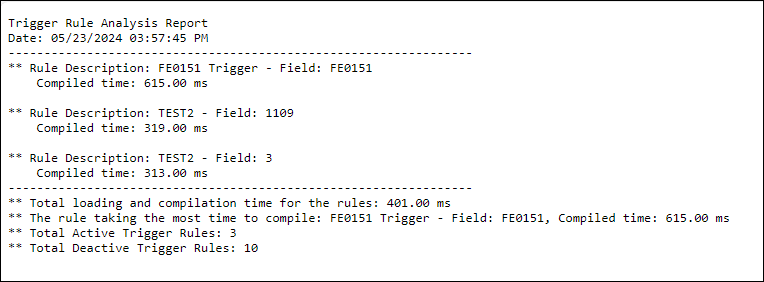
A new analysis tool is now available with the Field Triggers business rule setting in the Encompass desktop interface. Use this tool to evaluate all active field trigger rules. The analysis performs the following actions:
-
Determine that the trigger field used in the active rule(s) is valid.
-
Calculate the time to compile each active rule.
-
Calculate the time to compile all active rules.
-
Identify the rule that takes the most time to compile
Based on the results, you can determine if rules need to be adjusted for impacts on system performance or other issues.
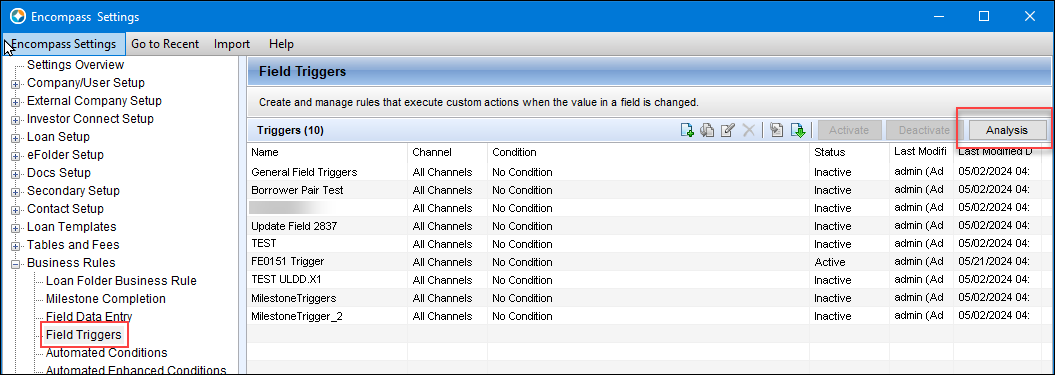
To Run the Analysis:
-
On the menu bar, click Encompass, and then click Settings.
-
On the left panel, click Business Rules, and then click Field Triggers.
-
Click the Analysis button.
-
The system runs the analysis.
-
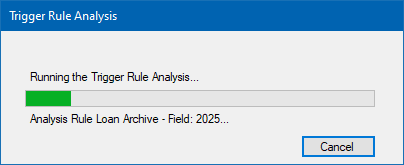
-
Once the analysis is complete, a TriggerRuleAnalysis.txt file is generated with the analysis details and saved to the user Temp folder.
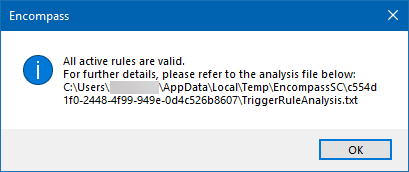
-
Open the file to review the analysis details.
Administrators can now set up Persona Access to Fields and Field Data Entry business rules to control access to the Archived checkbox (5016) in loan files. Previously when administrators attempted to select field 5016 for these business rules they would receive the following message and they would not be able to continue setting up the rule for the field:
The field ID ‘5016’ is a hidden field and cannot be used in this context.
In the Encompass web interface, users do not select the Archived checkbox to archive a loan. Instead, they select Archive Loan from the menu provided at the top of the loan file. Persona Access to Fields and Field Data Entry business rules set up to manage access to the Archived checkbox (5016) will also apply to this Archive Loan option in the menu in the Encompass web interface.
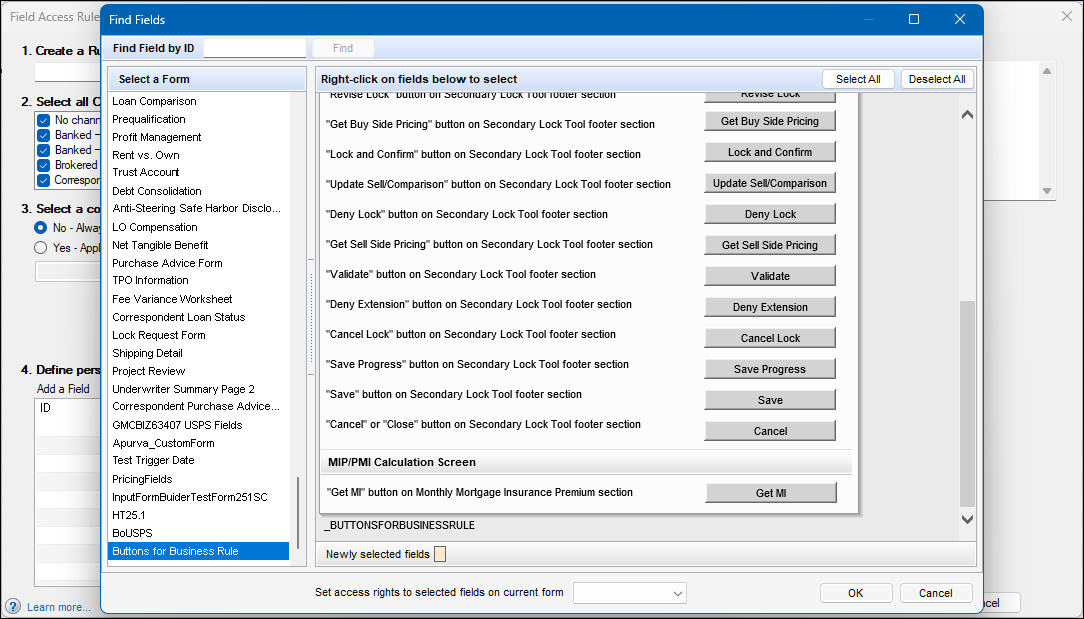
The following buttons have been added to the Buttons for Business Rule form that is provided when searching for fields to use with Persona Access to Fields business rules. These additions were added to assist administrators with managing persona access to buttons on the Secondary Registration screen via Persona Access to Fields business rules.
-
Revise Locks
-
Get Buy Side Pricing
-
Lock and Confirm
-
Update Sell/Comparison
-
Deny Lock
-
Get Sell Side Pricing
-
Validate
-
Deny Extension
-
Cancel Lock
-
Save Progress
-
Save
-
Cancel or Close
To access the Buttons for Business Rule form, open the Encompass Settings > Business Rules > Persona Access to Fields setting in the Encompass desktop interface. Click the New icon to create a new rule or select an existing rule, and then click the Edit icon. In the Define persona's field access for the condition section, click the Find button, and then select the Buttons for Business Rule form in the left panel.
On the Milestone Completion business rules setting in the Encompass desktop interface, the Type ID column on the Required Tasks tab has been changed to Template ID to provide a better description of the unique IDs assigned to templates associated with milestones.
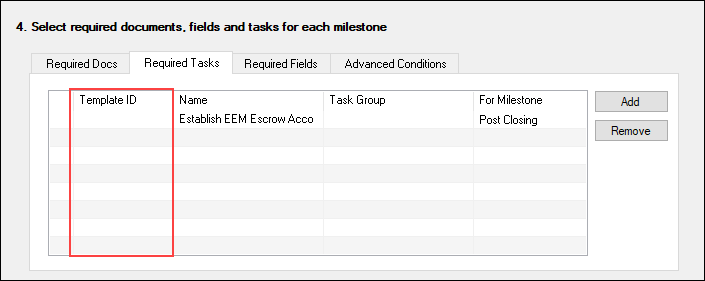
Administrators use the Required Tasks tab in these business rule settings to select milestone tasks or task-based workflow tasks that will be required to be completed before associated milestone can be completed.
On the Milestone Completion business rules setting in the Encompass desktop interface, administrators can use the Required Fields tab to add fields that will be required to be populated before the milestone can be completed. The descriptions of fields 418 and 169 have been updated to specify the correct line on the 1003 where the field is located.
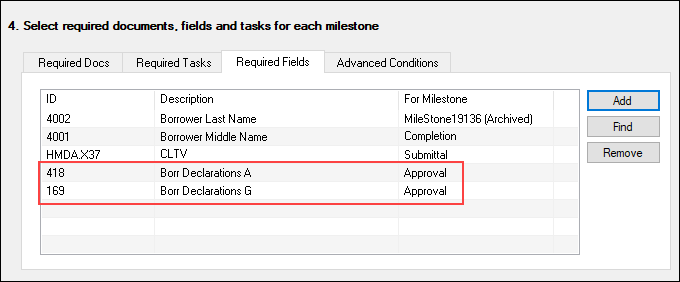
Previously, the field 418 description was Borr Declarations L and field 169 was Borr Declarations A. Those are the 1003 line locations for these fields on the 2009 URLA forms. These new descriptions refer to the 1003 line locations on the 2020 URLA form versions (line A and line G).
Personas
New options have been added to the Company/User Setup > Personas setting in the Encompass desktop interface as described below.
-
On the eFolder tab in the Personas setting, a new Edit Email Messages (Notification Templates) option has been added to the General panel. When this option is selected, the Message to Recipient column and the Edit Message option is displayed for users assigned with the persona when they are sending disclosures, requesting or sending documents, requesting eConsent, or sending closing or pre-closing documents.
-
Note that the Edit Message link is used only with loans utilizing notification templates for borrower notifications. It is not used in loans when HTML email templates are used for these notifications.
-

-
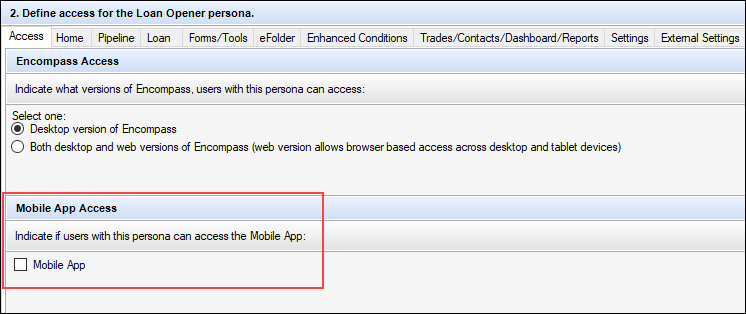
On the Access tab in the Personas setting, a new Mobile App Access section has been added, with a Mobile App option. This new persona option is not currently functional. It is planned for use with a new Encompass Consumer Connect mobile app in a future release.
-
Note that once the mobile app is fully functional, the Both desktop and web versions of Encompass... option and the Mobile App option must both be selected for the persona. If the Desktop version of Encompass option and the Mobile App option are selected, the user with this persona will not be able to access the mobile app.
-
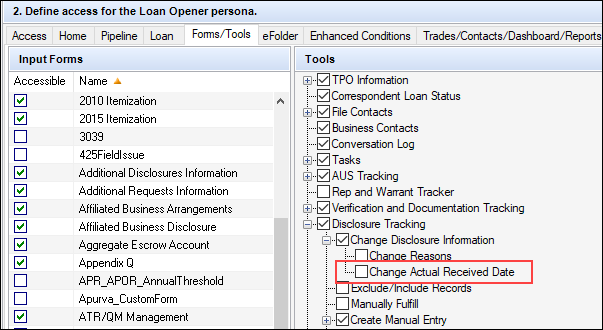
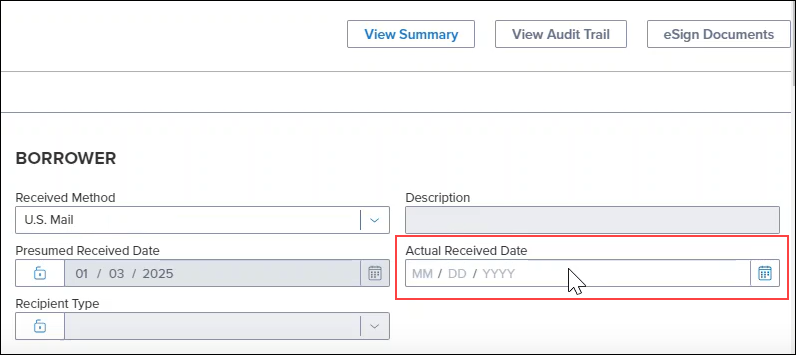
A new option has been added to the Personas setting that administrators can use to manage the permission for users to change the Actual Received Date on the Disclosure Details screen in the Disclosure Tracking tool. Starting in Encompass 25.1, only users with this Personas permission can edit this date field.
To grant permission to the persona, open the Encompass Settings > Company/User Setup > Personas setting in the Encompass desktop interface, click the Forms/Tools tab, and then expand the Disclosure Tracking options in the Tools panel. Expand the Change Disclosure Information options, and then select the Change Actual Received Date option.
User Experience
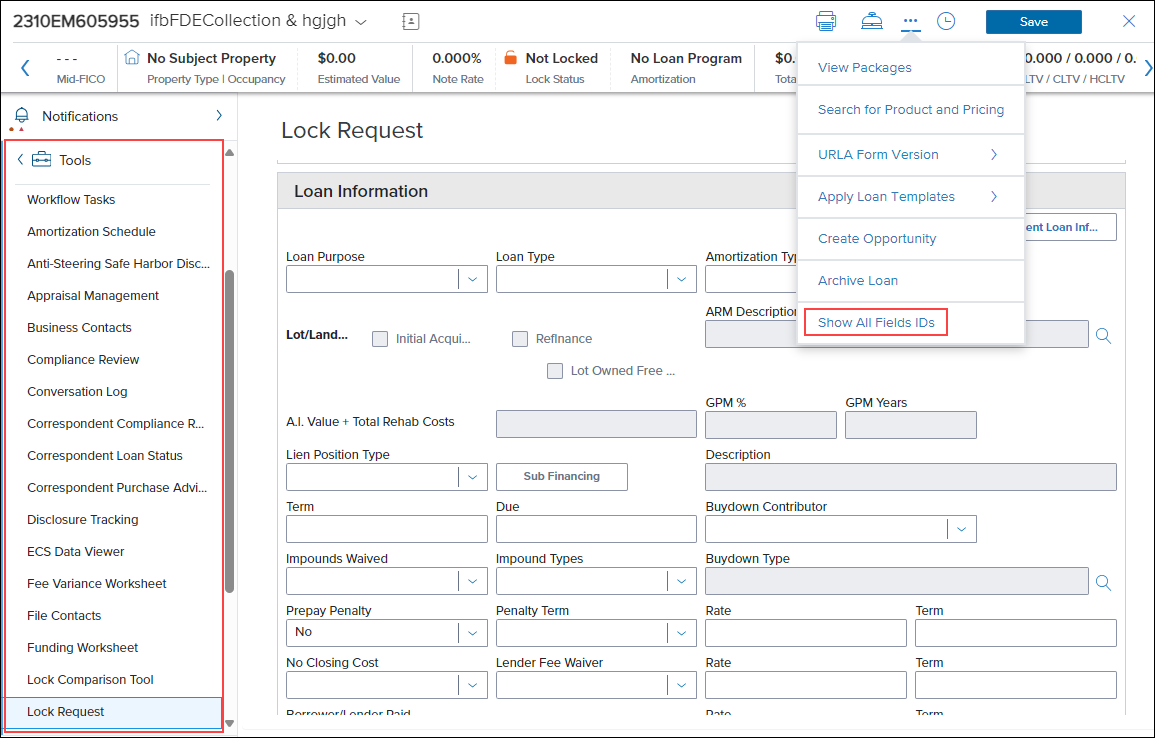
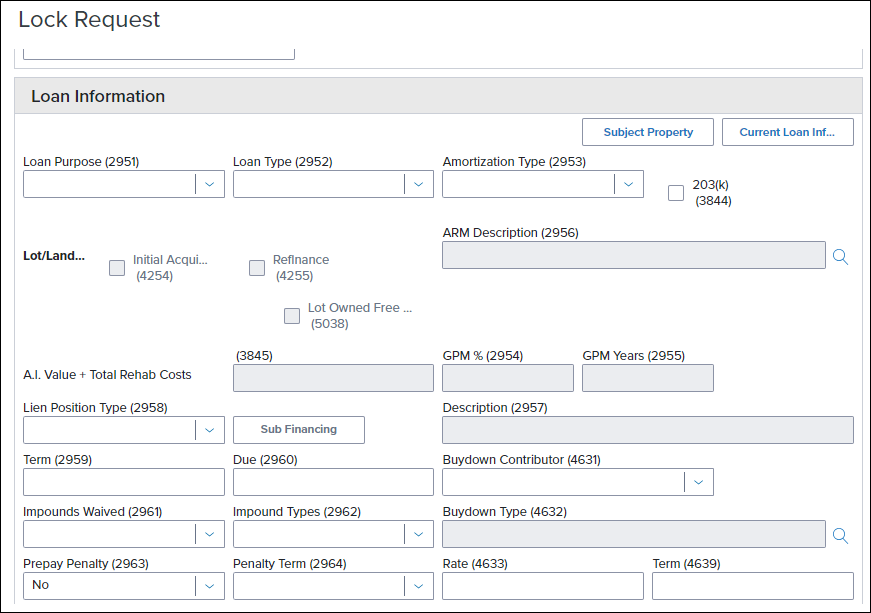
Users can now select the Show All Fields IDs option to display the field IDs for virtual fields on custom input forms. In addition, the Show All Field IDs option is now applicable to the fields on the following additional input tools. Previously the field ID's only displayed on some of the input tools, but not these listed here:
-
Custom forms with virtual fields.
-
Amortization Schedule
-
Anti-Steering Safe Harbor Disclosure
-
Correspondent Loan Status
-
Correspondent Purchase Advice Form
-
ECS Data Viewer
-
Fee Variance Worksheet
-
Lock Request Tool
-
Project Review
-
TPO Information
-
Underwriting Summary
ENCW-110863
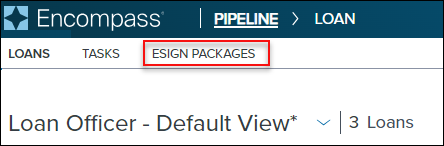
The Packages option, which enables users to view loans that are awaiting a loan officer’s eSignature, has been renamed to eSign Packages and has been relocated from the App launcher to a tab on the Pipeline.
To access eSign Packages:
-
Log into the Encompass web interface.
-
From the Pipeline, select eSign Packages.
Conditions Update
Four new columns have been added to enable users to view more information on the Conditions page. The following columns have been added.
-
Latest Status - Displays the current condition status.
-
Latest Status Date/Time - Displays the date and time that the status was last updated.
-
Latest Status User - Displays the username of the user who last updated the status.
-
Added By - Shows the username of the user who added the condition to the loan.
For information on adding or removing columns from the Conditions list, click here.
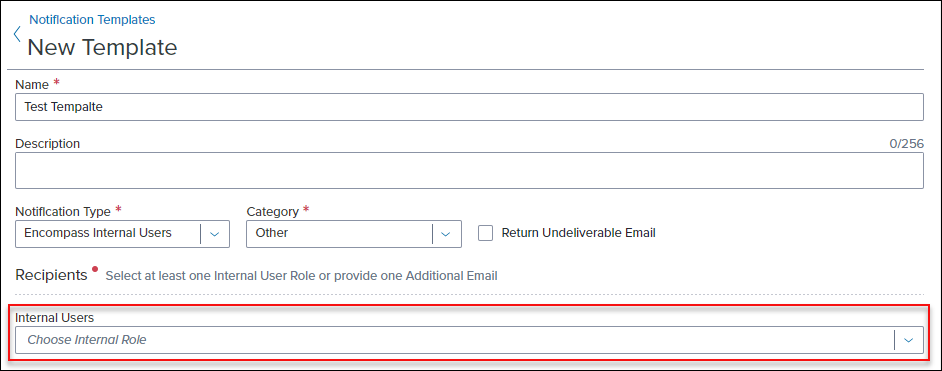
Notification Templates Update
The new TPO Correspondent role has been added to the list of available internal users in Notification Templates. With this update, Administrators can now select the TPO Correspondent role in the Internal Users field for notification templates. This update enables notifications to be sent to the TPO Correspondent role. In order to select this option, the TPO Correspondent role must be configured in the Encompass desktop interface. For more information on configuring the TPO Correspondent role, view the entry here.
Note: A user must be assigned to the TPO Correspondent Role on the loan in the File Contacts Tool and the user must have a valid email address for the notification to be sent successfully. Additionally, the notification template must be invoked by a workflow rule using the Send Notification resulting action.
Scheduler Templates Update
Filtering and sorting support has been added to the Scheduler Templates list. Users can now filter the list of scheduler templates by the following columns:
-
Name
-
Description
-
From
-
Active
-
Created By
-
Created Date
-
Modified By
-
Modified Date
To Sort by Column
-
Select the Sort
 icon in the column header to sort notification templates by that column in ascending order.
 -
Select the Sort
 icon in the column header again to sort in descending order.
To Filter by Column
-
Select the Search
 icon on the column header.
 -
Enter the search criteria in the column header and press enter. The results are filtered by the search criteria.
Additionally, you can change the order of the columns by selecting the Handle in front of the column and dragging it to the desired location. The width of the column can also be adjusted by selecting and holding the column divider and then drag the divider left or right to the desired position. This functionality is not available when using a touch interface. Changes to the order and width are retained for the current session only.
Note: A known issue exists where the column width can sometimes reset during the same session. This issue will be fixed in a future release.
Workflow Management
Workflow Tasks settings pages have been reorganized in the left navigation menu on the Encompass Admin Portal. The Task Global Settings, Task Templates, and Tasks Workspace Templates pages have been consolidated under a new Workflow Tasks menu option.
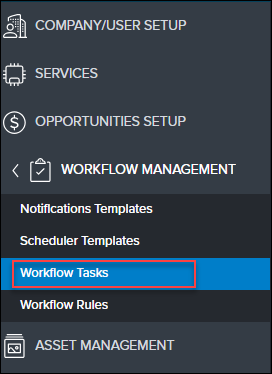
The new Workflow Tasks menu option now consolidates the following pages into one page with a tabbed view:
-
Task Global Settings - Listed as Global Settings
-
Types (New) - See Below
-
Task Workspace Templates - Listed as Workspace Templates
-
Task Templates
The Task Global Settings tab is the default tab displayed when selecting the Workflow Tasks menu option until the administrator completes configuration of the global settings. After the global settings are configured, the user is taken to the Task Templates tab by default.
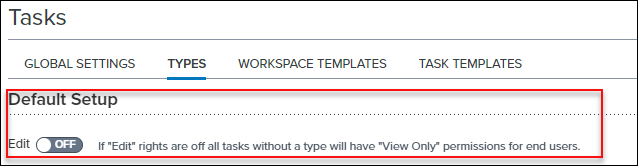
A new Types option has been added to the Workflow Tasks settings page. This new feature enables lenders to control a users' access to other users’ tasks. Administrators can create task types to define access to specific functions for a task. The task type can then be assigned to one or more task template. When the task template is added to loans, the currently logged in user's access to the task is determined by the Type's settings.
The Types tab lists any types that have been configured in the system. Additionally, the Default Setup section controls the default state for tasks that do not have a task type assigned to it.
-
If the Edit option is set to On, all tasks without an assigned task type are editable by users when the task is assigned to a loan.
-
If the Edit option is set to Off, all tasks without an assigned task type are set to “View Only” for users when the task is added to a loan.
To Add a New Task Type:
-
From the Encompass Admin Portal, select Workflow Management from the left navigation menu and then select Workflow Tasks.
-
Select the Types tab.
-
Select New Type.
-
Enter the name for the task type in the Name field.
-
In the Persona Permissions section, select a checkbox to add or remove access to task actions for a persona.
Note: Clearing the View checkbox hides tasks with this task type from the persona.
- Select Save.

Note: Selecting the checkbox in the column header enables or disables the action for all personas.
Task types display in the Types List section after they have been created. You can sort the Types List section by selecting the Type Name, Modified By, or Modified Date column. By default, this list is sorted by the Modified Date column, displaying the most recently modified types at the top of the list. To edit an existing entry, select the Menu and then select Edit
 .
.
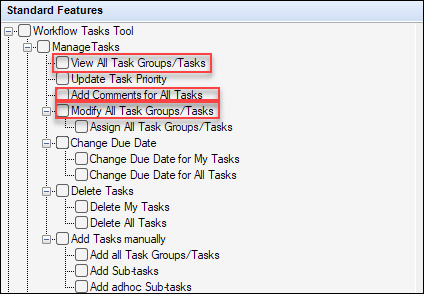
An Important Note About Personas:
Some persona settings configured in the Encompass desktop interface take precedence over the settings configured in the Task Types section. The following persona settings override the Task Types settings:
-
Modify all Task Groups/Tasks persona setting always takes precedence over the Task Types setting.
-
If a persona does not have the View All Task Groups/Tasks persona option enabled, the View All Tasks setting on the Task Types page is ignored.
-
If the persona has the Add Comments for All Tasks option enabled, the Comments setting on the Task Types page is ignored.
Persona Settings:
For more information on configuring Personas, click here.
Once task types have been added, they need to be applied to a task template to take effect.
When the task is added to a loan, the Workflow Tasks tool shows the assigned type and the user's access to the task is defined by the type's settings for their persona(s) if the task is assigned to a different user.
Bulk Task Type Assignment
You can now assign task types to multiple task templates at the same time using the Bulk Task Edit option.
To Assign a Task Type to Multiple Task Templates
-
From the Workflow Tasks page, select Task Templates.
-
Select the Checkbox in front of the task templates you want to edit.
-
Select Edit.
-
On the Bulk Task Edit window, select Task Type in the Task Settings field.
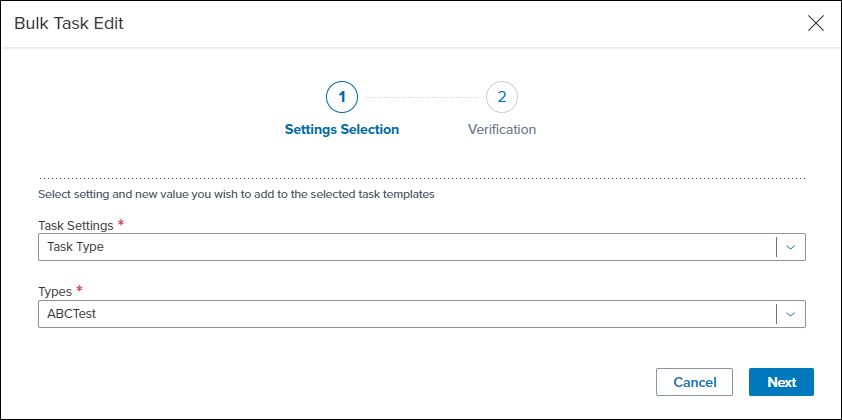
-
Select the task type to apply in the Types field., and then select Next
-
Verify the changes on the Verification view, and then select Apply.
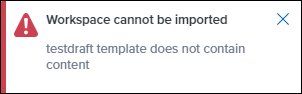
A change has been made to prevent administrators from importing workspace templates where the workspace content object in the XML import file is empty. This update helps to ensure that administrators don't import workspaces that are drafts or are missing data. When this situation occurs, the user receives a notification indicating that the workspace cannot be imported. The notification also indicates the name of the workspace template that has missing content.
Example of Error:
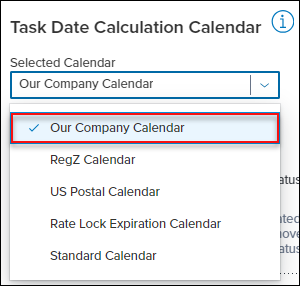
The Business Calendar option in the Selected Calendar field has been updated to Our Company Calendar. This change only updates the label, and selecting this option still indicates that you want to use the compliance calendar defined by your company. This change brings the label in the list in line with the name of the calendar in the Encompass desktop interface settings. This option has also been updated in the Task Date Calculation Calendar Override field in workflow task templates.
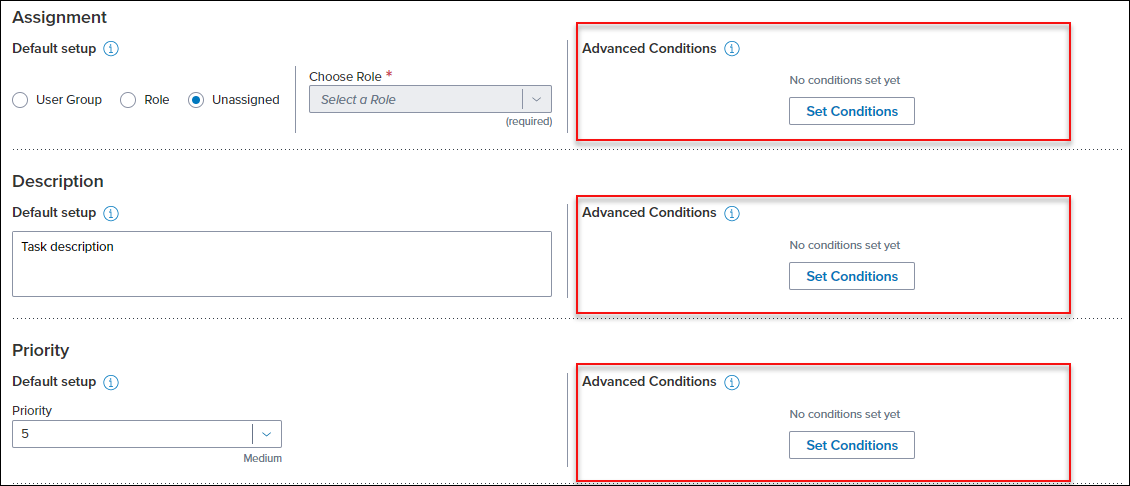
Advanced Conditions options have been added to enable lenders to configure templates to dynamically create Assignment, Description, and Priority values when applying a task template to a loan, based on loan level field values. Accordingly, three new Advanced Conditions sections have been added next to the Assignment, Description, and Priority sections in task templates.
When you select the Set Conditions button, a new Conditions for Assignment slide out panel displays.
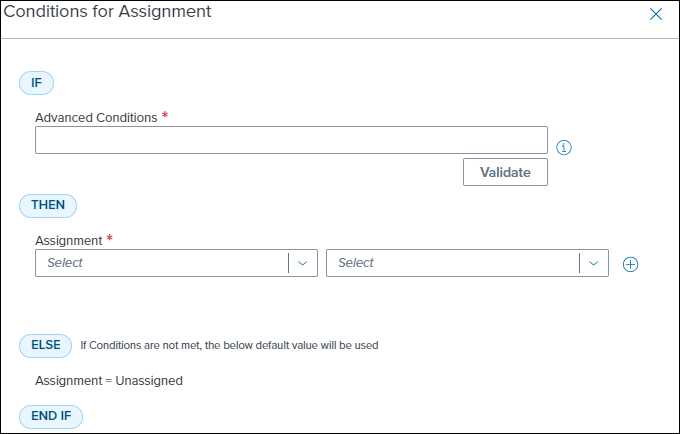
To Add Advanced Conditions:
-
From the Edit Task page, select the Set Conditions button next to the Assignment, Description, or Priority section.
-
On the Conditions page, enter the Advanced Conditions that will be used in the If section.
-
Note: The conditions syntax utilizes the Visual Basic .NET programming language. For information on how this syntax works, see the Advanced Coding for Business Rules guide.
-
-
Select the appropriate options that should be applied when the advanced conditions are met in the Then section.
-
To add another set of If / Then conditions select the + sign. You can select up to 20 total If / Then sets.
-
To remove an added set of If / Then conditions, select the - sign.
-
-
Once you have configured the conditions, select Apply.
A notification that advanced conditions have been set displays.

To edit the conditions again, select Edit . To delete the advanced conditions, select Delete  .
.
Note: When the task template is added to a loan, the first advanced conditionality in the list that is met using the loans data is what is used to create the value. If none of the advanced condition sets are met, the default value for the task template attribute is used.
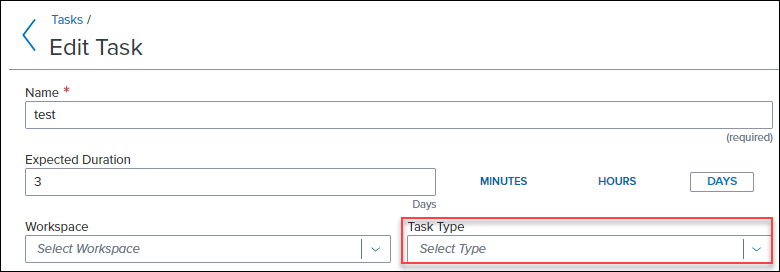
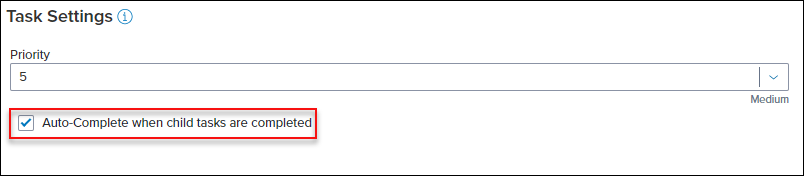
The Auto-Complete when child tasks are completed option has been moved from the Task Settings section to the Sub-Tasks section on the Add/Edit Task page in Task Templates. The label has also been updated to Auto-Complete the task when subtasks are completed.
Old Location and Label:
New Location and Label:

A new Advanced Search feature has been added to enable administrators to find workflow rules that contain a specific type of configuration. A search can be performed for workflow rules that contain a specific task template, condition template, document name, scheduler template, notification template, role, milestone, or field ID.
To Use Advanced Search for Workflow Rules
-
From the Encompass Admin Portal, select Workflow Management from the left navigation menu.
-
Select Workflow Rules.
-
Select the Menu
option on the top right section of the page, and then select Advanced Search. -
On the Advanced Search page, select the category to search by.
-
The second dropdown list is always "=". Enter or select the search criteria in the 3rd dropdown list.
-
Select Submit to apply the search. The Workflow Rules page displays only the rules where the criteria is present in any part of the rule.
-
To clear the search filter, select the X at the end of the search filter that displays at the top of the list.
Once the search has been applied, you can still further sort and filter the results by the available column.
Note: The advanced search results remain unless you clear the search results or navigate away from the Encompass Admin Portal.
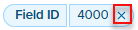
A new search option has been added to make it easier to find specific documents for the File Attached triggering event, Required Document Folders for Conditions, and the Request / Send Documents resulting action for Workflow Rules. When selecting the option to add documents, you can now select the Search icon on the Document Folder or Document Name column header. You can then type in the name of the document / document folder, and the list of documents is filtered as you type.
In the 24.3 Major Release, a change was made which redefined the concept of Task Groups as it relates to Workflow Tasks. As a result, the task group attribute was not carried over when importing. Additionally, the ability to import an existing task over itself was temporarily removed. It was also stated that these would be addressed in a future release. With this update, the following changes have been made:
-
When importing a Task template that has a Task Group attribute, the Task Group attribute is now retained if the Task Group name already exists in the target instance. If the Task Group name does not already exist in the target instance, the task template is imported without the Task Group value.
-
Re-enabled the ability to import an existing task over itself.
Services Updates
The Services Landing Page user interface, which enables users to place orders and view any orders placed on a loan, has been updated to be more in line with other table views in the Encompass web interface. This update provides a more consistent experience, as well as adding additional functionality. The new UI displays a list of all orders on the loan and is sorted by the Last Activity column in descending order. This enables users to see the latest changes to their service orders listed at the top.
To Filter the List by Category:
-
From a loan, select Services and then select All Services.
-
On the Services Landing Page, select the Category dropdown.
-
Select the category that you want to view to filter the list of service orders.
To Sort the Service Order List:
-
Select the column header in the Pipeline to sort loans by column in ascending order.
-
Tap the column header again to sort in descending order.
In addition, the Easy Order option has been relocated to a button to make it easier to access. With this change, users can select the Easy Order button, and then select the category they want to place an easy order for to initiate this process.
To Use the New Easy Order Option:
-
On the Services Landing Page, select Easy Order.

-
Select the category you want to initiate an easy order for. The Easy Order process is initiated.
ASO-18683, ASO-18689
A new Product Status filter option has been added to the top right corner of the Services Management page. This new filter option enables users to filter the list of services by active products or deprecated products. By default, the Product Status filter is set to Active, hiding products that have been deprecated by partners from the main view. To view the deprecated products, you can select the Product Status filter and then select Deprecated.

A new Use Stacking Template option has been added to the Partner Documents section of the Add / Edit Easy Order or Automated Order Setup pages. This option enables administrators to select a predefined document stacking template to send to a partner as part of the order. Before this update, the only option was to manually select each document that you wanted to include with orders.
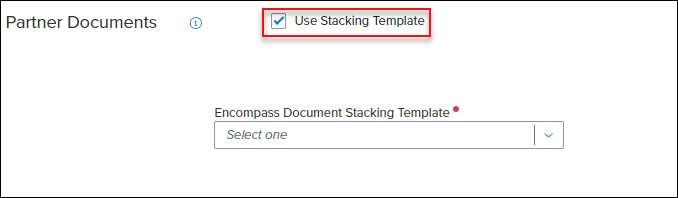
To Select a Stacking Template:
-
From the Add or Edit screen for an Easy Order or Automated Order setup page, navigate to the Partner Documents section.
-
Select Use Stacking Template.
-
In the Encompass Document Stacking Template field, select the stacking template to use for the service setup.
Note: For more information on configuring Document Stacking Templates in the Encompass desktop interface, click here.
An update has been made to the Condition Mapping feature in Services Management to make it easier for Administrators to find the conditions they want to assign. Administrators can now filter available condition templates by the condition type. When an admin selects Condition Template as the mapping type, they can now select a condition type in the Condition Type field. Once a condition type has been selected, the list of conditions available in the Condition Template field is filtered to only display those with the selected condition type.
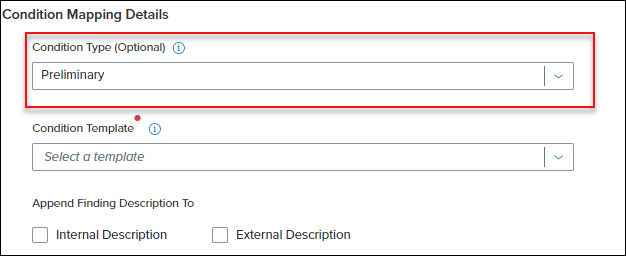
To Filter Condition Mapping by Condition Type:
-
From the Services Management page, select the Menu
on the partner card you want to configure, and select Condition Mapping. -
On the Condition Mapping page, select Condition Template in the Mapping Type section.
-
In the Condition Mapping Details section, select a condition type in the Condition Type (Optional) field.
-
In the Condition Template field, select one of the templates in the filtered list.
For more information on configuring Condition Mapping, click here.
The Services Management page has been updated to include pagination controls. This enables users to navigate through service partner configurations, while providing more control on how many options to display on one page. Pagination controls are located at the bottom of the page, and users are able to select the number of items to display per page, move from one page to the next, or select a specific page to display. By default, the page displays 20 items per page, but users can select to display 20, 40, 60, or 80 items per page.
To Navigate Services Management Services:
-
From the Services Management page, locate the pagination options at the bottom of the page.

-
To change the number of items displayed per page, select the Down Arrow
 and then select a number from the list.
 -
Use the Left Arrow
 or Right Arrow
 to move to the previous or next set of items.
-
To navigate to a specific page, select the Down Arrow
next to the page indicator and then select a page number from the list.
-
A new feature has been added which enables our service partners to remove the requirement to define partner specific options for Easy Order and Automated service setups. If the Partner opts to remove those requirements, the Easy Order Options and Automated Options sections are removed from the service setups for that partner.
Below are examples of the options that can be hidden by the partner.
Example of Easy Order Option:

Example of Automated Order Option:

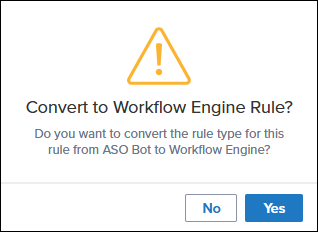
In the 24.2 Major Release, an update was made to disable the creation of ASO Bot workflow rules. With this update, a new option has been added to easily convert ASO Bot rules to a Workflow Engine rule. This option displays when an administrator edits an existing ASO Bot rule. To convert the rule, select Yes. To keep the rule as an ASO Bot rule, select No.
The “Run any matched orders” option has been removed from Mortgage Insurance service setups. When the "Run any matched orders" option is enabled on a service setup, all service orders that meet the criteria are placed. This option is being removed from the MI category to prevent multiple orders from being placed on a loan.
An update has been made to the Add Entities window to enable administrators to select more than 200 users at a time. This window is used to add authorized users for multiple features, such as adding / editing service management setups, adding / editing credentials, and the Vendor Allocation feature. Previously, administrators could only add up to 200 users at a time.

MI Center
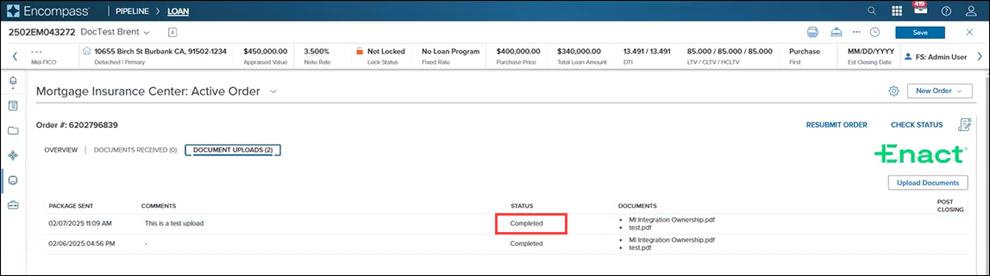
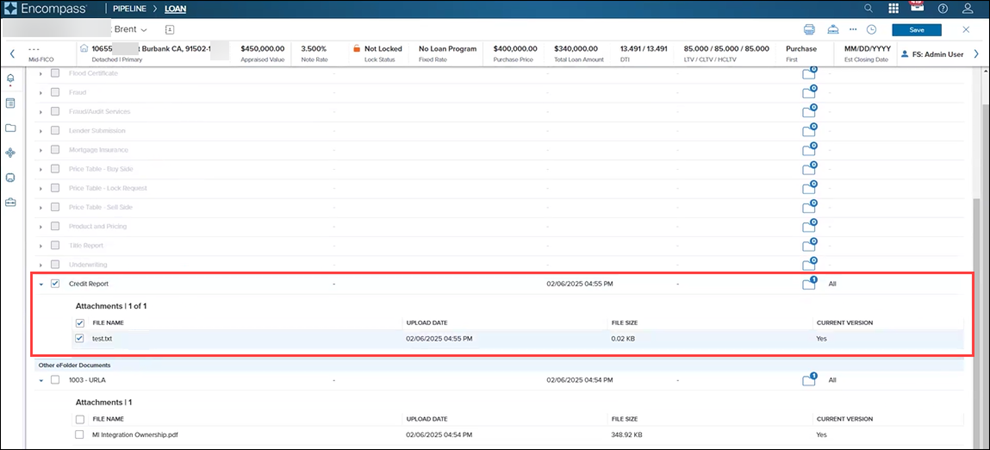
A new From eFolder button has been added to the Upload Documents page enabling you to add documents, saved in the eFolder, to your MI order. New workflow supporting document upload using the From eFolder button is also being introduced with this release.
Document Uploads are supported for Non-Delegated and Contract Underwriting order types only. For more information, see the Document Uploads section in MI (Mortgage Insurance) Center in Encompass.
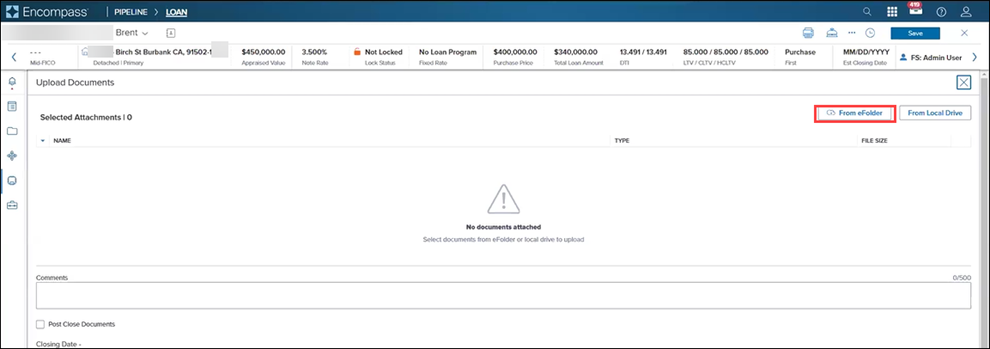
To Upload eFolder Documents
-
Go to the MI Center (open the loan for which you want to place your MI order, and from the Services menu, click MI Center).
-
Go to the MI order to which you want to add documents from the eFolder.
-
Click the DOCUMENT UPLOADS tab and then click the Upload Documents button.
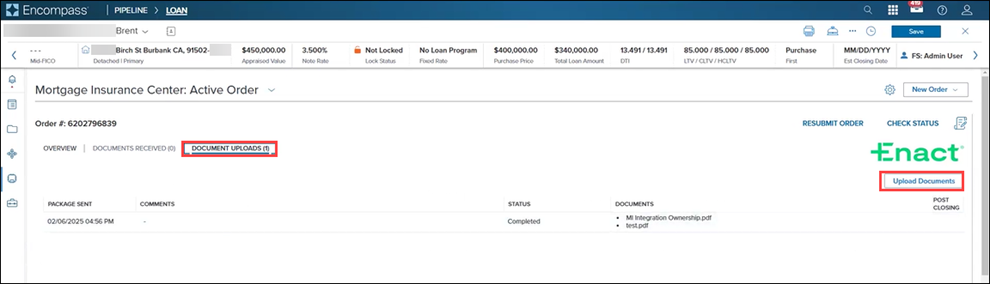
-
In the Upload Documents page, click the From eFolder button.
-
In the Select from eFolder page, select checkboxes corresponding to the docs you want to upload, and click the Continue button.
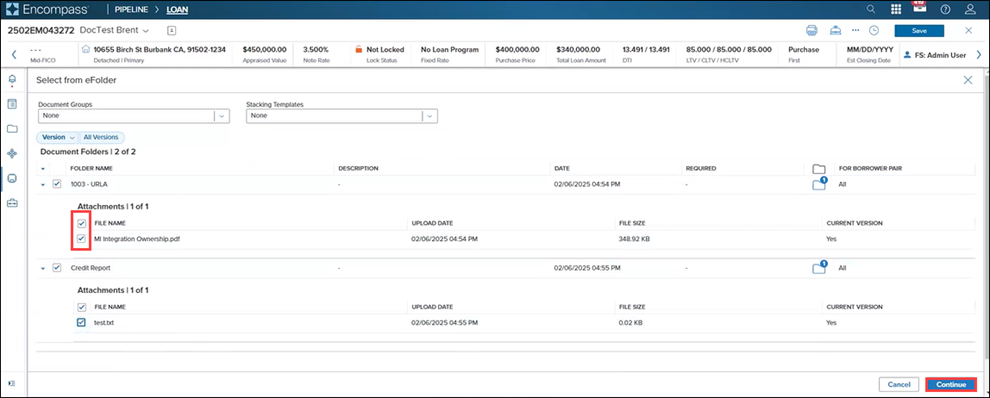
-
In the Upload Documents page, optionally enter additional information in the Comments section, and click the Upload button.
-
Wait for the upload to process.
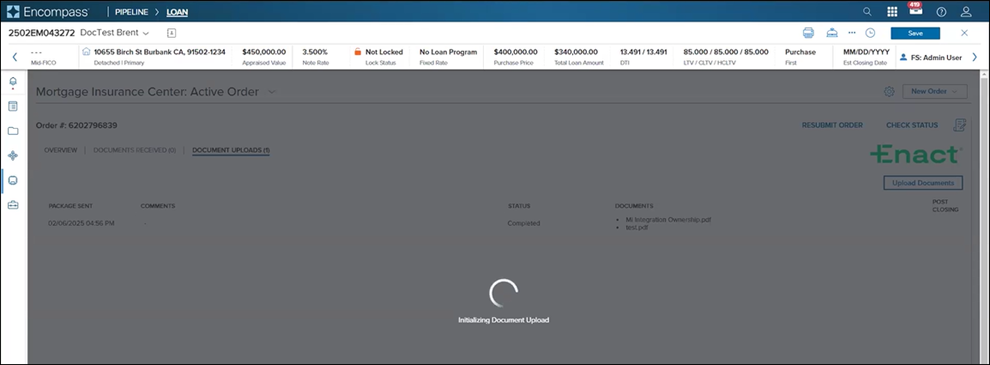
-
When the upload completes, a Success message displays and the STATUS displays as In Progress.
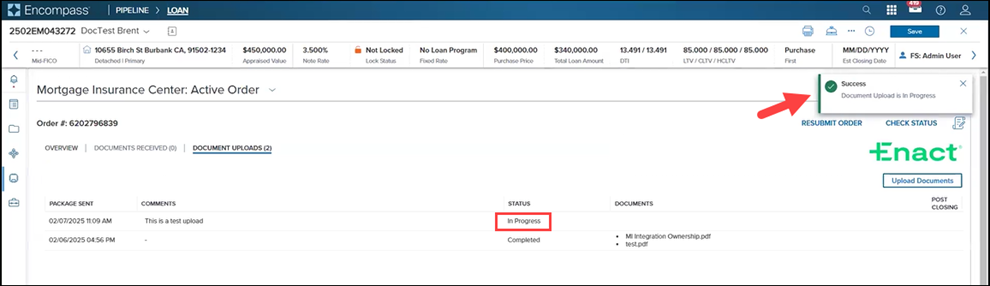
-
You can navigate away from the MIC, access it again, click the DOCUMENT UPLOADS tab to verify that STATUS now displays as Completed.
Additional Updates to/Information on this Feature
-
Ability to expand and collapse all panels:
-
Click the arrow next to FOLDER NAME to expand…
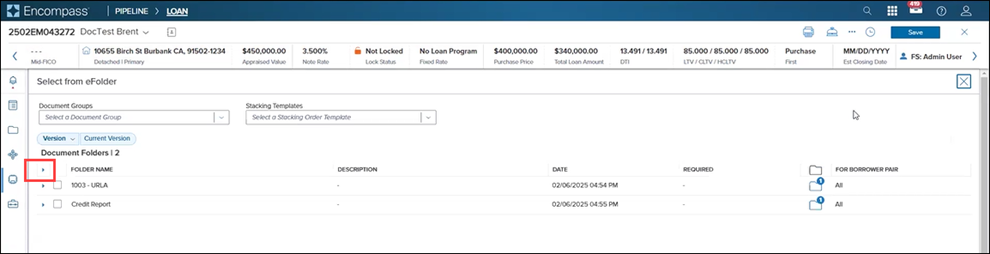
-
And view all the panels
-
-
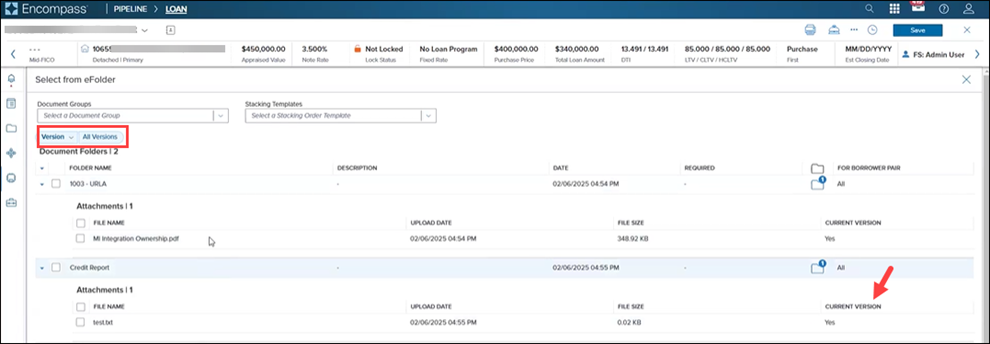
Current Version/All Versions: By default, the latest version of eFolder docs are displayed.
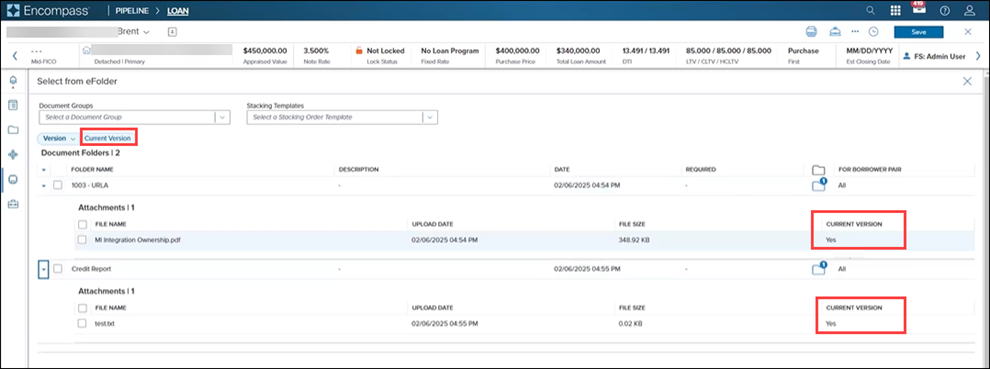
-
Click the Version drop-down menu and click All Versions.
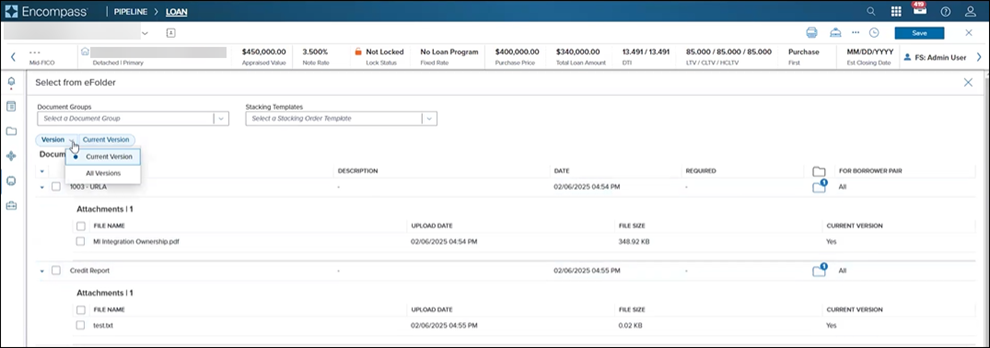
-
If older versions of documents exist in the eFolder, CURRENT VERSION value displays No.
-
-
Stacking Templates: Use this drop-down menu to select and upload eFolder documents from predefined Stacking Templates. When you select a stacking template, the Document Folders panel displays in two sections:
-
Stacking Template Documents: <Stacking Template Name>: Top panel displays stacking template documents. If these documents are available in the eFolder, checkboxes corresponding to the documents are activated and available for selection.
-
-
Document Groups: Use this dropdown menu to select and upload eFolder documents from predefined Document Groups.
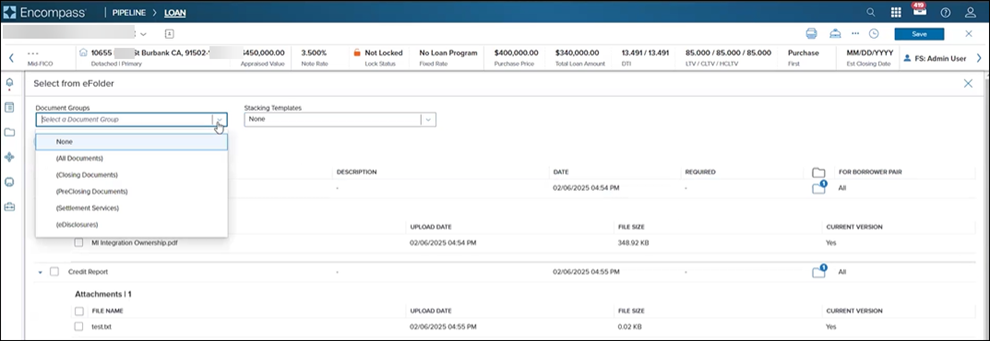
-
Document Group: < Document Group Name>: Top panel displays document group documents.
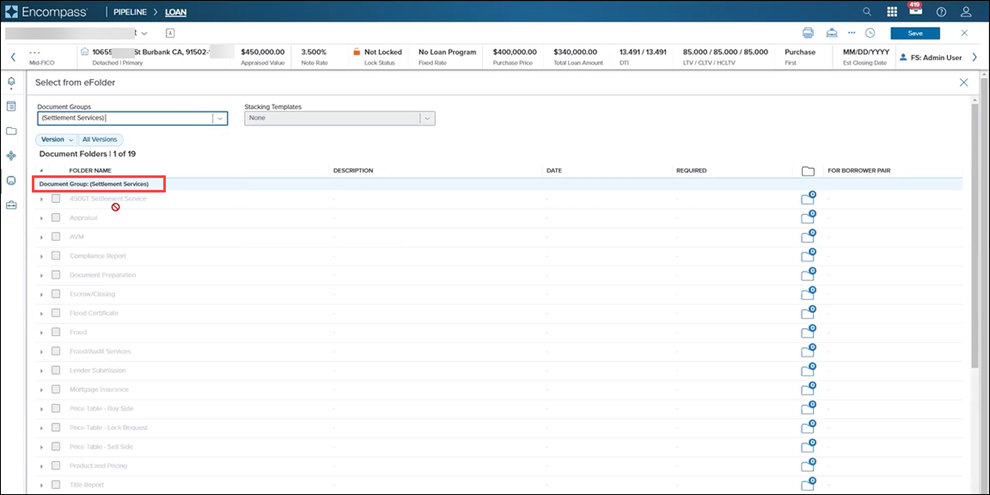
-
If these documents are available in the eFolder, checkboxes corresponding to the documents are activated and available for selection.
-
-
Other eFolder Documents: Lower panel displays non-document group files in the eFolder.
-
Other eFolder Documents: Lower panel displays non-stacking template documents in the eFolder.
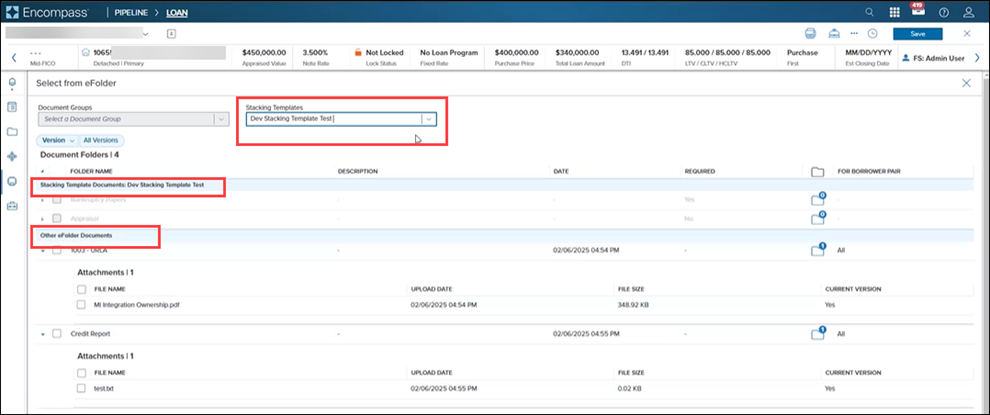
-
-
Document Groups and Stacking Templates: These are exclusive - you cannot filter by both. If you filter by Stacking Template, Document Groups are deactivated/disabled, and vice versa.
Updates for ICE PPE
ICE PPE Float Option
The following additions have been made to Settings to support the new ICE PPE Float option.
-
On The Options page, a new Float (ICE PPE Only) option has been added to the Options page under Settings.
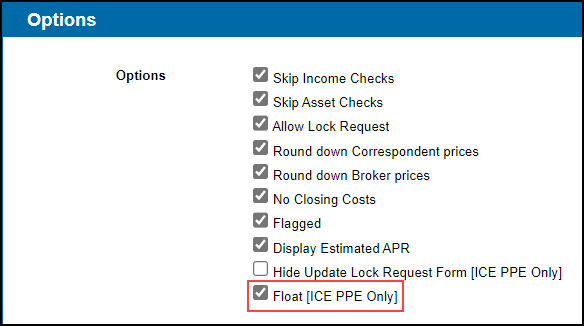
-
When enabled, the Float button will be displayed next to the Request Lock button on the Summary page.
This Float feature does update fees in the 2015 Itemization in Encompass. We encourage you to thoroughly test this feature and adjust, if needed, any of your current Encompass business rules before enabling this feature.
-
The Update Lock Request button is removed.
-
The Float button will only appear when the loan does not have an active lock, expired lock, or canceled lock.
-
On the Update Lock Request Fields page, "not supported on float feature" has been added to the page header.
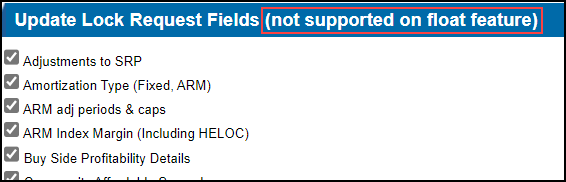
This addition was made to clearly indicate that the Update Lock Request Fields options are not supported when the Float (ICE PPE Only) option is enabled.
When enabled, the Float button will be displayed next to the Request Lock button on the Summary page.

-
When the Float button is selected, program and pricing data will be pushed to the Lock Request Form without locking the loan.
-
The following fields will be pre-populated on the Lock Request Form so the values do not need to be manually entered.
-
Base ARM Margin (field ID 2647)
-
Total ARM Margin Adjustments (field ID 2688)
-
Net ARM Margin Expected (field ID 2689)
-
Base Price (field ID 2101)
-
Total Price Adjustments (field ID 2142)
-
Net Price (field ID 2143)
-
Starting Adjust Price (field ID 3874)
-
Credit to Borrower (field ID NewHud.X1143) - If Commission is positive set
-
Value will be entered as a positive rate in Encompass
-
Fee to Borrower (field ID NewHud.X1150) - If Commission is negative set
-
Value will be entered as a positive rate in Encompass
-
When the Float button is selected, a Price Table - Float Request document link is generated and available under Documents. The link opens a document that captures the rates at the time of the Float.
-
The read-only Float Updated on field (5035) on the Lock Request Form provides users with a way to view the float date and determine if a float rate lock has been requested.

There is a known issue with the Total Loan Amount and Financed Fee when a USDA loan is floated. When a loan is locked, the loan amount and fee are automatically adjusted to reflect the recursive nature of the USDA fee when sent to Encompass. However, when a loan is floated, the adjustment is not applied and the two values sent to Encompass are the same values in ICE PPE.
Assumed Income
Two new Assumed Income columns, one for a checkbox and the other for an amount, have been added to the Programs grid.
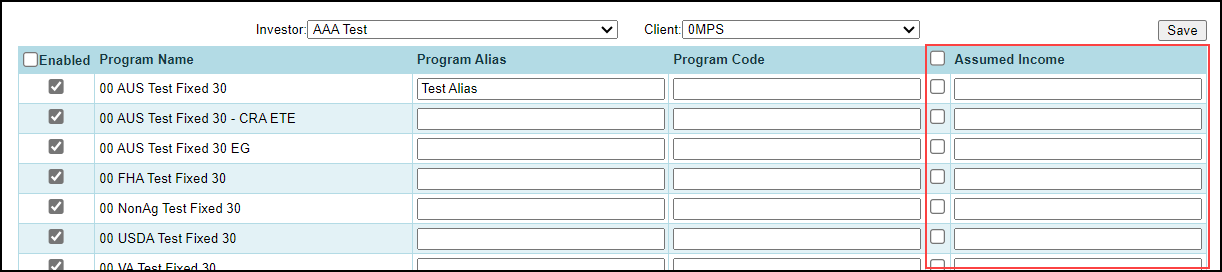
When enabled (checkbox selected), a Client admin can configure default income, ranging from zero to 10,000,000, for specific products/product categories. This will allow Loan Officers to price before receiving actual income values to return a wider array of products.
The AnnualIncome calculation has been updated to use the Assumed Income when the calculated AnnualIncome is zero or null.
disableLock has been added to the rateSelector and loanQualifier/loanPrograms responses. By default, the value will be "False".
The disableLock property is a boolean data type where "True" indicates locking is disabled.
The Update Lock Request Form and the Request Lock buttons on the Lock Summary page are disabled when the disableLock property in the rateSelector response is "True".
When a mouse pointer hovers over the disabled button, a tool tip "Locking this Loan Program has been disabled by your Administrator." is displayed.
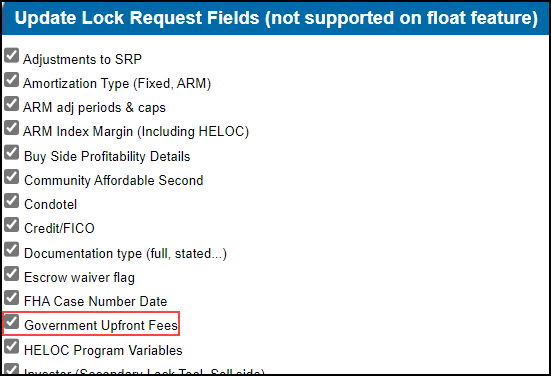
Government Upfront Fees
A new Government Upfront Fees option has been added to the Update Lock Request Fields page under Settings. By default, this option will not be selected for new and existing Clients.
The selection of Product Types on the Options page under Settings has been modified as follows:
-
Any combination of Agency, Non-Agency, and Non-QM
and
-
FHA, VA, or USDA
-
If more than one product is selected, a validation message "Only one of FHA, VA, or USDA can be selected." is displayed.
If a transaction has a combination of FHA, VA, and USDA selected, your user will be redirected back to the Search page to select only one of the Standard Products.
The Search page has been updated to support government upfront fees.
-
The Government Upfront Fee fields are displayed when "FHA", "VA", or "USDA" is selected as the Standard Product.
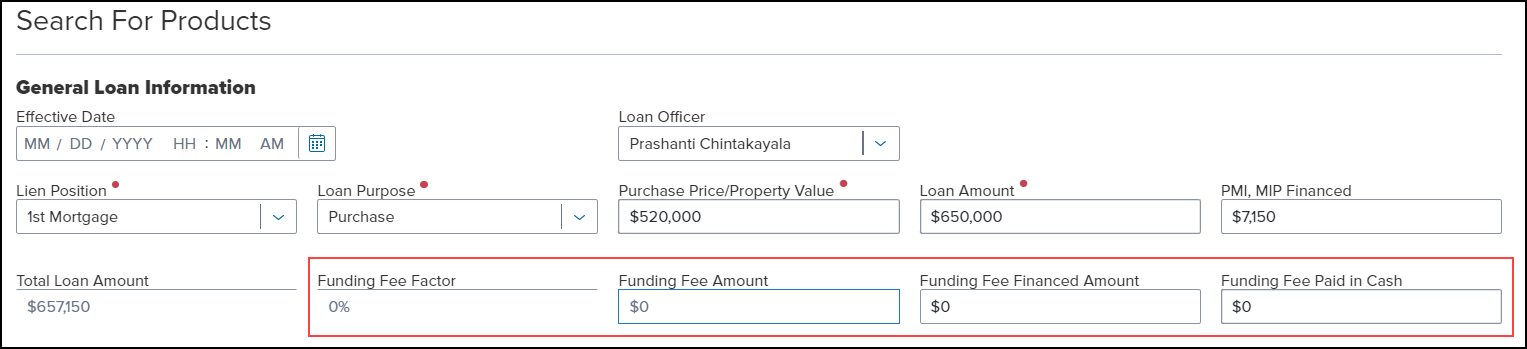
-
The field labels will be determined by the Standard Product selected.
-
If "FHA" is selected, the fields will be labeled "UFMIP Factor", "UFMIP Amount", "UFMIP Financed Amount", and "UFMIP Paid in Cash".
-
If "VA" is selected, the fields will be labeled "Funding Fee Factor", "Funding Fee Amount", "Funding Fee Financed Amount", and "Funding Fee Paid in Cash".
-
If "USDA" is selected, the fields will be labeled "Guarantee Fee Factor", "Guarantee Fee Amount", "Guarantee Fee Financed Amount", and "Guarantee Fee Paid in Cash".
-
The factor and amount fields are read-only while the financed amount and paid in cash fields can be edited.
-
The factor field displays a percent up to two decimal places.
-
The amount field displays a dollar amount.
-
UFMIP Amount - Defaults to (Base Loan Amount * UFMIP Factor)
-
Funding Fee Amount - Equal to (Base Loan Amount * Funding Fee Factor)
-
Guarantee Fee Amount - Equal to (Base Loan Amount * Guarantee Fee Factor)
-
The financed amount field accepts a dollar amount.
-
UFMIP Financed Amount - Defaults to UFMIP Amount
-
Funding Fee Financed Amount - Defaults to Funding Fee Amount
-
Guarantee Fee Financed Amount - Defaults to Guarantee Fee Amount
-
The paid in cash field accepts a dollar amount.
-
UFMIP Paid in Cash Amount - Defaults to zero
-
Funding Fee Paid in Cash Amount - Defaults to zero
-
Guarantee Fee Paid in Cash Amount - Defaults to zero
-
The financed amount and paid in cash fields are editable and will display a validation message "The sum of Financed and Paid in Cash must equal the total upfront fee." if the sum does not equal the total upfront fee.
-
The financed amount will be included in the Total Loan Amount calculation.
The following APIs have been modified as follows:
-
The loanQualifier REST API has been modified to save the "Is this the first use of the VA loan program" (field ID VASUMM.X49) field to the loan table.
-
The Rates Partner Service API has been modified to accept VASUMM.X49 (if required).
The Government Upfront Fee fields have been added to the ICE PPE integration transaction response.
For FHA/VA loans, the following fields have been added to the ICE PPE integration transaction response.
-
Field 1826
-
Field 1760
-
Field 1760
-
Field 1107 (auto calculated field)
-
Field 1045 (auto calculated field)
For USDA loans, the following fields have been added to the ICE PPE integration transaction response.
-
Field 3560
-
Field 3566 (Entire or Portion of the guarantee fee will be financed)
-
If fee financed amount and fee amount are equal, then field 3566's value is "FinancingAll". Otherwise the value is "FinancingPortion".
-
Field 3563
-
Field 1045 (auto calculated field)
In addition, the fee fields have been added to the rateSelector response.
These fields are only returned when the "Government Upfront Fees" option is selected on the ICE PPE Update Lock Request Fields page under Settings.
Rate Alerts
A Rate Alert button has been added to the bottom of the Summary page and a Rate Alert icon has been added to the top right corner of the Summary page.
Rate Alert Button

Rate Alert Icon

Selecting either the Rate Alert button or icon enables you to create an alert.
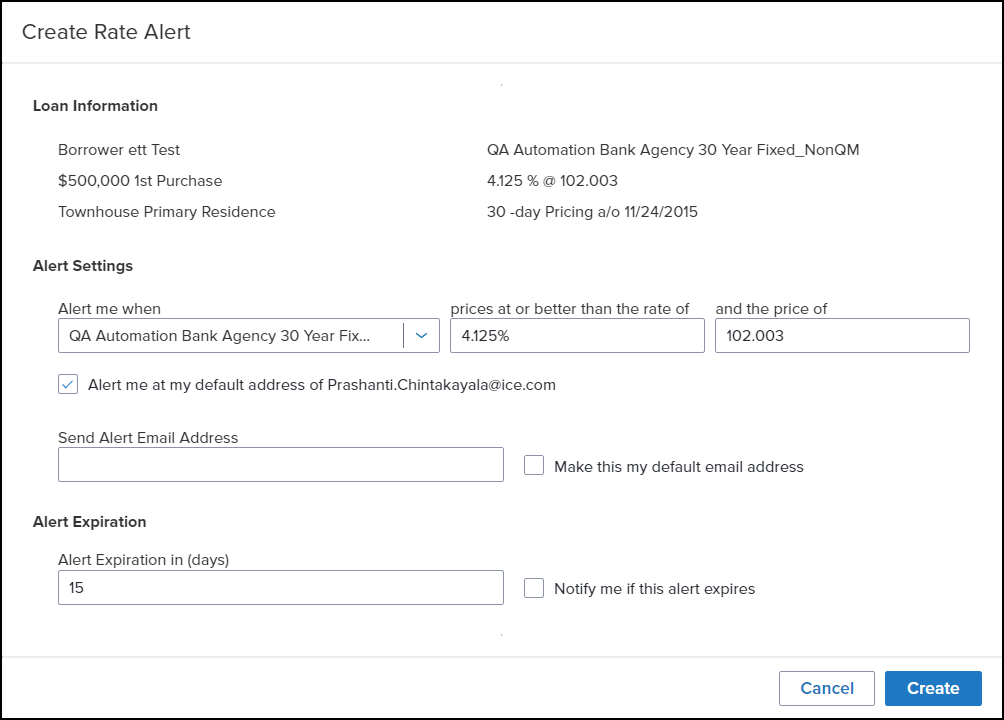
To Create an Alert:
-
From the Alert me when dropdown list, select either the current program or "any similar program".
-
In the prices at or better than the rate of field, either leave the rate as is or enter a different rate.
-
In the and the price of field, either leave the price as is or enter a different price.
-
If the default email address displayed is where you want the alert sent, leave the checkbox selected.
-
If you want the alert to be sent to a different email address, enter it in the Send Alert Email Address.
-
If you want this email address to be your default, select the Make this my default email address checkbox.
-
In the Alert Expiration in (days) field, enter the number of days you want the alert to be active.
-
If you want to be notified when the alert expires, select the Notify me if this alert expires checkbox.
-
Select Create.
Get Buy Side Price Analyzer Updates
When all the pricing displayed on the Get Buy Side Price Analyzer slide in panel is identical, the Worst Case ( ) icon is no longer displayed.
EPPS-74194
The snapshots on the Get Buy Side Price Analyzer slide in panel now display the actual Request Type.
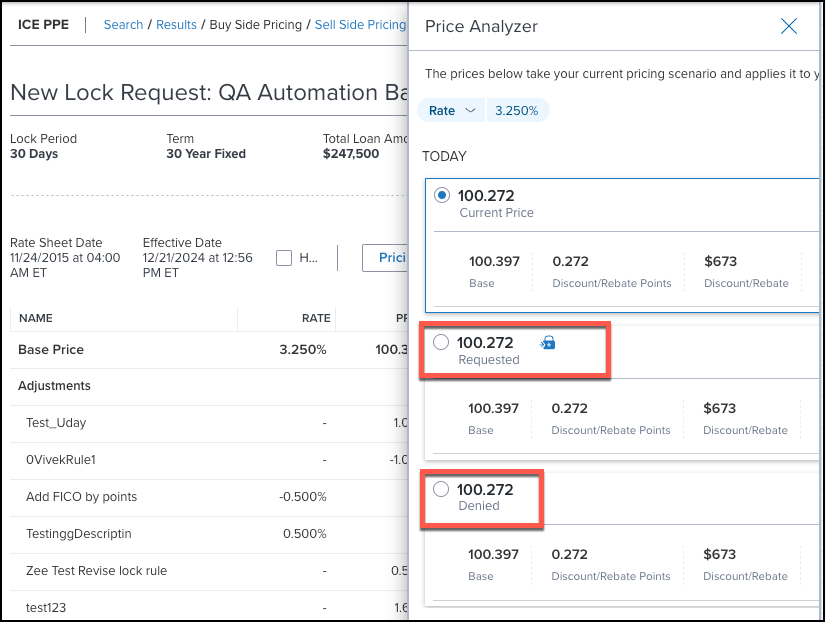
EPPS-74200
Manual Adjustments
The following updates have been made to the Buy Side Pricing page.
-
The "Custom Price Adjustments" section has been renamed to "Custom Adjustments".

-
The "Custom Price Adjustments" slide in panel has been renamed to "Custom Adjustments" and a new Rate field has been added.
-
Either the Rate or Price field must be entered.
-
The rate adjustments will be displayed on the Summary page.
The new Custom Adjustment Rate field has been added to the ICE PPE API.
Additional Enhancements
The Lock # of Days in the Update Lock Request Fields modal will no longer be displayed for a new lock (New Value is always blank).
When a required field error is generated for a missing field located in a collapsed section, that section will now be forced open to make the missing field easier to find.
A new Online Help link has been added to the following ICE PPE pages.

-
Search
-
Results
-
Summary
-
Buy Side Pricing
-
Sell Side Pricing
When selected, the ICE PPE help site is opened.
| Next Section: Web Input Form Builder | ||
| Previous Section: New Forms & Features |