Encompass Updates and Enhancements to Features - 22.3 Major Release
This section discusses the updates and enhancements to existing forms, features, services, or settings that are provided in this release.
New Custom Left Navigation Menus
Administrators can now create custom versions of the left navigation menu to display in the loan workspace for loan team members based on loan channel conditions. To accomplish this, administrators create different templates for the navigation menu to apply to the loan, specifying the loan channel(s) in which to display this template and the items to display in the menu. Templates can be configured with one or more loan channels.

Note that the persona access settings set up for forms and tools are still enforced for each loan team member just as in earlier versions of Encompass.
To Manage Left Navigation Settings:
-
Log into the web version of Encompass as an administrator.
-
On the default Admin screen, select Company/User Setup, and then select Loan Left Navigation.
-
The first time you view the Loan Left Navigation page in Encompass 22.3, the Default Template is selected. This template is automatically applied to the loan workspace and applies to all loan channels. You cannot modify any of the options that are configured for this default template
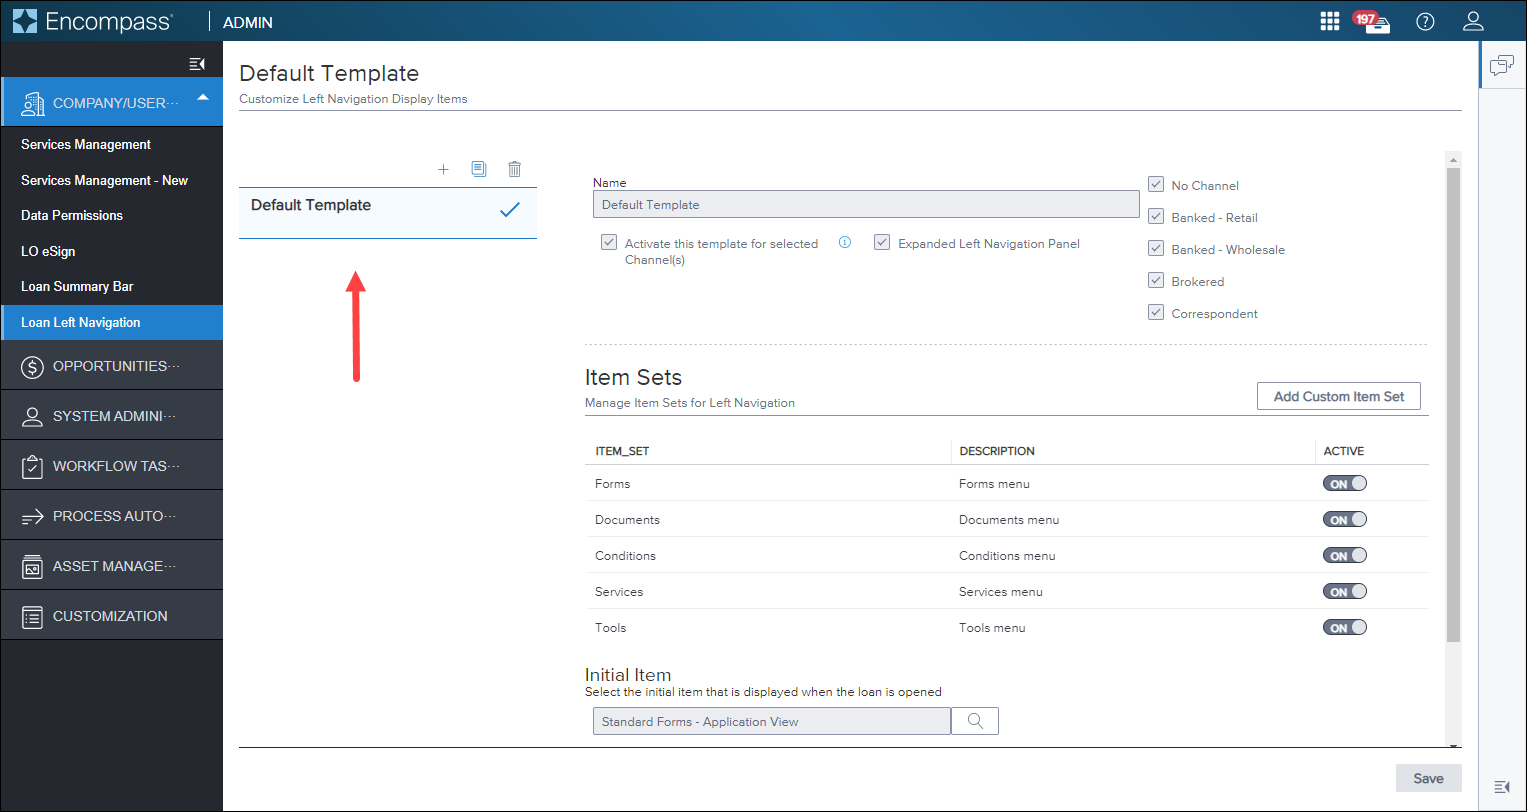
NOTE: The Allow Customization option (toggle) provided in the top-right corner of earlier versions of the Admin screen has been removed. Administrators could use this option to control when they could modify the default left navigation menu. When this toggle was set to “Off”, administrators could not make any changes to it. Since the default left navigation menu cannot be modified in any way in this 22.3 release, the Allow Customization option is no longer required.
-
To create a new custom template to be applied to the loan workspace based on specific conditions that differ from the Default Template conditions, select the Add icon.

-
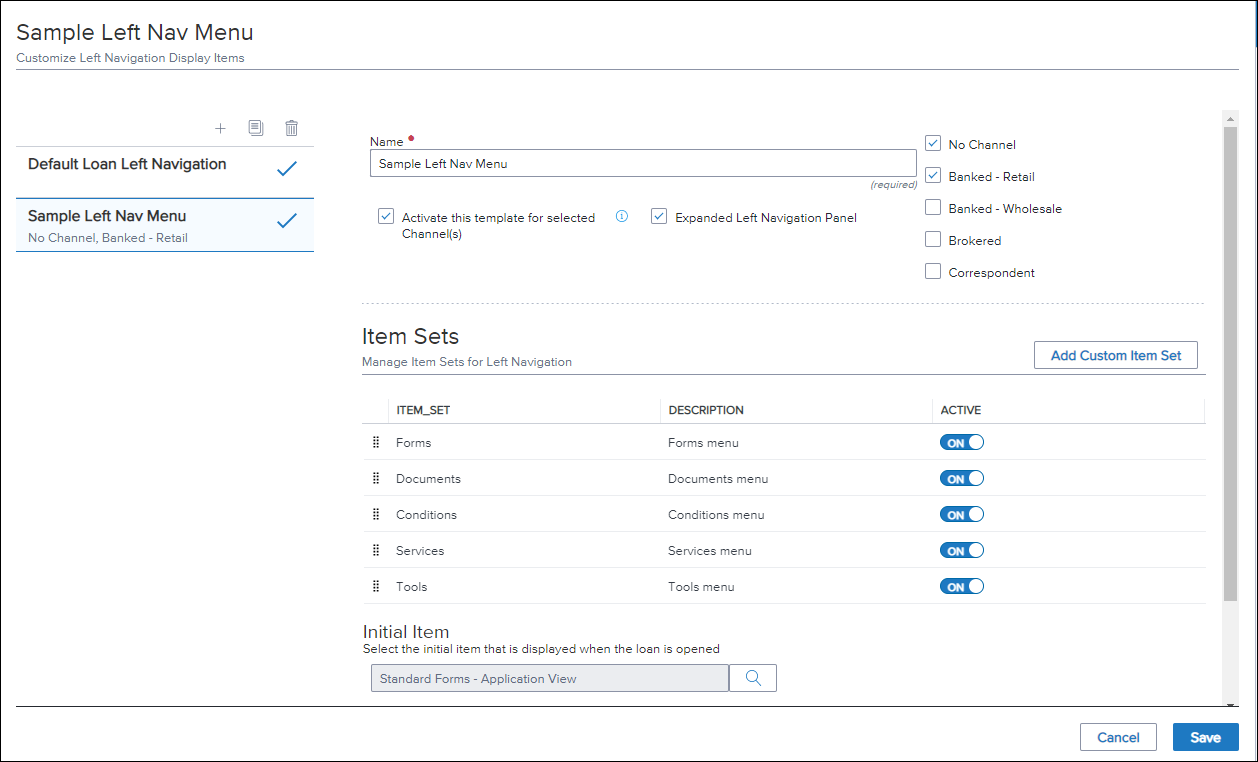
Type a name for the new template (required), and then select one or more loan channels (required) in which this left navigation menu will be displayed in the loan workspace.
-
By default, the Activate this template for selected Channel(s) option is selected. Once saved, this template will be applied to applicable loans the next time a loan team member opens a loan file.
-
If you do not want this template to be used, clear this option. It will not be available to loan team members until it is activated.
-
Use the Expanded Left Navigation Panel check box to determine if the left navigation menu is expanded or collapsed when a loan team member initially opens a loan file. By default, the left navigation menu is set to be expanded. Clear this option to display the collapsed view of the left navigation menu in loan files.
-
Loan team members can use the Expand/Collapse icons to expand and collapse the left navigation menu themselves when working in loan files.
If you created a custom left navigation menu in earlier versions of Encompass and it was activated, that left navigation template will be listed as your first custom template (below the Default Loan Left Navigation template) in the template list in Encompass 22.3.
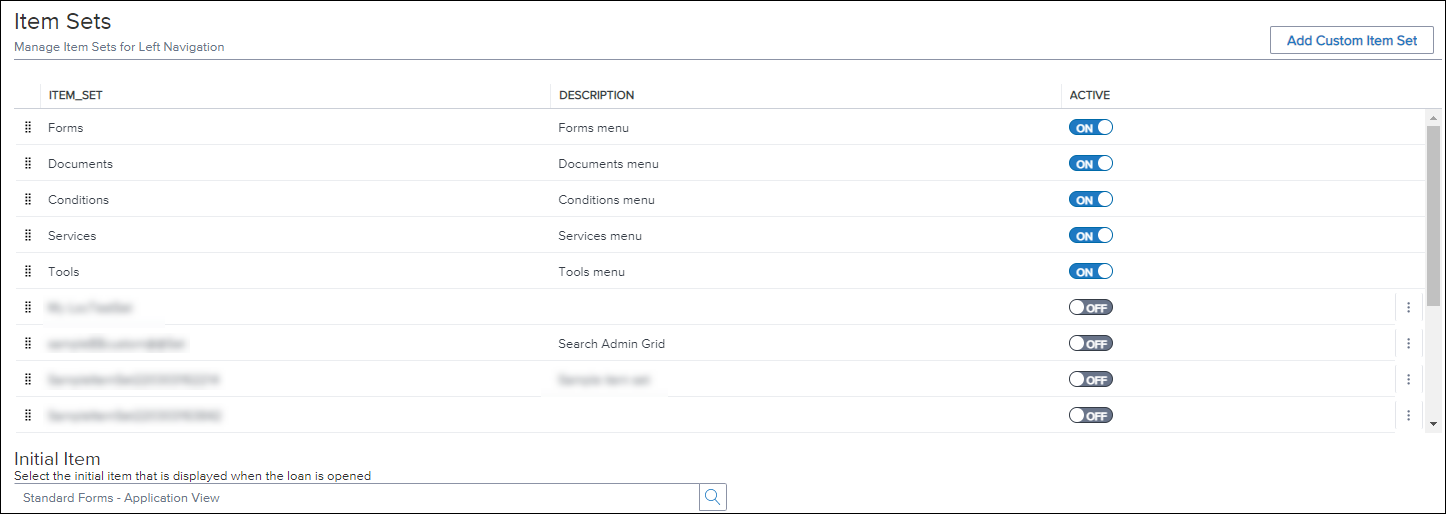
The Item Sets settings determine what is displayed in the left navigation menu, the order in which the item sets are displayed, and the initial item (form or tool) that is displayed when a loan team member opens a loan file.
To Show or Hide Item Sets on the Left Navigation Menu:
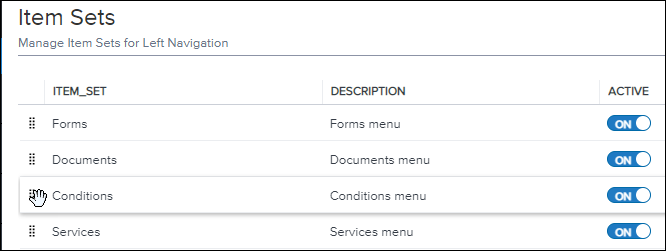
By default, the Forms, Documents, Conditions, Services, and Tools item sets are displayed on the left navigation menu. Use the Active toggle options to hide or show these item sets, as well as any custom item sets you have added, in the left navigation menu.
-
To show an item set on the menu, set the toggle to On.
-
To hide an item set from the menu, set the toggle to Off.
Note that when an item set is On (i.e., displayed on the left navigation menu), the persona access settings set up for forms and tools are still enforced for each loan team member. Only authorized loan team members can access the forms and tools provided in these item sets.
To Manage the Order of Item Sets Listed on the Left Navigation Menu:
To change the display order of the item sets on the left navigation menu, select and drag the item set up or down in the list.
To Add a Custom Item Set:
You can add custom item sets that may contain forms and tools to the left navigation menu.
-
In the top-right of the Item Sets section, select the Add Custom Item Set button.
-
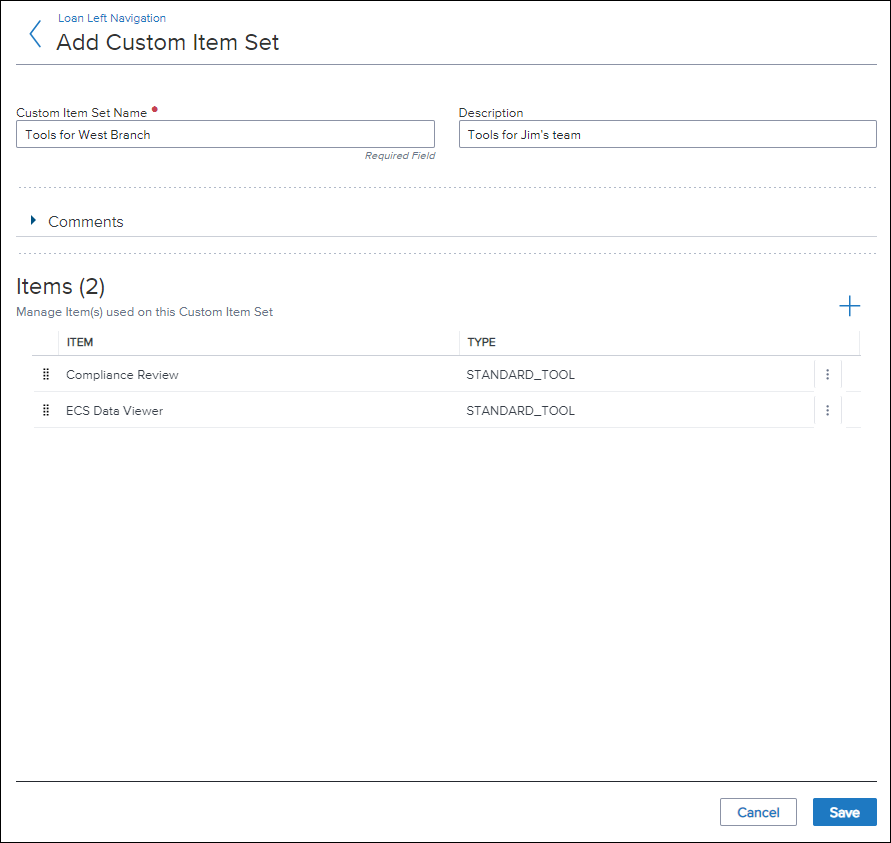
Type a name for the item set (required) and a description (optional).

-
You can add additional details or notes about the item set in the Comments field.
-
Next, select the Add icon in the Items section to add items to the item set.
-
Here you can select the standard and custom forms and tools to add to the item set:
-
Select the down arrow to display the items within that group, and then select the right arrow to add the form or tool to the item set.
-
To return to the main view of the standard and custom forms and tools, select Contents.
-
To remove an item from the Added Contents panel, select the Remove icon (blue X).
-
To remove all items from the Added Contents panel, select Clear All.
-
To change the display order of the items within the item set on the left navigation menu, select and drag the item up or down in the list.
-
When finished, select Done.
-
Select Save to add this item set to the Items Sets list.
-
By default, the new item set is active. Once the administrator saves this custom item set, it will display in the left navigation menu the next time a loan team member logs into Encompass and opens a loan file. If you want to add a new custom set, but you don’t want to display it in the left navigation menu, follow the To Add a Custom Item Set instructions, and then set the Active toggle to Off.
To Manage Custom Item Sets:
-
To edit a custom item set, select the Edit (pencil) icon.
-
To delete a custom item set, select the Delete (trash can) icon.

To Set the Initial Item to Display When a Loan is Opened:
Using the Initial Item setting, you can select a standard or custom form or tool to display when a loan team member opens a loan file.
If you do not select an Initial Item to display, the Application View standard form is displayed when a loan team member opens a loan file.
-
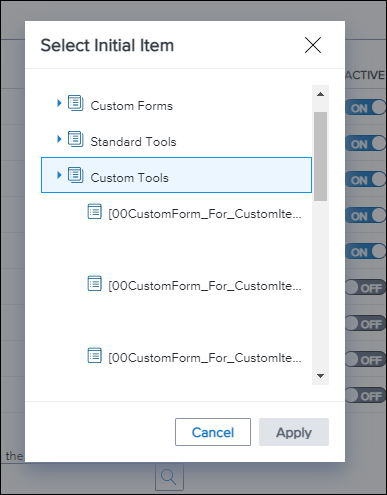
In the Initial Item setting, select the Lookup (magnifying glass) icon.
-
Select a form or tool group to expand its contents, and then select the form or tool to display.
-
Select Apply.
-
All standard and custom forms and tools that are currently stored in the Customization > Custom Forms and the Customization > Custom Tools pages are available to select here. Ensure that the form or tool that you select is Enabled (on the Custom Forms or Custom Tools pages). If the form or tool you select for the initial item is not Enabled, then the Application View standard form is displayed for the loan team member.
-
If a loan team member does not have access to the form or tool (based on their persona permissions), then the Application View standard form is displayed for them.
To Save a Customization Setting:
To save a custom change to the Loan Left Navigation settings, select the Save button located at the bottom of the screen. No custom changes, including changing the Allow Customization toggle from Off to On (or vice versa), are saved until you select this Save button.
Select the Cancel button to remove all un-saved changes from the Loan Left Navigation page.

To Manage Custom Templates
-
To edit a custom template, select the template in the list. The template details are then displayed on the screen,
-
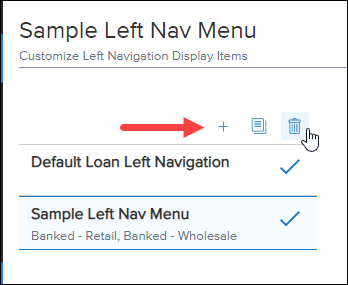
To create a new template, select the select the Add icon .

-
To copy a template, select the template in the list, and then select the Duplicate icon.

-
To delete a custom template, select the Delete icon.

NGENY-30043
Web Version Settings
Administrators and authorized users working in the Encompass Settings can now click the new Encompass - Web Version Settings link for easy access to their company’s administrative settings in the web version of Encompass. After clicking the link, the web version of Encompass - Web Version Settings screen opens in a separate modal window. There, administrators can set up and manage their company's settings for the web version of Encompass. For more information on this update, view the desktop version of Encompass release notes here.
NICE-40576. NICE-41473
Pipeline Updates
The Pipeline has been updated to provide pagination to the list of loans. This update displays a set number of loans per page, rather than displaying one long list of loans. This option enables faster loading of the pipeline data and also provides customization for the experience, such as the number of loans to display per page and navigation controls to move to a specific page.
To Navigate Loans in the Pipeline:
-
From the Pipeline, locate the viewing options at the bottom of the page.
-
By default, the Pipeline lists 50 loans per page. To change the number of loans per page, select the Down Arrow
 button and then select the number of loans to display per page.
 -
Use the Left Arrow
 and Right Arrow
 buttons to move to the previous or next set of records.
-
To select a specific page, select the Down Arrow
 button and then select the page number from the list.
-
ENCW-61703
The Pipeline has been updated to inform users when the pipeline view they are using is filtered by an advanced search filter from the desktop version of Encompass. With this update, users can now see when a Pipeline view is filtered by an advanced search in the desktop version of Encompass, and what those search parameters are.
Example of Pipeline View Filtered by Advanced Search:

Note: For information on how to perform an advanced search in the desktop version of Encompass, click here.
ENCW-61703
When viewing loans on the Pipeline, users now have more control over the information that is displayed there. Users can change the position of a column in the pipeline by selecting the Handle in front of the column name. Users can also add and remove columns from the Pipeline view using the new Customize Columns option.
Note: At this time, changes to the pipeline view are applied for one session and are reverted the next time the user logs in.
To Customize Pipeline Columns :
-
From the Pipeline in the web version of Encompass, select the Menu
 located on the right hand side above the Pipeline columns.
 -
Select Customize Columns.
-
On the Customize Columns window, select the Arrow
 to move a column from the Available section to the Selected section.
-
To remove a column from the Selected section, select the Remove
 icon
icon
-
ENCW-73201
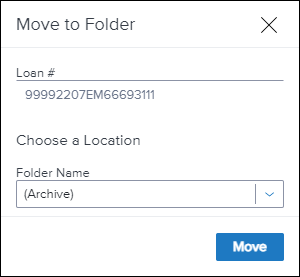
The ability to move a loan from one folder to another has been added to the web version of Encompass. Users can move one loan at a time from the folder they are viewing to another folder they designate. Additionally, users are also able to delete a loan from a folded in the Pipeline. When you delete a loan, it is moved to the (Trash) folder.
Note: The ability to move or delete a loan is controlled by the Persona settings in the desktop version of Encompass.
To Move a Loan:
-
From the Pipeline in the web version of Encompass, select the Menu
 located on to the right of the loan that you want to move.
 -
Select Move
 .
. -
On the Move to Folder window, select the folder to move the loan to from the Folder Name field.
-
Select Move.
To Delete a Loan:
-
From the Pipeline in the web version of Encompass, select the Menu
 located on to the right of the loan that you want to move.
 -
Select Delete
 .
. -
On the confirmation window, select Yes to delete the loan or No to return to the preview screen
ENCW-68847
Form & Tool Enhancements
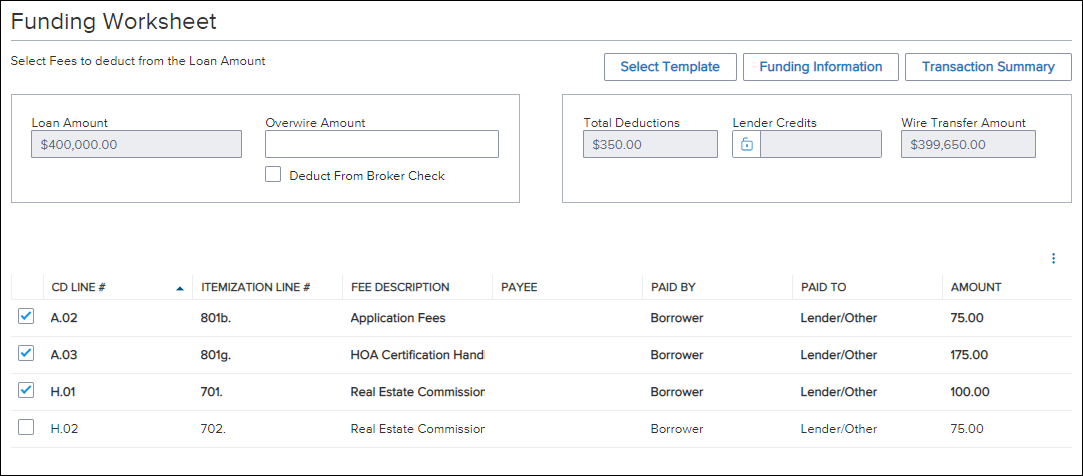
Support for the Funding Worksheet Tool has been added to the web version of Encompass. Use the Funding Worksheet to select a funding template, view funding information, review a transaction summary, and review the Funding Balancing Worksheet. The top of the form displays the calculations used to determine the Wire Transfer Amount. By default, fees are not shown if they have a zero dollar amount.
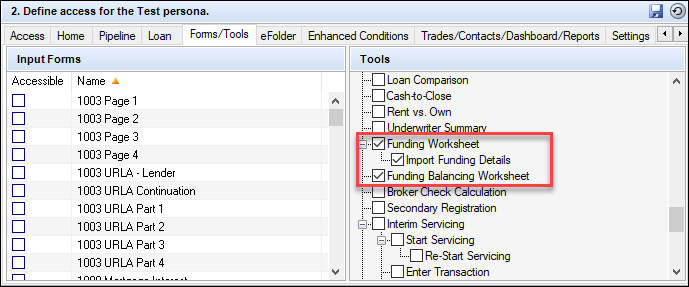
In order for users to view this tool in the web version of Encompass, Administrators must enable access to the Funding Worksheet and Funding Balancing Worksheet on the Forms/Tools tab for the user's persona.
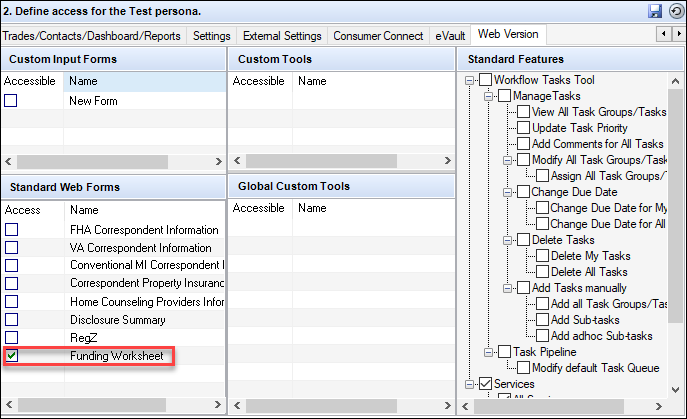
In addition, the Funding Worksheet must also be enabled in the Standard Web Forms section on the Web Version tab for the user's persona.
To Use the Funding Worksheet:
-
From a loan in the web version of Encompass, select Tools and then select Funding Worksheet.
-
To apply a funding template, select Select Template.
-
On the Select Template window, select the funding template to apply to the loan.
-
Select Only apply template fields that contain a value to apply only non-blank fields to the loan. If not selected, all fields in the template (including blanks) are written to the loan.
-
To apply the template, select Select.
-
Select Apply.
-
To view the Funding Information window, select Funding Information.
-
To view the Transaction Summary page, select Transaction Summary.
ENCW-63334
A new Homeownership Education and Housing Counseling section has been added to the Homeownership Education & Housing Counseling form which enables users to enter a separate set of information for homeownership education. Previously, there were only fields to document the housing counseling information for the loan.
To Record Homeownership Education Information:
-
From a loan in the web version of Encompass, select Forms and then select Application View.
-
Select Homeownership Education....
-
After selecting an option for the borrower, select Copy from Borrower to copy the same selection to the co-borrower.
ENCW-76237
Updates have been made to the Average Representative Credit Score (field ID 4752) to resolve an issue that caused an AUS Data Discrepancy Alert to trigger after receiving a Fannie Mae Desktop Underwriting (DU) report for a loan with only one borrower (or for a loan with two borrowers but only one credit score).
Previously, the calculation for the Average Representative Credit Score (field ID 4752), which is always a numeric value, was copied to the Average Median Score (Fannie) (field ID AUS.X199) in the AUS Tracking tool record for the DU results in Encompass. When Fannie Mae DU returned a different value for the Average Median Score (Fannie) field, an alert was triggered. However, for a loan with only one credit score, DU returns a text value of Not Applicable instead of a numeric value for the Average Median Score (Fannie). This discrepancy triggered an alert.
To resolve this issue, the following updates have been made to the Credit Information sections on the Borrower Summary Origination and Borrower Summary Processing input forms:
-
The calculation used to populate the Average Representative Credit Score (field ID 4752) has been removed. This field is now a manual entry field.
-
The value in the Average Representative Credit Score and Average Median Credit Score are blank before a user runs DU.
-
A new Not Applicable check box (field ID 4830) has been added next to the Average Representative Credit Score.
-
The Lock icon for the Average Representative Credit Score also controls the Not Applicable check box. Both fields are locked or unlocked in unison.
-
A user can select the Lock icon to enter an Average Representative Credit Score manually or to select the Not Applicable check box.
-
When the Not Applicable check box is selected, a blank value is populated to the Average Representative Credit Score, the check box takes precedent. The Average Representative Credit Score field will remain blank and will not be populated with a value.
-
When a user runs DU, the value is populated to both the Average Representative Credit Score and the Average Median Credit Score.
-
When DU returns an Average Median Credit Score, the value will not overwrite the Average Representative Credit Score if the Lock icon has been clicked to enable manual entry.
The following table describes the scenarios for populating the fields and triggering alerts.
| DU Run? | AUS.X199 | 4752 Locked? | 4752 | Not Applicable | Alert Triggered? |
|---|---|---|---|---|---|
| No | Blank | No | Blank | Cleared | No |
| No | Blank | Yes | Numeric Value | Cleared | No |
| Yes | Numeric Value | No | Numeric Value - Same as AUS.X199 | Cleared | No |
| Yes | Numeric Value | Yes | Numeric Value - Doesn’t match AUS.X199 | Cleared | Yes |
| Yes | Numeric Value | Yes | Blank | Selected | Yes |
| Yes | Numeric Value | Yes | Blank | Cleared | Yes |
| Yes | Not Applicable | No | Blank | Selected | No |
| Yes | Not Applicable | Yes | Blank | Selected | No |
| Yes | Not Applicable | Yes | Numeric Value | Cleared | Yes |
ENCW-76091
To enable lenders to record unrounded income and rental amounts, the Total Gross Monthly Income and Rent fields (current and former addresses) no longer round the values entered. Additionally, lock icons have been added to the Total Gross Monthly Income fields to enable users to override the calculated values for these fields. The following fields have been updated:
Total Gross Monthly Income - Current Employment:
-
Borrower - Field FE0112
-
Co-Borrower - Field FE0212
Total Gross Monthly Income - Additional Employment:
-
Borrower - Field FE0312
-
Co-Borrower - Field FE0412
Rent Amount - Current Address:
-
Borrower - Field FR0116
-
Co-Borrower - Field FR0216
Rent Amount - Former Address:
-
Borrower - Field FR0316
-
Co-Borrower - Field FR0416
ENCW-75489
Workflow Automation Enhancements
A new Task Updated triggering event has been added to the web version of Encompass. This triggering event enables administrators to configure rules that trigger when the status of a task has changed or when the disposition of the task has changed.
To Select Task Updated for the Triggered Event:
- From the Encompass Admin Portal, select Process Automation.
- Select Workflow Rules, and then select New Rule to create a new rule.
- In the Triggering Event field, select Task Updated.
- Select the task that the event should trigger for.
- In the Task Field Changed field, select Status or Disposition
- If you selected Status for step 5, select a status in the Changed To field to define the status that the task needs to be changed to before the rule is triggered.
- Additional, if you only want to trigger the rule when the task changes from a specific status, select a status from the Changed From field.
- If you selected Disposition for step 5, select a disposition in the Changed To field to define the disposition that the task needs to be changed to before the rule is triggered.
- Additional, if you only want to trigger the rule when the task changes from a specific disposition, select a disposition from the Changed From field.
ENCW-72753
The Task Completed triggering event has been updated to enable administrators to create a rule that triggers when a specific task is completed with a specific disposition. Previously, administrators were only able to configure the Task Completed triggering event to trigger off a specific task. Now, administrators can also specify that the task must be completed with a specific disposition before triggering the rule.
To Select Task Completed for the Triggering Event:
- From the Encompass Admin Portal, select Process Automation.
- Select Workflow Rules, and then select New Rule to create a new rule.
- In the Triggering Event field, select Task Completed.
- Select a task from the list of stand alone tasks.
- To specify a disposition that the task must be in when completed, select the disposition from the With Disposition field.
ENCW-72483
A new Update Task Disposition option has been added to the Resulting Action field for Workflow Rules. This resulting action enables administrators to update a task with a specific disposition, add a disposition comment to the task, and update the task priority automatically. Administrators can use this action to automatically indicate exceptions by setting the appropriate disposition value and then trigger subsequent automation (via another rule leveraging the Task Updated triggering event) such as creating another task to handle the exception.
To Select Update Task Disposition for the Resulting Action:
- From the Encompass Admin Portal, select Process Automation.
- Select Workflow Rules, and then select New Rule to create a new rule.
- Select the Result tab.
- In the Resulting action field, select Update Task Disposition.
- Select the task that the rule applies to.
- In the Update deposition field, select the disposition to apply to the task.
- Enter a comment to apply to the task when the disposition is updated.
- Optionally, to update the priority select the desired priority from the Update Priority field.
ENCW-72891
An update has been made to the Apply Enhanced Conditions resulting action which enables the automatic application of specific enhanced conditions. With this update, users can choose to add specific enhanced conditions directly from the Workflow Rule configuration. This enables adding specific enhanced conditions to a loan automatically based on granular triggering events, such as a task being updated to a specific disposition or fields being modified.
For information on configuring Automated Conditions in the desktop version of Encompass, click here.
To Select Apply Enhanced Conditions for the Resulting Action:
- From the Encompass Admin Portal, select Process Automation.
- Select Workflow Rules, and then select New Rule to create a new rule.
- Select the Result tab.
- In the Resulting action field, select Apply Enhanced Conditions.
- Select Apply Automated Conditions to automatically apply all automated conditions.
- Select Apply Selected Condition(s) to apply selected automated conditions.
- If you selected Apply Selected Condition(s), select the Add
 icon to add conditions.
 - On the Select Conditions window, select the check box for each condition you want to apply and then select Apply.
- To remove a selected condition from the Selected Conditions list, select Remove
 .
.
ENCW-71870
An update has been made to the Workflow Rules feature to enable administrators to add tags to their rules. Tags enable administrators to classify & identify related rules. Related rules with the same tag value can be filtered based on the tag value. Tags can be entered in the Tags field when creating or editing a rule.
Note: Tags do not support special characters or spaces. When entering a tag, use only letters or numbers or the underscore character (_).
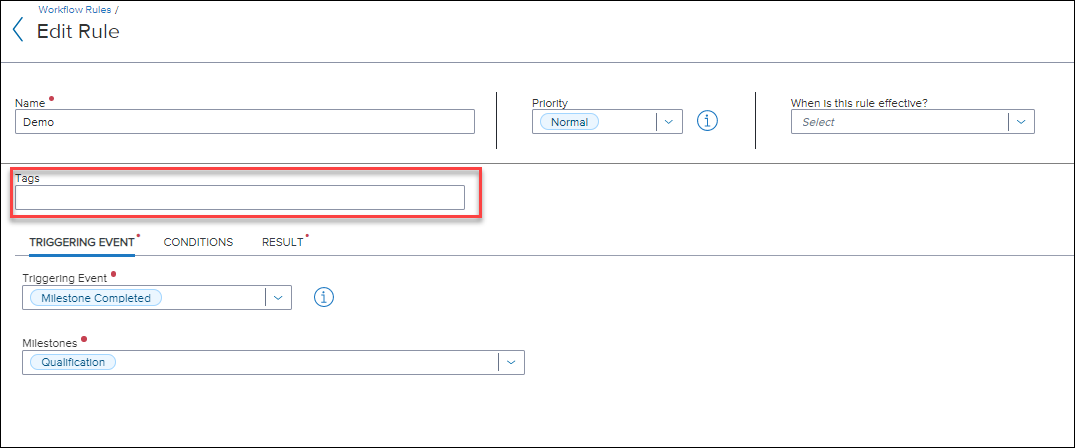
To Filter the Workflow Rules Pipeline by a Tag:
- From the Encompass Admin Portal, select Process Automation.
- Select Workflow Rules.
- Select the Tags column, and then select the Search
 .
. - Enter the tag name or select the tag from the list, to filter the list of workflow rules.
ENCW-71870
The Workspaces, Workflow Rules, and Tasks Pipeline views have been updated to provide pagination to the list of items displayed. This update displays a set number of items per page, rather than displaying one long list of items. This option enables faster loading of the data and also provides customization for the experience, such as the number of items to display per page and navigation controls to move to a specific page.
To Navigate Items With Pagination:
-
From the Workspaces, Workflow Rules, or Tasks Pipeline pages, locate the viewing options at the bottom of the page.
-
To change the number of items displayed per page, select the Down Arrow
 button and then select the number of items to display per page.
 -
Use the Left Arrow
 and Right Arrow
 buttons to move to the previous or next set of records.
-
To select a specific page, select the Down Arrow
 button and then select the page number from the list.
-
ENCW-74097, ENCW-72284, ENCW-72612
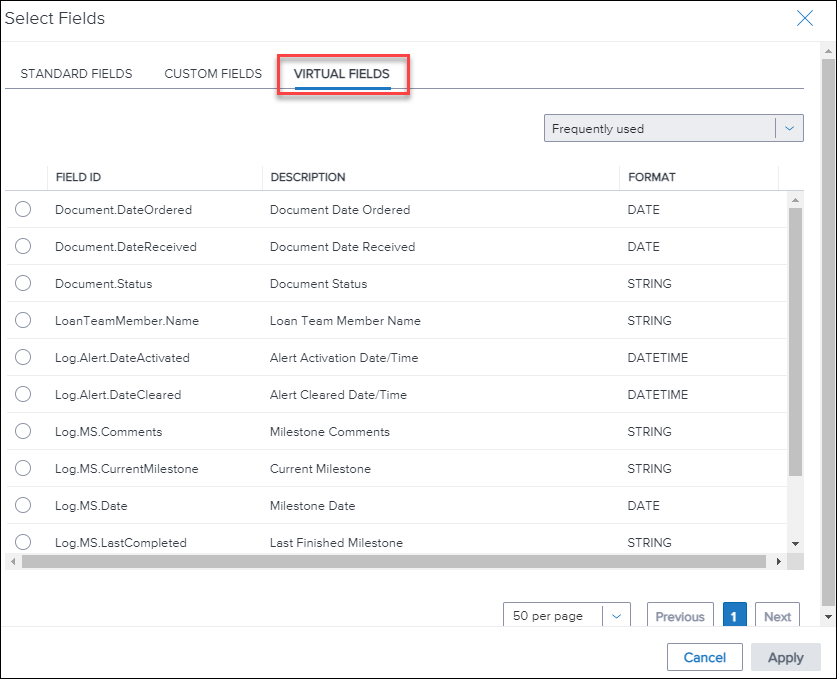
Virtual Field Support has been added to the query builder for Workflow Rules conditions. This new option enables administrators to build conditions off of frequently used virtual fields, such as the Document Date Ordered field or the Current Milestone field. Administrators can access the virtual fields from the Virtual Fields tab when searching for fields in the query builder.
ENCW-74377
In Encompass 22.1, the new Workflow Tasks tool was introduced in Encompass (desktop version). The tool enabled loan team members to view tasks assigned to them, track the status of the tasks, and their due dates. By utilizing the options for user roles in Encompass, multiple users assigned with different roles can work on tasks in parallel across milestones. In this 22.3 release, the tool has been enhanced to provide additional capabilities that previously were only available in the web version of Encompass. When using the desktop version of Encompass, authorized loan team members can now start a new workflow task, switch tasks, update task details such as priority and due date, view and complete sub-tasks, disposition sub-tasks, and open the sub-task count.
For more information, view the release notes for the desktop version of Encompass here.
ENCW-71042
Services Updates
A new Data Permissions feature has been added to the web version of Encompass. This new feature enables administrators to view which loan fields are accessible from supported partners when a transaction is submitted in web version of Encompass. For this initial phase, this feature provides informational data only. Administrators can view the Field ID, Field Description, Partner JSON Path, and the Read and Write permissions for each field. The list of data permissions can also be exported to a .CSV file.
Example of Data Permissions:

To Access the Data Permissions Feature:
-
From the Encompass Admin Portal, select Company/User Setup from the left navigation menu.
-
Select Data Permissions.
-
Select a partner category in the Category field, and then select a service provider in the Service field.
-
If the data permissions feature is supported for the selected partner, the data permissions list displays.
-
If the data permissions feature is not supported for the selected partner the following message displays: Provider does not have configured data entitlements.
-
-
To export the data permissions results, select Export to CSV
 . The .CSV file is saved to your browsers download folder.
ASO-11123
A new Re-Order button has been added to the slide out menu for existing service orders in the web version of Encompass. This new button enables users to quickly place a subsequent order for the loan with the same provider. When a user selects the Re-Order button, they are taken directly to the order page for the provider that they placed an order with previously.
To Re-order a Service From the Slide Out Menu:
-
From a loan in the web version of Encompass, select Services from the left navigation menu.
-
Select All Services, and then select a service category where a service has already been ordered for the loan.
-
Select an order entry to view the slide out menu.
-
Select Re-Order

ASO-9751
A new link has been added to the service order status when additional error information is available for a failed order. This new link provides users with the error information that is returned from the provider to give the user insight into the reason that the order failed. This feature is only available when using a mouse to hover over the failed status.

To View Error Details:
-
From a loan in the web version of Encompass, select Services from the left navigation menu.
-
Select All Services, and then select a service category where a order failed.
-
Hover over the Failed status. An informational pop-up displays.
-
If available, select View Error Details.

ASO-10729
Underwriting Center Updates
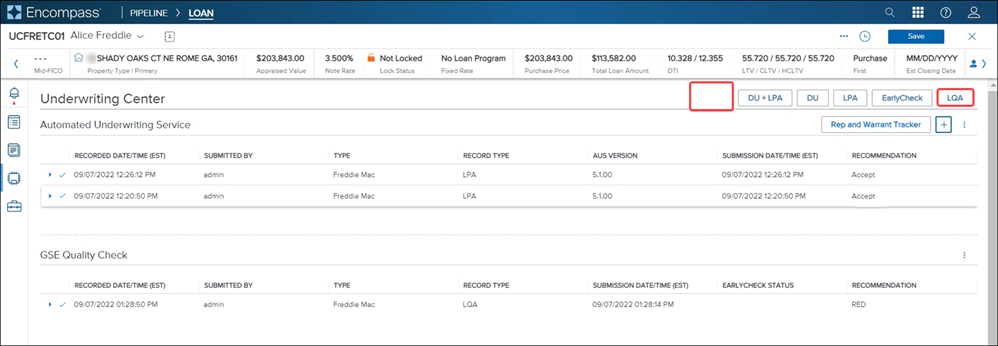
New EarlyCheck and LQA buttons supporting One Click Ordering are available with this release.

Prerequisites:
-
Persona access to the buttons
-
EarlyCheck and LQA Services are configured
-
One-Click configured
These buttons are available (displayed and active) only if all prerequisites are met. For EarlyCheck, after you place the order, you can view the results and report details on the Services Landing Page (SLP).
For LQA, results from successful orders will be displayed in the GSE Quality Check panel in the Underwriting Center. Failed order details (for both EarlyCheck and LQA) will be displayed in a future release.
Results for EarlyCheck will be displayed in the UWC with a future release.
-
Log into Encompass Web and from the Pipeline, open the file you want to submit to LQA.
-
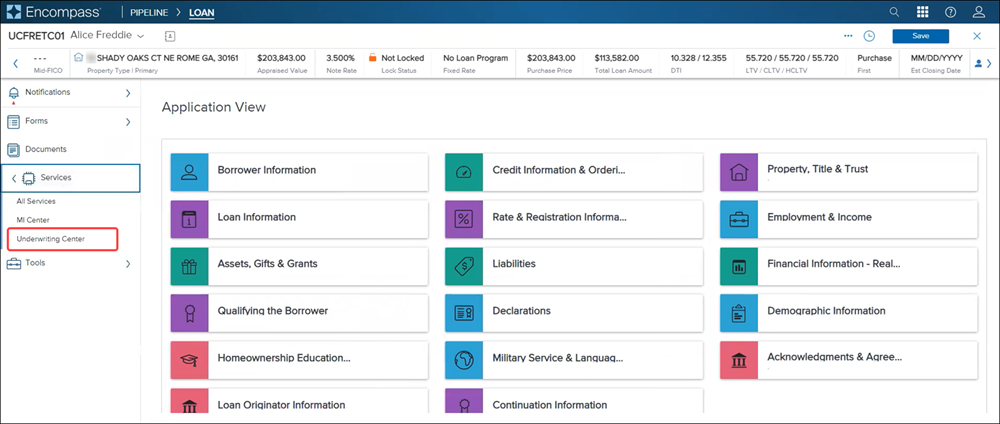
Point to Services, and then click Underwriting Center.
-
Note that the loan is scanned for prerequisite fulfillment and qualification to submit to LQA. Clicking the LQA button displays an Evaluating loan message, and the button is not active yet.

-
Click the LQA button when the spinning wheel/evaluating icon disappears.
-
If your loan contains missing, non-mandatory data, an AUS Validation Issues window displays the missing fields. It is recommended that you click the Cancel Order button and update the loan information for a more successful submission.
-
You can also click the Continue with Missing Data button and proceed with the loan submission.
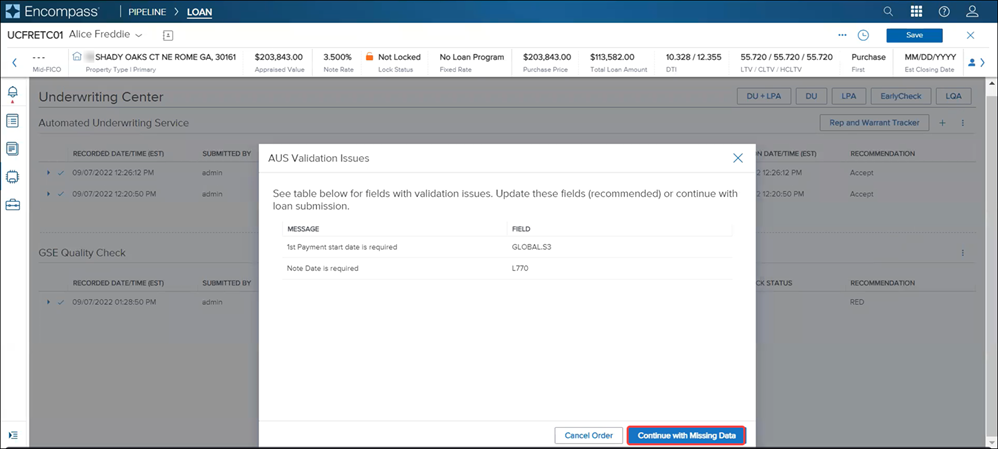
-
-
When the loan submission completes successfully, a Success message displays.
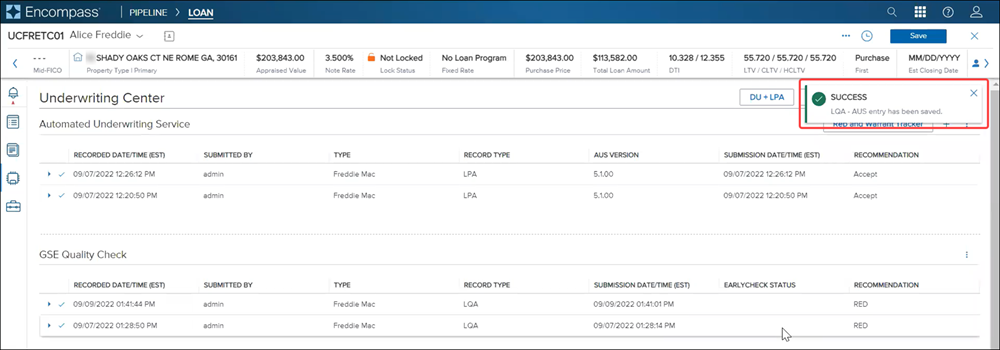
-
GSE Quality Check panel updates with the order details.
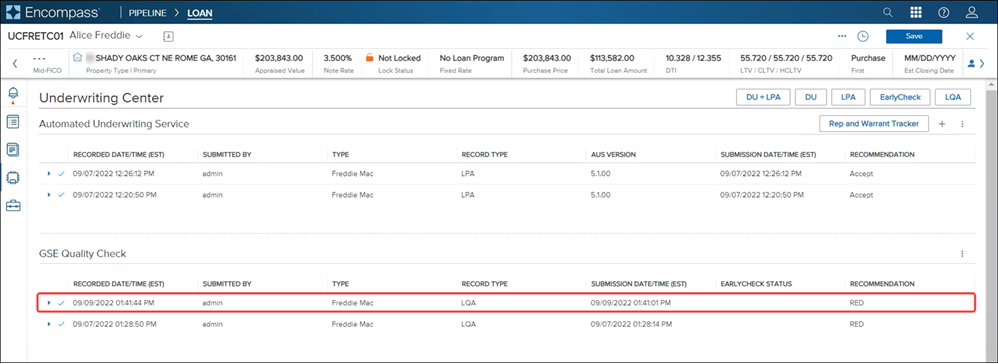
-
Click the arrow corresponding to the order to view additional order details (existing functionality)

-
Click the Loan Data Snapshots button.

-
View the Loan Snapshot Data that was used.
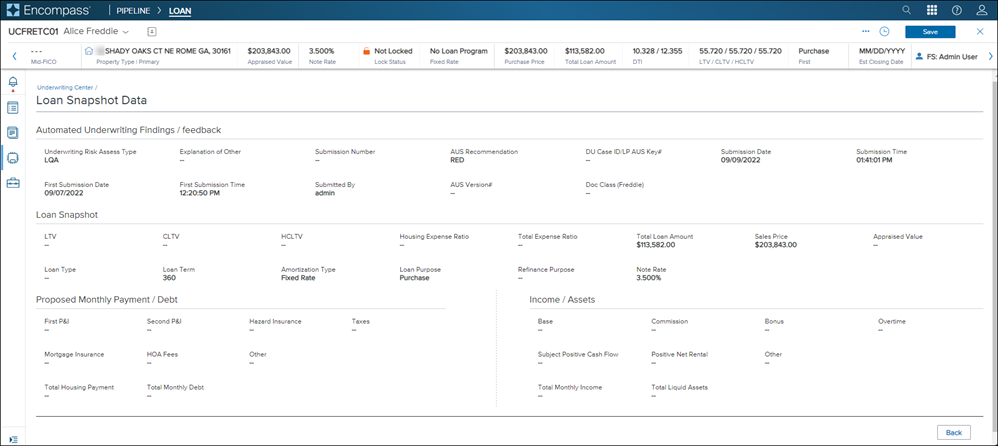
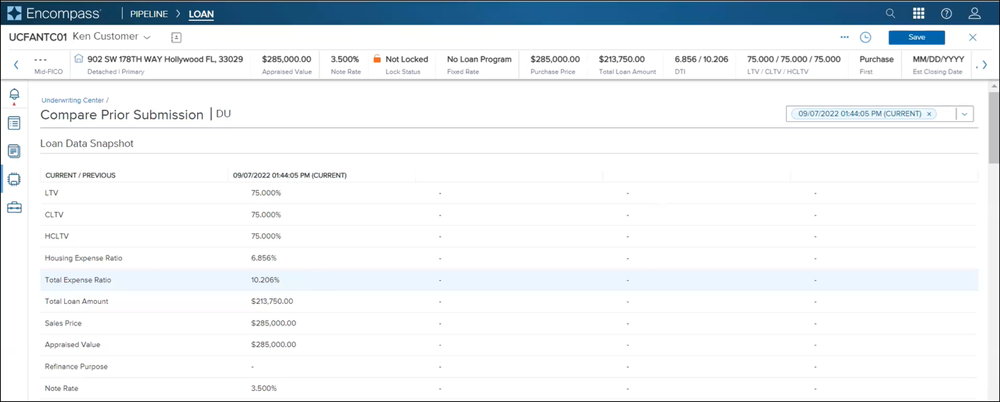
Compare Prior Submission page updated with the following:
-
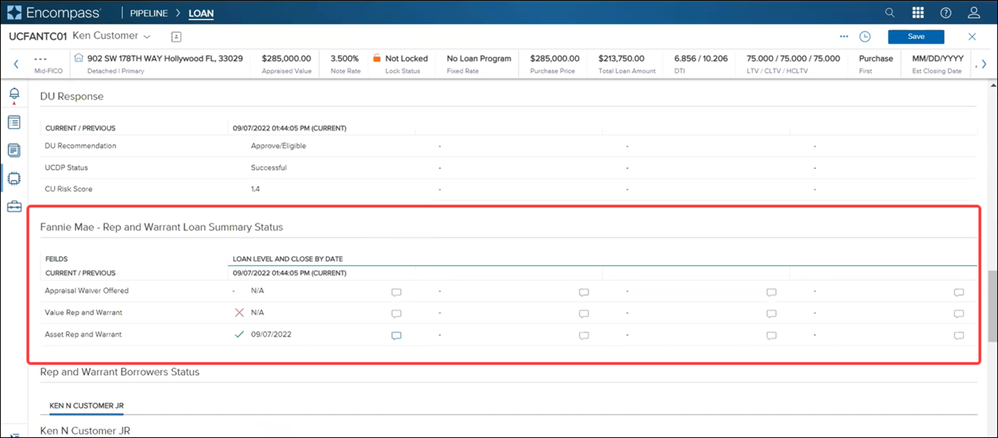
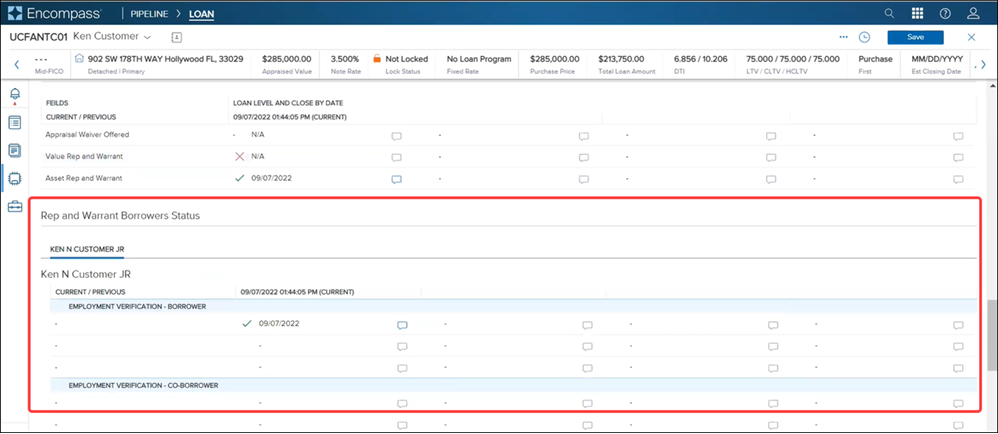
New field labels and data mapping for both DU Response and LPA Response sections
-
Data mapped to new Fannie Mae Rep and Warrant Loan Summary Status and Freddie Mac Rep and Warrant Loan Summary Status panels
-
Data mapped to Rep and Warrant Borrowers Status (primary borrower pair) for both Fannie Mae DU and Freddie Mac LPA
-
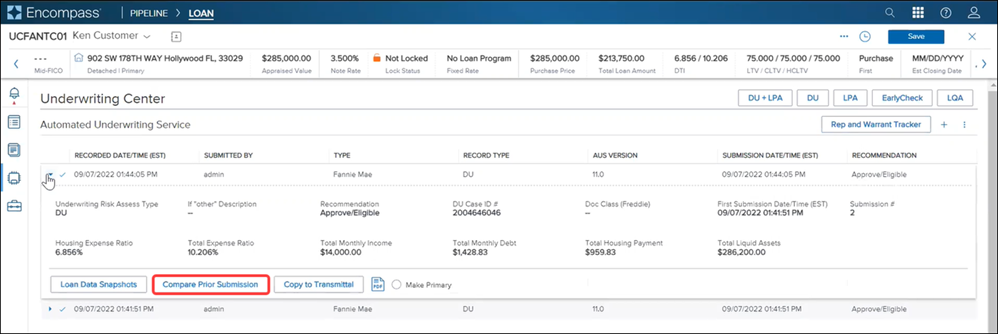
In the Automated Underwriting Service panel, go to the loan you want to view, and click its corresponding arrow.

-
Click the Compare Prior Submission button.
-
View the various new panels in the Compare Prior Submission page.
For more information and details of the complete workflow, see the Underwriting Center Guide.
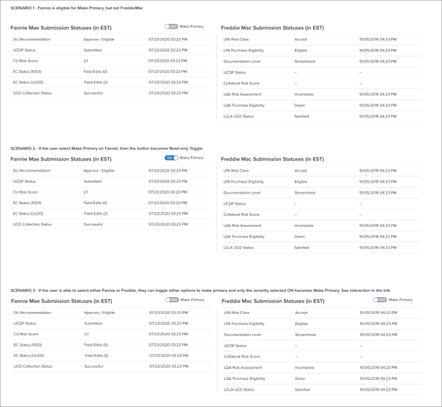
A new Make Primary button has been to the Rep and Warrant Tracker tool with this release. Functionality of this button is similar to the Make Primary button available in the AUS panel.
Use this new button to identify your primary order so you can continue placing subsequent orders (with the same or different AUS) without interrupting your workflow. Identifying the primary order can also be leveraged for business rules with this release. Database and field updates will be available in a future release.
When the Make Primary button is selected, it updates to a blue ON button, providing a visual indicator to identify the primary AUS order on the loan.
Enhanced Conditions Updates
A new Owner field has been added to Enhanced Conditions which can be used to track the role assigned to the condition. The Owner field is a drop down field that a user can use to select a role from all available roles. This field can also be populated by a template. Users can also sort the Conditions pipeline by the new Owner field.
Note: For information on how to use the owner field for reports, business rules or custom forms in desktop version of Encompass, view the Enhanced Conditions Owner Field Available for Reports, Business Rules, Custom Forms, and Pipeline Views entry in the release notes for the desktop version of Encompass.
To Change the Owner Role on an Enhanced Condition:
-
From a loan in the web version of Encompass, select Conditions from the left navigation menu.
-
Select a condition from the Conditions Pipeline.
-
Select the Owner field, and then select the role you want to assign to the task.
-
Select Save.
ENCW-61408
Mobile Web Enhancements
The eSign process for the mobile web version of encompass has been updated to provide an experience similar to the web version of Encompass. With this change, users can access their list of packages that need to be eSigned under the new Packages option. Users can eSign documents directly from the Packages tab without opening a loan, but users can also access the documents that need to be eSigned from the loan file.
Note: The packages listed under the new Packages tab are a consolidated list of all packages for loans in your pipeline. Packages viewed from inside a loan are specific to that loan only.
To eSign Documents From the Packages Option:
-
From the mobile web version of Encompass, select the Menu
 icon.
icon. -
Select Packages.
-
On the eSign Packages page, select the Settings
 icon to select your packages view (Last 30 Days, Last 90 Days, or All Packages)
 -
Select Review & Sign to initiate the eSign ceremony for a package through DocuSign.

-
On the Loan Documents page, select Next to view and sign the document.
-
Select Start to begin signing.
-
Select the eSign signature point to eSign the document. The document will move to the next signature point automatically.
-
Select Finish to finish signing the document and return to the Packages page.
To eSign Documents From the Loan File:
-
From a loan with documents that need to be eSigned, select the Menu
 option in the top right corner.
 -
Select View Packages.
-
On the Packages page, select Review & Sign to initiate the eSign ceremony for a package through DocuSign.
-
You can also select the Right Arrow
 to view details of the package, or select the Documents
  icon to view the documents that are part of the package.
-
-
Select Start to begin signing.
-
Select the eSign signature point to eSign the document. The document will move to the next signature point automatically.
-
Select Finish to finish signing the document and return to the Packages page.
ENCW-69467
Prospect Engagement
-
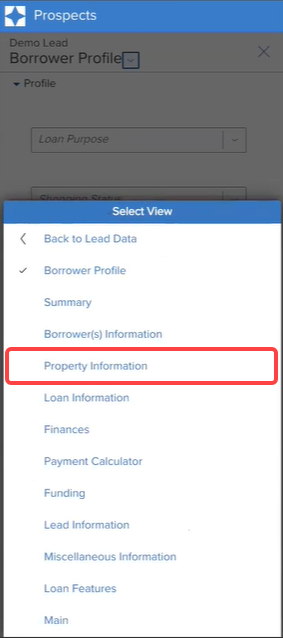
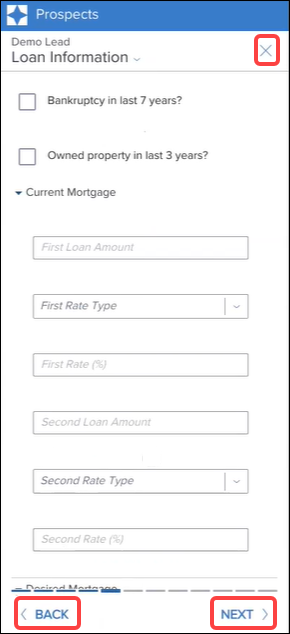
Auto-Save attempts during Details section navigation such as:
-
Switching panes
-
Tapping the Close icon
-
Tapping Next or Back buttons in the footer
-
Note: Lead Save success messages are not displayed when navigating between panes, and only displayed when you return to the Lead Summary page.
-
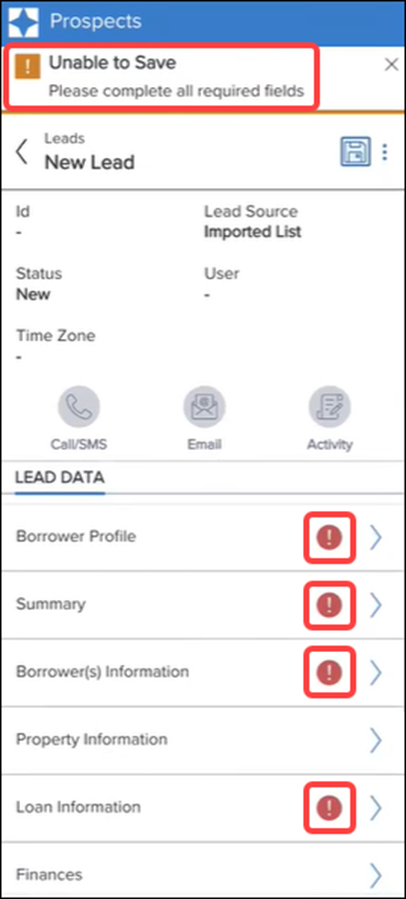
Summary page updates to identify sections with missing required fields and/or data validation issues:
-
More comprehensive error messages with details of failure reasons; message displayed in the age
-
When you create a lead, and attempt to Save the record, if there are issues with the lead creation, Borrower Summary panes with missing info now display an error icon indicating issues with that pane. The header area of the Borrower Summary page also displays an error message with details of the issue.
-
Tap each pane that displays an error to access the pane.
-
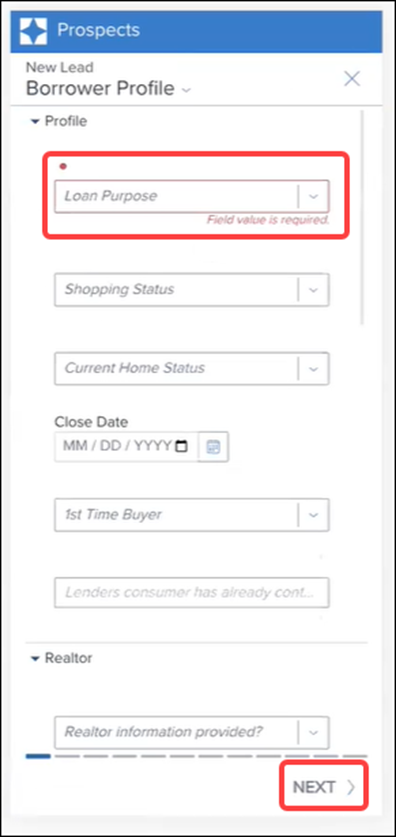
Mandatory fields that are not populated are indicated with a red dot, for easy identification
-
A message also displays your action item
-
The Next button is grayed out until the mandatory fields are updated
-
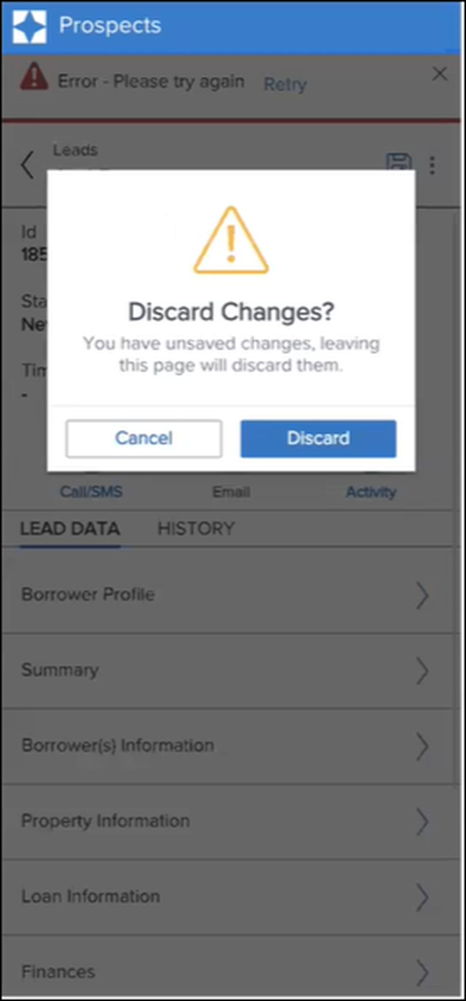
Discard window that used to display as you made changes to each pane within the Borrower Summary page now displays only at the Borrower Summary page level. For example, when you update the Borrower data and attempt to navigate away from the Borrower Summary page.

-
-
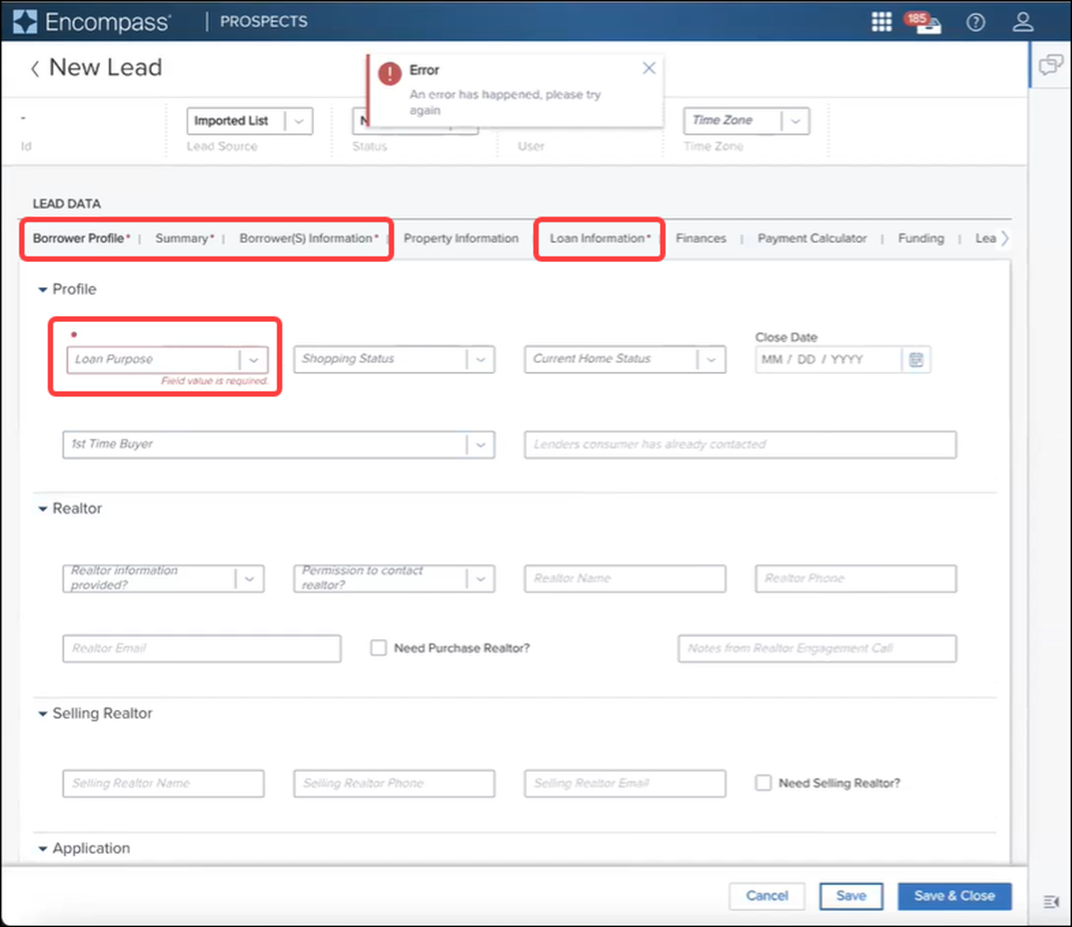
The following enhancements have been made to the Desktop application:
Tabs with missing data are indicated with a red dot, and fields within tabs updated with a red dot and comprehensive error messages indicating your action item.
LOC-3009
Usability enhancements for Desktop and Mobile applications:
-
Desktop:
-
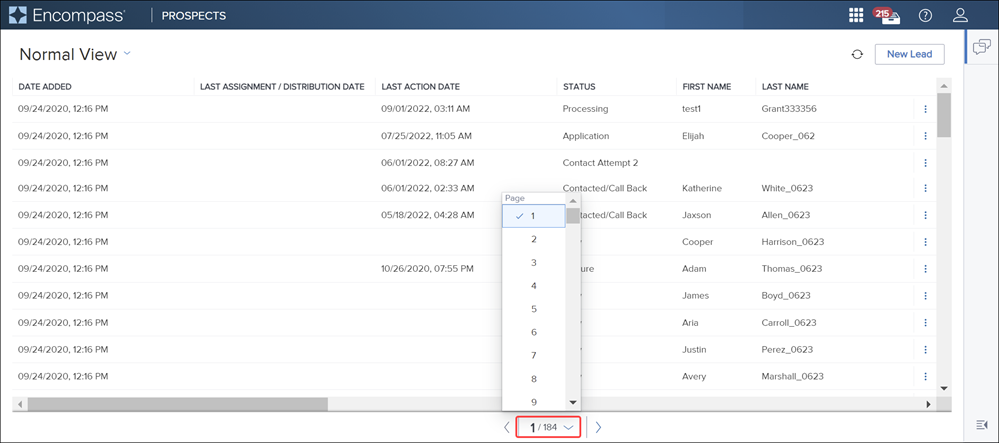
Complete redesign of all List Views (Normal View and Incomplete Applications) within the Prospects tab
-
Pagination instead of infinite scroll: Ability to navigate between pages using page numbers displayed at the bottom of the page
-
Lesser number of leads retrieved per page for better load time performance
-
-
Mobile:
-
Lead Summary page updates:
-
Floating icons vs tool bar
-
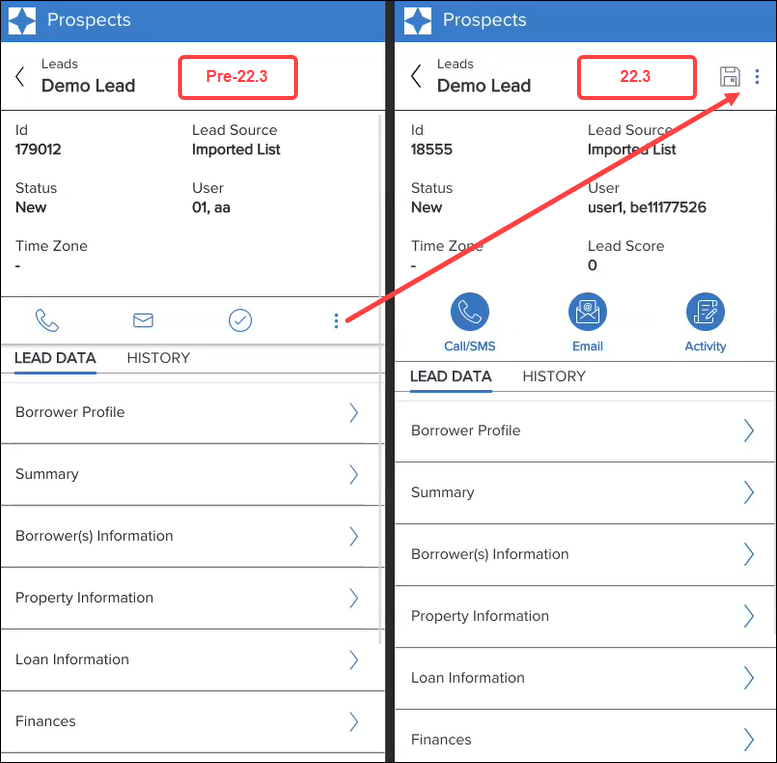
Ellipses action icon moved from the toolbar to the header: Now in the Lead Summary level. Prior to this release, Ellipses action icon was located within each pane of the Lead Summary view, requiring more clicks to navigate away from the pages.
-
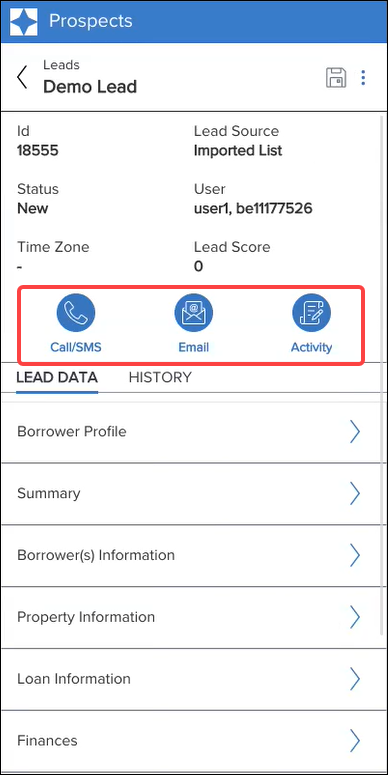
Updated icons for Call/SMS, Email, and Activity.
-
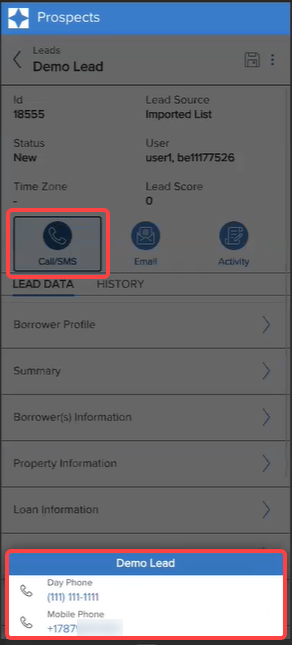
Tap an icon to view the details within the same page instead of opening a new page.
-
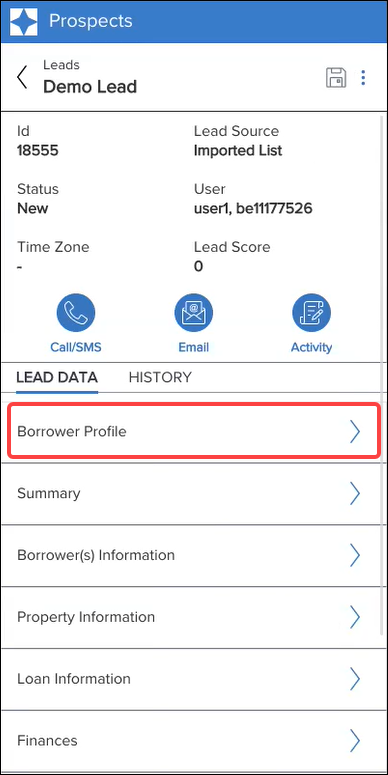
Tap a Lead Data pane to view details of the pane.
-
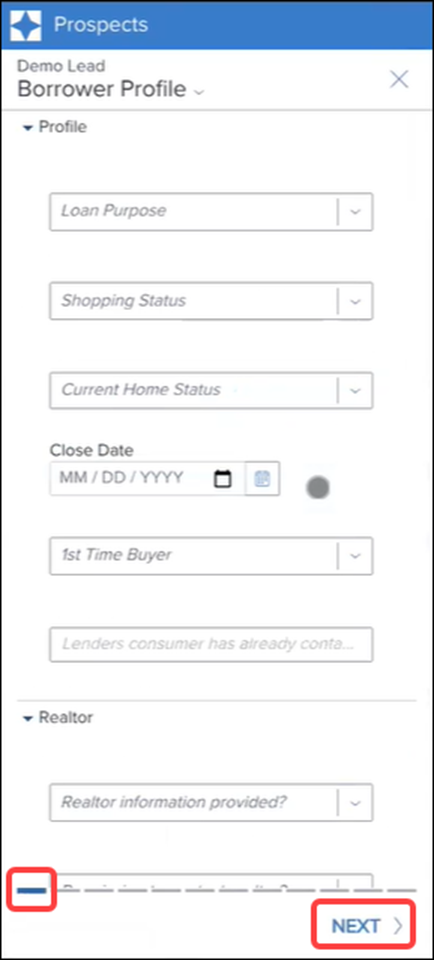
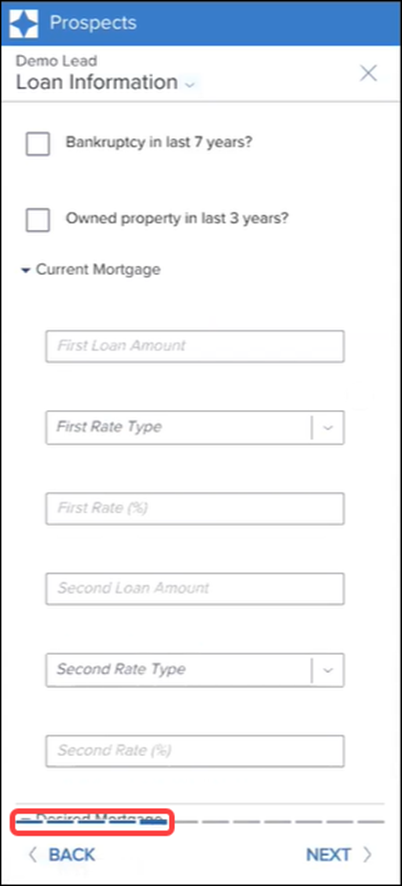
Note that the Footer displays the total steps and where you are in the workflow. You can use the Next button to navigate to subsequent steps.
-
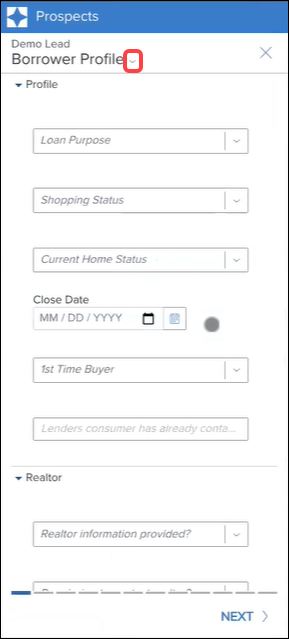
Tap the drop-down arrow next to the page header (in this example, Borrower Profile).
-
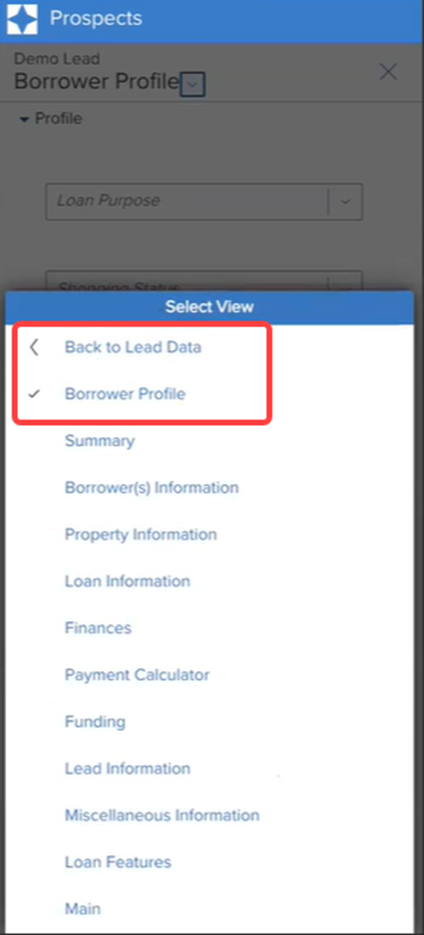
In the Select View window:
-
Tap Back to Lead Data to go back to the Lead Summary page.
-
Note that the check mark indicates the pane you are viewing.
-
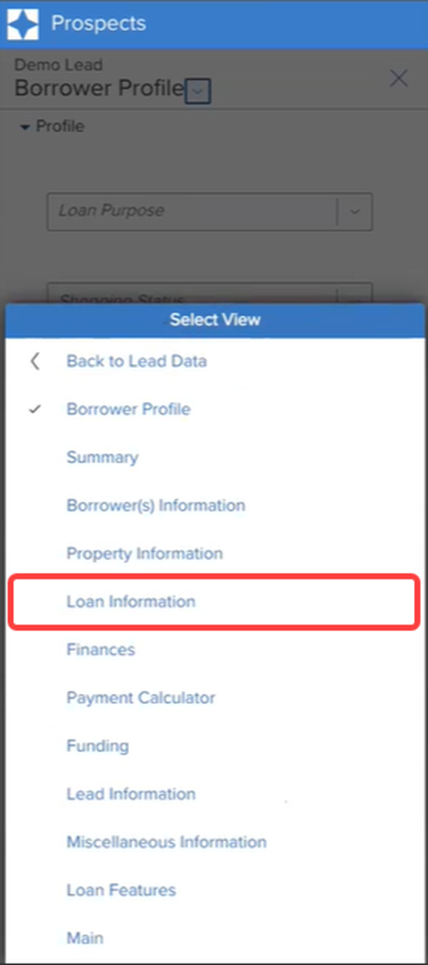
Tap any link to access details for that pane.
-
Note that the footer has updated to indicate which step in the process you are in. You can also use the Back and Next buttons to navigate between the steps in the workflow.
-
-
-
-
LOC-3282
| Next Section: Updates and Enhancements to Encompass Web Input Form Builder | 
|
|

|
Previous Section: Introduction |
