LeadManager: Client Settings Page: Detailed Review
TOPICS COVERED IN THIS ARTICLE:
Detailed Review of the Settings: Client tab within the Client Settings page
ENVIRONMENT:
LeadManager
DETAILS:
The Client Settings page is where you should enter your information about your company and make some overall settings about how you want your Velocify LeadManager™ system to function.
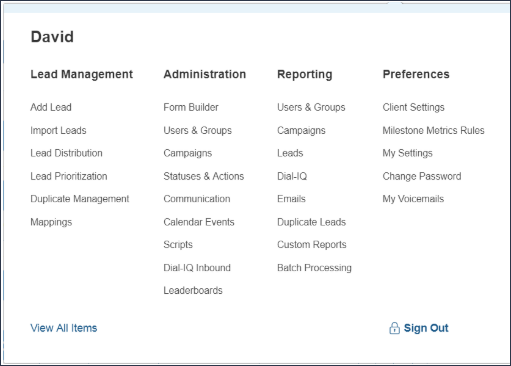
First, access the Menu page by clicking your name in the upper right of the header.

Under Preferences, click Client Settings.
The Client Settings page has four primary tabs.

Depending on the additional features enabled in your Velocify account, you may see more tabs on this page. For information on those tabs, please reference the topic related to that feature.
-
Settings: Client
-
Lead View: Columns
-
Lead View: Statuses
-
Pull Distribution: Columns
First is the Settings: Client tab. This tab contains four groups:
-
Account Settings
-
Lead & Campaign Settings
-
Email, Notification & Calendar Event Settings
-
Timezone Protect
-
Other Settings
-
Integrations Settings
Account Settings
The values that you put into the fields in the first section, Account Settings, refer to your general company information. This may appear in emails that LeadManager sends out automatically so be sure that you enter them as you want them to appear in official, external business communication.

Home Page Message
This is displayed on the LeadManager dashboard which is visible to all users. Use this for general company wide announcements.

IP Address Security Settings and Password Requirements.
IP Address Security Settings enable you to restrict the IP address from which your users can log into the system. If you want to prevent your users from logging in outside of the office, click Edit IP Address Security Settings and add your local IP address to the IP Address Filter.
Your local IP Address will be displayed on the IP Address Security Settings
Click Edit Password Requirements to stipulate user password criteria.

Auto Refresh View Leads Page
Enter a number of minutes in this field to determine how often the view leads page should auto refresh. New leads are not displayed in real time on the View Leads page so you may want to have the page auto-refresh regularly to display new leads.

Priority View Page
This setting controls which leads are displayed in the Priority View to users assigned the Manager role. Select Standard Priority View to display only those leads that are directly assigned to the Manager. Select Expanded Priority View to display both leads directly assigned to the Manager, as well as leads that are assigned to all users within the Manager's extended team. Additional configuration of which leads are shown within Priority View when using Expanded Priority View can be accessed from the Manager's My Settings page.

Priority View Leads per Page
This setting changes the way leads are presented so that only one lead at a time is presented to a user. Once the user either takes an action on the lead or uses the Next Lead function, the page will provide a new lead.
For more detail on Single Lead View please read the following Help Article: Prioritization: Single Lead View

Priority Info Bars
This setting changes the way that leads are presented so that leads in different Priority Queues are separated by Priority Info Bars. This helps users to understand why certain leads are considered a higher priority for contact than other leads in the Priority View. The descriptions for Priority Info Bars are created in Add/Edit Priority Queue.
For more detail on Priority Info Bars please read the following Help Article: Prioritization: Priority Info Bars

Time Zone
Set your local time zone. This affects when users can receive leads through automatic lead distribution that may run between certain hours.

Home Page Milestone & Performance Metrics Visible by Role:
To make Dashboard Metrics visible to users of a role, click the role name.

Lead Form Layout
Choose the layout of the Lead form; either a list view, or a tab view.

Default Campaign
Choose the default campaign that a new lead will be in when it enters the system.

Default Lead Status
Choose the default status that a new lead will be in when it enters the system.

Unique Field for Importing
Determine which field will be the unique field for imported leads.

Lead Identifier
The lead identifier is the lead data that will be displayed in logs, calendar events and other places. Typically this would be the lead name and a phone number.

New Lead Bold
Click this if you want new leads to be bolded on the view leads page.

New Lead Highlight
Click this if you want new leads to be highlighted on the view leads page.

Flagged Lead Highlight
Click this if you want flagged leads to be highlighted on the view leads page.

Users Can Change Lead Status
Click this if you want to allow users to change statuses on leads.

Email, Notification & Calendar Event Settings
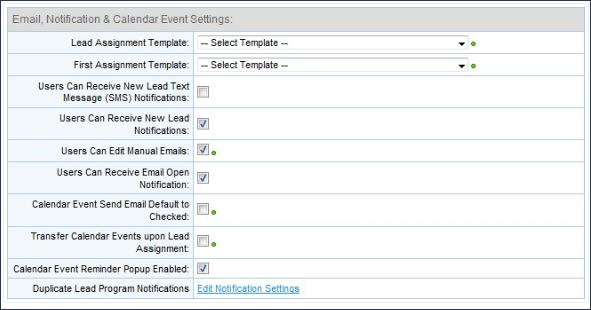
Lead Assignment Template
Select from the pulldown the email that you would like to be sent to a lead when it is assigned to a user.
First Assignment Template
Select from the pulldown the email that you would like to be sent to a lead when it is first assigned to a user.
Users Can Receive New Lead Text Message (SMS) Notifications
Select this to if your users can receive SMS notifications of new leads.
Users Can Receive New Lead Notifications
Click this to allow users to receive new lead notifications (popups) in LeadManager.
Users Can Edit Manual Emails
Click this to allow users to edit manual emails.
Users Can Receive Email Open Notification
Click this to let users receive email open notifications. Email open notifications are messages that the user will receive when their email has been opened. This helps users reach leads right at the moment when they are reading the email.
Calendar Event Send Email Default to Checked
When users set a calendar event, they can be reminded by a popup reminder, an email or a text. Click this check box if you want the default settings on the Add Calendar Event page to send an email reminder to the lead about their calendar event.
Transfer Calendar Events upon Lead Assignment
When a lead gets re-assigned to a different user, you can make sure that any appointment that has been scheduled with that lead goes with the lead to the new user. Click this check box to make sure appointments don’t get dropped when leads get re-assigned.
Calendar Event Reminder Popup Enabled
Click this to enable the calendar event reminder popup.