Custom fee sets
 Overview
Overview
You use the Disclosures page to specify closing disclosure fees. You may also be able to choose the labels and default fees that display on the Disclosures page. This lets you change some or all of the names of the fees to match your company’s terminology.
If you use the same fees for many loans, your Simplifile account manager can work with you to create a custom fee set that includes all of this information. Then you can apply the custom fee set to each loan that requires the same fees, and change only the few fees that are different. You may also be able to create and edit your own custom fee set from within Simplifile. If you upload a UCD.xml file to add fees to a loan, you may need to map the fee names in the UCD file to your custom fee set.
Custom fee setup and editing within Simplifile
Custom fee setup and editing within Simplifile
If desired and if you have the necessary permission, you can create and edit a custom fee set from within Simplifile. This sets up default fees that display to lenders who work on loans at your company as well as to settlement agents. Loans you create in Simplifile use the custom fee set you set as active from that point on. Loans created previously to that time are not affected.
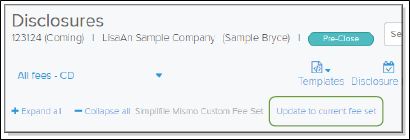
You can change the fee set applied to newly created loans at any time. The name and version number of the fee set used to create a loan displays on the Disclosures page of that loan, as shown in the example. This can help you identify the fee set used to create a specific loan.
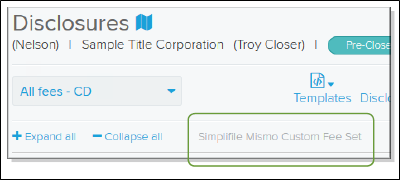
You create, edit, and set custom fee sets as active on the Custom Fee Set page. The Custom Fee Set page contains all of the sections and all of the MISMO fee items that display on the Closing Disclosure tab of the Disclosures page. To view fees of a certain type, find the section that contains the fee type and select the plus sign to display the fee types in that section.
Required and optional fee items automatically display in the correct section. You can edit fee items or add your own custom fee items. You can remove optional or added custom fee items, but you cannot remove required fee items. You can dictate any fee, which makes that fee non‑negotiable. This means that the settlement agent cannot recommend any changes to the fee.
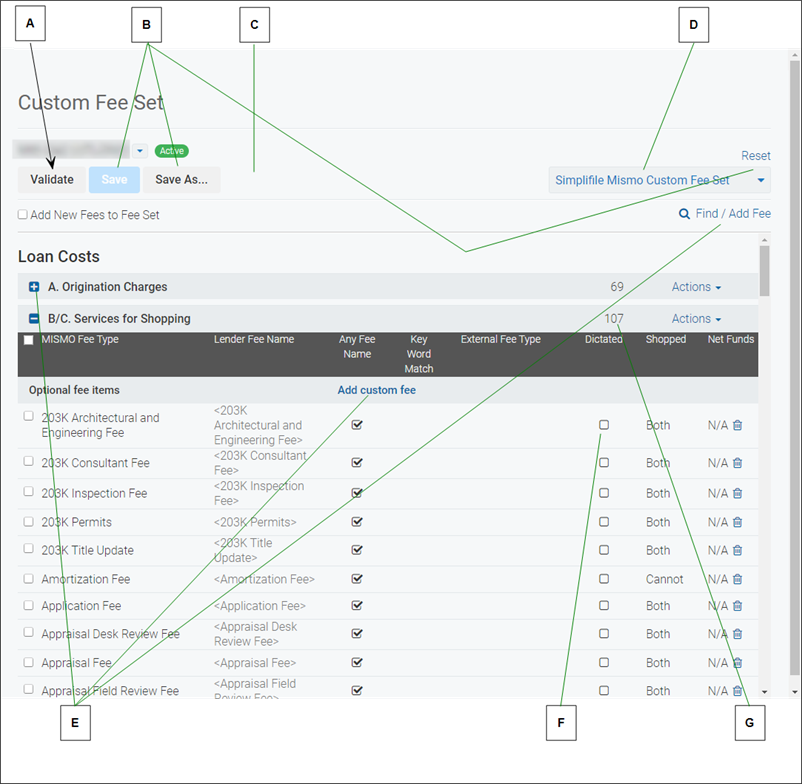
Below is a partial example of the Custom Fee Set page.
| Letter | Description |
|---|---|
| A | When you finish adding or editing fees, select the Validate button to display any errors you must correct before using your custom fee set. |
| B | Select the Save  button to save your custom fee set or the Save As button to save a new version of the fee set. Select the Reset button to display the default MISMO fee set. button to save your custom fee set or the Save As button to save a new version of the fee set. Select the Reset button to display the default MISMO fee set. |
| C | Select the Set as Active button to use this custom fee set as the default for any new loans you add to Simplifile. |
| D | Use the dropdown list to choose the custom fee set you want to review or edit. |
| E | Select a plus sign to expand a section and view, add, or edit fees within that section. Select the Add custom fee item within a section to add a new fee, or use the Find/Add Fee feature to find and add a fee. For more information, see Collaborate on disclosures and fees. |
| F | Mark a box in the Dictated column to make the fee non‑negotiable. |
| G | A number in a section header indicates how many fees are in the section. |
Adding and editing a fee
You use the following options in the Add Custom Fee Item window (for new fees) and the Edit Custom Fee Item window (for existing fees) to configure the settings of fees you want to add or edit. You can use some options on only certain fee types.
MISO fee type
Use the dropdown list to choose the MISMO fee type that most closely describes the item you want to add.
The MISMO specification determines MISMO fee types. MISMO items can include fees, liabilities, prorated items, prepaid items, escrow items and adjustments.
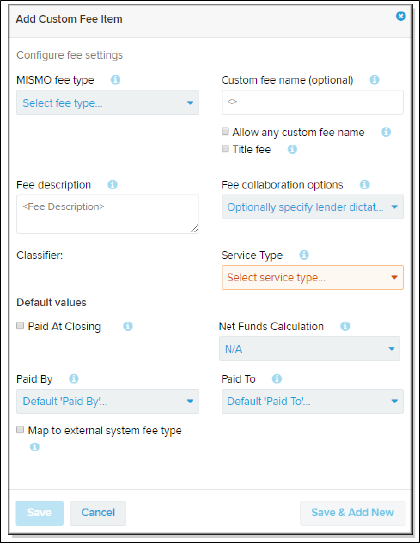
Custom fee name (optional)
Leave this field empty to display the default MISMO name. You can also enter a descriptive name that you want to display on the Disclosures page and on printed disclosure documents.
Allow any custom fee name
To allow the entry of any display label text for the item instead of requiring a match to a fee set item of this type, mark this box. This option is automatically marked if there is no display label for a fee set item. If this box is unmarked, you must provide a custom fee name, which fees of this type must match.
You can mark this box for only one fee set item of each fee type (or combination of fee type and LOS fee type). If none of the fee set items with the same fee type (or combination of fee type and LOS fee type) is marked, there must be an exact match on one of the display label texts.
Title fee
Mark this box to indicate that the fee is title‑related and should be paid to a title company. The fee displays in the dropdown list with Title ‑ before the name. This makes the fee more easily identifiable.
Optional fee
Mark this box to indicate that the creditor does not require the fee.
Fee description
Add a description for the fee or edit or add to the existing description, if desired. (You cannot edit MISMO descriptions.) The Fee Search tool looks at the description as well as at the fee name. A customized description may help people find fees.
Fee collaboration options
If desired, choose one of the following:
- Lender dictated ‑ Choose this option to make a fee item non‑negotiable (un‑editable) to people other than lenders at your company. Settlement agents cannot suggest changes to these fees.
- Locked after disclosure. Choose this option to make this fee un‑editable after a disclosure date is added to the Disclosures page of the loan. When you add the disclosure date to the Disclosures page, collaborators can no longer edit accepted fees with this designation.
- Read Only Fee. Choose this option to identify a fee that is imported from another system. These integration‑ dictated fees cannot be added or edited on the Disclosures page by either the lender or the settlement agent.
Service Type
If this is a fee in section B or section C, use this dropdown list to choose whether the buyer can shop for the fee, cannot shop for the fee, or can do either. For more information, see Configuring shopped/not shopped for custom fees.
Paid at Closing
Mark this box to indicate that the fee will be paid when the loan closes.
Net Funds Calculation
To include this fee on the Net Funds tab to help with wire payment reconciliation, choose Debit or Credit. For more information on this tab, see Dashboard page.
Paid By
If available, use the dropdown list to choose who should pay this fee.
Paid To
If available, use the dropdown list to choose who should receive this fee.
Map to external system fee type
If you are mapping a fee from your LOS (Loan Origination System) to a MISMO type you chose in the MISMO fee type field above, mark this box. Then, in the field that displays, enter the fee item type from your LOS.
Itemization Total
Mark this box if the fee will be broken down (itemized) into smaller fees. This makes the fee the parent fee.
Itemization Parent
If the fee itemizes another fee, use the dropdown list to choose the main fee (parent) that this fee itemizes.
Configuring shopped/not shopped for custom fees
You can choose the sections where each shopped/not shopped for fee is valid. This determines where the fee displays when the Disclosures document is printed or exported. To do this, for each fee, you choose one of the following service types when you add or edit the custom fee item:
Both
Fees with this service type display in both section B and section C. This is especially helpful if you choose the Other type for your added fee.
Can Shop
For fees with this service type, on the Closing Disclosure, if the person adding the fee marks the Shopped box, the fee displays in section C. If the person adding the fee leaves the Shopped box unmarked, the fee displays in section B, services the borrower cannot shop for.
Cannot Shop
Fees with this service type display in section B. Fees that are never shoppable include the following:
|
Assignment Fee |
Bankruptcy Monitoring Fee |
|
CLO Access Fee |
Commitment Fee |
MI Initial Premium |
|
Modification Fee |
New Loan Administration Fee |
Redraw Fee |
|
Re‑inspection Fee |
Underwriting Fee |
VA Funding Fee |
Understanding linked fees
On a disclosure document, any contractual adjustments entered in section K (Due from Borrower at Closing) also display in section M (Due to Seller at Closing). This happens automatically in Simplifile when you enter one of the items in either section K or section M.
The MISMO‑identified identical items for these sections include the following:
- Sale price of property and of any personal property included in the sale
- Closing costs paid at closing
- Adjustments, assessments, and prorations
- City, town, and county taxes
Fees other than those listed above may display in section M, but not in section K.
Similarly, adjustments entered in section L (Paid Already by or on Behalf of Borrower at Closing) also display in section N (Due from Seller at Closing). This happens automatically in Simplifile when you enter one of the items in either section L or section N.
The MISMO‑identified identical items for these sections include the following:
- Seller credit
- Satisfaction of junior liens
- City, town, and county taxes
- Unpaid assessments, prorations, or other items that have not yet been paid Fees other than those listed above may display in section N, but not in section L.
Setting up net funds
The Disclosures page lets you choose to display Net Funds. This lets you and the settlement agent view, add, and remove credits and debits that affect the net payment you make in your funding wire. Below is an example.
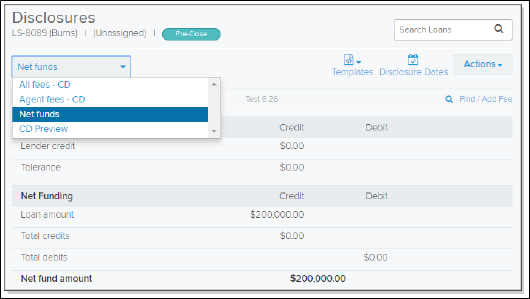
You can set up fees on your custom fee set to automatically display on this tab. You do this on the Edit Custom Fee Item window (for existing fees) or the Add Custom Fee Item window. Both are accessed from the Custom Fee Set page.
- To include an existing fee in the Net Funds calculation: Select the fee you want to add to Net Funds. This opens the Edit Custom Fee Item window.
- To add a new fee to the Net Funds calculation, open the appropriate fee section and select Add Custom Fee. This opens the Add Custom Fee Item window.
Use the Net Funds Calculation dropdown list on the window that displays to choose whether the fee item should display on the Net Funds tab as a debit or a credit. Be sure to save your changes.
Validating a custom fee set
You can have Simplifile validate your custom fee set to let you know if your fee set contains the necessary information. When you select Validate, Simplifile reports issues such as empty sections and lists. This can help you review any missing items and correct them.
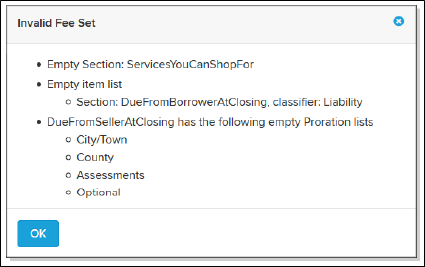
An example of the list of issues displays on the right. To correct an issue, you would find the section or list in your custom fee set and add or correct the information, as needed.
Updating a fee set
Loans created using a fee set typically keep that fee set from creation through post‑closing to prevent reconciliation issues on archived or older loans. Occasionally, however, a problem with disclosure collaboration can be resolved if you apply the most current fee set to the loan. You must have the necessary permission to do this. If this is an option, a link displays at the top of the Disclosures page.
How to build and edit your custom fee set in Simplifile
- In the navigation menu, select the Organizations item.
- Select the name of the organization where you want to build a custom fee set.
- In the navigation menu, select the Custom Fee Set item.
- To view, add, or edit a fee item, find the section where the item should be listed. You may need to select the plus sign beside the section heading to display the fee items in that section.
- Do one of the following:
- To remove a fee item, select the trash can
 icon beside the item.
 - To edit a fee item, select a section of the fee that displays in the Edit
 icon when you drag your mouse over it. To add a fee item, select an Add link (such as Add custom fee or Add Assessment).
For information about how to complete the fields in the add or edit windows that display, see How to add fee item details to a custom fee set.
- To remove a fee item, select the trash can
-
To edit multiple items in a single section in the same way at the same time, mark the checkboxes for the items and select the Actions
 dropdown button on the section header. Select the Modify selected fees item in the dropdown list that displays. Make the changes you want in the window and select the Apply button.
You can select the Load selection defaults link in the upper right corner to restore the fee set you started from.
-
When you finish editing and adding fee items, select the Validate button in the upper left corner of the Custom Fee Set page.
If you fee set is valid, the Valid Fee Set window opens with the message "Fee Set is valid". Select the OK
 button.
If your fee set has issues, the Invalid Fee Set window displays. Do one of the following:
- To return to the fee set and make corrections, select the Fix Errors button.
- To save the fee set with errors, select the Update Anyway button.
- When you finish adding and making changes to your fee set, do one of the following:
- To save the fee set, select the Save button.
- To keep the fee set you started from as well as the set you have been working on, select the Save As button. Give the fee set a name and select the OK button.
- To use the fee set for all loans going forward, select the Set as Active button.
- To save the fee set, select the Save
How to add fee item details to a custom fee set
- In Simplifile, access the fee set where you want to add a fee item.
- In the Add/Edit Custom Fee Item window, complete the following fields, as needed:
- MISMO fee type. Choose the type of fee to add.
- Custom fee name. If desired, enter a custom name for the fee.
- Allow any custom fee name. Mark this box to allow the entry of any display label text for the item instead of requiring a match to a fee set item.
- Optional fee. Mark this box if the creditor does not require the fee.
- Fee description. If desired, enter, add to, or edit the information in the field.
- Fee collaboration options. Do one of the
following:
- To prevent change recommendations for the fee from your collaborator, choose Lender dictated.
- To make the fee un‑editable after a disclosure date is added to the loan, choose Locked after disclosure.
- To make the fee viewable but un‑editable, choose Read Only fee.
- Service type. If this field displays, choose whether the buyer can or cannot shop for the fee.
- Paid at closing. Mark this box if the fee will be paid when the loan closes.
- Net funds calculation. If this fee should be made part of the net funds calculation, choose whether the fee is a debit or a credit.
- Paid by/Paid to. If available, choose who should pay and/or receive this fee.
- Map to external system fee type. Mark the box if one of the following is true:
- You are mapping a fee from your LOS to the fee type you chose in the MISMO fee type field. Then, in the field that displays, enter the name of the fee as it exists in your LOS system.
- Your fee does not display in the list of MISMO fee types.
Then, in the field that displays, enter the name of the fee as it exists in your LOS system.
- Itemization total. Mark this box if the fee will be broken in to smaller fees.
- Itemization parent. If this fee is part of another fee, choose the other fee from the dropdown list.
- Do one of the following:
- To save the fee item, select the Save button.
- To save the fee item and add another fee item, select the Save and Add New button.
- To save the fee item, select the Save
Setting defaults by section
You can use any section’s Actions dropdown list to change settings for one or more single items in the section. This can help you set up your custom fee set more quickly. Changes to section defaults do not affect existing fees in the section, but would apply to any fee added to the section. This can help prevent accidentally removing customizations already made to individual fees. You can change individual fees to remove a default setting.
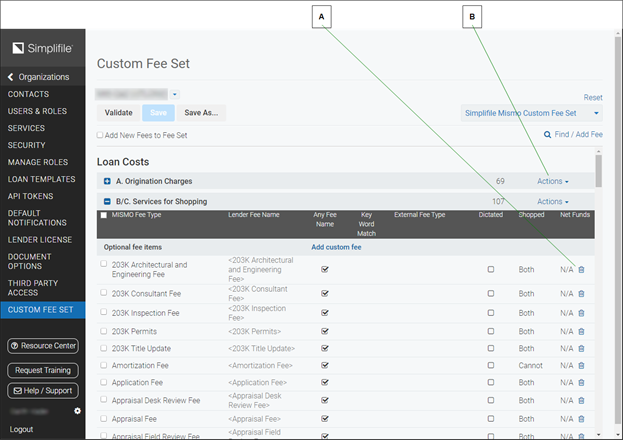
| Letter | Description |
|---|---|
|
A |
To remove a fee from the fee set, use the trash can |
|
B |
Use Actions |
The following list describes the settings you can apply from Actions dropdown button.
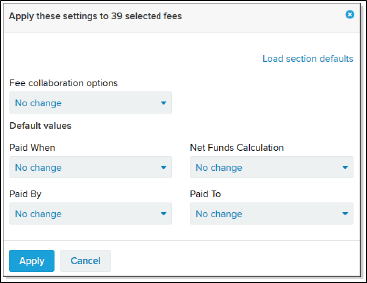
- Fee collaboration options. You can choose one of the following:
- Lender dictated (settlement agent cannot recommend a change)
- Locked after disclosure (fee cannot be edited after the disclosure date is added to Simplifile)
- Read Only fee (fee cannot be edited by either collaborator)
- Paid When. You can choose at or before closing.
- Paid By. You can choose Borrower, Broker, Correspondent, Lender, Seller, or Others.
- Service Type (Section B/C only). You can choose whether the fees in this section typically display in B (cannot shop for) or C (can shop for) or both.
- On the Closing Disclosure, if the person actually adding the fee marks it as Did Shop, the fee displays in section C.
If the person adding the fee marks it as Didn’t Shop, the fee displays in section B.
- Fees marked Cannot Shop on the custom fee set typically display in section B.
- On the Closing Disclosure, if the person actually adding the fee marks it as Did Shop, the fee displays in section C.
- Net Funds Calculation. You can choose Credit, Debit, or N/A (not applicable).
- Paid To. You can choose Broker, Other, Investor, Lender, or Third Party Provider.
Each option also lets you choose to remove the default value and leave the field blank, so that collaborators can choose the appropriate value when needed.
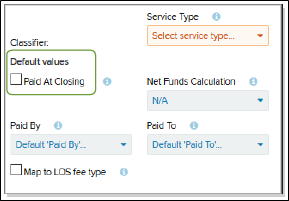
How to create default settings for items in a section
- In Simplifile, access the fee set where you want to add a fee item. For help in doing this, see steps 1 through 7 in How to build and edit your custom fee set in Simplifile.
- If desired, mark the boxes of fees in a single section whose default settings you want to change.
- On the section header where you want to create
default settings, select the Actions dropdown button.
- In the dropdown list that displays, do one of the following:
- To change the defaults for the section, choose Edit section defaults.
- To change the defaults for the items you marked in step 2, choose Modify # selected fees.
- Make the choices you want from the following dropdown lists:
- Fee collaboration options. Choose one of the following to set the behavior for most fees in this section:
- Lender dictated. Prevents the settlement agent from recommending any changes to the fees in the section.
- Locked after disclosure. Prevents any collaborator from editing a fee in this section after the disclosure date is added to Simplifile.
- Read Only fee. Prevents any collaborator from making or recommending changes to this fee.
- Paid When. Choose when fees in this section are typically paid.
- Net Funds Calculation. Choose how net funds for fees in this section are typically calculated.
- Paid By. Choose who typically pays the fees in this section.
- Paid To. Choose who typically receives the fees in this section.
- Service Type (Section B/C only). Choose whether the fees in this section typically display in B (cannot shop for) or C (can shop for) or both.
- For fees marked Can Shop on the custom fee set, if the person actually adding the fee marks it as Did Shop, the fee displays in section C the Closing Disclosure.
If the person adding the fee marks it as Didn’t Shop, the fee displays in section B.
- Fees marked Cannot Shop on the custom fee set typically display in section B.
- For fees marked Can Shop on the custom fee set, if the person actually adding the fee marks it as Did Shop, the fee displays in section C the Closing Disclosure.
- Fee collaboration options. Choose one of the following to set the behavior for most fees in this section:
- When you finish, select the Save button.
Correct Fee Mapping
Correct Fee Mapping
You can customize fee names and other items that display on the Disclosures page in the following ways:
- You can dictate certain fees, such as a lender origination fee.
If the person adding the fee marks it as Didn’t Shop, the fee displays in section B.A dictated fee is non‑negotiable. This means that, while a settlement agent can see the fee on the Disclosures page, the agent cannot suggest changes to the fee. Any changes you make are automatically accepted and no review is needed.
- You can determine which item types can be included in each section of the Disclosures page.
For example, a credit report fee can display in section A. Origination Charges or section B. Services Borrower Did Not Shop For. If you map the fee to only section B, neither you nor the agent can add a credit report fee to any other section of the Disclosures page.
- You can choose custom display labels for the items on the Disclosures page.
Your labels are mapped to MISMO‑approved terms so that your Disclosures fields meet MISMO standards even if the labels are different. This means that the fee labels in the UCD.xml file that either you or the settlement agent upload must match the labels you set up.
-
You can choose strict validation.
Strict validation more tightly enforces how fee labels match what you provide in your custom fee type set.
If fees are imported from an external system, any uploaded items with fee types that do not match your fee type set must be mapped to the correct item or removed from the system before collaboration can continue.
When someone imports a UCD.XML file, the system tries to match as many uploaded fees as possible. To do this, Simplifile uses MISMO terms that are approved for each disclosure document section, subsection, and classifier, and which have been mapped to your custom fee type set. On occasion, you may have invalid or un‑mapped fees that do not match your fee type set. If this happens, when you open the Disclosures page for a loan with un‑mapped fees, Simplifile identifies the fee mappings you need to resolve. Below is an example.
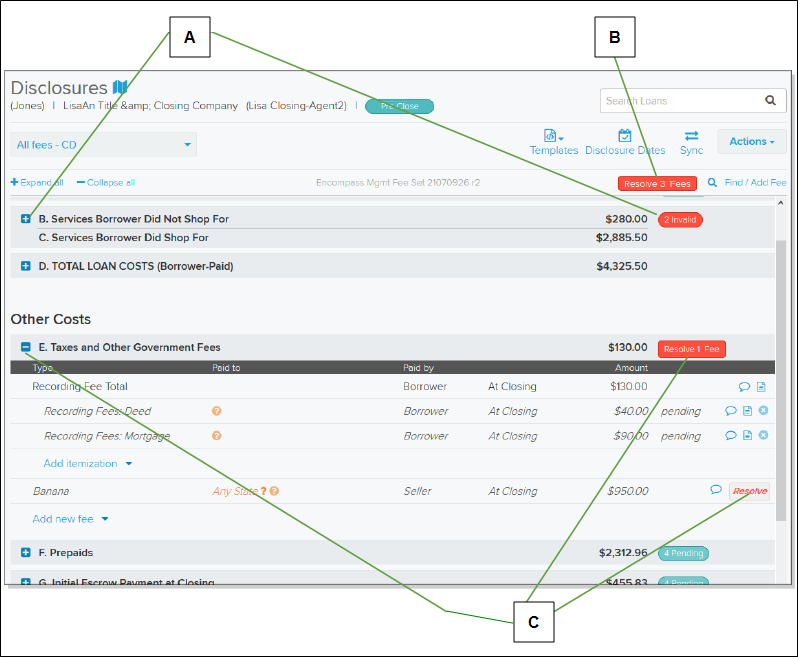
| Letter | Description |
|---|---|
| A | Closed sections (indicated by a plus sign) identify any invalid fees in the section with an Invalid button. |
| B | At the top of the page, Simplifile displays the number of fees that need to be resolved. |
| C | In an expanded section (indicated by a minus sign), you can select the button in the header to resolve all fees in the section, or select the Resolve button beside a single fee to resolve only that fee. |
Select an Invalid button to display the fee. Select a Resolve button to have Simplifile display the Correct Fees Mapping window. This box can help you resolve any issues. Below is an example
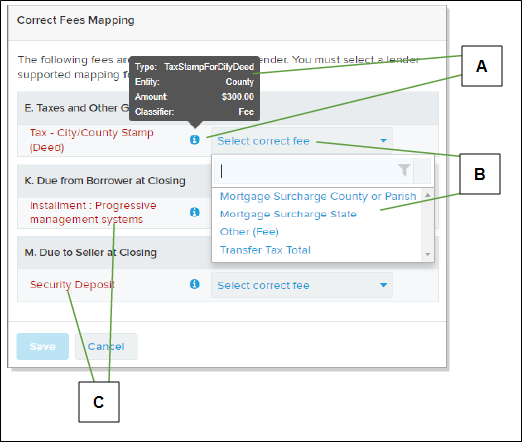
| Letter | Description |
|---|---|
| A | Select the information icon ( ) to display information about the invalid fee. ) to display information about the invalid fee. |
| B | Use a fee’s dropdown list to find a matching fee. |
|
C |
Unmapped items display in red. |
If the list of invalid fees on the left shows a fee between asterisks and with no spaces (as shown in the example below), the imported fee had an item type that was not in your fee type set and had no display label specified. The list may also show a blank field if there is no label specified.
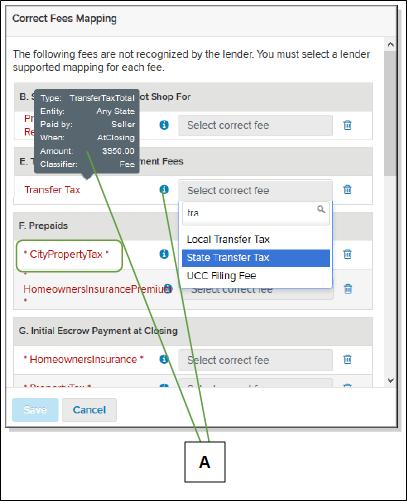
| Letter | Description |
|---|---|
| A | Select the information icon () for any fee to get more information. |
The same fee name may display in both columns. This means that the fee type of the uploaded fee does not match a fee type in your fee type set, but it has a display label that matches the display label of a different fee in your fee type set. For example, both columns will display the same text if your fee type set has an item type of Other with a display label of Assumption Fee and the UCD has an item type of AssumptionFee with a display label of Assumption Fee.
Just as with any other fee change made on the Disclosures page during collaboration, any changes made to fees that are not dictated must be approved by the person who did not propose the changes.
However, while settlement agents can map fees for you to approve, they cannot remove items that you uploaded. They should mark any items they have questions about so that you can review those items.
For more information on collaboration, see Collaborate on disclosures and fees.
How to map unrecognized fees
- Open the loan whose fees you want to work with. For more information, see Find a Loan.
- On the navigation menu, select the Disclosures item.
- Do one of the following to display the Correct Fees Mapping window:
- To display all invalid fees, select the Resolve X Fees button at the top right of the fee list.
- To display invalid fees in a specific section, select X Invalid in the section header. Then select Resolve X Fees in the section header, or select Resolve beside a single fee.
- In the Correct Fees Mapping window, for each displayed fee, select Select correct fee to view the fee item types you can map to that fee. Fees that need to be mapped display in red.
- Do any of the following to help locate the item
type you want to map to the fee:
- Select the information icon (
 ) to display information about the invalid fee.
 - If the dropdown list is long, enter text in the search field to display item types that contain the text you enter.
- Hover your mouse pointer over an item in the dropdown list to display a description of that item type.
- Select the information icon (
- When you find the fee you want in the dropdown list, select the item to map it to the fee type.
- If you do not find a valid fee type, select the trash can icon to remove the item from the section.
- Repeat steps 4 through 7 for each fee in the window.
- When all invalid fees have been mapped or deleted, select the Save button.