RegZ-CD
The RegZ-CD form provides the borrower with an overall view of the terms of the loan and its costs over time. It also contains information specific to the requirements for requesting closing documents. Many of the fields will already be completed, based on entries on the 1003 and the Loan Estimate disclosure input forms. The RegZ-CD has no corresponding output form and is used primarily to review loan information, to edit information about specific types of loans (for example, ARM mortgages), and to order closing documents.
This help topic describes the 2015 Closing Disclosure forms required by RESPA regulations for loans originated on or after October 3, 2015. Your Encompass administrator configures when your company switches by default from the 2010 to the 2015 forms. However, if you have not yet sent your initial disclosure to the borrower, you can switch between the 2010 and 2015 versions of the forms by clicking Forms on the Encompass menu bar, pointing to RESPA-TILA Form Version, and then clicking the 2010 or 2015 option. To view the help topic for the 2010 Closing RegZ disclosure form, refer to the Closing RegZ help topic.
Section Information
-
Loan Program - When working with this feature, a "loan program" is a template of predefined values that display primarily on the Truth-In-Lending Disclosure statement and the 1003 application. Here you can use the Loan Program button to select a loan program to use with the loan. The data from the template is copied to the loan forms. Once applied to the loan, you can leave the data as is or change values as needed. The original data on the loan program template is not affected. Click the Loan Program button to select a loan program to apply to the loan.
-
If you select a loan program that is associated with a plan code, the plan code data is applied to applicable fields as well.
-
To view the loan program data that will be applied to the loan if selected, click to select the loan program. The details display in the Details section (located on the right side of the Select Loan Program Template window).
-
To change the loan program data for this loan only, make your changes in the Details section of the Select Loan Program Template window.
If you select a loan program associated with a plan code, the plan code data cannot be edited in the Select Loan Program Template window.
-
-
Select the Only apply Loan Program template fields that contain a value checkbox to apply only those fields that are populated in the template to the loan file.
-
If the selected loan program template has a closing cost template associated with it, select Only apply Closing Cost template fields that contain a value checkbox to apply only those fields that are populated in the closing cost template to the loan file.
-
Plan Code - Use the Plan Code feature to select a loan program that will be applied to the closing documents.
Use the Plan Code feature to select a loan program that will be applied to the closing documents. Here you can select from a list of investor-specific plan codes or create your own custom plan code.
-
To apply a new plan code to the loan file (and the associated closing documents), click the Plan Code button, click to select a plan code, and then click Select.
-
Only plan codes that match the current loan data are listed. To view all plan codes, click the Clear Filter button.
-
If there is an investor associated with the plan code, the Apply Investor Info dropdown list displays in the lower-left corner of the Select Plan Code window. To apply investor information to the loan file and closing documents, select the investor from the dropdown list. The forms to include in the closing documents and/or the address to print on the forms for servicing may be determined by the investor you select here.
-
You can perform a search by typing data into a field above a plan code column or by selecting an option from a column's dropdown list. Only plan codes containing the specified data are displayed.
-
Click a column header to sort all plan codes in ascending or descending order based on the information in a column.
-
To add a plan code to the list, click the New icon, and then select the plan code to add. To view a plan code's details, including the values that will be added to the loan file if selected, select the plan code, and then click the View Plan Code Details icon (magnifying glass). For detailed instructions about working with plan codes, view the Closing Doc Plan Codes help topic.
-
If any values in the loan file are different from the corresponding values in the selected plan code, the Plan Code Conflict window displays showing the affected fields. Conflicting loan data is identified by a red alert icon.
-
Click the Import Plan Data button to overwrite the current loan data with the selected plan code data. These changes are applied to the loan immediately.
-
Click Skip Import to continue ordering the closing documents without resolving the plan code conflicts.
-
Click Cancel to close the Plan Code Conflict window without making any changes to the loan data. You can then update the applicable fields in the loan file to resolve any conflicts that were found.
-
Alt Lender - Use the Alternate Lender feature to view alternate lender information (code number and description) that appears on the closing documents.
-
On the RegZ-CD form, click the Alt Lender button to view alternate lender information (code number and description) that appears on the closing documents.
-
In the Alternate Lenders window, select a lender, and then click Select to replace the current lender information in the loan with the selected lender's information.
-
Check Closing Document Data - The Closing Document Data button on the RegZ-CD input form enables you to review and confirm the accuracy of the lender and investor data that will be applied to the closing documents. If necessary, you can change this data and replace the old data in the loan file. Please note, any changes you make here are applied to the current loan file only.
-
-
On the RegZ-CD input form, click the Closing Document Data button on the top-right of the form.
-
In the Closing Document Data window, click the Lender Info tab to view lender data that is currently included in the lender settings. This information is added as part of the initial Encompass Docs Solution set up performed by ICE Mortgage Technology and your administrator. This information will print to your closing documents.
-
Click the Investor Info tab to view the investor data that is currently in the loan file. This information is populated based on the plan code currently applied to the loan.
-
To change a field on either tab, click the slider to the left of the field and enter or select a new value. Changes made here are applied to the current loan file only.
-
To make changes to the default lender and investor data that is applied to the closing documents, contact your ICE Mortgage Technology account representative.
-
-
When finished, click OK.
-
-
Print 01/2001 Version of Uniform Instruments checkbox – When the checkbox is cleared, Encompass generates the 2022 versions of the Fannie Mae and Freddie Mac Uniform Legal Instruments (Notes, Security Instruments, etc.). Select the checkbox to generate the old 01/2001 versions of the Uniform Legal Instruments.
-
If authorized by your administrator, you can click the blue Lock icon
 next to a field, and then enter data manually. When you click the blue Lock icon, it changes to a gold Lock icon
  .
. -
After entering data manually, you can click the gold Lock icon
to replace the manually entered data with data calculated by Encompass. -
If closing documents have not been ordered yet, the Disclosed APR and Disclosed Finance Charge fields are populated with data pulled from the corresponding fields in the Disclosure Tracking tool when the gold Lock icon is clicked.
-
If closing documents have been ordered, the values in the Disclosed APR and Disclosed Finance Charge fields revert back to the values that were set when the closing documents were ordered when the gold Lock icon is clicked.
Lender Representative
You can designate an Encompass user as a lender representative for purposes of eClosing, which will be available in a future release of Encompass. Many documents require the lender to have a designated representative execute the documents for electronic closing.
Use the Lender Representative dropdown list (field ID 4672) to select the role that represents the lender for eClosing purposes. The dropdown list includes options that correspond to roles in the Files Contacts tool, including roles based on Milestones and roles not based on Milestones. After selecting a role, the user ID, name, email, work phone number, and cell phone number are populated to the form from the File contacts for the loan. Use the Lock icons to edit the fields. The representative is populated based on the following logic:
-
The user assigned to the role in the currently open milestone.
-
If none found, the user assigned to the role in the most recently closed milestone, starting with the previous milestone and working backward.
-
If none found, the user assigned to role in a future open milestone
-
If none found, the field is left blank.
If an Encompass user has not yet been assigned to the role for the loan in the File Contacts tool, click the Find icon next to the Current Assigned User ID field to select a user and populate the user information on the RegZ-CD. This information may be automatically updated later when a milestone changes, a milestone template is attached, a change is made to the lender representative's contact information, or a new lender representative is assigned to the loan. If you click the Lock icon for any of the lender representative fields to manually enter information, the Currently Assigned User ID (field ID 4682) will be cleared.
This section displays the loan amount and terms, including the monthly payment, purpose, and details for the loan type. Most information will already be completed with information from the 1003 and RegZ forms. Information specific to the RegZ-CD includes selecting a Plan Code and Alt Lender information, and entering closing-related dates.
If not already populated from the Borrower Summary form, enter the loan amount, followed by the additional terms required for the loan.
Enter the number of months that payments will be applied to the interest rate only. Select the Qualify using P&I checkbox to qualify the loan using an estimated payment that includes both principal and interest.
Select a method of calculation for the repayment schedule. For each option, the value represents the number of days per year used to calculate the loan's daily interest.
Select the checkbox to require mortgage payments every two weeks, rather than every month. For more information about biweekly loans, refer to the Process a Biweekly Loan topic.
![]() Potential Negative Amortization
Potential Negative Amortization
Enter the terms for a negative amortization loan.
Enter the additional payment to be made every month to reduce the loan balance in the Extra Payment field (field ID 312).
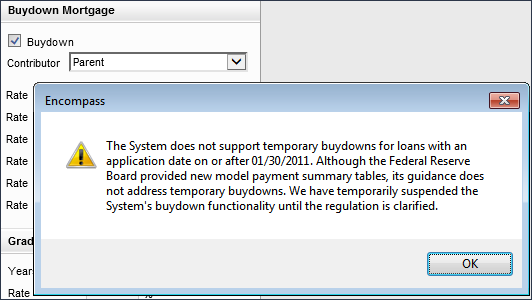
Encompass has temporarily stopped supporting temporary Buydown loans with an application date on or after January 30, 2011. Support will resume once the Federal Reserve Board clarifies how temporary Buydowns should be managed so that they comply with the Mortgage Disclosure Improvement Act (MDIA) Interim Rule for Closed-End Loans that went into effect on January 30, 2011.
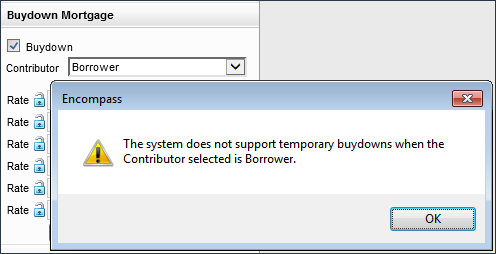
Some support for non-borrower temporary buydowns is enabled (which was introduced in Encompass 19.2 (view the release notes)). Temporary buydowns are not supported when the borrower is indicated as the buydown mortgage contributor.
It is important to note that Encompass users are still responsible for providing a Temporary Buydown Agreement as well as determining whether the terms of the temporary buydown program complies with regulatory and investor requirements.
To Provide Buydown Feature Details:
- Select the Buydown checkbox to indicate the loan includes a buydown feature.
- From the Contributor dropdown list, select the individual or entity that is making contributing payments, such as the seller.
- Use the Rate and Term fields to document and calculate a borrower’s subsidized P&I payment and total buydown for loans in which the contributor is not the borrower.
- If you selected Borrower from the Contributor dropdown list:
-
The Buydown Mortgage fields are read-only by default. You may click the blue Lock icon to enter the terms of the Buydown subsidy manually. However, the REGZ-CD output form will not be accurate if it contains Buydown data and you must acknowledge that you are knowingly proceeding at your own risk before entering data.
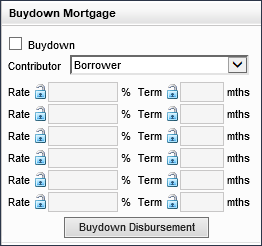
- If you selected any other option besides Borrower from the Contributor dropdown list:
-
Enter the terms of the Buydown subsidy in the Rate and Term fields.
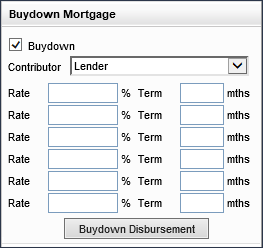
- Click the Buydown Disbursement button to view a quick-entry window that displays the Buydown Disbursement Summary fields. Here you can view and edit the buydown values. Any changes made in this quick entry window will be applied to the Buydown Disbursement Summary form and vice versa.
-
Users must be authorized to access the Buydown Disbursement Summary input form (via their persona) in order to view the Buydown Disbursement Summary quick entry window. Unauthorized users will receive a message stating that they cannot view the quick entry window when they click the Buydown Disbursement button.
Regarding loan templates, please note the following:
- Loan Programs Templates - When applying a Loan Programs template, values from the template for the Buydown Mortgage rates and terms will not be applied when any option besides Borrower is selected for the Contributor in the loan file.
The Contributor dropdown field has not been integrated into Loan Programs templates. Therefore, the Buydown Mortgage fields in the template are fields 1269-1274 and 1613-1618 which are used for the loan only when Borrower is selected as the Contributor.
Therefore, if you apply a Loan Programs template, the Buydown Mortgage fields in the template will be applied only when Borrower is selected as the Contributor in the loan file.
-
Data Templates - The Contributor dropdown field has been integrated into Data templates (for the RegZ-LE and RegZ-CD input forms). Therefore, the Buydown Mortgage fields used for Borrower and Non-Borrower (fields 4535 - 4546) contributors are both provided in the template and values and can be entered for both types. Therefore, the values entered in the Data template for the Buydown Mortgage fields will be applied as expected for both Borrower and Non-Borrower contributors.
- Loan Programs Templates - When applying a Loan Programs template, values from the template for the Buydown Mortgage rates and terms will not be applied when any option besides Borrower is selected for the Contributor in the loan file.
As mentioned earlier, temporary buydowns were not supported in Encompass 19.1 (and later). With this in mind, on the RegZ - LE and RegZ – CD, when a user selected the Buydown checkbox (field ID 425) and then clicked a Lock icon to change any of the Rate or Term fields, the system displayed the following pop-up message.
Starting in Encompass 19.2, temporary buydowns are not supported only when the Borrower is selected as the Contributor. On the RegZ - LE and RegZ – CD in Encompass 19.2, when a user selects the Buydown checkbox, selects Borrower from the Contributor dropdown list, and then clicks a Lock icon to change any of the Rate or Term fields, the system displays the following pop-up message.
The AP Table is disclosed when the periodic principal and interest payment for the loan can change after consummation, but not because of a change to the interest rate; or if the loan is a seasonal payment loan. If the periodic principal and interest payment does not change, the AP Table is not disclosed. The information disclosed in the AP Table on the Loan Estimate is disclosed in the AP Table on Closing Disclosure - Page 4 after being updated to reflect the terms of the loan at consummation.
The Adjustable Payment table includes the following entries:
-
Interest Only Payments - Read-only fields populated based on data from the loan file.
-
Optional Payments - Read-only fields populated based on data from the loan file.
-
Step Payments? - Editable fields for indicating whether the loan has step payments (the default selection is No) and entering the number of payments that are made before the payment amount changes.
-
Seasonal Payments - Editable fields for indicating whether the loan has seasonal payments (the default selection is No) and entering a description.
-
Monthly Principal and Interest Payments
-
If the Yes option is selected for Interest Only Payments, the three fields in this section are populated with read-only text describing the changes and maximum payment amount for the principal and interest payments, based on data in the loan.
-
If the Yes option is selected for Optional Payments, Step Payments?, or Seasonal Payments, the three field in this section are blank and can be edited.
If the Biweekly option (field ID 423) is selected for the Amortization type, the title of this section changes from Monthly Principal and Interest Payments to Biweekly Principal and Interest Payments.
![]() Adjustable Interest Rate (AIR) Table
Adjustable Interest Rate (AIR) Table
The AIR Table is disclosed when the loan’s interest rate can change after consummation. The AIR table displays on the input form when the ARM option is selected for the Amortization Type (field ID 608). If the ARM option is not selected: the loan’s interest rate does not change after consummation, the AIR Table is not disclosed, and the table does not displayed on the input form.
The AIR table includes the following entries:
-
Index + Margin - The margin index and rate.
-
Initial Interest Rate -The initial interest rate for the loan.
-
Min/Max Interest Rate - The minimum and maximum interests rates during the life of the loan. Click the Lock icon to edit the minimum rate.
-
Change Frequency - This sections display the timing of the first interest rate adjustment and the number of months between each subsequent adjustment.
-
Limits on Interest Rate Changes - The maximum interest rate change for the initial increase and subsequent increases.
Use the Interest Accrual Options section to configure options for simple interest and 0% interest loan options.
The 0% Payment Option is used when originating down payment assistance loans for affordable housing. This field is applied to loan calculations only when a loan’s note rate (field 3) is set to 0%. The following values can be selected from the dropdown list:
-
Amortizing Payment – This value displays by default when a loan's note rate (field 3) is set to 0%.
-
No Payment with Balloon
-
No Payment – Fully Forgiven
All three options can be used with fixed rate 0% loans. For ARM loans with an initial 0% interest, Encompass calculations support only the Amortizing Payment option, however Encompass does not prevent a user from selecting one of the No Payment options on a 0% ARM loan.
Use the remaining fields in the Interest Accrual Options section to set the interest accrual parameters used to correctly calculate payment streams, finance charges, and APR.
-
Use 366 Days in Leap Year – When selected, this field is applied to calculations only if 365/365 or 365/360 is selected for the Interest Days/Days in a Year (field ID 1962).
-
Use Simple Interest Accrual – This field is used in combination with Interest Days /Days in Year and must be selected to apply simple interest calculations to the P&I payment and payment schedule when an option with 365 days (365/365, 365/360) is used. If this checkbox is not selected, a default value of 360/360 (standard accrual method) is used for calculations regardless of the selection made for the Interest Days/Days in a Year (field ID 1962).
-
Number of Days (Biweekly, Interim Interest Classic HELOC) – Selections in this field affect interim interest collected at closing, as well as biweekly payment schedules and classic HELOC schedules that are not configured using the HELOC Management input form.
If the Use Simple Interest Accrual checkbox (field ID 4749) is selected, the selections for the Interest Days/Days in a Year dropdown list (field ID 1962) and the Use 366 Days in a Leap Year checkbox (field ID 4748) are used to determine the simple interest calculations for the payment schedule, according to the logic in the table below.
| Interest Days/ Days in a Year | Use 366 Days in Leap Year |
Description |
|---|---|---|
| 365/365 | Selected |
Every year is calculated as 365, except for leap years, which are calculated as 366. Monthly interest is calculated on the actual days in the prior month. |
| 365/365 | Cleared |
Every year is calculated as 365, including leap years. Monthly interest for each payment is calculated based on the actual days in the prior month. |
| 365/360 | Selected or cleared |
The days per year are always 360 in this method. Monthly interest for each payment is calculated based on the actual days in the prior month. |
The Use 366 Days in a Leap Year option is applied to calculations only when the Use Simple Interest Accrual checkbox has also been selected.
In the first two fields in the Adjustable Rate Mortgage section, enter the maximum percentage that the loan can adjust at the first adjustment period and the number of months from the close of the loan to when the first rate adjustment can occur.
-
In the Adj Cap field (field ID 695), enter the maximum percentage that the loan rate can change at each adjustment, after the first adjustment.
-
In the Adj Period field (field ID 694), enter the number of months between rate adjustments, after the first adjustment.
-
In the Life Cap field (field ID 247), enter the maximum percentage (above the initial note rate) that the rate can adjust during the life of the loan.
-
The Max Life Int. Rate field (field ID 2625) displays the maximum interest rate cap for the life of the loan.
Click the Get Index button to look up the current index (based on the ARM Index Type indicated on the the RegZ-LE). The Index field (field ID 688) is updated with the most current index and is used as the basis for the rate of the loan.
-
Due to a change of policy by the ICE Benchmark Administration effective September 2, 2014, all LIBOR index rates are updated one business day after the index’s effective date. LIBOR rates obtained using the Get Index button reflect the prior business day’s LIBOR rate.
The following ARM Index Types are impacted:
-
LIBOR - 1 month 1 Month London Inter-Bank Offering Rate (LIBOR)
-
LIBOR - 3 month 3 Month London Inter-Bank Offering Rate (LIBOR)
-
LIBOR - 6 month 6 Month London Inter-Bank Offering Rate (LIBOR)
-
LIBOR - 12 month 12 Month London Inter-Bank Offering Rate (LIBOR)
For more information about construction loans, refer to the Process a Construction Loan topic.
Select a method for calculation of interest. Method A (also known as Half Loan or On Advance When Made Method): Interest is payable only on the amount advanced for the time it is outstanding. Assumes one half of the commitment amount is outstanding at the contract interest rate for the entire construction period. Method B (also known as Full Loan): Interest is payable on the entire amount regardless of actual dates or amounts of disbursement. Assumes the entire commitment amount is outstanding at the contract interest rate for the entire construction period.
Select a method for calculation of the repayment schedule. In each option, the first value represents the number of days per year used to calculate the loan's total interest and the second number represents the number of days per year used to calculate the daily interest. 360/360: Total interest is calculated based on the months in the loan period multiplied by 30 (partial months are not allowed) / Daily interest is calculated based on 360 days in a year. 365/360: Total Interest is calculated based on the total days in the loan period (partial months are allowed) / Daily interest is calculated based on 360 days per year. 365/365: Total Interest is calculated based on the total days in the loan period (partial months are allowed) / Daily interest is calculated based on 365 days per year.
Use the Edit icons in the Mortgage Insurance section to calculate the mortgage insurance premium and term. For detailed instructions, refer to Calculating Mortgage Insurance Premiums.
The Projected Payments section shows the estimated payments (monthly or biweekly, depending on the loan type), the final balloon payment, if any, and the estimated monthly taxes, insurance, and assessments.
-
Click the View Payment Schedule button to view the loan's Amortization Schedule.
The Project Payments table is read-only by default and displays information based on the type of loan. Use the Customize checkbox and Edit button at the top of the section to customize the Projected Payments section for construction loans and other loan types that require specialized setup for the Projected Payments table.
The top of the section lists the estimated payments (monthly or biweekly, depending on the loan type). A column on the left lists the type of information displayed in each row:
-
Time period
-
Principal and interest
-
Mortgage insurance
-
Estimated escrow
-
Total estimated monthly or biweekly payment
Up to four columns on the right display payment amounts, including payments for various time periods when the principal and interest payment change, mortgage insurance payments end, or a balloon payment is due.
For example:
-
A 30-year fixed rate loan displays only one column if monthly payments do not change during the life of the loan and there is no mortgage insurance or balloon payment.
-
A 5/3 ARM Interest Only loan may have four columns due to periodic interest rate adjustments and the termination of mortgage insurance payments.
All adjustable rate (ARM) loans will generate a four column Projected Payments table based on the following loan triggers:
The final balloon payment is populated to the fourth column in the table, i.e., the Final Payment column. This is existing logic continued from earlier versions of Encompass.
-
If the Max Lifetime Rate is reached at the first adjustment, all subsequent adjustments are reflected in the four column Projected Payments table even if the payment has not changed.
-
If the Min (Floor Rate) is reached at the first adjustment, all subsequent adjustments are reflected in the four column Projected Payments table even if the payment has not changed.
![]() Periodic Principal and Interest Payment Changes
Periodic Principal and Interest Payment Changes
Four column Projected Payments table is generated when the following events occur:
-
Interest Only payment period ends
-
Negative amortization period ends
-
The anniversary of the initial periodic payment changes after multiple payment changes occur in a single year
If automatic termination of mortgage insurance occurs in any of the above scenarios, a four column Projected Payments will be generated if the current table contains only three columns. Otherwise, the automatic termination of mortgage insurance on its own will not trigger a fourth column.
The Apply Actual Payment Change checkbox is provided at the top of the Projected Payments table for ARM loans only. Select this checkbox to revert to the previous Projected Payments table trigger logic used in Encompass 15.2.0.0 (and earlier) and apply the actual payment change. This checkbox is hidden if the Projected Payments table’s Customize checkbox is selected.
The Payment Schedule is calculated using values from the loan terms and loan type fields. You can also enter custom values as follows.
-
Select the Customize checkbox.
-
Type values in the Number of Payments, Interest Rate, and Monthly Payment fields as needed.
-
Click Calculate Payment to recalculate the payment schedule.
-
Clear the Customize checkbox to return to the original schedule.
These sections contain information related to loan conditions such as early payoff, late charges, assumability, and recission details.
- Click the Prepayment Penalty button to enter detailed prepayment penalty information.
![]() Enter prepayment penalty information
Enter prepayment penalty information
-
To create up to five entries for prepayment penalties, select the type of prepayment penalty (Hard or Soft).
-
Type the number of months in the prepayment period, and the percentage of the prepayment.
-
The Hard Prepayment Period and Prepayment Penalty Period fields are calculated based on previous entries.
-
In the Prepayment Penalty Fee field, enter the number of months of advanced interest that the prepay penalty cannot exceed.
-
In the Penalty Based on field, select the amount or balance on which the prepayment penalty is based.
-
Use the Recission Detail section at the bottom of the RegZ-CD input form to record details about the act of rescission, including whether the consumer waived rescission or exercised their right to rescind. Note that the data in this Rescission Detail section will not be printed to the RegZ-CD output form.