Feature Enhancements in Version 24.3
This section discusses the updates and enhancements to existing forms, features, services, or settings that are provided in this release.
New ICE PPE Workflow
Get Buy Side and Get Sell Side Experiences
(Updated on 12/13/2024)
In the ICE PPE 24.2 release, we introduced the Loan Officer experience. In this release, we are expanding upon the Loan Officer experience by introducing the Get Buy Side experience. The following enhancements will enable a Secondary Lock Desk user to perform Get Buy Side Pricing using an ICE PPE integration.
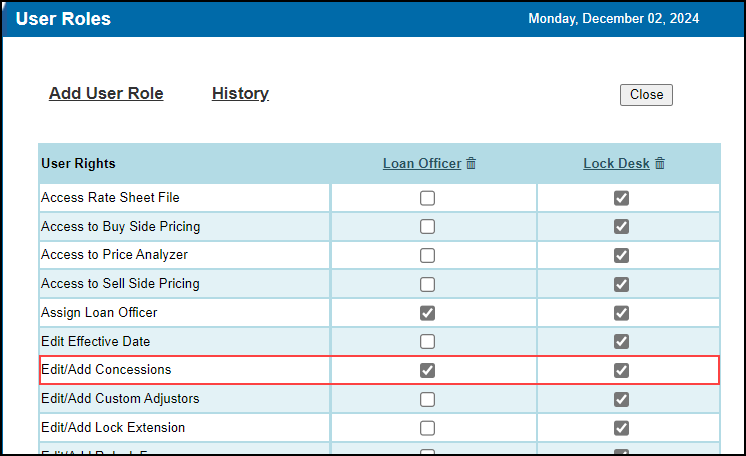
Anew Edit/Add Concessions User Right has been added to the User Roles page. When this user role is selected, authorized users can add and edit Concessions on the Secondary Lock Tool.
To Access the User Roles Page:
-
Log into ICE PPE as a Client administrator.
-
Click the Company tab.
-
Click the Add/Manage User Roles link at the top of the page.
New default User Rights have been added to the Lock Desk User Role. These rights will be added for all existing and new Clients to enable a Lock Desk user to perform Get Buy Side Pricing.

Get Buy Side Pricing
The following list provides the notable Buy Side Pricing differences between the web version of Encompass and the desktop version of Encompass.
-
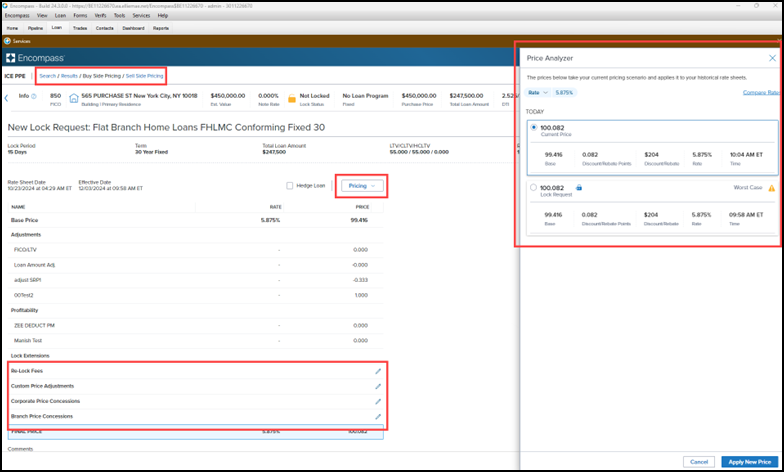
Lock Summary Landing Page - Users will now land on the Lock Summary page instead of qualification results. Users can navigate to the Search, Results, and Sell Side pages from the navigation control in the top left of the page.
-
Miscellaneous Adjustments - Miscellaneous adjustments can be entered on the Buy Side Pricing page including Re-Lock Fees, Custom Price Adjustments, Corporate Price Concessions, and Branch Price Concessions.
-
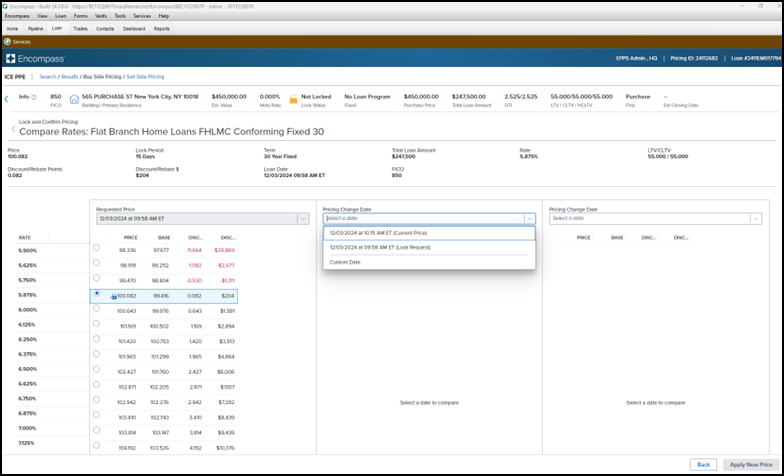
Price Analyzer - a new Price Analyzer can be accessed from the Pricing dropdown list. A slide in is displayed showing each existing snapshot as well as the current price. Users can change the pricing by selecting from among these snapshots or navigate to Compare Rates for a more detailed analysis.
-
Hedge Loan Checkbox - The Hedge Loan checkbox can be selected on this page.
Example of the Buy Side Pricing Page
Example of the Compare Rates Page
Get Sell Side Pricing
The following list provides the notable Sell Side Pricing differences between the web version of Encompass and the desktop version of Encompass.
-
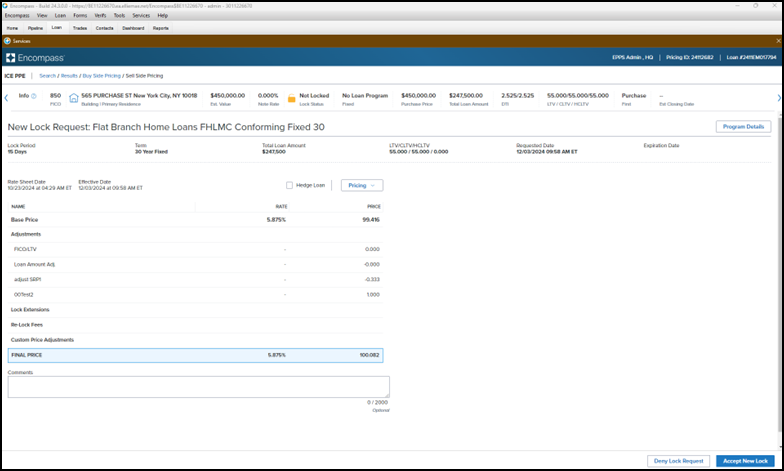
Lock Summary Landing Page - Users will now land on the Lock Summary page instead of qualification results. Users can navigate to the Search, Results, and Buy Side Pricing pages from the navigation control in the top left of the page.
-
Price Analyzer - The new Price Analyzer shown in the Example of the Buy Side Pricing Page screen shot above can also be accessed from the Pricing dropdown list on this page. A slide in is displayed showing each existing snapshot as well as the current price. Users can change the pricing by selecting from among these snapshots or navigate to Compare Rates for a more detailed analysis.
-
Hedge Loan Checkbox - The Hedge Loan checkbox can be selected on this page.
Example of the Sell Side Pricing Page
When the Buy Side Profitability Details setting is disabled on the Update Lock Request Fields page under Settings, the profit adjustments will be removed from Elevated Adjustments in the LockRate API.
Auto Validate
(Added 12/13/2024)
A new Lock Comparison Tool has been added to Encompass. This new tool displays pairs of fields that are monitored for changes made after the loan is locked. When loan data in a loan with an active lock is changed, the lock must be validated again. You can validate the loan using the Validate Pricing button on the Lock Comparison Tool or the Validate Pricing menu option on the Pipeline.
New Lock Comparison Tool persona options have been added to the Personas Setting tab and the Personas Forms/Tools tab.
Settings Tab
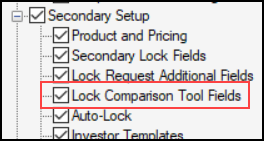
The Lock Comparison Tool Fields option in the Secondary Setup section of the Settings tab provides authorized users with the ability to customize the fields on the Lock Comparison Tool.
-
Personas with Access to All Features selected prior this release will not inherit access to this option automatically. It will need to be manually configured.
-
Personas created with Access to All Features selected after this release will have this option selected automatically.
Forms/Tools Tab
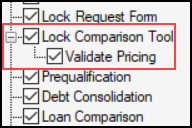
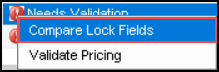
The Lock Comparison Tool option on the Forms/Tools tab provides access to the tool and the Compare Lock Fields option on the Pipeline when a rate lock validation status icon is selected.
-
Personas with Access to All Features selected prior this release will not inherit access to this option automatically. It will need to be manually configured.
-
Personas created with Access to All Features selected after this release will have this option selected automatically.
The Validate Pricing child option on the Forms/Tools tab provides access to the Validate Pricing button on the Loan Comparison Tool and the Pipeline when a rate lock validation status icon is selected.
-
The Lock Comparison Tool persona option must be selected before this child option can be selected.
-
Personas with Access to All Features selected prior this release will not inherit access to this option automatically. It will need to be manually configured.
-
Personas created with Access to All Features selected after this release will have this option selected automatically.
SEC-21909, SEC-22311
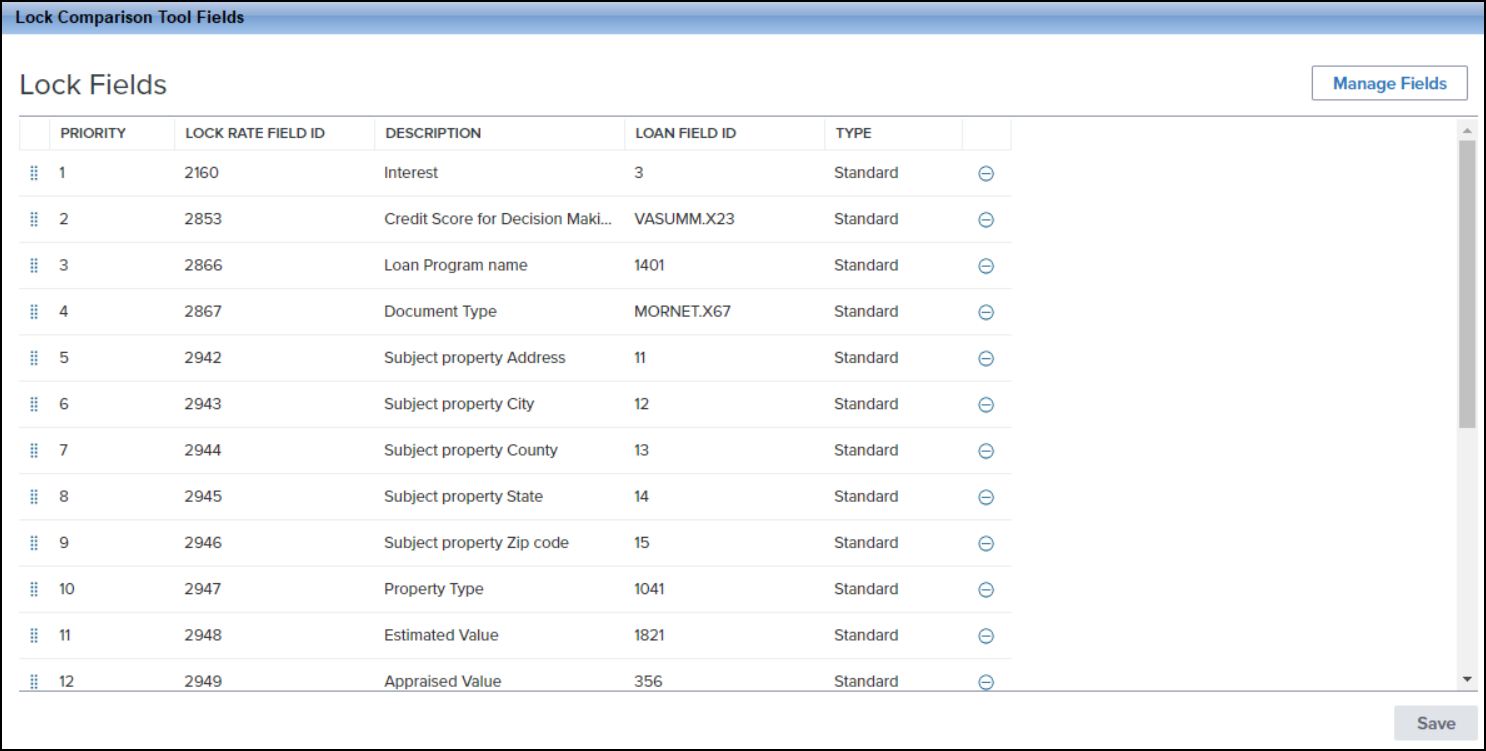
A new Lock Comparison Tool Fields setting has been added under Secondary Setup. This setting enables authorized users to customize the fields displayed on the Lock Comparison Tool.
To Configure the Lock Comparison Tool Fields Setting:
-
On the menu bar, click Encompass and then click Settings.
-
On the left panel, click Secondary Setup and then click Lock Comparison Tool Fields.
-
If the user does not have the right to access this setting, an error message is displayed stating the user does not have access to the setting.
-
The fields displayed on the screen are the default fields that will be displayed in the Lock Comparison Tool.
-
To reorder the fields in the list, click and hold the Move (
 ) icon next to the
field you want to move and then drag that field to its new
place on the screen.
) icon next to the
field you want to move and then drag that field to its new
place on the screen. -
To delete a field from the list, click the Delete (
 )
icon next to the field you want to delete.
)
icon next to the field you want to delete.
-
To customize the fields in the tool, click Manage Fields .
-
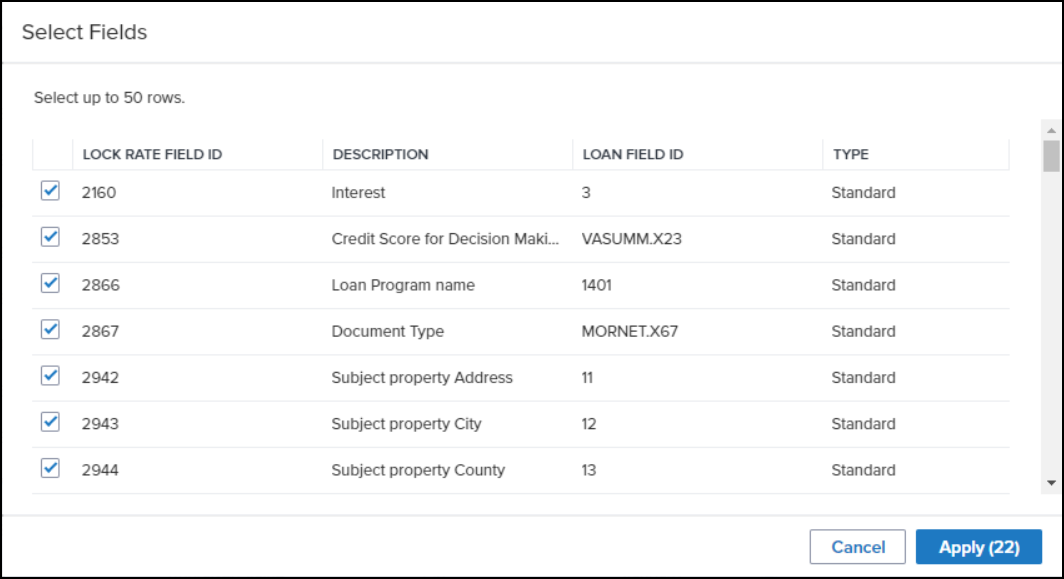
From the predefined list of fields, select the fields you want to display in the tool and deselect the fields you do not want to display in the tool.
The fields available for selection are either from the Lock Request Form and/or Lock Request Additional Fields. Currently borrower paired fields (e.g., 2950 --> 1811) are not supported.
-
A minimum of 1 field must be selected and the maximum number of fields allowed is 50.
-
Click Apply to save your changes.
-
The number next to “Apply” indicates the number of fields being applied to the tool.
SEC-21981
The new Lock Comparison Tool monitors the fields configured in the Lock Comparison Tool Fields setting for loan data changes made after a loan is locked. When data in a loan with an active lock is changed, that loan must be validated again, using the Validate Pricing button on the tool or using the Validate Pricing menu option on the Pipeline.
-
To use the Lock Comparison Tool, you must be assigned a persona with the right to access the tool.
-
To validate pricing, you must be assigned a persona with the right to validate pricing.
-
The Validate Pricing button and menu option will not be displayed under the following circumstances:
-
The loan is not locked
-
The lock has expired
-
The lock has expired
-
No Provider ID is populated in field ID 5029
-
Field ID 4788 is empty
-
Loan is in Correspondent bulk trade
-
No Provider ID is available in the lock snapshot (Validate Pricing button)
To Use the Lock Comparison Tool:
-
On the Pipeline, locate a loan displaying a status in the Rate Lock Validation Status column.
-
If the column is not displayed, right-click any column header and then select Customize Columns. In the Search field, enter “Rate Lock Validation” and then click Find. Select the Rate Lock Validation Status checkbox and then click OK.
-
When adding the Rate Lock Validation Status column (i.e., field 4788) to the Pipeline, be sure that the field is also added to the Encompass Reporting Database. If you do not add it to the Selected Fields section of the database, errors may be triggered when you attempt to add the column to the Pipeline.
-
Click on the status icon and then select Compare Lock Fields.
-
Alternatively, you can open the loan and then click on Lock Comparison Tool in the Tools panel or click on the Lock icon in the loan header and then click on Lock Comparison Tool.
-
The read-only fields at the top of the screen display the number of field changes, the date the loan was locked, and the lock validation status.
-
The Lock Fields dropdown field enables you to either display “All Fields” or “Only Fields with Changes”.
-
The grid provides the field name, the current lock value, and the current loan value.
-
The Current Loan Value column displays any changed field values or the existing lock field value if there are no changes.
-
The increase or decrease of a changed field value is indicated with an upward or downward arrow.
-
If the loan needs validation, the Validate Pricing button is displayed.
-
You can leverage Encompass workflow engine rules to automatically validate pricing, submit a lock update, add tasks, or email specified users.
Or
-
You can click Validate Pricing.
-
Alternatively, you can click the loan’s status icon on the Pipeline and then select Validate Pricing.
-
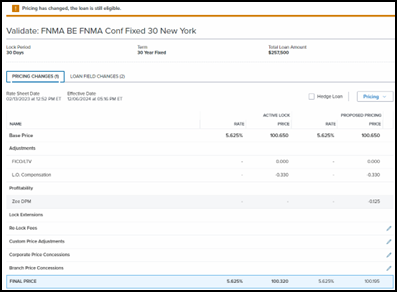
If you click Validate Pricing, ICE PPE is launched and will display changes and any impact to pricing or eligibility.
-
Two tabs, "Pricing Changes" and "Loan Field Changes" are displayed.
-
Pricing Changes - Displays the active lock pricing data and the proposed lock pricing data side by side.
-
Loan Field Changes - Enumerates which values are mismatched between the loan and lock data.
-
The Lock Validation Status (field 4788) will be one of the following:
-
No Price change, still qualifies
-
Price changed, still qualifies
-
Loan no longer qualifies
-
Click the Update Lock button to submit the lock update.
-
If Auto Lock is turned off, a request will be sent to Secondary Registration and will require confirmation.
-
If Auto Lock is turned on, the request will automatically be confirmed and the loan will be updated.
-
After the lock update is confirmed, Encompass will clear the value in Lock Validation Status (Field 4788).
SEC-22508, SEC-26489
Manual Adjustments
The Secondary Lock Tool has been updated to support manual adjustments.
-
Limits have been added to active adjustments in the Price Adjustment and Price Concession categories.
-
10 relocks
-
10 adjustments
-
5 corporate price concessions
-
5 branch price concessions
-
Adjustments and Concessions are read-only once they are marked with an approval status.
While we are moving Clients towards entering adjustments in ICE PPE, we need a process that handles current loans that have entered adjustments in Encompass.
When a user enters ICE PPE we will validate that adjustments in ICE PPE match the adjustments in Encompass. If they do not match, we will pre-fill ICE PPE with the adjustment values in Encompass to force a reprice with those adjustments. If the adjustments are edited in ICE PPE, Encompass will be updated with those adjustment values.
Lock Extensions
Currently, adjustments to pricing are entered in the Encompass for lock extensions. ICE PPE does not have this data when performing pricing, which limits the ability for ICE PPE to directly provide an accurate price. The following enhancements will enable adjustments to be entered in ICE PPE and enable Encompass to be the recipient of this data.
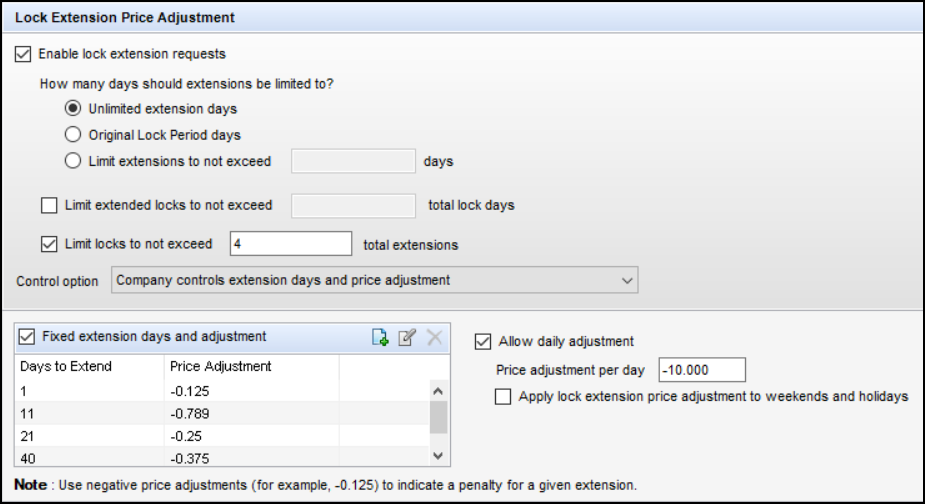
The Lock Extension behavior has been updated based on the Lock Extension Price Adjustment settings in the desktop version of Encompass (Encompass>Settings>Secondary Setup>Product and Pricing). Depending on the settings that are enabled/disabled, certain data will either be automatically populated or ICE PPE users will be able to manually enter that data on the Lock Extension page.
-
When the "Limit extensions to not exceed [number] days" is enabled:
-
Any number that exceeds the set maximum days will be removed from the "Days to Extend" dropdown list on the Lock Extension page.
-
If all the numbers exceed the set maximum days, no options will be displayed in the "Days to Extend" dropdown list on the Lock Extension page.
-
If the "Days to Extend" value entered on the Lock Extension page exceeds the set maximum days, an error message "Value must be less than or equal to [number]" will be displayed and the Request Extension button will be disabled.
-
When the "Limit extended locks to not exceed [number] total lock days" is enabled:
-
Any number that exceeds the set limit will be removed from the "Days to Extend" dropdown list on the Lock Extension page.
-
If all the numbers exceed the set limit, no options will be displayed in the "Days to Extend" dropdown list on the Lock Extension page.
-
If the "Days to Extend" value entered on the Lock Extension page exceeds the limit, an error message "Value must be less than or equal to [number]" will be displayed and the Request Extension button will be disabled.
-
When the "Limit locks to not exceed [number] total extensions" is enabled:
-
If the maximum total extensions has exceeded the set [number], a Lock Extension Limit Reached error message will be displayed. An Exit ICE PPE button will be the only available action.
-
When the Company control "Company controls extension days and pricing adjustment" is selected and:
-
"Fixed extension days and price adjustment" is enabled and "Allow Daily Adjustment " is disabled, your users are required to select the "Days to Extend" from the dropdown list on the Lock Extension page.
-
Both "Fixed extension days and price adjustment" and "Allow Daily Adjustment" are enabled, your users will manually enter the "Days to Extend" into the field.
-
If the number corresponds to an entry in the Fixed extension days and price adjustment grid, the corresponding price adjustment will be populated in the "Price Adjustments" field on the Lock Extension page.
-
If the number does not correspond to an entry, the price adjustment will be calculated with the per day value.
-
"Fixed extension days and price adjustment" is disabled and "Allow Daily Adjustment " is enabled, your users will manually enter the "Days to Extend" and the price adjustment will be calculated with the per day value on the Lock Extension page.
-
When the Company control "Company controls extension days and pricing adjustment by extension occurrence" is selected:
-
The Extension #1 "Days to Extend" and "Price Adjustment" from the Adjustment per Lock Extension grid will be populated on the Lock Extension page for the first extension. Both fields will be read-only.
-
The Extension #2 "Days to Extend" and "Price Adjustment" from the Adjustment per Lock Extension grid will be populated on the Lock Extension page for the second extension. Both fields will be read-only.
-
The "Days to Extend" and "Price Adjustment" values will be populated on the Lock Extension page based on the extension number until the maximum number of total extension days is reached (as configured in the Lock Extension Price Adjustment section). When the maximum is reached, a Max Extension Reached error message will be displayed.
-
When the Company control "No company control - user can request any extension days and price adjustment" is selected:
-
Your users are required to enter the "Days to Extend" and the "Price Adjustment".
-
"0" is a valid value.
-
A positive adjustment cannot be displayed as the calculated adjustment.
Two new lock extension validations have been added.
-
Lock Extension Pending Request Validation - If a loan has a pending lock request and a user attempts to request a lock extension for that loan, a Pending Price Request error message will be displayed to prevent existing active requests from being overwritten. An Exit ICE PPE button will be the only available action.
-
Lock Extension Price Values Validation - Verifies that the current extension pricing values are identical to the Encompass pricing values. If the Rate Lock Validation Status column displays a value on the Pipeline (e.g., Needs Validation, Price Changed, still qualifies, etc.), a Loan Price Validation error message is displayed. A Close ICE PPE button will be the only available action.
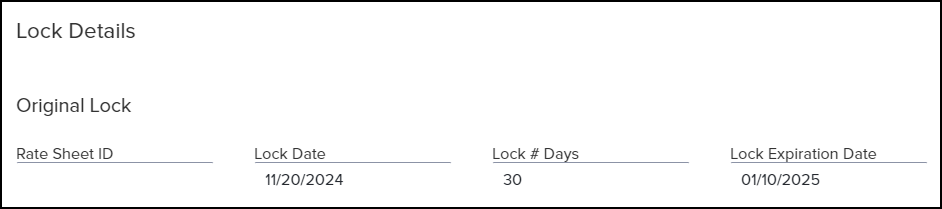
A new Original Lock section has been added to the Lock Extension page. This section displays lock data from previous locks.
Additional Enhancements
The spinner displayed to visually indicate to users that an action is currently in progress has been updated from the pulsing flower to a spinning circle.
The Assign LO & Price as LO feature requirement that the logged-in (session user) view the results with their own rights has been removed. Instead, they will view the results as the LO would see them if they themselves had priced the loan.
-
The username will be changed to the LO name (an LO other than the session user) when the loan is qualified.
In the EPPS 24.2 release, we added the Loan Officer field to LoanQualifier/Eligibility endpoints. As part of Auto Validate, the Loan Officer id who requested the last transaction must be determined. Currently, if a null value is passed from the Partner API, the null value is stored against the loan. From this release forward, instead of storing the null value, the current user id will be stored as a Loan Officer if null is passed from the Partner API.
Currently, the first accordion defaults to open on the Best Ex tab on the Results page. From this release forward, all accordions will default to closed on the Best Ex tab.
The Effective Date and Time validation on the Search page has been modified to validate the date only.
-
The rate retention period has been changed from one year to 450 days.
-
The validation states "Effective Date must not be prior to [calculated date]."
-
A date and time is permitted up to and including 450 days prior to the current date.
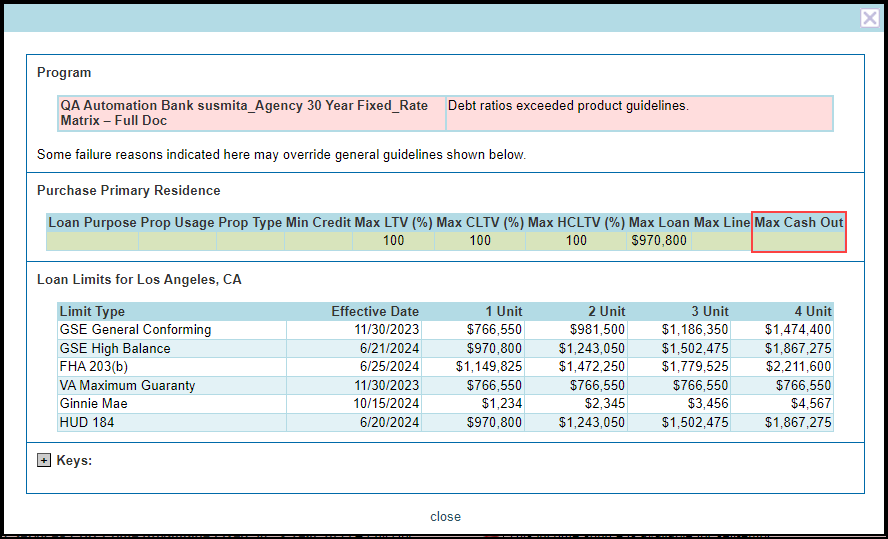
A new Max Cash Out column has been added to the far right side of the Ineligibility grid on the Ineligible Programs tab on the Results tab.
-
Related to MaxCash column in the Guideline Definition.
-
Cells will be highlighted when the subject cash out exceeds the Max Cash Out.
Updates to ICE PPE
Matrix Enhancements
A new Matrices link has been added to the Settings tab.
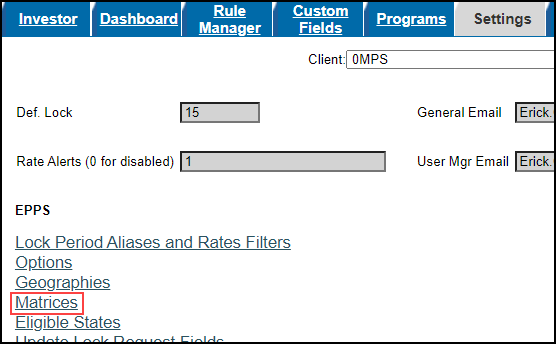
The link opens to the Matrices listing page. The list only displays the matrices marked as available to the current Client ID.
This page can only be accessed by a Client admin for this Client.
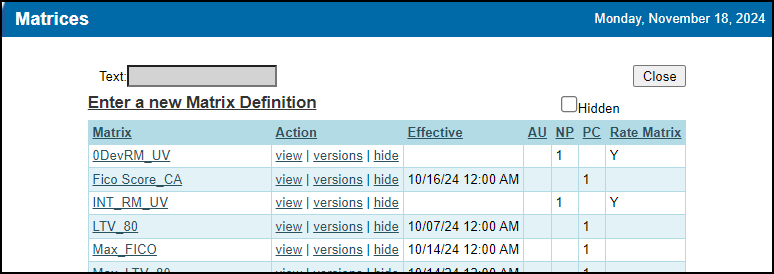
When the Enter a new Matrix Definition or view link is selected from the Matrices listing page accessed from the Settings tab, the Matrix Definition page is opened.
Clients use matrices to enable users to replace individual rules with matrices, which reduces the amount of individual rules needed.
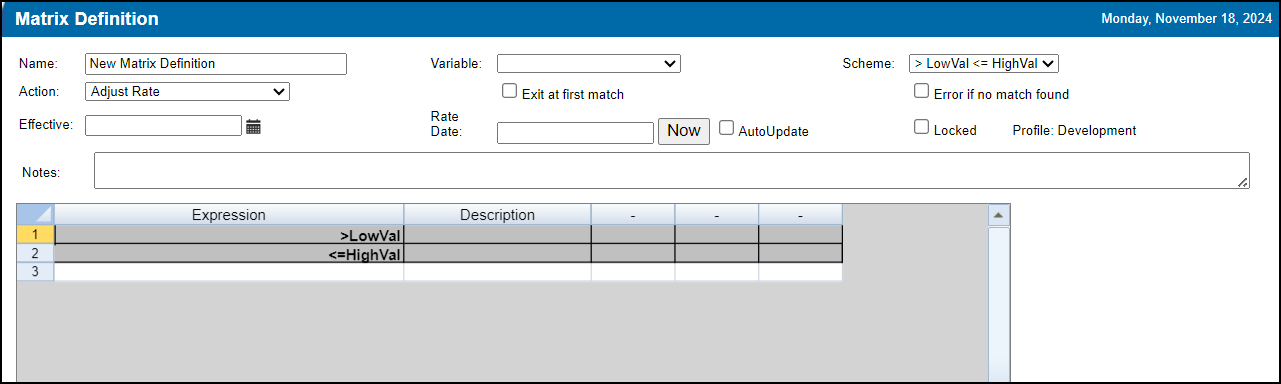
-
If Enter a new Matrix Definitionis selected, you can create a new matrix definition. Matrices house pricing actions to be taken on loans falling within certain parameters.
For detailed information on matrices, refer to the Using the ICE PPE Custom Program Management guide.
-
If the view link is selected for a specific matrix, you can view a read-only version of the definition.
When a Matrix name or versions link is selected from the Matrices listing page accessed from the Settings tab, the Matrix Versions page is opened. This page displays past and present production versions of the Investor’s matrices, and any matrices in Test profile. The list only displays the matrices marked as available to the current Client ID.
This page can only be accessed by a Client admin for this Client.
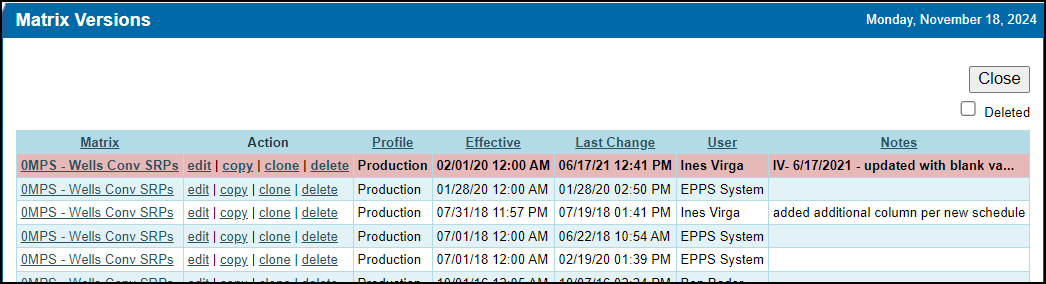
-
If the edit link is selected for a specific matrix, you can edit that version of the matrix definition (Test or Production).
-
If the copy link is selected for a specific matrix, a Test copy of the matrix version is created. All parameters of the matrix version/definition are copied with the exception of effective date and notes. Copy is helpful when there are simple changes to the matrix definition.
-
If the clone link is selected for a specific matrix, a new matrix based on the selected version and its parameters is created. All parameters of the matrix, matrix version, and matrix definition are cloned with the exception of effective date and notes.
-
The delete link is only available for matrix versions in Test. Production versions cannot be deleted for historical purposes.
-
The Deleted checkbox will display all deleted matrix versions stored for historical purposes.
For detailed information on matrices, refer to the Using the ICE PPE Custom Program Management guide.
A new Execute Matrix rule task has been added to the Rule Manager. This new task executes the selected Client Matrix.

In addition, the Matrices button opens the modified Matrices listing page that can be accessed from the Settings tab.
The list of Variables on the Matrix Definition (accessed from the Settings tab and CPM) has been modified. The following Variables are no longer available.
-
iGlobal1, fGlobal1
-
iGlobal2, fGlobal2
-
iGlobal3, fGlobal3
-
Use Expressions
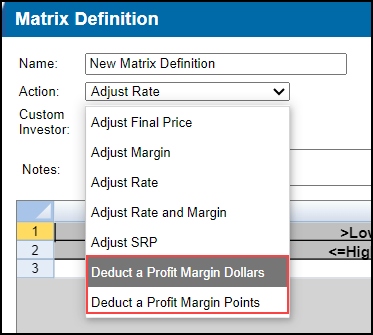
The list of Actions on the Matrix Definition (accessed from the Settings tab and CPM) has been modified. The following Actions are no longer available.
-
Increase iGlobal1, Increase fGlobal1
-
Increase iGlobal2, Increase fGlobal2
-
Increase iGlobal3, Increase fGlobal3
-
Set Variable
The list of Expressions on the Matrix Definition (accessed from the Settings tab and CPM) has been modified. The following Expressions (not a comprehensive list) are no longer available.
-
Client
-
Lender
-
LenderCategory
-
PropValue
-
Downpayment
-
iGlobal1, fGlobal1
-
Variable Agency Level
Two new actions, Deduct a Profit Margin Dollars and Deduct a Profit Margin Points, have been added to the Matrix Definition. These actions enable Clients to manage margin rules via matrices.
The Deduct a Profit Margin Dollars action deducts a profit margin expressed in dollars while the Deduct a Profit Margin Points action (formerly Deduct a Profit Margin) deducts a profit margin expressed in points.
Custom Terms
A new Custom Term field has been added to the Search page. This field enables you to map the exact term of a loan, in months, to an existing program type.

-
Either a Loan Term must be selected or a Custom Term must be entered.
-
An error message "Either enter a Custom Term or choose a Loan Term." will be displayed if both a loan term is selected and a custom term is entered.
-
If a Custom Term is populated and a user selects a Loan Term, the Custom Term is cleared.
-
If a Loan Term is selected and a user enters a Custom Term, all Loan Term are cleared.
-
The Custom Term field is editable.
-
An integer greater than zero and less than or equal to 360 is allowed. An error message "Custom Term must be an integer value from 1 to 360." will be displayed if the integer does not meet the criteria.
-
The custom term must match an enabled program for the Client.
-
An error message "No match found for Custom Term." will be displayed if the custom term does not match an enabled program.
-
If the custom term is valid, that value will be saved to Loan Term.
The Qualification change made for custom terms can result in qualification results with empty results collections. In this scenario, an error message "No Products matched your request." will be displayed.
In addition, the "Either enter a Custom Term or choose a Loan Term." validation for the Loan Term field is removed in the Simple Search.
EPPS-68511
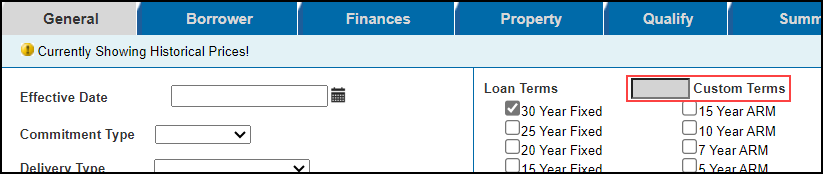
A new Custom Terms field has been added to the Loan Terms section of the General tab. This field enables you to map the exact term of a loan, in months, to an existing program type.
-
Either a Loan Term must be selected or a Custom Term must be entered.
-
An error message "Either enter a Custom Term or choose a Loan Term." will be displayed if both a loan term is selected and a custom term is entered.
-
The Custom Term field is editable.
-
An integer greater than zero and less than or equal to 360 is allowed. An error message "Custom Term must be an integer value from 1 to 360." will be displayed if the integer does not meet the criteria.
-
The custom term must match an enabled program.
-
An error message "No match found for Custom Term." will be displayed if the custom term does not match an enabled program.
-
If the custom term is valid, that value will be saved to Loan Term.
When a custom term is defined for a loan, any selected Program Types/Terms will be ignored and only fixed programs that support the custom term will be returned.
When a custom term is not defined, programs will be returned according to the existing logic (i.e., according to the selected Program Types / Terms).
The Qualification change made for custom terms can result in qualification results with empty ProgramType and Program collections. In this scenario, an error message "No Products matched your request." will be displayed.
EPPS-68505
When a loan is qualified and a Custom Term is provided, the 40 Year Amortization and/or 50 Year Amortization options will be disabled if present and enabled.
When a loan is qualified and a Custom Term is provided, if the fixed term is not divisible by 12, the FFIEC logic will be used to determine the number of years to use for the APOR lookup.
According to the FFIEC, when a covered loan’s term to maturity ... is not in whole years, the financial institution uses the number of whole years closest to the actual loan term or, if the actual loan term is exactly halfway between two whole years, by using the shorter loan term. There is an exception for a loan term shorter than six months (including variable-rate covered loans with no initial, fixed-rate periods), which should be rounded to 1.
For example:
-
241 months => 20 years
-
247 months => 21 years
-
246 months => 20 years
-
11 months => 1 year
-
1 month => 1 year
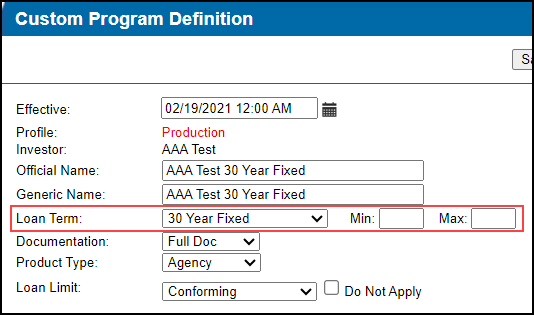
When a fixed rate Program Type is selected for a Program Definition, Min and Max fields will be displayed next to the Loan Term.
-
If either a Min or Max is entered, then the other field is required.
-
An error message "Both Min Custom Term and Max Custom Term are required." will be displayed if only one field is entered.
-
An integer greater than zero and less than or equal to 360 is allowed.
-
An error message "Min Custom Term and Max Custom Term must be integer values from 1 to 360." will be displayed if the integer does not meet the criteria.
-
The Max must be greater than the Min.
-
An error message "Max Custom Term must be greater than Min Custom Term." will be displayed if the integer does not meet the criteria.
A new ActualTerm expression has been added to enable the Term, in months, to be available for the Condition Definition and Rate Matrix Definition.

-
When ActualTerm is selected, you will be provided with a list of Boolean operators to choose from.
-
The value of ActualTerm is equal to the value of the Loan.Term.
-
If the Loan.Term is NULL, the value is (ProgramType.Term * 12).
Term from field ID 2959 has been added to the GetLoanPrograms, CheckEligibilityand Pricing, loanQualifier, and eligibility request payloads. The Term will be saved to the loan record.
The loanQualifier and eligibility request payload validations have been updated.
-
Either the term or productType must be provided.
-
If both the term and productType are provided, the productType will be ignored.
-
If neither the term nor the productType are provided, a validation error is generated.
A new Lookup API termRange has been added to the REST Service. The /vs/lookups/termRange has been modified to retrieve the Min and Max.
-
TermMin INT NULL
-
TermMax INT NULL
The REST Service responses have been updated as follows:
-
loanQualifier response:
-
loanPrograms[].termMonths - New property.
-
Integer.
-
Field from QualificationProgram.ActualTerm.
-
Reflects Custom Term when in use, otherwise use Loan Term * 12.
-
rateSelector response:
-
loan.amortizationTermMonths - New property.
-
Field from QualificationProgram.AmortizationMonths.
-
Reflects Custom Term when in use, otherwise use Amortization * 12.
-
lien.loanTermMonths - Reflects Custom Term when in use, otherwise use Loan Term * 12.
Admin Updates
A new Hide Update Lock Request Form (ICE PPE Only) setting has been added to the Options section on the Options page (Admin>Settings>Options). By default, the setting is not selected for both existing and new Clients.
This setting is only applied when an ICE PPE provider is selected on the Encompass Product and Pricing setting.
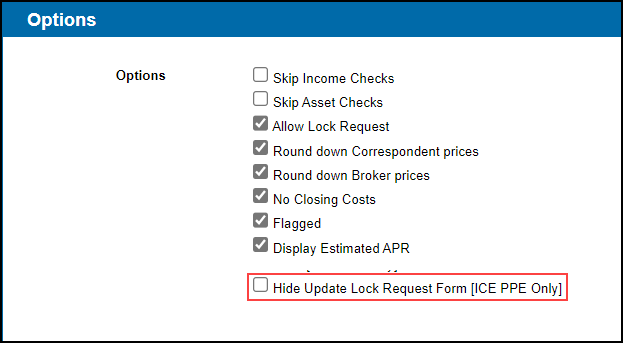
When selected, the Update Lock Request Form button on the Loan Summary page (desktop version of Encompass) and the Summary page (web version of Encompass) are hidden.
A new Hide action and a Hidden checkbox have been added to the Client Dashboard.
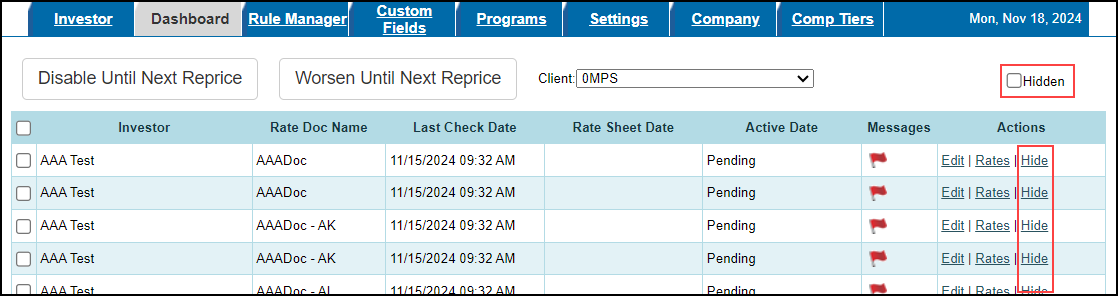
-
When Hide is set to True:
-
The row is no longer displayed in the grid.
-
The pricing is suspended (Suspended is displayed in the Messaged column).
-
The Investor dropdown field is removed from the Programs tab and the Qualify tab. In addition, the Investor condition in the Rule Manager is removed.
-
Programs from the Investor are not displayed in the results on the Qualify tab.
-
When Hide is set to False:
-
The row is displayed in the grid.
-
The Investor dropdown field is displayed on the Programs tab and the Qualify tab. In addition, the Investor condition in the Rule Manager is displayed.
-
Programs from the Investor are displayed in the results on the Qualify tab.
-
When the Hidden checkbox is selected:
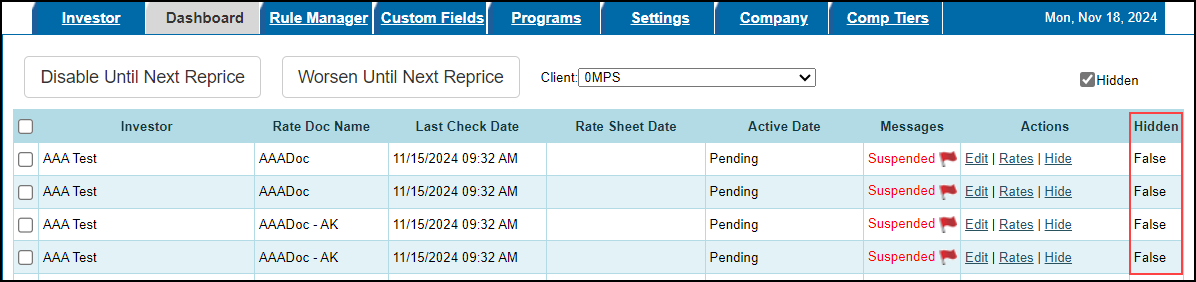
-
The hidden rows are displayed.
-
A Hidden column is displayed and indicates the value of the Hide action (True or False).
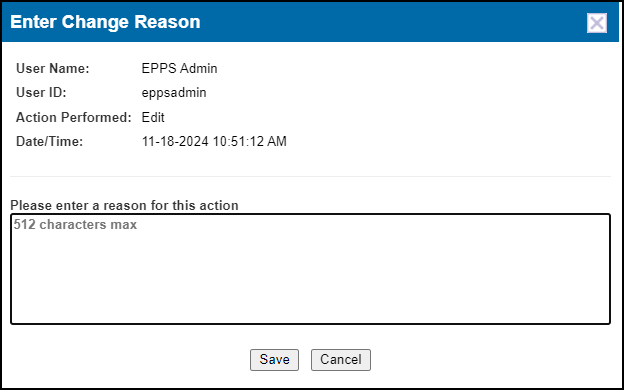
When you make a change and then select Save on the User Roles page (Admin>Company>Add/Manage User Roles), you will be prompted to enter a reason why the change was made in the Enter Change Reason popup window. In addition, the window is populated with who made the update, the action taken, and when the update was made.
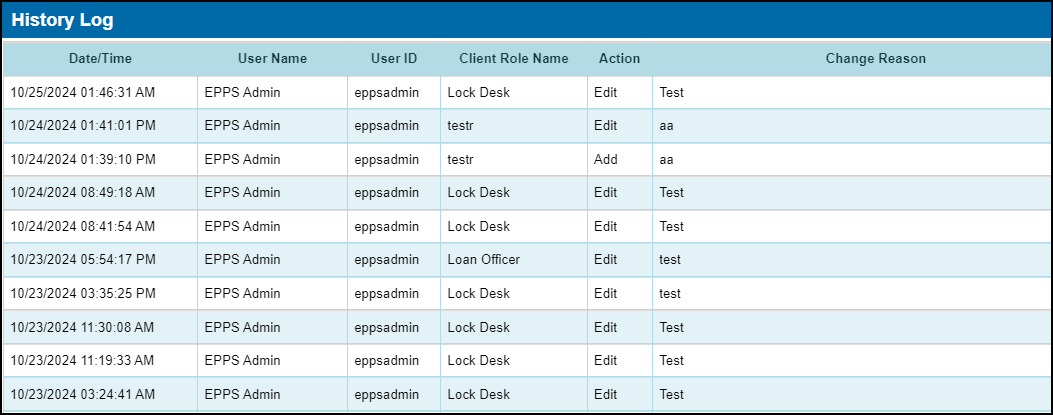
A new History link has been added to the User Roles page (Admin>Company>Add/Manage User Roles). When selected, a History log is displayed that indicates which user role has been updated, who made the update, the reason the update was made, when the update was made, and the action taken.
The execution of rules with the Disqualify a Loan and Hide Results tasks has been modified to prevent programs where the tasks applied are not displayed in the Ineligible Results regardless of whether they are disqualified prior to the rule execution. From this release forward, programs that match the conditions for rules with a task of Disqualify a Loan and Hide Results will be hidden regardless of any other prior or subsequent disqualification.
A new Pricing column has been added to the Rates Docs grid on the Investor Dashboard tab.

-
A Flag icon will appear in the Pricing column for rate docs where the Set Pricing Flag action has been applied using the Disabled Until Next Reprice button on the dashboard.
-
The Flag icon is removed when the rate doc reprice is complete.
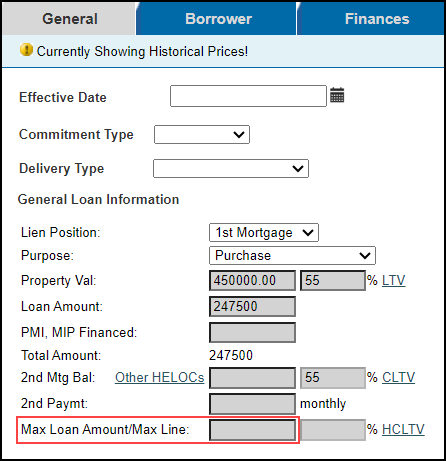
User Interface Updates
Currently in ICE PPE, the Max Loan Amount/Max Line field is only displayed for first mortgage HELOCs in the General Loan Information section of the General tab. From this release forward, the Max Loan Amount/Max Line field will be displayed for all first mortgage loan terms.
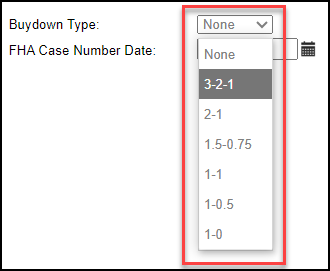
The display order of the Buydown Type values on the General tab has been modified to list the values in descending order.
A new Max Cash Out column has been added to the Ineligible Details Guidelines grid.
-
Related to MaxCash column in the Guideline Definition.
-
Cells will be highlighted when the subject cash out exceeds the Max Cash Out.
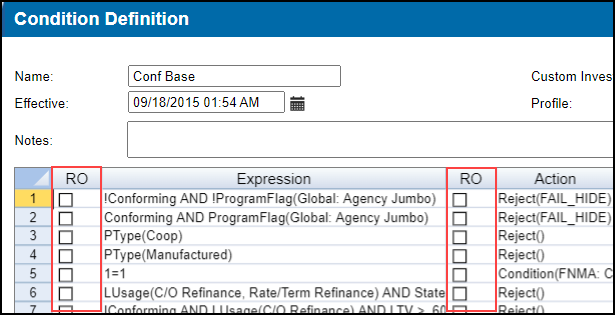
CPM Updates
Two new read-only RO columns have been added to the Condition Definition. These columns will be available to users with the Manage CPM Manager Rights.
A boolean parameter has been added to the YSPMax action in the Condition Definition.
-
When the parameter is true, no rates subject to the YSPMax cap is displayed.
-
When the parameter is false, all rates subject to the YSPMax cap are displayed.
-
By default, the parameter will be False and is not required.
Effective Date Validation Updates
Currently, when a user enters an Effective Date and Time on the General tab in excess of one year prior to the current date and time, a validation message "Effective Date must not be prior to [calculated date and time]." is generated. From this release forward, the following changes have been made to the validation:
-
The rate retention period has been changed from one year to 450 days.
-
The Effective Date and Time validation will only validate the date.
-
The validation message has been updated to "Effective Date must not be prior to [calculated date].".
The Effective Date and Time validation in the loanQualifier and GetLoanPrograms API requests have been modified to validate the date only and the validation message has been updated to "Effective Date must not be prior to [calculated date].".
Currently, ICE PPE does not permit any historical pricing older than one year. Any Qualifications are blocked before they begin. From this release forward, the Effective Date and Time validation in Qualification has been modified to accept a date and time up to and including 450 days prior to the current date because the rate data extension period (historical pricing lookiback) has been extended to 450 days.
Rebranding of Encompass Product & Pricing Service
All references to "EPPS" on the Options page has been updated to "ICE PPE". This includes the radio button in the DTI section and the notes in the Define Starting Adjusted Rate Below Par and Define Starting Adjusted Rate Above Par sections.
All instances of the EPPS logo have been updated to the ICE PPE logo. This includes but is not limited to the logo:
-
at the top of each page
-
on the Loan Summary page
-
on the Lock Request Form returned to Encompass
-
on the Login page
The page title displayed in the browser has been changed from "Encompass Product and Pricing Service" to "ICE PPE".

Currently the Authentication page used when retrieving Custom Field Definitions from Encompass displays obsolete branding. From this release forward, the Authentication page used will display current branding.
Additional Enhancements
The Lock Desk User Role (aka Super Admin) has been updated to enable them to fully use the ICE PPE integration. The Super Admin is now assigned all User Rights.
The ICE Mortgage Technology Partner Network dll's "RequestDialog.cs" has been updated to check for the instance name when a user clicks the Continue button to log in. If the instance name does not begin with "TEBE" or "DEBE", an error message "You are not authorized to use the UAT provider, Please contact your administrator." will be displayed to stop a user from proceeding.
Coming Soon
New Integration Between ICE PPE and ICE Surefire
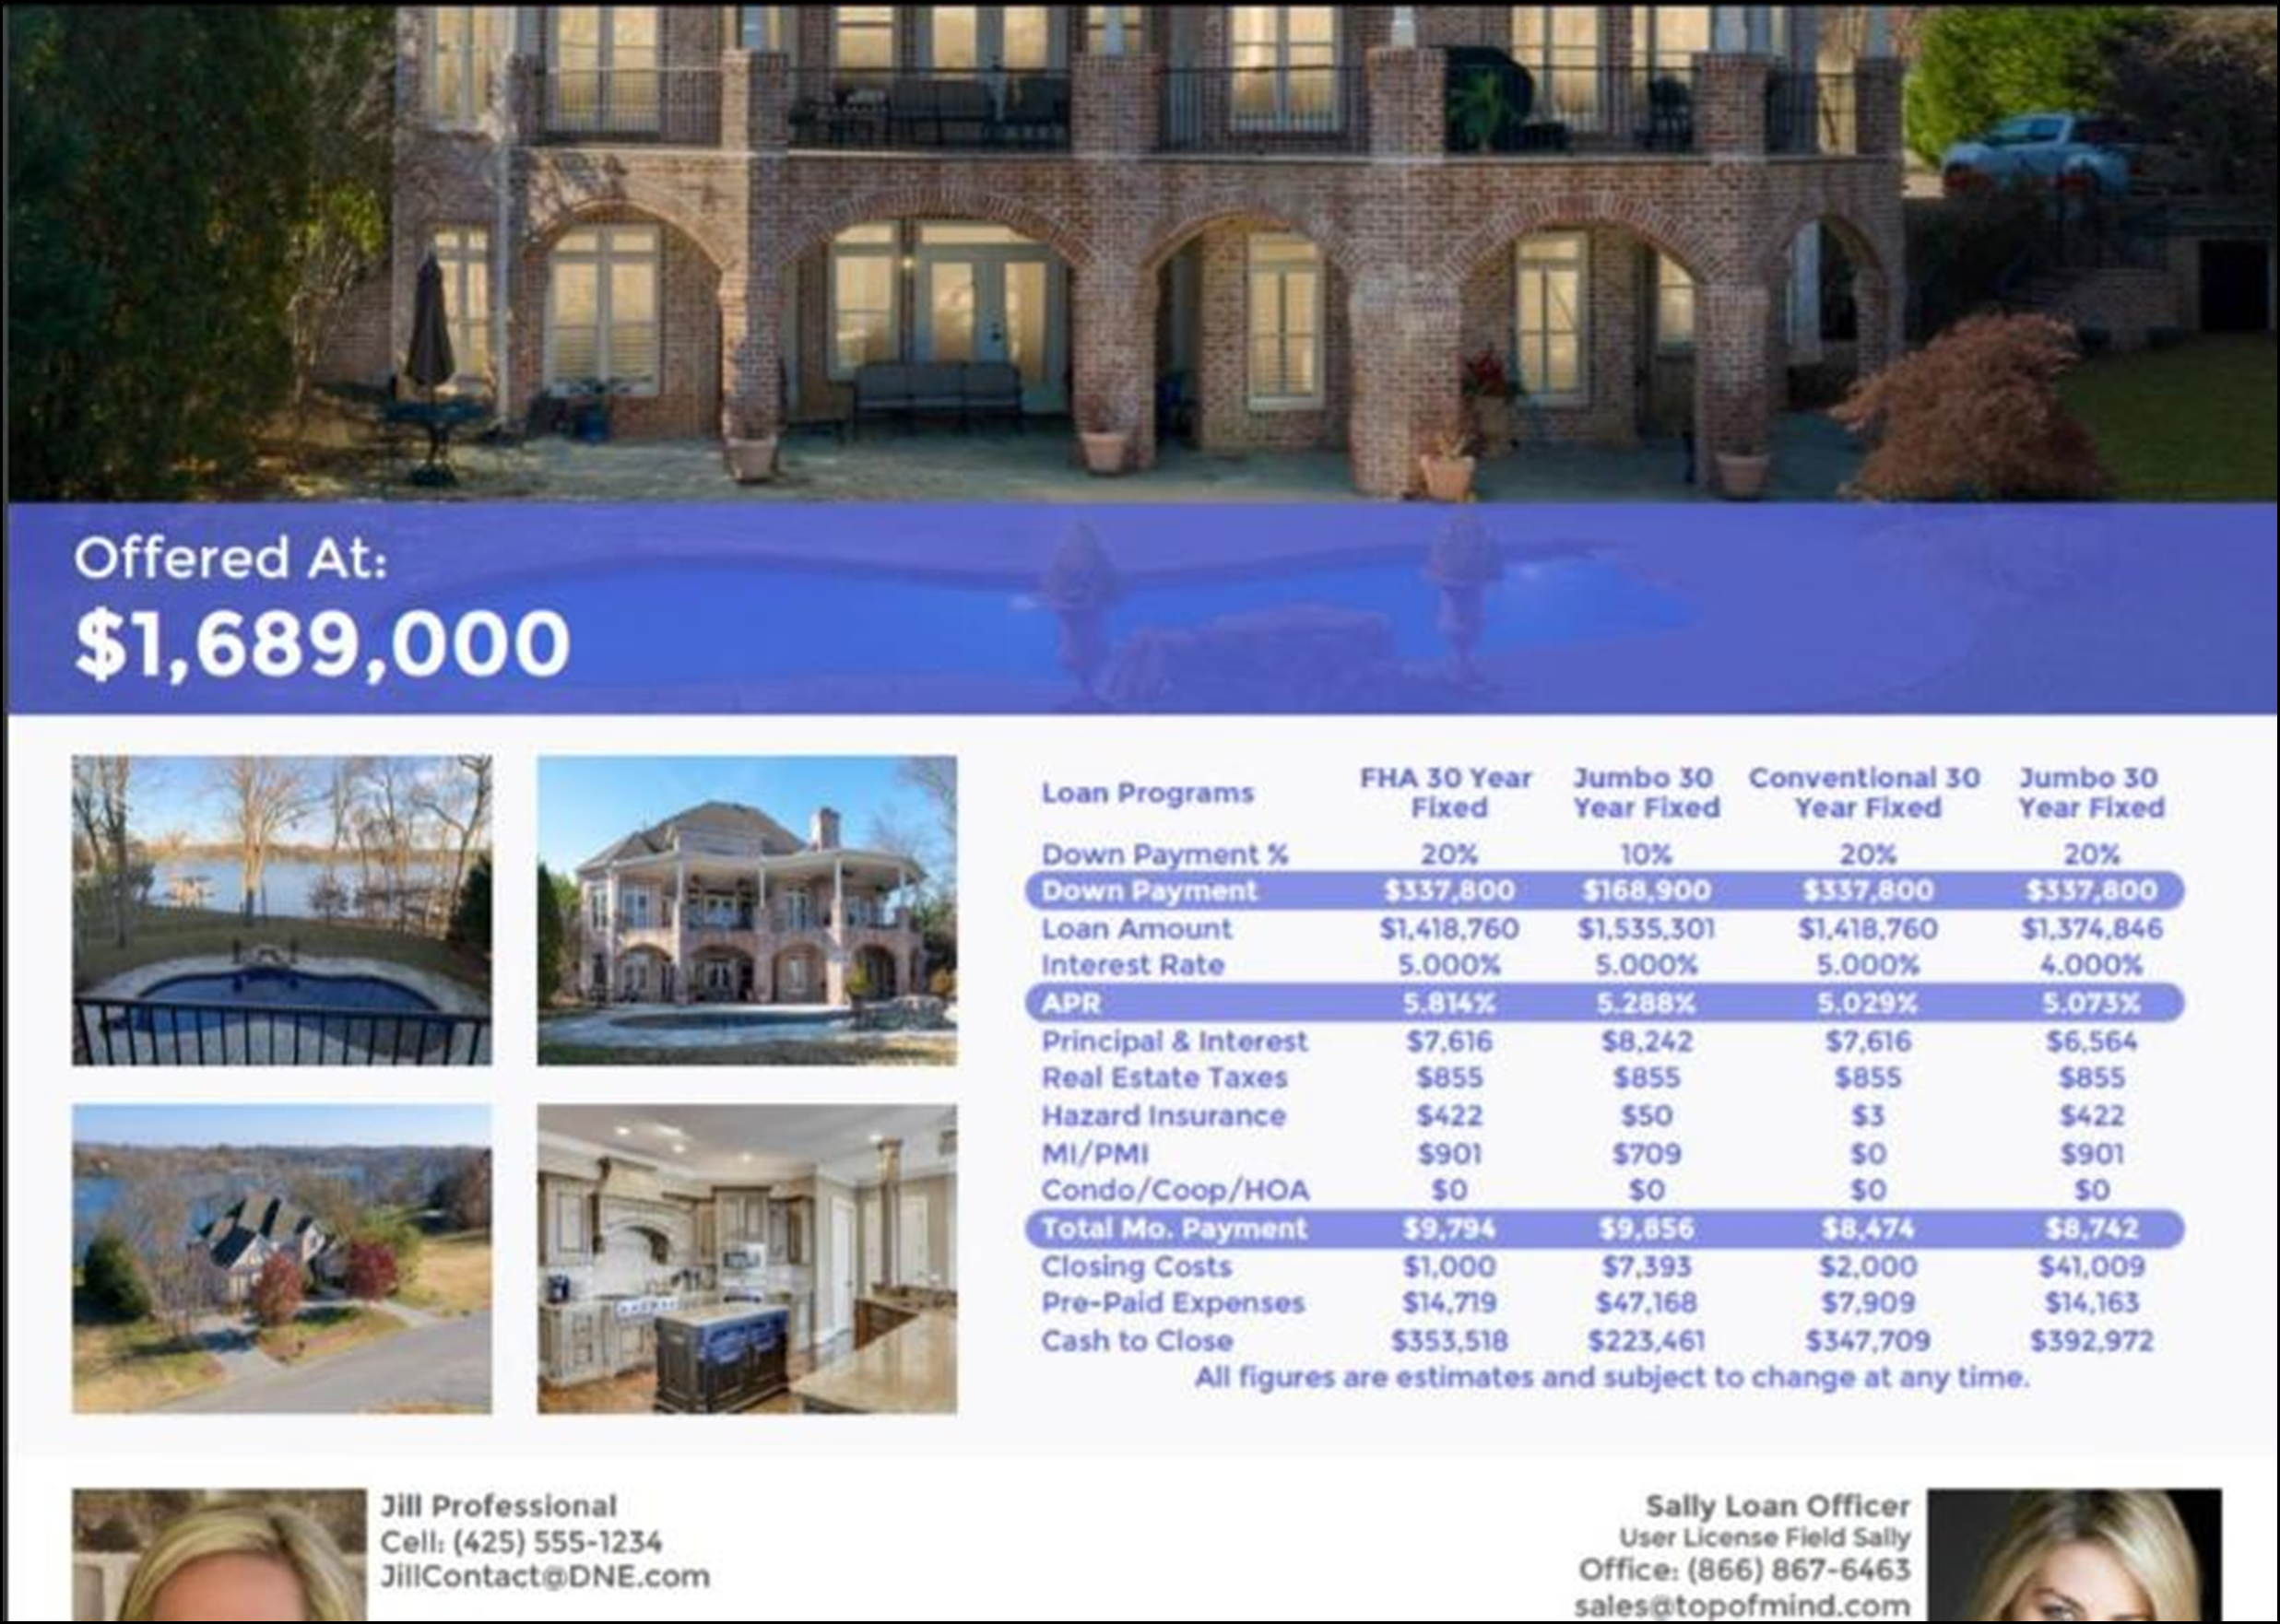
We are excited to announce the upcoming integration between ICE PPE and ICE Surefire. This integration will enable ICE PPE users to include real time Loan Program Comparisons driven from ICE PPE pricing and products in single property websites for listings that can be co-branded with partners, display photos, generate open house flyers, and be shared via social media.
This functionality will be available shortly after the release of ICE PPE 24.3.
To enable the integration between ICE PPE and ICE Surefire, follow the steps below.
To Add ICE PPE as an Available Rate Source:
As an ICE PPE customer, you can set up ICE Surefire to employ ICE PPE pricing engine-generated pricing scenarios in your Single Property Site (SPS) media.
-
Log into ICE Surefire as a Primary admin.
-
In the left navigation menu, select CRM Settings and then select Pricing Engine.
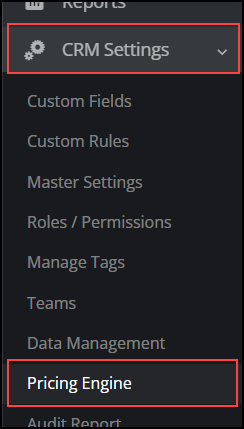
-
Select the Configuration tab.
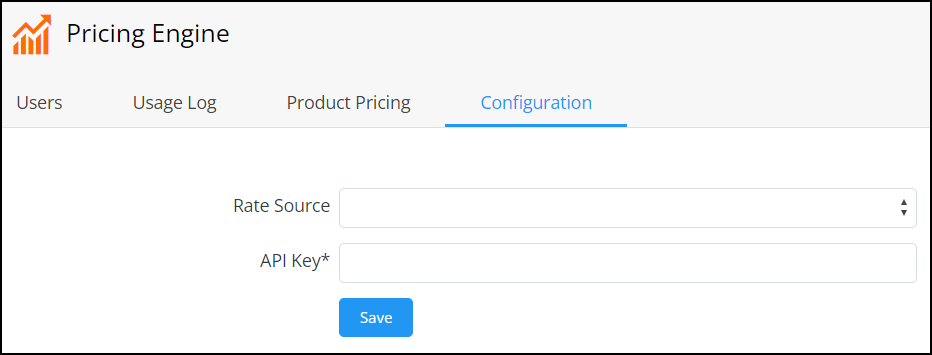
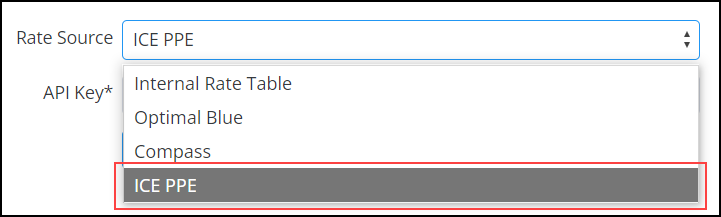
-
In the Rate Source dropdown field, select "ICE PPE".
-
In the required API Key field, enter your numeric API key (API Generated Token) provided by ICE PPE.

-
To receive your API key token, please submit an ICE Surefire Support ticket requesting a key be generated for you. Please allow 24 hours for a token to be provided.
-
Prior to requesting a token, make sure all users who will utilize the ICE PPE - ICE Surefire features are added to your ICE PPE account. Otherwise, if users are missing (or user information is incorrect), there can be another 24 hours delay to sync additional users.
If you have any user errors or experience syncing issues, please submit an ICE Surefire Support Ticket.
-
Select Save.
-
If your credentials are valid, a "Success" popup window is displayed.
-
If your credentials cannot be validated, you will need to contact a representative from ICE Surefire for assistance. Alternatively, you can contact a representative from ICE PPE for assistance.
To Activate ICE PPE Users:
When your organization enables ICE PPE as its pricing engine, only ICE PPE users activated in ICE Surefire will be able to access Single Property Sites.
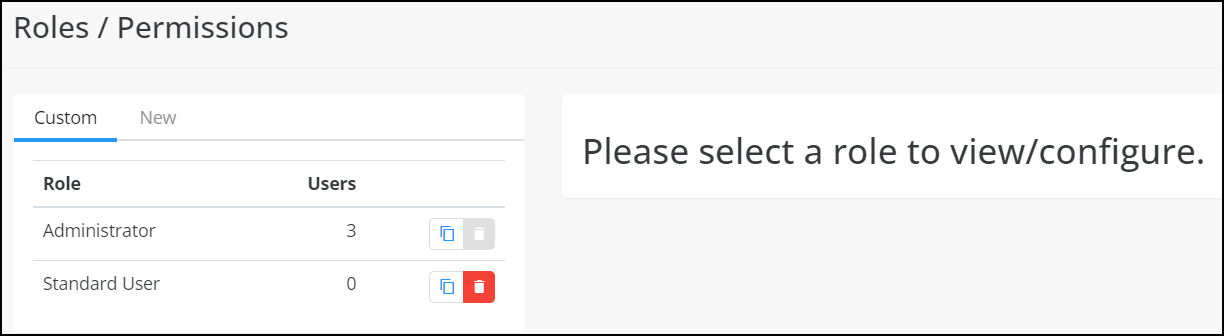
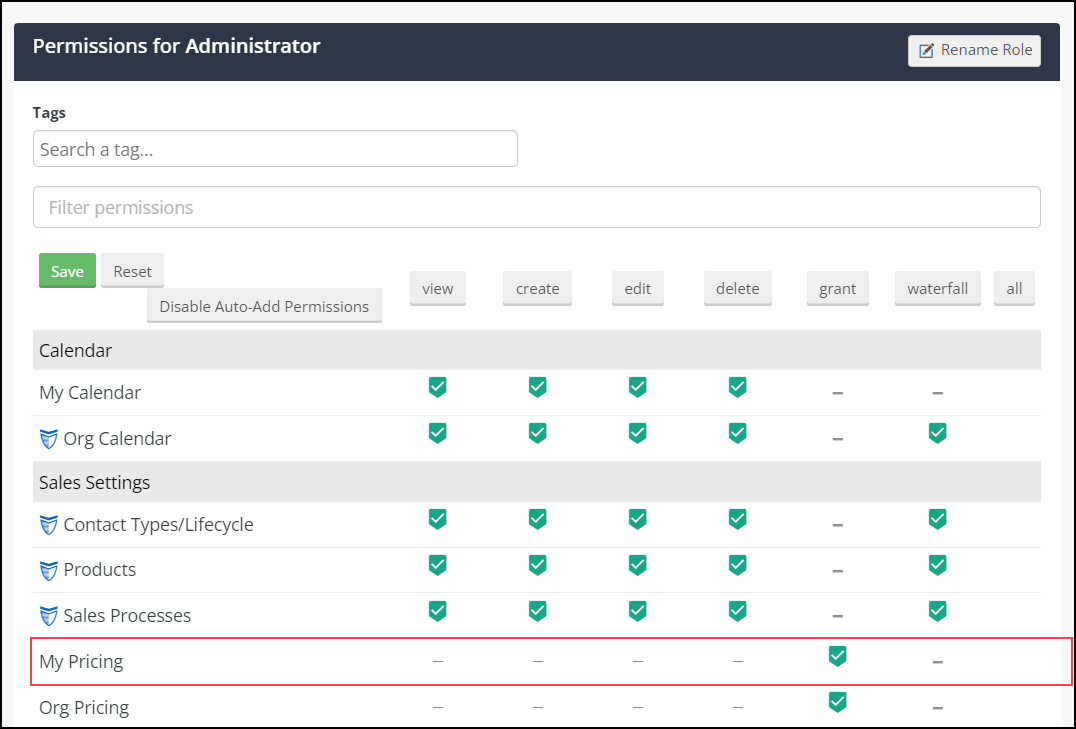
To Enable Pricing Engine in Roles and Permissions:
For Surefire users to access ICE PPE as a Pricing Engine option, you must enable the Pricing Engine permission for a user's role in Surefire.
-
Log into ICE Surefire as an Admin.
-
In the left navigation menu, select CRM Settings and then select Roles / Permissions.
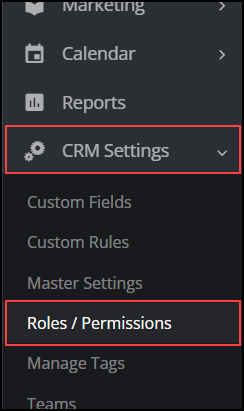
-
Select the user role you want to provide ICE PPE use (e.g., Standard User, Administrator, etc.).
-
In the Permissions table, make sure that the "My Pricing" permission is selected under the Sales Settings section.
-
Select Save.
To Activate an ICE PPE User:
Each user that should be able use Surefire must have their account activated.
-
Log into ICE Surefire as an Admin.
-
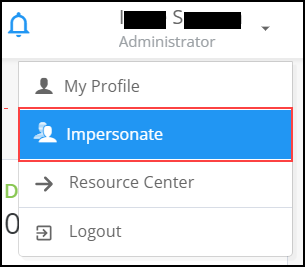
As an Admin, you can impersonate a user to activate ICE PPE for them.
-
Select your name in the top right corner and then select "Impersonate" from the dropdown list.
-
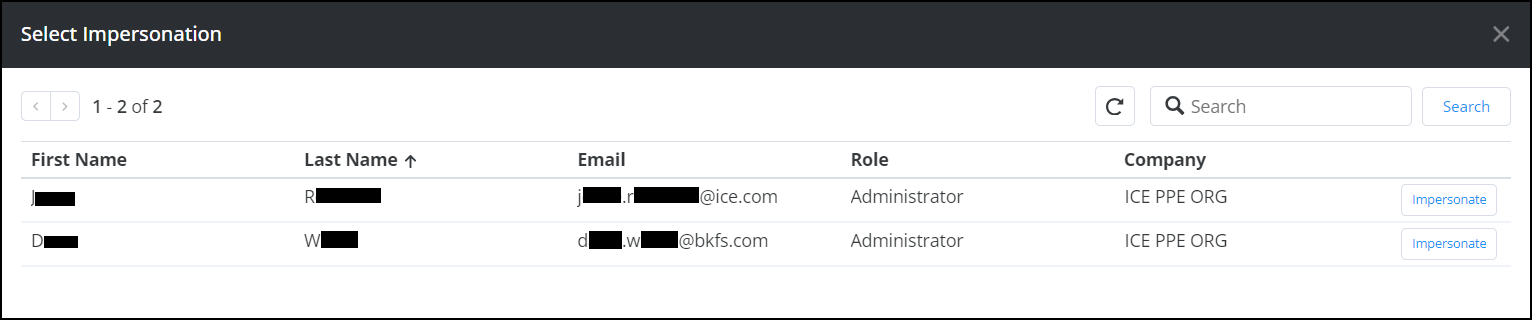
Select Impersonate on the far right of the row with the user you want to impersonate.
-
Make sure you know the user's last name and email address.
-
Select Yes, I'm sure!. You are now logged in as the user you selected to impersonate.
-
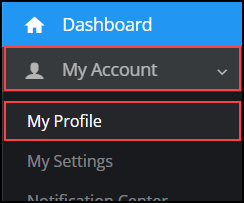
In the left navigation menu, select My Account and then My Profile.
-
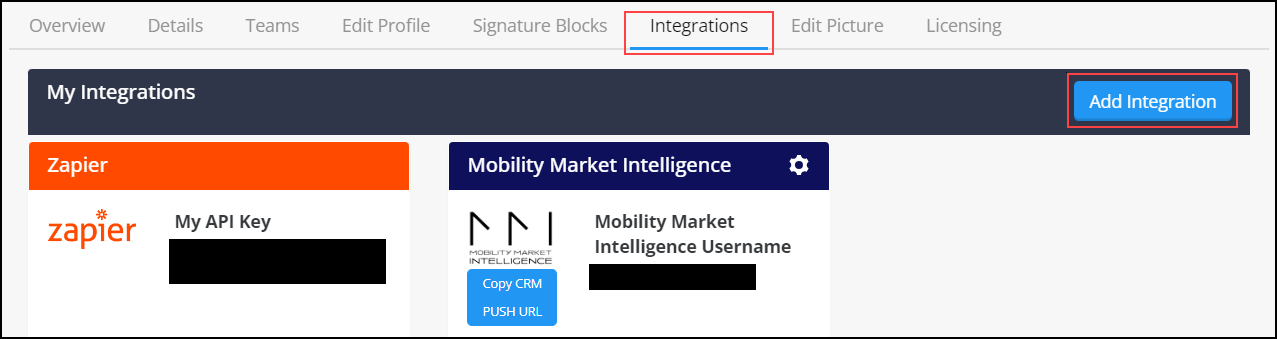
Select the Integrations tab and then select Add New Integration.
-
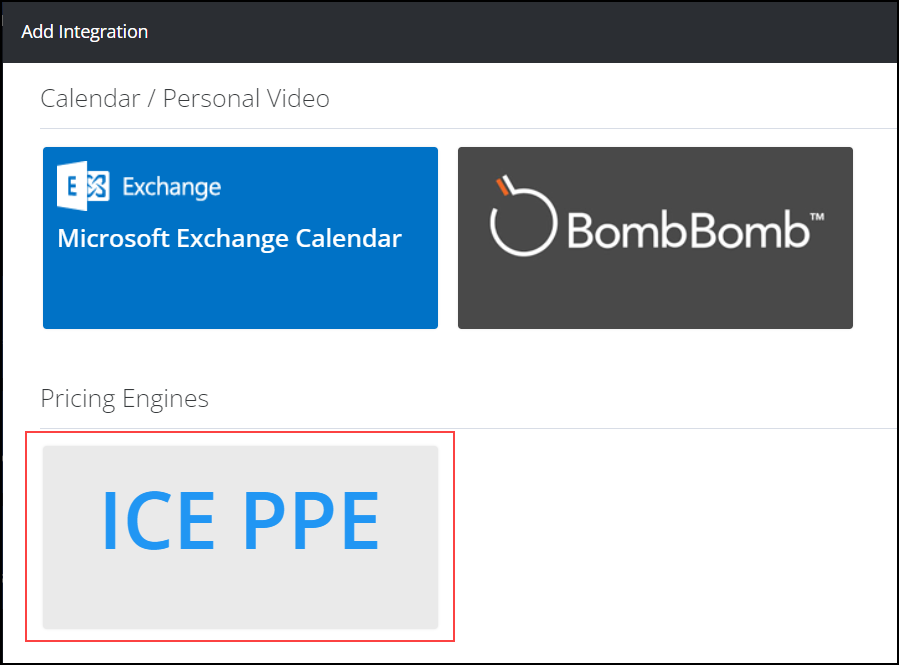
In the Add Integration popup window, select "ICE PPE".
-
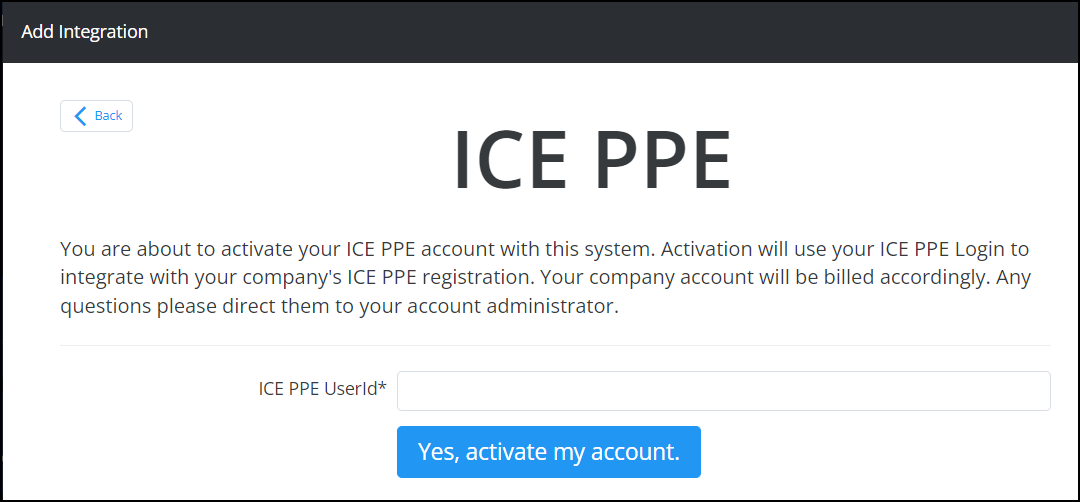
In the required ICE PPE UserId field, enter the ICE PPE UserId of the user you are impersonating.
-
Select Yes, activate my account.
-
Repeat steps 2-8 for every user you that should be able to use Surefire.
To Create ICE PPE Rate Scenarios within ICE Surefire:
A rate scenario can be created on a company level or individual user level.
To Create an ICE PPE Rate Scenario:
-
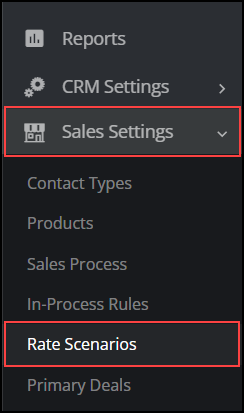
In the left navigation menu, select Sales Settings and then select Rate Scenarios.
-
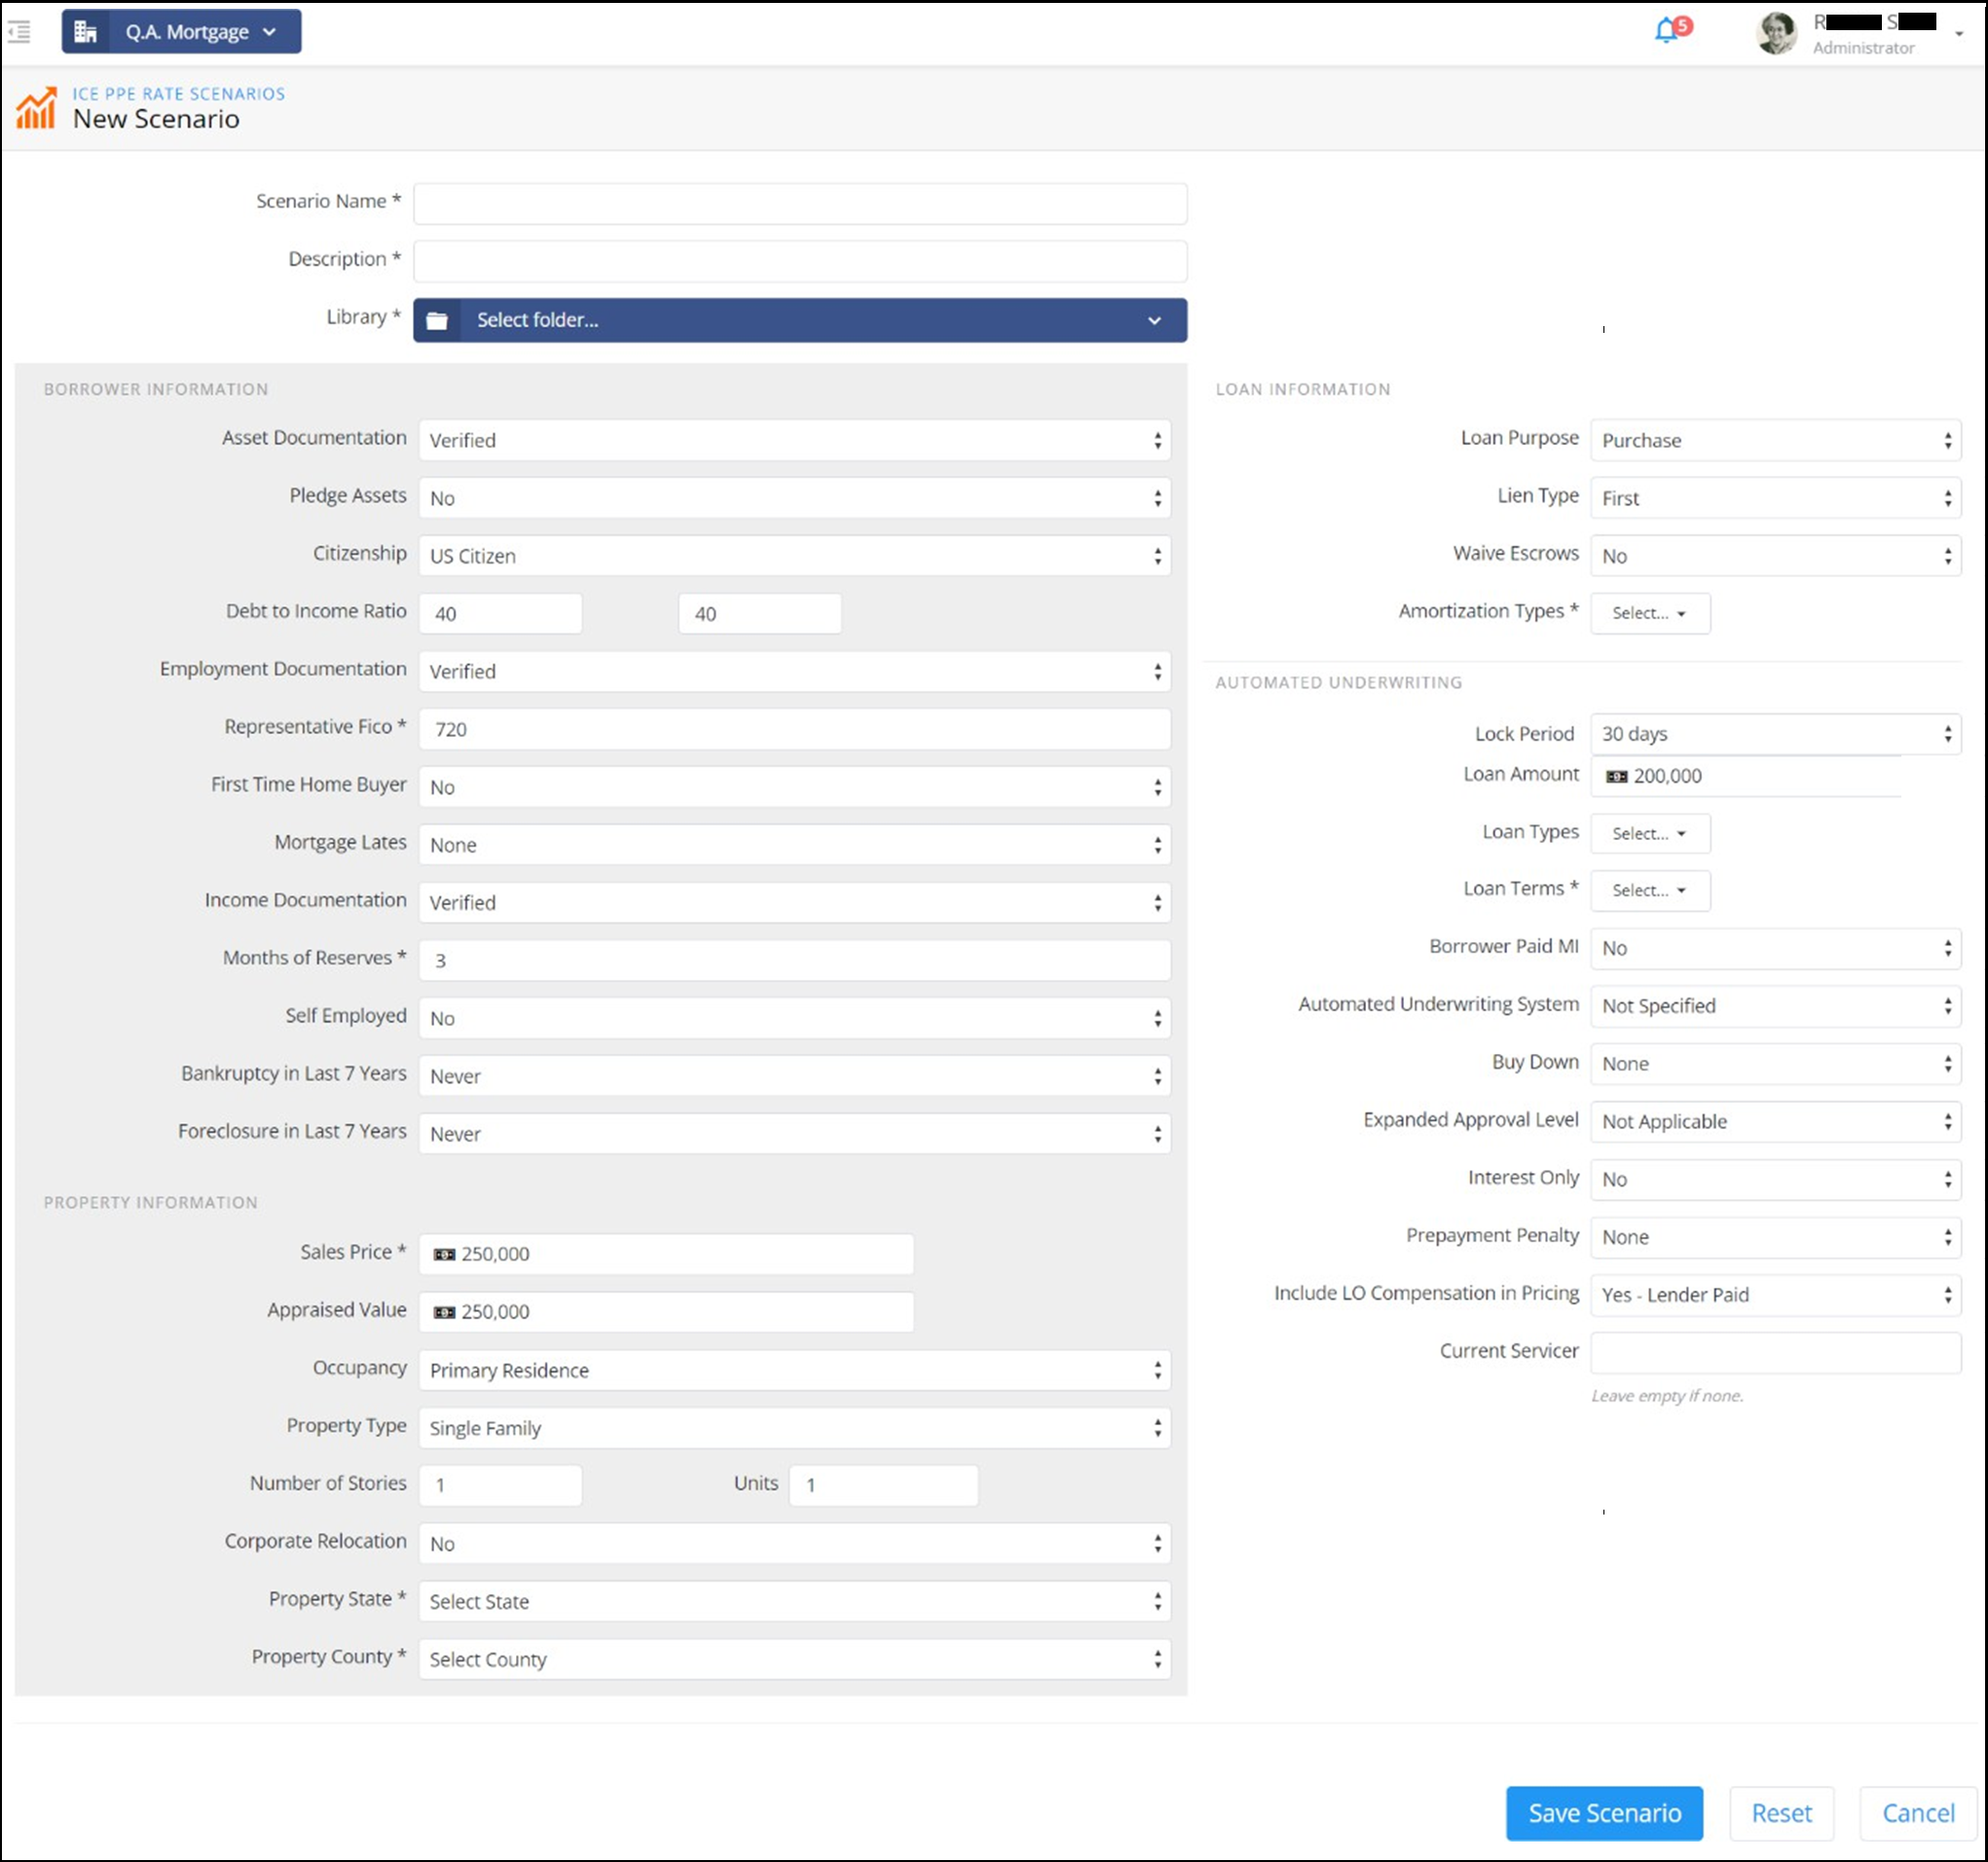
Select New Scenario.

-
On the New Scenario page, enter the data you have for a given borrower scenario (e.g. Loan Types, Loan Terms, etc.). Make sure all mandatory/required fields are completed.
Users will never get Pricing information for states they are not licensed in.
-
Select Save Scenario.
To Review Pricing Details for an ICE PPE Rate Scenario:
-
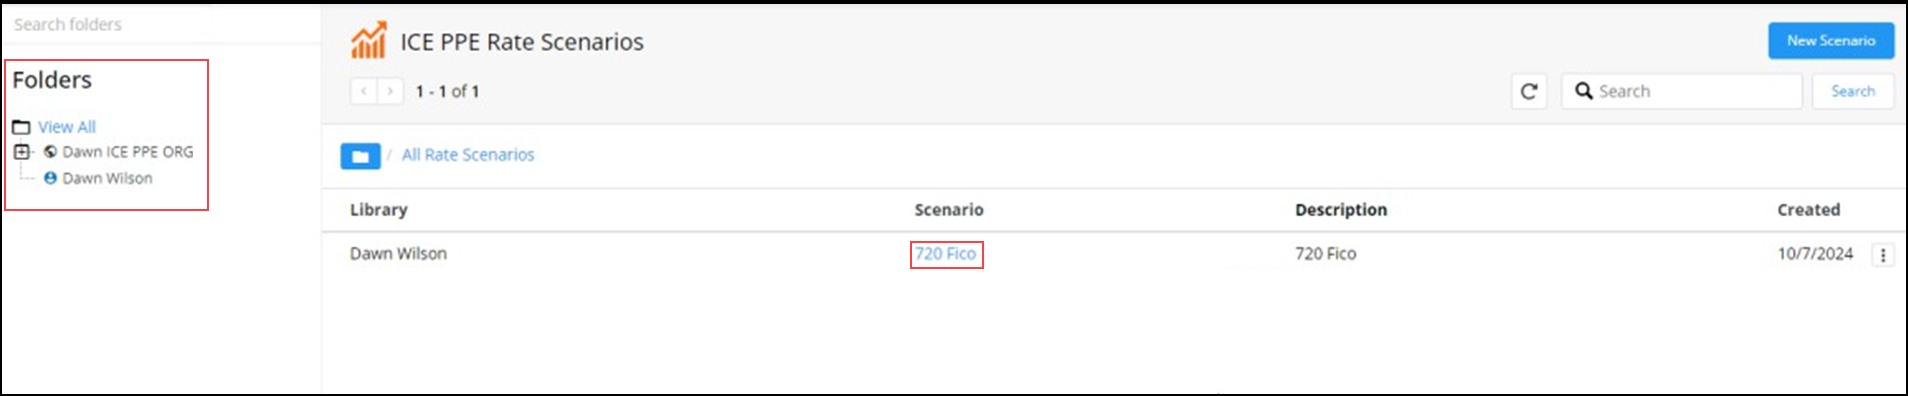
In the left navigation menu, select Sales Settings and then select Rate Scenarios.
-
Select the folder with the Rate Scenario you want to review.
-
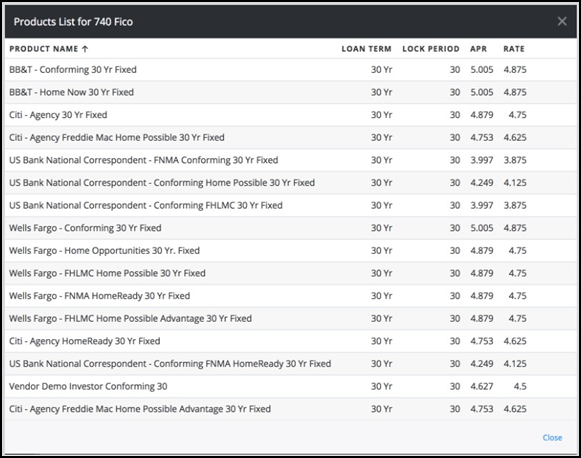
Select the Rate Scenario with the day's pricing details you want to review.
-
A list of products for the Rate Scenario you selected (Products List for [Rate Scenario]) is displayed.
Once the ICE PPE - Surefire integration is complete, you can create and manage Single Property Sites.
To Manage Single Property Site Loan Programs:
For additional help with Single Property Sites, select your Profile icon and then select "Resource Center" from the dropdown list. Use the Search to find "How to Manage Single Property Site Loan Programs".
-
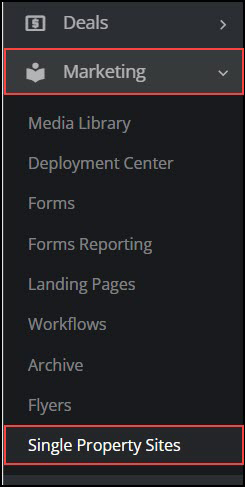
In the left navigation menu, select Marketing and then select Single Property Sites.
-
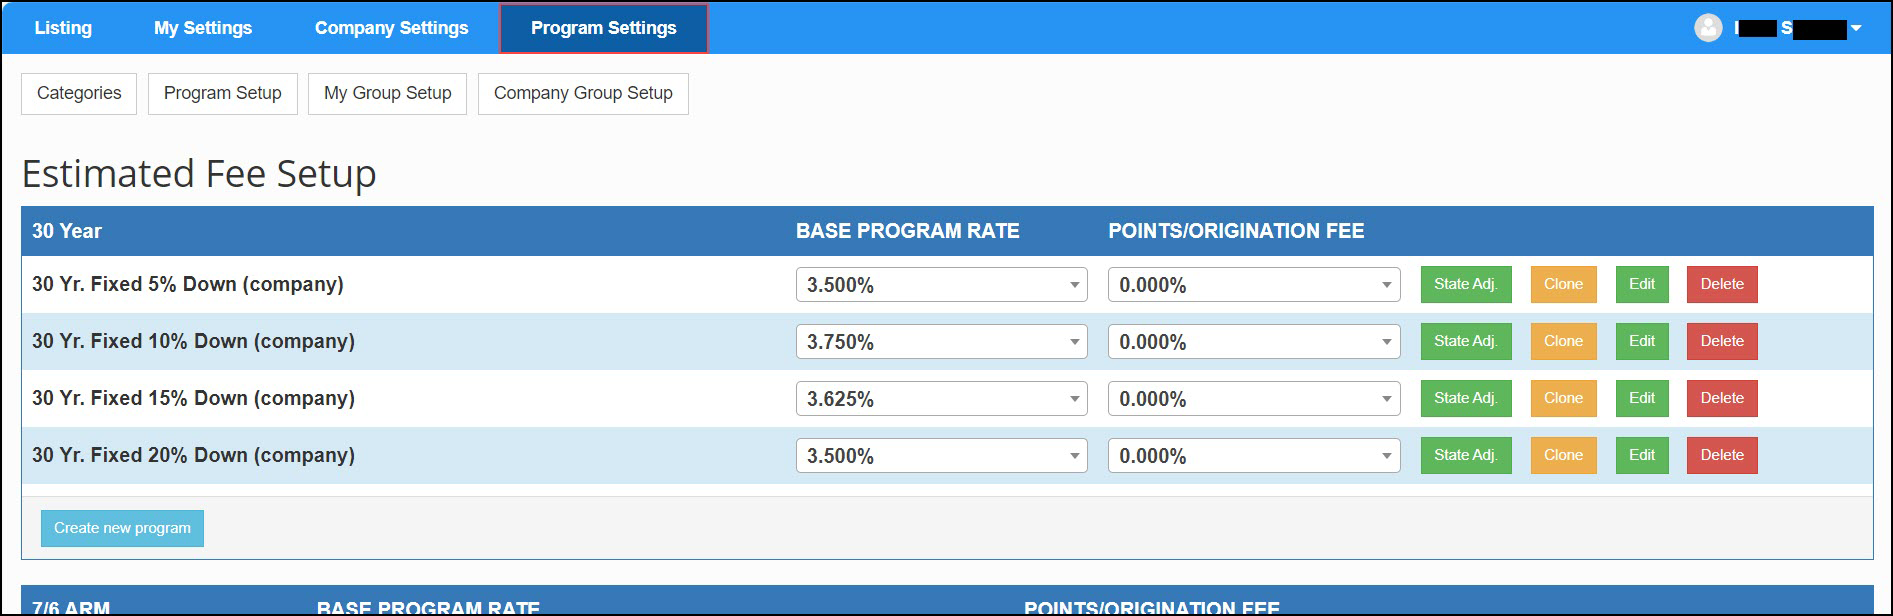
Select the Program Settings tab.
-
By default, you will begin on the Program Setup tab.
-
Program Settings are structured using a simple system composed of three elements:
-
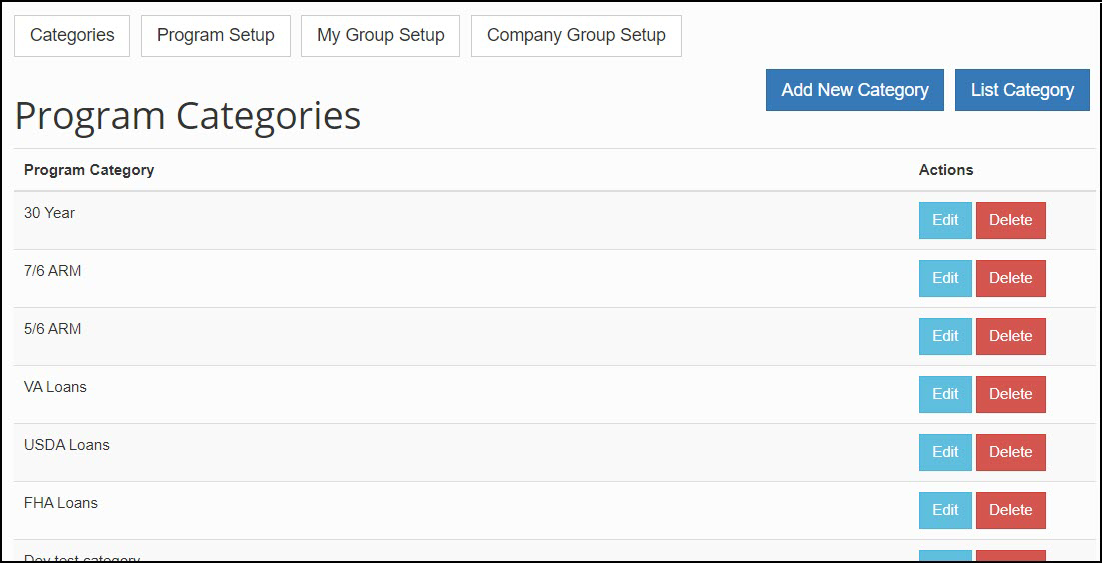
Program Categories - Individual Loan Programs must belong to a Program Category. For example, a company could have categories for 30-year, FHA, VA, and Jumbo. You can view these as broad categories of different loan types with underlying specific Loan Programs.
For additional help creating Program Categories, select your Profile icon and then select "Resource Center" from the dropdown list. Use the Search to find "Create a Loan Program Category".
-
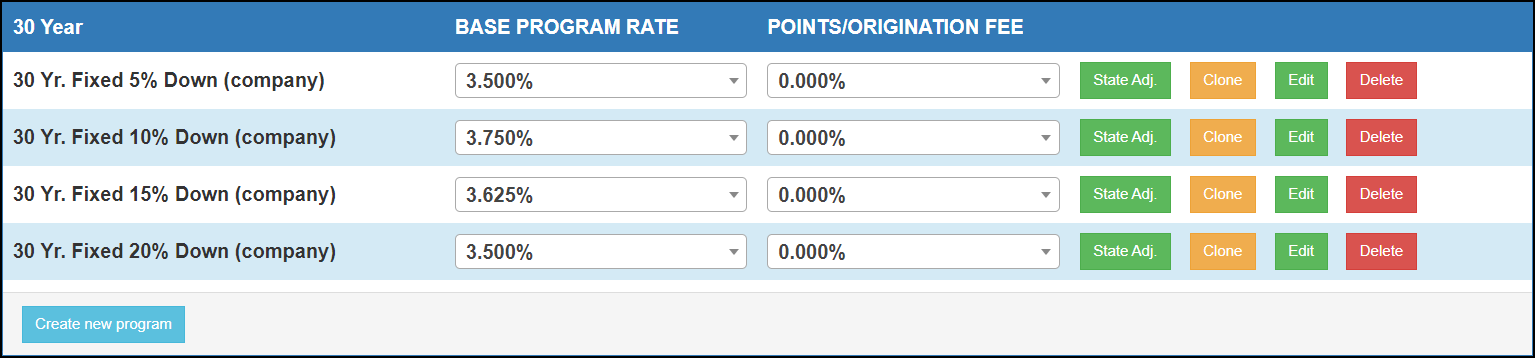
Loan Programs - Within a Program Category, an admin can create and edit individual Loan Programs. These are for more specific types of loans than the broader Program Category. For example, for a 30 Year category, you could include programs such as 30-Year Fixed 5% Down, 30-Year Fixed 10% Down, 30-Year Fixed 15% Down, and 30-Year Fixed 20% Down. Once you create the Loan Programs, you can edit the attributes of the program (e.g., Rate, Term, Taxes, etc.) and adjust the rate by state.
-
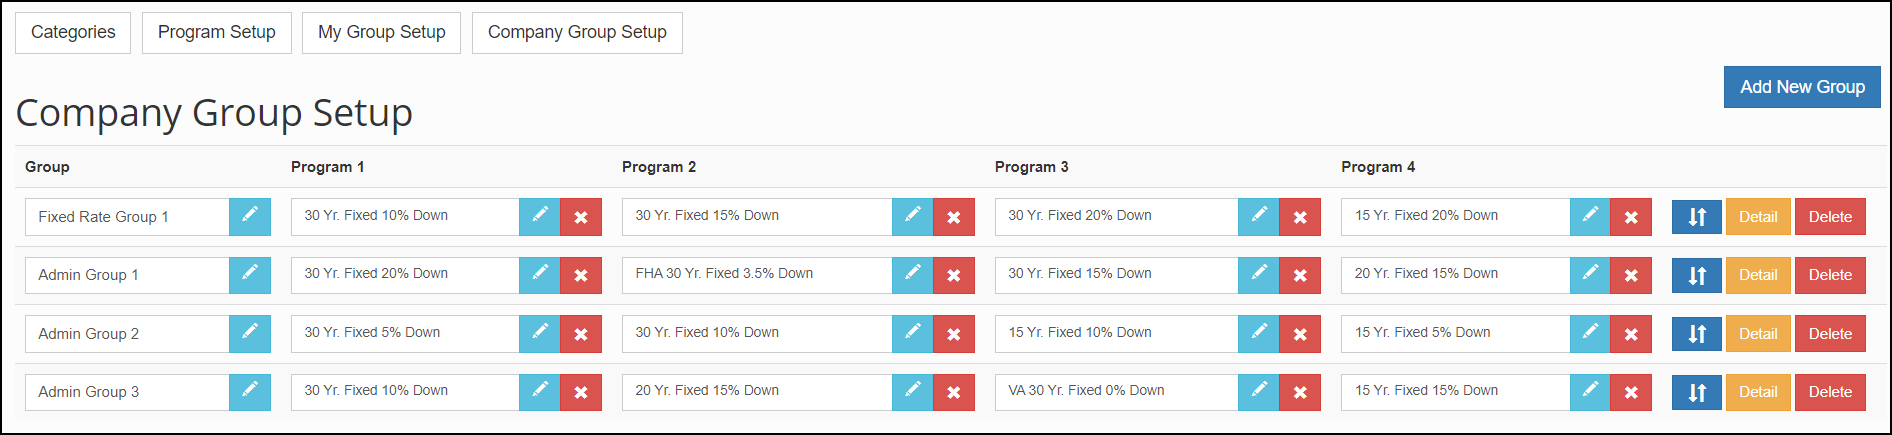
Program Groups (Personal and Company) - Once a set of Loan Programs are created, you have the option to create your own Program Groups (or containers), with up to four programs. You apply the Program Group to a SPS and the group of programs is displayed in the Rate Table of the listing's Single Property Site Flyer.
To Add Loan Programs to a group, select Add Program from the Company Group Setup page.
To Create a Single Property Site:
For additional help creating and managing Single Property Sites, select your Profile icon and then select "Resource Center" from the dropdown list. Use the Search to find "View and Manage Single Property Sites”. You will find information on how to configure settings, set up branch and licensing information , set default loan programs, set your sites' "theme colors", manage layouts, and much more.
-
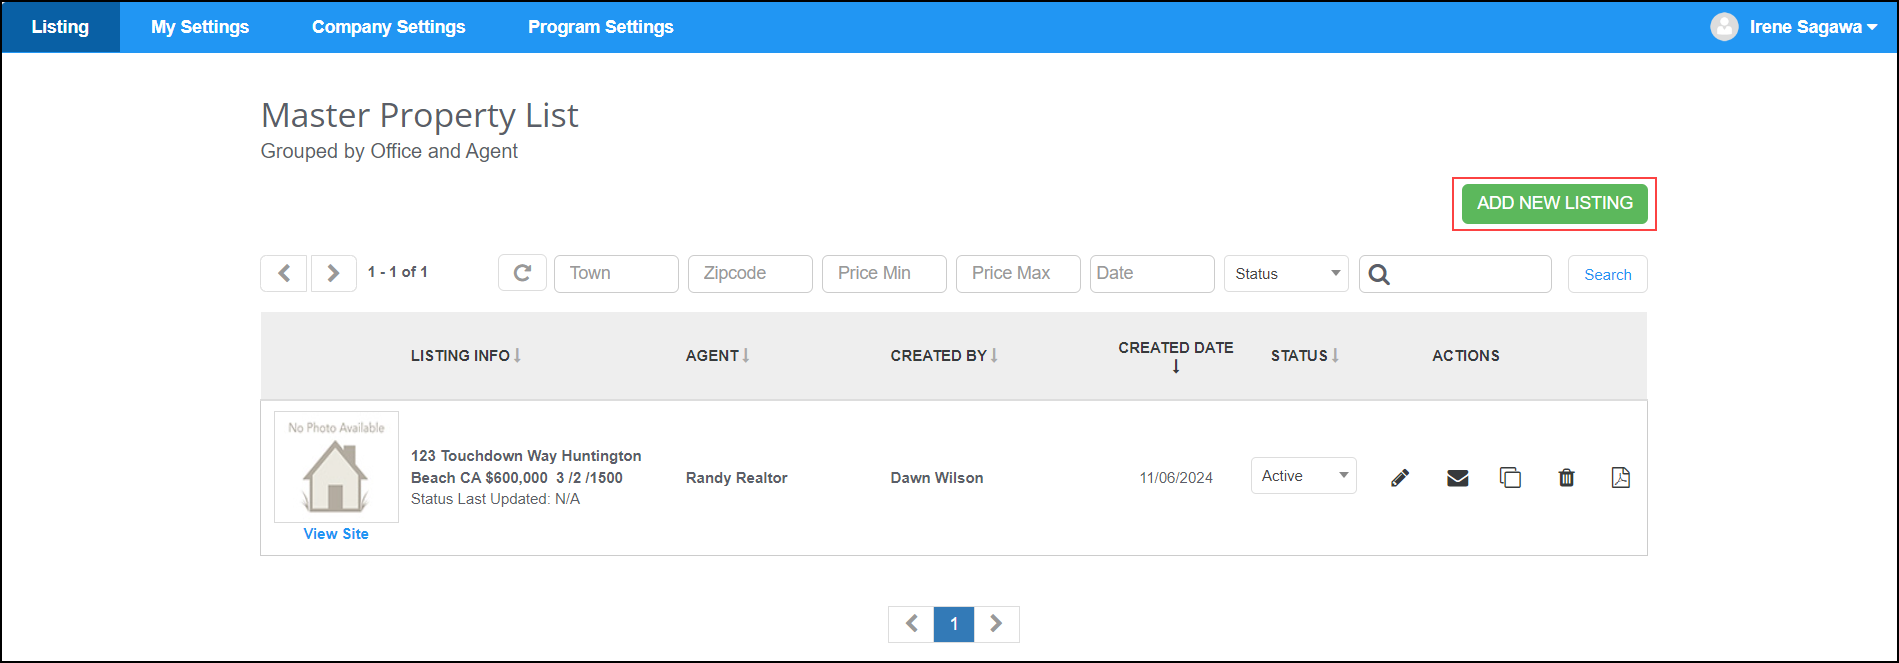
In the left navigation menu, select Marketing and then select Single Property Sites.
-
On Listing tab of the Master Property List page, select Add New Listing.
-
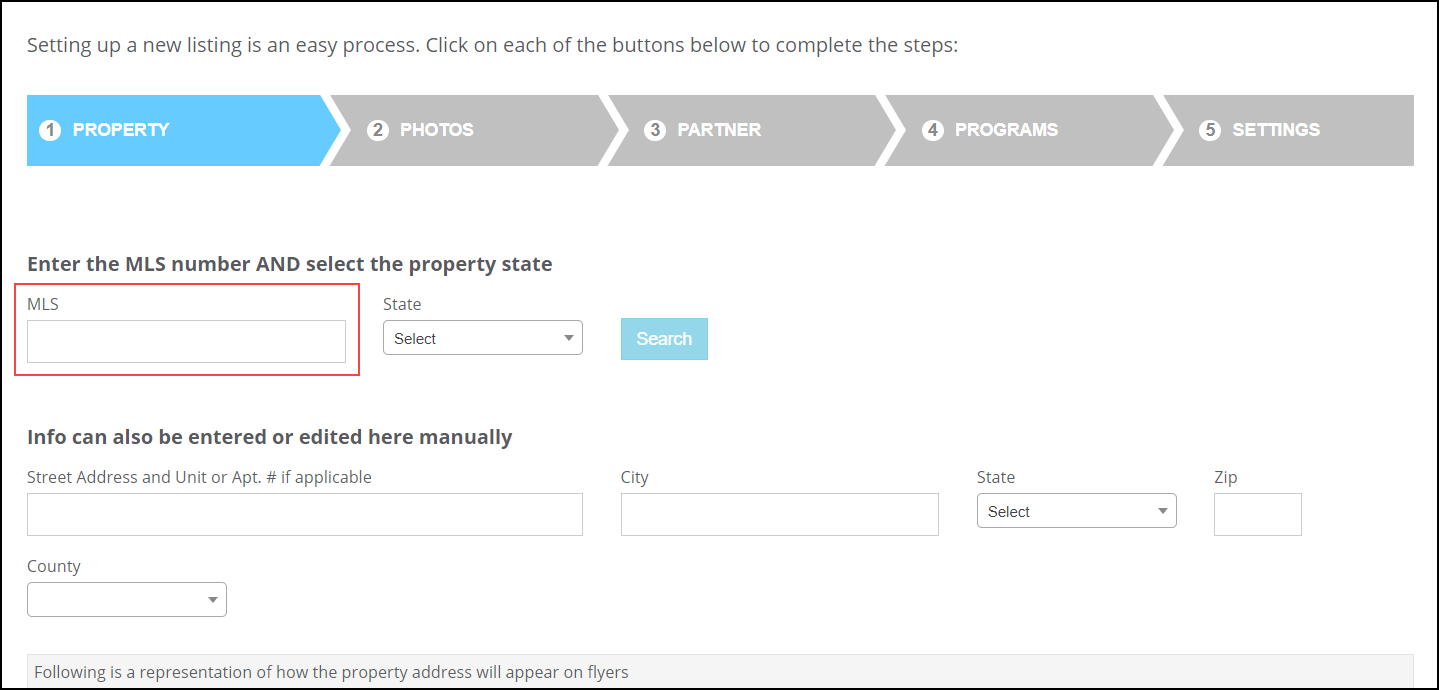
On the Property tab, enter the MLS number for the listing. When you add a valid MLS ID, you can automatically pull in all the information for the listing. If the MLS ID is not found, you can manually enter the property information.
-
Select Save & Continure.
-
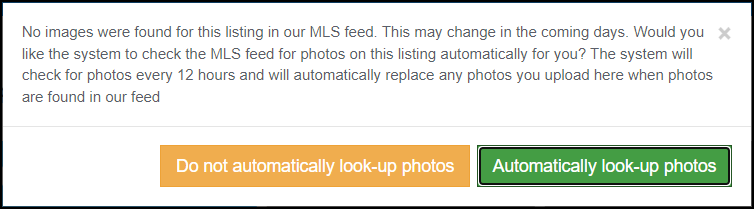
If no photos are found for your listing on the MLS feed, a popup window is displayed asking if you would like the MLS feed to be monitored and any photos found to be automatically uploaded to the listing. Select Do not automatically look-up photos to disable this service. Select Automatically look-up photos to enable this service.
If you enable this service and photos are found, those photos will automatically replace any photos you manually uploaded to the listing.
-
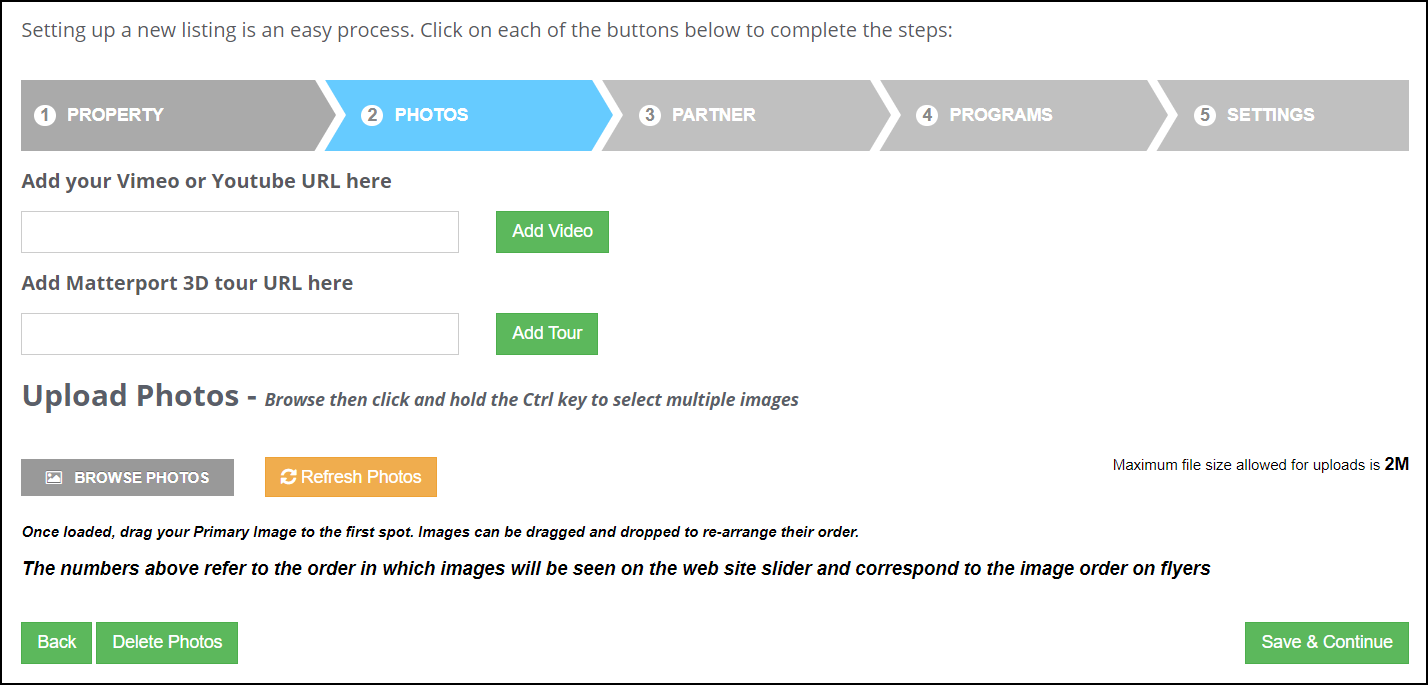
The system automatically pulls in the photos available from the MLS. However, you can remove any existing photos and upload your own photos on the Photos tab. In addition, you can upload videos and 3D tours of the property. You can also delete any digital media uploaded for your listing from this tab.
-
Select Save & Continue.
-
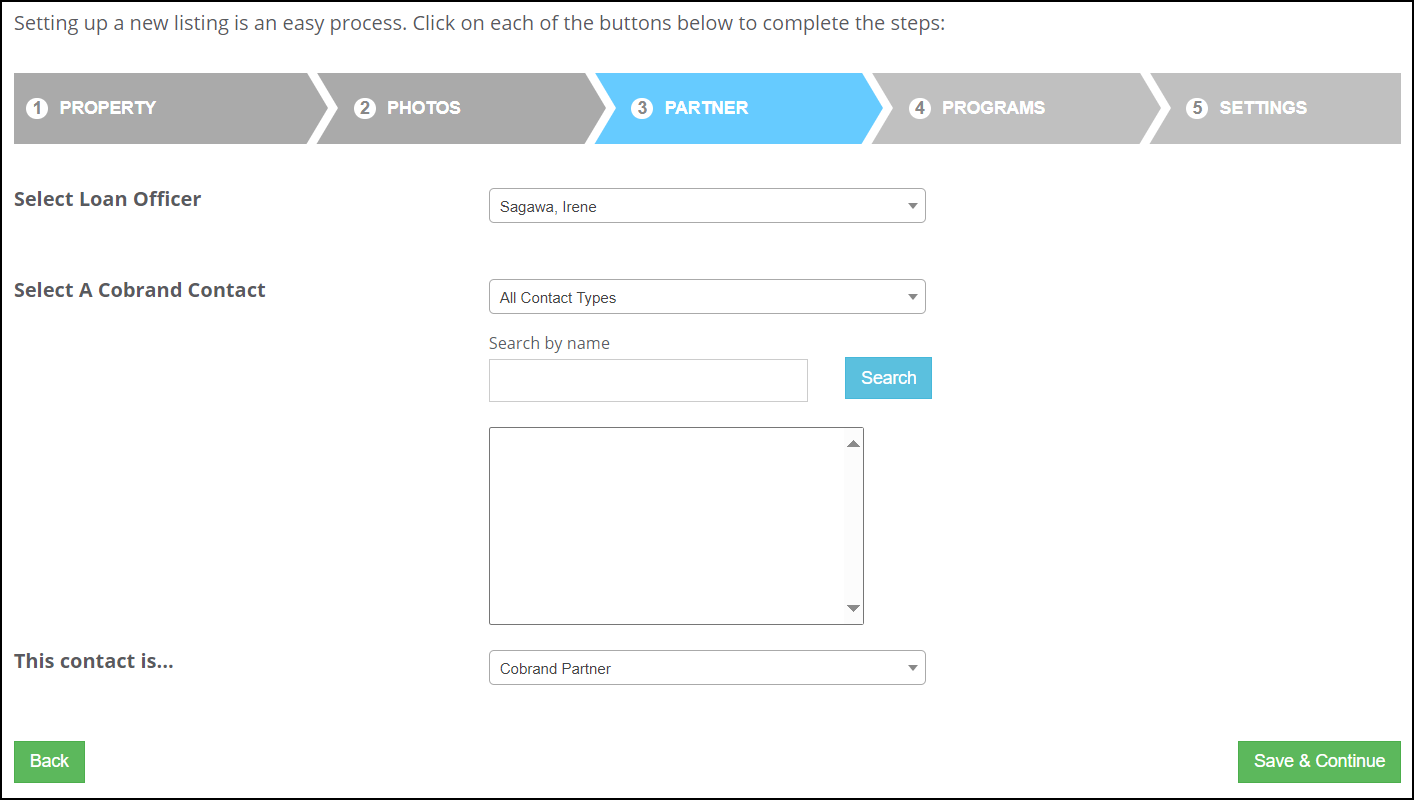
On the Partner tab, select the Surefire user who will be the Loan Officer for the listing (the currently logged on user is displayed as the default selection).
-
The selected user's contacts will be listed as the available users for the listing's Cobrand Contact.
-
Select and define the Cobrand Contact. If it is a FSBO property, select the contact.
-
-
Select Save & Continue.
-
On the Programs tab, select from the Your Group dropdown list and the Rate Scenario(s) that you created previously. This returns pricing results from ICE PPE and enables you to select which products are displayed on the Single Property Site (see the examples below).

-
Select Save & Continue.
-
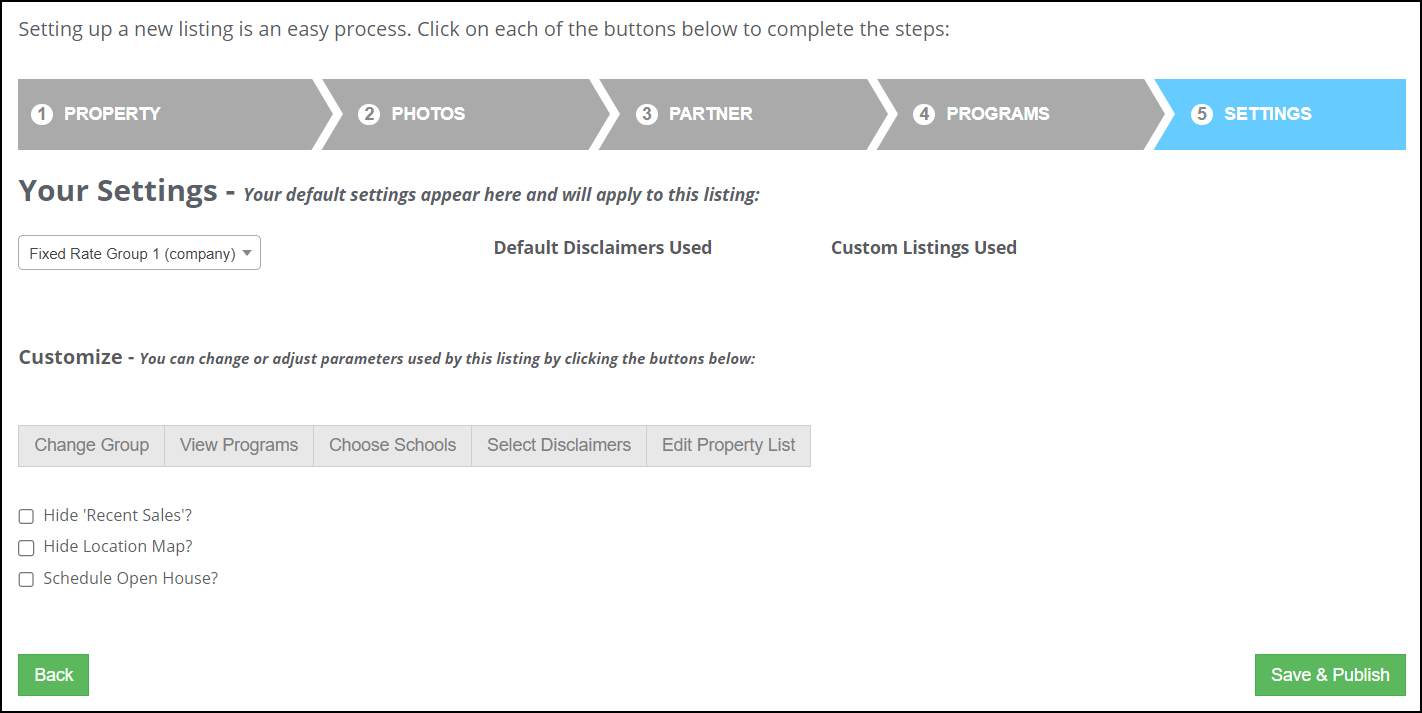
On the Settings tab, your default settings are displayed and will be applied to the listing. In the Customize section, you can modify any of the areas listed (Change Group, View Programs, etc.), as well as select any of the checkboxes (Hide 'Recent Sales'?, Hide Location Map?, etc.).
-
When done, select Save & Publish.
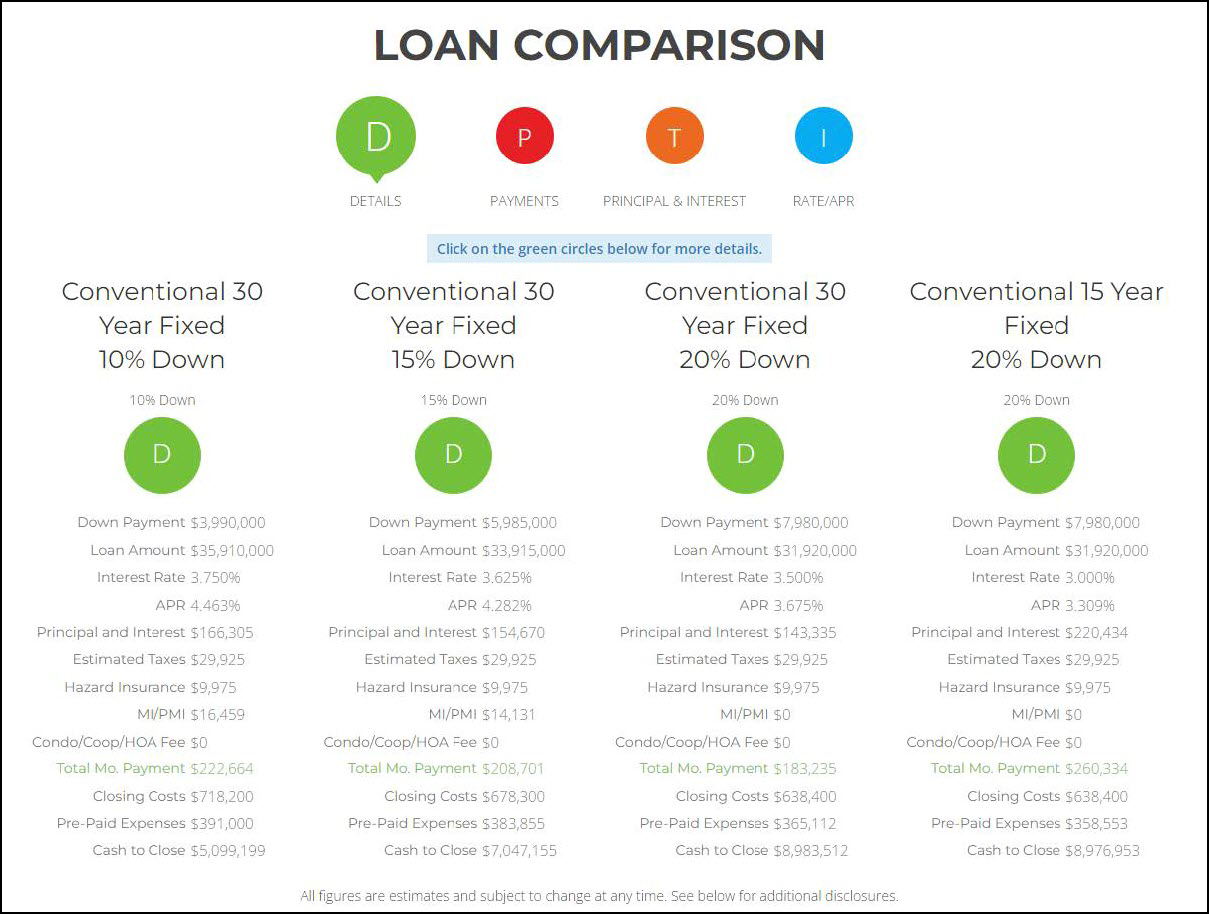
Example of a Single Property Site Pricing:
Example of a Single Property Site Flyer:
| Next Section: Fixed Issues | ||
| Previous Section: Introduction |