Loan Application
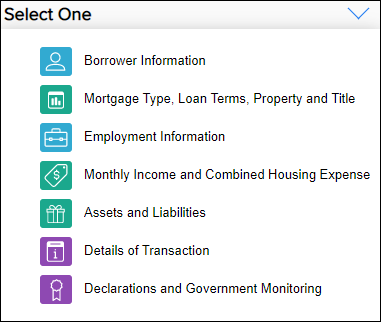
When opening a loan in the Desktop or Tablet view, the Loan Application view displays for the 1003 URLA form. This layout groups the loan application into categories for easy navigation. Users can select one of seven categories to enter data specific to that category. The categories are as follows:
-
Borrower Information
-
Mortgage Type, Loan Terms, Property and Title
-
Employment Information
-
Monthly Income and Combined Housing Expenses
-
Assets and Liabilities
-
Details of Transaction
-
Declarations and Government Monitoring
To Use the Loan Application View:
- From the Pipeline, select a loan.
- The Loan Application view displays. To view a form, select a card, such as Borrower Information.
-
To switch to a different form, select the Blue Arrow
 next to the form name and then select the form you want to view.
Switching Between Loan Application Views
The Encompass web interface supports the new redesigned version of the Uniform Residential Loan Application (URLA), also known as the Fannie Mae 1003 or the Freddie Mac Form 65, that will replacing the 2009 version of the URLA. The redesigned URLA makes it easier for lenders to collect information required by the Home Mortgage Disclosure Act (HMDA) and to incorporate additional application information identified under the URLA/ULAD initiative. Starting January 1, 2021, lenders may submit the redesigned URLA loan application to GSE-specific AUS production environments. Starting March 1, 2021, lenders are required to use the new forms for all new loan applications. Once the new forms have been enabled by an administrator, users can switch between the two form versions.
To Switch Between URLA Form Version
- From a loan, select the
 Menu and then select URLA Form Version.
 - Select Loan Application - URLA 2009 to view the 2009 version of the URLA form, or select Application Views - URLA 2020 to view the new 2020 version of the URLA form.
Loan Summary - The Loan Summary bar is provided for all loans to enable loan team members to see pertinent loan information at a glance. Users can see the mid-FICO, subject property, estimated value, net price, note rate, and more at a glance. Users can select the arrows at either end of the Loan Summary ribbon to scroll through the available information.

Loan Action – The Loan Action bar is provided for all loans to enable loan team members to view the loan number, manage borrowers, and view the loan’s current status in the loan timeline. When more than one loan team member is working in the loan file, the Loan Action bar will be in read-only mode for all loan team members who open the loan file after the first person has opened the file.
-
Loan Action: Select the borrowers dropdown arrow to view the borrower pairs. Select the Pencil icon to manage borrower pairs.

- Loan Action: Select the Contacts icon to view the primary borrower’s contact information. Select the Order Credit Report button to submit a credit report request.
- Loan Action: Select the Print
 icon to preview, download, or print forms. With this option you can:
Print individual and groups of forms.
Print forms with borrower data, field IDs, or blank fields.
Download forms as a PDF file.
Convert a form to a PDF and add it to the eFolder
To Access and Use the Print Forms Tool
From a loan, select the Print
 icon.
icon.On the Print Forms page, select the forms to print as follows:
Select the Down Arrow
 next to Form Groups, and then select the Down Arrow
 next to Personal Form Groups or Public Form Groups.
Select the Down Arrow
 next to Standard Forms, and then select the Down Arrow
 next to the standard form category you want to view.
Select the Down Arrow
 next to Standard Forms, and then select the Down Arrow
 next to Personal Custom Forms or Public Custom Forms.
Select the forms you want to add, and then select the Move Arrow
 icon.
icon.To remove a form you added, select the X next to the form name.
From the Options list, select one of the three printing options.
Select Preview to preview the forms, Download to download a pdf version of the forms, or Print to print the forms.
Select Add to eFolder to convert the forms to a PDF and add a copy to the Document Folders section of the eFolder.
Downloaded forms are saved to your browsers default download location.
Note: When you print or send the Closing Disclosure of Loan Estimate and the CD Date Issued (field ID CD1.X1) or the LE Date Issued (LE1.X1) dates are prior to the current date, a pop-up window provides the option to use the existing CD or LE Date Issued date or update the CD or LE Date Issued field to the current date. If the CD or LE Date Issued is blank, the current date is selected by default, and you have the option to proceed or cancel.
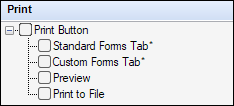
The following Persona settings on the Personas > Loan tab affect the print on demand feature:
Print Button - Enables or disables the Print option.
Standard Forms Tab - Enables or disables the ability to print standard forms.
Custom Forms Tab - Enables or disables the ability to print custom forms.
Preview - Enables or disables the print preview option.
Print to File - Enables or disables the Download option.
For information on configuring personas in the Encompass desktop interface, click here.
-
Loan Action: Select the Scheduler Timeline icon (bell) to view the status of scheduler events that have been configured through the Scheduler Templates administrator settings. This provides users with an improved method for identifying scheduler items and their current status.
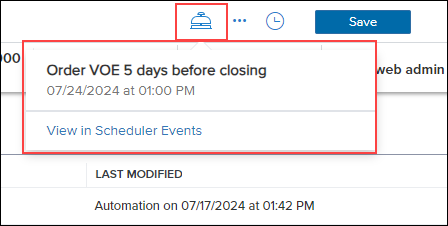
You can also select View in Scheduler Events to view a list of active, cancelled, and completed scheduled events for the loan.

-
Loan Action: Select the Timeline icon to view the loan’s milestones and the loan’s current position in the loan workflow. Additionally, the date that a milestone was completed or the date that a milestone is expected to be completed displays under the milestone name in the Timeline.
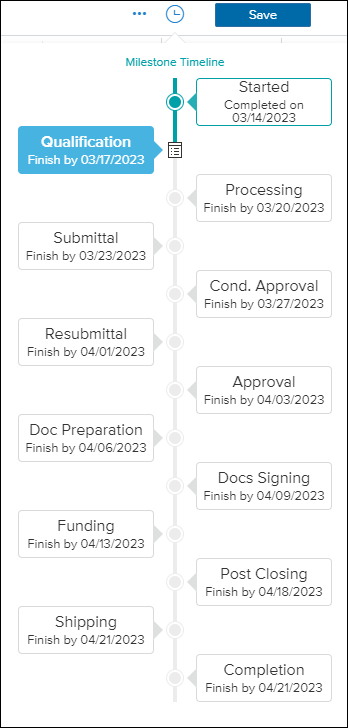
Milestones
A milestone is a step in the workflow that defines loan activities and the role that carries out those activities. When activities are completed, the milestone is marked as finished, and work begins on the next milestone. The Milestone Details window enables users to make comments on milestones, view the days to finish the milestone, change milestone dates, accept the loan file, or return the file to the sender. When the user selects a milestone, the Complete Milestone window displays.
Comments Tab:
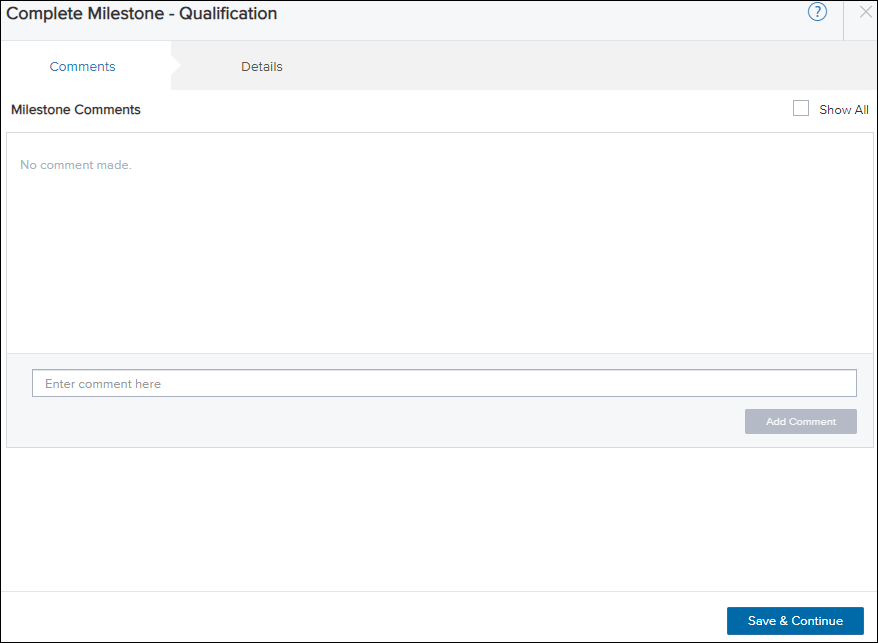
Users can view any comments on for the milestone and can add their own comments. To view all comments associated with all milestones, select Show All.
Details:
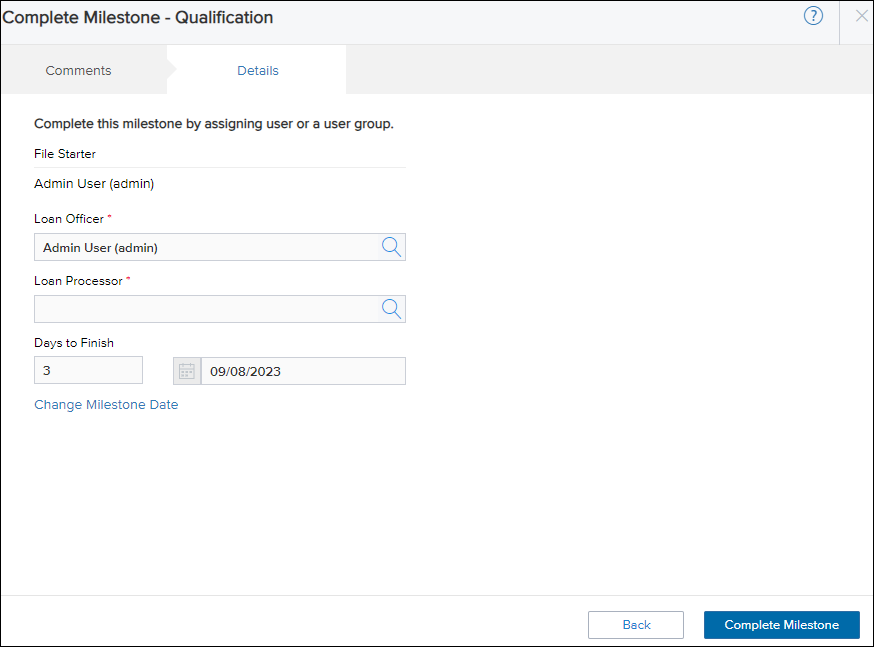
The Details tab enables users to view who the loan is currently assigned to, assign loans to other users, view the expected days and date to finish the milestone, and more.
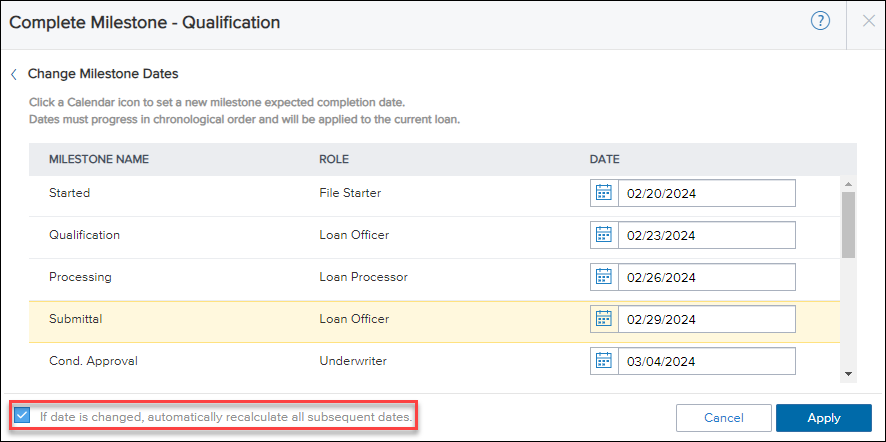
Change Milestone Dates
The Change Milestone Dates window enables users to update the dates related to the milestone. There is also an If date is changed, automatically recalculate all subsequent dates which enables the system to automatically recalculate the expected completion date for all unfinished milestones. When a user utilizes this option, the date is recalculated based on your administrator's settings in the Milestone settings. If this checkbox is selected, only the dates for the milestones that occur after that milestone are recalculated.
If this checkbox is not selected (or cleared), the expected completion date for all other unfinished milestones in the milestone template will not be recalculated when you change a milestone's expected completion date. This enables you to change a date without affecting any other dates.
To Select the New Option:
-
From the Milestone Worksheet on a loan file, select Change Milestone Date.
-
On the Change Milestone Dates window, select If date is changed, automatically recalculate all subsequent dates.
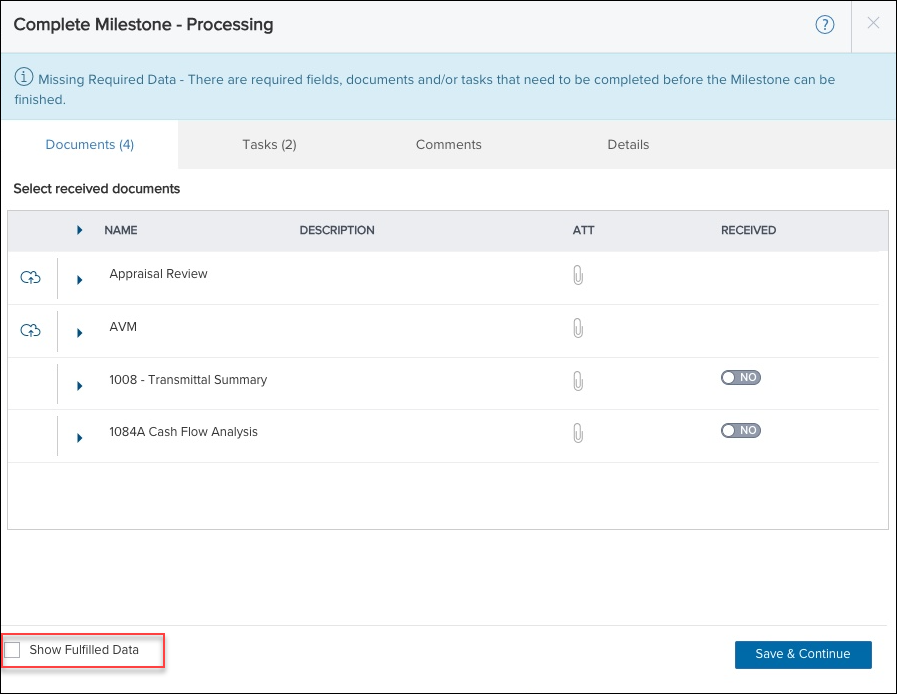
Show Fulfilled Data
The Show Fulfilled Data option enables users to view all required milestone items that have already been completed on the milestone. When the Show Fulfilled Data option is selected, the following indicators enable users to differentiate what has been fulfilled already:
-
Documents have a Yes indicator in the Received column.
-
Completed tasks have a line through them.
-
Fulfilled fields show the field value.
To Use the Show Fulfilled Data Option:
-
From a loan, select the Milestone Timeline
 icon and then select Milestone Details
 .
. -
Select Show Fulfilled Data.
Recording Milestone Activities:
This section describes how to use the options on the milestone details window. The information you see on a milestone details window, and the activities you are permitted or required to complete, is based on the configuration of each milestone and your individual user settings.
To View the Milestone Details:
-
From a loan, select the Milestone Timeline
 icon and then select Milestone Details
 .
. -
On the Comments tab, select Show All to view all comments on all milestones.
-
To add a comment, enter the comment and then select Add Comment.
-
To move to the Details tab, select Save & Continue.
-
To assign a new loan officer, select the Search
 icon in the Loan Officer field.
 -
Select the loan officer from the drop-down list, and then select Apply.
-
To assign to a User Group, select Assign to User Group and then select the user group from the drop-down list.
-
-
To assign a new loan processor, select the Search
 icon in the Loan Processor field.
 -
Select the loan processor from the drop-down list, and then select Apply.
-
To assign to a User Group, select Assign to User Group and then select the user group from the drop-down list.
-
-
To change the milestone date, select Change Milestone Date.
-
On the Change Milestone Dates, window, select or enter the updated date for one or more milestones, and then select Apply.
To Accept or Reject a Loan File:
When a loan is assigned to a new loan officer or loan processor, the new assigned user can choose to accept the loan file or return the file to the original sender. The newly assigned user can then either accept or reject the loan file.
-
From the loan that has been assigned, navigate to the Details tab on the Milestone Details window.
-
To accept the loan file select Accept File.
-
To reject the loan file, select Return to Sender to return the loan to the originally assigned user.
To Move a Loan to a New Milestone in Desktop or Tablet:
- From a loan file, select the Milestone Timeline
 icon.
icon. - Select the Milestone Worksheet
 icon to move the loan to the next milestone.
 - The Complete Milestone window displays. Select Complete Milestone.
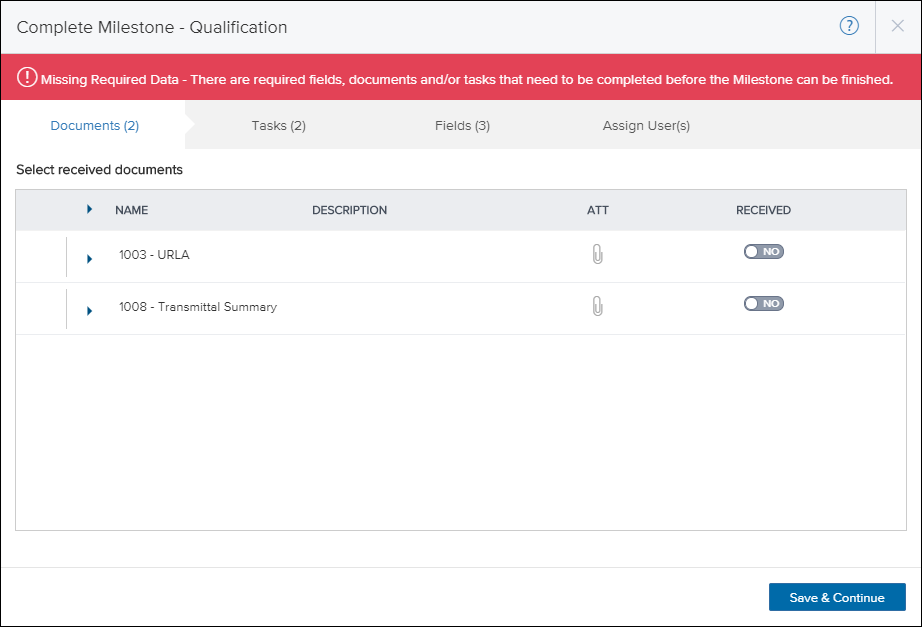
- If any milestone completion business rules are triggered, the user is able to satisfy those conditions on this window.
-
On the Documents tab, select the documents that were received and select Save & Continue.
-
On the Tasks tab, select the tasks that have been completed and then select Save & Continue.

-
On the Fields tab, enter the missing required field data and then select Save and Continue.

-
On the Assigned Users(s) tab, select the user or user group to assign the loan to and then select Complete Milestone.

Note: If the Documents, Tasks, or Fields tab had items that are not satisfied you are not able to complete the milestone.
To Move a Loan to a New Milestone in a Mobile View:
- From a loan file, navigate to the Milestone Timeline and select the Milestone Worksheet
 icon to move the loan to the next milestone.
 -
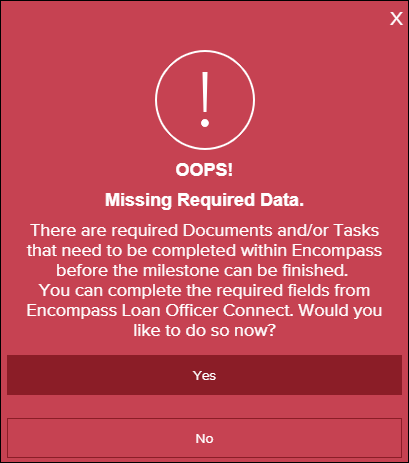
If any milestone completion business rules are triggered, the user receives a warning message.
-
To complete the required fields, select Yes.
Note: If you have Document or Task requirements, these will need to be completed in Encompass before the milestone can be moved.
-
Enter the required fields, and then select Save.

-
When all conditions have been satisfied, select the user or user group to assign the loan to and then select Complete Milestone.
Apply Loan Templates
After you start a loan, you can use the Apply Loan Template menu to change the loan template set or the closing cost template for the loan.
To Use the Apply Loan Template Set Option on Desktop And Tablet:
-
From an existing loan, select the ... menu.

-
Select Apply Loan Templates, and then select Apply Loan Template Set.
-
On the Select Loan Template Set window, select the new template that you want to apply.
-
To append the data from that template, and overwrite existing data in those fields, select Options and then select the Append template data check box.
Note: This option is enabled by default.

- Select Apply.
To Use the Apply Loan Template Set Option on Mobile:
-
From an existing loan, select the
 menu and then select Apply Loan Templates.
 -
On the Apply Loan Templates menu, select Loan Template Set.
-
On the Select Loan Template Set window, select the new template that you want to apply.
-
To append the data from that template, and overwrite existing data in those fields, select Options and then select the Append template data check box.
Note: This option is enabled by default.

- Select Apply.
To Use The Apply Closing Cost Template Option on Desktop And Tablet:
-
From an existing loan, select the ... menu.

-
Select Apply Loan Templates, and then select Apply Closing Cost Template.
-
On the Select Closing Cost Template window, select the new template that you want to apply.
-
To apply only template fields which contain values, select Options and then select the Only apply template fields which contain values check box.
Note: This option is enabled by default.

- Select Apply.
To Use The Closing Cost Template Option on Mobile:
-
From an existing loan, select the
 menu and then select Apply Loan Templates.
 -
On the Apply Loan Templates menu, select Closing Cost Template.
-
On the Select Closing Cost Template window, select the new template that you want to apply.
-
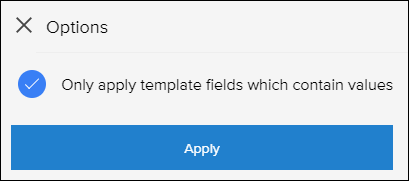
To apply only template fields which contain values, select Options and then select the Only apply template fields which contain values check box.
Note: This option is enabled by default.
- Select Apply.
Closing Cost Template Limitation
Users can only apply Closing Cost Templates that apply to the 2015 Itemization.
To Use The Apply Affiliated Business Arrangements Template Option on Desktop And Tablet:
-
From an existing loan, select the ... menu.

-
Select Apply Loan Templates, and then select Apply Affiliated Business Arrangements Template.
-
On the Select Affiliated Business Arrangement Template window, select the template that you want to apply.
-
Select Overwrite to overwrite the existing records on the loan with the information from the template. Select Append to only add the information from the template.
- Select Apply.
To Use The Apply Settlement Service Provider Template Option on Desktop And Tablet:
-
From an existing loan, select the ... menu.

-
Select Apply Loan Templates, and then select Apply Settlement Service Provider Template.
-
On the Select Settlement Service Provider Template window, select the template that you want to apply.
-
Select Overwrite to overwrite the existing records on the loan with the information from the template. Select Append to only add the information from the template.
- Select Apply.
Archive a Loan
You can archive a loan from the loan file to remove the file from the pipeline view.
To Archive or Unarchive a Loan
-
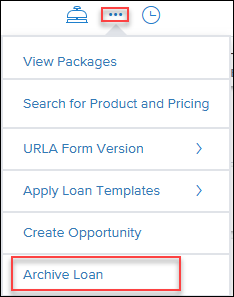
From a loan, select the Menu
 .
. -
Select Archive Loan to archive the current loan.
-
If the loan has already been archived, this option is replaced with Unarchive Loan. Select Unarchive Loan to remove the archived status for the loan.
-
-
On the confirmation window, select Yes.
While there isn't a persona setting to turn off the option to archive/unarchive loans, administrators can create a Persona Access to Field business rule for Encompass field 5016 and set the rights to View Only/Disabled for personas that should not have access to this feature. This will hide the Archive/Unarchive loan option.
Adding and Removing Borrower Pairs
The Encompass web interface users can add and remove up to six borrower pairs on a loan file. When you add additional borrower pairs, separate sets of forms are created which enable you to record borrower data for each pair.
To Add a Borrower Pair:
-
Open a loan file in the Encompass web interface.
- Select the borrowers drop-down arrow to view the borrower pairs.

- Select the Pencil icon to manage borrower pairs.
- Select + New Pair to add a new borrower pair.
- Fill in the information for the new borrower or borrowers, and select Next to save the borrower pair.
- Review the changes on the Summary page, and then select Save.
To Delete a Borrower Pair:
-
Open a loan file in the Encompass web interface.
- Select the borrowers drop-down arrow to view the borrower pairs.

- To delete a borrower pair, select the Trash icon next to the borrower pair you wish to remove.
- Select Next
- Review the changes on the Summary page, and the select Save.
Subordinate Mortgage Loan Amounts
A Subordinate Mortgage Loan Amounts window serves as a centralized dashboard that provides a comprehensive view of all financing associated with the subject property and easy access to the component subordinate financing fields. The window is accessed by clicking the Sub. Financing button on forms such as the Borrower Summary Origination, Borrower Summary Processing, and the Loan Application (2. Mortgage Type, Loan Terms, Property & Title).
The new Subordinate Mortgage Loan Amounts window contains the following sections, which enable users to track subordinate financing data related to the current loan.
-
Mortgage and HELOC Liabilities
-
Loan linked to current transaction
-
New Financing not Linked to Current Transaction
-
Total Financing for Subject Property
-
Total Ratios for Subject Property
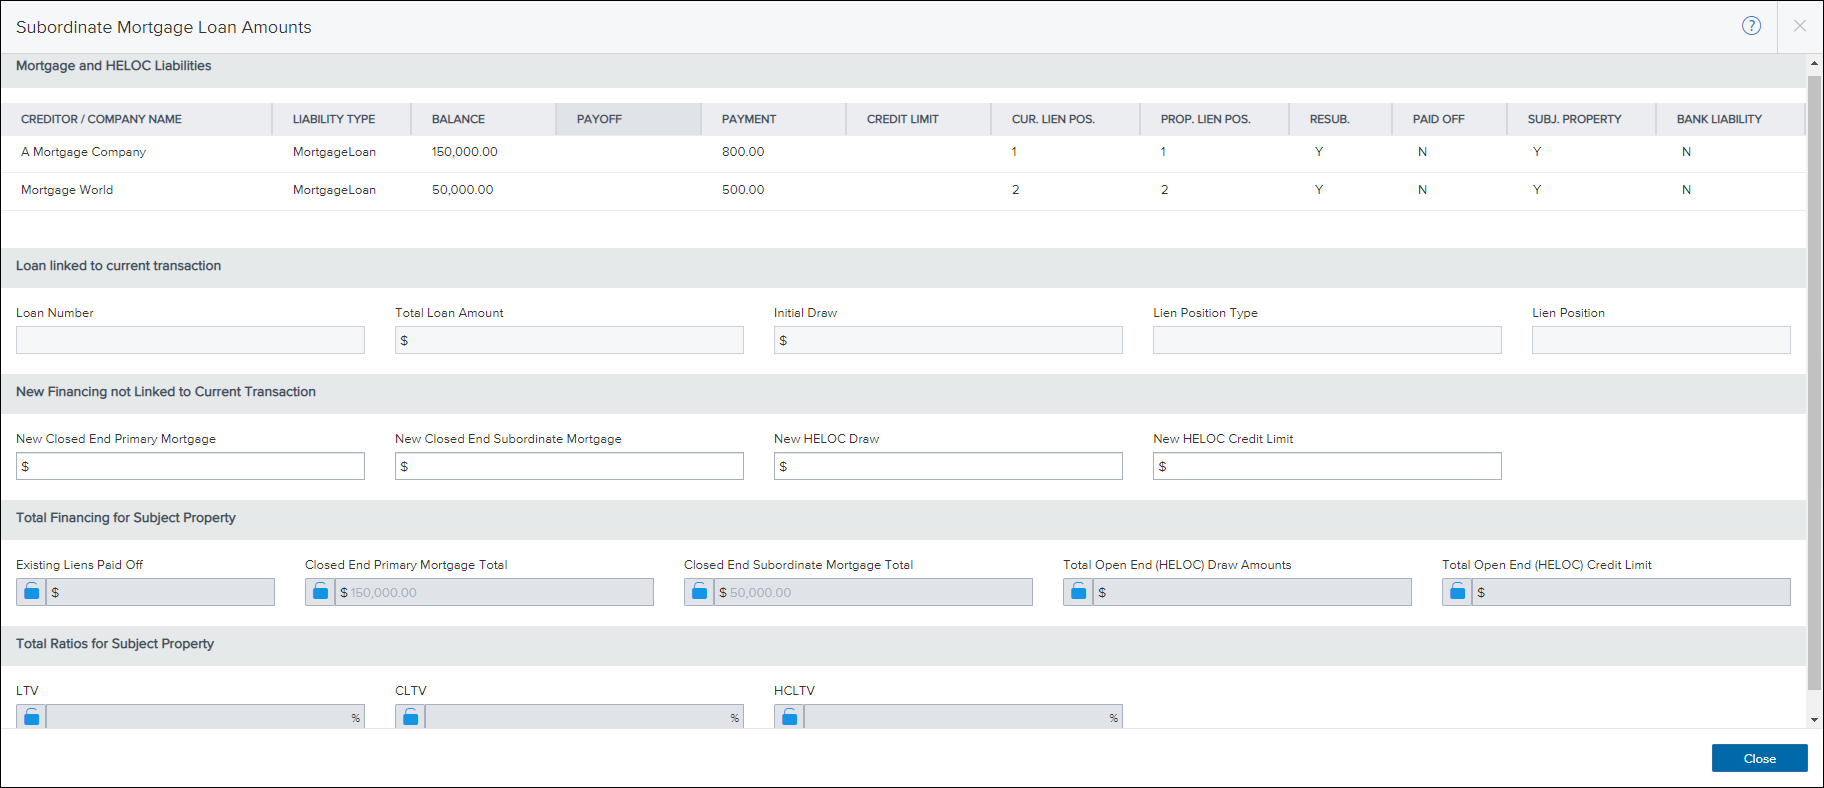
This section displays existing mortgages and liabilities associated with the subject property. The columns in the table provide quick access to detailed information from the Liability records. Liabilities display in this section when they have an Account Type of Mortgage or HELOC and when the Subject Property check box is selected in the VOL record.

This section enables a user to view any loans that have been linked to the current transaction in Encompass Smart Client. The section lists the loan’s Encompass Loan Number, the Total Loan Amount (Encompass field 2), the Initial Draw (Encompass field 1888) if the loan is a HELOC loan, The Lien Position Type (Encompass field 420) and the Lien Position (Encompass field 4494). These fields are read-only and are populated from the linked loan file.
This section enables manual entry of loans that are in process with another lender during the origination of the current loan, including new closed end primary and subordinate mortgage amounts, and new HELOC draw and limit amounts.
-
Record first lien mortgages in the New Closed End Primary Mortgage amount (Encompass field 4487). These amounts are included in the Closed End Primary Mortgage amount (Encompass field 427) listed in the Total Financing for Subject Property section. An example of this use case would be a lender who is issuing a simultaneous second to be closed with a first lien from another lender. The other lender’s first lien, which is not yet a liability, is documented in New Closed End Primary Mortgage.
-
Record second through fourth lien mortgages in the New Closed End Subordinate Mortgage (Encompass field 4488). These amounts are included in the Closed End Subordinate Mortgage amount (Encompass field 428) listed in the Total Financing for Subject Property section. An example of this use case would be a lender who is issuing a first lien with a simultaneous second to be closed from another lender. The other lender’s lien, which is not yet a liability, is documented in New Closed End Subordinate Mortgage.
-
Record HELOC draws and credit limits in the New HELOC Draw / Credit Limit amounts (Encompass fields 4489 and 4490). The draw amount should be entered in the first box, and the total credit line should be entered in the credit limit box. These amounts are included in the appropriate Total Open End (HELOC) Draw Amount (Encompass field CASASRN.X167) and Total Open End (HELOC) Credit Limit (Encompass field CASASRN.X168) fields in the Total Financing for Subject Property section.
This section includes the following calculated totals for subject property financing:
-
Existing Liens Paid Off (Encompass field 26)
- First Mortgage Total (Encompass field 427)
-
Closed End Second Mortgage Total (Encompass field 428)
-
Total Open End (HELOC) Drawn Amounts (Encompass field CASASRSN.X167)
-
Total Open End (HELOC) Credit Limit (Encompass field CASASRSN.X168) – The total of the credit limit from liabilities, the HELOC Credit Limit for loans not linked (field ID 4490), and the loan amount for any Piggyback loans.
This section displays the total LTV, LTV, and HCLTV ratios for the subject property.
- LTV (Encompass field 353) –With the exception of USDA or refinance loans, the LTV (Loan-To-Value) ratio is calculated by dividing the total loan amount (Encompass field 2) by the purchase price (Encompass field 136) or appraised value (Encompass field 356), whichever is lower. For USDA or refinance loans, the LTV (Loan-To-Value) ratio is calculated by dividing the loan amount by the appraised value (Encompass field 356). For 203(K) loans, the LTV (Loan-To-Value) ratio is representative of the Case LTV. See the FHA 203(K) worksheet for details.
-
CLTV (Encompass field 976).
- HCLTV (Encompass field 1540).
Assets and Liabilities
On a desktop or tablet, you can use the Assets and Liabilities page to add assets such as bank accounts, real estate records, stocks and bonds, vehicles, and other assets. You can also add liabilities and view any liabilities returned from a credit report.
To Add a Checking or Savings Account:
-
On the Assets and Liabilities page, select Add Institution.

- Enter the banking institution name and select which borrower the institution is associated with.
- Select Add Account to add account information to the banking institution.

- To add another account select Add Account. To delete an account select the minus icon.

- To save your changes, select Save.
To Add a Real Estate Record:
-
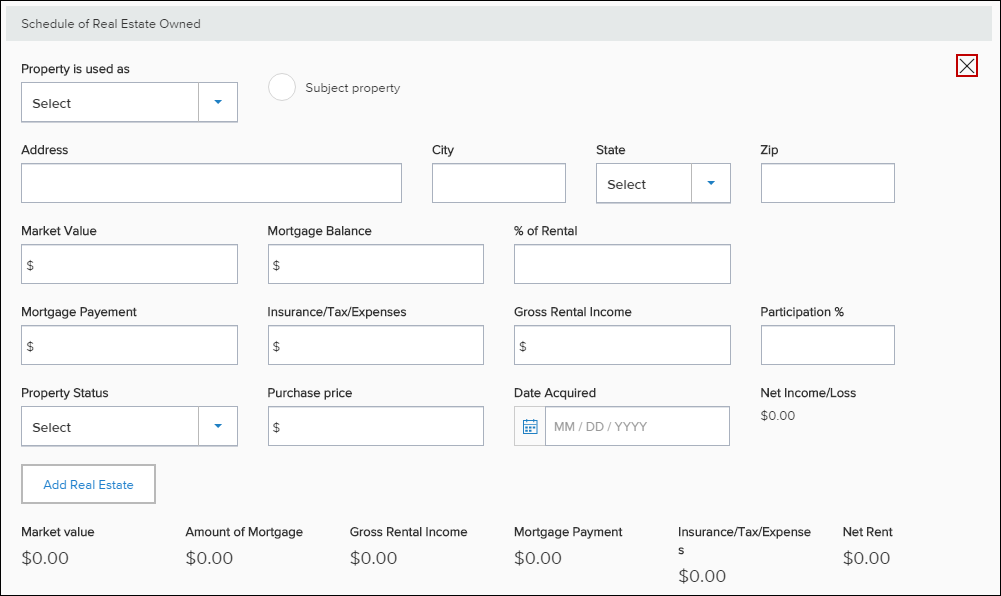
On the Assets and Liabilities page, select Add Real Estate.

- Enter the real estate information.
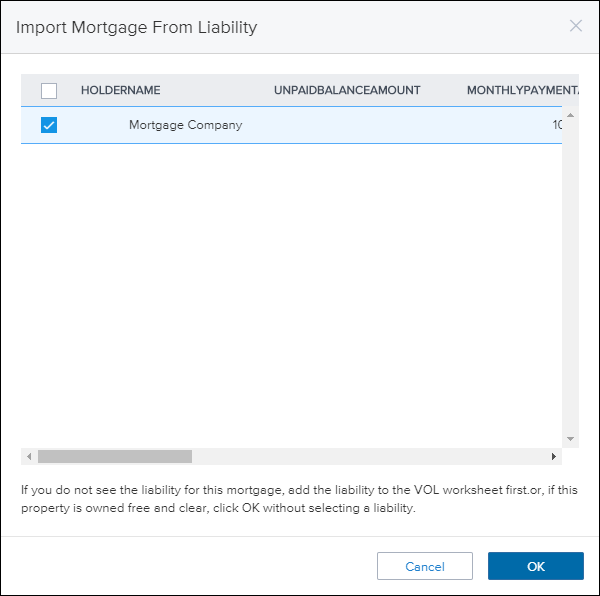
- To attach a liability to a real estate record select Attach/Show Liens.
-
The Import Mortgage From Liability screen displays. Select a liability to attach to the real estate entry, and then select OK.
- To add an additional real estate record, select Add Real Estate.
- To remove a real estate record select the X icon.
- To save your changes, select Save.
To Add Stocks and Bonds:
-
On the Assets and Liabilities page, select Add Stocks and Bonds.

- Enter the stock or bond information.
- To add an additional stock or bond record, select Add Stocks and Bonds.
- To remove a stock or bond record, select the minus (-) icon.

- To save your changes, select Save.
To Add a Vehicle:
-
On the Assets and Liabilities page, select Add Vehicle.

- Enter the vehicle information.
- To add an additional vehicle, select Add Vehicle.
- To remove a vehicle, select the minus (-) icon.

- To save your changes, select Save.
To Add Other Assets:
-
On the Assets and Liabilities page, select Add Other Assets.

- Enter the asset information.
- To add an additional asset, select Add Other Assets.
- To remove an asset, select the minus (-) icon.

- To save your changes, select Save.
To Add General Liabilities:
-
On the Assets and Liabilities page, select Add General Liability.

- Enter the liability information.
- To add an additional asset, select Add General Liability.
- To remove a general liability, select the minus (-) icon.

- To save your changes, select Save.
2018 HMDA Demographic Information
The Encompass web interface provides support for the HMDA (Home Mortgage Disclosure Act) reporting changes that are scheduled to take effect in 2018 for the collection of loan data that is required for government monitoring of loan applications.
The Encompass web interface enables users to collect the 2018 HMDA data in accordance with Regulation C, 2015 HMDA Rule. Covered financial institutions are required to collect the 2018 HMDA data for loans with a final disposition (originated, declined, withdrawn, closed, purchased, etc.) taken on or after January 1, 2018. Once the Encompass HMDA settings are configured in the Encompass admin settings, the Encompass web interface uses those settings to enable the Encompass web interface users to provide the required demographic information. For the duration of 2017, user may select which information they choose to submit for government reporting for HMDA. The Use 2018 DI check box enables users to modify this section of the 1003 to capture the appropriate data required before submitting an application.

To View 2018 HMDA Fields
-
From a loan in the Encompass web interface, select the Loan Applicantion view and then select the Declarations & Government Monitoring card.
- Navigate to the Government Monitoring section of the page.
- If the new government monitoring information is not visible, select the Use 2018 DI check box.
The following behavior applies to the Information Not Provided and I do not wish to provide this information check boxes for Ethnicity, Race, and Sex that displays in the Government Monitoring section of the of the Declarations & Government Monitoring page.
- Face to Face Interviews - When this method is used to collect HMDA 2018 demographic information, the Information Not Provided check box is disabled. Selecting I do not wish to provide this information will clear any of the race or ethnicity sub category check boxes in these sections. For example, if the I do not wish to provide this information check box was selected in the Ethnicity section, the user could select Hispanic or Latino but the Mexican check box would be cleared.
- Telephone, fax, mail, email, or internet interviews - When the method used to collect HMDA 2018 demographic information is Telephone Interview, Fax or Mail, or Email or Internet, both the Information Not Provided and I do not wish to provide this information check boxes are enabled. Both check boxes can be selected at the same time. Selecting the Information Not Provided check box in the Ethnicity, Race, or Sex section will clear all the remaining check boxes and fields in that section, with the exception of the I do not wish to provide this information check box.
See Also:
Borrower Summary - Origination
Ordering Credit
Product and Pricing