How To: Import Leads from a Spreadsheet [Advanced Edition]
TOPICS COVERED IN THIS ARTICLE
- How to Import Leads from a Spreadsheet
ENVIRONMENT
- LeadManager – Advanced Edition only
STEP BY STEP INSTRUCTIONS
To import a batch of leads into the system from another source, for instance an Excel spreadsheet, lead data fields in the spreadsheet must match the data fields in Velocify LeadManager™.
- In order for LeadManager to put the correct data into the correct field when the leads are imported, the fields need to all be mapped.
- The order of the data columns in the spreadsheet to the order of the fields in the mapping in LeadManager. This is true if you are importing leads from a spreadsheet from one spreadsheet only one time, or if you are uploading leads from many differently formatted spreadsheets on an ongoing basis.
- An example of how you might need to make multiple mappings to import multiple lead sources is: Imagine one of your lead sources provides you with a spreadsheet every week where the first names of all the leads appear in Column A. Another lead source provides you with a weekly spreadsheet where the first names of all the leads appear in Column B.
- You could reformat one of the spreadsheets so the lead data was structured the same in both. But since these lead sources are ongoing, creating a separate mapping for each lead source saves you the trouble of having to reformat the spreadsheets on a weekly basis.
- Creating separate mappings for each of these spreadsheets ensures that the lead data always ends up in the right place.
- Even if you are not dealing with multiple lead sources, a mapping must be completed to import leads from a single spreadsheet.
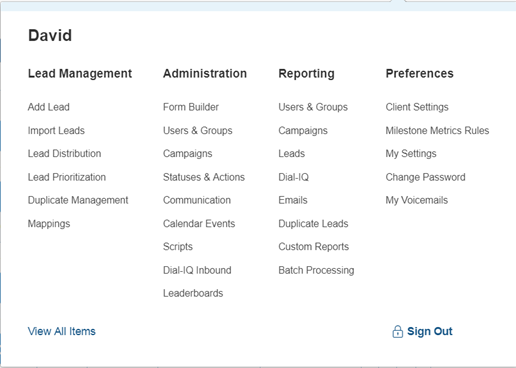
Access the Menu page by clicking on your name in the upper right of the header.

Under Lead Management click Mapping.
On the Import Mappings page there is a list of current import mappings.
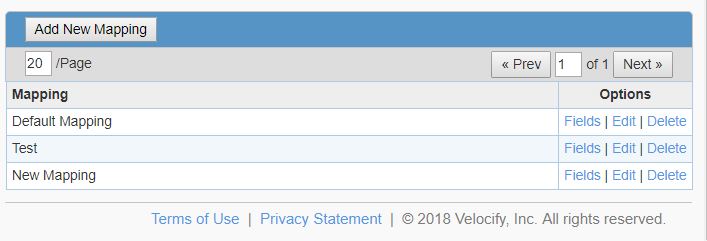
Click the Add New Mapping button.
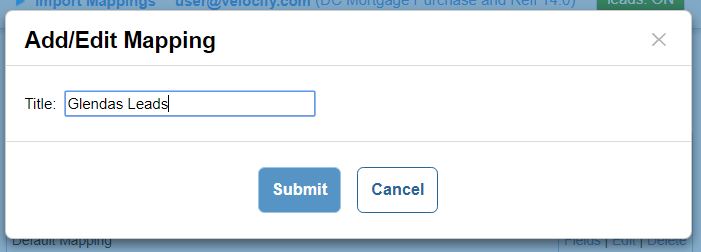
You will be prompted to provide a Title to the mapping .
In this example, the name is ‘Glenda’s Leads.'
Add a title and click Submit.
Your new mapping will appear in the list.
Next you will need to add fields to the mapping and order them correctly. To do this, you will need to click the Fields link associated with your new mapping.
But first, in order to know which fields to add to your mapping, and in what order, open the spreadsheet from which you are importing the data.
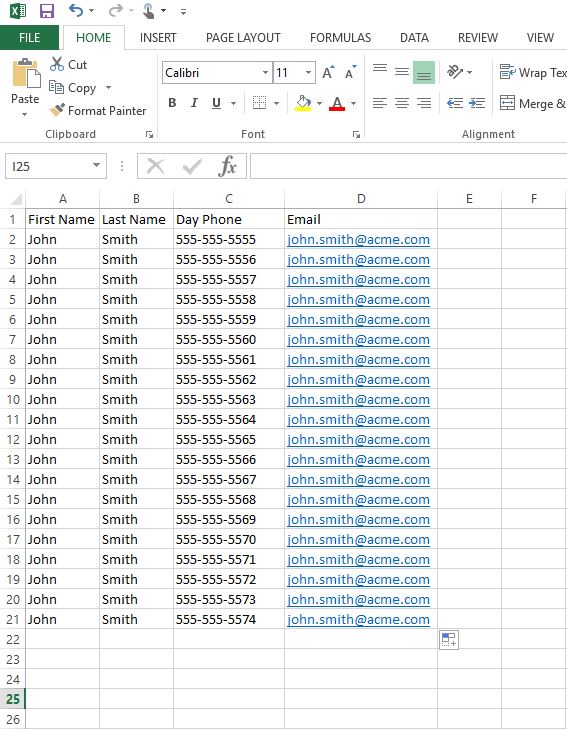
In this example the lead spreadsheet contains only first and last names, day phone, and email. Your mapping will have to contain those fields in that order.
The point of configuring the mapping is to make the order of the columns in the spreadsheet match the order of the fields in the mapping in LeadManager. The actual values that appear in row 1 of the spreadsheet are not important.
If, for example, your spreadsheet displays “1stName” in the first column, and the first field in LeadManager is “First Name”, you do not need to change your spreadsheet to match. What is important is that the data in the columns matches; i.e., that the first names in the spread sheet are being imported to the first name field in the LeadManager lead form.
Now click the Fields link associated with your new mapping.

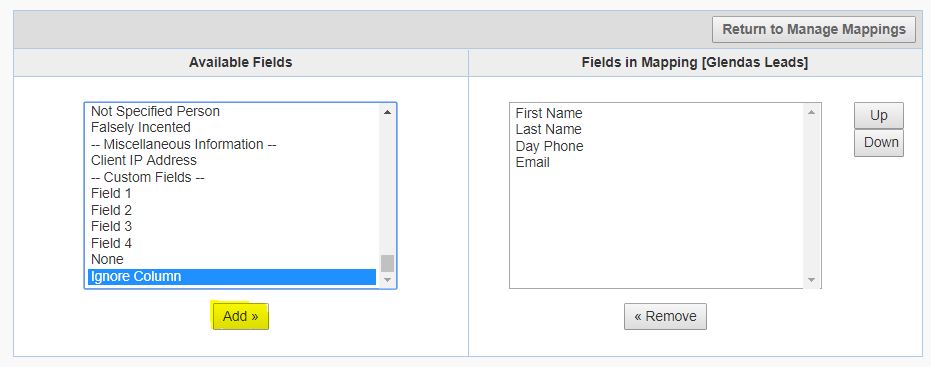
The right hand column, Fields in Mapping [Glenda’s Leads] is empty. The fields that appear in your spreadsheet need to appear in this column in the same order.
Click to select the fields you want to add and click the Add button, making sure to add the fields in the order that they appear in your spreadsheet. Here’s how:
You may add Fields one at a time or multi-select by holding down the “ctrl” button (on the keyboard) while clicking.
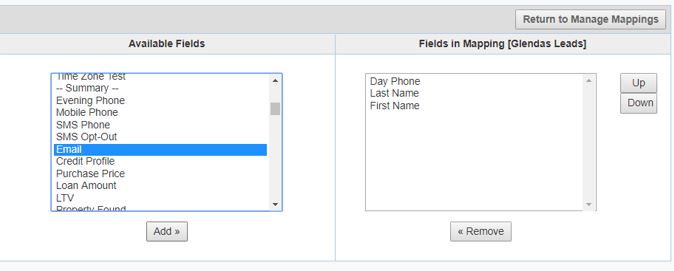
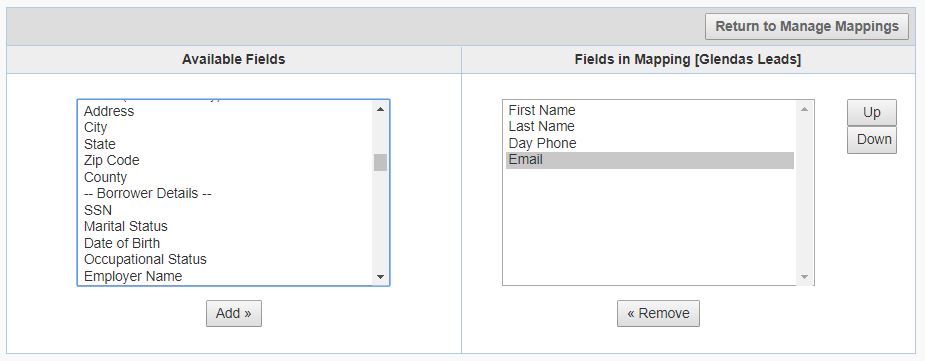
The Fields are now listed in the right column and will be part of the mapping. If the Fields in Mapping are not in the correct order, click to select the field whose position in the order you would like to change and click the Up or Down button to move it to the correct position.
To match this order in the Glenda’s Leads mapping, click Email to select, then click the Down button.
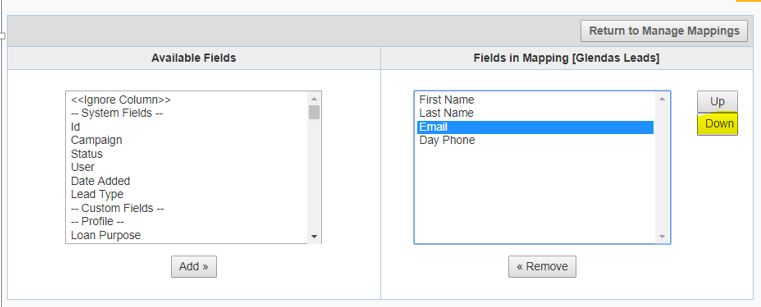
Now the order of fields in the mapping match the order of columns in the spreadsheet.
Adding Fields with the Form Builder or Using <<Ignore Column>>
If you have a field in your spreadsheet that you do not have in your LeadManager lead form you will be unable to add it to your mapping. This is because only fields on your lead form will appear in the Available Fields list.
Assuming you don’t want to delete the column out of the spreadsheet, there are two ways to address this issue.
- Add the field to the lead form using the Form Builder. Adding fields to the lead form should be done if the data in your spreadsheet is something you want to capture in LeadManager. For more information, see Form Builder: Adding A Field.
- Use the <<Ignore Column>> field when creating the mapping. Use the <<Ignore Column>> field if you don’t want to delete the column from the spreadsheet, and you also do not care to import it into LeadManager.
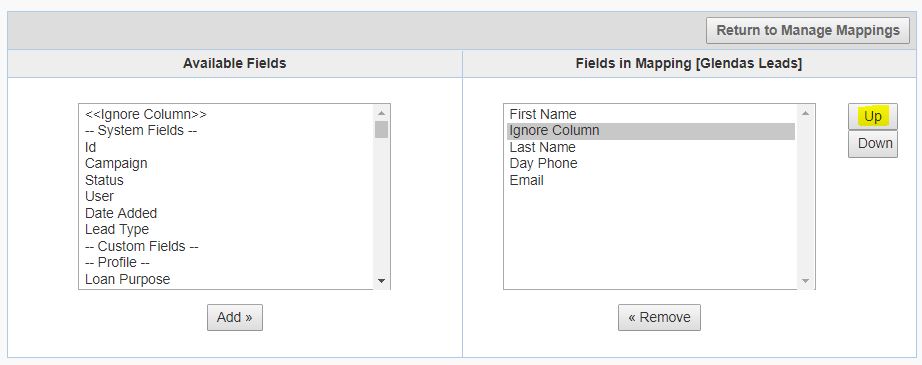
How to use the <<Ignore Column>>
The example spreadsheet contains a column for Middle Name, a field which does not appear on the lead form. You want to leave this data in the spreadsheet but you don’t want to capture it in LeadManager.
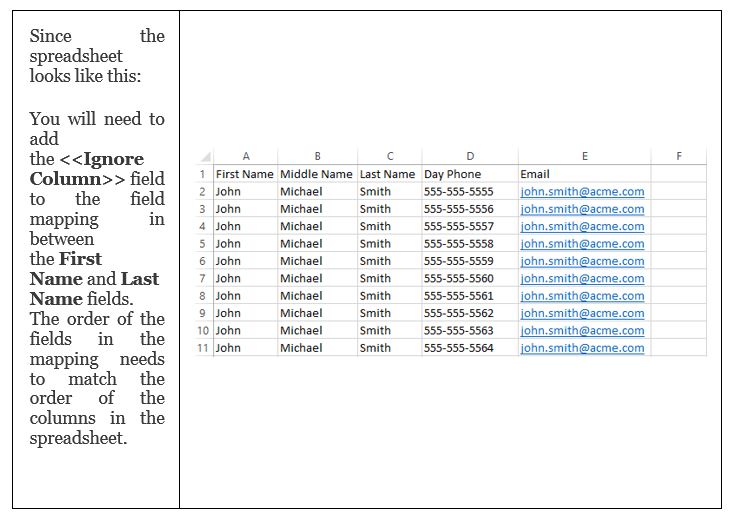
To add <<Ignore Column>> to Fields in Mapping, click <<Ignore Column>> and then click the Add>> button.
Use the Up button to move the <<Ignore Column>> field into the correct position in the mapping. It should look like this:
Now that fields have been added and ordered to match the spreadsheet, click the Return to Manage Mappings button.
You can change the name of the mapping by clicking its Edit link.

Importing Leads
Now that you have created a mapping in LeadManager to import leads from spreadsheets.
Access the Menu page by clicking on your name in the upper right of the header.
Under Lead Management click Import Leads.
The Import Leads page will load.
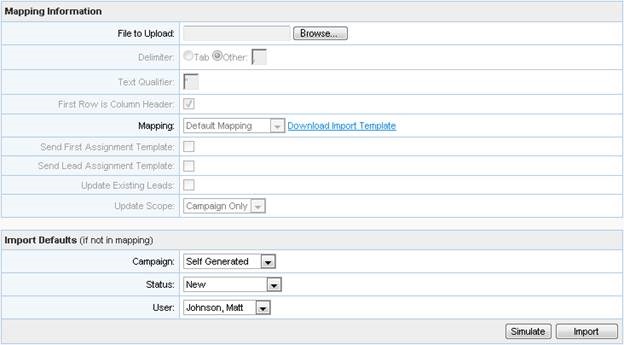
See below for a description of the settings on the Import Lead form. Some of these you will need to configure after for the import. Others, in a majority of cases, can be left with their default values.
Most leads are uploaded to the Lead Warehouse. If you use the direct mail feature, you may be uploading Direct Mail Records, which are stored in a separate database. Click here for more about Direct Mail (dead link).
Click the Choose File button to find the spreadsheet containing lead data on your computer. When you click the button, a File Upload dialog will pop up.
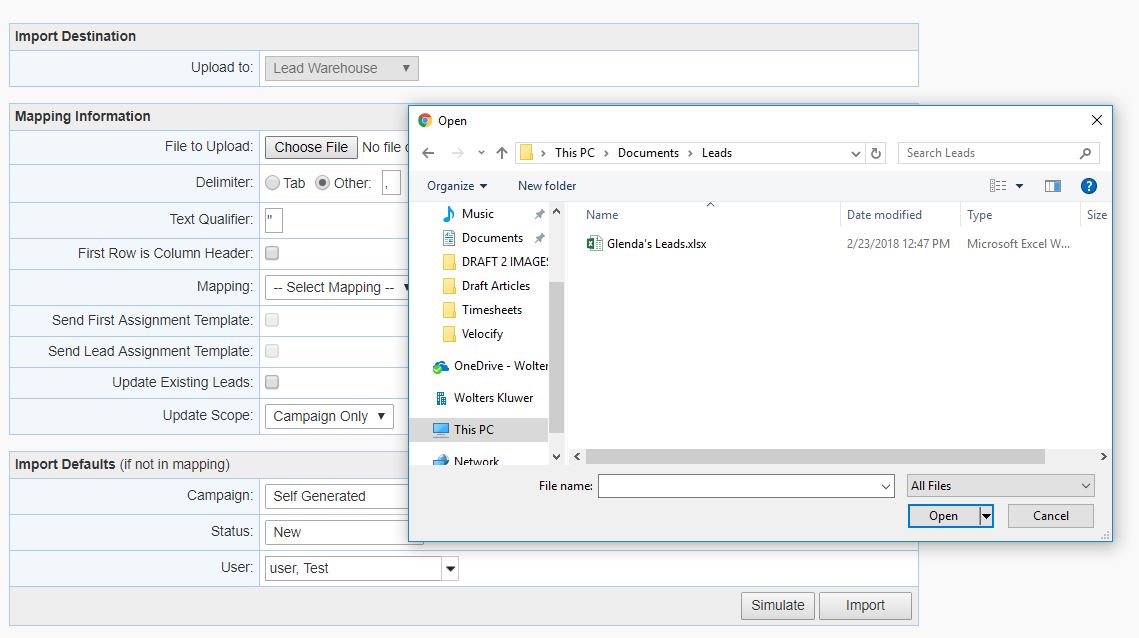
Navigate to the file you want to upload, select it, and click Open.
There are two different types of files containing lead data can be imported. These are:
- Comma Separated Values file(.csv). These can be created and edited in Excel or NotePad
- Microsoft Excel 97-2003 spreadsheet (having the .xls extension)
Spreadsheets with the .xlsx extension are not currently supported. If you are using a later version of Excel and saving spreadsheets with the file format .xlsx, save a copy of the spreadsheet in the .xls format. This copy can be imported by LeadManager.
If you are importing a spreadsheet with the file extension .xls, ignore the Delimiter radio button. The Delimiter is a tab or a character in the lead data file that separates values that will be imported into fields in the LeadManager lead form. In a .CSV file, or Comma Separated Values, the delimiter is “comma.” When you open a .CSV file with Notepad the data inside it looks like this: Frank,Wilson,123 Main Street,Loganville,CA,92674, etc. If you open it in Excel, it will look like a normal spreadsheet.
If you are importing a spreadsheet with the file extension .xls, ignore the Text Qualifier field. The text qualifier is the character that lets LeadManager know that the value contained within it is text. In most cases this should be left as the double quotation mark that is its default value.
If your spreadsheet or .CSV has a top row that indicates what data is held in the column then click this checkbox. A first Row Column Header reads something like, “First Name, Last Name, etc...”
If the top row contains actual lead data like, “Frank, Wilson, etc…” then leave this checkbox unchecked. The words that appear in the first row of your spreadsheet are not important. They do not have to exactly match the field name in LeadManager.
Any mapping that you have created will appear in this dropdown menu. Select the mapping that is appropriate for your current import.
The Assignment Template Fields are grayed out and only configurable by LeadManager.
Select this check box if you are importing leads that are already in the system. An example of how this setting works is if you are re-importing leads after the spreadsheet containing them has accumulated more data.

Let’s say leads were imported without email addresses and email addresses were collected later. These leads can be re-imported, and the existing leads will capture the new data (email addresses) without creating a duplicate copy of the lead.
Update Scope should be set to Global.

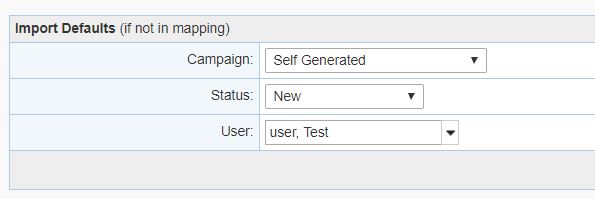
Select the Campaign, Status and User you'd like the leads to be associated with when they enter the system.
Select New from the Status drop-down and –Select User— from the User drop-down if you'd like the leads to be distributed by automatic distribution.
Click the Simulate button to test that there are no errors in the lead data.

At the bottom of the page, the import results are displayed. These results will reveal how many leads were imported, when, and if any errors occurred during the simulation.
Click the Details link in the Options column.

Results will be displayed in the log.
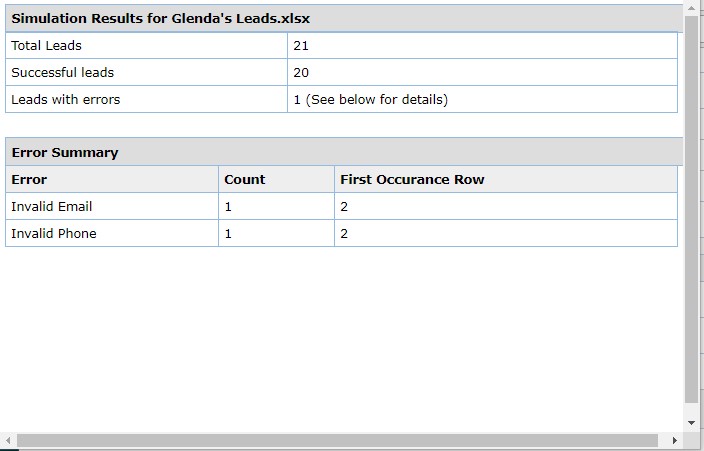
If the import simulation completes without errors, import the leads.
Note that the Import Leads form will reset to blank after the simulation so you will have to browse for the file and configure the settings of your import again.
If you have questions about any errors in your simulation, contact Velocify Support.
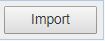
Configure your settings and click the Import button
At the bottom of the page, the import results are displayed. These results will reveal how many leads were imported, when, and if any errors occurred during the import.
Click the Details link in the Options column to view the details of your Import. If you have questions about any errors in your import, contact Velocify Support.
The imported leads can be found on the View Leads page and will be distributed according to the settings you made on the import leads form.