Dial-IQ: Detailed Review
TOPICS COVERED IN THIS ARTICLE:
Dial-IQ Automatic Actions/Client Settings Page
ENVIRONMENT:
Dial-IQ
DETAILS:
Product Requirements:
-
Each agent needs a 10 digit direct dial phone number or a 10 digit phone number with an extension.
-
Browsers: It is recommended that you use Mozilla Firefox or Google Chrome.
Dial-IQ is a paid feature. To purchase Dial-IQ contact your Account Manager.
Overview
Velocify Dial-IQ empowers users with an intelligent cloud-based dialer integrated into Velocify LeadManager.
Dial-IQ allows users to click on a link to call a lead, leave prospects a personalized voice message, and ensure callback appointments are made on time and never forgotten.
Dial-IQ offers many powerful outbound dialing features, including:
-
Click-to-Dial
-
Power Dialing
-
Multiple Pre-recorded Voicemails
-
Rep-Driven Intelligent Activity Prioritization
-
Shotgun ConnectTM
For detailed information on the Dial-IQ Administrator Settings on the Client Settings page, please reference the Dial – IQ Administrative Settings topic.
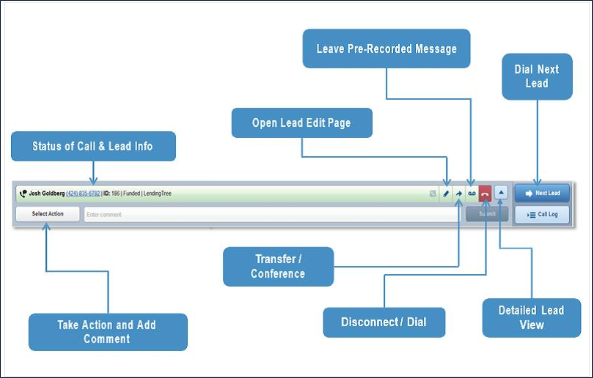
Dial – IQ Display at a Glance
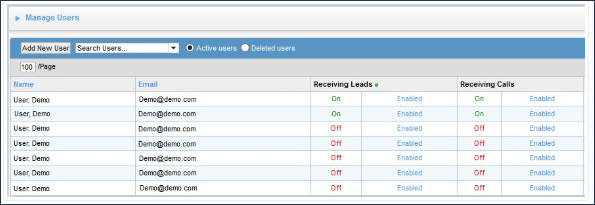
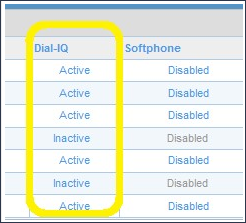
Dial-IQ Administrator Settings on the Manage Users Page
Administrators can control user access to Dial-IQ from the Manage Users page.
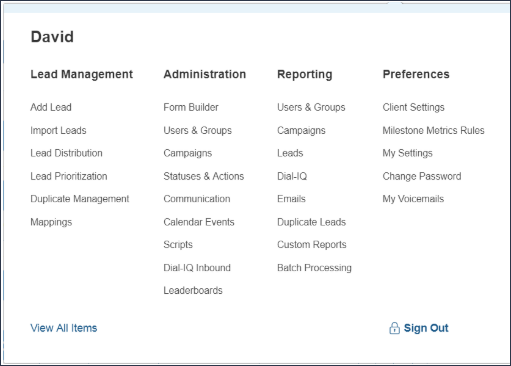
First, access the Menu page by clicking on your name in the upper right of the header.

Under Administration, click Users & Groups.
On the Manage Users page, an Administrator activates Dial-IQ per user by clicking the value in the Dial-IQ column to change it from Inactive to Active.
Dial-IQ User Settings on the My Settings Page:
There are some settings a user must configure to use Dial-IQ.
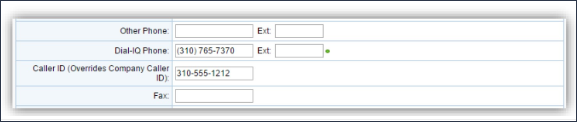
Every user who is using Dial-IQ needs to enter his or her 10 digit Dial-IQ Phone number (and extension if necessary) on their Menu – Preferences - My Settings page.
First, access the Menu page by clicking on your name in the upper right of the header.
Under Preferences, click on My Settings.
The user must enter their phone number in the Dial-IQ Phone field. This is the phone number that Velocify will use to connect calls to the user. This may be the user’s desk phone, cell phone or a VOIP phone. This must be a working number that connects directly to the user.
Enter a Caller ID number in the Caller ID field (optional). This is the number that will be displayed to the people you are calling.
An Administrator can choose to enter Dial-IQ phone number for their agents by clicking the agents Settings link in the Options column on the Manage Users page.

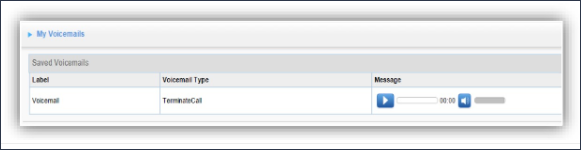
Dial-IQ My Voicemails page
The My Voicemails page is where voicemails can be pre-recorded and played back. Each message can be accessed from the dialer display (shown below) and can be set to one of two types:
-
Terminate Call – The Terminate Call option is for a standard voicemail. When you select a recorded voicemail that is set to terminate the call, the call will promptly end, and the voicemail message will be left for the lead.
-
Continue Call – The Continue Call option allows you to continue speaking to the lead (or continue speaking into their voicemail inbox) after the recorded portion has been completed. This can be useful if you want to record a disclaimer for the call.
To access the My Voicemails Page:
First, access the Menu page by clicking on your name in the upper right of the header.
Under Preferences, click My Voicemails.
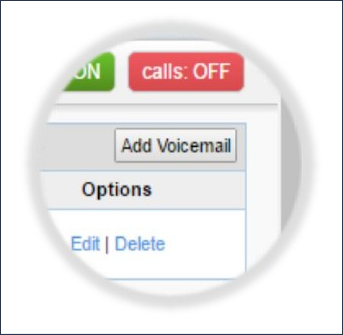
On the My Voicemails page, in the upper right corner, click Add Voicemail.
Enter the name of the voicemail and the voicemail type (for example, Terminate Call or Continue Call), then click Submit. The Record button will then display.
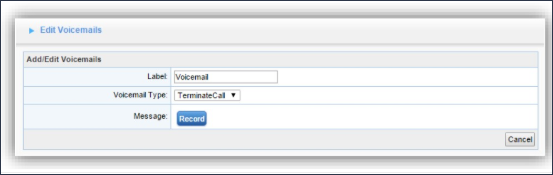
Click Record. Velocify will call your phone number (from the Dial-IQ Phone field in the My Settings page) and allow you to submit your recording. Once you have finished recording, Velocify will refresh the page and show you the recording you submitted.
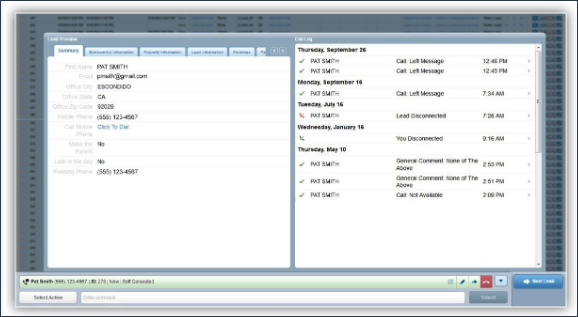
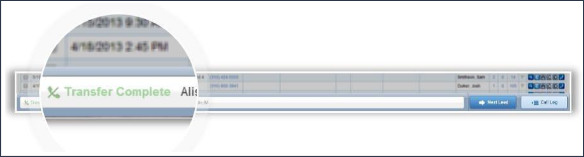
The Dial – Display:
The Dial-IQ display has three states: the minimized view (when not in use), the normal view, and the maximized view that enables users to view and enter more information.
Minimized View – Inactive

Normal View – Active Call

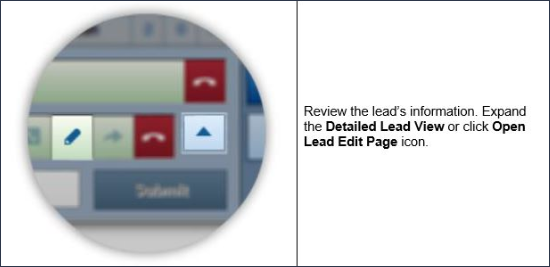
Maximized View – Detailed Lead View
Basic Features:
Dial-IQ has many dialing features, including Click-to-Dial, Power Dialing, Inbound Call Handling, and Shotgun Connect. This chapter covers Dial-IQ basic features.
Click-to-Dial:
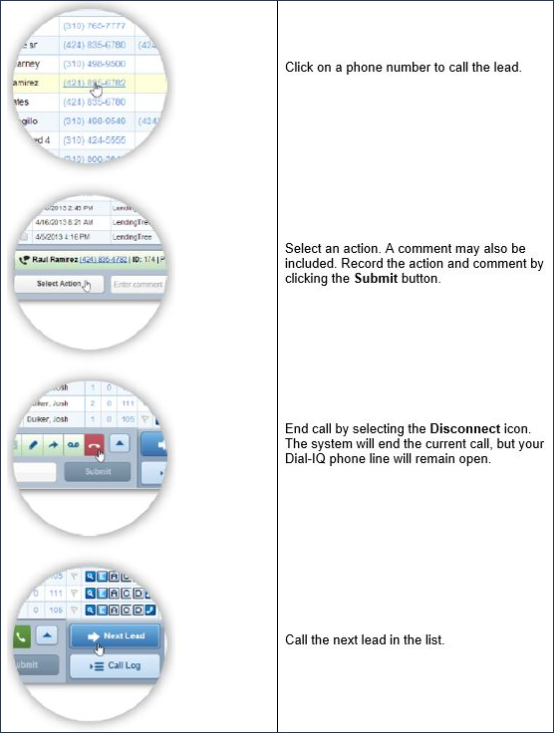
Click-to-Dial allows you to click on a phone number in Velocify to call out to the lead.
You will find that most displayed phone numbers can be clicked on to initiate a phone call.
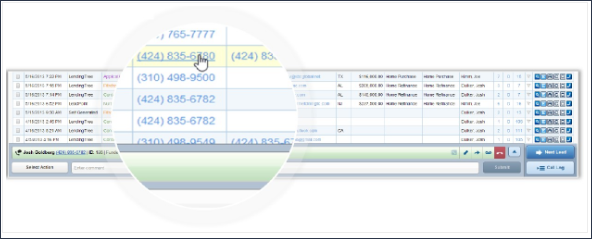
To initiate a Click-to-Dial call, first click on a phone number to start a call.
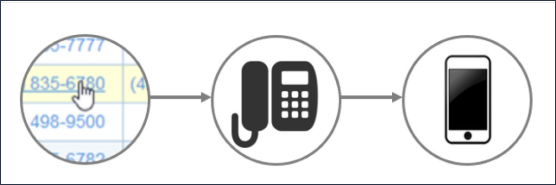
Your Dial-IQ phone will ring. When you answer your phone the system will begin connecting your call, and the lead’s phone will ring.
Dialing Additional Numbers on a Lead:
A lead may have multiple phone numbers available for Click-to-Dial. Those additional numbers are accessible from the Dial-IQ display.
To access additional phone numbers, hover over the Alternate Phones icon.
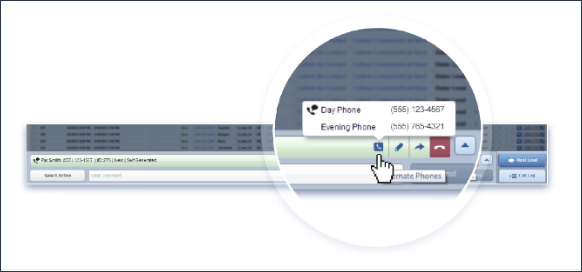
This icon will be grayed out if no additional numbers are present.
Power Dialing:
Power Dialing provides a way to quickly speed dial through a list of leads. It allows you to call one lead after another without manually disconnecting your phone between calls.
To start power dialing, click on any lead's phone number in the Priority or Normal View. This will initiate a call to that lead.
Leaving a Pre-Recorded Voicemail:
Dial-IQ provides the ability to leave a pre-recorded message when you encounter a voicemail.

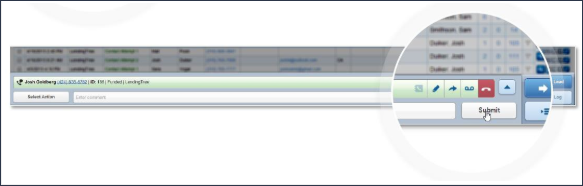
Recording an Action:
Actions can be recorded directly from the Dial-IQ display. An action should be submitted for every call or call attempt for every lead.
-
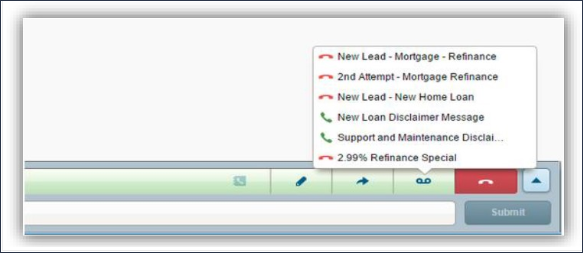
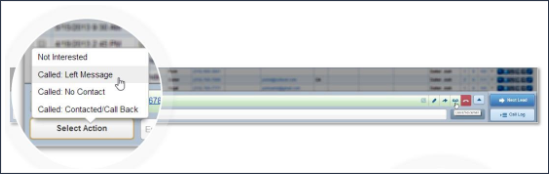
Click Select Action at the left of the Dial-IQ display. A menu will display all available actions for the lead.
-
If necessary, leave a comment in the Enter comment box.
-
Click Submit to record the selected action.
Schedule Dial:
When you create a calendar event for a lead, Scheduled Dial allows Velocify to call you at the time of the event. Once you answer the phone, it will immediately call out to the lead, connecting you for your appointment.
Creating a Calendar Event with Scheduled Dial:
When you create a new calendar event, select the Scheduled Dial check box to enable Scheduled Dial.
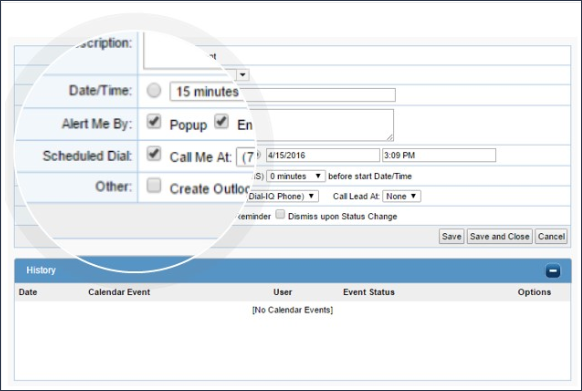
Select the phone number for Velocify to call you at the time of the event, and choose which phone number should be called for the lead.

RECEIVING LEADS AND INBOUND CALLS:
Internet leads and live inbound calls can both be routed to you using Dial-IQ. This dramatically accelerates your speed to contact and ensures that the right leads get to the right people fast.
Receiving Internet Leads
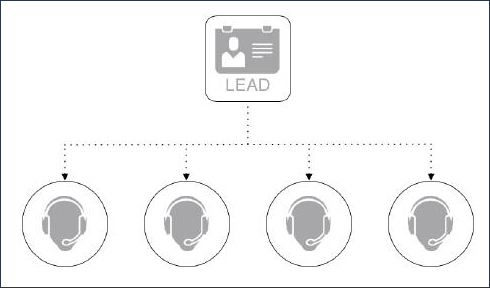
When an internet lead is added to Velocify, your administrator can have that lead routed to you using Dial-IQ. This can be done through one of three methods:
-
Fixed – This routing method will notify only you to receive the lead.
-
Hunt Group – This routing method will notify you to receive the lead. However, if you do not answer, another user will be notified to take that lead instead.
-
Shotgun Connect – This method notifies many users of a new lead at once. Only the first to claim the lead receives it.
Notifications of a new lead using Dial-IQ can be either phone notification or on-screen notification.
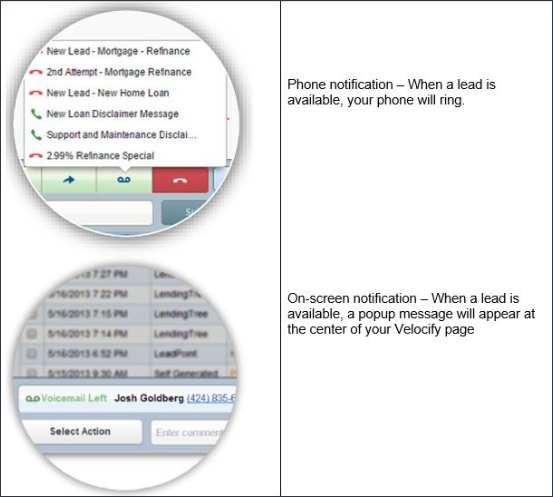
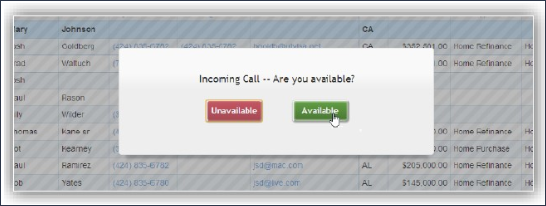
Accepting a Lead by Phone Notification:
-
Answer your phone. A short message will inform you that a lead is available and will prompt you to press 1 to accept the lead.
-
Press 1 on your phone. If you won the lead, Dial-IQ will announce the lead’s information (e.g. the lead's name) and automatically initiate a call to the lead's default phone number.

As Dial-IQ initiates the call to the lead, the Dial-IQ display appears.

Accepting a Lead by On-Screen Notification
- Click Available on the popup notification to win the lead.
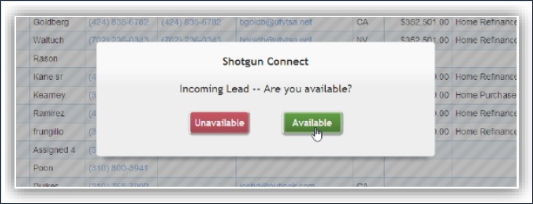
- If you won the lead, your phone will begin to ring. Answer your phone to automatically initiate a call to the lead’s default phone number.
Receiving Inbound Calls
Live inbound calls may be routed to you using Dial-IQ. You may be notified of a live inbound call either by phone notification or on-screen notification, similar to being notified of a new internet lead.
Accepting a Call by Phone Notification
- Answer your phone. A short message will inform you of the inbound call and will prompt you to press 1 to accept the call.
- Press 1 on your phone. If you won the call, Dial-IQ will automatically connect you. Each inbound call is associated with a lead, which will be assigned to you and appear in the Dial-IQ display.

Accepting a Call by On-Screen Notification
- Click Available on the popup notification to win the call.
- If you won the call, your phone will begin to ring. Answer your phone to receive the inbound call.
CALL TRANSFER:
Any Dial-IQ call may be transferred through the Dial-IQ system. There are three primary types of transfers: cold transfers, warm transfers, and no hold transfers.
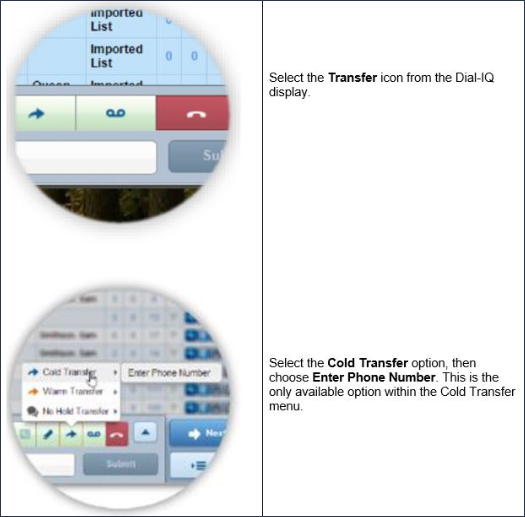
Cold Transfer
A cold or "blind" transfer is when you transfer the call directly, without speaking to the person you are transferring the call to.
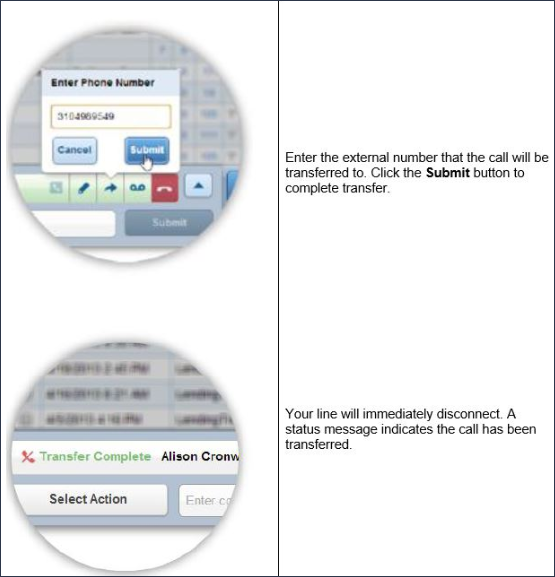
Transferring the call to an external number is the only available option for cold transfers.
Initiating a Cold Transfer:
Warm Transfer:
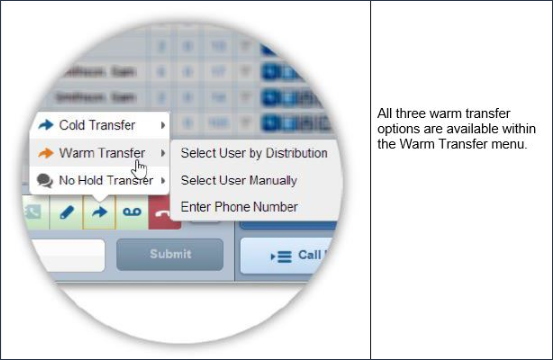
A warm transfer allows the agent who is currently speaking with the caller to speak with the new agent before the call is transferred. In this scenario, Agent 1 can provide Agent 2 with information about the caller – such as background information – while the caller is on hold. Agent 1 can then conference in the caller before completing the transfer so that all three parties can speak.
Diai-IQ offers three warm transfer methods:
-
Select User by Distribution – This method leverages Velocify’s distribution system. The call will be automatically transferred to the next eligible and available agent according to the routing rules.
-
Select User Manually – This method presents a list of available Dial-IQ agents the call may be transferred to.
-
Enter Phone Number – This method allows the agent to input an external phone number to transfer the call to.
Initiating a Warm Transfer Using Distribution:
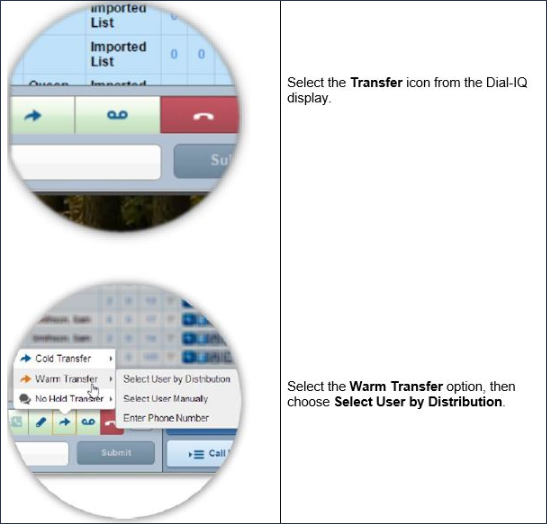
The call will automatically be transferred to the next eligible and available agent according to the routing rules.
The warm transfer has started. The lead is placed on hold, and Dial-IQ will immediately begin searching for available agents.

Initiating a Warm Transfer by Selecting User Manually:
This method leverages allows for the selection of an available agent from a list.
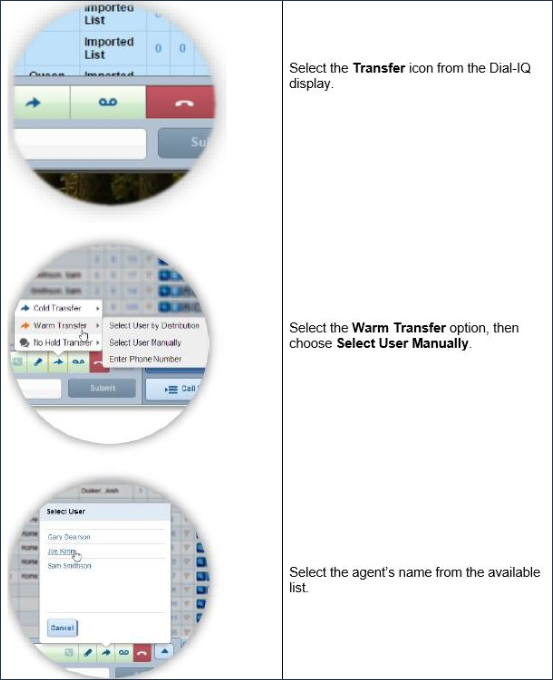
The warm transfer has started. The lead is placed on hold, and Dial-IQ will immediately begin searching for available agents.

Initiating a Warm Transfer to an External Phone Number:
This method leverages allows for the selection of an available agent from a list.
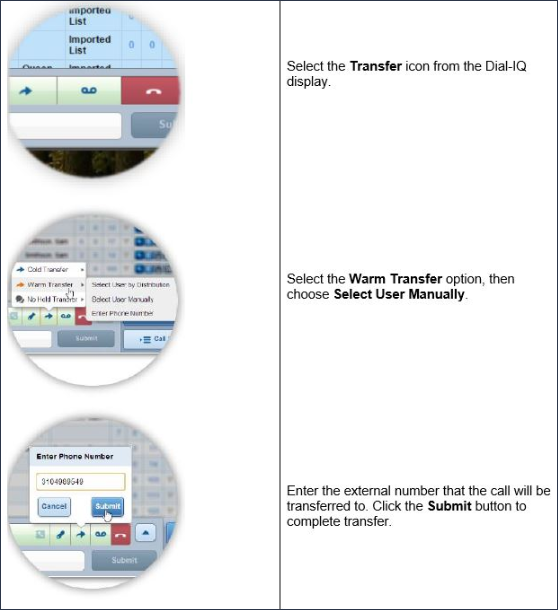
The warm transfer has started. The lead is placed on hold, and Dial-IQ will immediately begin establishing connection.

Completing a Warm Transfer:
Once a warm transfer is initiated, the steps to complete the transfer process are the same regardless of the method of warm transfer selected (by distribution, manually, or by external phone number).
- Initiate a warm transfer by selecting a transfer method. The lead is placed on hold, and Dial-IQ immediately begins searching for available agents.

- You will be connected to an agent who is available to take the transfer. The agent’s name will be displayed on a new status bar. This agent status bar will be green to indicate you are connected to the agent. The lead will still be on hold.

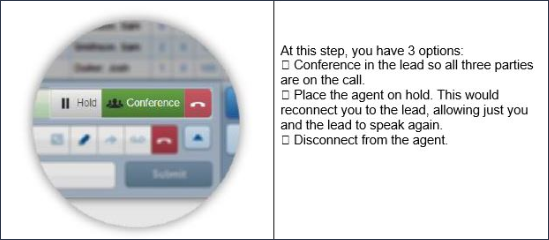
- Conference in the lead. Click the Conference button to take the lead off hold.

- At this step, all three parties will be on the call. This allows for a hand-off conversation. Both the lead's status bar and the agent's status bar will be green, indicating both parties are off hold.

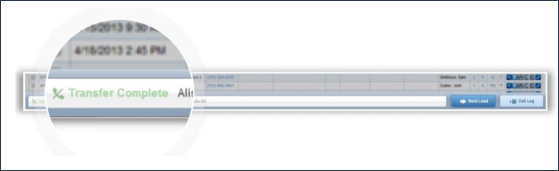
- Complete the transfer. Click the Complete Transfer button to finish the warm transfer process. You will be disconnected from the call.
Receiving a Warm Transfer:
Provided you are available and eligible, you may receive transferred calls from other agents.
A Transfer notification rings your Dial-IQ phone number. On the Dial-IQ display, the top status bar will show the name of the agent who has initiated the transfer. The bottom status bar displays the name of the lead to be transferred to you.

Answer your phone to accept the transferred call. You will be connected to the agent who is transferring the call. The status bar displaying the agent's name will be green, indicated you are connected to the agent. The lead is on hold and will not be on the line at this step. The status bar containing the lead's information remains gray.

- All parties will be conferenced. After a hand-off conversation the transferring agent may conference in the lead. During the conference step both the lead's status bar and theagent's status will be green, indicating both parties are on the line.

At this stage you will be able access the lead's information.
The transferring agent will complete the transfer. The transferring agent will drop off the line, and you will remain connected to the lead.

No Hold Transfer:
A no hold transfer provides a method of transferring a lead to another agent without putting the lead on hold.
Transferring the call using distribution is the only available option for no hold transfers.
Initiating a No Hold Transfer:
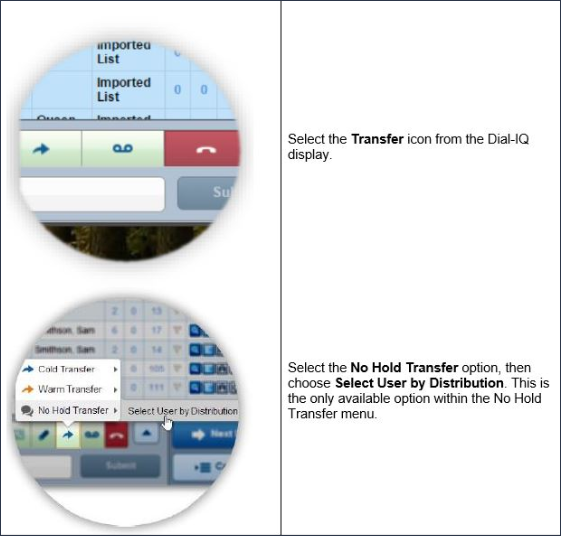
The no hold transfer has started. Dial-IQ will immediately begin searching for an available agent.

Completing a No Hold Transfer:
Dial-IQ finds an available agent. The agent will be notified and placed on hold, and their name will be displayed on a new status bar. The agent’s status bar will be gray, indicating that they are on hold while you are still connected to the lead.

- Conference in the second agent. Click the Conference button to bring in the agent that the call will be transferred to.
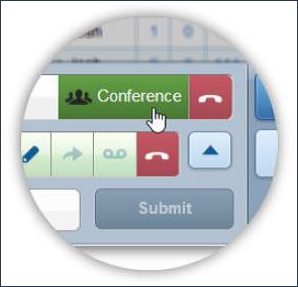
- The conferencing will be complete. At this step, all three parties will be on the call. The second agent’s status bar will be green indicating they are off hold.

- Complete the transfer. Click the Complete Transfer button to finish the warm transfer process. You will be disconnected from the call.
d