Log in to Simplifile
Overview
To use the Simplifile application, you must have a username and password for Simplifile. You may get your Simplifile username and password from an email from Simplifile or from your Simplifile administrator.
When you get your username and password, open the Simplifile website (simplifile.com) and near the upper right corner, select the LOG IN TO SIMPLIFILE button. The Log In page opens.
To use Simplifile, you must go to the Simplifile website (simplifile.com) and log in to your Simplifile account. You need a username and password to do this.
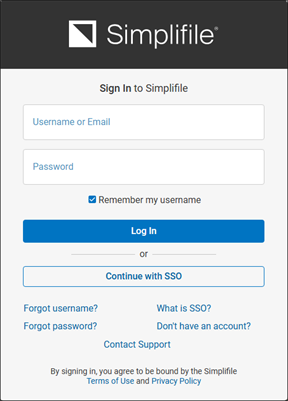
You may get the Simplifile username and password from an email from Simplifile or from your Simplifile administrator.
Before you log in, you can:
- Review the SimplifileTerms of Use.
- Review the SimplifilePrivacy Policy.
- Retrieve your forgotten username.
- Reset your forgotten password.
- Contact Simplifile Support.
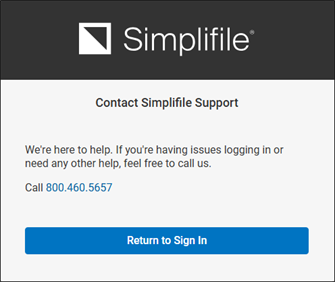
If you have problems logging in, select the Contact Support link to open the Contact Simplifile Support page.
After you log in, you can:
- Change your password. See Change your password.
- If your Simplifile application uses the Password Reset Security feature, you can change your security questions. See Change your identity verification questions.
If you are an eRecording submitter (using the Submitter component), the default home page that opens after you log in is the Packages page.
In your organization’s security policy, when the Require security questions box is marked, the first time users try to open Simplifile they need to provide answers to six questions—five that Simplifile can use to verify their identity online, and one that Simplifile Support can use to verify their identity if they need to call in.
The users choose the questions they want to answer from a predetermined set of 26. The answers are encrypted and securely stored. Users can change the security questions at any time. For more information, see the Security Questions window topic Enter your security question choices and answers task.
On subsequent logins, if a user enters the password correctly within ten tries, he or she is logged in to Simplifile.
The following scenarios describe what happens during login if the organization’s security policy requires security questions and a user sets up answers to the security questions and then tries to log in to Simplifile:
- If the user enters his or her password correctly within ten tries, the person is logged in.
- If the user incorrectly enters his or her password ten times or clicks the Forgot Password link in the Simplifile Log In window to indicate that he or she has forgotten the password, Simplifile displays three of the five security questions for the person to answer. If all three security questions are answered correctly, Simplifile sends an email that contains a link to reset the password to the account email address on record.
- If a wrong answer is given for any of the questions, Simplifile displays a new set of three questions. If this happens three times, Simplifile locks the person’s account. The user must call Simplifile Support to have the account unlocked and reset the password.
What is Single Sign-On (SSO)?
Single Sign-On is an authentication method that allows users to log into a variety of application and services using a single set of login credentials. With SSO enabled for your organization, you may be able to use your existing organization credentials to allow direct access to Simplifile without a separate login process and without the need to remember a separate Simplifile username and password.
How can my organization get connected to Simplifile using SSO authentication?
Simplifile is currently testing SSO authentication with a limited number of pilot customers. If you would like to be added to this list,please contact our Support team at support@simplifile.com or 800.460.5657.
Who do I contact if the SSO authentication process is not working?
If you organization is currently enabled for SSO authentication and you are experience problems, please contact our Support team at support@simplifile.com or 800.460.5657.
To use Single Sign-On (SSO)
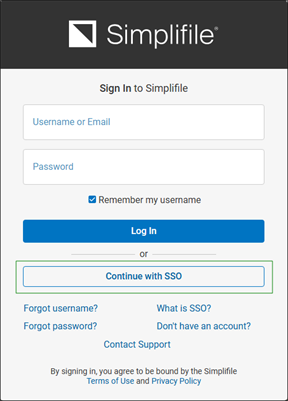
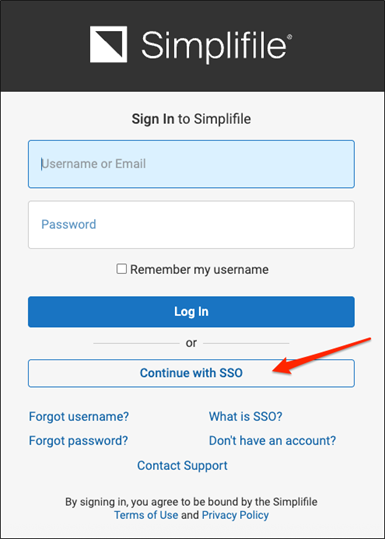
After your organization is set up to use single sign on (SSO), to sign in to Simplifile click the Continue with SSO button in the Sign In to Simplifle window.
Two-factor authentication
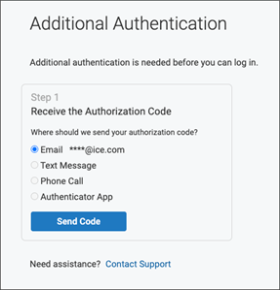
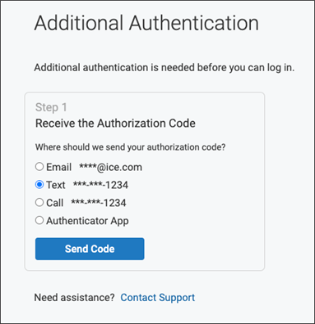
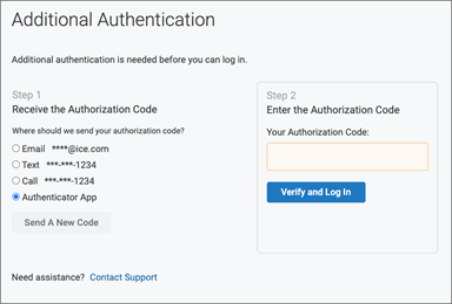
If your organization’s security policy requires two-factor authentication (also know as multi-factor authentication, or 2FA),when you log in, you will see the screen below.
Using your email for two-factor authentication
When you select the Email option, and select the Send Code button, an email is sent to the account's email address of record.
When you receive the email, enter the verification code in the Enter the Authorization Code field.
Using your phone or text for two-factor authentication
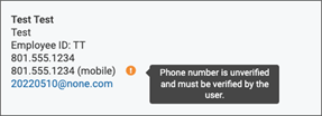
After you log in, you will see a banner below informing you that you can add your mobile phone number as an additional 2FA method.

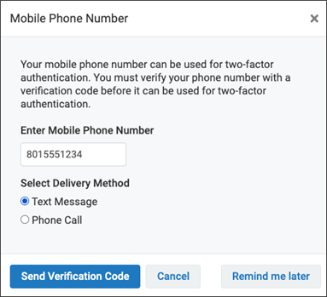
Selecting the banner opens the Mobile Phone Number window where you can enter your mobile phone number and verify it. After you select the Send Verification Code button, the 6-digit code is either texted to you or you'll receive a phone call depending on the delivery option you choose.
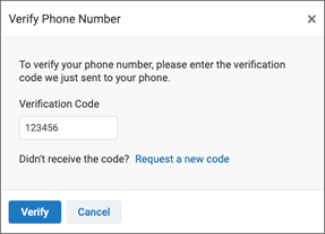
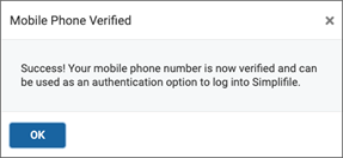
When your phone number is verified, you can use it as a two-factor authentication method next time you login.

Using an Authenticator App for two-factor authentication
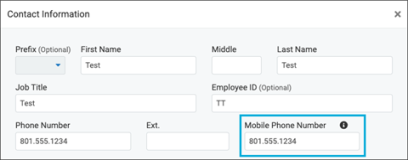
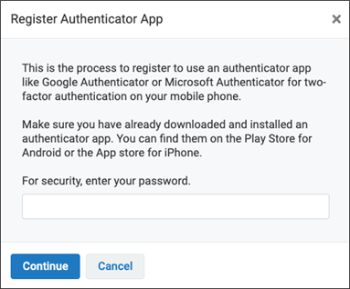
In addition to using your email and mobile phone number as a two-factor authentication option, you can also register to use an authenticator app like Google Authenticator or Microsoft Authenticator. On the My Settings page, you'll see the Authenticator App row in the Contact Information section. Select the Click to register link to begin. This opens the Register Authenticator App window where you enter your password to continue.

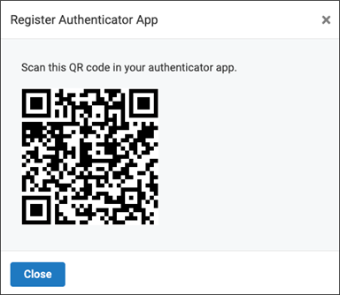
After you have downloaded an authenticator app to your phone and have successfully verified you password, you'll see a QR code displayed that can be scanned with your authenticator app. When successfully scanned in your authenticator app, you'll be registered to use this as an option for two-factor authentication going forward.

When you have one or more of the two-factor authentication options enabled, you'll be able to select them on the Additional Authentication screen when logging into Simplifile.
I want to ...
Log in to Simplifile
- In a web browser, enter simplifile.com.
- In the upper‑right corner, select the LOG INTO SIMPLIFILE button. The Simplifile Log In page opens.
- In the Username field, enter your username.
- In the Password field, enter your password.
- If you want Simplifile to remember your username the next time you are going to log in, mark the Remember username box.
- Select the LOG IN button.
- If required, provide the answers to the questions you used as identity verification and complete the log‑in process.
Retrieve your Simplifile username (retrieve username)
If you forget your Simplifile username, you can get instructions on how to retrieve it from the Simplifile Log In page.
- In a web browser, enter simplifile.com.
- In the upper‑right corner, select the LOG INTO SIMPLIFILE button. The Simplifile Log In page opens.
- Below the Log In button, select the Forgot username? link. The Simplifile Forgot Username web page opens.
- In the Email field, enter your email address associated to Simplifile.
- Select the Submit button. A message appears that says, “If the email address you entered belongs to a Simplifile user, an email with further instructions was sent to emailadddress.xxx.
- To get your Simplifile username:
- Go to your email application.
- Open the email sent by support@simplifile.com.
- Follow the instructions.
Reset your forgotten Simplifile password (reset password)
If you forget your Simplifile password, you can get instructions on how to reset it from the Simplifile Log In page.
- In a web browser, enter simplifile.com.
- In the upper‑right corner, select the LOG INTO SIMPLIFILE button. The Simplifile Log In page opens.
- Below the large Log In button, select the Forgot password? link. The Simplifile Forgot Password web page opens.
- In the Username field, enter your Simplifile username.
- In the Email field, enter your email address associated to Simplifile.
- Select the large Submit button. A message appears that says, “An email with further instructions was sent to emailadddress.xxx.
- To reset your Simplifile password:
- Go to your email application.
- Open the email sent by support@simplifile.com.
- Follow the instructions.
View the Simplifile Terms of Use
- In a web browser, enter simplifile.com.
- In the upper‑right corner, select the LOG INTO SIMPLIFILE button. The Simplifile Log In page opens.
- In the paragraph near the bottom of the page, select the Terms of Use link. A page opens with the Simplifile Terms of Use information.
View the Simplifile Privacy Policy
- In a web browser, enter simplifile.com.
- In the upper‑right corner, select the LOG INTO SIMPLIFILE button. The Simplifile Log In page opens.
- In the paragraph near the bottom of the page, select the Privacy Policy link. A page opens with the Simplifile Privacy Policy information.
Troubleshooting ‑ Log In page issues
Issue ‑ Slowness (Spinner just spins on the Log In page.
After entering the user credentials on the Log In page, the spinner just continues to spin.
Cause ‑ Requests being blocked by web‑based content filter.
Requests to simplifile.com are being blocked ether partially or entirely by a web‑based content filter.
Solution ‑ Have simplifile.com whitelisted from the web‑based content filter.
-
If the organization is using a web‑based content filter, have the organization's IT department whitelist simplifile.com.
- If whitelisting the web‑based content filter does not resolve the issue, contact Simplifile Support.
Issue ‑ Can't log in
From time to time Simplifile users can't log in. This could be due to a number of reasons including:
- Too many unsuccessful log in attempts were made because the password was forgotten.
- Too many unsuccessful log in attempts were made because Caps Lock and or Num Lock were enabled on the keyboard.
- The organization uses an API which its password wasn't updated when the user's Simplifile password was updated.
- Their organization's administrator has locked the user account.
Symptom ‑ Can't log in
The user is unable to log in.
Cause 1 ‑ The organization's Simplifile administrator has locked the account.
- The organization's Simplifile administrator locked the user account.
Solution 1 ‑ Request the organization's Simplifile administrator unlock the account.
- Have the organization's administrator unlock the user account.
Cause 2 ‑ Account locked. Too many unsuccessful log in attempts
The Simplifile user account is locked. Too many unsuccessful log ins have been attempted. This may be caused by one or more of the following:
- A forgotten password.
- The CAP Lock and or Num Lock features were enabled when the password was entered.
Passwords are case sensitive. A user may have entered and re‑entered his or her password incorrectly multiple times if Caps Lock and or Num Lock are enabled which will eventually lock the user account. When the user account has been unlocked, have the user make sure the Caps Lock and Num Lock are disabled before she or he enters the password.
- If the organization uses an API, the password may have been updated for simplifile.com but not updated it in the API software.
Is the organization is using an API? If so, was the password updated simplifile.com but not updated it in the API software? The password in API software (for example Softpro, ResWare, etc.) being used may need to be updated.
Solution 2 ‑ Reset password. Reset locked user account. Log in.
- If the organization uses an API, reset the password in the API.
- Reset your password. See the Reset your forgotten Simplifile password (reset password) task.
- Have the organization's Simplifile administrator unlock the user account. See the Reset a locked user account task.
- Make sure that the Caps Lock and or Num Lock is disabled on the keyboard.
- Log in to the account carefully entering the password.
- If you still can't log in, contact Simplifile Support.
Cause 3 ‑ The account is unlocked and logged in, but the user still cant get access
- After trying the above solutions, do the following.
Solution 3 ‑ Log out. Clear the browser. Log in.
- Enter simplifile.com/logout/ in the browser to log out of Simplifile.
- Clear the browser's cache.
- Log in to simplifile.com.
- If you still can't log in, contact Simplifile Support.
Issue ‑ Can’t Login with SSO: SSO Unauthorized
Symptom
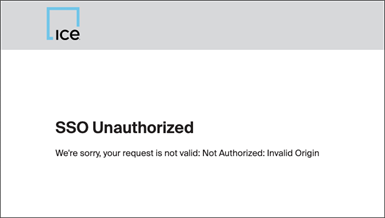
When clicking the Continue with SSO button, it loads a page that returns SSO Unauthorized.
Cause
This is from clicking the button from Simplifile.com rather than Simplifile.ice.com.
Solution ‑ Ensure you are using Simplifile.ice.com to load the login page
- Click simplifile.ice.com and then click the Continue with SSO button.
 .
.