Recording Basics
This topic gives basic information that can help you get started recording documents with Simplifile.
A ‑ Access Simplifile
- Do one of the following to log in to Simplifile:
- Go to simplifile.com and select the LOG INTO SIMPLIFILE button in the upper right corner.
- Enter https://simplifile.com/sf/ui/app/login in your browser’s address bar.
- When the Log In page displays, enter your username and password.
- Select the Log In button.
- If necessary, provide answers to the questions you chose to use as identity verification. Then complete the log‑in process.
- Learn about the Recipient Menu page. See the Recipient Menu page.
B ‑ Access a Document to Review
- Do one of the following to log in to Simplifile:
- To display the next document in the queue, select the Review Next Document
 button.
 - In the navigation menu, select the Review item. Then do one of the following:
- To review the next document in the queue, select the Begin Reviewing Next Document
 button.
 - To begin reviewing documents in a specific package, select the Begin Reviewing
 link on the right side of the package card header.
 - To continue reviewing the documents in a specific package in the order in which they are listed in that package, select the Continue Reviewing
 button in the package card.
 - To work with a specific document, select the document name.
- To review the next document in the queue, select the Begin Reviewing Next Document
- To display the next document in the queue, select the Review Next Document
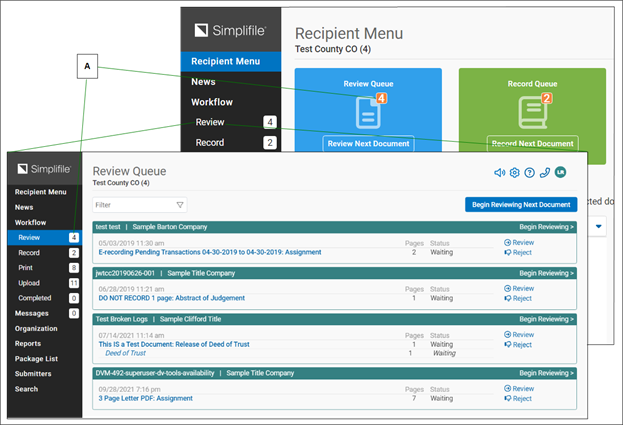
| Letter | Description |
|---|---|
| A | The number indicate how many documents are in the queue. |
C ‑ Review a Document
- Complete B ‑ Access a Document to Review above to display the document you want to review.
Your document displays on the right. Information and tasks display on the left.

- Review all pages of the document to make sure it meets the submission requirements.
- Complete the fields and tasks on the left side.
- If you need to make changes in the fees, select the displayed fee total. When the fees are correct, select the Save
 button, and mark the box at the bottom that says the recording fees are correct.
 - Make sure that any necessary stamps are in the right positions. Select and hold a stamp to move it. Double‑click a stamp to rotate it 90 degrees.
When the stamps are correctly displayed, mark the box that says the stamps are positioned correctly.
- If you do not finish a review or want another reviewer to check a document, select the Done
 button. The system unlocks the document so that another reviewer can work with it.
 - If everything is correct, select the Accept
 button. The task is complete.
 - If a document needs to be returned to the submitter for any reason, do the following:
- Select the Reject
 button.
 - Mark the boxes of the rejection reasons you want to use.
- Enter any comments you want to make in the Comments box.
- If desired, choose who should receive the rejected document from the Send Rejection to dropdown list.
- Select the Reject Document button.
- To cancel the rejection, select the Cancel
 button.
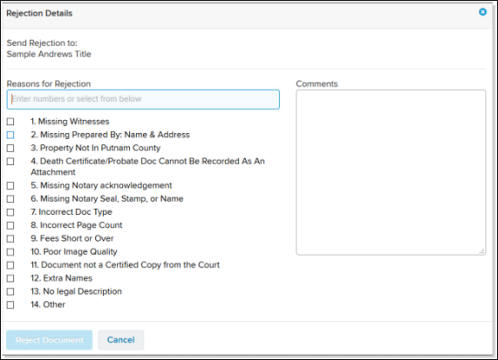
- Select the Reject
D ‑ Record a Package
- Do one of the following:
- Select the Record Next Document button.
- In the navigation menu, select the Record Queue item.
- On the next page that displays, do the following:
- If a Record button displays next to the Apply Stamps button, select the button. This automatically fills the recording numbers fields so that you do not have to enter the information manually.
If you do not see a Record button, complete any necessary fields (such as the book or page number).
- Select the Confirm button next to each book, page, or entry number to verify that they are correct.
- If necessary, select the Refresh Timestamps button, or change the time manually.
- If a Record button displays next to the Apply Stamps button, select the button. This automatically fills the recording numbers fields so that you do not have to enter the information manually.
- Select the Apply Stamps button.
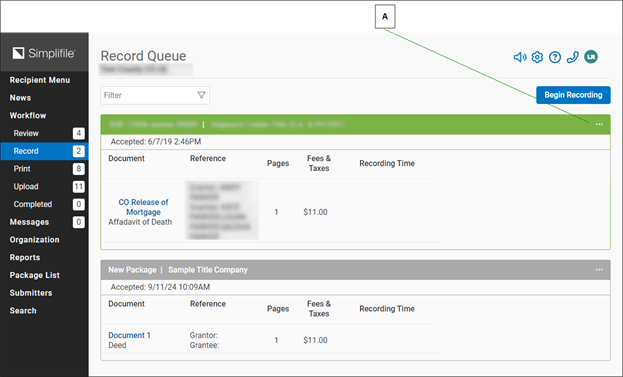
Letter Description A To unaccept or reject documents in the package, select the Menu  (ellipsis) button in the
header and choose the action you want from the dropdown list that displays.
(ellipsis) button in the
header and choose the action you want from the dropdown list that displays. -
If necessary, go to the print or upload queue and select the Off/On toggle to turn on the process. When started, the upload and printing processes continue to run in the background until the person who started the process logs out, closes the browser, or stops the process.
Uploaded documents are saved to a file location specified by your recording county (or jurisdiction).
When all of the documents in a package are recorded, the package status changes to recorded and the submitter is notified.