Feature Enhancements in Encompass Investor Connect 19.2 June Service Pack
Updates to the Loan Submission Workflow
Prior to the Encompass Investor Connect 19.2 June Service Pack release, the Review Documents window that displayed when submitting multiple loan files (batch loan submissions) displayed a list of documents being submitted and a column indicating whether each document was required in the stacking template. This list included all documents for all loans in the submission package. The workflow for batch loan submissions did not provide options for adding or removing documents from the package.
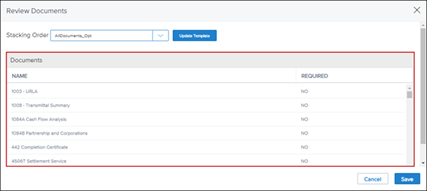
Starting with the Encompass Investor Connect 19.2 June Service Pack, options have been added to enable lenders to add or remove documents from each of the loans that are included in a batch loan submission package. To support the new workflow, a new Review Summary window has been added to for batch loan submissions and the review documents window has been revised to enable lenders to add or remove documents from loan in the submission package.
New Review Summary Window
The Review Summary window lists all the loans in the submission package, displays information about each of the loans, and provides links that open a Review Documents window for each loan where you can add or remove documents for the loan or apply a different stacking order for individual loan files if needed. After you finish reviewing the information on the Review Summary window and making any adjustments on the Review Documents windows for individual loans, click the Save button to return to the “Deliver to” window to submit the loan package.
To Open the Review Summary Window:
-
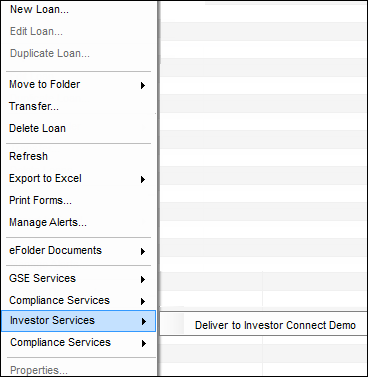
Select two or more loans on your Encompass Pipeline.
-
Right-click the selected loan or loans.
-
Point to Investor Services, and then click the Deliver to option for the investor.
-
When the “Deliver to” window opens, click the Review Documents button.

-
The Review Summary window opens.

At the top of the window, click the Stacking Order dropdown list to select a new stacking order template for all the loans in the package. To update the selected stacking template, click the Update Template button. For detailed information about updating a stacking template, refer to the Encompass Investor Connect Lender User’s Guide or the Working with Stacking Orders topic in the Encompass Investor Connect online help.

The total number of loans in the package displays above the table.

As many as 50 loans can be selected from the Pipeline for each submission package.
The columns in the table include the following information about each loan in the package. The columns can be sorted in ascending or descending order by clicking the column header:

-
Loan Number
-
Borrower Name
-
Loan Amount
-
Property Address
-
Stacking Template – When the window first opens, the stacking template selected on the “Deliver to” window is applied to all loans in the package. You can select a differ stacking
-
Status – This column lists the status of the document files attached to a loan:
-
A red exclamation point indicates that one or more documents required by the stacking template are missing from the loan.
-
An orange exclamation point indicates that one or more documents that are optional in the stacking template are missing.
-
A green check mark indicates that all documents in the stacking order are included.

-
-
Action – Click the Review link in this column to access the Review Documents window for the selected loan. Initially this link displays in bold text. Refer to the Review Documents entry for detailed information about using this window.
-
After you click the link and review the documents, the link no longer displays in bold text.
-
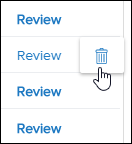
Additionally, when you move your mouse pointer over the blank space to the right of a Review link, a Delete icon becomes visible. Click this icon to delete a loan file from the package. If you remove the last loan in a package, a confirmation message asks if you want to cancel the package.
-
Clicking the icon deletes the loan from the loan submission package. It does not delete the loan file from Encompass.
Revised Review Documents Window
On the Review Summary window, click a Review link in the Action column for a loan file to open the Review Documents window for the loan. Use the Review Documents window to add or remove documents from a loan file in the submission package, or to apply a different stacking template only for the selected loan file.

The loan number and borrower name for the loan display at the top of the window.

Click the Stacking Order dropdown list to select a new stacking order template for the selected loan file. The stacking order selected on this window applies only to the individual loan file and does not affect other loans in the package. To update the stacking template, click the Update Template button. For detailed information about updating a stacking template, refer to the Encompass Investor Connect Lender User’s Guide or the Working with Stacking Orders topic in the Encompass Investor Connect online help.
-
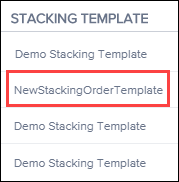
After a new stacking order is applied to an individual loan file, the entry in the Stacking Template column on the Review Summary window for the individual loan is updated with the new stacking template name.
-
When more than one stacking template is applied to the loans in a package, Multiple Selections is populated to the Stacking Order dropdown lists on both the Review Summary window and the “Deliver to” window.


The revised Review Documents window for batch loan submissions lists all the documents included for the loan file. Click a column header to sort the Documents table in ascending or descending alphabetical order based on the contents of the column. The information that displays in these columns is populated from the eFolder Document Details window for each of the documents:
-
The checkboxes in the column on the far left indicate whether the document is included in the submission package. Select or clear the checkbox to add or remove the document.
-
In the second column from the left, the word “Missing” displays if there is no file attachment associated with the eFolder document. “Missing” displays in red font when the document is required by the stacking template and in orange font when a document is not required by the stacking template.
-
ATT - A Paper Clip or Image icon display in this column when a document has a PDF or image file attachment.
-
Name – Name of the document.
-
Requested From – The entity or individual from who the document was requested.
-
Borrower Pair – The borrower pair with whom the document is associated.
-
Status – The status of the document in the eFolder.
-
Date – Date when the document’s status was last undated in the Document Details window.
-
Required – Indicates whether the stacking template lists the document as a required document.
There are two methods for adding or removing documents from the selected loan file:
-
The checkboxes in the column on the far left of the table are selected when documents are included for this loan in the submission package. Select or clear the checkboxes to add or remove documents from the submission package for the selected loan file.
-
An Add Additional eFolder Documents button on the upper-right corner of the table enables user to add additional documents from the eFolder. For detailed information, refer to the Add Additional eFolder Documents section below.

Add Additional eFolder Documents
Click the Add Additional eFolder Documents button on the Review Documents window to add documents that are in the eFolder for a loan but are not currently included in the submission package based on the selected stacking template.

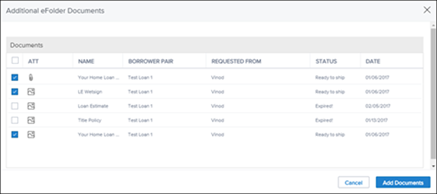
The Additional eFolder Documents window lists documents that can be added from the eFolder. The window includes the same type of information as the Review Documents window, but with no Required column (documents in this window are by default not required in the document stacking order template). When the window first opens, all the checkboxes in the left column are cleared. Select a checkbox to add a document to the submission package. When finished, click the Add Documents button to add the selected documents and return to the Review Documents window.
DND-2807: DND-3251
When submitting a single loan to an investor, the header at the top of the window now includes the loan number and the borrower name for the loan file. Previously the heading included only the words Review Documents.

DND-2907
Updates to Investor Preferences
An update has been made to the error message that displays when a package exceeds the allowable file size limit. Previously, an error message displayed when a loan package exceeded the 400 MB size limit supported by Encompass. Now investors can also set an allowable size limit they will accept for loan packages. One of the following error messages now displays when the file size is exceeded.
When a loan exceeds the Encompass limit, the following error message displays:
-
Files exceed 400MB and can’t be sent. Try reducing file sizes or number of images.

When a loan exceeds the investor’s limit, the following error message displays and provides the investor's allowable limit:
-
Files exceed investor’s limit of [XX] MB. Try reducing file sizes or number of images.

DND-3568
Investors can now configure the submission type that displays by default on the “Deliver to” window when a lender submits a loan package. Depending on how the lender configures the submission types, the Submission Type dropdown list uses the following behavior:
-
When only one submission type is available for the investor, the default type displays on the Submission Type dropdown list and the list is disabled for selection by the lender.
-
When there are multiple submission types and the investor has selected a default, the default type displays on the Submission Type dropdown list, but the lender can select another option from the list as needed.
-
If the lender has not selected a default submission type, the Submission Type dropdown list is blank, and the lender can select an option from the list.
DND-2682
When lenders select a Submission Type that requires documents, Encompass now ensures that lenders select a stacking order template and include documents in the loan submission package. Previously when a lender selected None for the Stacking Template dropdown list, the loan package could be submitted without documents.
When a lender clicks the Send button when required documents or a stacking template are not selected for these types of submissions, an error message now instructs lenders to add documents or modify the stacking template. The lender is unable to send the package until these issues are resolved.

Additionally, when a required document is missing or when a stacking template is not selected for these types of submissions, the Done button is disabled on the Review Documents window. Lender must close the window to continue.
DND-2684
Loan Delivery Status Window
The user interface for the Loan Delivery Status window has been redesigned. The window is now a web-based window with a new look and feel. The window has infinite scrolling: as a lender scrolls down the page, additional transaction data is loaded on to the page. Previously lenders accessed the loan submission transactions by navigating between pages that displayed 50 entries per page.
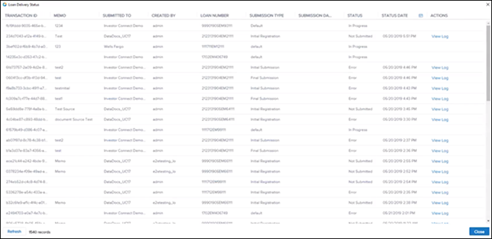
The lower left corner displays a Refresh button for updating the page content. It also lists the number of records listed on the window.

The loan delivery status window displays data for the last 90 days only.
Lenders can filter all columns on the page except for the Action column. Click a column header to apply a filter.

When you select a filter, the column and filter name display on the upper left corner of the window. When multiple filters are selected, all the filters that are applied are listed on the upper-left.

Click the X to the right of a filter to clear the individual filter. Click the Clear button on the upper-left of the window to clear all the filters.

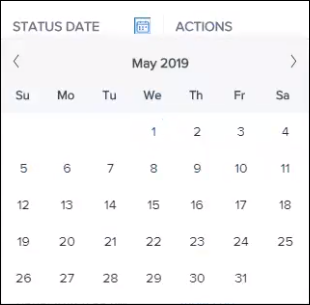
For the Submission Date and Status Date columns, lenders can select a single date or a range of dates.
-
To select a single date, click the column header. When the calendar displays, click the date twice.
-
To select a date range, click the column header. When the calendar displays, click the first date in the range once, and then click the second date in the range.
DND-2282


