Personal Status Online
View the "Status Online" Quick Reference Guide
Use the Personal Status Online configuration tool to set up a template with your personal
templates and triggers for Status Online updates. If you are authorized to use the Status Online feature, a Status Online update is triggered when you exit a loan after making changes that match the criteria set in the status online templates you have created.
Updates are published to a secure website (Loan Connect or Encompass Consumer Connect) where authorized borrowers and partners can track the progress of a loan at any time from any Internet
connection. Updates can also be configured to send your borrowers and partners HTML email notifications that provide more detailed information about the update.
Personal Status Online updates are sent in addition to the Company Status Online updates that have been created by your administrator. The template is specific
to each user who is authorized to use the Status Online tool.
Changes to the setting apply only to loans created after the setting is changed.
About Update Triggers
Each template created contains a trigger
that prompts a Status Online update when an event is achieved. You can create a trigger based
on the achievement of a milestone, the receipt of a document, or the entry of a value in a specified field. You can
override the settings in the template when you update the status for a
specific loan. You can also configure each status update to send out automatic or manual updates when a trigger event occurs:
-
Automatic - The Status Online update is sent automatically without any action on the part of the Encompass user who is working in the loan.
-
Manual - The Encompass user who is working in the loan decides whether or not to send the update manually. If a reminder has been created, a prompt displays when the user exits a loan after a Status Online update has been triggered.
Personal Status Online Template
Use the Personal Status Online Template tab to create the templates and triggers for your Personal Status Online updates. The templates display in a list that includes the Name, Status Trigger, Update Method, and Email Message (email template) selected for each template.
Entries that display in gray text are Company Status Online templates that were created by your company's administrator. You cannot edit or delete Company Status Online templates, but you can duplicate them, and then use the duplicates as a starting point for creating new Personal Status Online updates.
 Add a Status Online Template
-
On the menu bar, click Encompass, and then click Settings.
-
On the left panel, click Personal Settings, and then click Personal Status Online.
-
On the Personal Status Online Template tab, click the New icon.
-
Complete the procedures described below, and then click the Save icon to save your changes.
Select
Trigger
Select the No Trigger option only if you plan to select the Manually Update option for the Update Method in the Configure Status Online Update section.
-
If you select the
Milestone Finished trigger, select a milestone from the list.
-
If you select the Document Received trigger, select a document from the list.
The documents that display in the list are based on the documents your administrator has added to the Documents setting under eFolder Setup in the Encompass Settings.
Select fields based on field IDs
-
Click the New icon.
-
Type one or more field IDs.
-
When finished, click Add.
Select fields from forms
-
Click the Find icon.
-
Select a form on the left panel.
-
Right-click one or more fields on the form.
-
Continue selecting forms and fields until you are finished, and then click OK.
Configure Status Online Update
-
Type a Status Description. This is the description your borrowers and partners will
see when you publish Status Online updates.
-
Select an Update Method:
-
Automatic Update - Updates are sent automatically when a user exits a loan file after a trigger event occurs. No action is required on the part of the Encompass user who is working in the loan.
-
Manual Update - A prompt displays when a user exits a loan file after a trigger event occurs. The prompt window allows the Encompass user who is working in the loan to decide whether to send the update manually.
-
If you select the Manual Update option, select a Reminder option:
-
No reminder - When a user exits a loan, if a Status Online template has been triggered, the user will not be prompted with an update message.However, if an email template has been added to the trigger, an Email Notification window displays when the user manually publishes the update, allowing the user to adjust the email subject, message, and recipient email addresses.
-
Remind users when they exit the loan - When a user exits
a loan, if one of the templates has been triggered, the Status Online Tool will open and the user will be prompted to update Status Online.
Send Notification Email (Optional)
If you created email templates (see below), you can select predefined content to include in the notification email.
-
Select a template from the Email Template list.
-
Select Loan Officer, File Starter, Current User, or Me from the From list.
-
The email for the selected user will display in the From field when the email notification is sent.
-
Selecting Me will cause your email address to always display as the sender, even if another user sends the update.
-
Selecting Current User will use the email address of the user sending the update.
-
In the To section, select the checkbox for one or more recipients who will receive the email notification.
A new update template or edits to an existing template are applied only to loan files that are started after the template is created or changed. The changes are not applied to previously existing loan files. For example, if you associate an email template with a Status Online template, the email notification will be sent only for loans created after the email template was associated with the update.
Work with Personal Status Online Templates
After creating Personal Status Online templates, you can edit or delete templates as needed.
Edit a template
-
On the Personal Status Online Templates tab, select a template on the list and click the Edit icon.
-
Edit the Status Description and the Trigger options,
and then click Save.
Delete a
template
-
On the Personal Status Online Templates tab, select a template on the list and click the Delete icon.
-
Click Yes
in response to the confirmation message.
Email Templates
Use the Email Templates tab to create preconfigured email messages that can be attached to Status Online templates and sent to borrowers or partners instead of typing an email text each time you send an update.
Add an Email Template
-
On the Email Templates tab, click the New icon to open the Email Template Details window.
-
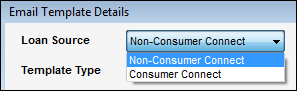
Select a Loan Source from the dropdown list. (This option was introduced in the Encompass 18.2 major release.)
-
Select Non-Consumer Connect to create templates for loans originated in Encompass or other any other source except from an Encompass Consumer Connect application. Templates created with the Non-Consumer Connect option selected will not have the Recipient Full Name field available in the list of Commonly Used Fields.
-
The remaining Commonly Used Fields are available in both types of templates.
- The Template Type field is a read-only field and automatically set to Status Online.
- Type a Subject for the email.
- Type the content of the email message in the text box.
- Click Save.
All existing templates are maintained in the HTML Email Templates, Company Status Online, and Personal Status Online settings. A duplicate template specifically for use with Encompass Consumer Connect is provided for each of the default templates that are provided by Encompass. In the Encompass Consumer Connect templates that you create, the fields that define the borrower name and co-borrower name are replaced with the Recipient Full Name field.
When email notifications are sent, Encompass verifies whether the loan is a Consumer Connect or Non-Consumer Connect loan. Encompass then displays only the appropriate templates for the loan. Only Consumer Connect templates are available for Encompass Consumer Connect loans; only Non-Consumer Connect templates are available for Non-Encompass Consumer Connect loans. When applying a Consumer Connect template, the email text displays the words Recipient Full Name. When the email is sent, the recipient’s name is populated in the appropriate email as it is sent to each recipient.
Format an Email Template
Use the toolbar on the Email Template Details window to format the content of an email template:
-
On the Email Templates tab, select a template from the list, and then click the Edit icon.
-
To insert an image, click the Image icon to open the Insert Image window.
-
Select Company Images or User Images.
-
Select a file, and then click Insert.
-
To add an image to the Insert Image window, click the Add icon, browse to the image, and then click Open.
-
To delete an image from the Insert Image window, select an image, and then click the Delete icon.
-
To insert a hyperlink, highlight the link text, click the Hyperlink icon, and select an option:
-
To have the link open a Consumer Connect or Loan Connect site, select the The WebCenter/Loan Center option.
-
To have the link open a website, select General web address, and then enter the URL for the website using the format http://www.websitename.com
-
To have the link open the recipient's email application, select Email address, and then enter the email address that you want to display in the email To line.
-
To insert the signature of the Encompass user sending the update, click the Add Field icon, select the Signature option, and then click Insert.
If you paste content into the HTML editor from another text editor (for example Word or Notepad), additional paragraph tags may be copied into the HTML code from the other text editor. This could cause the signature to display below the location where you pasted it. To adjust the signature location, open the source code, as described in Step 7, and remove the duplicate <P> and </P> tags from around the signature.
-
To insert a commonly used field, click the Add a field icon, select the Commonly Used Field option, select a field from the list, and then click Insert.
-
To insert any Encompass field, click the Add a field icon, select the Other Field option:
-
Type the field ID.
-
Or click the Find icon, select a form in the left panel, right-click a field in the left panel, and then click OK.
-
To modify the HTML code for the template, or to insert your own HTML code for a template, right-click the content screen, click View Source, edit or enter the HTML code, and then click Update.
-
When finished, click Save.
Edit an Email Template
-
On the Email Templates tab, click the Edit icon to open the Email Template Details window.
-
Select a template from the list, and then click the Edit icon.
-
Edit the Subject and message, and then click Save.
Duplicate an Email Template
-
On the Email Templates tab, select a template from the list, and then click the Duplicate icon.
-
Change the Subject, edit the message content as required, and then click Close.
Delete an Email Template
See Also:
About Status Online
Company Status Online
Status Online Tool