New Features & Forms in Version 22.3 (Banker Edition)
This section discusses the new features being introduced in this Encompass release.
ICE Mortgage Technology AIQ
If your company has purchased the ICE Mortgage Technology AIQ service, Encompass users can now use the AIQ Income Analyzer to analyze and calculate the borrower’s income. The analyzers are used to analyze income data from a loan in Encompass, compare it to income documents for the loan, and identify any discrepancies that need to be addressed. Users who have been given permission to access the AIQ Income Analyzers can view and click the AIQ Analyzers button in the loan file header.

Click the button to open the AIQ Income Analyzer web page in a browser window.

Encompass administrators can also add a button to a custom input form to open the AIQ Income Analyzer web page.
CBIZ-44346, CBIZ-45601
For companies that have purchased the ICE Mortgage Technology AIQ service, two new categories of alerts are now available on the Alerts & Messages tab on the upper-left of the Loan Workspace in an Encompass loan file. An Encompass user who has access to the service can view a green Credit Analyzer alert and click a green Income Analyzer alert entry on the tab to open the Income Analyzer Message window.

When file attachments for income-related documents are imported into a loan, the AIQ Income Analyzer scans the data in the attachments and compares it to the data in the Verification of Employment (VOE) income records in the loan. The alert is generated when the AIQ Income Analyzer has finished analyzing the data. Encompass users can use the information in the alert to compare and reconcile any incomes data differences between the document attachments and the VOE records.
When you click an Income Analyzer alert, the window shown below opens in the Loan Workspace.

The top section of the window displays the alert name, description, and date.

At the top of the Income Comparison section are one or more buttons that display the names of the borrowers for the loan in the following order: the primary borrower in the first borrower pair, the co-borrower in the first borrower pair, the primary borrower in the second borrower pair, the co-borrower in the second borrower pair, and so forth for each of the remaining borrower pairs in the loan. The primary borrower for the first borrower pair is selected by default. The selected borrower’s name displays in red text.
When you click the button for a borrower, income data displays for that borrower.
When there is no data for a selected borrower, a No information returned message displays below the borrower buttons.

When there is data for the selected borrower, the following sections display on the window:
-
The Current section includes up to two entries for current employment records.

-
The Prior section includes an entry for one prior employment records.
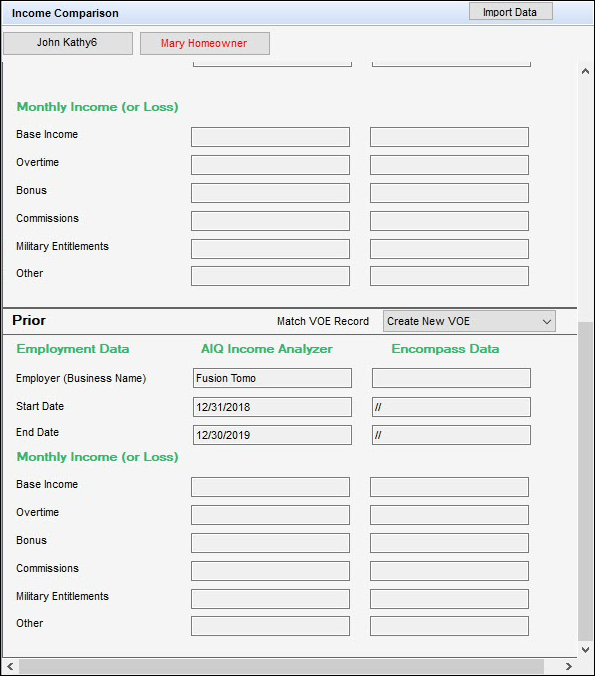
Each of the Current and Prior sections includes an Employment Data section and a Monthly Income (or loss) section.
-
Employment Data - This section includes rows for the following information:
-
Employer (Business Name)
-
Start Date
-
End Date - This row displays only for Prior employment.

-
-
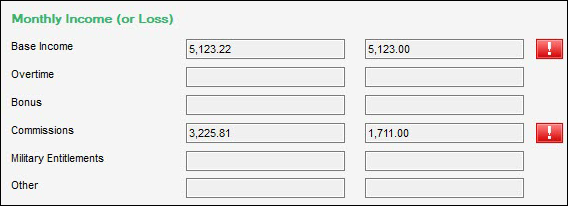
Monthly Income (or loss) - This section includes rows for the following information:
-
Base Income
-
Overtime
-
Bonus
-
Commission
-
Military Entitlement
-
Other
-
Two columns enable users to perform a side-by-side comparison of the AIQ and Encompass data.
-
AIQ Income Analyzer - This column shows data from the AIQ Income Analyzer
-
Encompass Data - This column shows data from the Encompass VOE record.
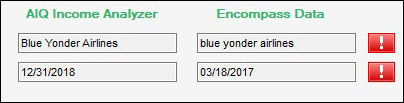
A red Exclamation Point icon displays to the right of the Encompass Data column for any fields that do not match.
By default, data is mapped base on the borrower name and the employer name. Each employment record shown in the alert window has a Match VOE Record drop-down list that users can click to map the AIQ data to a different Encompass VOE record.
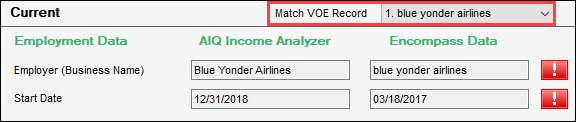
The drop-down list in the Current sections displays only current VOEs in Encompass. By default, the first current VOE displays. The drop-down in the Prior sections displays only prior VOEs in Encompass. By default, the first prior VOE displays. The drop-down is disabled if there are no current or prior VOEs. Each AIQ employment record is assigned to one Encompass VOE. Each Encompass VOE is assigned to only one AIQ employment record.

Users can decide whether to retain the AIQ Income Analyzer data mapping to the default Encompass VOE, select a different Encompass VOE, or select the Create New VOE option in the drop-down list to create a new Encompass VOE using the AIQ Income Analyzer data.
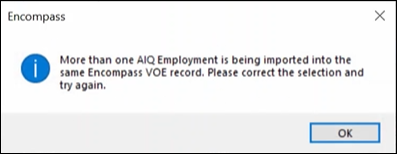
If more than two Employment Data records in the AIQ Income Analyzer column are mapped to the same VOE record in Encompass, the following message displays. Select a different Match VOE Record option for one of the records.
After making the selection, the user clicks the Import Data button in the Income Comparison header to copy the information from the AIQ Income Analyzer to the selected VOE option. After a user clicks the Import Data button, a confirmation message displays to remind the user that importing the data will replace the income amounts on the existing VOEs.
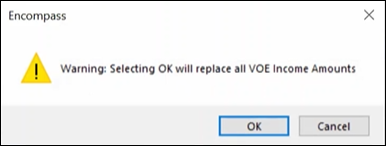
After the user clicks OK, the data is imported, the alert clears, and Encompass opens the VOE input form.
Access to the Import Data button is configured in the Personas setting. For details, refer to Personas Settings Option to Enable Import of AIQ Analyzer Income Data.
When data is copied from the AIQ Income Analyzer:
-
Blank fields in AIQ will clear the value in a corresponding Encompass field when a VOE has existing data in the field.
-
When an Encompass field does not have a corresponding field in the AIQ Income Analyzer, the Encompass value is retained.
-
Additional existing Encompass VOE records are not replaced when data is copied. They must be deleted manually by a user.
CBIZ-41608, CBIZ-45300, CBIZ-46950, CBIZ-45956, CBIZ-46882
A new read-only Source column has been added to the table at the top of the Verification of Employment (VOE) input form to record the source of the data used in each of the VOE records.

Encompass automatically populates the column with one of the following sources:
-
Encompass - This is the default option.
-
AIQ Analyzer - This option is populated when Encompass data is overwritten by an AIQ Analyzer Data import. The column is populated with the words AIQ Analyzer followed by the date and time of the most recent import. After data is imported from the AIQ Analyzer, the source will always be listed as AIQ Analyzer, even if the VOE record is later edited in Encompass.
-
Blank - The column Is blank for any VOEs created prior to the Encompass 22.3 Major Release.
Migration
For Verification of Employment records created prior to upgrading to the Encompass 22.3 Major Release, the source column will be blank.
CBIZ-46849
Electronic Document Management
The Disclosure Tracking Tool in Encompass now provides access to individual audit trails for each eClose or eDisclosure package for loans submitted to Encompass via Encompass Consumer Connect. Access to an audit trail is provided by clicking the new View Audit Trail button in the Disclosure Tracking Tool entry for each package. The eDisclosure or eClose package entries are accessible in the Disclosure History section of the Disclosure Tracking Tool.

When the Disclosure Details window opens for an eClose package, the View Audit Trail button displays in the Disclosure Details window header.

When the Disclosure Details window opens for an eDisclosure package, the View Audit Trail button displays on the Details tab and on the eDisclosure Tracking tab.

Click the View Audit Trail button to open a PDF viewer with a list of documents that provide the Audit Trail data. Audit Trail documents include the following:
-
Consent
-
Certificate of Completion - Ancillary
-
Certificate of Completion - eNote - This option displays for eClose packages only.
-
Audit Trail

Click a document in the Audit Trail Documents panel on the left to view the document in the viewing panel on the right.
The document viewer has a known issue with documents not displaying when a file is first selected. To make a file display, select the file and then click inside the viewing panel on the right.

The Consent file contains a PDF with a copy of every consent agreement generated for the loan. The name of the recipient, the time and date when the form was signed, and the IP address of the recipient displays at the end of each consent agreement in the PDF. The banner at the top provides information about the status of the signatures. Click the Signature Panel button to open a panel with information about the consent signatures.

The Certificate of Completion - Ancillary is the certificate of completion for the ancillary documents in the eDisclosure package and eClose package. It tracks the signing events for the documents. The banner at the top provides information about the status of the signatures. Click the Signature Panel button to open a panel with information about the eDisclosure signatures.

The Certificate of Completion - eNote is the certificate of completion for the eNote. It tracks the signing events for the documents. The banner at the top provides information about the status of the signatures. Click the Signature Panel button to open a panel with information about the eNote signatures.

The Audit Trail provides details about events related to the eDisclosure or eClose package. The banner at the top provides information about the status of the signatures. Click the Signature Panel button to open a panel with information about signatures related to the Audit Trail for the loan.

To Print or Save a Document:
-
Select a document in the left panel.
-
Right-click the document in the viewing panel on the right.
-
When the right-click menu opens, click Print.
-
To print the document, select a printer from the Printer list, and then click Print.
-
To save the document, select the Microsoft Print to PDF option from the Printer list, click Print, select a destination where the PDF will be saved, and then click Save.
DOCP-39334
| Next Section: Feature Enhancements | ||
| Previous Section: Introduction |