Feature Enhancements in Version 21.2 (Banker Edition)
This section discusses the updates and enhancements to existing forms, features, services, or settings that are provided in this release.
Update to Microsoft Windows Support
(Added on 4/30/2021)
New Windows Operating Systems Now Supported
The following Windows Operating Systems are now supported for use with Encompass: Windows 10, Build 2004 Windows 10, Build 20H2 Windows Server 2019 (for Encompass client machines) For more information about Encompass system requirements and compatibility with third-party applications, refer to the System Requirements and Compatibility Matrix.
ATR/QM Updates
Video Collection: New ATR/QM Updates
Working with Ability-to-Repay (ATR/QM) and HOEPA Regulations
Updates are being made to the ATR/QM features in Encompass to implement and support recent ATR/QM rule changes by the Consumer Financial Protection Bureau (CFPB) per 12 CFR Part 1026. These changes include:The Bureau of Consumer Financial Protection (CFPB) issued a final rule amending the General QM loan definition in Regulation Z per 12 CFR Part 1026. The final rule removes the General QM loan definition’s 43% DTI limit and replaces it with price-based thresholds. Additionally, Appendix Q is no longer required for the debt and income analysis. This final rule is effective on March 1, 2021. Mandatory compliance is October 1, 2022. For General QMs that are not fixed rate, a new APR must be calculated to compare against the new priced-based limits. There is a safe harbor for underwriting purposes if a General QM loan is analyzed and verified based upon specified GSE or Agency guidelines/handbooks.
Updates are being made to the ATR/QM features in Encompass to implement and support the ATR/QM rule changes. These changes include:
-
Updates to the ATR/QM Management input form.
-
Appendix Q removed from the ATR/QM Management input form and converted into a standalone input form for use by underwriters.
-
Optional price-based test now available.
-
Support for higher-priced coverage transactions.
-
Ability to control whether the DTI-based general QM rule or the price-based general QM rule is used at any time until the mandatory rule change date takes effect.
The Appendix Q tab has been removed from the ATR/QM input form per updates announced by the Consumer Finance Protection Bureau (CFPB) 12 CFR Part 1026, CFPB. A new stand-alone of Appendix Q has been added to the Encompass standard input forms to assist underwriters in their loan evaluations.
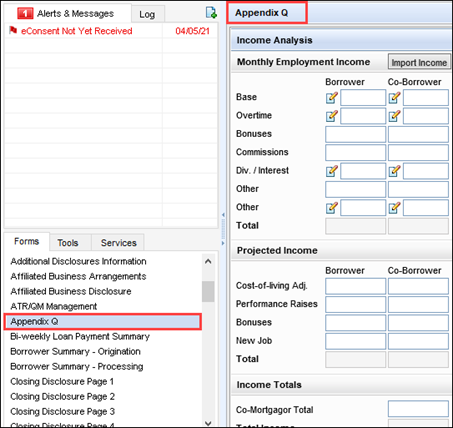
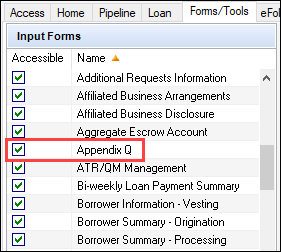
Administrators control access to the form by selecting a new Appendix Q checkbox that has been added to the Forms/Tools tab in the Personas setting (Encompass > Settings > Company/User Setup > Personas). This checkbox is selected by default for existing Encompass users with access to the ATR/QM Management input form prior to updating to Encompass 21.2.
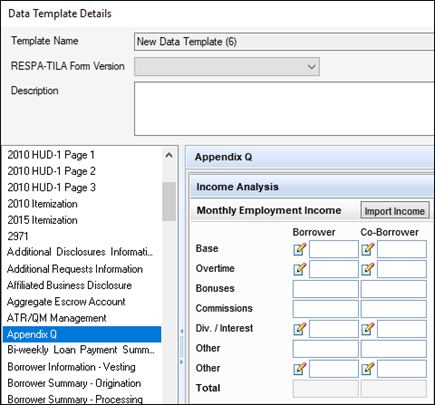
The Appendix Q input form is also available in the Data Templates setting (Encompass > Settings > Loan Templates > Data Templates) where default data can be added to data templates that are applied to loans.
CBIZ-37481
(Updated on 6/11/2021)
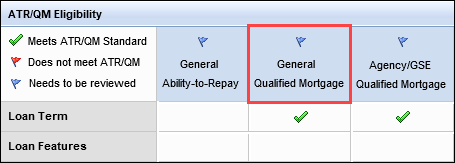
A new Price Limit row has been added to the Eligibility tab in the ATR/QM Management input form under the Points and Fees Limit row.
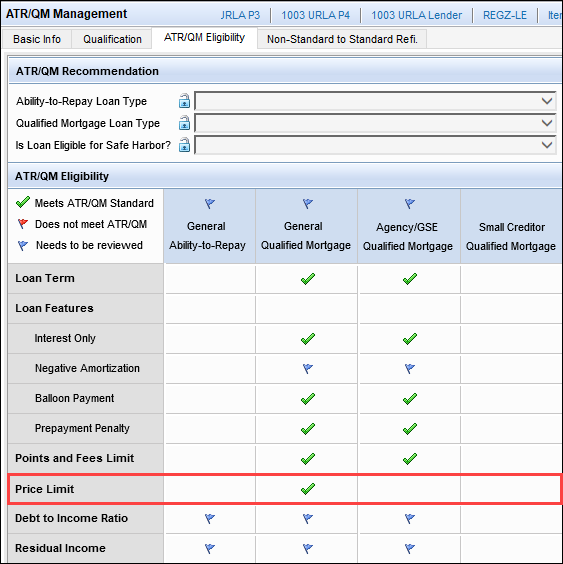
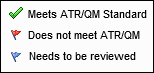
This row is used to populate the read-only field (field ID QM.X384) in the General Qualified Mortgage column with the Meets ATR/QM Standard, Does not meet ATR/QM, and Needs to be reviewed icons shown below based on the calculated results of the QM APR to APOR Test.
This field is populated when the Loan Application Date (field ID 745) is on or after the Use Price Based General QM Definition Date configured in the Policy category in the Encompass Admin Tools and the loan-level Use Price-Based QM checkbox (field ID QM.X383) is also selected. Otherwise, the field is blank.
The results that display in the new field also affect the icon that displays in the General Qualified Mortgage column heading. When an icon displays in the Price Limit field, the same icon displays in the heading field. When no icon displays in the Price Limit field, the heading uses the icon from the Debt to Income Ratio field (field ID QM.X40).
Note that the icons display in the Price Limit field QM.X384 for the Conventional loan type only.
CBIZ-37474, CBIZ-38035
(Updated on 6/4/2021)
Updates have been made to the logic used to populate the Meets ATR/QM Standard, Does not meet ATR/QM, and Needs to be reviewed icons shown below in the Agency/GSE QM Available field (field ID QM.X380) on the ATR/QM Eligibility tab on the ATR/QM Management input form.

The Agency/GSE QM Available field is located on the Agency/GSE QM Available row in the Agency/GSE Qualified Mortgage column.
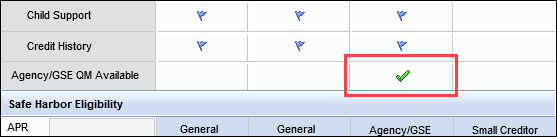
The following logic is now applied when populating the field:
-
When the Loan Type (field ID 1172) is USDA-RD, FHA, or VA, a blank value displays.
-
When the Loan Type (field ID 1172) is HELOC or Other, a blank value displays.
-
When the Loan Type (field ID 1172) is Conventional:
- The Does not meet ATR/QM icon (red flag) displays when any of the following fields are later than the Agency QM Policy Expiration Date selected in the Encompass Admin Tools:
Closing Date (field ID 748)
- Disbursement Date (field ID 2553)
Scheduled Closing Date (field ID 763)
- Creation Date (field ID 2025)
-
A blank value displays when Creation Date (field ID 2025) is not later that the Agency QM Policy Expiration date, but all the following fields are blank or invalid:
-
Disbursement Date (field ID 2553)
-
Closing Date (field ID 748)
-
Scheduled Closing Date (field ID 763)
-
-
The Meets ATR/QM Standard icon (green flag) displays when none of the scenarios listed above are valid.
- The Does not meet ATR/QM icon (red flag) displays when any of the following fields are later than the Agency QM Policy Expiration Date selected in the Encompass Admin Tools:
CBIZ-38028
A new Use Price Based General QM Definition Date option has been added to the Policies category in the Encompass Admin Tools to set the date when loans are determined to be a General Qualified Mortgage based on the price-based rule, without relying on the Agency/QM DTI rule.
For example, if the policy setting for the Use Price Based General QM Definition Date is 10/1/2022:
-
Loans created on or after 10/1/2022 would be evaluated against the priced-based rule.
-
Loans created prior to 10/1/2022 would be evaluated against the existing DTI rule.
The default date for the option is set to 10/1/2022. Administrators can select an earlier date, but the date cannot be set earlier than 3/1/2021.

CBIZ-38477
A new Use Price-Based General QM checkbox (field ID QM.X383) has been added to the Risk Assessment section of the Qualification tab on the ATR/QM Management input form. This checkbox is a loan-level editable field that can be used to override the Use Price Based General QM Definition Date policy setting in the Encompass Admin Tools, which determines when the old DTI-based test is disabled, and the new price-based QM APOR test is enabled. The checkbox enables Encompass users to clear the checkbox to use the old DTI-based test during the optional period after the date set in the Admin Tools, but prior to the mandatory date (10/1/2022) for the new price-based rule.
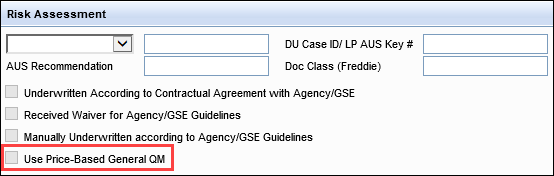
The checkbox is enabled when the loan application date (field ID 745) is on or after the date set in the Use Price Based General QM Definition Date policy setting in the Encompass Admin Tools. By default, when a loan is created, the checkbox is selected or cleared based on the policy setting in the Admin Tools. The checkbox can also be selected or cleared based on business rules. Access to the field can be controlled in Encompass Banker Edition via a Persona Access to Fields business rule.
CBIZ-38503
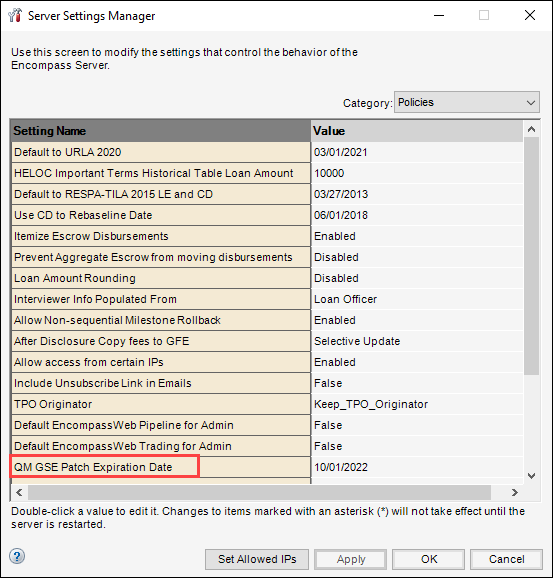
The name of the ATR/QM POLICY EXPIRATION DATE option in the Policies category in the Encompass Admin tools has been changed to QM GSE Patch Expiration Date.
CBIZ-38642
(Updated on 8/5/2021)
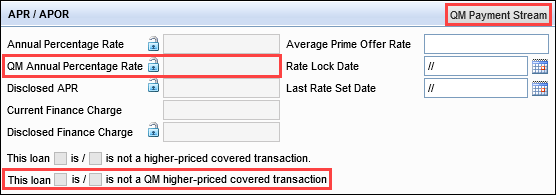
A new button and two new fields have been added to the APR/APOR section of the Qualification tab on the ATR/QM management input form:
-
QM Annual Percentage Rate field (field ID QM.X381).
-
Two new checkboxes (field ID QM.X382) to indicate whether a loan is or is not a QM higher-priced covered transaction.
-
QM Payment Stream button.
Both new fields are available in the Encompass Reporting Database and can be added to custom forms and Encompass reports.
QM Annual Percentage Rate
Encompass calculates and populates a value to this field when a loan meets the criteria for a QM Loan. Otherwise, Encompass populates the value from the APR field (field ID 799). By default, the field is disabled for editing, but a user can click the Lock icon to manually edit the value.
QM Higher-Priced Covered Transaction
Encompass will select one of these checkboxes (field ID QM.X382) to indicate whether a loan is a QM higher-priced covered transaction based on the criteria described in 12 CFR 1026.43(b)(4).
QM Payment Stream Pop-Up Window
Encompass users can click the new QM Payment Stream button to view the payment schedule used to calculate the value in the new QM Annual Percentage Rate field (field ID QM.X381). After clicking the button, the payment schedule opens in a new pop-up window. The payment schedule assumes a fixed interest rate at the maximum rate over the first 5 years of the loan. The payment schedule is provided for testing purposes for Encompass users. If the loan doesn't have an APR change, the following message will display when a user clicks the button:
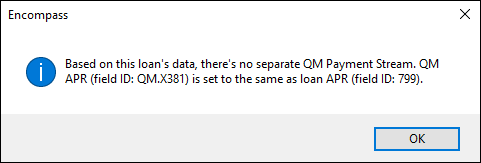
In order for this QM Payment Stream button logic to apply as described above, the 1st Change value (field ID 696) must be 60 months or less AND the Annual Percentage Rate (field ID 799) and QM Annual Percentage Rate (field ID QM.X381) must be the same value in both fields.
CBIZ-33320, CBIZ-37964
(Added on 4/23/2021)
The following logic is used to populate the appropriate This loan is/is not a QM higher-priced covered transaction checkbox (field ID QM.X382) for first lien and subordinate lien loans.
When the First Lien checkbox is selected for the Mortgage Lien Type (field ID 420):
-
The Is checkbox is selected when the QM APR (field ID QM.X381) is equal to or greater than the APOR (field ID 3134) plus 1.5%.
-
The Is Not checkbox is selected when the QM APR (field ID QM.X381) is less than the APOR (field ID 3134) plus 1.5%.
When the Subordinate Lien checkbox is selected for the Mortgage Lien Type (field ID 420)
-
The Is checkbox is selected when the QM APR (field ID QM.X381) is equal to or greater than the APOR (field ID 3134) plus 3.5%.
-
The Is Not checkbox is selected when the QM APR (field ID QM.X381) is less than the APOR (field ID 3134) plus 3.5%.
The logic applies to loan that meet the following criteria:
-
The Number of Units (field 16) is 4 or less.
-
The Mortgage Lien Type (field ID 420) is not blank.
-
The Average Prime Offer Rate (field ID 3134) is not blank and is not zero.
-
The QM Annual Percentage Rate (field ID QM.X381) is not blank and is not zero.
CBIZ-37968
(Added on 4/23/2021)
An update has been made to the existing General QM APR calculation, so Encompass can determine the appropriate DTI-based APR for various ARM loan types, compare the APR to the APOR (for price-based limits), and determine General QM eligibility. The DTI-based APR is calculated using the maximum rate over the first five-years to calculate the APR. The new QM APR calculation is triggered in the same manner as the APR calculation in prior versions of Encompass:
-
When a user opens certain input forms, for example the RegZ-LE or RegZ-CD.
-
When a user saves the loan.
-
When the calculations are needed by an API call.
CBIZ-37920
URLA
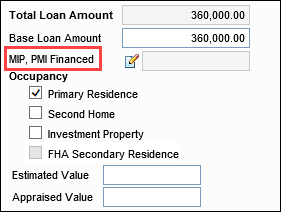
For loans using the new URLA forms, the label for the PMI, MP Financed field (field ID 1045) in section 4a on the 1003 URLA Part 4 input form has been changed to MIP, PMI Financed to be consistent with the terminology used on the MIP, PMI, Guarantee Fee Calculation pop-up window.
CBIZ-38744
Enhanced Conditions
(Updated on 4/30/2021)
Administrators can now use the Custom Print Forms setting in Encompass (Encompass > Settings > Loan Setup > Custom Print Forms) to add enhanced conditions to custom print forms. After an administrator selects criteria for the enhanced conditions, Encompass inserts a virtual field on the custom output form. When an Encompass user generates the form, Encompass uses the virtual field to dynamically pull information from enhanced condition details from the loan file and adds it to the form.
To support enhanced conditions in custom print forms, three new options have been added to the Category dropdown list on the Insert Fields window that displays when adding content to a custom output form:
-
Enhanced Conditions (single condition)
-
Enhanced Conditions (multiple condition)
-
Enhanced Conditions (By Options)

Enhanced Conditions (Single Condition)
Use this option to select a field on the Conditions Details window for a specific enhanced condition. When the custom form is generated, data is pulled from the field and populated in the custom output form. For example, if you select Condition Name for the Field Name and then select the Assets condition, the name of the Assets condition will display on the output form.
With the Encompass 21.1 release, results for single conditions include both open and closed conditions. Enhancements are scheduled for a future Encompass release t0 enable users to select either open or closed conditions.
To Add Enhanced Conditions (Single Conditions):
-
On the menu bar, click Encompass, and then click Settings.
-
On the left panel, click Loan Setup, and then click Custom Print Forms.
-
Double-click an existing form, or click the New icon, type the name of the custom form, and then double-click the new form.
Microsoft Word and the Insert Fields window open.
-
In the Insert Data Fields section, select Enhanced Condition (single condition) from the Category dropdown list.

-
In the Field Name dropdown list, select the field.

-
When the Select Enhanced Condition window opens, you can search for a condition by entering all or part of the Condition Title or Condition Type in the Find field. When you click the Find button, the list highlights the first entry that contains the search term. Continue clicking Find to view additional matches.

-
After selecting a condition, click the Insert button. The Select Enhanced Condition window closes.
-
After you select a condition, the virtual Field ID displays on the Insert Fields window. Click the Insert button to add the virtual field code to the custom input form.

-
When finished adding fields, save and close the custom form.
Enhanced Conditions (Multiple Conditions)
Use this option to determine the type of information to pull from multiple enhanced conditions by selecting from a list of preconfigured criteria. When enhanced conditions match the criteria, the specified information is pulled from the conditions and populated to the custom output form. You can select two types of options for the information:
-
Populate the number of enhanced conditions that match the criteria.
-
Populate the name, description, and status of each enhanced condition that matches the criteria.
To Add Enhanced Conditions (Multiple Conditions):
-
On the menu bar, click Encompass, and then click Settings.
-
On the left panel, click Loan Setup, and then click Custom Print Forms.
-
Double-click an existing form, or click the New icon, type the name of the custom form, and then double-click the new form. Microsoft Word and the Insert Fields window open.
-
In the Insert Data Fields section, select Enhanced Condition (multiple conditions) from the Category dropdown list.

-
In Field Name dropdown list, select the entry that define the conditions you want to include on the form. You can select two types of options:
-
Options that begin with the word Number will display the number of enhanced conditions that match the preconfigured criteria.
-
Options that begin with the word All will list the name, description, and status of each condition that matches the preconfigured criteria that you selected. Some of these options display conditions for all condition types. Some allow you to select specific condition types.

-
-
If you select an All option for a specific condition type, the Select Enhanced Condition window opens. Select the condition type on the window, and then click Insert. The Select Enhanced Condition window closes. You can choose only one condition type for this selection.
-
To search for a condition type on the Select Enhanced Condition window, enter all or part of the Condition Title or Condition Type in the Find field, and then click the Find button. The window highlights the first entry that contains the search term. Continue clicking Find to view additional matches.

-
-
After selecting a condition type, the virtual Field ID displays on the Insert Fields window. Click the Insert button to add the code for the virtual filed to the custom input form.

-
When finished adding fields, save and close the custom form.
When you generate the output form, external descriptions from the Conditions Details window display for external conditions. Internal descriptions from the Conditions Details window display for internal conditions.
Enhanced Conditions (By Options)
Use this option to add a list of conditions to the custom form based on a combination of the following criteria:
-
The option selected for one of six fields on the Conditions Details window (Category, Prior To, Source, Recipient Details, Tracking Status, or Tracking Owner).
-
The Condition Type.
-
Whether a condition is external or internal.
For example, you can populate the custom form with a list of conditions that match all the following criteria:
-
Only conditions that have Funding selected for the Prior To field.
-
Conditions with all condition type.
-
External conditions only.
When the custom form is generated, a list of conditions that match all the criteria displays on the form. The list includes the condition name and condition description.
With the Encompass 21.2 release, the output generated for Enhanced Conditions (By Options) includes only open conditions. Enhancements are planned for a future Encompass releases to enable users to select conditions that are open or closed.
To Add Enhanced Conditions (By Options):
-
On the menu bar, click Encompass, and then click Settings.
-
On the left panel, click Loan Setup, and then click Custom Print Forms.
-
Double-click an existing form, or click the New icon, type the name of the custom form, and then double-click the new form. Microsoft Word and the Insert Fields window open.
-
In the Insert Data Fields section, select Enhanced Condition (By Options) from the Category dropdown list.

-
In Field Name dropdown list, select the Condition Details window field that you want to use in your criteria.

-
When the Select Options window opens. Select a field option in the Select Criteria 1 section.

-
In the Select Criteria 2 section, select a condition type.
-
In the Select Criteria 3 section, select an option to include conditions that are external only, internal only, or both.

The external description from the Conditions Details window display for external conditions. The internal description displays for internal conditions. When you select the option for Both, the external description displays for both external and internal conditions.
-
When finished, click the Insert button. The Select Options window closes.
-
After selecting your options, the virtual Field ID displays on the Insert Fields window. Click the Insert button to add the code for the virtual filed to the custom input form.

-
When finished adding fields, save and close the custom form.
Scenario: Adding an Enhanced Conditions by Options
The following scenario demonstrates how to use the Enhanced Conditions (By Options) feature to add a virtual field that populates a list of all open external conditions that are prior to funding. Screen shots illustrate the virtual field as it displays in the Custom Print Forms setting and the information that is populated when you generate the output form.
To Add a List of All Open External Prior-to-Funding Conditions:
-
On the menu bar, click Encompass, and then click Settings.
-
On the left panel, click Loan Setup, and then click Custom Print Forms.
-
Double-click an existing form, or click the New icon, type the name of the custom form, and then double-click the new form. Microsoft Word and the Insert Fields window open.
-
In the Category dropdown list, select Enhanced Condition (By Options).
-
In the Field Name field, select Prior To.

-
When the Select Option window opens, select Funding for Criteria 1.

-
Select All for Criteria 2.

-
Select External Conditions Only for Criteria 3, and then click Insert.

-
The virtual field ID displays on the Insert Fields window. Click Insert.
-
The code for the virtual field is added to the custom output form.

-
When you print or preview the custom output form, data from the conditions in the loan file is populated to the output form.

(Added on 4/30/2021)
In previous versions of Encompass, authorized users could delete enhanced condition types that they or other users had created. Starting in this 21.2 release, authorized users can now delete the enhanced condition types provided in Encompass by default out of the box. The following default enhanced condition types may be deleted:
-
Preliminary
-
Underwriting
-
Post-Closing
When managing the condition type settings, a warning message is provided when you are deleting one of these condition types. As the message states, deleting the condition type will also result in the deletion of enhanced condition templates that reference the condition type. Once a condition type is deleted, it will not be provided again when you upgrade to a new version of Encompass. The condition type would need to be added manually if you want to use it.

NICE-34195
Encompass Forms and Tools
(Added on 4/23/2021)
The following new fields have been added to the Encompass Reporting Database to capture data for a total of five authorized agents for the VA 26-1820 Loan Disbursement form. Data for these fields is imported from loan files submitted via Encompass LO Connect. These fields do not display on any input forms in Encompass, but they print on the VA-26-1820 Loan Disbursement output form. They are also available in the Encompass Reporting Database and can be added to custom forms and reports. The new fields are listed in the table below.
| Reporting Database Field Description | Field ID |
|---|---|
| HUD Duly Auth Agent Name 2 | 4690 |
| HUD Duly Auth Agent Addr 2 | 4691 |
| HUD Duly Auth Agent City 2 | 4692 |
| HUD Duly Auth Agent State 2 | 4693 |
| HUD Duly Auth Agent Function 2 | 1798* |
| HUD Duly Auth Agent Name 3 | 4694 |
| HUD Duly Auth Agent Addr 3 | 4695 |
| HUD Duly Auth Agent City 3 | 4696 |
| HUD Duly Auth Agent State 3 | 4697 |
| HUD Duly Auth Agent Function 3 | 4698 |
| HUD Duly Auth Agent Name 4 | 4699 |
| HUD Duly Auth Agent Addr 4 | 4700 |
| HUD Duly Auth Agent City 4 | 4701 |
| HUD Duly Auth Agent State 4 | 4702 |
| HUD Duly Auth Agent Function 4 | 4703 |
| HUD Duly Auth Agent Name 5 | 4704 |
| HUD Duly Auth Agent Addr 5 | 4705 |
| HUD Duly Auth Agent City 5 | 4706 |
| HUD Duly Auth Agent State 5 | 4707 |
| HUD Duly Auth Agent Function 5 | 4708 |
* HUD Duly Auth Agent Function 2 (field ID 1798) is an existing Encompass field that displays on the VA 26-1820 Loan Disbursement input form and is now associated with the function for agent #2 for loans imported from Encompass LO Connect.
CBIZ-32911
The ability to delete Bid Tape Registration jobs from the Bid Tape Management view has been added to manage the data displayed in the view.

A Delete icon will be displayed, on the far right, when a cursor is placed on a job’s Status. This new icon is available for jobs with one of the following statuses:
Jobs with a status of In Progress or Imported cannot be deleted (only canceled).
-
Canceled
-
Invalid File
-
Error
-
RegisteredWithError
-
Registered
To Delete a Bid Tape Registration Job:
-
Click the Trades tab, and then click the Bid Tape Management tab.
-
Locate the job you want to delete, and then hover your cursor over its Status.
-
Click the Delete icon.
-
When the “Delete this item?” prompt is displayed, click on Delete.
This delete action cannot be undone once Delete is clicked.
-
The job is deleted from the Bid Tape Management view.
(Updated on 6/30/2021)
For loans using the new URLA forms, the following Project Type checkboxes have been added to the (Re) Lock Request tab on the Lock Request Form tool to enable product and pricing engines to use the project type when identifying the correct pricing and eligibility for the loan.
-
Condominium (field ID 4711)
-
Cooperative (field ID 4712)
-
Planned Unit Development (PUD) (field ID 4713)
-
Property is not located in a project (field ID 4714)

Encompass automatically selects or clears the checkboxes based on the Property Type selection made on the 1003 URLA - Lender input form (field IDs URLA.X205–URLA.X208):
The mapping described above is one-way. Changes to the checkboxes on the Lock Request Form do not copy back to the checkboxes on the 1003 URLA – Lender input form. However, the checkboxes on the 1003 URLA – Lender input form will be updated when a lock request snapshot has been locked (auto lock or manual) and confirmed using different values from the new checkboxes on the Lock Request Form.
-
If the Project Type fields on the lock request snapshot are blank, no further action will be taken.
-
If the values are the same on the lock request snapshot and the URLA 2020, no further action will be taken.
-
If the values are different on the lock request snapshot and the URLA 2020:
-
The Project Type fields will be added to the Compare with Current Loan Data pop up window.
-
The Project Type field values on the lock request snapshot will be posted to the corresponding URLA 2020 fields when the lock is confirmed.
-
If your company utilizes a ‘no sync’ API to determine which loan fields get updated when a rate lock request is confirmed, then changes to these new Project Type fields will not trigger updates to loan fields.
CBIZ-36038, SEC-18973
The new Project Type fields (Condominium, Cooperative, Planned Unit Development (PUD), and Property is not located in a project) have been added to the Lock Request and Loan Snapshot on the Secondary Lock Tool to track that data when lock requests are submitted. In addition, these fields have been added to the Reporting Database.
Encompass Settings
Support for Importing and Exporting Milestone Completion Rules
Administrators can use the Milestone Completion tool to define and manage requirements that must be met before a milestone is finished. When configuring these rules, administrators can add workflow tasks that enable loan team members in Encompass LO Connect to more effectively manage and automate tasks across the entire loan lifecycle and adopt an exception-based workflow. In this Encompass 21.2 release, administrators can now successfully import and export Milestone Completion rules and the workflow tasks configured with the rule will be retained and enforced in the loan in both Encompass and Encompass LO Connect.
For more information on task-based workflows, refer to the Working with Task-Based Workflows setup guide.
NICE-30680
The following updates have been made to the Personas settings for LO Connect. These settings are located on the Encompass Settings > Company/User Setup > Personas > LO Connect tab.
- The Update Priority option has been renamed to Update Task Priority and moved directly to the Manage Tasks group (from the Modify All Task Groups/Tasks group).
-
A new option, Add Comments for All Tasks, has been added to the Manage Tasks group.
Administrators can use these persona options to control which users in Encompass LO Connect can update workflow task priorities and add comments to workflow tasks.

- A new option, Disclosure Summary, has been added to the Standard Web Forms section of the settings screen to control access to the Disclosure Summary input form in Encompass LO Connect.
For personas with this option selected here, a link to the Disclosure Summary is displayed in the left-navigation menu in Encompass LO Connect for the user.

NICE-34681, NICE-34682, NICE-34540
Electronic Document Management
(Added on 6/15/2021)
An update has been made to the way document conversion is implemented when file attachments are imported into the eFolder by customers using the old document viewer. The Enable Document Conversion checkbox in the Document Conversion setting (Encompass > Settings > eFolder Setup > Document Conversion) is now used to enable or disable document conversion for all file attachments imported from the following sources:
-
Documents added from within Encompass.
-
Documents imported via APIs.
-
Documents imported from Encompass LO Connect or Encompass TPO Connect loans.
Prior to this update, the Enable Document Conversion checkbox controlled document conversion in the old document viewer only for documents added to the eFolder from within Encompass. Customers who wanted to enable document conversion for documents added via APIs or from web-based versions of Encompass had to submit a request to ICE Mortgage Technology to enable server-side document conversion.
The old document viewer was used by all Encompass users prior to the 20.2 release, when the Cloud Viewer (a new cloud-based document viewer created in-house by ICE Mortgage Technology) was made available on request. The change described here affects clients who continue to use the old document viewer. The change does not affect the Cloud Viewer, which always has document conversion enabled.
DOCP-21405, EBSP-29967
| Next Section: Fixed Issues | ||
| Previous Section: Introduction |