New Features & Forms in Version 18.3

New Printed Output Forms
The following printed output forms are being introduced in Encompass 18.3.
- Credit Score Information Disclosure (FACT Act) - Individual (Name printed on form: Credit Score Information Disclosure (FACT Act) - Individual Borrower)
- This new form is being provided to help ensure compliance by providing separate credit disclosure notices to the borrower and co-borrower(s).
- To print this form, click the Print icon, click the Standard Forms tab, select General Forms from the Look In list, and then click to select Credit Score Information Disclosure (FACT Act) – Individual in the list. Click the Add button to move the form to the Selected Forms list, and then click Print.
- Note that if you are viewing the FACT Act Disclosure form and click the Print icon, the Credit Score Information Disclosure (FACT Act) – Individual form will be automatically listed in the Selected Forms list in the Print window if one (or more) of the credit score fields in the loan file are populated with data (fields 67, 60, 1450, 1452, 1414, or 1415).
- TX Mortgage Banker Conditional Approval Letter (Name printed on form: Texas Mortgage Banker Conditional Approval Letter) – This new Texas state-specific form is being introduced pursuant to 7 Tex. Admin. Code §81.201(b)
- TX Mortgage Banker Conditional Qualification Letter (Name printed on form: Texas Mortgage Banker Conditional Qualification Letter) – This new Texas state-specific form is being introduced pursuant to 7 Tex. Admin. Code §81.201(a)
In order to make these new forms available in your Encompass system(s), the administrator or other authorized user must use the Documents tool in Encompass Settings to add the form as a new form. For instructions to add a new form, refer to the Documents topic in the Encompass online help.
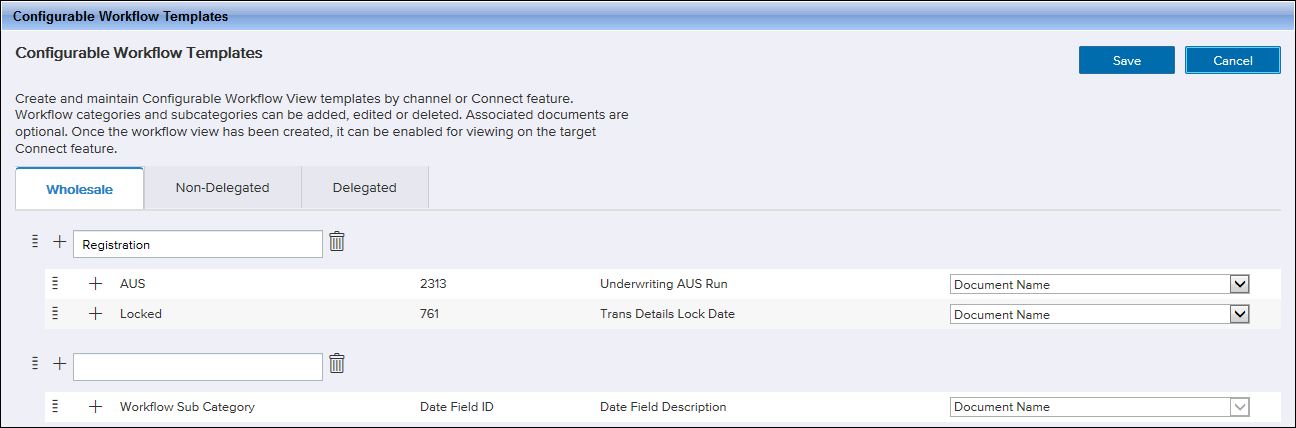
Configurable Workflow Templates
Configurable Workflow Templates are available in Encompass Banker Edition only, not Encompass Broker Edition.
Why we made this update: To enable system administrators to create channel specific workflow views for Connect modules which captures data from Encompass that displays the workflow and current status of the loan (as defined for the workflow).
To enable system administrators to create and maintain configurable workflow view templates by channel for Connect modules, a new Configurable Workflow Templates setting has been added under Loan Templates.
Currently, this feature is only enabled for TPO Connect.
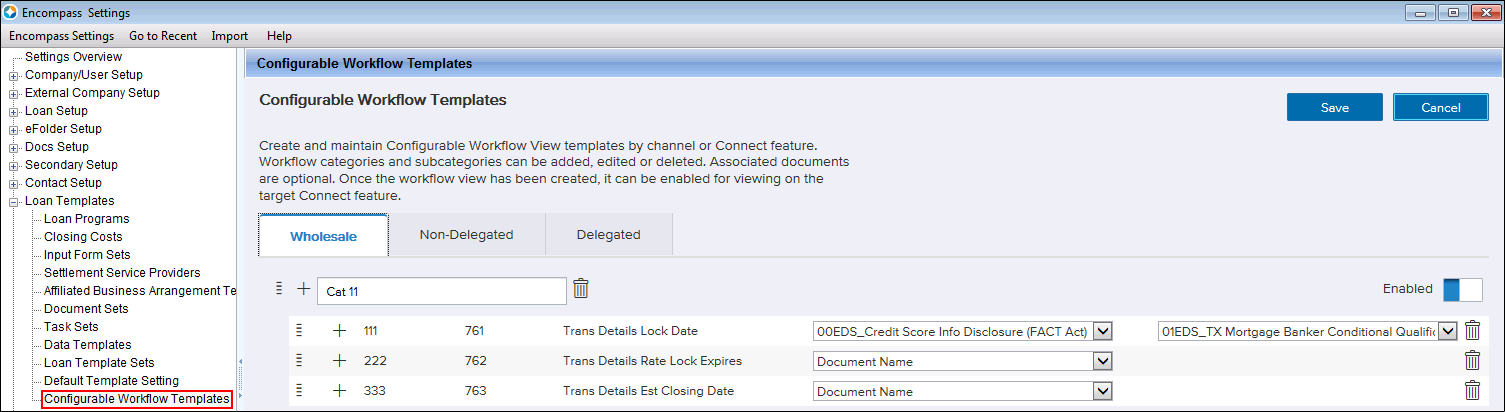
To view this new setting, TPO Connect must be provisioned and the user must be designated as an Administrator or Super Administrator. In addition, the appropriate channels must be selected on the Channel Options setting (under Loan Setup) to display the associated tab (up to three) on the Configurable Workflow Templates setting.
- Wholesale – Select Banked Wholesale to display the Wholesale tab.
- Delegated and Non-Delegated– Select Correspondent to display the Delegated and Non-Delegated tabs.
To Add Initial Workflow Category and Workflow Sub Category:
- On the menu bar, click Encompass, and then click Settings.
- On the left panel, click Loan Templates, and then click Configurable Workflow Templates.
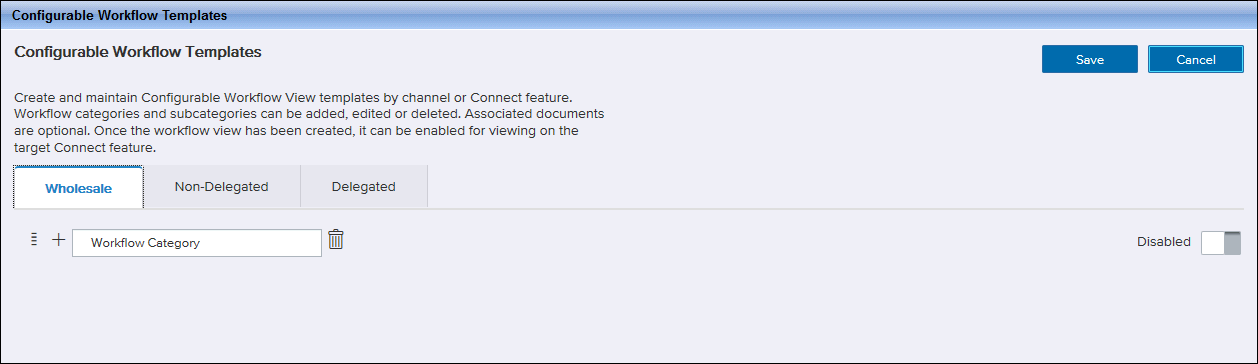
- Click on the channel tab where you want to add a workflow template.
- Enter a unique Workflow Category. This field is required and accepts up to 30 characters.
The "Workflow Category" field label is merely a visual cue. Enter your desired category name, such as "Underwriting", over "Workflow Category".
- A Workflow Sub Category row is displayed.
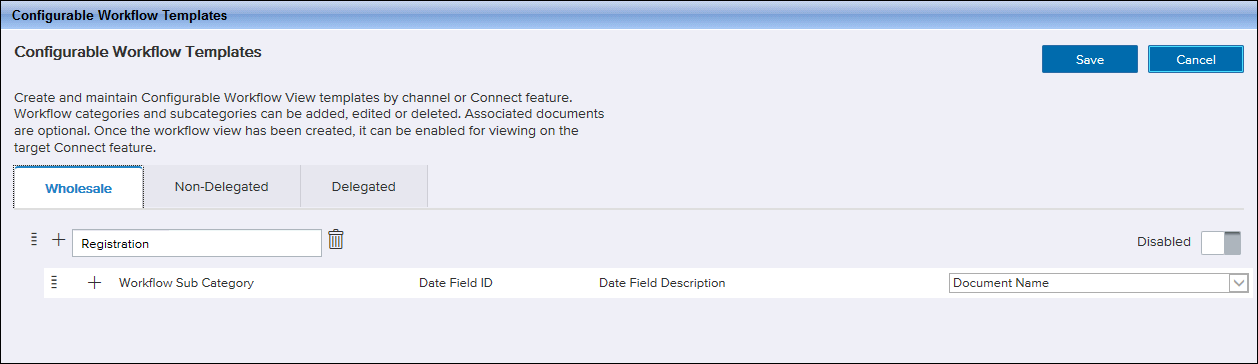
- Enter a unique Workflow Sub Category within the Workflow Category.
The "Workflow Sub Category" field label is merely a visual cue. Enter your desired sub category name, such as "Conditional Approval", over "Workflow Sub Category". You can enter a maximum of 30 characters.
- At least one workflow sub category is required.
- Workflow sub categories can be repeated between workflow categories, if so desired.
- You can enter a maximum of 30 characters.
- Enter a Date Field ID. This field is required.
- The field ID must exist within Encompass (it cannot be a virtual field).
- The field ID must be defined as a Date or Date/Time field.
- You cannot have duplicate Date Field IDs within the same workflow category.
- The Date Field Description is populated by Encompass based on the Date Field ID entered.
- Select an eFolder document from the Document Name dropdown list, if applicable.
- If an eFolder document was selected, you can select another eFolder document from the second Document Name dropdown list, if applicable.
- You cannot have duplicate documents within the same workflow sub category.
- Click on the Disabled slider to enable your new workflow category.
- Click Save to save your changes.
If you decide to Cancel your changes, you will be returned to the Wholesale tab, regardless of which tab you are on when you click Cancel. In addition, the reverted values (if any) will be displayed on the Wholesale tab. When you navigate to the Non-Delegated or Delegated tabs, they will display the values entered prior to any changes you made.
To Add Additional Workflow Categories:
- Locate where you want to add your new workflow category.
- Click on the Add icon (
 ) next to the existing workflow category above that location.
 - A new Workflow Category/Workflow Sub Category is displayed below the existing workflow category/workflow sub category.
Currently, there is a maximum limit of 20 workflow categories per channel.
To Add Additional Workflow Sub Categories:
-
Locate where you want to add your new workflow sub category.
- Click on the Add icon ( ) next to the existing workflow subcategory above the location.
- A new Workflow Sub Category is displayed below the existing workflow sub category.
Currently, there is a maximum limit of 20 workflow sub categories per channel.
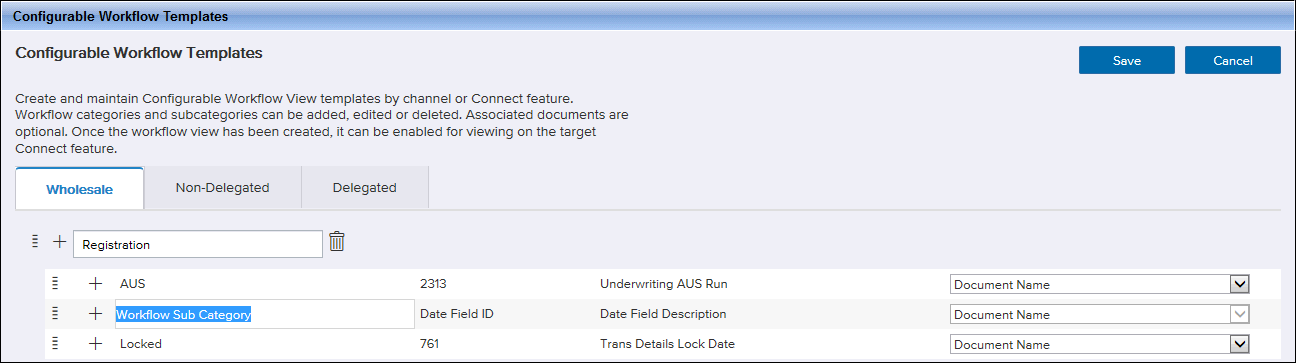
To Edit Workflow Categories or Workflow Sub Categories:
- On the menu bar, click Encompass, and then click Settings.
- On the left panel, click Loan Templates, and then click Configurable Workflow Templates.
- Click on the channel tab where you want to edit a workflow template.
- To edit a Workflow Category, click in the field.
- To edit Workflow Sub Category fields, double-click in the field.
- Click Save to save your changes.
To Delete Workflow Categories or Workflow Sub Categories:
- On the menu bar, click Encompass, and then click Settings.
- On the left panel, click Loan Templates, and then click Configurable Workflow Templates.
- Click on the channel tab where you want to delete workflow categories/sub categories.
- To delete a Workflow Category, click on the Delete icon (
 ) next to that category.
All sub categories within the workflow category will also be deleted.
- To delete a Workflow Sub Category, click on the Delete icon ( ) next to that sub category.
- Click Save to save your changes.
-
A warning message, "One or more deletes have been requested for these settings, the deletes will permanently remove those entries. Do you wish to continue?" [Yes] [No], is displayed for any deleted entries. Selecting Yes saves the change, while selecting No cancels the save and returns the grid back to its values before any changes were made.
To Sequence Workflow Categories or Workflow Sub Categories:
- On the menu bar, click Encompass, and then click Settings.
- On the left panel, click Loan Templates, and then click Configurable Workflow Templates.
- Click on the channel tab where you want to sequence workflow categories/sub categories.
- To move a Workflow Category, click on the Order icon (
 ) next to that category, drag the category to where you want it, and then drop it.
 - To move a Workflow Sub Category, click on the Order icon ( ), drag the sub category to where you want it, and then drop it.
A workflow sub category cannot be moved outside of it’s associated workflow category.
- Click Save to save your changes.
New Features & Forms for Version 18.3.0.4
This update contains an update to users' Encompass client machines (18.3.0.4) that was made available on August 4, 2018. The new feature listed below is included in this update.
This new feature is available in Encompass Banker Edition. This update does not impact Encompass Broker Edition.
The client-side update can be controlled manually via the Encompass Version Manager tool. If the tool has been configured to always apply new releases to users’ computers automatically, users will receive this update upon their initial log in of Encompass following the release.
In Encompass, go to Help > About Encompass in the menu bar to view your Encompass version. Once you upgrade, your new version number will be 18.3.0.4.
The Encompass SDK (Encompass Software Development Kit) has been repackaged with this 18.3.0.4 update. Although it is not required, it is recommended that you upgrade to this latest SDK delivered with this update to ensure the same functionality that is in this latest version of Encompass is also available in your SDK. If your SDK application utilizes the Encompass SmartClient, you can automate this process so the SDK is upgraded automatically every time you apply an Encompass release. If your SDK application is installed on a computer at your location, you must manually upgrade the SDK for every release. For instructions for automating the upgrade process or manually upgrading the SDK, refer to the Upgrading the Encompass SDK page or view the SDK Programmer’s Guide.
Again, upgrading to this latest SDK package is recommended, but not required, for this 18.3.0.4 update.
Visit the Encompass SDK Install Files page to access the SDK install files for this release.
Updates to the Encompass Client Machines
The following item is a client-side update that is applied to users' Encompass client machines. This client update can be controlled manually via the Encompass Version Manager tool. If the tool has been configured to always apply new releases to users’ computers automatically, users will receive this update upon their initial log in of Encompass following the release.
Encompass Settings
A new Loan Error Information setting has been added to Encompass to enable administrators to locate business rules or custom field calculations that are not firing correctly in loans submitted from Encompass Consumer Connect websites. The setting is enabled automatically for Encompass customers with Encompass Consumer Connect websites, but administrators need to use the Personas setting in Encompass to give users access to the setting.
To Enable Persona Access to the Setting:
-
On the menu bar, click Encompass, and then click Settings.
-
On the left panel, click Company/User Setup, and then click Personas.
-
Select a persona, and then click the Settings tab.
-
In the Company Settings panel, under System Administration, select the Loan Error Information checkbox.
To Search for Loan Error Information:
-
On the menu bar, click Encompass, and then click Settings.
-
On the left panel, click System Administration, and then click Loan Error Information.
-
In the Search section, use the First Name, Last Name, and Loan GUID fields to specify search criteria as needed.
-
Select an Error Created Date to set the time frame for the search:
-
Select Today to search only loans that were submitted on the current date.
-
Select Range to search for loans submitted over a particular time period, and then select or type the Start Date and End Dates for the time period.
The maximum allowable range is 90 days.
-
-
To run the search, click the Search button.
-
Or click Clear to clear the search criteria.
-
-
The List of Loan File Errors section displays information about loans with business rules or custom field calculations that are not firing correctly in Consumer Connect loans.
-
To view details about the loan error, click the View link in the Error Details column.
-
The Loan Error Details pop-up window displays detailed error information.
When a company is running Encompass in multiple environments (for example test and production environments), data is drawn only from the environment in which the search is run.
-
NICE-4042, NICE-12106
Proceed to Feature Enhancements
![]()