Feature Enhancements in Version 23.1 (Banker Edition)
This section discusses the updates and enhancements to existing forms, features, services, or settings that are provided in this release.
Updates for System Requirements
The Microsoft .NET Framework 4.8 is required for Encompass 23.1. Prior to upgrading to Encompass 23.1, customers must install .NET Framework 4.8 and validate it is enabled on their Encompass client systems. The .NET Framework 4.8 is not part of the Encompass 23.1 install package.
If .NET Framework 4.8 is not enabled, customers attempting to open Encompass using the AppLauncher.exe file in the SmartClientCache file directory will be prompted to exit or install .NET Framework 4.8 and they will not be able to open Encompass.
It is strongly recommended that you enable .NET Framework 4.8 on your Encompass client systems no later than February 1, 2023 in preparation for the planned Encompass 23.1 release.
Windows Requirements
Encompass is supported on Windows 10 (21H2), Windows 11 (21H2), and Windows 2019 Server operating systems only.
-
.NET Framework 4.8 was provided for Windows 10 as part of the Windows 10 May 2021 Update. Review the Additional Information below for links to additional Windows 10 updates that include .NET Framework 4.8.
-
.NET Framework 4.8 is enabled by default in Windows 11. Therefore, if you are using a Windows 11 system, it is likely that .NET Framework 4.8 is already enabled.
Validating if .NET Framework 4.8 is Installed and Enabled
Follow these instructions provided by Microsoft to validate the version of .NET Framework that is being used on users’ Encompass systems.
Installing .NET Framework 4.8 on Windows 10
If .NET Framework 4.8 is not installed on your Windows 10 system, visit this page and apply the applicable Windows 10 update.
Additional Information:
-
If you are a new customer who has never installed Encompass, Microsoft .NET Framework 3.5 needs to be enabled first. Once .NET Framework 3.5 and 4.8 are enabled, you can proceed with installing Encompass 23.1.
-
If you are an existing Encompass customer, do not disable .NET Framework 3.5 on your system even when .NET Framework 4.8 is also used. Both versions are required to ensure a successful upgrade to Encompass 23.1.
-
Encompass customers utilizing the Encompass SDK must enable .NET Framework 4.8 on their systems. It is not included in the 23.1 SDK package.
-
Be sure to recompile all SDK programs in .NET Framework 4.8. (This recompilation should be done prior to upgrading to Encompass 23.1.) Older SDK programs may break if not recompiled.
-
Plugins do not need to be recompiled to .NET 4.8.
-
Refer to knowledge article 114651 ‘Microsoft .NET 4.8 Required for Encompass 23.1’ for additional details about this requirement.
As you may recall,
With the Encompass 23.1 release, the Chromium-based engine DLL version is being updated from 2.12 to 2.18.
Similar to when you upgraded to 22.2 and 22.3, a one-time download of one large Chromium engine DLL file, DotNetBrowser.Chromium.Win-x86.dll, (100MB) is required as a result of this update from DLL version 2.12 to 2.18. This will take some time to download. Users should expect a delay while the entire DLL is downloaded before the Encompass Login screen for Encompass 23.1 is displayed. The same delay will occur before the Encompass Admin Tools Login screen is displayed after upgrading to 23.1.
This information, as well as additional information about the recent Chromium-based engine updates, can be found in KA #000114063.
Encompass Forms & Tools
A new Section F – Disposition of Application and Underwriter Certification has been added to the 26-6393 VA Loan Analysis input form.
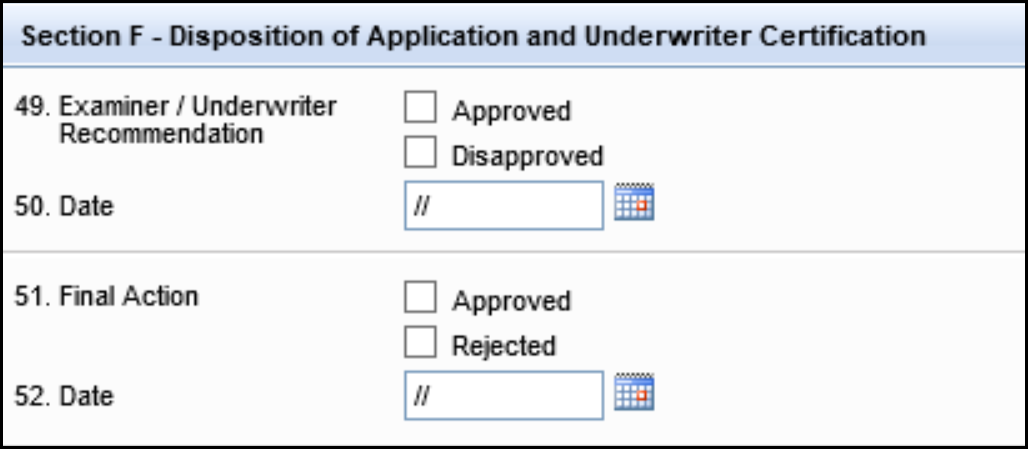
Section F includes the following new fields:
-
Examiner/Underwriter Recommendation check boxes (field ID VALA.X31) - Select the Approved or Disapproved check box to indicate the underwriter recommendation for the application. Only one check box can be selected at a time. By default, both check boxes are blank.
-
Examiner / underwriter recommendation Date (field ID VALA.X32) - To enter a date, click the Calendar icon or type a date in the field.
-
Final Action check boxes (field ID VALA.X33) - Select the Approved or Disapproved check box to indicate the final action on the application. Only one check box can be selected at a time. By default, both check boxes are blank.
-
Final action Date (field ID VALA.X34) - To enter a date, click the Calendar icon or type a date in the field.
Section F on the Output Form
The output form is populated with data from the input form as described below:
-
The Examiner/Underwriter Recommendation check boxes on the input form are used to populate the two check boxes at the top of Section F on the output form.
-
The examiner / underwriter recommendation Date on the input form is used to populate box 49 on the output form.
-
The Final Action check boxes on the input form are used to populate the two check boxes in box 51 on the output form.
-
The final action recommendation Date on the input form is used to populated box 52 on the output form.
CBIZ-42518
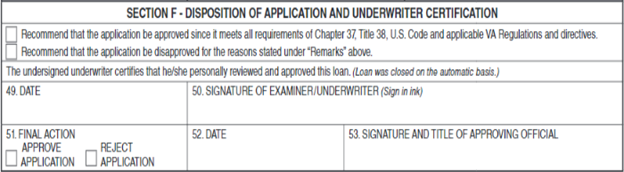
When a user selects the option on the Request for Transcript of Tax input form to provide a wage and income transcript (field ID IRS0150), the Transcript Options column in the table at the top of the form now displays a W2 entry to indicate that the wage and income transcript option has been selected.
When selecting the Oct 2022 version of the 4506-C form, the wage and income transcript (field ID IRS0150) check box displays in section 7 on the input form.
When selecting the Sep 2022 4506-C version of the form or when the Use IRS 4506-C check box is cleared, the wage and income transcript (field ID IRS0150) check box displays in section 8.

CBIZ-43489
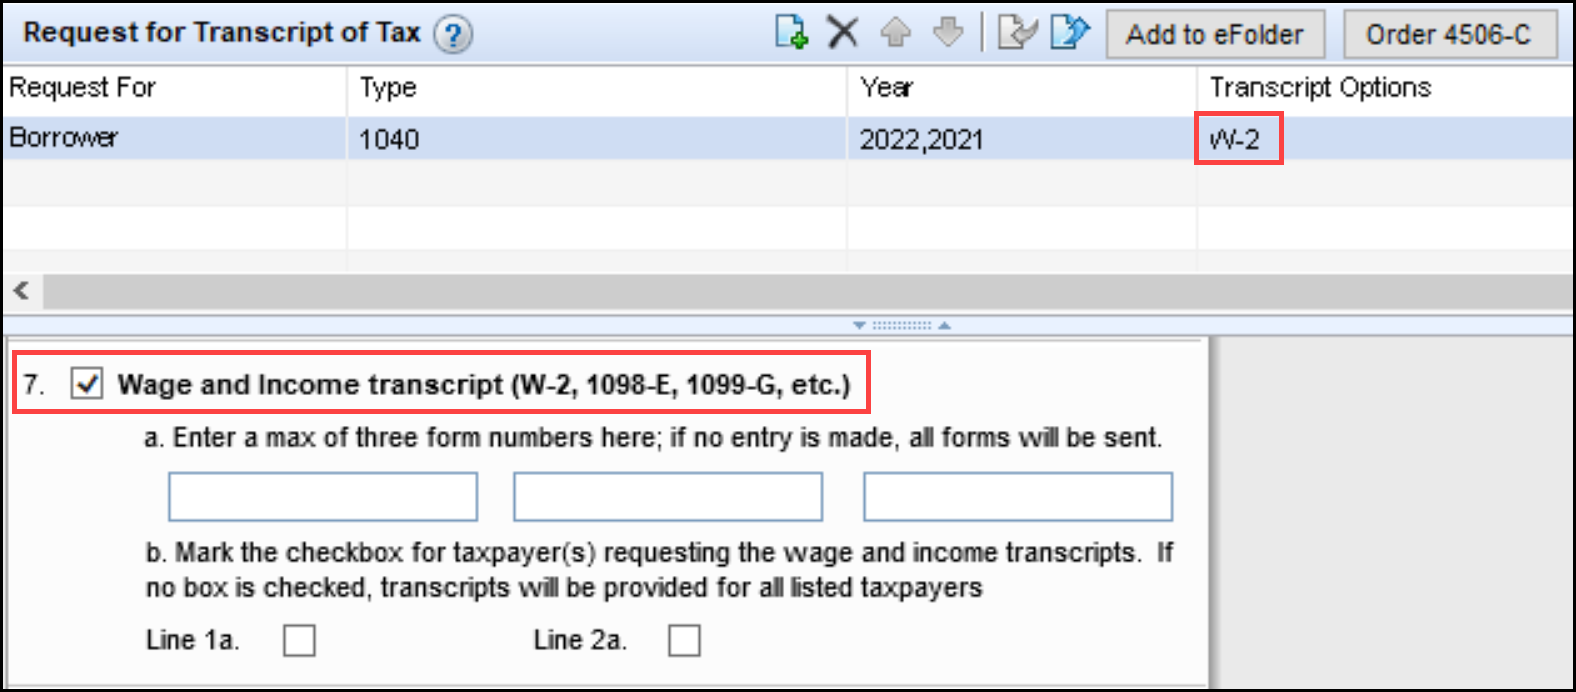
New fields have been added to the Statement of Denial input form and changes have been made to the user interface on the form. The changes are shown in red rectangles in the image below. Descriptions of the changes are listed below the image.
-
The words Concerning Credit have been added to the end of the header for section 1.
-
The Garnishment or Attachment check box has been replaced by a Garnishment, Attachment, Foreclosure, Repossession or Collection Action or Judgment check box (field ID DENIAL.X34) and the following three new check boxes have been added below this Garnishment, Attachment, Foreclosure, Repossession or Collection Action or Judgment check box:
-
Garnishment or Attachment check box (field ID DENIAL.X101)
-
Foreclosure or Repossession check box (field ID DENIAL.X102)
-
Collection Action or Judgment check box (field ID DENIAL.X103)
-
For loans existing prior to upgrading to Encompass 23.1, the Garnishment, Attachment, Foreclosure, Repossession or Collection Action or Judgment check box will remain selected if a selection was made in the Garnishment or Attachment check box list in previous versions of Encompass. The three remaining check boxes are cleared by default. Users can manually select the relevant check boxes if needed. Administrators can also create business rules to populate these check boxes.
-
The Delinquent Credit Obligations check box has been renamed Delinquent Past or Present Credit Obligations With Others.
-
A new Excessive Obligations in Relation to Income check box (field ID DENIAL.X104) has been added to section C. INCOME.
CBIZ-44349
To make the VA 26-1805 Reasonable Value input form consistent with the output form, the layout of the input form has been revised and organized into six sections. Two existing fields have been updated, and 21 new fields have been added.
The images below show the new layout used for each of the new sections on the form. New or updated fields are shown in a red rectangle and are also listed below each image.
Section 1
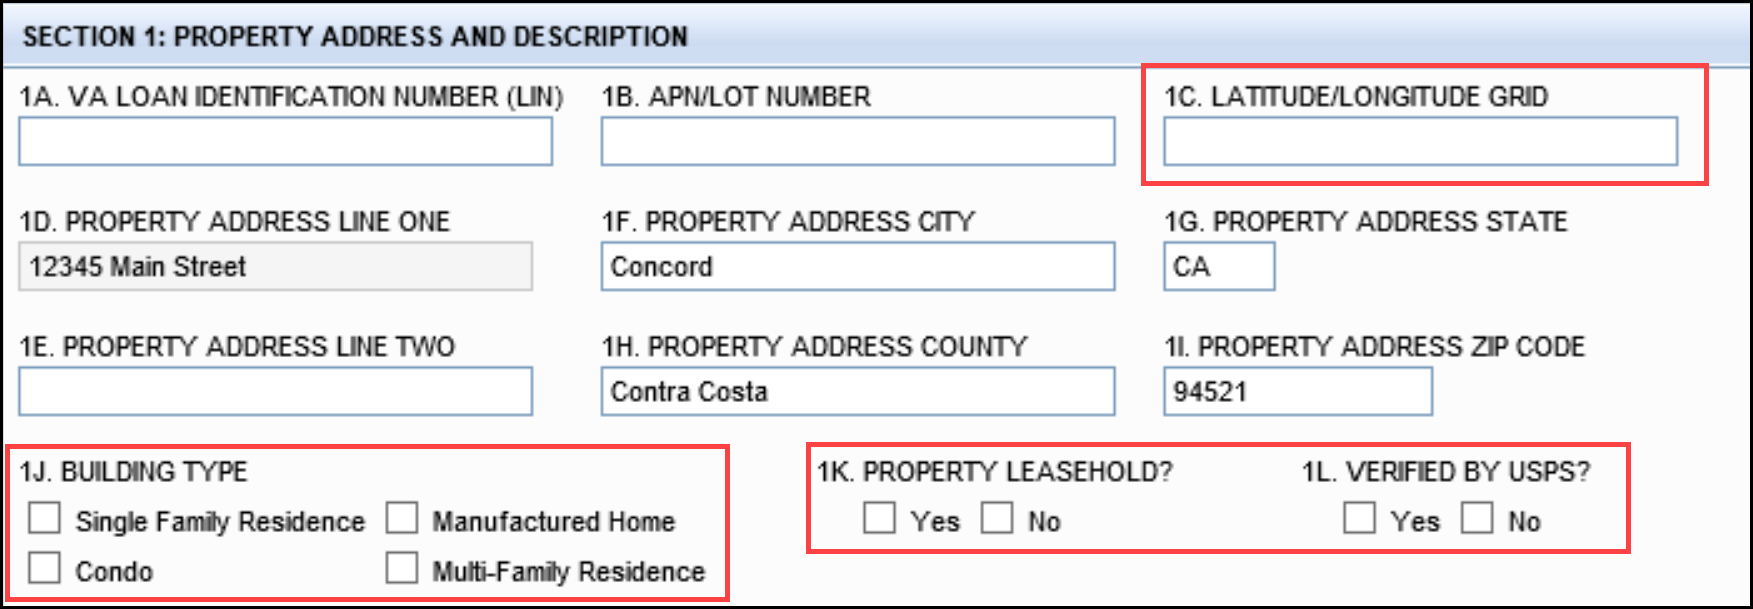
New fields in section 1:
-
1C. LATITUDE/LONGITUDE GRID (field ID 4860) - Subject property latitude and longitude.
-
1K. PROPERTY LEASEHOLD (field ID 4861) - Yes and No check boxes.
-
1L. VERIFIED BY USPS (field ID 4862) - Yes and No check boxes
Updates to existing fields in section 1:
-
1J. Building Type (field ID 602) - The drop-down list has been replaced with the following check boxes: Single Family Residence, Condo, Manufactured Home, Multi-Family Residence.
Section 2
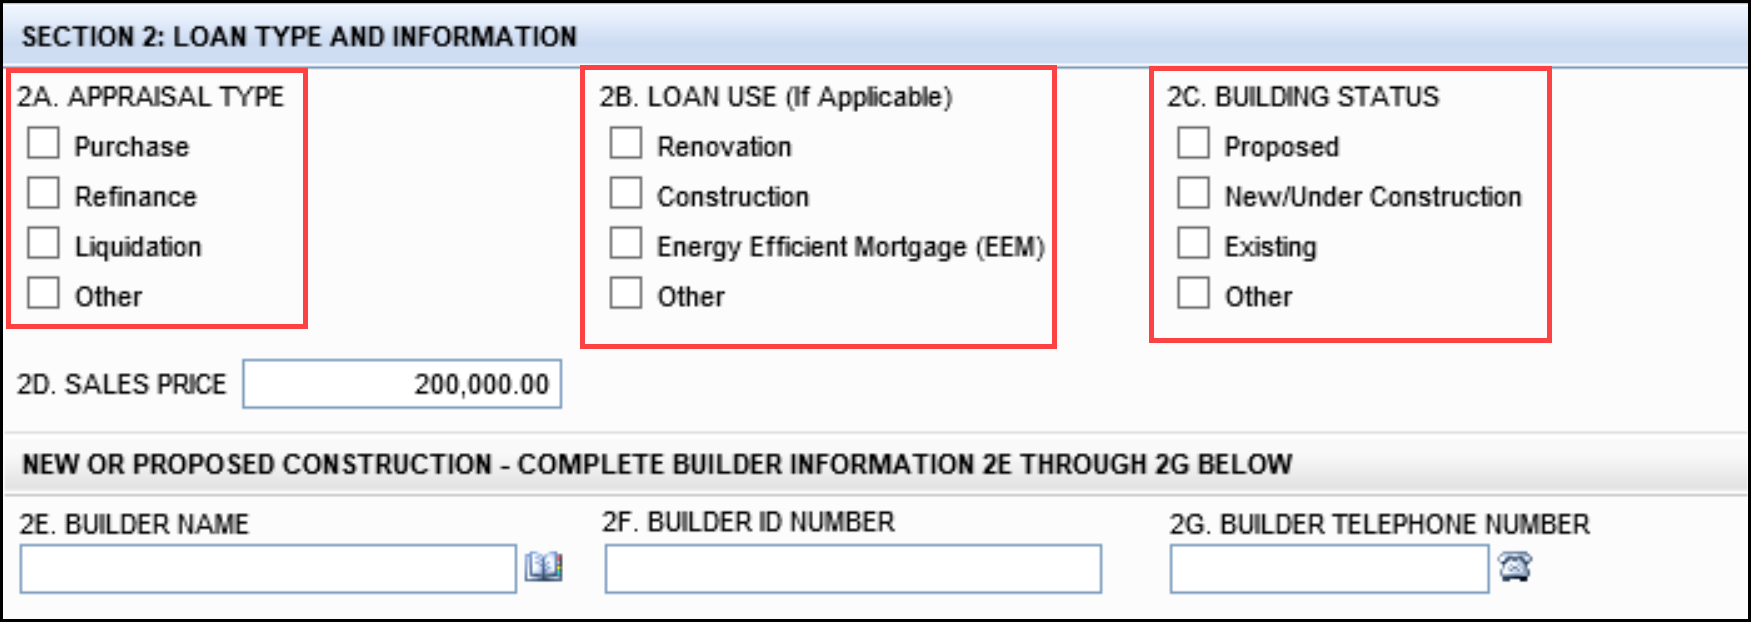
New fields in section 2:
-
2A. APPRAISAL TYPE (field ID 4863) - Purchase, Refinance, Liquidation, and Other check boxes
-
2B. LOAN USE (If Applicable) (field ID 4864) - Renovation, Construction, Energy Efficient Mortgage (EEM), and Other check boxes.
Updates to existing fields in section 2:
-
2C. Building Status (field ID 601) - The Building Status drop-down list has been replaced with the following check boxes: Proposed, New/Under Construction (previous “Under Construction”), Existing, and Other.
Section 3
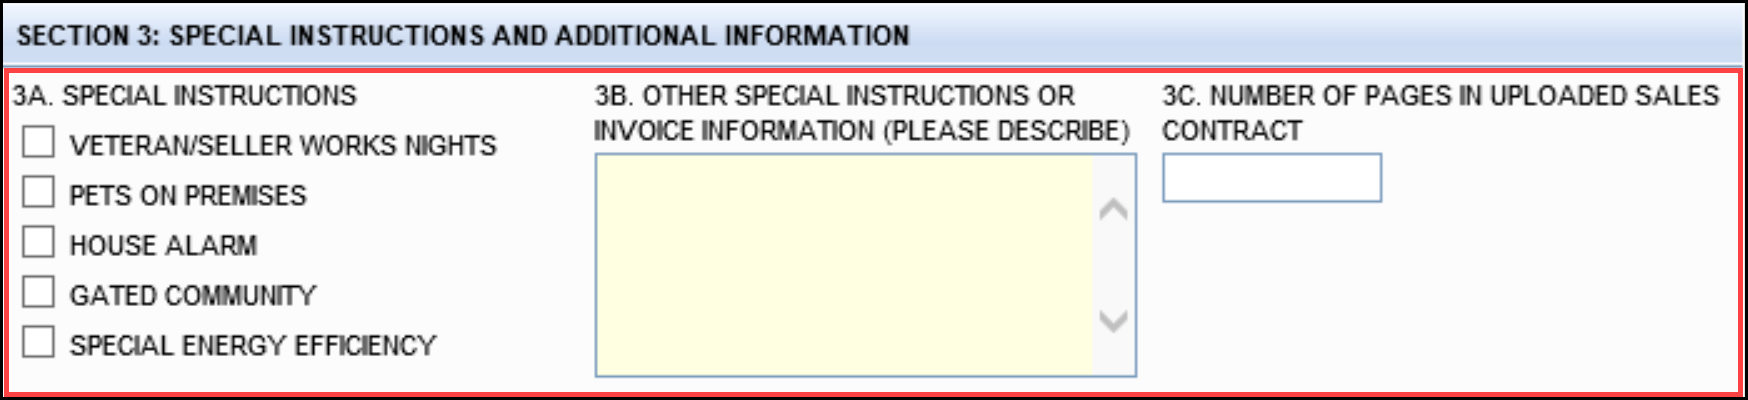
New fields in section 3:
-
3A. SPECIAL INSTRUCTIONS - Check boxes for Veteran/Seller Works Nights (field ID 4865), Pets on Premises (field ID 4866), House Alarm (field ID 4867), Gated Community (field ID 4868), and Special Energy Efficiency (field ID 4869). Multiple check boxes can be selected at the same time.
-
3B. OTHER SPECIAL INSTRUCTIONS OR INVOICE INFORMATION (PLEASE DESCRIBE) (field ID 4870)
-
3C. NUMBER OF PAGES IN UPLOADED SALES CONTRACT (field ID 4871)
Section 4
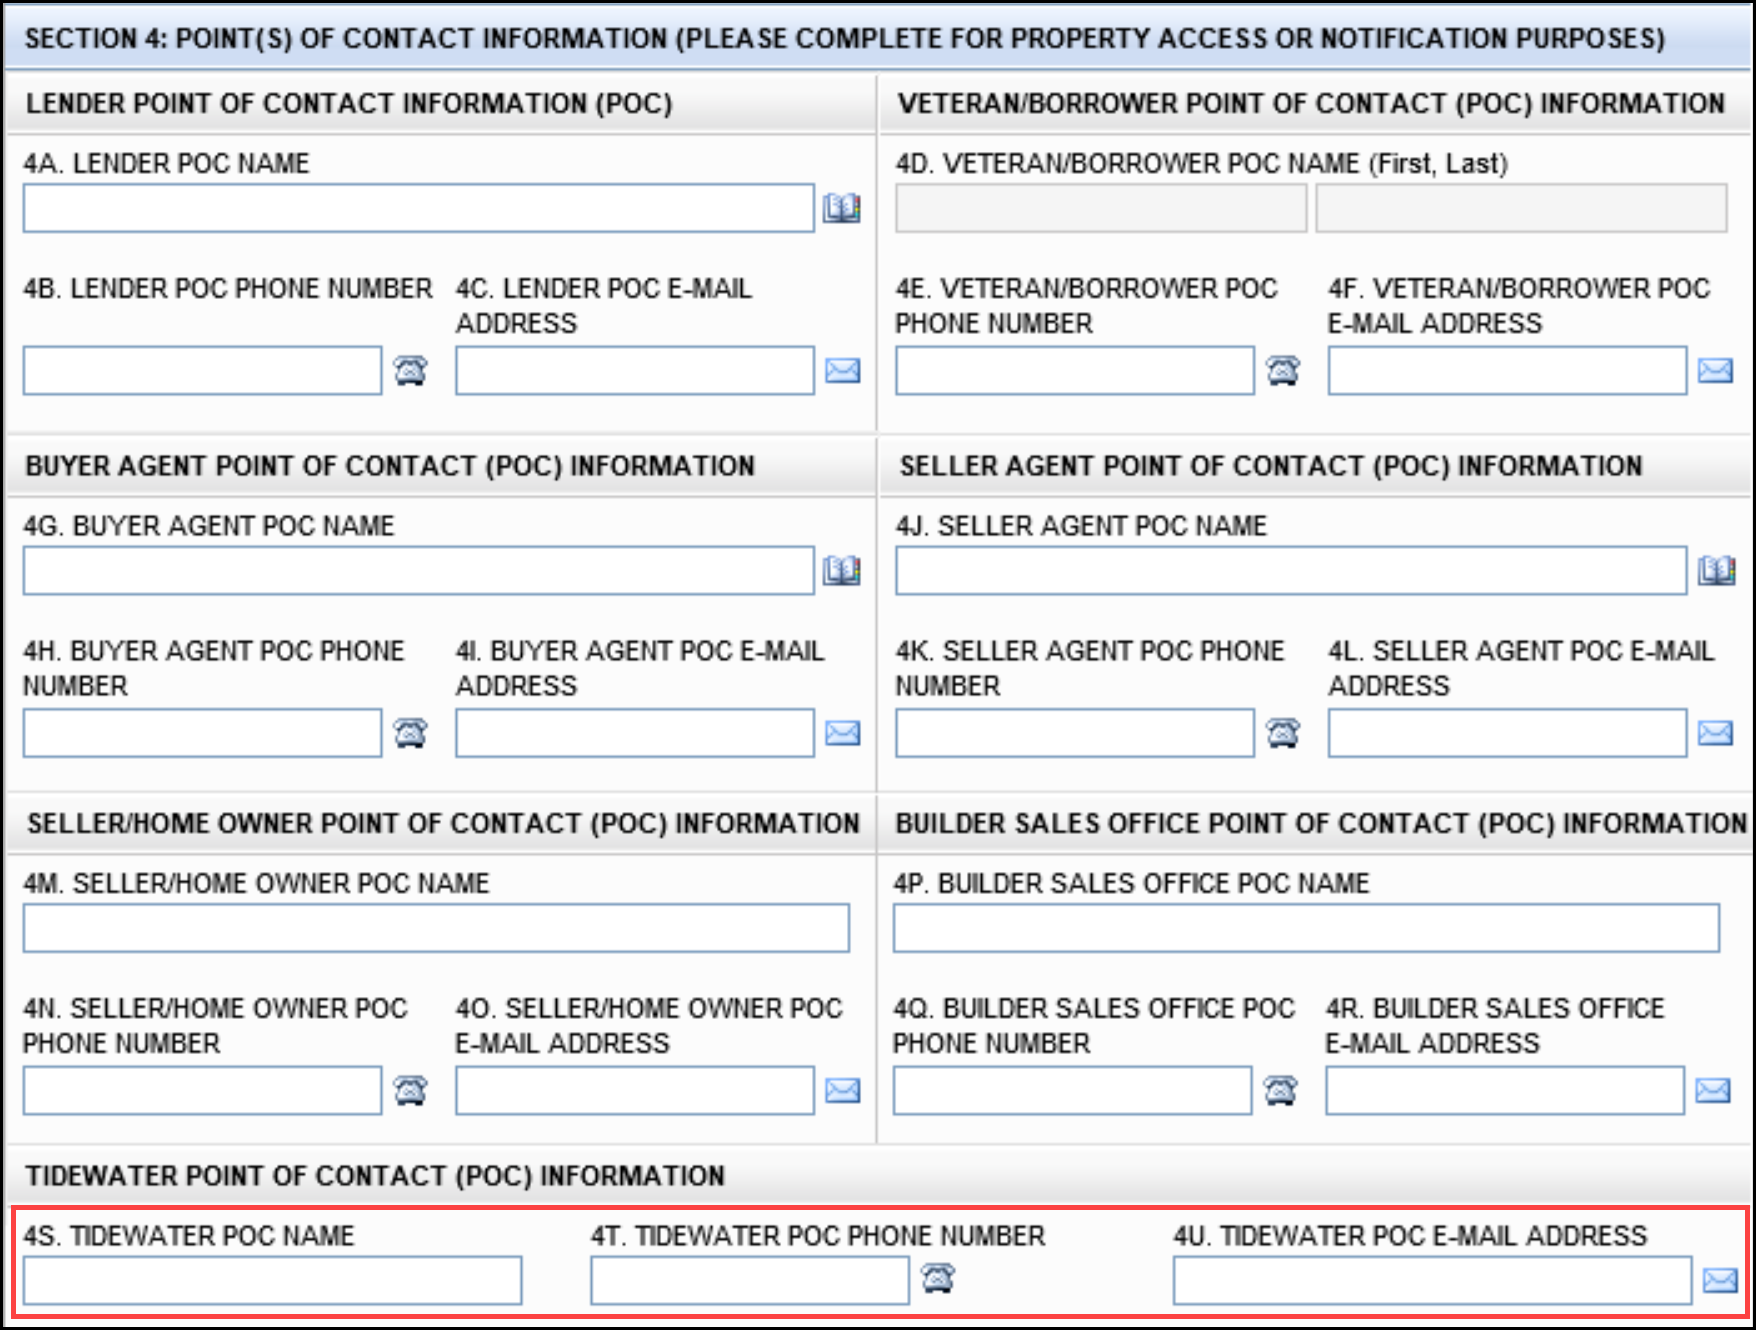
New fields in section 4:
-
4S. TIDEWATER POC NAME (field ID 4872)
-
4T. TIDEWATER POC PHONE NUMBER (INCLUDE AREA CODE) (field ID 4873)
-
4U. TIDEWATER POC E-MAIL ADDRESS (field ID 4874)
Section 5
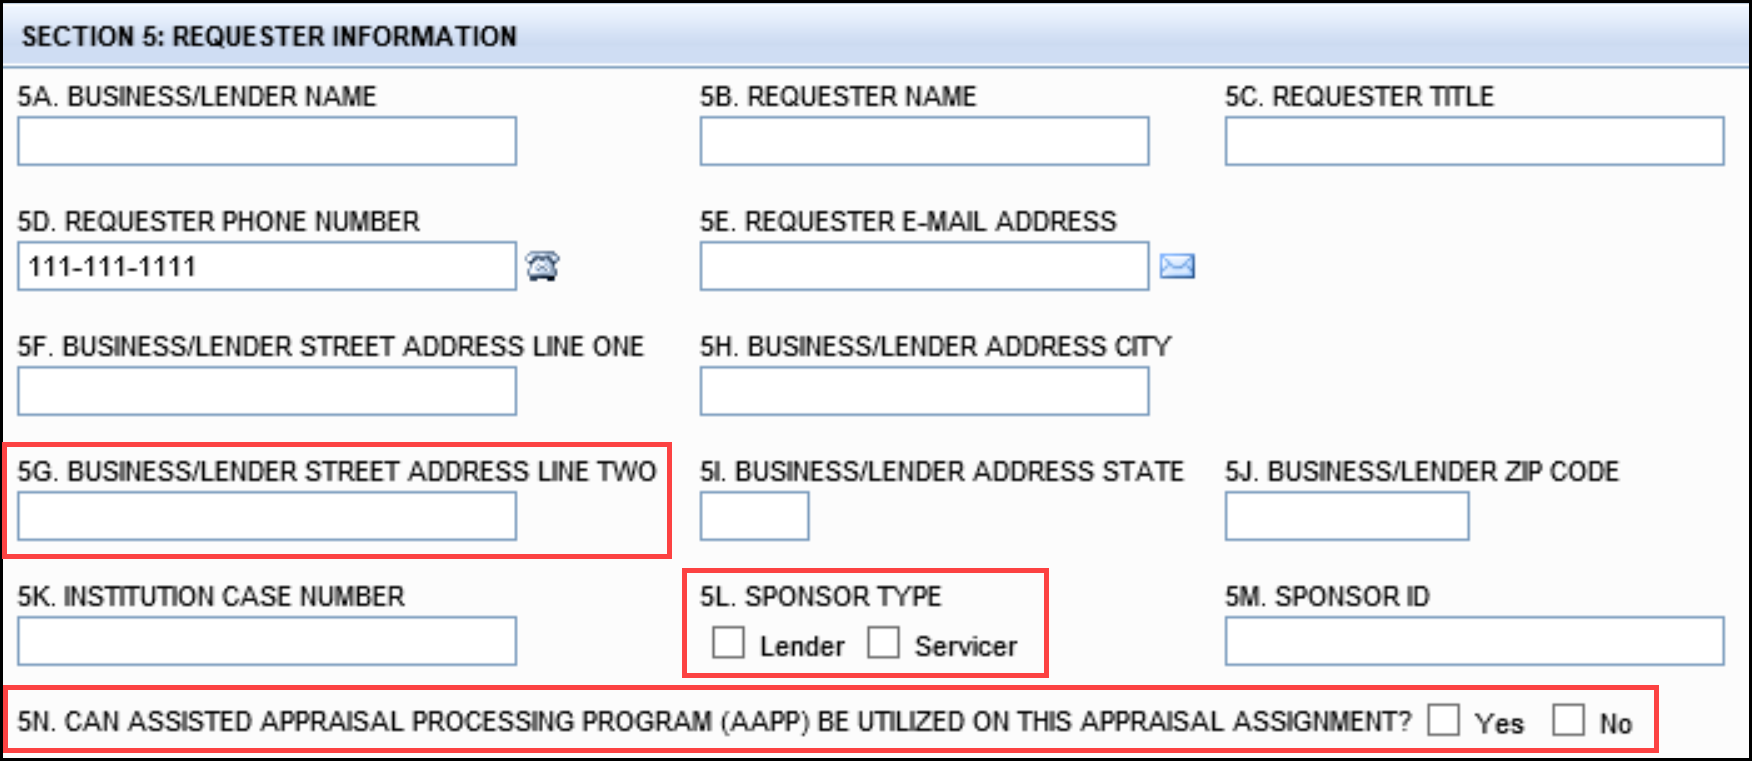
New fields in section 5:
-
5G. BUSINESS/LENDER STREET ADDRESS LINE TWO (field ID 4875).
-
5L. SPONSOR TYPE (field ID 4876) - Lender and Servicer check boxes.
-
5N. CAN ASSISTED APPRAISAL PROCESSING PROGRAM (AAPP) BE UTILIZED ON THIS APPRAISAL ASSIGNMENT? (field ID 4877) - Yes and No check boxes.
Section 6

New fields in section 6:
-
6D. VETERAN ADDRESS LINE TWO (field ID 4859)
Certification for Submission to VA Section

Migration
For loans created prior to upgrading to Encompass 23.1, data is not automatically populated to new fields. Users need to manually enter data in the fields as needed.
CBIZ-47944
(Updated on 3/16/2023)
A new section for Verification Information has been added below the Credit Information Section on the Borrower Summary - Origination input form.

This section includes the following four new borrower-level fields to indicate whether the borrower and co-borrower on loans submitted via Encompass Consumer Connect have authorized the Verification of Employment form (VOE) and to record the authorization date:
-
Authorized VOE check box for the borrower (field ID 4894)
-
Authorized VOE check box for the co-borrower (field ID 4895)
-
Date Authorized for the borrower (field ID 4896)
-
Date Authorized for the co-borrower (field ID 4897)
The following logic is used for these fields:
-
When a borrower or co-borrower is removed, the borrower or co-borrower fields are cleared.
-
When the Manage Borrowers window is used to swap a borrower and co-borrower, their check box and Authorization Date selections are also swapped.
-
When duplicating a loan, the fields are cleared in the new loan.
CBIZ-46234
For loans using the 2015 Itemization input form, the following updates have been implemented on the input forms listed below to clearly identify all transfer tax line items.

2015 Itemization - line items 1204 and 1205
The labels for line items 1204 and 1205 have both been changed to Transfer Tax.
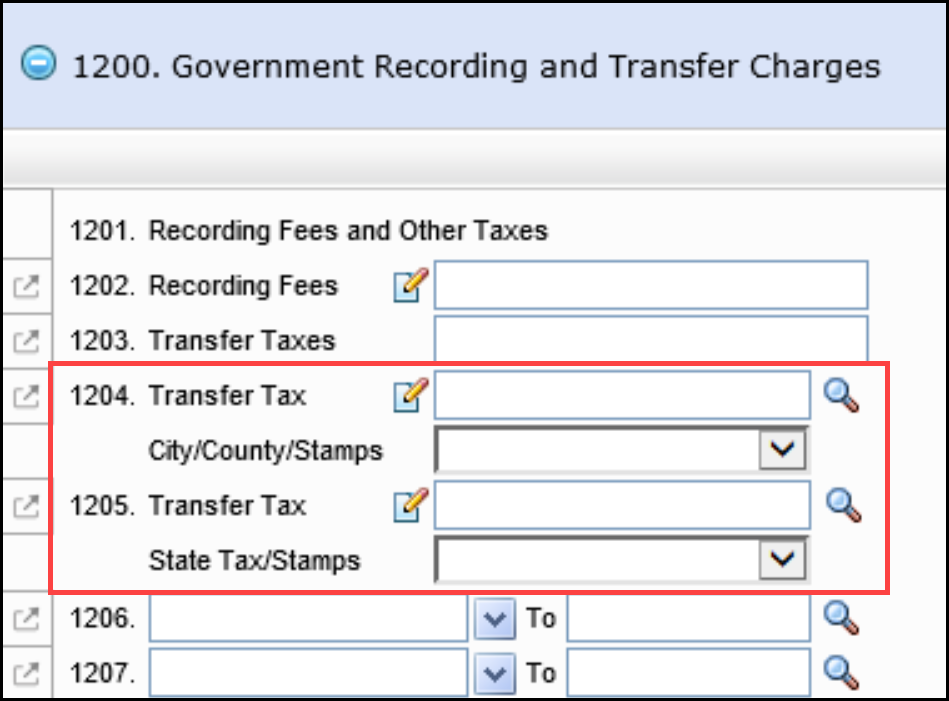
New lines with drop-down lists have been added below line items 1204 and 1205:
-
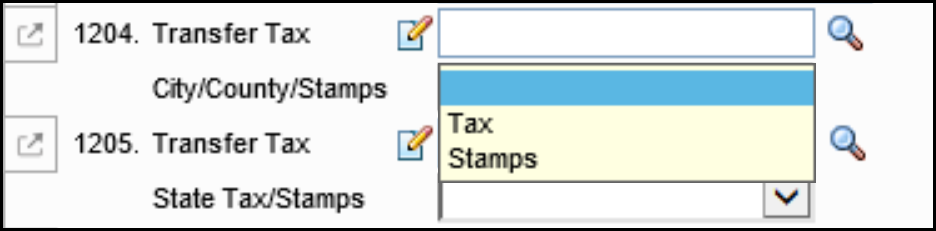
The drop-down list for line 1204 is labeled City/County/Stamps.
-
The drop-down list for line 1205 is labeled State Tax/Stamps.
-
Three options are available on each of the drop-down lists: Taxes, Stamps, and a blank value. The fields are populated with a blank value by default.
When a user switches from the 2015 to the 2010 version of the itemization form, data is cleared from the two drop-down lists. If the loan is then switched back to the 2015 version, the data in the drop-down is not retained.
Loan Estimate Page 2 and Closing Disclosure Page 2
The Loan Estimate Page 2 and Closing Disclosure Page 2 reflect the selections made in the new drop-down lists.

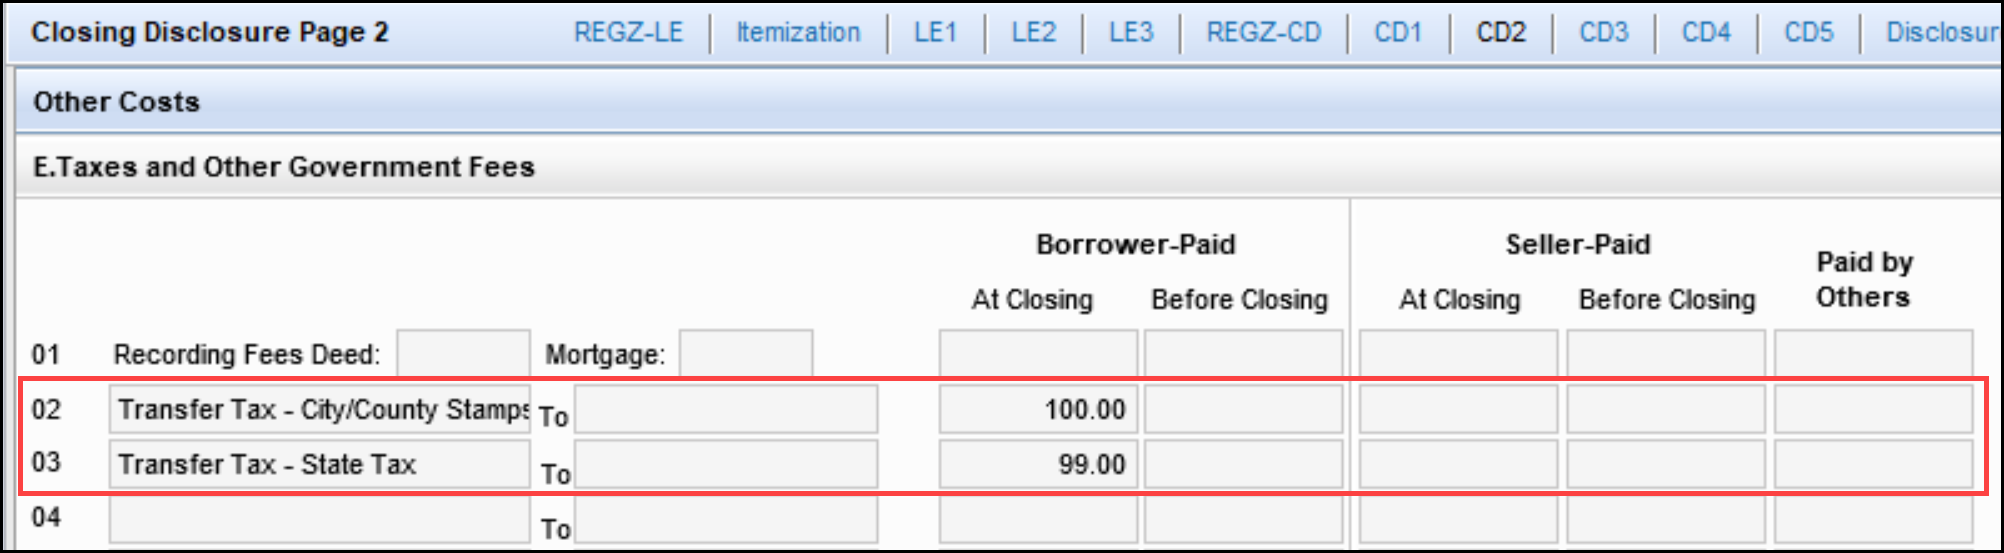
The new fee labels also display on the relevant output forms.
CBIZ-35245
Lenders now can waive escrow for mortgage insurance payments for a loan. Previously mortgage insurance payments were always escrowed by default and could not be waived.
To support this update, changes have been made to the escrow workflow and a new Escrowed check box has been added to the following input forms:
-
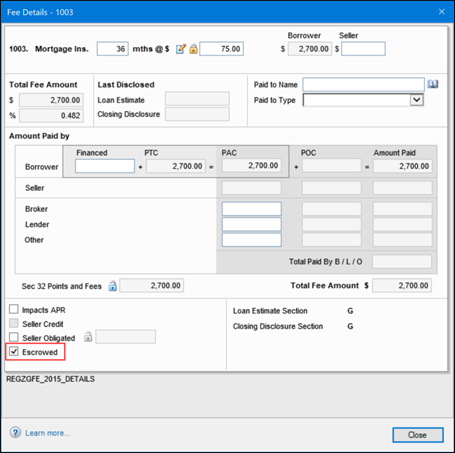
2015 Itemization - In the Fee Details pop-up window for line 1003
-
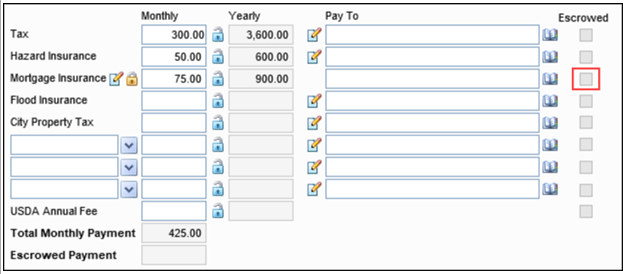
Aggregate Escrow Account
-
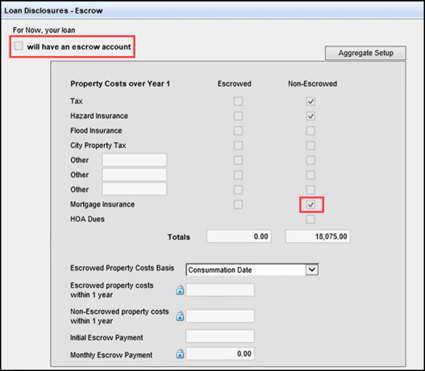
Closing Disclosure Page 4
IMPORTANT: Please coordinate with your business, legal, and compliance experts to determine whether you want to limit your users’ ability to waive mortgage insurance escrows. Your Encompass administrator can create business rules to limit access to the Escrowed check box if needed.
A new Escrowed check box (field ID NEWHUD2.X4769) has been added to the Fee Details pop-up window for line 1003 on the 2015 Itemization input form. When mortgage insurance (field ID 232) is entered on line 1003, the Escrowed check box on the pop-up window is selected by default. Users must clear the check box to waive escrow for the mortgage insurance.
When the Escrowed check box is cleared on the Fee Details window, the Escrowed check box for mortgage insurance (field ID NEWHUD2.X1728) is cleared on the Aggregate Escrow Account input form.
A new Mortgage Insurance row with Escrowed and Non-Escrowed check boxes (field ID NEWHUD2.X1728) has been added to the Closing Disclosure Page 4. When the Escrowed check box is cleared on the Fee Details window, the Non-Escrowed check box for mortgage insurance is selected on the Closing Disclosure Page 4. If there are no additional escrows for the loan, the will have an escrow account check box (field ID CD4.X9) is also cleared and disabled.
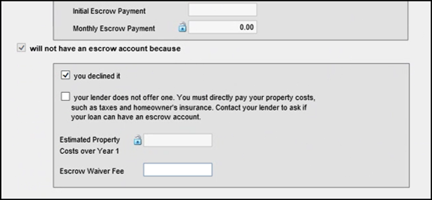
When the Escrowed check box is cleared on the Fee Details window and there are no other escrowed payments, the will not have an escrow account because check box (field ID CD4.X9) is selected on the Closing Disclosure Page 4 and users can edit the fields that display below the check box.
If a user completes the Aggregate Escrow Setup form later, and adds one or more escrow items:
-
The will not have an escrow account because check box on the Closing Disclosure Page 4 is cleared, and the fields in the section below the check box are cleared and disabled.
-
The will have an escrow account check box on the Closing Disclosure Page 4 is selected, and the fields in the section below the check box are updated based on the new entries in the Aggregate Escrow Setup form.
-
The Escrowed check boxes in the Fee Details windows on the 2015 Itemization input form are updated and disabled to prevent users from changing the selections made in the Aggregate Escrow Setup entries.
Migration
For existing loans that have already had aggregate setup run prior to updating to Encompass 23.1, Encompass will perform a one-time migration to populate the correct selection for the new Escrowed checkbox (field ID NEWHUD2.X4769) on the Fee Details pop-up window for line 1003 on the 2015 Itemization input form.
CBIZ-49377
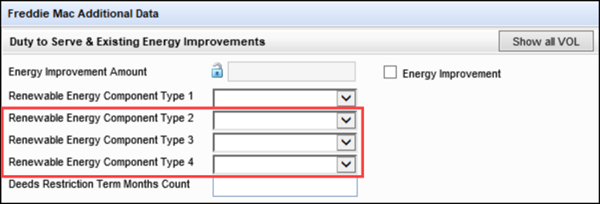
To increase the number of product selections and attributes that can be sent to Freddie Mac, the Renewable Energy Component Type drop-down list (field ID CASASRN.X207) in the Duty to Serve & Existing Energy Improvements section on the Freddie Mac Additional Data input form has been renamed Renewable Energy Component Type 1 and the following three new fields have been added below the existing field:
-
Renewable Energy Component Type 2 (field ID CASASRN.X214)
-
Renewable Energy Component Type 3 (field ID CASASRN.X215)
-
Renewable Energy Component Type 4 (field ID CASASRN.X216)
CBIZ-49007
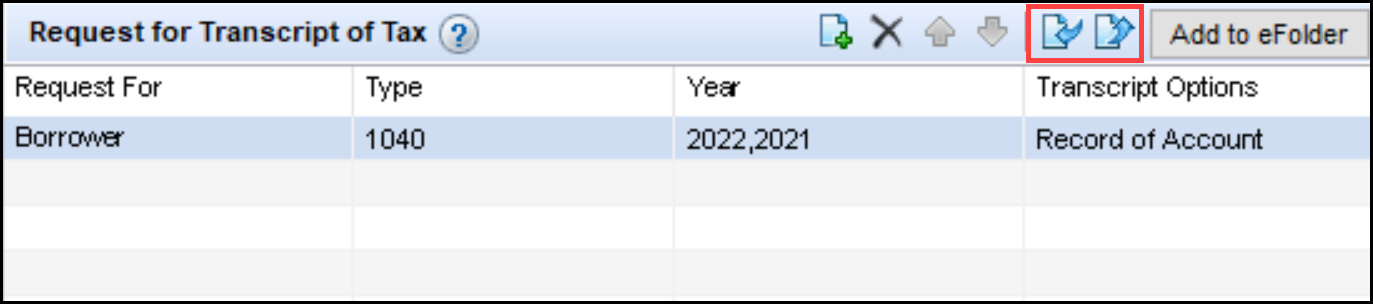
The icons for copying data to and from the Request for Transcript Tax input form now copy data for all relevant fields, including the new fields that were added with the Encompass 22.3 Major Release. Previously the copy function was not moving data for the new fields between the forms.
CBIZ-49074
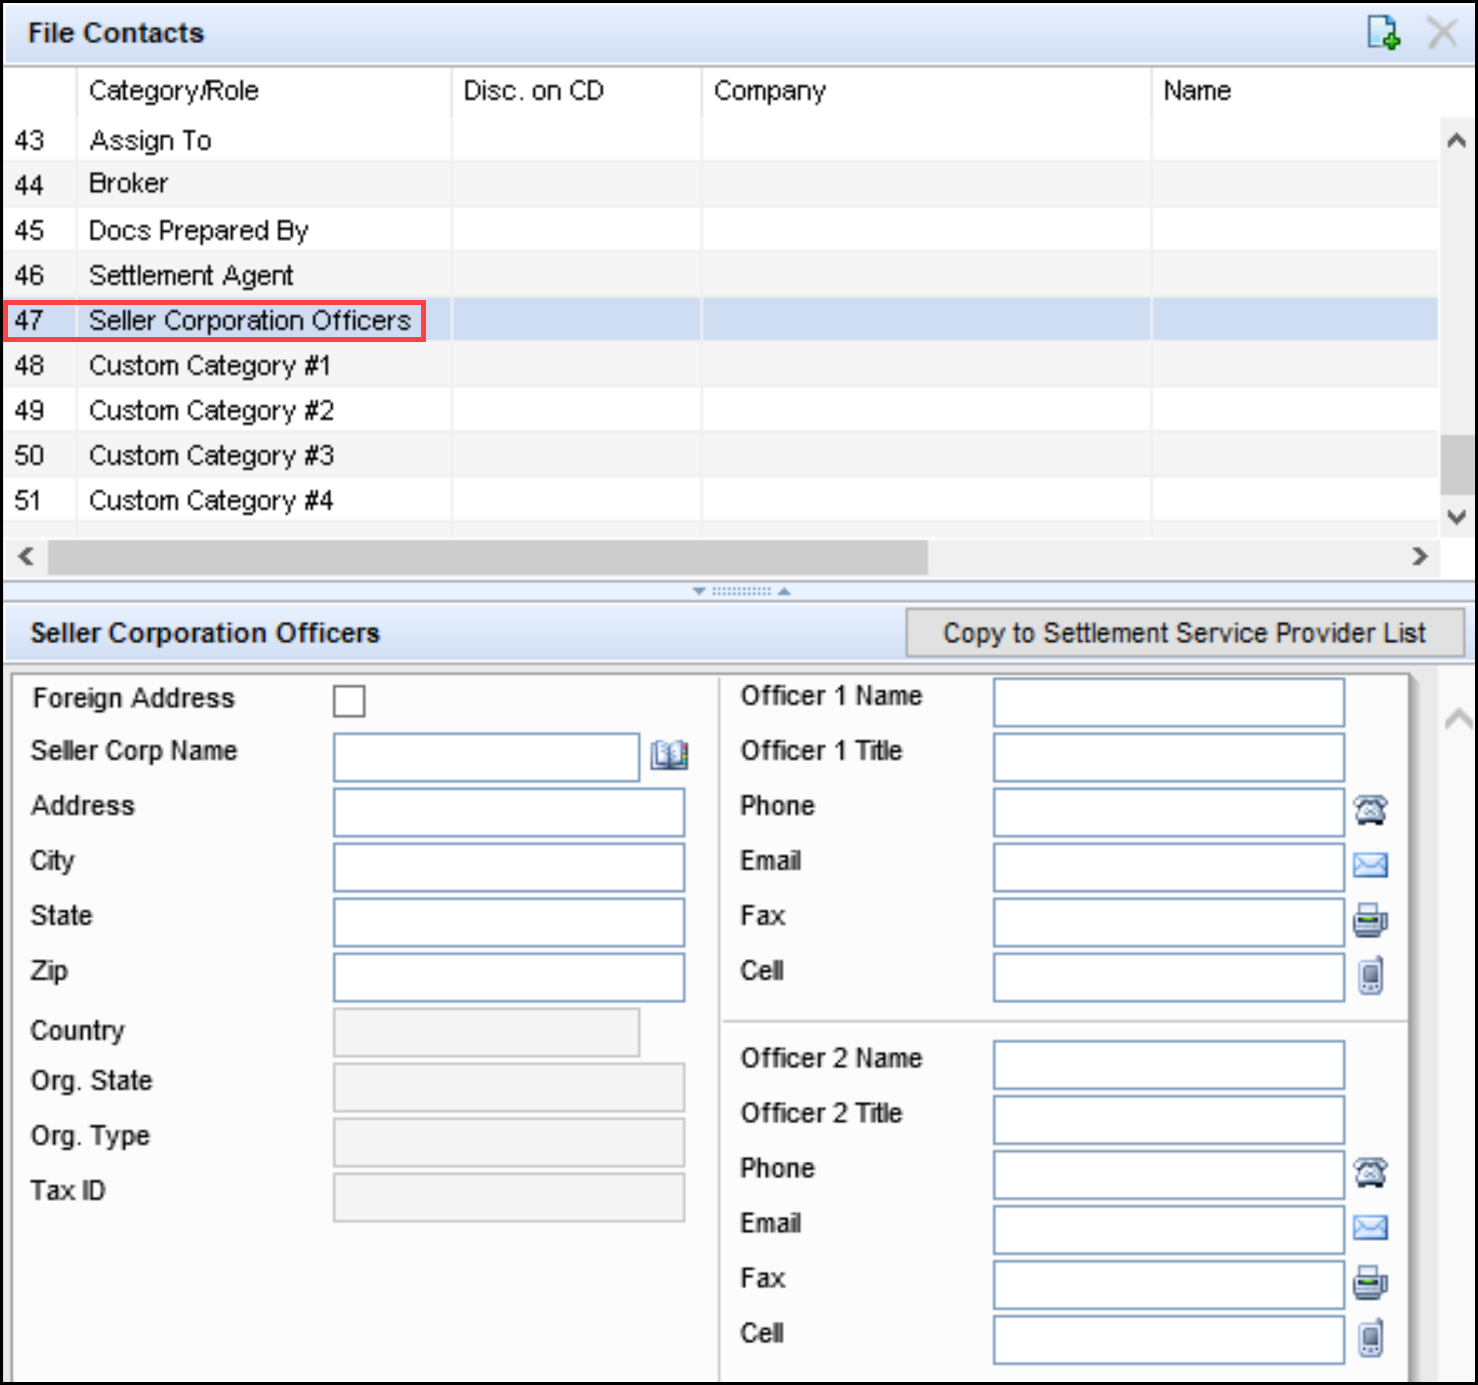
A new Seller corporation Officers category has been added to the File Contacts tool to enable an Encompass user who is ordering an eClose Package with a Seller Corporation Officer to enter contact information for the officer and eliminate the need to manually enter the officer’s email address during the order process.
Select the Seller Corporation Officers option in the table at the top of the tool. The contact information at the bottom of the screen is divided into three sections. Use the column on the left to enter information for the corporation. Use the sections on the right to enter the name, title, and contact information for up to two officers.
CBIZ-37049
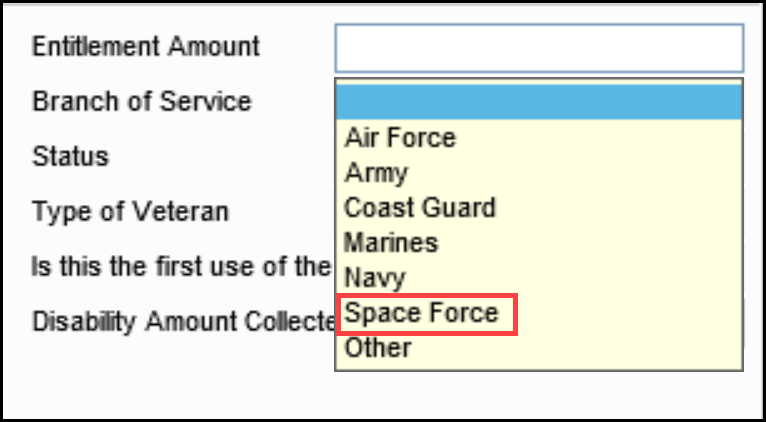
A new option for Space Force has been added to the Branch of Service drop-down list (field ID 954) on the VA 26-0286 Loan Summary and the VA Management input forms.
CBIZ-47198
On Rep & Warrant Tracker Tool, in the Rep and Warrant status section, a new ACE+ PDR Offered row has been added to the Freddie Mac table.
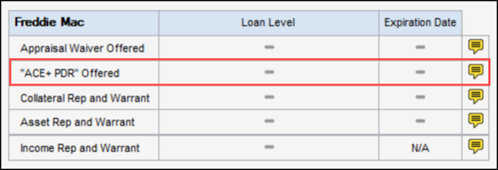
The new row includes the following three new fields:
-
"ACE+ PDR" Offered Loan Level (field ID TQL.X243)
-
"ACE+ PDR" Offered Expiration Date (field ID TQL.X244)
-
"ACE+ PDR" Offered Comments (field ID TQL.X242)
CBIZ-15879
When opening the Workflow Tasks tool from the Tools tab, the tool now opens in the loan workspace panel (as the majority of Encompass tools do). In earlier versions of Encompass, the tool opened in a pop-up window.
NICE-42282
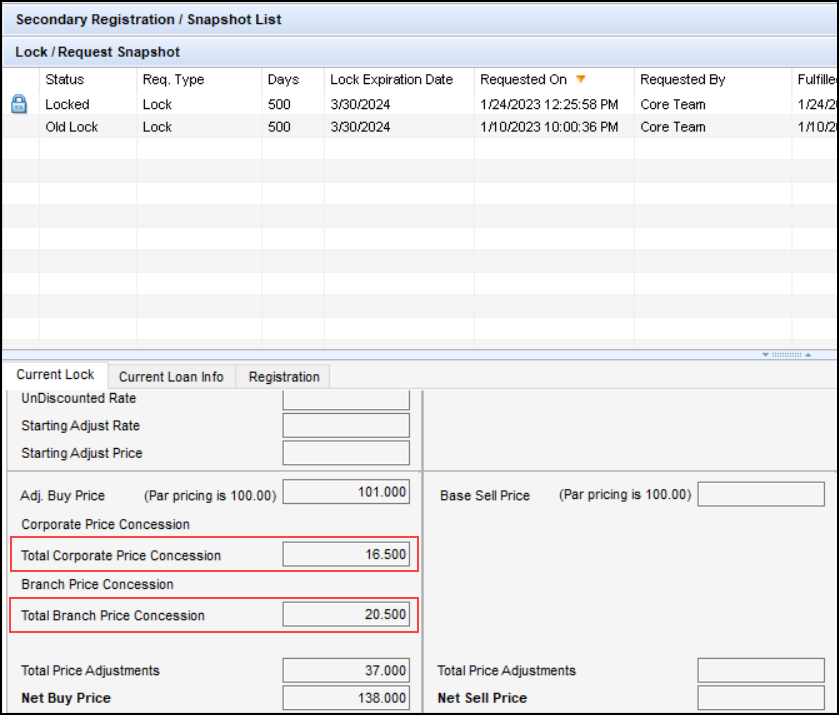
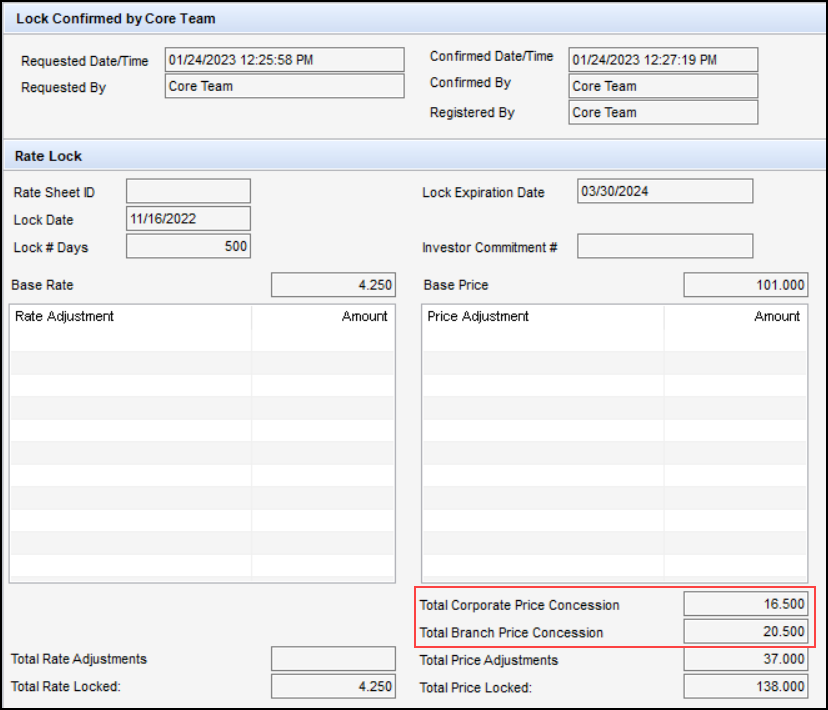
To enable users to easily determine the total corporate price concession and the total branch price concession amounts, a new Total Corporate Price Concession (field ID 4858) field and a new Total Branch Price Concession (field ID 4857) field have been added to the Current Lock tab on the Secondary Registration tool and the Lock Confirmation screen.
The Total Corporate Price Concession field is the total of the five Corporate Price Concession fields on the Secondary Lock Tool while the Total Branch Price Concession field is the total of the five Branch Price Concession fields.
Current Lock tab on the Secondary Lock Tool
Lock Confirmation Screen
(Added on 3/9/2023)
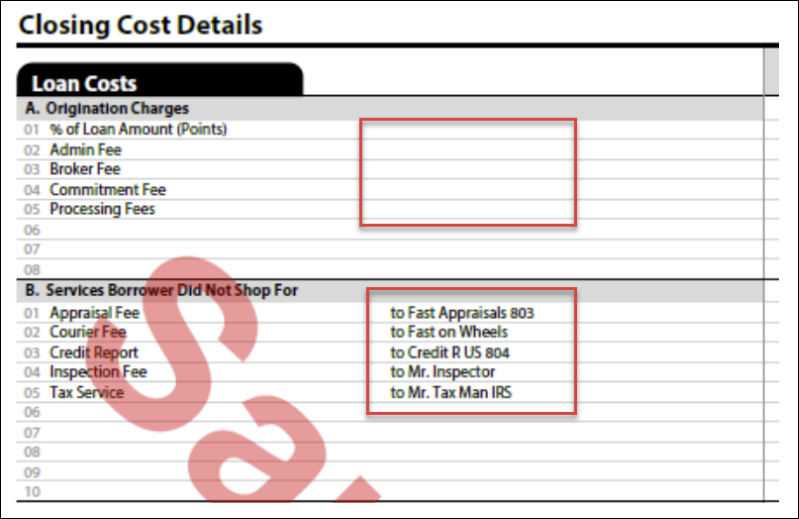
In accordance with §1026.38z(f)(1) which requires creditors to disclose the compensation to a third-party loan originator (broker) along with the name of the loan originator company ultimately receiving the payment, the Standard, Alternate, and Pro-forma versions (GTRIDCDWS_S, GTRIDCDWS_SPF, GTRIDCDNS_S, AND GTRIDCDNS_SPF) of the Closing Disclosure (CD) printed output form have been updated. With this update, the name of the broker company receiving a payment from the lender will be printed in Loan Costs - Section A of the output form. When an item in the Loan Costs - Section A of the CD Page 2 input form is marked as paid to a broker by the lender, a Paid to label followed by the broker company name will print to the right of the fee name in Section A of the CD output form. The name of the broker company will display in the area shown below (red box) when applicable, similar to the way names of the service providers are printed in Section B.)
Previously, the name of the broker company only displayed in Section A of the output form when a broker compensation value was entered on line 801(f) of the 2015 Itemization input form.
Starting on March 18, 2023 when this updated version of the printed output form is introduced, the new output form will be available in all versions of Encompass (including 23.1 and earlier and later versions).
VA Loans
The VA Discount Charge Violation alert now displays for VA loans only when the following conditions are true:
-
VA is selected for the Loan Type (field ID 1172).
-
The % Discount (field ID VARRRWS.X9) is greater than 2.
-
IRRRL (streamline Refi) is selected from the Loan Code drop-down list (field ID 958).
Previously, the alert would also display for non-IRRRL VA loans that exceeded the 2% discount amount
CBIZ-46090
HELOC Loans
(Updated on 3/9/2023)
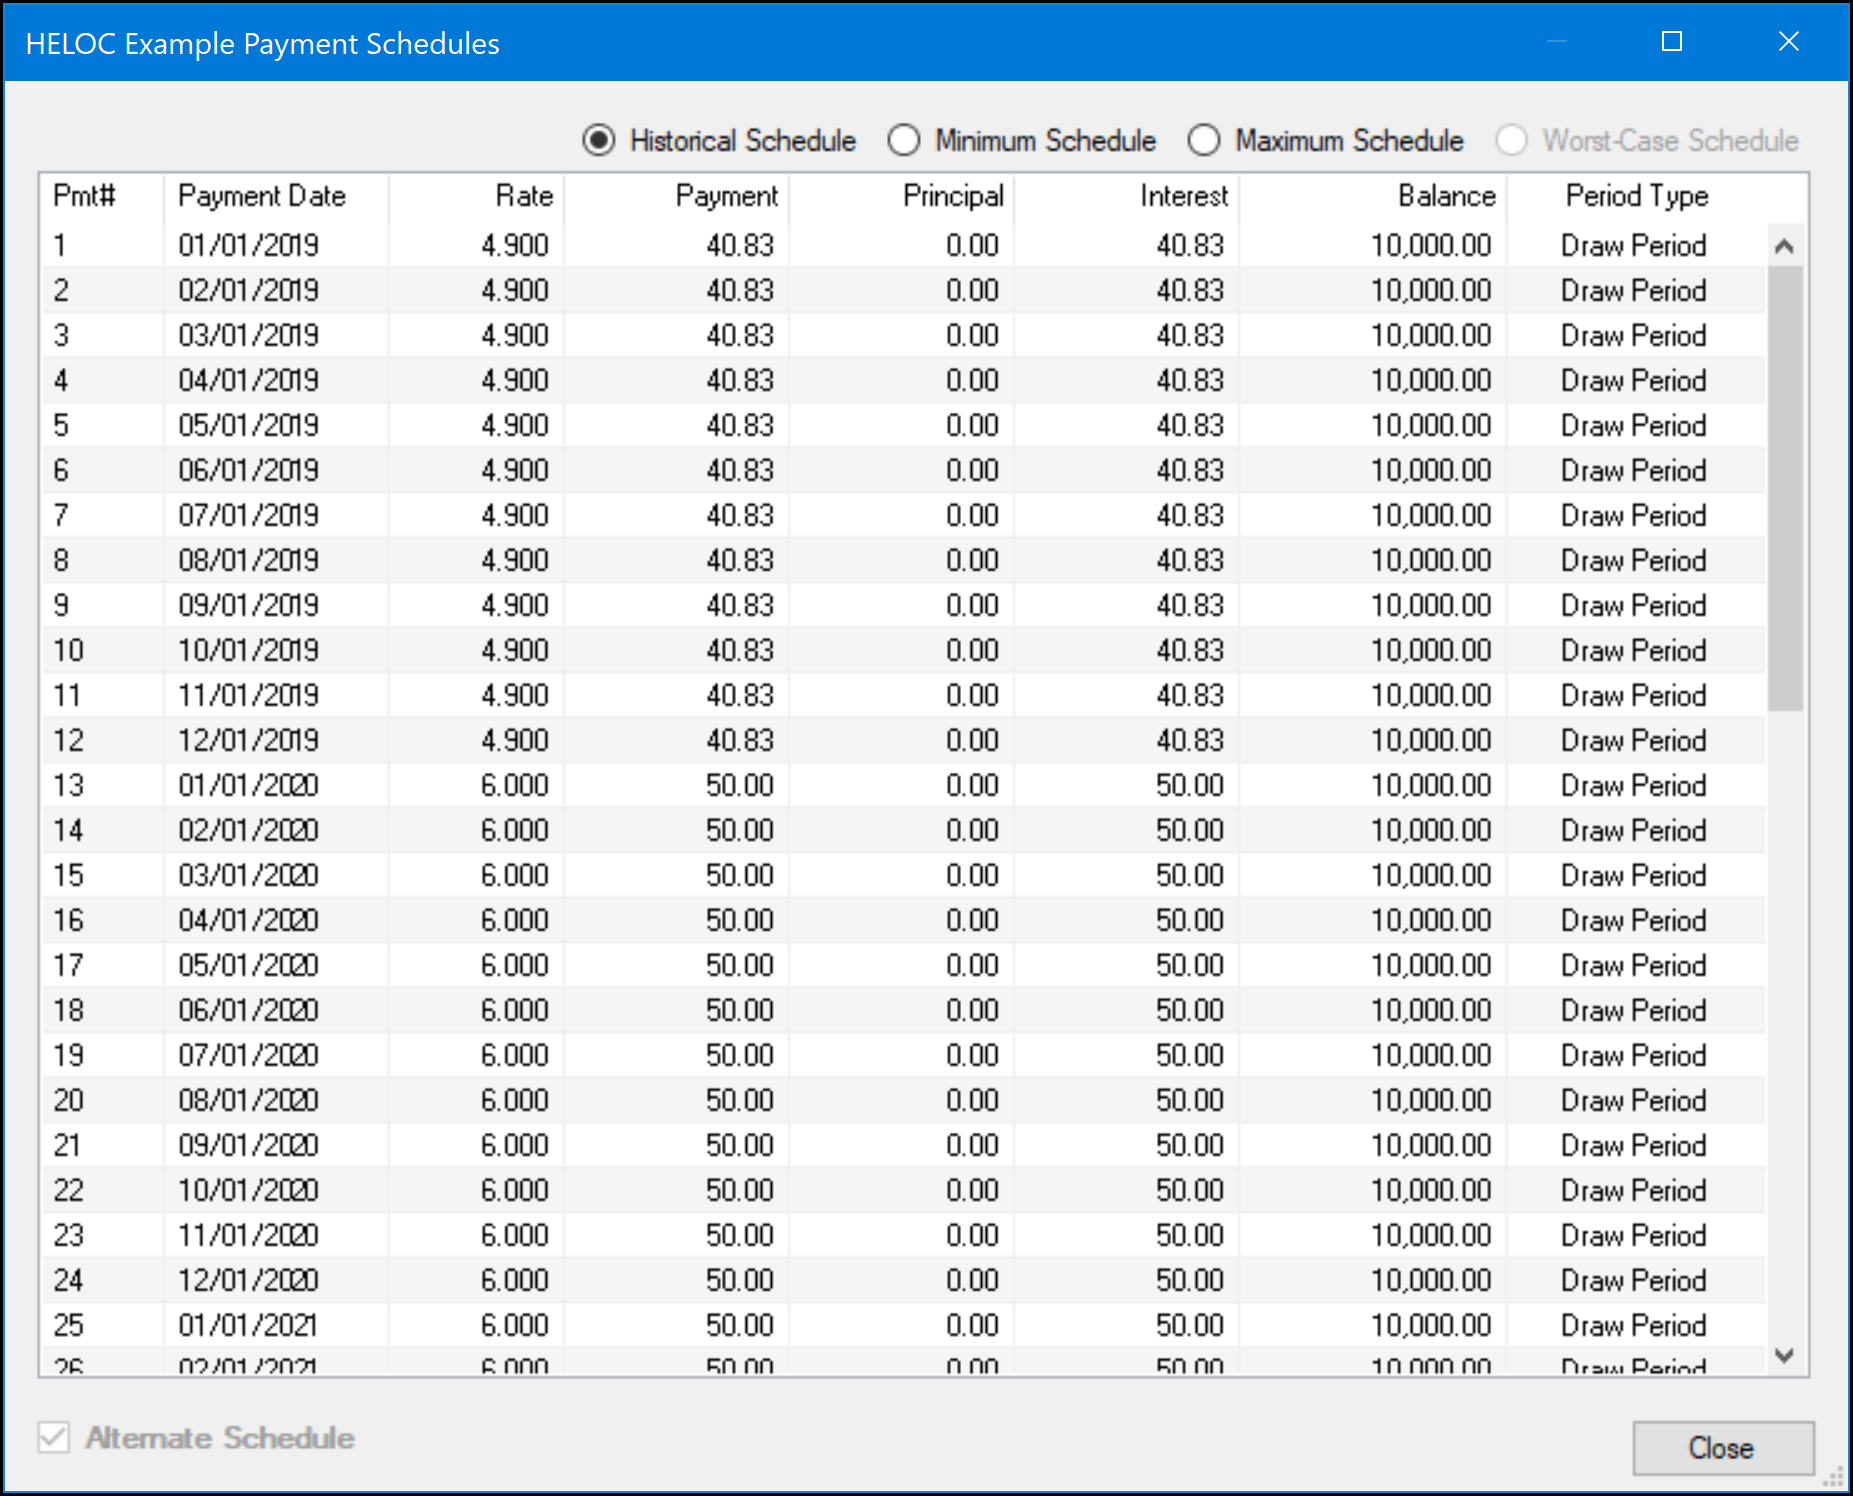
Updates have been made to the Minimum Payment Schedule and Worst-Case Payment Schedule calculations for adjustable rate HELOCs to ensure that the rate does not drop lower than the ARM Floor (field ID 1699) or go higher than the Max Allowable APR (field ID 1893).
The schedules are accessible from the HELOC Management input form by clicking the View Example Schedules button to open the HELOC Example Payment Schedules pop-up window.
For the Minimum Payment Schedule, the calculation will add in consideration of both the ARM Floor and Max Allowable APR, and the result will be as follows:
-
Should the Rate from the Historical Schedule’s most current year (e.g., 2023) be lower than the ARM Floor, the rate used for the Minimum Payment Schedule will equal the ARM Floor.
-
Should the Rate from the Historical Schedule’s most current year (e.g., 2023) be higher than the Max Allowable APR, the rate used Minimum Payment Schedule will equal the Max Allowable APR.
For the Worst-Case Payment Schedule, the calculation will add in consideration of both the ARM Floor and Max Allowable APR, and the result will be as follows:
-
Should the sum of the Margin + Index (field ID 1827) be lower than the ARM Floor, the rate used will equal the ARM Floor.
-
Should the sum of the Margin + Index (field ID 1827) be higher than the Max Allowable APR, the rate used will equal the Max Allowable APR.
The Worst-Case Payment Schedule is currently calculated only when the Property State (field ID 14) = FL.
CBIZ-42368
A new option for an alternate HELOC historical schedule has been added to the HELOC Table setting in Encompass to enable lenders to select which of the following versions of the historical schedule to use with HELOC loans that are less than 15 years:
-
Default schedule - This version prints the padding years at end of table. It is the method used by the Consumer Financial Protection Bureau (CFPB).
-
Alternate schedule - This version prints the padding years at the beginning of table. It is the method used by the Office of the Controller of the Currency (OCC)
A new Use Alternate Schedule check box has been added to the Edit HELOC Historical Index Table pop- window. This window displays when creating or editing a dynamic HELOC table in the HELOC Table settings (Encompass > Settings > Tables and Fees > HELOC Table). An administrator selects the new check box to apply the alternate historical schedule to your company’s HELOC loans.
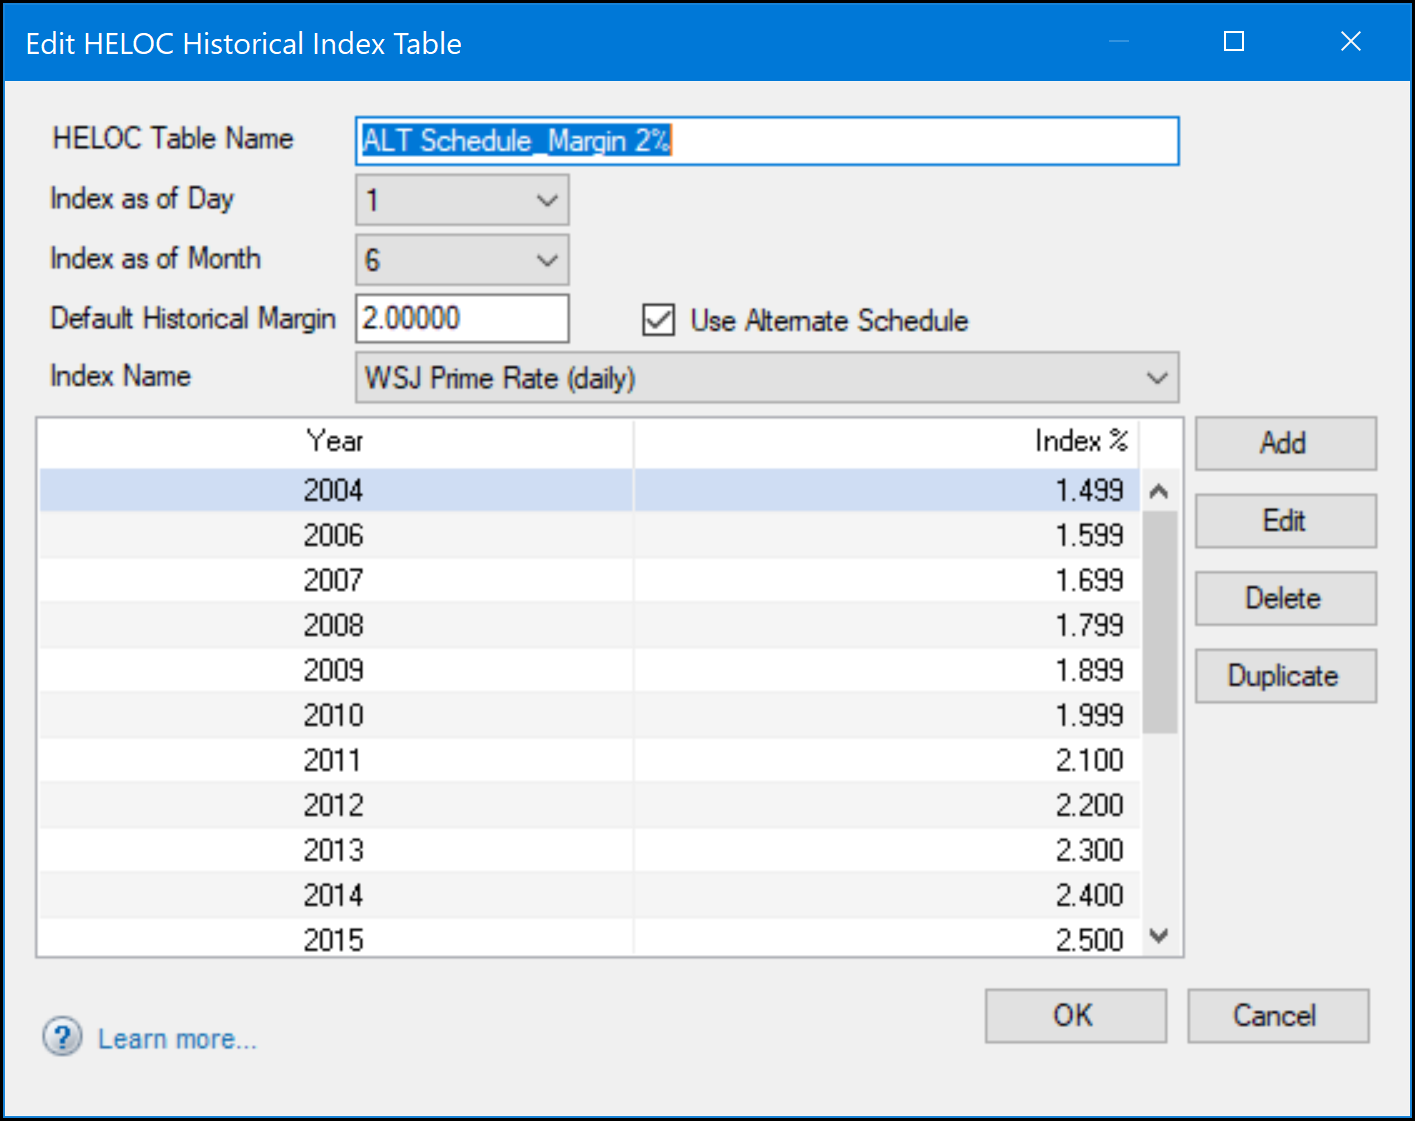
When a user clicks the View Example Schedules button on the HELOC Management input form, the Alternate Schedule check box displays at the bottom of the HELOC Example Payment Schedules window. This check box displays only when the Historical Schedule radio button is selected at the top of the window.
Migration
For loans created prior to updating to Encompass 23.1, when the Historical Schedule radio button is selected, the new Use Alternate Schedule check box displays on all HELOC defined tables with the check box cleared.
CBIZ-48414
Construction Loans
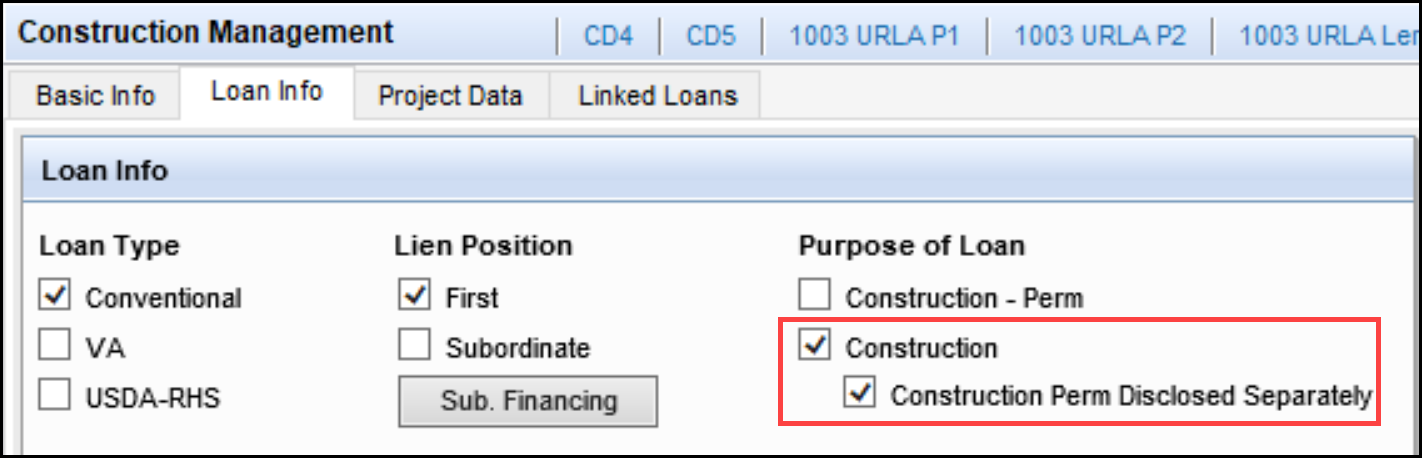
When creating a construction-only loan and then creating a linked construction-permanent loan, the permanent financing loan is no longer treated as a subordinate loan for the construction-only loan. This scenario occurs when the Construction check box (field ID 19) and Construction Perm Disclosed Separately (field ID 4084) check boxes are selected on the Loan Info tab on the Construction Management input form, and the clicking the New Perm button on the Linked Loans tab.
Loan Info Tab
Linked Loans Tab
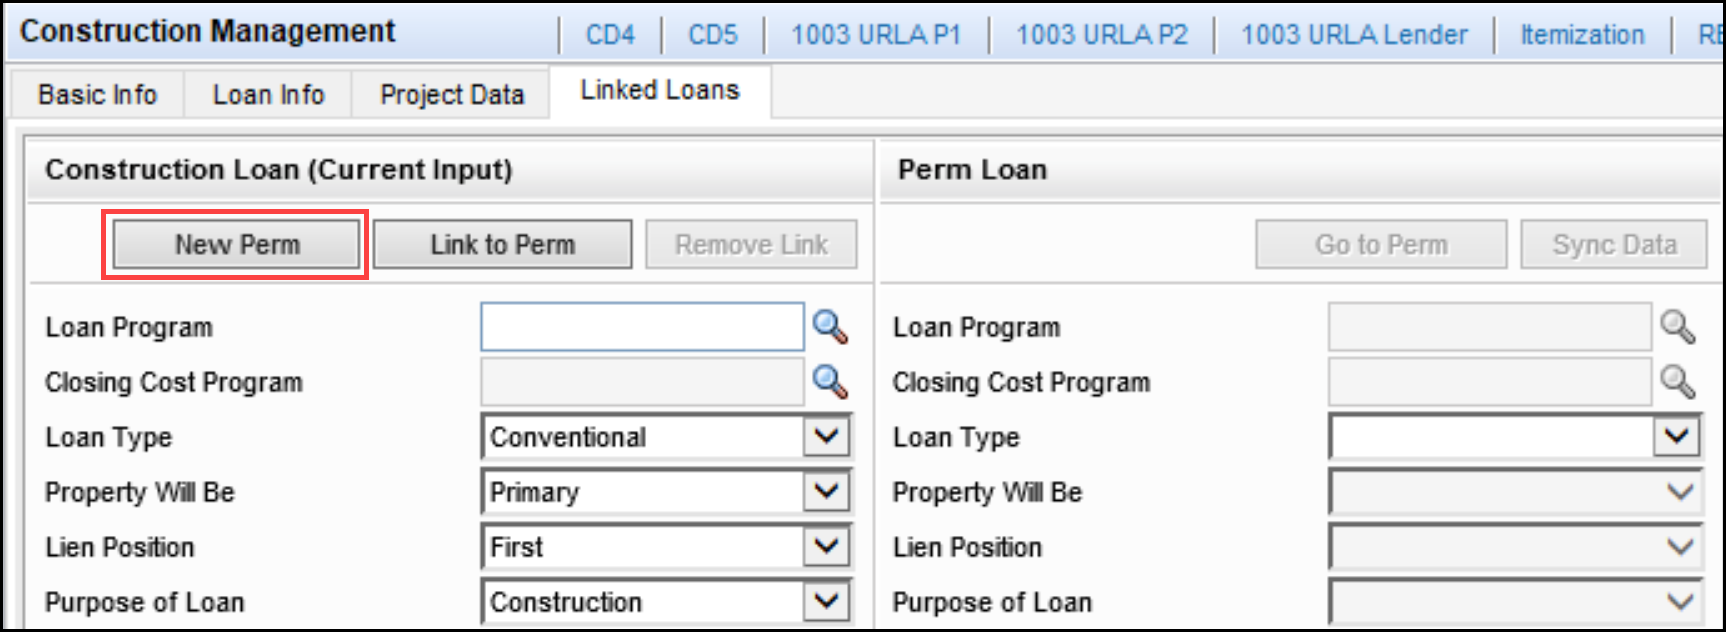
Previously, the loan created using the New Perm button was created as a subordinate loan, a new VOAL (Verification of Additional Loans) record was created for the permanent financing loan, and the loan amount for the permanent financing loan was the difference between the purchase price and the construction loan amount.
With the Encompass 23.1 release, the permanent financing loan is no longer created as a subordinate loan, the no new VOAL is created for the permanent financing loan, and the permanent financing loan amount now equals the construction-only loan amount.
This update impacts the Sub Fin Additional Mtgs (field ID 1732) and the following fields on the Subordinate Mortgage Loan Amounts pop-up window (accessed via the Sub Financing button on forms such as the RegZ-LE and RegZ-CD):
-
Total Additional Loans Amount (field ID URLA.X229)
-
Total Applied to Down Payment (field ID URLA.X230)
-
Closed End Subordinate Mortgage Total (field ID 427)
-
Closed End Subordinate Mortgage Total (field ID 428)
-
Total Open End (HELOC) Draw Amount (field ID CASASRN.X167)
-
Total Open End (HELOC) Credit Limit (field ID CASASRN.X168)
Additionally, when a construction-only or construction-to-perm loan is linked with another new loan, the following fields will be synchronized after linking:
-
Purchase Price (field ID 136)
-
Down Payment % (field ID 1771)
-
Down Payment amount (field ID 1335)
-
Loan Amount (field ID 1109)
These fields are not synchronized when a construction-only or construction-to-perm loan is linked with another existing loan. This won't impact the regular piggyback loans.
CBIZ-44025
ATR/QM
When the Use Price-Based General QM check box (field ID QM.X383) is selected on the Qualification tab on the ATR/QM Management input form, the QM Annual Percentage Rate (field ID QM.X381) is now calculating correctly when other general QM tests fail, for example, the Interest Only (field ID QM.X42) or Points and Fees (field ID QM.X46) tests. The QM Annual Percentage Rate is now calculated before the other tests are run to enable the GM APR tests to be run for non-QM loans that are ARM loans but not government or construction loans, for example interest-only, negative amortization, investment property, or balloon loans.
CBIZ-47507
An update has been made to enable the Price-Based General QM Price Limit test calculation comparing the QM APR and APOR to run on loans with a Loan Type (field ID 1172) of Other and to display the results on the Eligibility tab of the ATR/QM Management input form. Previously, the test would run only for loans with a Loan Type of Conventional.
The General QM Price Limit test calculation evaluation still does not run for loans with a Loan type of FHA, VA, or USDA.
Migration
This update does not apply to loans created prior to updating to Encompass 23.1.
CBIZ-47781
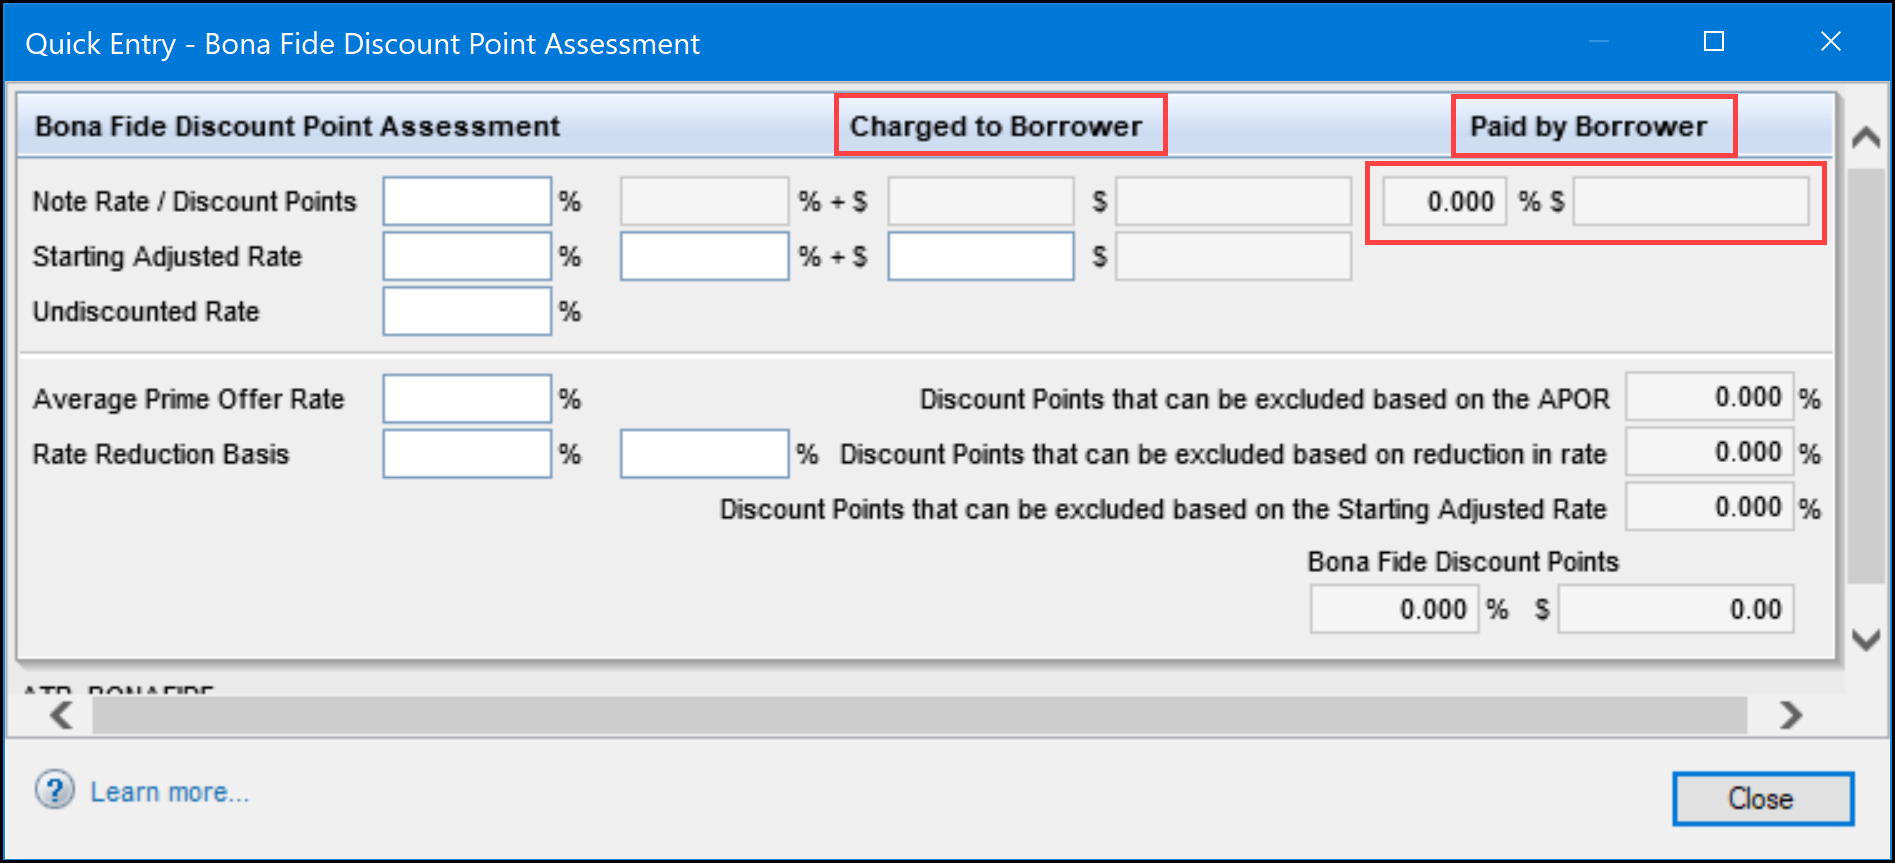
Updates have been made to address a discrepancy between the calculation used to determine Bona Fide Discount Points in Encompass loan files and the calculation used for Bona Fide Discount Points in the Encompass Compliance Service when a portion of the discount points is paid by someone other than the borrower. Previously, Encompass used the entire amount of the discount points, regardless of who paid the fees, whereas the Encompass Compliance Service used only the borrowers-paid portion. To match the calculation used by the Encompass Compliance Service, Encompass now includes only borrower-paid discount points in the calculation.
The following updates have been made to the Quick Entry - Bona fide Discount Points Assessment pop-up window in Encompass to support the calculation change. The pop-up window is assessed by clicking the Discount Points button on the Qualification tab on the ATR/QM Management input form.
-
In the header at the top of the pop-up window:
-
The Borrower heading has been renamed Charged to Borrower.
-
A new Paid by Borrower heading has been added.
-
-
A new three-decimal % field (field ID NEWHUD.X1727) has been added to the Note Rate / Discount Points row below the Paid by Borrower heading to capture the discount points % paid by the borrower. The percentage is calculated as the dollar amount paid by the borrower (field ID NEWHUD2.X937), divided by the loan amount (field ID 2), and then multiplied by 100. If there is no Loan Amount entered, the field is left blank.
-
The existing $ field (field ID NEWHUD2.X937) displays below the Paid by Borrower heading to capture the discount points dollar amount paid by the borrower.
-
The Paid To and Paid From drop-down lists have been removed from the pop-up window.
-
The new discount points % paid by the borrower (field ID NEWHUD.X1727) is used to calculate the excluded values and bona fide discount points totals at the bottom-right of the popup:
-
Discount Points that can be excluded based on the APR (field ID QM.X364)
-
Discount Points that can be excluded based on reduction in rate (field ID QM.X367)
-
Discount Points that can be excluded based on the Starting Adjusted Rate (field ID QM.X368)
-
Bona fide Discount Points % (field ID QM.X369)
-
Bona fide Discount Points $ (field ID QM.X370)
-
CBIZ-26327
HMDA
The updates described below have been made to the logic for the HMDA Loan Term (field ID HMDA.X83) to include biweekly loans and to ensure that the HMDA Loan Term field is never populated with a blank value. These updates apply to loans with a Reverse Mortgage field (field ID HMDA.X56) that is either blank or populated with a value other than Reverse Mortgage.
-
When the Biweekly check box (field ID 423) is selected, then the HMDA Loan Term is populated with the Loan Term years (field ID LE1.X2) multiplied by 12, plus the Loan Term months (field ID LE1.X3).
-
When the Purpose of Loan (field ID 19) is Construction - Perm and the Construction Period Included in the Loan Terms check box (field ID CONST.X1) is cleared, then the HMDA Loan Term is populated with the Due In months (field ID 325) plus the Period months (field ID 1176).
-
When the Purpose of Loan (field ID 19) is not Construction - Perm or the Construction Period Included in the Loan Terms check box (field ID CONST.X1) is selected, then the HMDA Loan Term is populated with the Due In months (field ID 325).
Logic for HMDA partial exemptions have not been modified.
CBIZ-33752
Loan File Import and Exports
An issue was resolved that caused a successful import message to display after a failed import of a ULAD 3.4 loan file. This scenario occurred when Encompass did not import the loan file because a Persona Access to Fields business rule prevented the persona from importing the data for a specified field.
This issue has been resolved. Encompass now imports the loan, excludes the prohibited field data, and displays the following message:
The loan was imported, however, [FIELD DESCRIPTION] was not able to be imported because field data entry rules prevent it.
CBIZ-46272
eClose
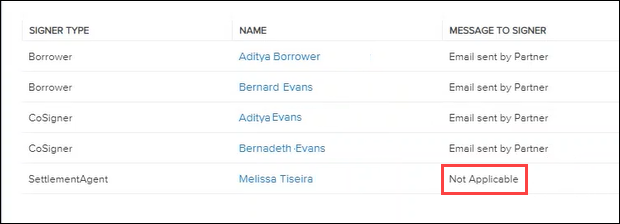
In the workflow for sending eClose packages, the Message to Signer column for a third party on the Signers window now includes an entry indicating that the email message option is Not Applicable. A third party includes anyone who is not a borrower, co-borrower, non-borrowing owner, or Encompass user. These parties are not sent an email message. This applies to the workflow for sending eClose Packages directly from Encompass.
DOCP-39972
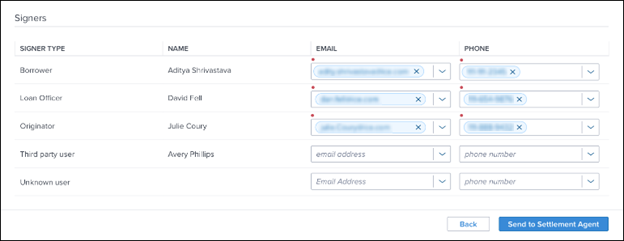
Email addresses and phone numbers for non-Encompass users (other than borrowers) are no longer required on the Signers window before sending an eClose package to a settlement agent. The Email and Phone fields for these users are no longer marked with a red dot to indicate that a field is required. This contact information is not mandatory because third-party or unknown signers are often not identified prior to the actual signing date. The Signers window now list the signers in the following order. Signers who are not required display at the bottom of the list:
-
Borrower (required)
-
Co-borrower (required)
-
Non-borrower owner (required)
-
Encompass user (required)
-
Third party user (not required)
-
Unknown user (not required)
DOCP-40062, DOCP-33396
The following update were made to the user interface on the Closing Documents window for eClose packages:
-
The Closing Documents header above the table now includes the number of documents selected and the total number of documents. Example: 47 of 50 selected.
-
The Description column has been relabeled as the Document Title column.
-
A status column has been inserted to the left of the Document Title column to display icons that provide additional information about a document.
-
The Previous button on the bottom right has been relabeled as the Back button.
DOCP-32548
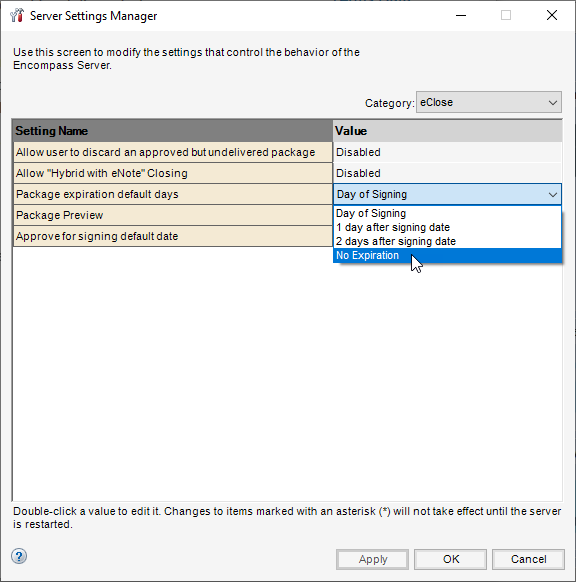
A new No Expiration option has been added to the Package expiration default days setting in the Encompass Admin Tools. When this option is enabled, the default expiration date for eClose packages is 30 days after the package signing date. If no expiration date is selected, the package expiration date field does not display on the Approve for Signing window unless the user’s persona has permission to override the policy and set an expiration date.
As with previous versions, this eClose package expiration setting is set to Day of Signing by default.
To Configure the No Expiration Option:
-
On your Windows task bar, click the Start menu or Start icon, navigate to the Ellie Mae Encompass program folder, and then click Admin Tools.
-
Double-click Settings Manager.
-
If you are prompted to log in to the server, type the User ID, Password, and Server that you use to log in to Encompass as the Admin user.
-
-
Select eClose from the Category list.
-
Double-click Package expiration default days, and then click the No Expiration option from the Value list.
-
Click OK.
If your persona does not have permission to override the default expiration date, only the Make package available for signing on field displays on the Approve for Signing window. If your persona has permission to override the default expiration date, a Package expiration (end of day) field also displays, and you can enter an expiration date to override the default selection.
DOCP-43152, NICE-41365
A new Package Signing Date option has been added to the Personas setting to give personas permission to change the default date on the Approve for Signing panel when ordering eClose packages. This option is in the Closing Docs section on the Loans tab in the Personas setting (Encompass > Settings > Company/User Setup > Personas).
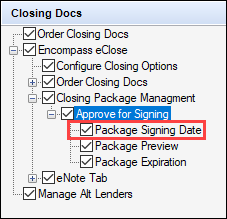
When this option is selected for a persona, a user with the persona can update the default Make package available for signing on date on the Approve for Signing panel.

When this option is disabled for a persona, the default Make package available for signing on date is not editable.
DOCP-43154, NICE-41366
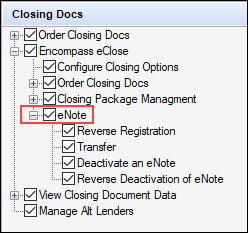
On the Encompass Settings > Company/User Setup > Personas > Loan tab, the Encompass eClose > eNote Tab persona category has been renamed to eNote. This update has been made to better represent what this eNote category is associated with since the persona options in this category are used for not only the eNote Tab but also for the eNote options in the eClose workflow.
New label in 23.1
NICE-42804
Electronic Document Management (EDM)
(Added on 2/6/2023)
Updates have been made to streamline the process for adding enhanced conditions to a loan file from a condition set to deliver improved performance times and reduce latency. Previously, time delays would occur when adding one or more enhanced conditions from a condition set or when creating or importing loan files that contained document sets with enhanced conditions, especially when larger numbers of conditions were added at the same time.
DOCP-40379
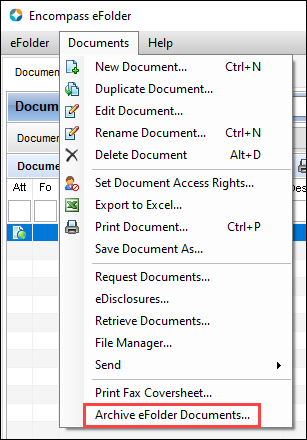
Beginning with the Encompass 23.2 release later this year, the EDM Archive will no longer be available to customers who want to archive eFolder documents to the EDM Archive or retrieve eFolder documents that were previously archived there. The EDM Archive is redundant and is being decommissioned because Encompass stores and retains all eFolder documents. The documents can be accessed by opening them in the eFolder itself.
The following changes will be implemented in the Encompass 23.2 release:
-
The Archive eFolder Documents option will be removed from the Documents menu in the Encompass as well as the Archive window that opens after you click the Archive eFolder Documents option.
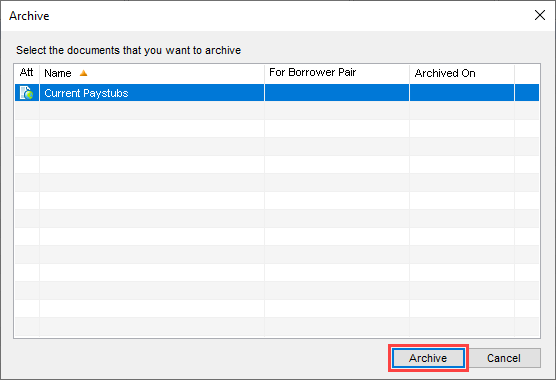
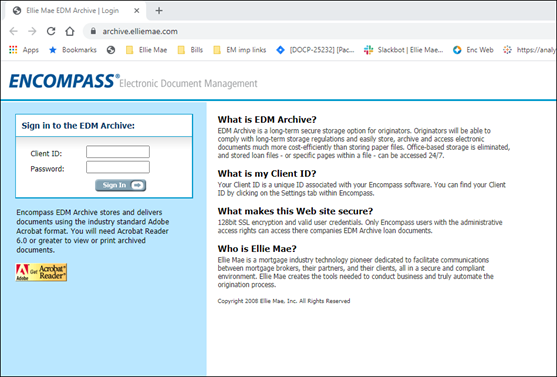
-
The https://archive.elliemae.com/ web site will be decommissioned. This is the site where users would retrieve eFolder documents from the EDM Archive.
DOCP-23581
Encompass Settings
Encompass now performs additional checks when an administrator attempts to delete a user profile from the Company/User Setup > Organization/Users tool in Encompass Settings. If a user is currently logged into Encompass (desktop version), the web version of Encompass, or TPO Connect, a pop-up message is displayed and the deletion will not continue.
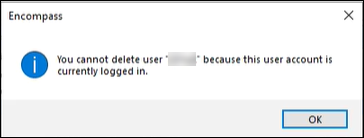
In addition, the DELETE API has also been updated to perform these additional checks when this API is used to delete a user profile.
Previously, the system only checked if a user was logged into the desktop version of Encompass when an administrator was deleting a user profile. These additional checks prevent users currently utilizing another application from being deleted from the Organization/Users tool in Encompass Settings.
NICE-41677, EBSP-41254
The logic described below is now used when multiple Field Data Entry business rules are being applied to a field and there is a conflict between the rules due to them having different rule types. When creating or editing a Field Data Entry business rule, the rule type is configured by clicking the Add button on the Field Rule window and then selecting from the Select a rule type drop-down list on the Field Rule pop-up window.
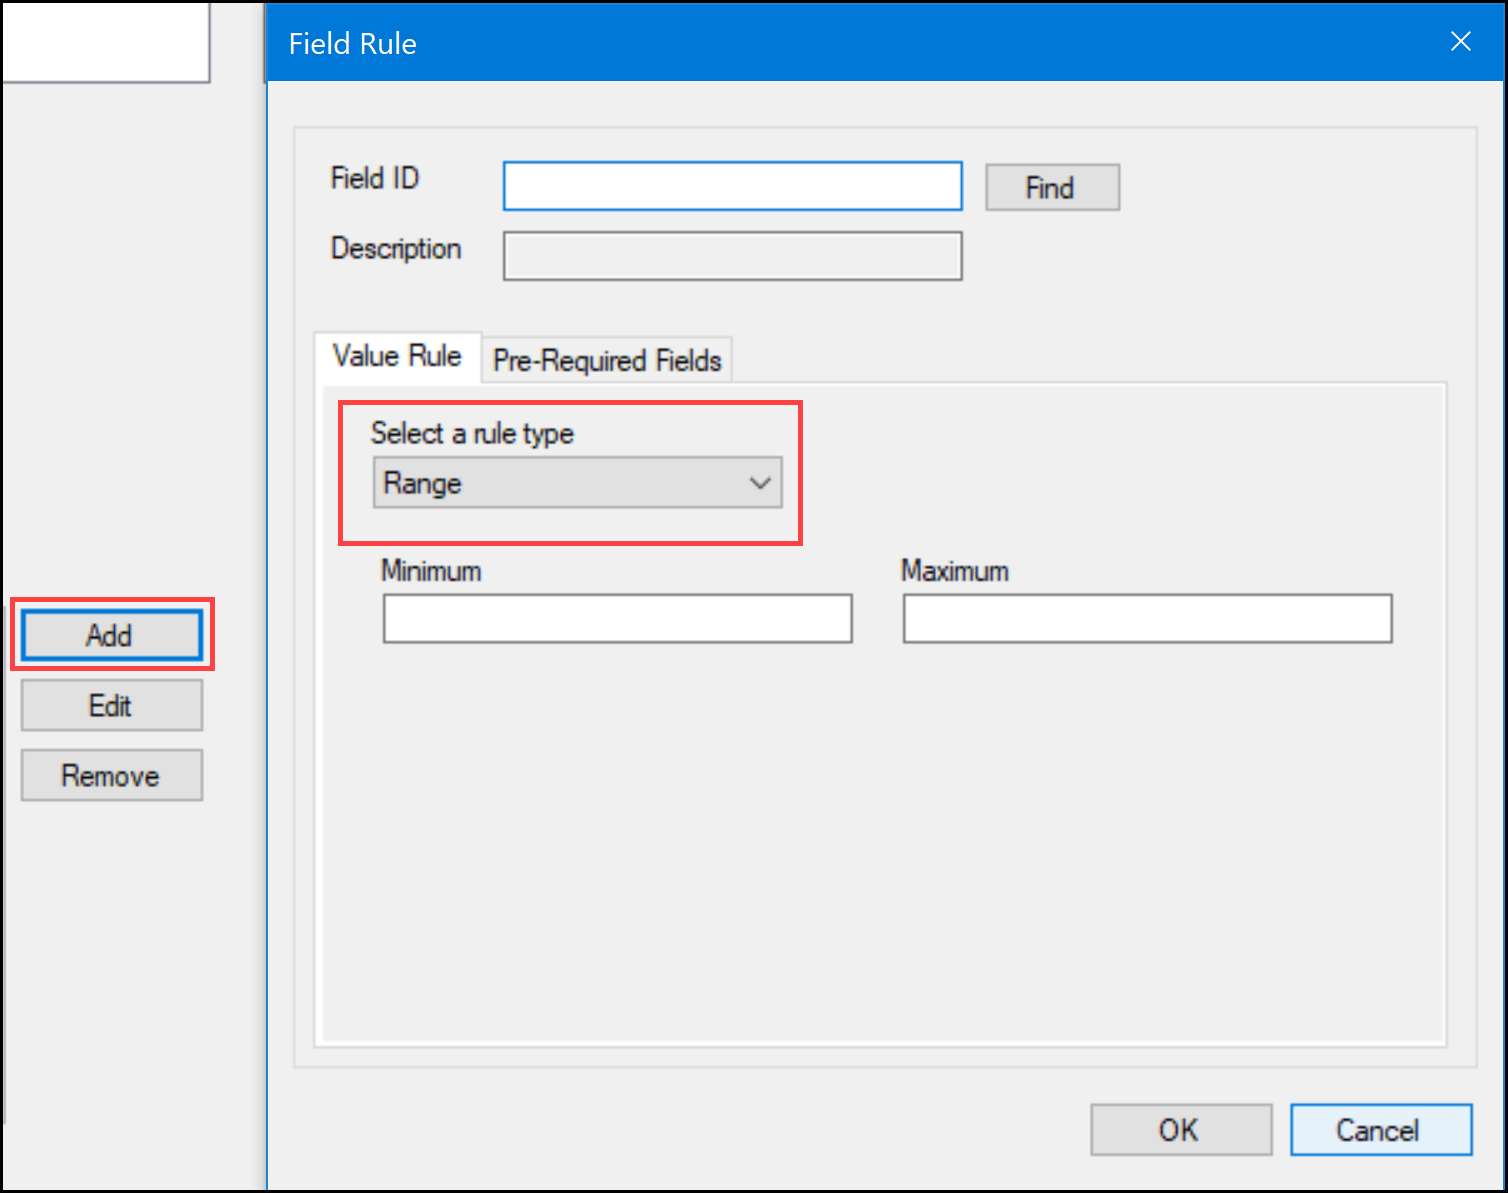
Updated logic:
-
Encompass applies the first rule that is loaded as expected. It will then apply the second rule, and so on. If a conflicting rule occurs, Encompass bypasses that rule..
-
After the conflicting rule is bypassed, the next Field Data Entry business rule is loaded and applied, and so on. If another conflicting rule occurs, Encompass bypasses that rule.
-
An error message is added to the Encompass.log file listing the field ID and the business rule names that caused the exception, for example: "[Field ID] has more than one business rule, Business Rule #1, Business Rule #2 and has triggered an exception."
Previously, when there were conflicts between Field Data Entry business rules, Encompass would throw an exception and then not apply any additional rules for the field after the exception error.
CBIZ-45422
New options for the Earliest Closing Date have been added to the Compliance Timeline Calculation for RESPA-TILA section of the Disclosure Tracking Settings (Encompass > Settings > Loan Setup > Disclosure Tracking Settings) to enable administrators to configure the earliest closing date calculation for loans using the RESPA-TILA forms.
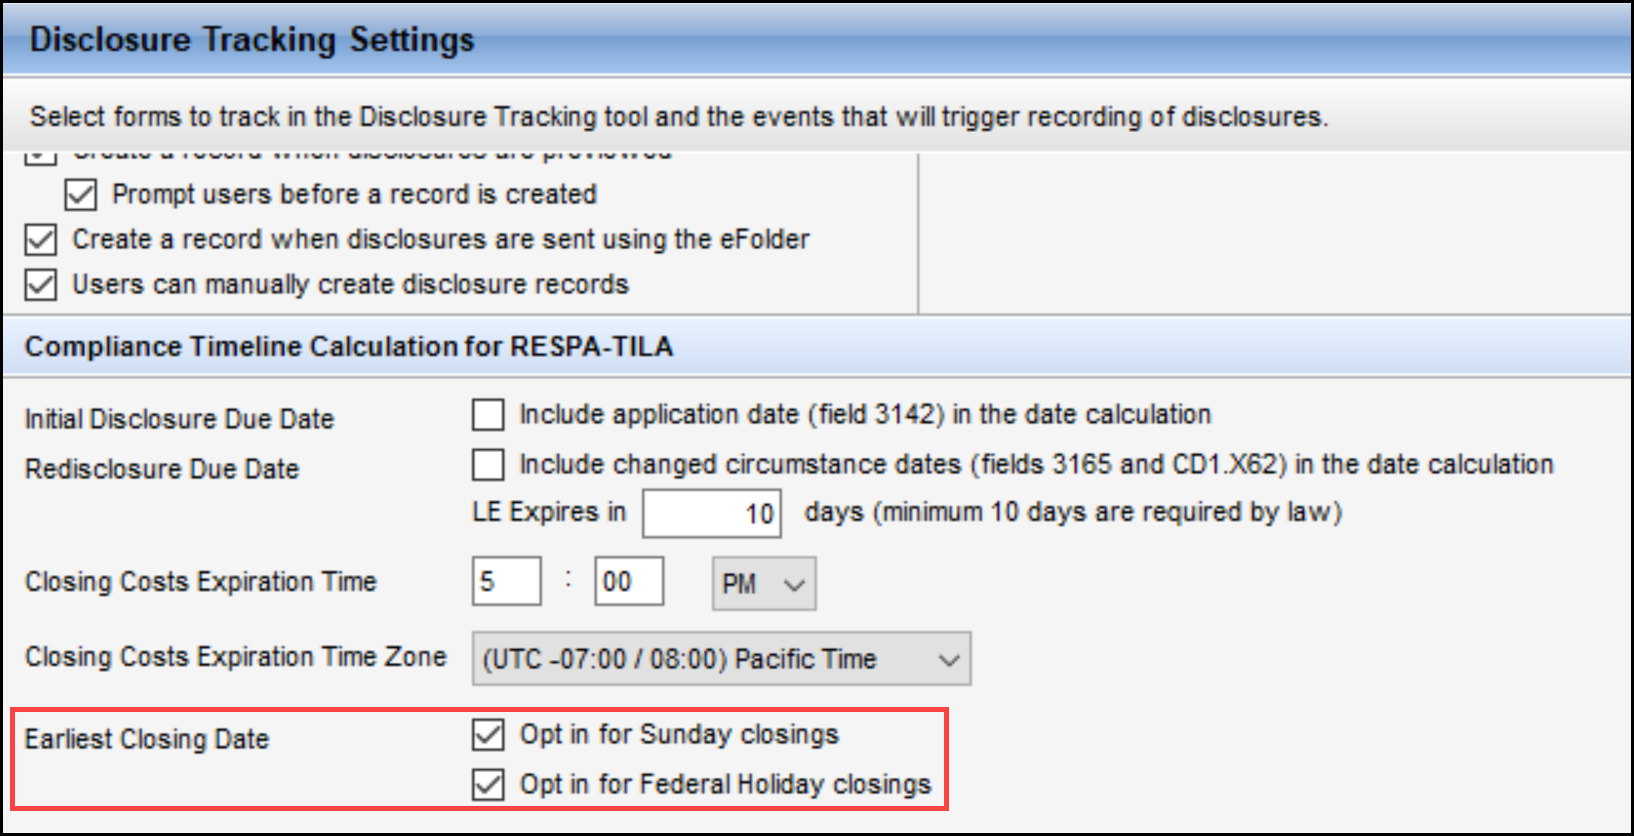
Two new options are available for configuring the Earliest Closing Date. By default, both options are cleared in the setting and are not applied by default to loans:
-
Opt in for Sunday closings
-
Opt in for Federal Holiday closings
The option to Opt in for Sunday closings and Opt in for Federal Holiday closings can be selected individually, or they can both be selected to include both Sundays and federal holidays in the calculation.
If only the Opt in for Federal Holiday closings check box is selected, when the earliest possible closing date falls on a Sunday federal holiday, the calculation rolls to the next possible earliest closing date, which would be a Monday.
These new check boxes will be independent from the regular calendar settings for Sundays and holidays set by the company. When the both the Sunday and federal holiday check boxes are selected, they would effectively override the calendar settings for the count of days End Date. The start date would still begin on a RegZ Calendar business date.
CBIZ-49252, CBIZ-49699
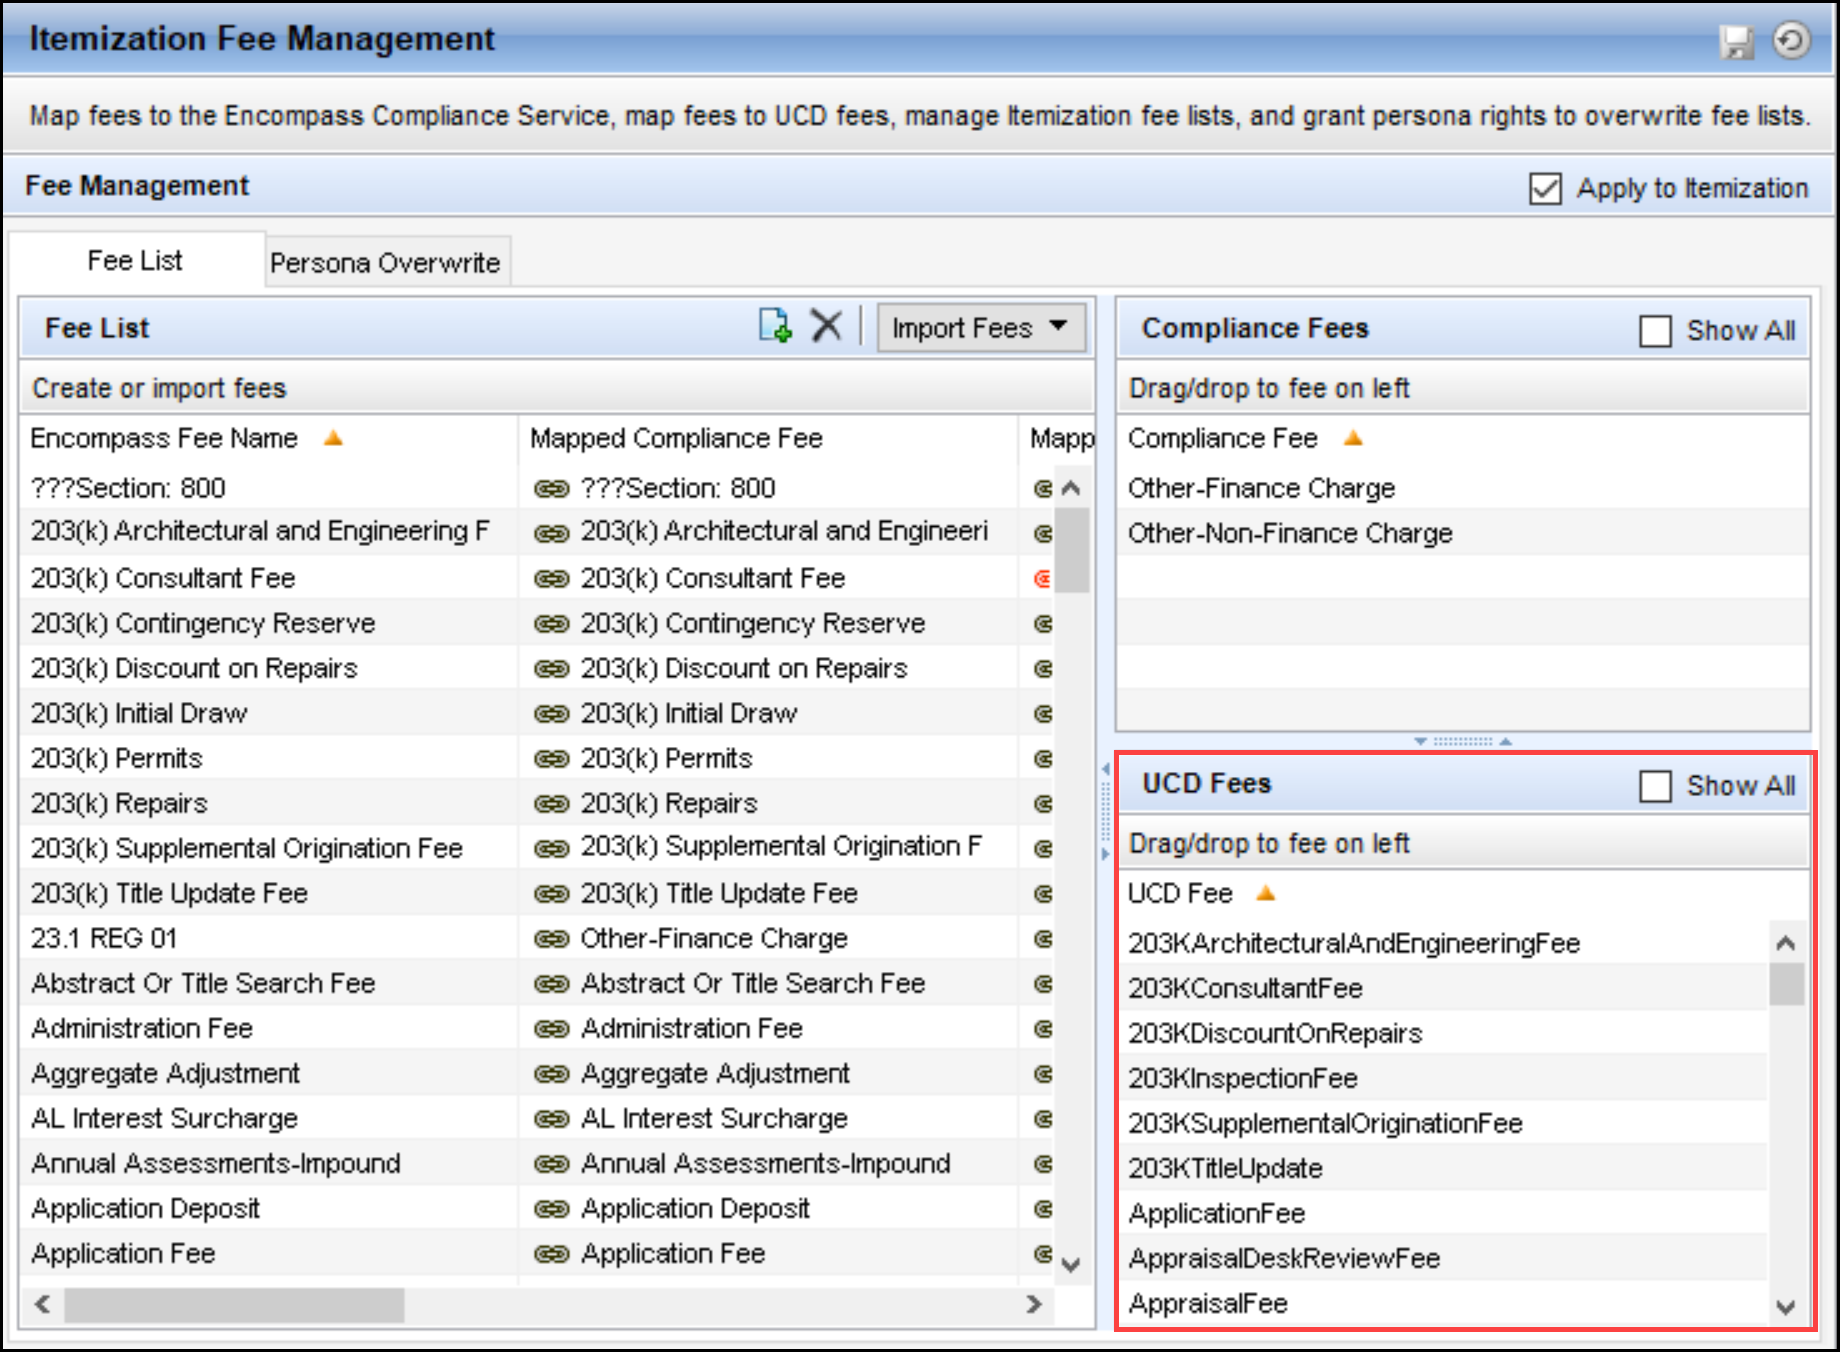
The following new options have been added to the UCD Fees section in the Itemization Fee Management setting (Encompass > Tables and Fees > Itemization Fee Management) to enable these fees to be included in UCD exports:
-
CommitmentFee
-
ModificationFee
-
MortgageBrokerFee
-
NewLoanAdministrationFee
-
RedrawFee
-
TaxRelatedServiceFee
-
UnderwritingFee
-
AssignmentFee
-
DeedPreparationFee
-
MIInitialPremium
-
StateTitleInsuranceFee
-
TitleCertificationFee
-
TitleFinalPolicyShortFormFee
-
TitleInsuranceFee
-
TitleServicesFeeTotal
-
TitleServicesSalesTax
-
AttorneyFee
-
DocumentaryStampFee
-
RecordingFeeForSubordination
-
TaxStampForCityDeed
-
TaxStampForCountyDeed
-
TaxStampForStateDeed
CBIZ-50736
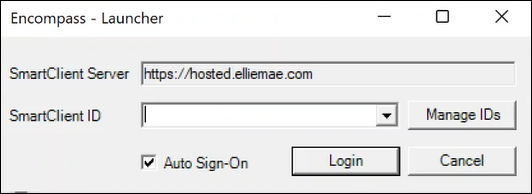
As a result of the Encompass 22.2.0.4 update introduced in September 2022, some users were no longer able to launch Encompass from the AppLauncher.exe if the executable file was located anywhere other than the default C:\SmartClientCache\Apps\Ellie Mae\Encompass folder location. AppLauncher.exe files located outside of the default location were not able to receive the latest updates and would therefore be unable to launch the most current version of Encompass. This issue has been resolved so that AppLauncher.exe files located in non-default locations can successfully launch Encompass.
NICE-42233
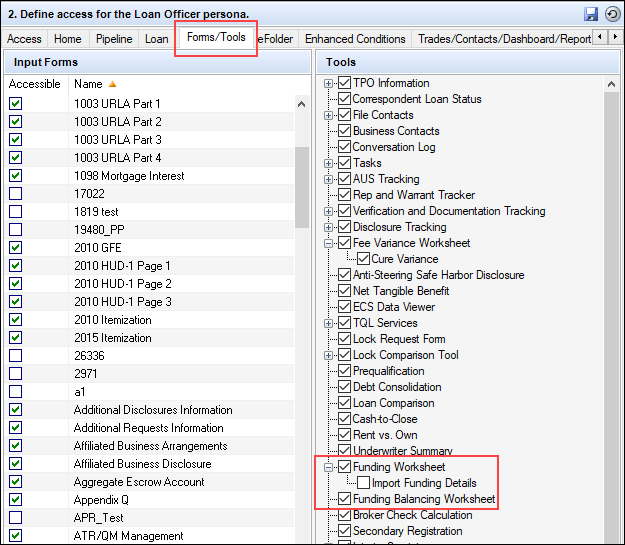
In order for a loan team member to be able to access the Funding Worksheet link in the left navigation menu when viewing loans in the web version of Encompass, administrators must provide access to the form based on the user’s persona. In previous versions of Encompass, administrators could manage this persona access with the Funding Worksheet option in the Encompass Settings > Company/User Setup > Personas > Web Version tab > Standard Web Forms panel. This option has been removed. Starting in Encompass 23.1, administrators can use the Funding Worksheet option in the Encompass Settings > Company/User Setup > Personas > Forms/Tools tab. This option was already being used in previous versions of Encompass to control persona access to the Funding Worksheet in the desktop version of Encompass and now it’s used to manage access in the web version of Encompass as well.
-
In order for the Funding Worksheet link to be accessible in the left navigation menu in the web version of Encompass, the Funding Worksheet and the Funding Balancing Worksheet options must be selected on the Personas > Forms/Tools tab.
Funding Worksheet Personas option in earlier versions of Encompass
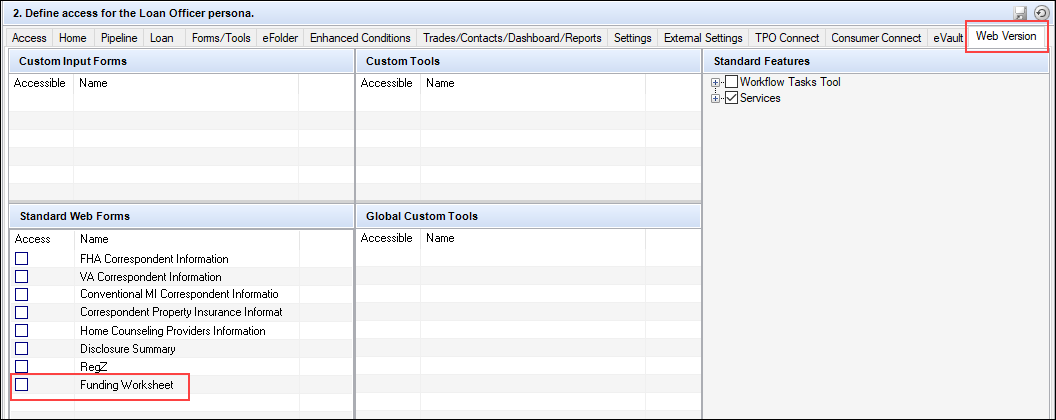
Funding Worksheet Personas option in 23.1
NICE-42612
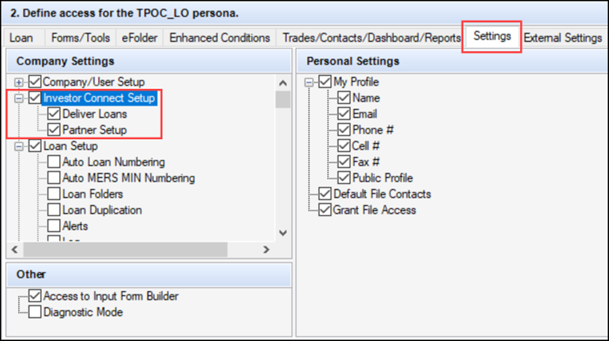
The Personas Setting option for configuring access to Investor Connect Settings has been moved from the External Settings tab to the Settings tab. Check boxes have been added as subcategories for the Investor Connect Settings option to enable administrators to configure persona access to the Deliver Loans and Partner Setup settings for Investor Connect.
SEC-24111
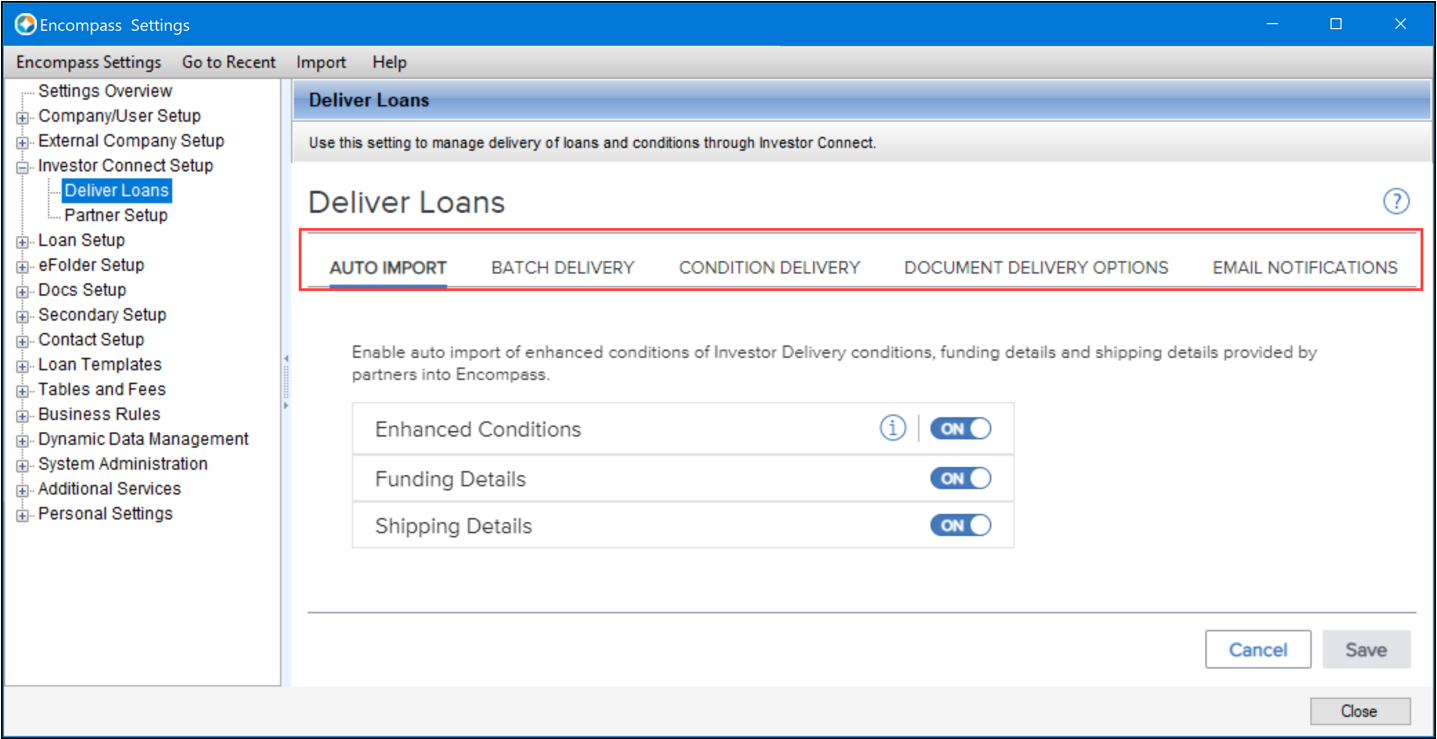
The user interface for the Deliver Loans setting has been redesigned to display as a series of tabs across the top of the setting. Options for each feature in the setting are accessed by clicking the tabs. The functionality for the Auto Import, Batch Delivery, Condition Delivery, and Email Notification features have not been changed. A new Document Delivery Options setting has been added to the setting (see the Document Delivery Options entry below for details).
When Encompass 23.1 is released, the updated layout for the Deliver Loans setting will also be implemented in Encompass 22.3.
DND-20641
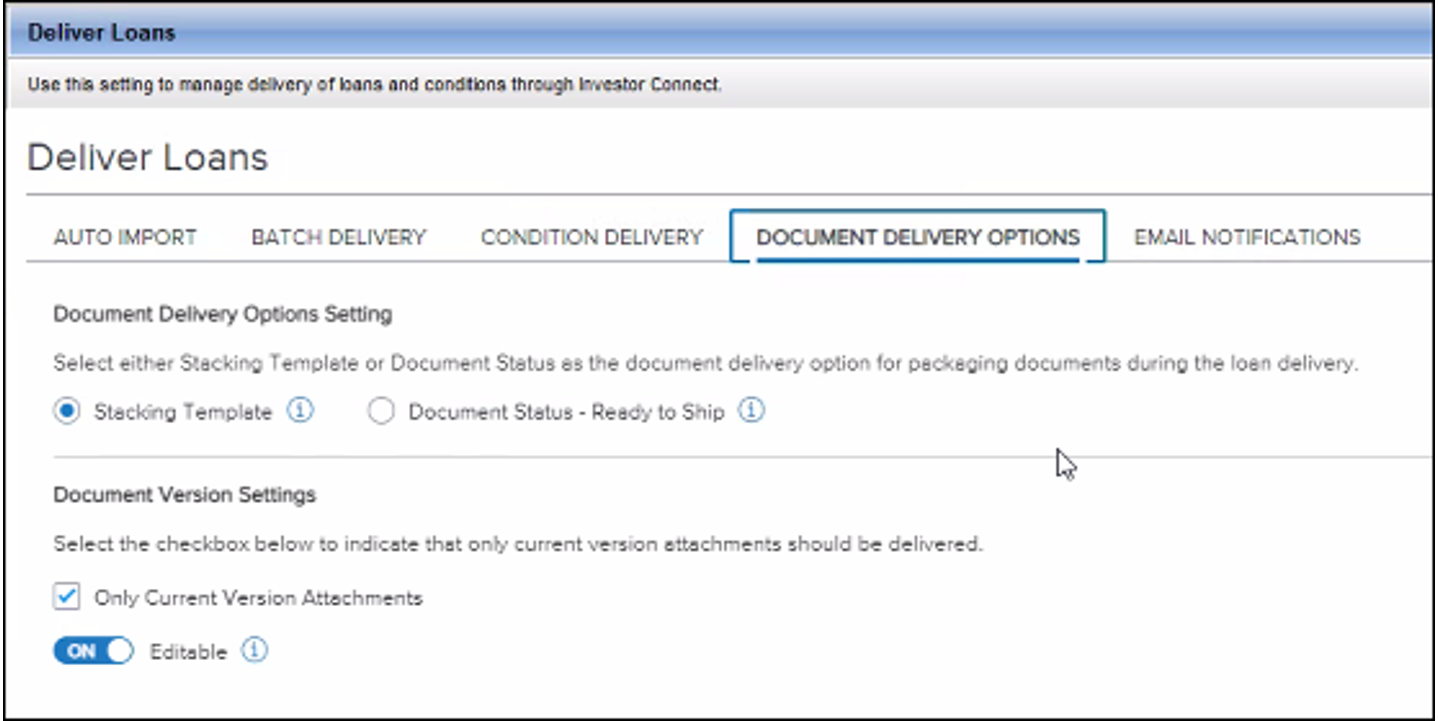
A new Document Delivery Options setting has been added to the Deliver Loans setting in Encompass (Encompass > Settings > Investor Connect Setup> Deliver Loans) to allow administrators to configure whether documents are packaged for delivery based on a stacking template or based on document statuses. Additionally, lenders can configure their package to include only the current version of document file attachments or both current and non-current versions. This feature provides lenders with additional flexibility when selecting documents that are packaged in the delivery.
To Configure the Documents Delivery Options:
-
On the menu bar, click Encompass, and then click Settings.
-
On the left panel, click Investor Connect Setup, and then click Deliver Loans.
-
Click the Documents Delivery Options tab.
-
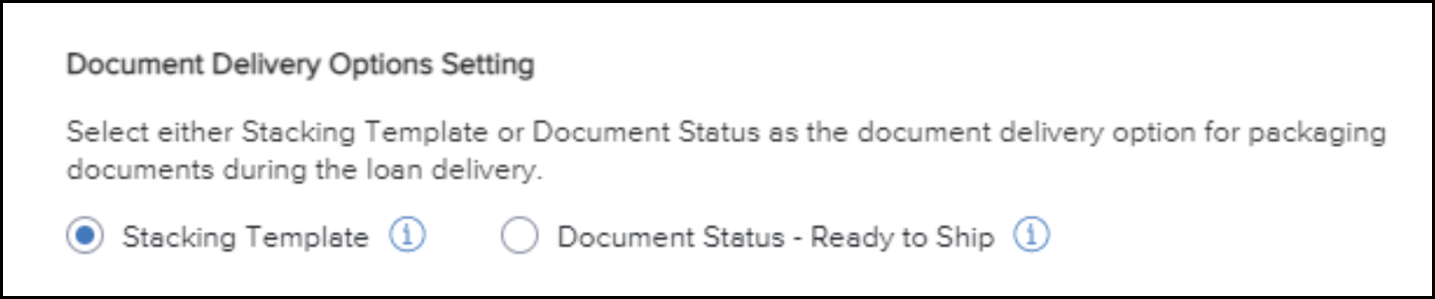
On the Document Delivery Options window, select one of the radio buttons at the top of the setting. The Stacking Template option is selected by default.
- Stacking Template - When this option is enabled, loan delivery packages continue to use the stacking template process previously applied to all loan delivery packages in Encompass Investor Connect. Documents are added to the loan delivery package based on the stacking template selected.
-
Document Status - Ready to Ship - When the document status option is enabled, documents are added to the loan delivery package if they have a status of Ready to Ship on Document Details window in the eFolder.
-
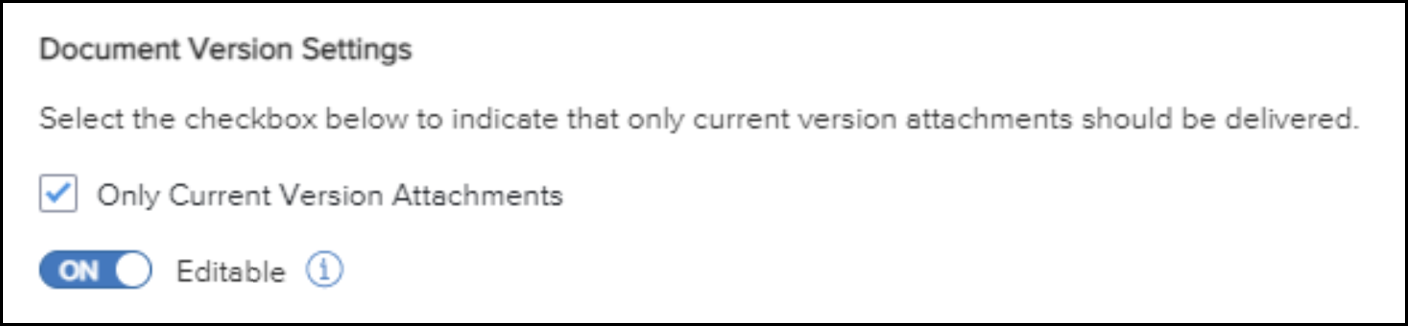
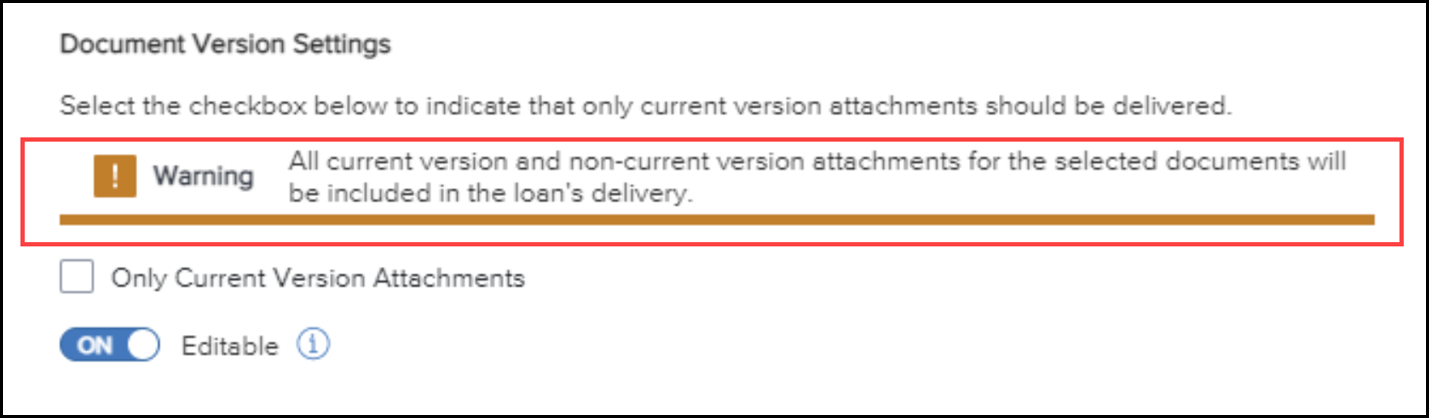
On the Document Version Setting section, select or clear the Only Current Version Attachments check box to package only eFolder document file attachments that are marked as Current. The check box is selected by default.
When you clear the check box, the following warning displays on the window:
-
Select On or Off for the Editable toggle switch. If you select On, Encompass users who are packaging loans for delivery will be able to change the option to include only current file attachments or to include both current and non-current versions. The toggle is set to Off by default.
-
When finished, click the Save button on the lower right.
When Encompass 23.1 is released, the Document Delivery Options will also be available in Encompass 22.3. However, only the Staking Template and Document Status options will be available in Encompass 22.3. The Document Version Settings options will not be available.
Document Delivery Options Setting in Encompass 22.3

DND-20883
Partners can now configure their own partner-specific announcements and schedule them to display on the Deliver Loan window when lenders package loans for delivery to the partner. Previously, partners utilized their web portals and ICE Mortgage Technology’s Status Center to display important messages, alerts about system maintenance, and information about topics such as rates and service levels timelines. Lenders had to proactively visit a partner’s portal to look for announcements before making a submission.
To support this feature, a new Partner Setup setting has been added to Encompass to enable Encompass Investor Connect partners to configure and schedule their own announcements. Lenders will see these partner-specific announcements on the Deliver Loans window when they package loans for delivery to the partner.
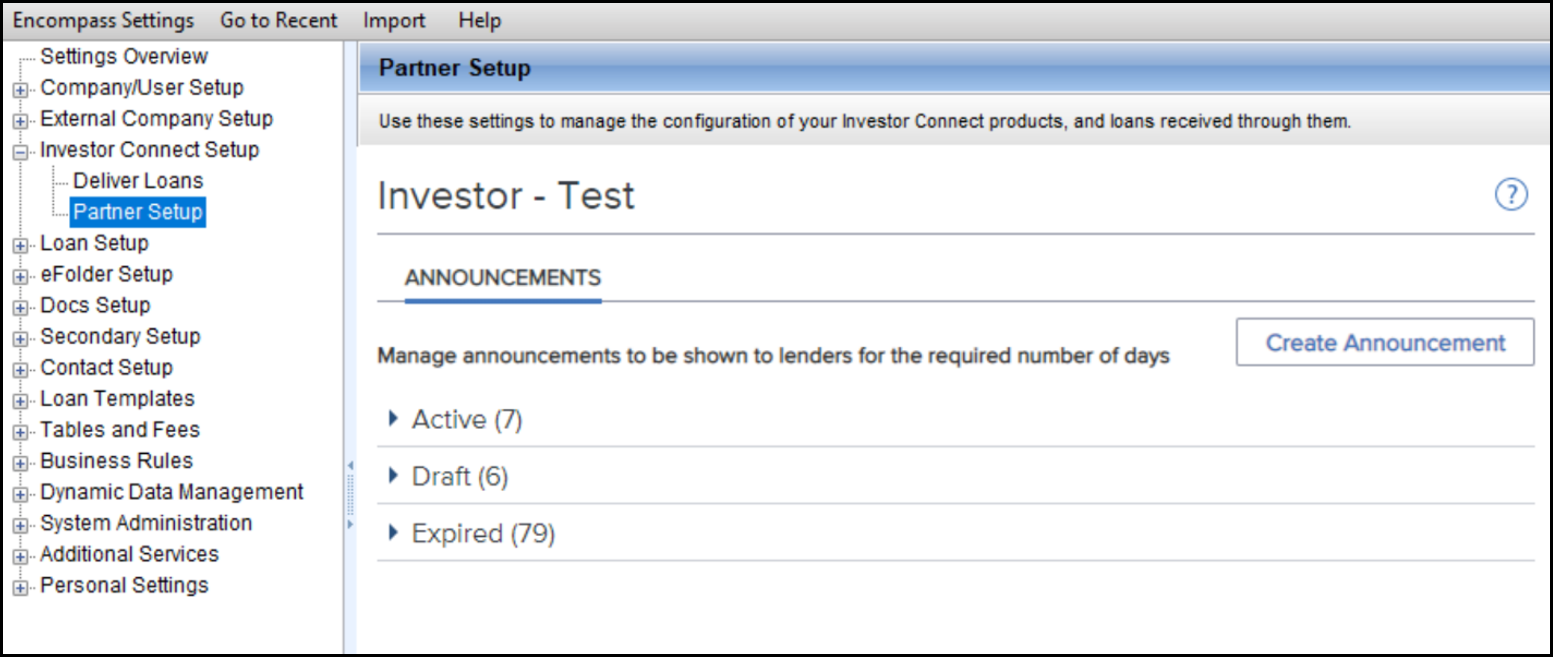
The ability to configure the options in the setting is available only to Encompass Investor Connect partners running an instance of Encompass that has been enabled to receive loan deliveries via Encompass Investor Connect.
Partners can even use their test instances of Encompass (provisioned during the onboarding process for Encompass Investor Connect partners) to manage announcements.
Detailed information about the Partner Setup setting will be provided in the Encompass Investor Connect release notes.
Anyone running an instance of Encompass that does not meet the qualifications specified above will see the following message when accessing the setting.
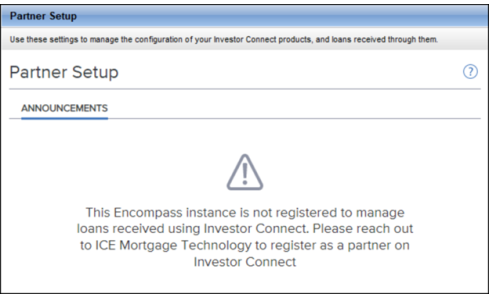
DND-20896
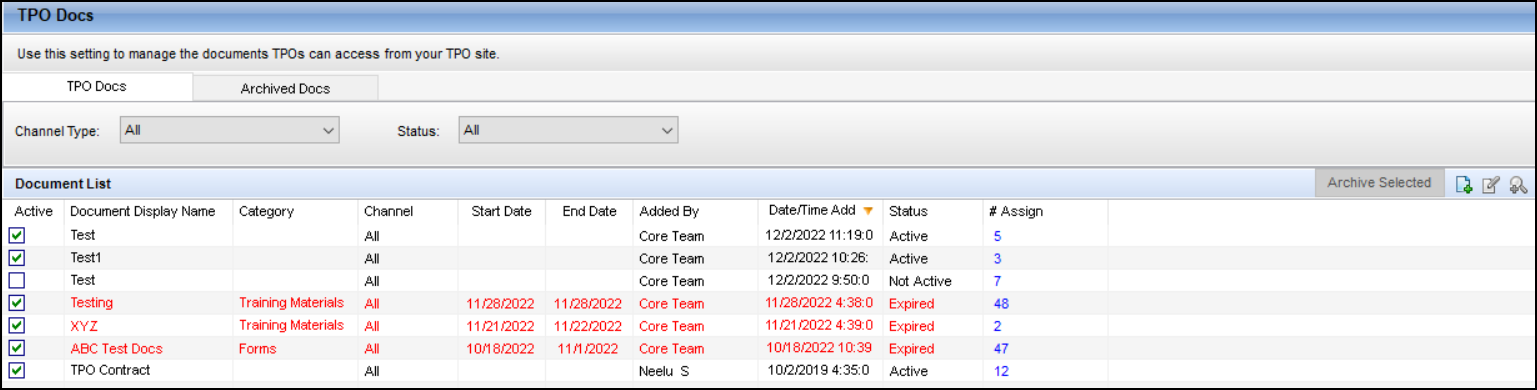
Currently in Encompass, once the TPO List of companies with access to TPO docs has been created, no changes can be made. To make modifications, the TPO Doc must be deleted and then a new one created with a new TPO List of companies. In this release, the ability to modify the list of TPO companies has been added.
![]() To Manage the TPO List for New TPO Docs
To Manage the TPO List for New TPO Docs
-
Select the New icon.
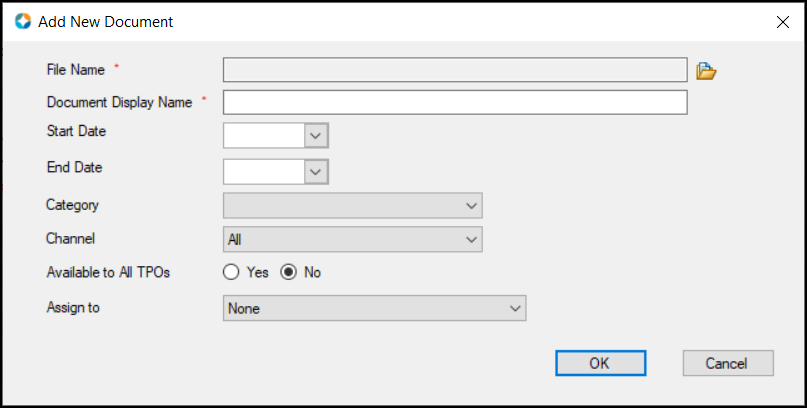
- In the required File Name field, select the folder icon on the far right.
-
In the Browse and Attach window, select a document from your computer, and then select Open.
- In the required Document Display Name field, enter the name of the document.
- In the Start Date and End Date fields, select the period for which the document is valid/active.
- From the Category drop-down field, select the Encompass TPO document category.
Authorized users can create TPO document categories using the Document Category option in TPO Settings.
- From the Channel drop-down field, select the TPO channel for which the document will be available.
- In the Available to All TPOs field, select No to restrict access to the document.
- From the Assign To drop-down list, select Select TPOs to define the TPO companies that will have access to this document.
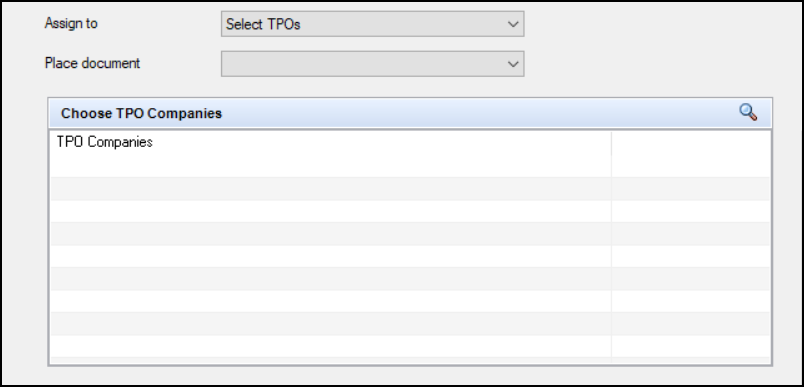
- From the Place document drop-down field, select where to place the document within the selected category.
- In the Choose TPO Companies panel, select the Find icon.
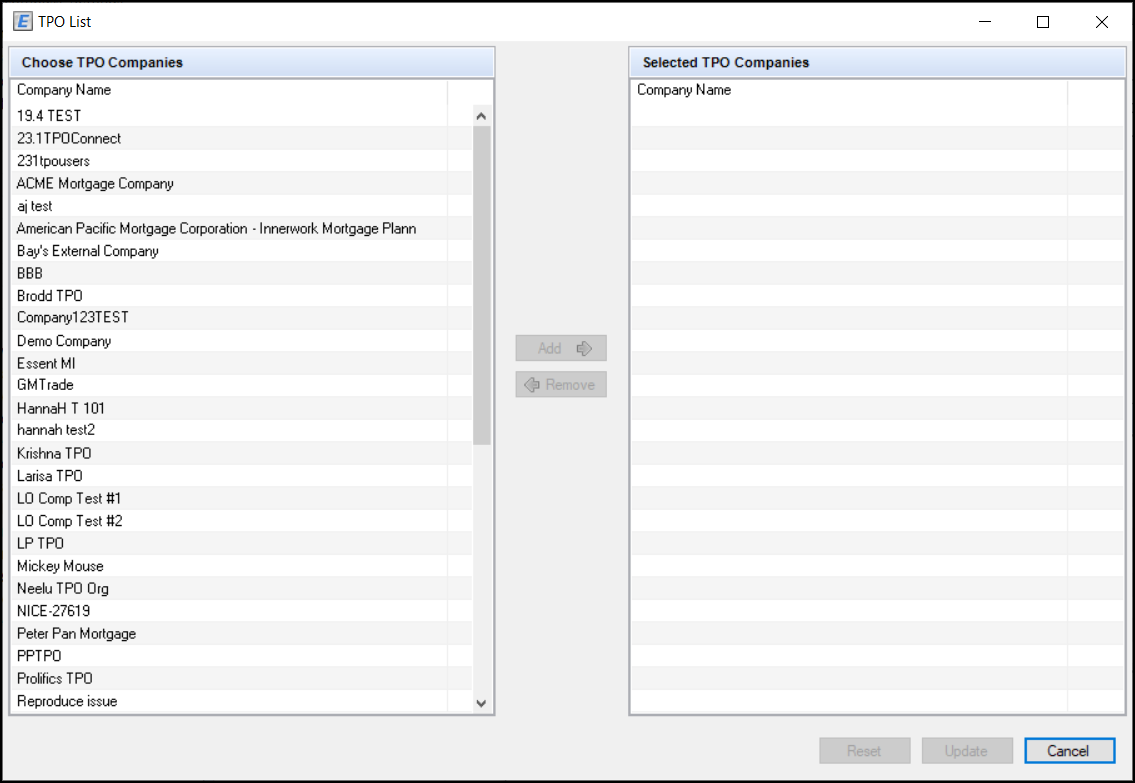
-
In the Choose TPO Companies window, select one or more TPO companies and then select Add.
-
To remove one or more TPO companies from the Selected TPO Companies window, select one or more TPO companies and then select Remove.
- To reset the list of selected TPO companies back to the list before the most recent changes, select Reset.
- To update the list of selected TPO companies, add or remove one or more TPO companies and then select Update.
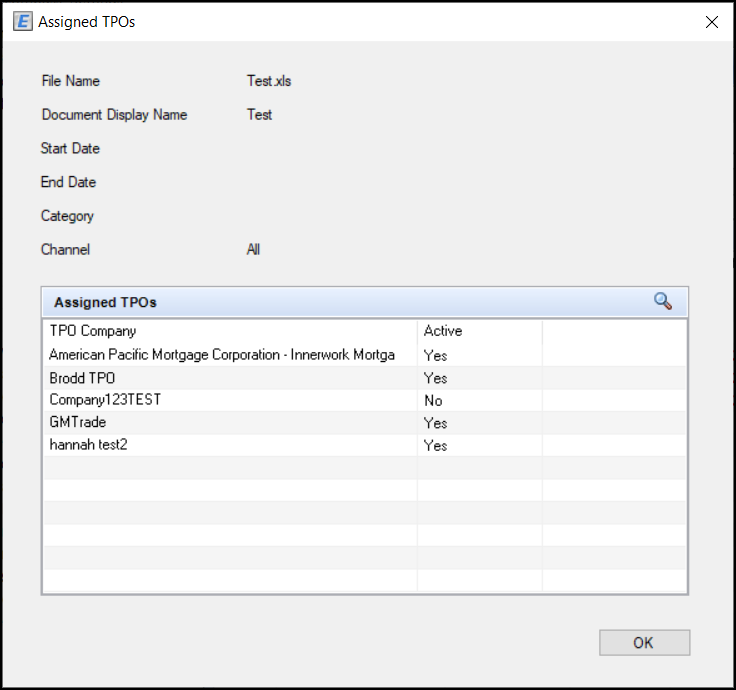
![]() To Manage the TPO List for Existing TPO Docs
To Manage the TPO List for Existing TPO Docs
-
On the menu bar, select Encompass and then select Settings.
-
On the left panel, select External Company Setup and then select TPO Docs.
-
Select a number link in the # Assign column to open the Assigned TPOs panel.
-
Select the Find icon to open the TPO List panel.
-
Make your changes and then select Update.
(Added on 1/31/2023)
As part of the Encompass 22.2 release, Encompass began using the Chromium-based engine, replacing current areas where the MSHTML engine was used. In this release, the Configurable Workflow Template setting has been updated to use the Chromium-based engine. The updates are as follows:
-
The Configurable Workflow Template setting is displayed when two criteria are met:
-
The Encompass instance must have Encompass TPO Connect provisioned.
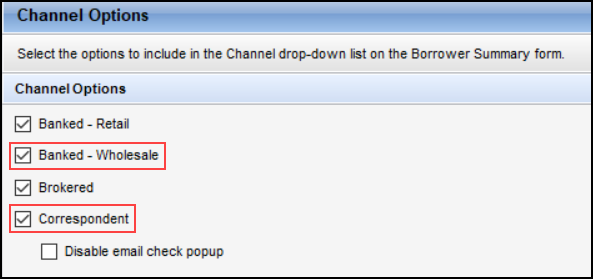
-
The Encompass instance must have either Banked - Wholesale, Correspondent, or both selected on the Channel Options setting under Loan Setup.
-
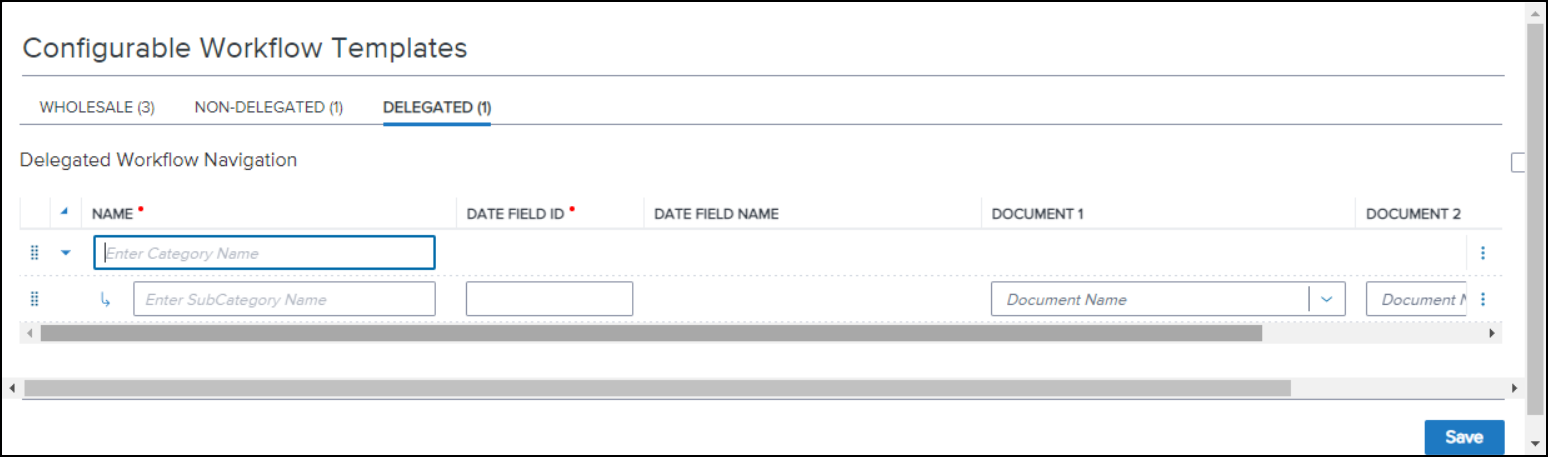
When a channel has no templates configured, a message “There are no templates yet” is displayed with an exclamation point in a triangle.
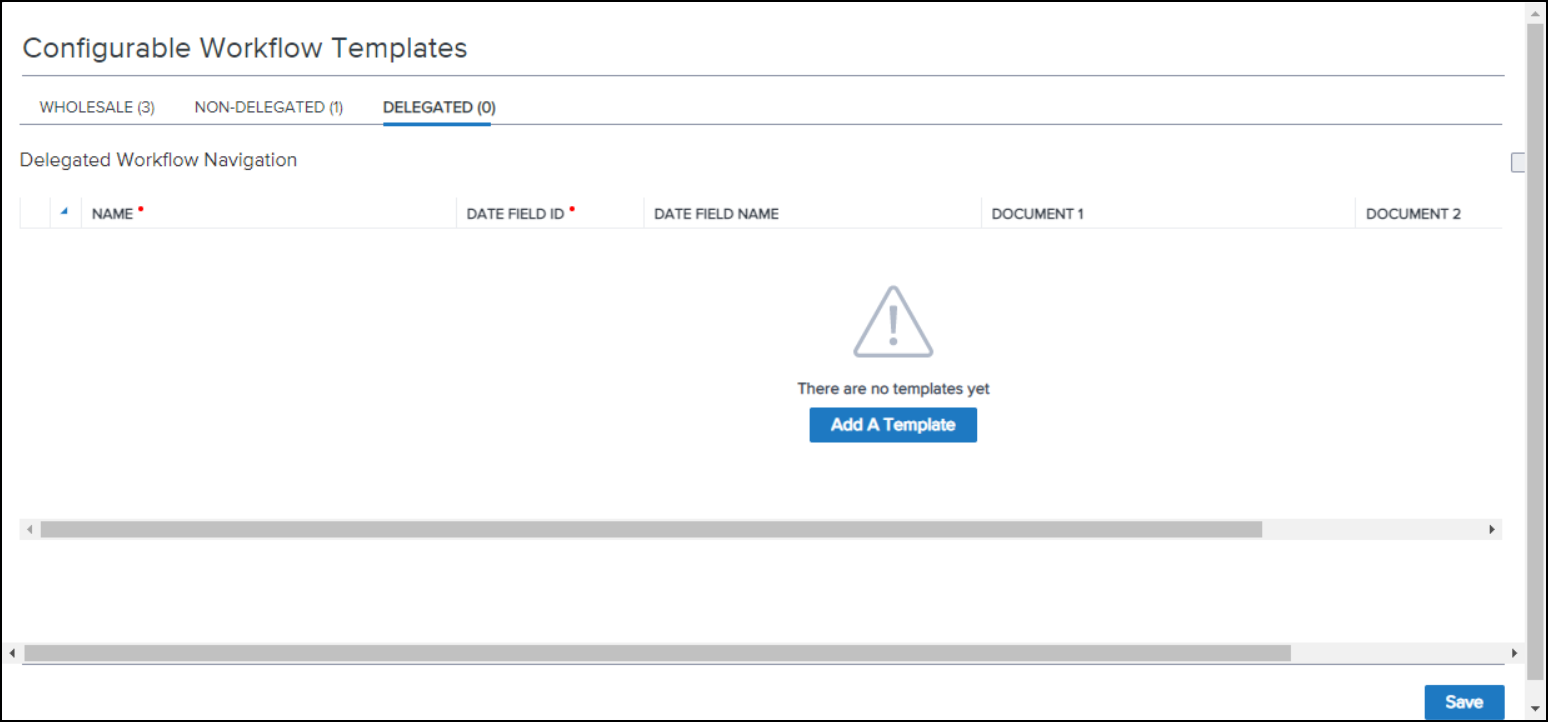
Select Add A Template to add the initial category and its subcategory.
-
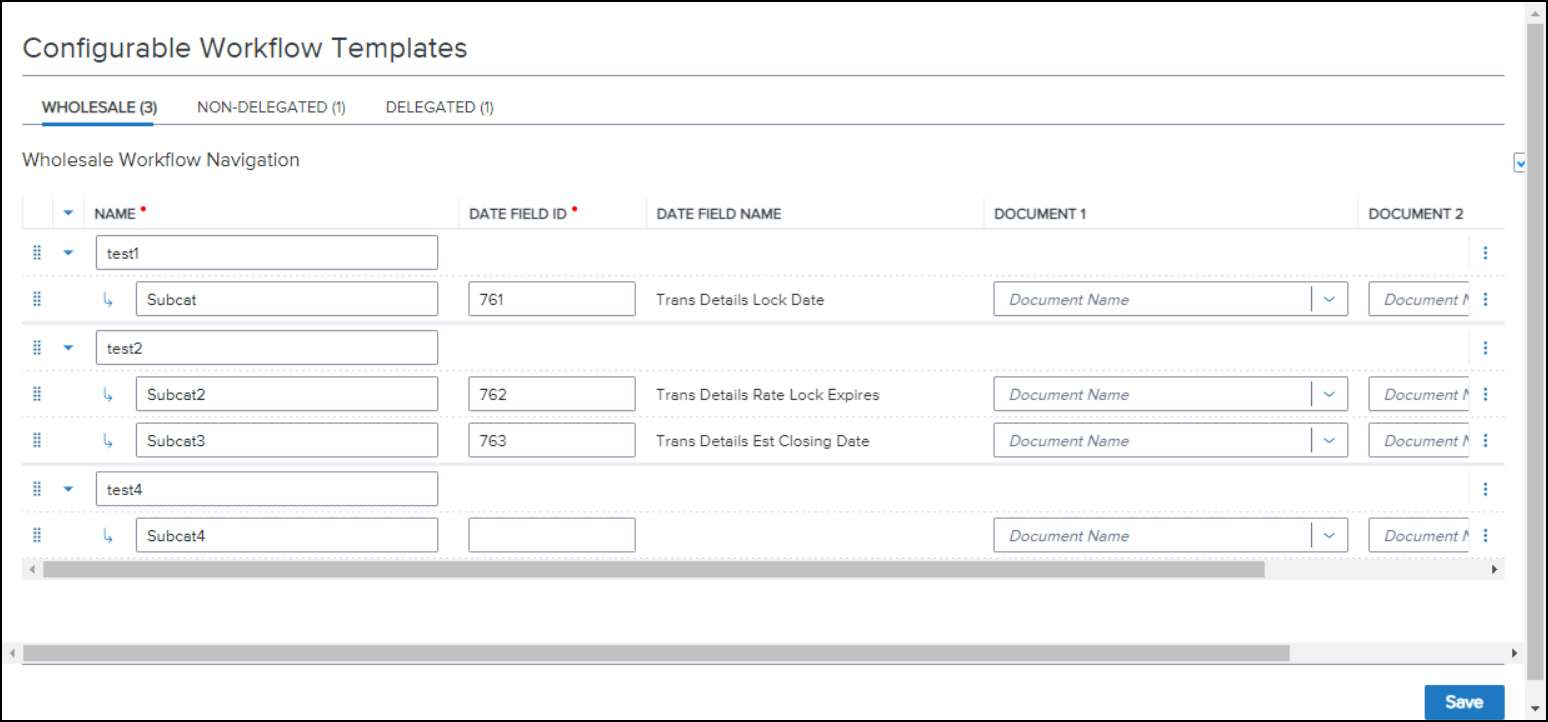
By default, the Configurable Workflow Template setting will open with all the categories in expanded mode to make it easier to see what is included in each category.
-
To add a new category or subcategory, select the three vertical dots (
 ) at the end of a row and then select the plus sign (
 ).
).

-
If adding a category, a new category and one subcategory will be displayed under the existing category and its subcategories.
-
If adding a subcategory, a new subcategory will be displayed under the existing subcategory.
-
When tabbing from one field to the next, the following validations are performed:
-
If there is a duplicate category name, a message “Duplicate Category name” is displayed under the affected field and a message “Please fix any fields that are marked below.” is displayed at the top of the page.
-
If there is a duplicate subcategory name, a message “Duplicate Subcategory name” is displayed under the affected field and a message “Please fix any fields that are marked below.” is displayed at the top of the page.
-
If there is a duplicate Date Field ID, a message “Duplicate Date Field ID” is displayed under the affected field and a message “Please fix any fields that are marked below.” is displayed at the top of the page.
-
If there is a duplicate document selected within a subcategory (Document 1 and Document 2), a message “Duplicate document” is displayed under the field where the duplicate is selected and a message “Please fix any fields that are marked below.” is displayed at the top of the page.
-
If an invalid Date Field ID is entered, a message “Not a valid Date Field ID” is displayed under the affected field and a message “Please fix any fields that are marked below.” is displayed at the top of the page.
-
To delete a category (and its subcategories) or subcategory, select the three vertical dots (
) at the end of the row you want to delete and then select the trash bin ( ).
).
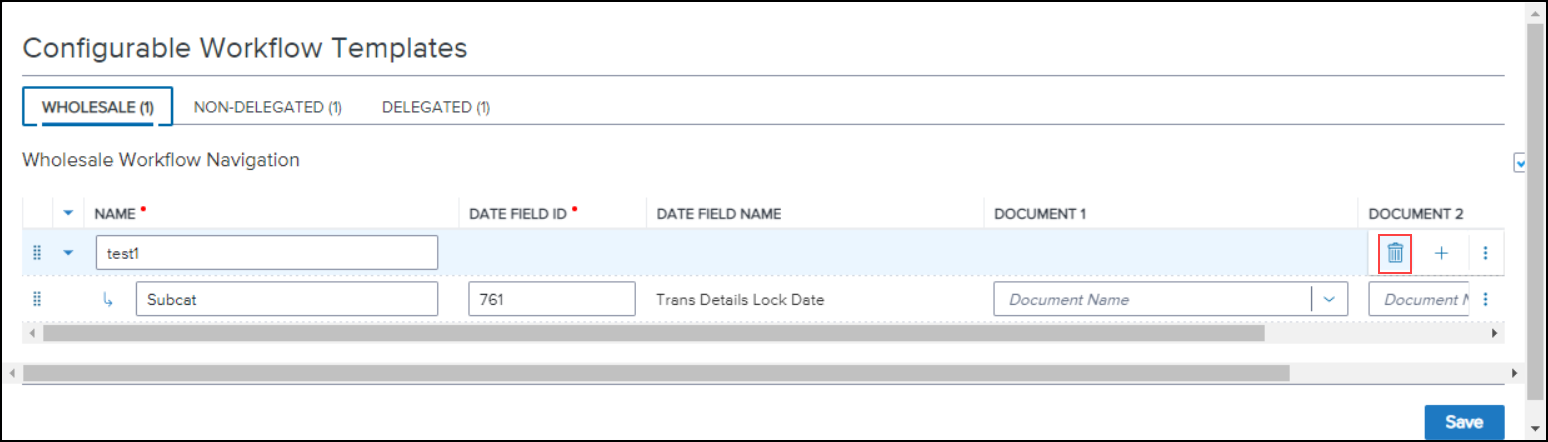
A prompt will be displayed:
-
Select Delete Category and Subcategories to delete the category and its subcategories.
-
Select Delete Subcategory to delete the subcategory.
If all categories are deleted, the page will once again display the message “There are no templates yet” with an exclamation point in a triangle. To add a template again, select Add A Template.
-
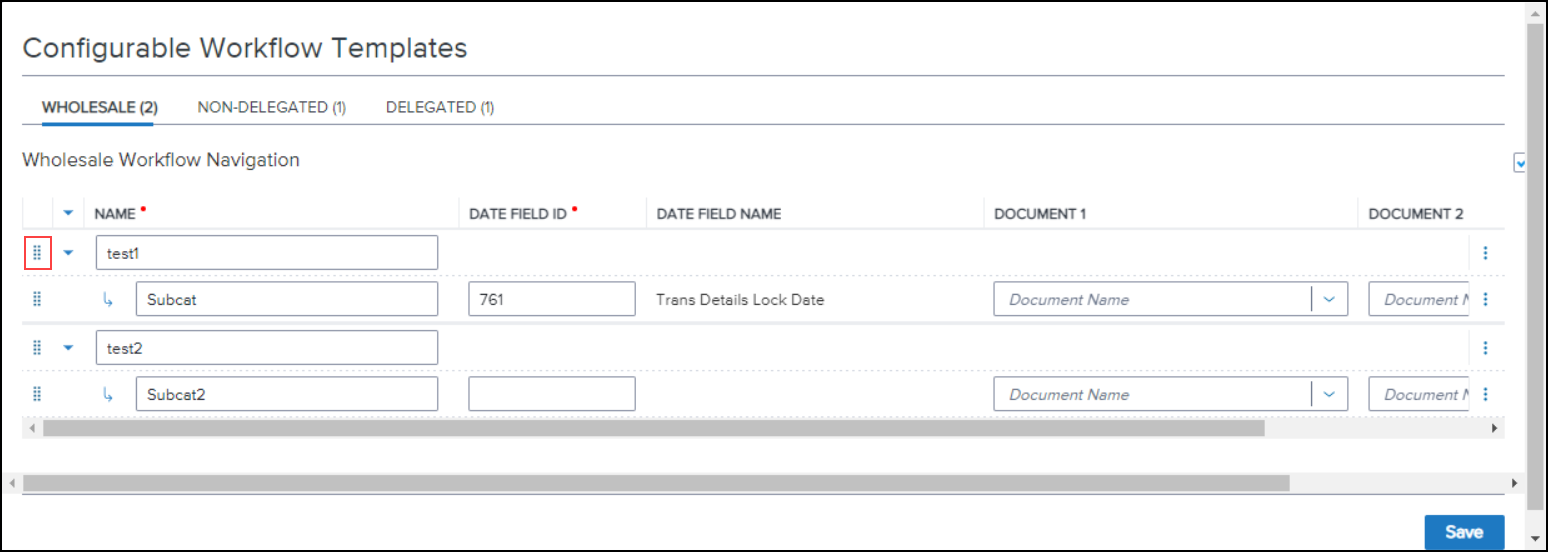
To move a category (and its subcategories) or a subcategory, select and hold the eight vertical dots (
 ) at the beginning of the row you want to move, drag the row to its new position, and then drop the row.
-
A category cannot be moved from a category position to a subcategory position.
-
A subcategory cannot be moved from a subcategory position to a category position.
-
The same subcategory can be present in different categories. However, the same subcategory cannot be present twice in the same category. If a duplicate Date Field ID is detected, a message “Duplicate Date Field ID” is displayed under the affected field and a message “Please fix any fields that are marked below.” Is displayed at the top of the page.
-
When Save is selected, the following validations are performed:
-
If a required field (i.e., category name, subcategory name, or date field ID) is blank, a message “This field is required.” is displayed under the affected field.
-
When an error is triggered, a message “Please fix any fields that are marked below.” Is displayed at the top of the page.
-
When errors are detected, the focus will be directed to the first tab with errors. From there, the focus will move from left to right and from top to bottom.
Once your save is successful, a message “Success: Your changes have been saved.” is displayed in the upper right corner.
(Added on 1/31/2023)
When multiple errors are displayed on the Normalized Bid Tape Template setting after Save is selected, the cursor is placed in the first field with an error. In addition, when the Tab key is selected, the cursor moves to the next field with an error.
Additional Feature Enhancements
The Encompass ZIP Code database has been updated with the latest available ZIP Code data.
CBIZ-48309
The loan amount that displays in the billing records accessible from the Home Page in Encompass is now updated any time the Loan Amount (field ID 2) is updated in the loan file. Previously the billing records were only updated when specific key fields were updated in a loan file. The Loan amount has now been added to the list of fields that trigger an update to a billing record
CBIZ-48750
(Added on 1/31/2023)
The version migration has been updated to include logic to validate that only the latest version of a compensation plan will include “Null” in EndDate.
This new function will be executed only once.
-
When a TPO organization has only one compensation plan, the EndDate for that plan will be set to “Null”.
-
When a TPO organization has multiple compensation plans, the EndDate for the plan with the latest StartDate will be set to “Null”.
-
The EndDate for all other plans will be set one day prior to the StartDate of the next plan.
| Next Section: Fixed Issues | ||
| Previous Section: New Features & Forms |