Feature Enhancements in Version 22.3 Major Release
This section discusses the updates and enhancements to existing features, services, or settings that are provided in this release.
Administration Portal
A new option is available that gives lender administrators the ability to associate either the company licenses or the loan officer licenses to the default loan application recipient. This option is available on the Website Builder page. When Use Company Licenses is selected, the loan application can show all the Subject Property States for which the company is licensed. When Use Loan Officer Licenses is selected, the loan application will only show the Subject Property States for which the loan officer is licensed. Use Loan Officer Licenses is selected by default.

NGCC-17935
New functionality has been added to the Website Builder page to clear a custom domain name and manage SSL certificates.
Clear a Custom Domain Name
Lender administrators can clear a custom domain name by clicking the new Clear Custom Domain button on the Website Builder > Custom Domain Settings tool.
When a custom domain name is cleared, the site is returned to its original "mymortgage-app.net" domain name. If an SSL Certificate was approved for the custom domain, it will also be cleared. However, it will remain available in SSL Certificate configuration settings in case the domain name is reinstated later. Any SSL certificates that are Pending or Expired will be deleted when the custom domain is cleared.
![]()
To Clear a Custom Domain Name:
-
In the Encompass Consumer Connect Admin portal, click Website Builder.
-
Click the Edit icon (
 ) next to your custom domain name.
-
When the Custom Domain Settings tool opens, expand the custom domain settings by clicking Enter your Custom Domain.
-
Click Clear Custom Domain.

A warning message displays stating that performing this action will make your custom domain inaccessible.
-
Click Confirm to clear the custom domain.
-
The site domain is renamed to its original "mymortgage-app.net" domain name and saved.
Recreating the Same Custom Domain
A custom domain name that was cleared can be recreated later. Note that certificates that were valid when the custom domain was cleared, will automatically be applied. No further steps are needed to approve the SSL certificate since it is already approved. Certificates that were not valid when the custom domain was cleared, will be deleted. However, a new certificate will be created when the custom domain is recreated. Lenders will need to follow the process for setting up a new certificate.
Resend Certificate Emails
When setting up a custom domain in Consumer Connect, part of the process is to verify domain ownership. To do this, Consumer Connect sends an email to a set of administrative email addresses (i.e. administrator@custom_domain_name, webmaster@custom_domain_name, etc) within the custom domain requesting approval of the SSL certificate. The certificate request will expire after 72 hours. Once the SSL certificate is approved, the custom domain setup process can move forward.
If the certificate request expires or was not received, the lender administrator can have it resent to them.
To Resend Certificate Emails:
-
In the Encompass Consumer Connect Admin portal, click Website Builder.
-
Click the Edit icon (
) next to your custom domain name.
-
When the Custom Domain Settings tool opens, expand the certificate settings by clicking SSL Certificate.
-
Click Resend Certificate Email.

The SSL certificate requests are resent to the administrative email addresses.
NGCC-63867, NGCC-67337
Loan Application Workflows
The layout of the Loan Application Workflow editor has been updated and reorganized to improve usability. The loan application sections have been divided into two new categories: Admin Configurations and Loan Application Sections. Sections that contain administrative settings, such as General, Disclosure Settings, Lender Defined Fields, Conditional Fields, Miscellaneous, and Services Settings are listed under Administrative Configurations. All other loan application-specific sections are listed under Loan Application Sections.

NGCC-66198
Enhanced flexibility for lender administrators to re-order the sections within the loan application to create a unique workflow.

Each section of the loan application is listed under Loan Application Sections. The order in which they are listed here represents the order in which they are presented to the borrower in the loan application. A lender administrator can change the order by clicking the Drag and Drop icon ( ) next to a section title and dragging it to the desired location. Upon release, the section will move to the new position in the loan application.
When reorganizing sections of the loan application, be aware that Consumer Connect does not validate the section order for the proper sequence of information displayed to the borrower. It is up to the lender to ensure that data integrity is maintained when moving sections around. Some examples are:
All sections relating to services should be placed below Loan Details and Personal Information.
Rates must be placed below Loan Details, Personal Information, Assets, Expenses, Employment and Income, Order Credit and Liabilities sections. Otherwise, the loan program results might change.
NGCC-64352
A new option has been made available for adding custom help text to individual fields in the loan application. When help text is added to a field, an Info icon appears next to it in the loan application. When a borrower hovers over the icon, the help text is displayed. The following example shows custom help text for the Loan Purpose field.

Adding Help Text
A new Help Text column has been added to the field settings in the Loan Application Workflows editor. The column contains icons the lender administrator can use to add ( ), edit (
 ), and delete (
 ) help text.

To Add Help Text to a Field in the Loan Application:
-
In the Encompass Consumer Connect Admin portal, click Loan App Workflows.
-
Click the Edit icon (
) next to the workflow. -
When the editor opens, locate the desired field.
-
In the Help Text column, click the Add icon (
).The Help Text Manager screen opens.
-
Enter the help text into the text field, then click Save.

-
Click Save to push your changes to the loan application on your site.
NGCC-66716
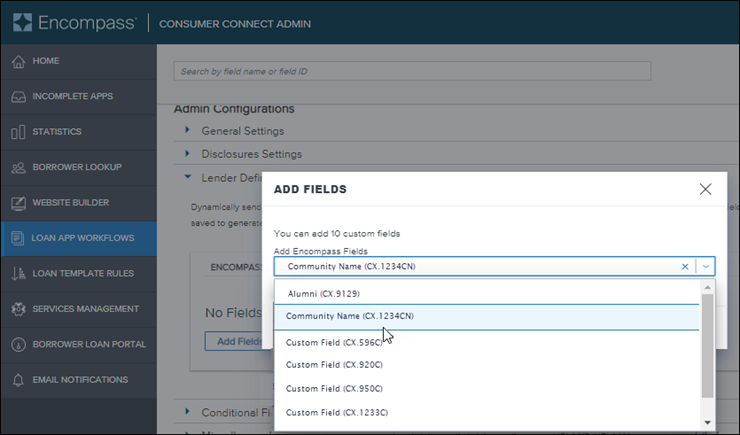
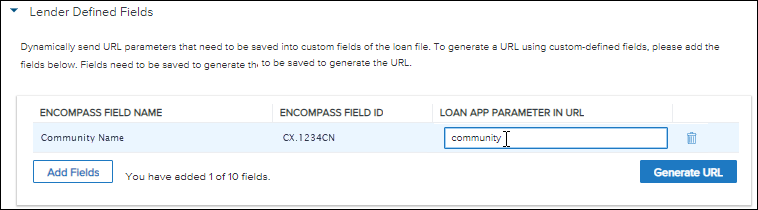
A new feature has been added to give lender administrators the ability to generate a loan application URL that passes custom fields and values to Encompass when the loan is submitted. With this feature, a lender administrator generates the URL using options in the new Lender Defined Fields section of the Loan App Workflow editor. The URL can be added to a company website where borrowers can start a new loan application.
The Lender Defined Fields section includes an Add Fields button that lender administrators click to specify the desired custom fields and values to populate the loan file. Once the fields and values are specified, the lender administrator clicks the Generate URL button and copies the URL.

Generating a URL with User-Defined Custom-Defined Fields
To generate a URL with user-defined custom-defined fields, the custom fields must exist in Encompass and must have a string data type. To learn how to create user-defined custom fields in Encompass, see Lender Custom Fields in the Encompass online help. For each URL, a lender administrator specifies a loan application recipient, a parameter name for the custom field that will appear in the URL, and a value for the parameter.
The format of the generated URL is as follows:
https://{site domain}/loan-app/?siteId={site ID}&workFlowId={workflow ID}&lar={loan app recipient}&customParameter={parameter name}%3A%3A%3A{parameter value}
In the following example, the loan application recipient is "jreese", the parameter for the custom field is "community", and the parameter value is "Eves-Pleasanton".
https://rosewoodlending.mymortgage-app.net/loan-app/?siteId=7081156063&workFlowId=1019006&lar=jreese&customParameter=community%3A%3A%3AEaves-Pleasanton
Why does the URL contain strange characters?
Generated URLs may contain percent signs (%) followed by two alphanumeric characters (for example, %3A). These URLs are valid. This happens because the URL is encoded to convert non-ASCII characters into a format that can be understood across all web browsers and servers.
To Generate a URL Using Custom-Defined Fields
-
In the Encompass Consumer Connect Admin portal, click Loan App Workflows.
-
Click the Edit icon (
) next to the desired workflow. -
When the editor opens, click Lender Defined Fields under Admin Configurations.

-
Click Add Fields, then select the desired custom field from the drop-down list. To locate the field, enter the field name or field ID in the search bar.
The list only displays the user-defined custom fields and field IDs that were created in Encompass. If the custom field is not listed, make sure it exists in Encompass.
-
Click Add.
-
Add additional fields as needed. Up to 10 fields can be passed in the URL.
-
For each field added, specify a loan application parameter. This is the name that will appear in the URL. Each name must be unique.
-
When finished adding fields and loan application parameters, click Save.
-
Click Generate URL.
The Generate Custom URL configuration screen appears.
-
Specify the loan application recipient to assign to this loan application, then enter the desired value for the field.

-
Click Copy URL.
NGCC-67409
The fields that capture REO details in the loan application have been made available in the Manage Your Properties section of the Loan Application Workflow editor. This enhancement gives lender administrators the ability to Show/Hide, Require, and edit these fields.
The fields that have been added to the Loan Application Workflow editor are listed in the table below.
| Default CC Field Name | Encompass Field Name / ID | Field Options |
|---|---|---|
| Address | Address 1 / FM0150 | |
| Unit Type | Unit Type / FM0147 | |
| Unit # | Unit # / FM0148 | |
| City | City / FM0006 | |
| State | State / FM0007 | |
| Zip | Zip / FM0008 | |
|
Property Status |
Mortgage Property Disposition Status / FM0024
|
Sold Pending Sale Retained for Rental Retain for Primary or Secondary Residence |
|
Property Currently Used As |
Mortgage Property Use of Property / FM0041 |
Primary Home Secondary Home Investment Home |
| Type of Property | Mortgage Property Type / FM0018 |
Single Family Condo Townhome More than 4 units Mobile home Commercial Home and Business combined Mixed Use Farm Land |
| Pending Sale Date | Pending Sale Date / FM0059 | |
| Property Will Be Used As | Mortgage Property Disposition Status / FM0055 |
Primary Residence Second Home Investment Other |
| Property Usage Description | Mortgage Property Market Value / FM0019 | |
| Outstanding Mortgage Balance | Mortgage Property Unpaid Balance / FM0017 | |
| Monthly Mortgage Payment | Mortgage Property Monthly Payment / FM0016 | |
| Taxes, Insurance, and Other | Mortgage Property Monthly Expense / FM0021 | |
| Purchase Price | Mortgage Property Purchase Price / FM0023 | |
| Gross Rental Income | Mortgage Property Monthly Gross Rental Income / FM0020 | |
| Date Acquired | Date Acquired / FM0022 |
NGCC-67068
The Joint Credit and Current Monthly Housing Expenses sections of the loan application have been enhanced to support up to five custom fields each.
NGCC-68109, NGCC-68285
Embedded Borrower Widgets and SSO Sites
A new option has been made available for embedded borrower widgets and SSO sites that allows lender administrators to add a link to their privacy policy. When a privacy policy URL is specified in the Privacy Policy area of the Loan App Workflows > Edit Workflow > Miscellaneous section, it will be made available to borrowers in the loan application. When a borrower clicks the link, the lender's privacy policy will open in a separate browser window.

When the Privacy Policy is set to Show and a link is provided in the loan application workflow, the link to the Privacy Policy displays on the Borrower Information section of the loan application.

NGCC-44002
Services
Starting in Consumer Connect 22.3, when applicants apply for a joint credit report, the system will only order a joint credit report when borrowers are married to each other. The following updates have been made in Consumer Connect Admin for this new system logic:
In the Loan App Workflows > Loan Application Sections > Personal Information settings, a new Are you married to the co-borrower? option has been added. Administrators can elect to show, hide, and require this question on the application.

In the Services Management > Order Credit Settings section, new options have been added for administrators to determine if the system will order individual credit reports when the borrower and co-borrower are not married or if the option to order credit will be disabled when the borrower and co-borrower are not married.

-
Select Order Individually for the system to order individual credit reports for the borrower and co-borrower.
-
Select Do not order to prevent the system from ordering a credit report. If applicants have selected No for the Are you married to the co-borrower? question on the application, the following message will display in RED under the question on the application: You cannot order credit report unless you are married to the co-borrower"
Here is an example of what the loan application looks like when the applicant selects No for the Are you married to the co-borrower? question and the administrator has selected the Do not order option in the Order Credit Settings section.

NGCC-66192
A new option has been added to the Product and Pricing Settings for both EPPS and Optimal Blue that controls whether discount and credit points will be displayed to borrowers in Rate search results. When Yes is selected for this option, discount and credit points are hidden in the rates results displayed by the Rates Calculator Widget and Loan Application Workflow.

NGCC-67683
Improvements have been made to the message text that is displayed on Home Owners Insurance task cards when no quotes are found or when a quote was not submitted successfully. Both messages provide more information and a phone number the borrower can call to speak with a licensed insurance representative.

NGCC-65655, NGCC-66824
Borrower Portal Enhancements
When saving a new loan application, the borrower is prompted to log in to the borrower portal or create a borrower portal account. After logging in with existing credentials or new account credentials, the borrower will be directed back to the loan application instead of the borrower portal.
NGCC-65221
Loan Application
Auto-complete functionality has been added to the Current Residence and Previous Residence Address fields. When a borrower types into an address field, the address will auto-complete and/or suggest possible addresses. Previously, the Subject Property Address fields only supported this functionality.
NGCC-36050, NGCC-65836
When a borrower selects Pending Sale as the Property Status for an REO asset, the new Pending Sale Date (field ID FM0059) field will be displayed.
NGCC-62541
When HELOC is selected as the Loan Purpose and the Product and Pricing service is enabled for the workflow, the Rates confirmation page will now display the questions Do you have a mortgage balance? and What is your mortgage balance? along with the other HELOC-related fields. If values were provided for these fields on the Loan Purpose page, they will be populated in the Rates confirmation page.
When the loan application is submitted, the Lien Position field (field ID 420) will be mapped as Subordinate with a Lien Position of "2" in Encompass.
NGCC-66033
Rebranding Updates
In support of our company naming update, the Ellie Mae logo displayed in the footer of each page of Consumer Connect sites, borrower portal, loan application, and Consumer Connect Admin has changed to "Powered by ICE".
NGCC-62591
Usage Note
If borrowers are not receiving the automated emails from Consumer Connect, it is possible the emails are being filtered out and moved to the spam folder. To help prevent this issue, configure a Sender Email Address that uses your company domain. For instructions, see Add a Sender Email Address.