Feature Enhancements
Email Updates
Starting with this release, the HTML editor on the Email Template and manual email send pages have been updated with a new editor.
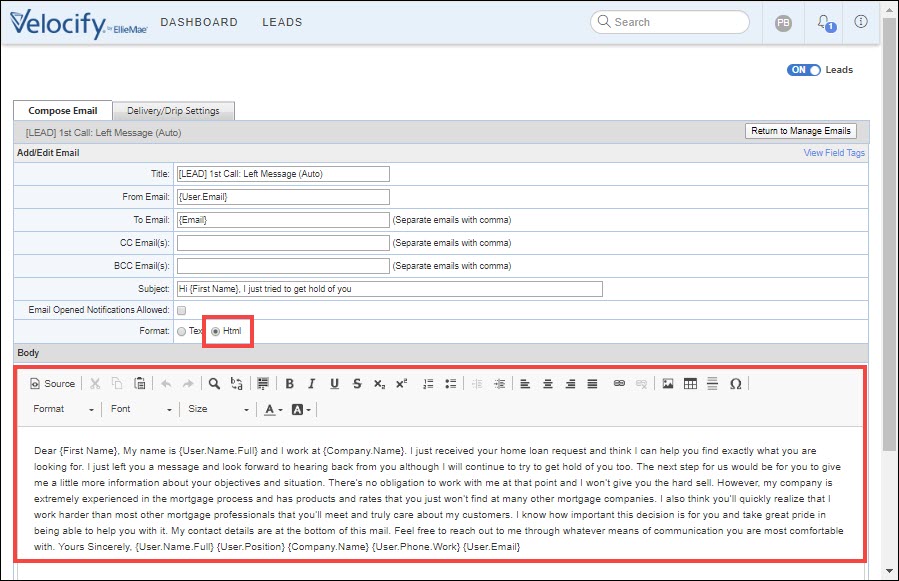
Use the menu options in the editor for quick access to formatting tools, view source code, spell check, insert images, tables, and emojis, and so on.
As part of the update, you no longer have to look up field tags in a separate browser window. You can search for field tags by typing {{.
- Go to your email compose window and in the Format field, select Html.
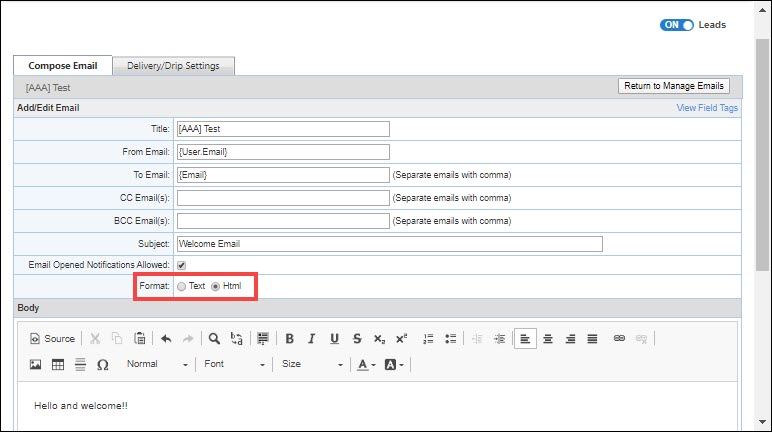
- Use the menu options to access formatting tools, view and use source code etc. to create your content.
- In the Body field, type {{ to display your available field tags in a drop-down list.
- The first 10 field tags are displayed by default. To view more tags, type the first few letters of the tag you want to view. This will update the list of displayed tags based on your search criteria. As you continue to use field tags, the default list of 10 field tags will populate with your most used tags.
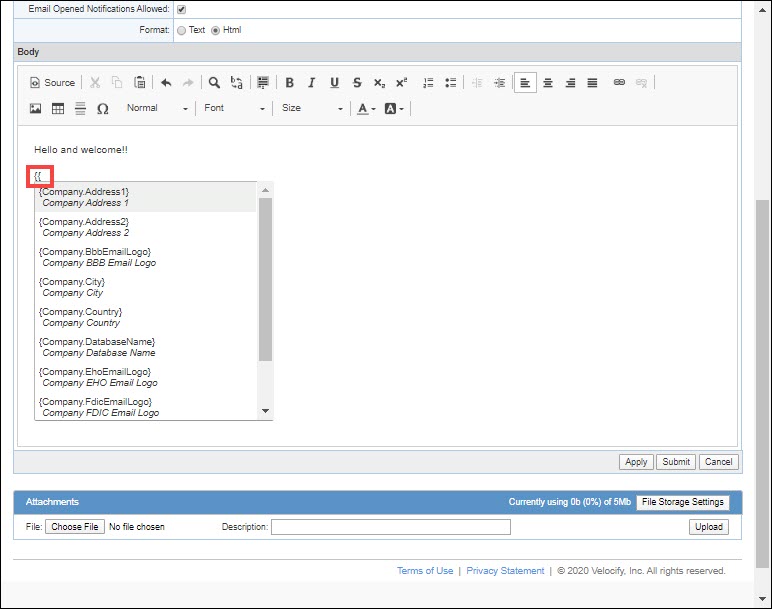
- Select your desired field tag from the drop-down list.
Two new Email Reports (Email Engagement by Template, and Email Engagement by To: Domain) and a new Email Settings tab are being added with the Velocify by LeadManager 19.4 January 2020 Service Pack release.
These updates are not available out of the box. You can reach out to ICE Customer Support to discuss enabling these updates for your LeadManager instance.
Two new reports – Email Engagement by Template, and Email Engagement by To: Domain (i.e. Sending Domain) – have been added. Use the data in these reports to track and monitor email performance metrics such as how emails are being delivered and whether leads are engaging with the emails.

If your instance has not been enabled with these updates, the two new report tabs will still display but data for the reports will not. A Coming Soon message will also be displayed.

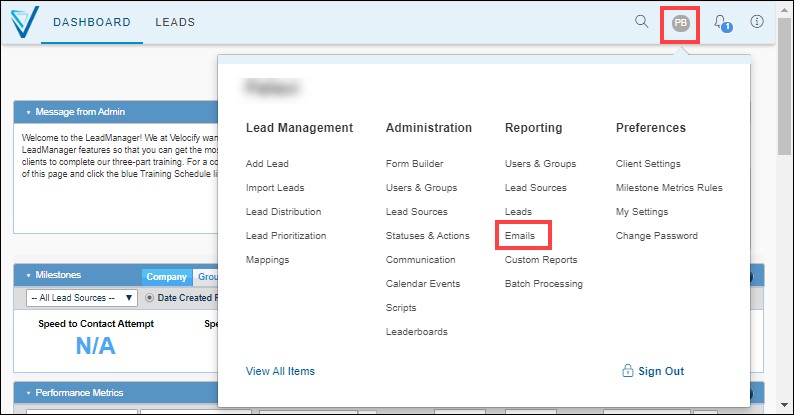
To view the reports, admins should log into LeadManager, click their name on the top right corner of the page, and from the Reporting menu, click Emails.
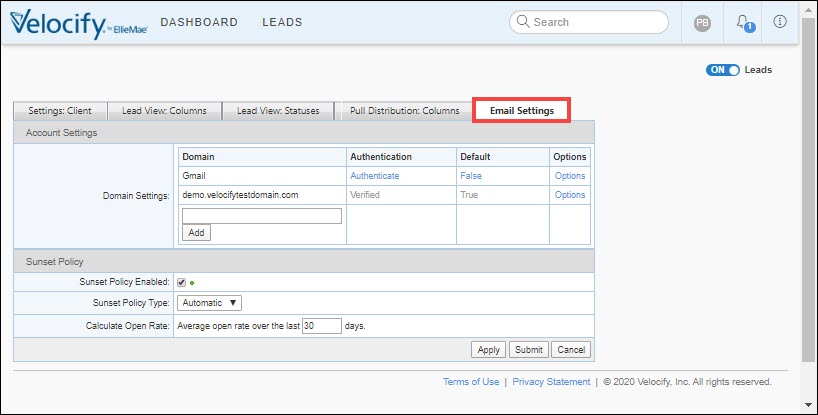
You can specify and authenticate your custom domain. This will improve email delivery because email providers (for your recipients, in this case) prefer to see emails delivered from a unique, authenticated domain. To support this, a new Email Settings tab has been added to Client Settings.
The Email Settings tab will display only if these updates have been enabled for your instance.
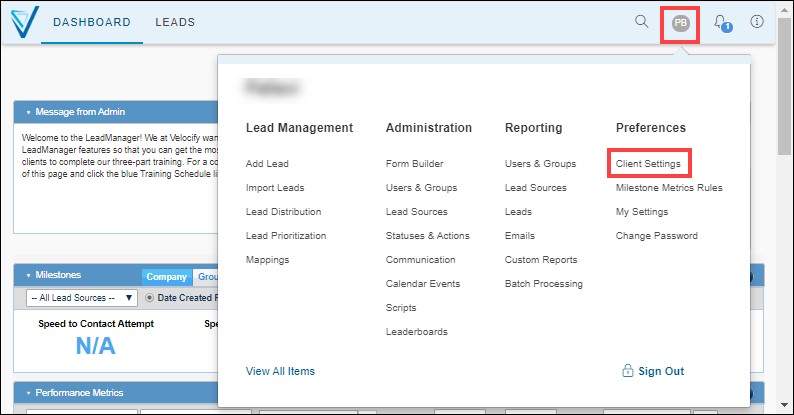
- To go to the Email Settings tab, log in as an administrator, click your name on the top right corner of the page, and from the Preferences menu, click Client Settings.
- Click the Email Settings tab.

- Use the Domain Settings section to register the custom email domain you will use when you send emails to your leads. You can also use Domain Settings to authenticate your custom domain, view DNS records for your custom domain, and delete your custom domain from Email Settings. It is strongly recommended that you acquire a custom domain for your emails. However, a default domain will be provided out of the box. You can purchase your domain from your preferred internet domain provider.
At time of publishing the following list of popular web hosting service providers was available:
- Bluehost
- InMotion Hosting
- HostGator
- Hostinger
- GoDaddy
- Tsohost
- Wix
- SiteGround
- Hostwinds
- Weebly
Consult with your service provider regarding implementation best practices.
- To add a custom domain, type the domain name in the Domain column, and click the Add button.
-
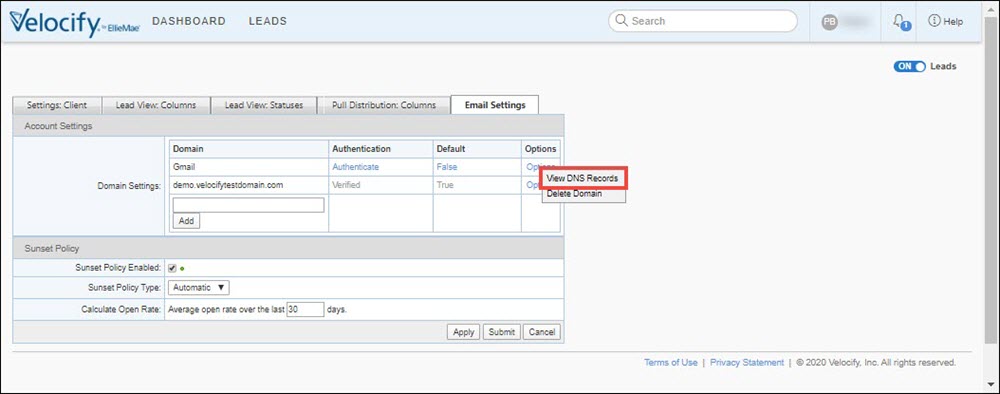
Click the Options link corresponding to your domain, and then click View DNS Records.
-
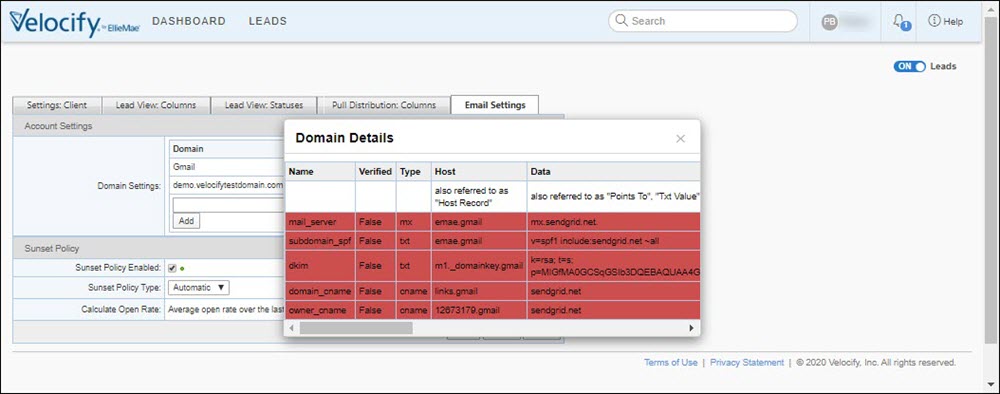
For each DNS (Domain Name System) record, a name, type, Host, and Data entry will be displayed. The data will display in red highlight initially until the domain has been authenticated.
-
Log into your ISP (Internet Service Provider)'s website and enter the information for the five DNS records so that it matches the Domain Details information from the Options link.
-
Back in the Email Settings tab, click the Authenticate link corresponding to your custom domain.
After you successfully authenticate your custom domain, the Authenticate link will update to Verified.
Verified is not a clickable link as no further action is needed.
Data will continue to display in red if there were issues with the domain authentication. Double-check that you have entered all the information in your ISP exactly as it appears in the Domain Details and try to authenticate again. If you continue to experience issues, contact ICE Customer Support.
In addition to using your custom domain to send emails, you should consider implementing a sunset policy for leads receiving your emails. Email providers track how your email recipients engage with your emails and take action (that could impact you negatively) when leads repeatedly ignore your emails. Sunset policy enables you to regulate this by sunsetting leads (for emailing purposes) after they have repeatedly failed to engage with/open your emails.
- Use the Sunset Policy section to define when your emails will stop being sent to unresponsive recipients. This feature is enabled out of the box (Sunset Policy Enabled check box is selected). Sunset Policy enables you to track lead activity on your email communications, stop sending emails to unresponsive leads, and focus on those who are engaging with you, thereby helping improve the efficiency and productivity of your marketing campaigns, and improving your inbox delivery rates among email providers.
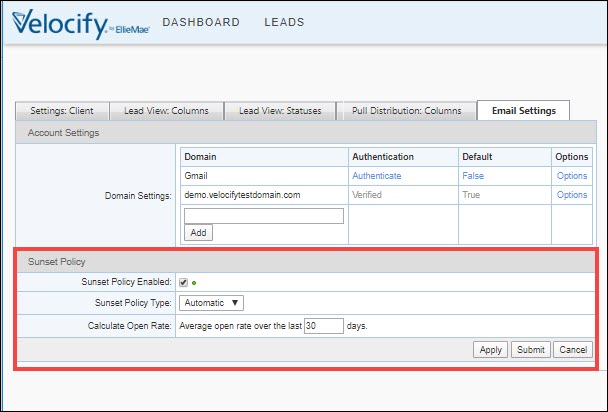
The Sunset Policy Type is set to Automatic by default and is the recommended policy. When Automatic is selected, Velocify will monitor your leads’ email engagement rates and automatically stop sending emails to unresponsive leads (sunset those unresponsive leads from receiving marketing emails) if they have not opened their emails for X days (as indicated in the Calculate Open Rate field). Sunsetting is based on your current email open rate across all leads, calculated and updated automatically by Velocify. We recommend that you keep the 30 days default setting as the duration to calculate open rate.
The Automatic Sunset Policy Type is designed to adjust how quickly unengaged leads should be sunset with reference to receiving marketing emails from you. The greater the average open rate for your emails, the more liberal the sunset policy (i.e. Velocify will provide your leads more time to keep receiving emails and to begin to engage with the emails). The lower the average open rate, the stricter the sunset policy – this is to try and achieve both a better email engagement rate from your leads and a better delivery rate of your emails by your leads’ email providers. As the open rate improves, the sunset policy will automatically adjust.
If you set the Sunset Policy Type to Manual, you will be able to set exactly how quickly to sunset a lead from email delivery when they have not opened any of your emails. Average open rates will not influence the sunset policy. The default value for Manual termination email sends to unresponsive customers is 120 days, i.e. if a lead has not opened an email in 120 days, that lead will no longer receive marketing emails.

Usability Updates
The Velocify LeadManager 19.3 December Service Pack release introduced the drag and drop feature to move items up and down a table on the Form Builder admin pages. With this release, the blue and yellow arrows (that you could click to move items up and down in a table) on the Scripts page have been replaced with drag handles (six-dot icon) to indicate that the fields are draggable.
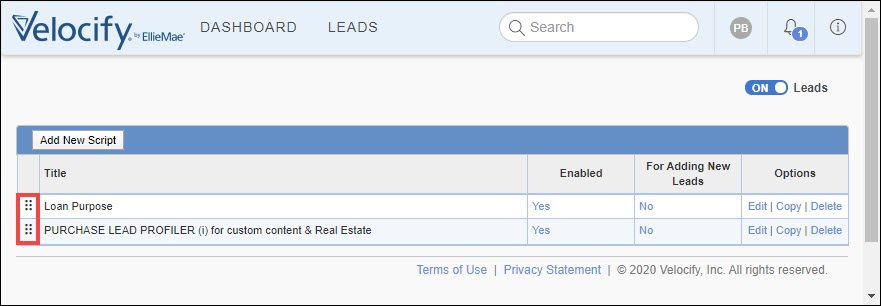
To Go to the Scripts Page:
- Log into LeadManager as a LeadManager administrator.
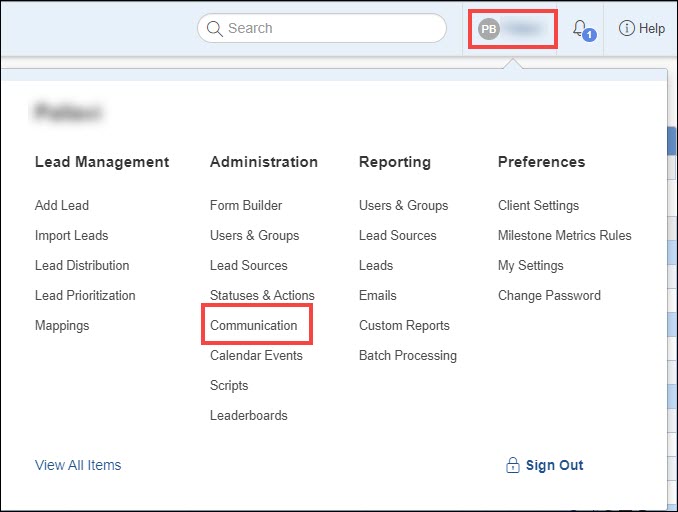
- Click your name on the top right corner of the page, and from the Administration menu, click Scripts.
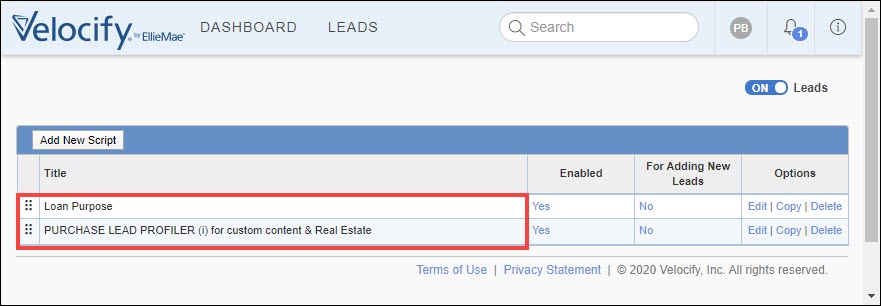
- To drag and drop rows, click the columns that do not include actions/links such as Yes, No, Edit, Copy, Delete.
For more information, see Drag and Drop Replaces Colored Up and Down Arrows in the Velocify LeadManager 19.3 December Service Pack Release Notes> Feature Enhancements> Usability Updates section.

