Distribution: User-Level Filters
TOPICS COVERED IN THIS ARTICLE
- User filters for Lead Distribution
ENVIRONMENT
LeadManager
DETAILS
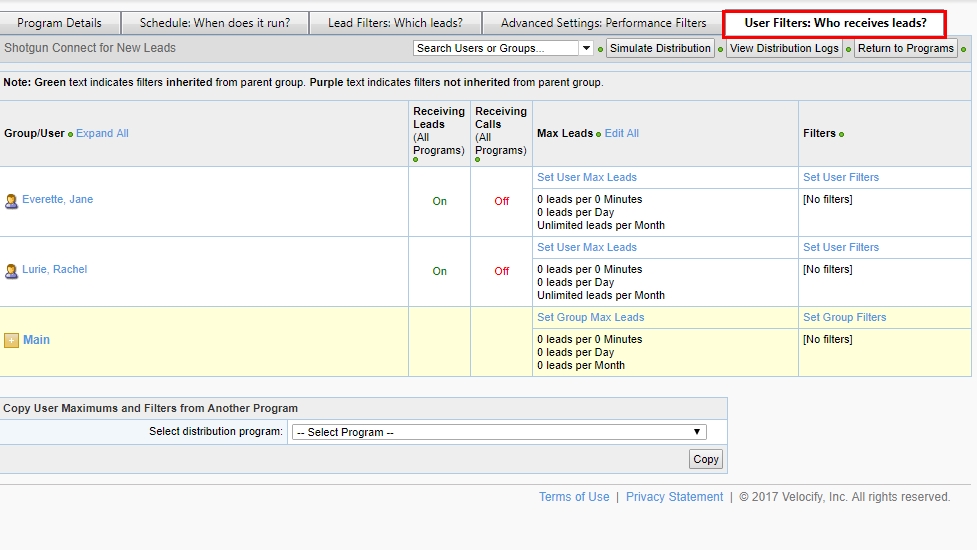
Setting user filters for distribution programs is done on the User filters: Who receives leads? tab:

Use this tab to configure which users will receive leads from this program. This is done by configuring two types of settings:
- Max Leads: Maximum number of leads distributed to a group or user within a defined timeframe
- Filters: Criteria that help you drill down to define the specific subset of leads you want to be distributed. Note that this is a second level of lead definition. You will be determining a subset of leads to be pulled from the group of leads already defined by the filters on the Lead Filters: Which leads? Tab
Max Leads and Filters can be set at the user level or the group level. Any settings that are applied to a group will automatically be inherited by members of the group.
Note: At the bottom of the page there is a pulldown you can use to copy user maximums and filters from another distribution program. Use this if you have user or group maximums and filters in another distribution program that have proven themselves effective and you wish to use them in this program without having to key in the values all over again.

- To set maximums for a user, click the Set User Max Leads link in the Max Leads.The process of setting maximums is the same for a group as it is for a user.

- When you click the Set User Max Leads link, the fields become active.

- Note the message in parenthesis to the right of these filters. If you leave these fields blank, the values are unlimited. So if you do not want to limit the number of leads distributed to this user by this program leave these fields blank.
- If you do want to set limits on the maximum leads received by this program do so by putting values in the fields. Set the first two fields to correspond to your desired limits, for example 3 leads per 30 minutes. The Per pulldown contains the values: minutes, hours, days, and weeks to give you more control over your maximums.
- Additionally, you can enter a maximum number of leads for each day, and a monthly maximum.
- After you have set the Maximum leads for this user click the Save button.
The Filters column displays the existing filters and has several options that can be performed by clicking links.

The options that exist in the filters column are as follows:
- Set User Filters- Click this link to load the User Filters page. This is explained in the next section of this article
- Clear User Filters - Click this link to clear user filters
- Inherit Group Filters- Click this link to inherit any filters that are applied to the group to which this user belongs
- Ignore Group Filters- Click this link to inherit any filters that are applied to the group to which this user belongs
Note: For the Inherit and Ignore Group Filters settings the group filters that will be inherited or ignored when these links are clicked are the group filters that are applied to the lowest subgroup of which the user is a member. Meaning that if Steve Ramirez is a member of the Team 1 Group, and the Team 1 Group is a subgroup of the Main Group, when you click to inherit or ignore the group filters, the filters you will be inheriting or ignoring are those applied to the Team 1 Group, not the Main Group.
To set filters for a user click the Set User Filters link in the Filters. The process of setting filters is the same for a group as it is for a user.

Applying filters that control which leads are distributed for a user is done by the same process that is used on the Lead Filters: Which Leads tab, except there are a few more options. Setting User Filtersis recommended for advanced users only so please read through this entire section carefully before using this feature.
In addition to filters, you will find the following checkboxes when you click Set User Filters:
- Global Filter: Selecting this insures that the filter will be applied for this user to all distribution programs. If you leave this option unchecked, this filter will apply to this user ONLY within this program. If you know that you want this filter to be applied for this user for every distribution program, click to select the Global Filter. Note that this feature is only available for clients using the Velocify Advanced Edition.
- Global Filter (Manual Assignment): Check the (Global Filter Manual Assignment) box to prevent a user from being manually assigned a lead that does not meet this filter requirement. An alert will be displayed if you attempt to assign a lead that does not meet this requirement. Note that this feature is only available for clients using the Velocify Advanced Edition.
- Restrictive: Clicking this checkbox will make this filter a requirement for leads distributed by this program to this user. Leaving it unchecked will mean that the user prefers leads that meet the defined criteria. An example of how this would be used is if you selected a filter State equal to. If the Restrictive box was checked next to this filter, it would mean that this user could ONLY receive leads that were from CA. On the other hand, if the Restrictive box was not checked, the system reads this as an indication that the user has a preference for CA leads. This is a good segue as it brings us to the more complex part of setting User Filters.
When a new lead is received and is eligible to be distributed by a program based on the requirements specified in the Lead Filters: Which leads? tab, the system has to decide who should get the lead based on the User Filters. When no User Filters are specified, the lead is distributed on a pure round-robin system. But if User Filters are specified, the system engages in a more complex decision making process to decide who should get the lead. The system does this by first assigning a sort of match score for every lead and every user. For every filter that is matched at the User Filters level, the user is assigned a score of 1 point for that lead.
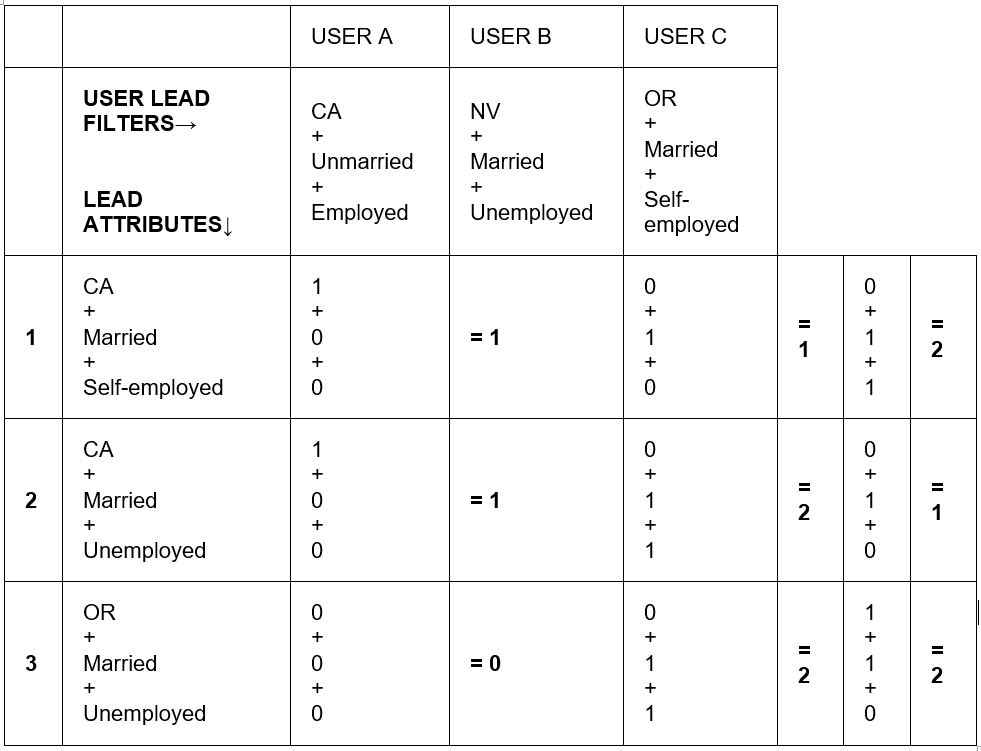
Understanding how the system decides on preferences is best described by an example.Let’s first set up users A, B & C with some user level filters as shown below:

Here’s how the match scores look for these users when combined with the following 3 leads:

- In the above example, Leads 1, 2 & 3 come in with the shown attributes. Let’s consider Lead 1 and User A first. Only one of User A’s preferences (State = CA) matches Lead 1’s characteristics and so User A only gets a score of 1 point for Lead 1.
- However, for User C, Lead 1 matches on two attributes (Married, Self-Employed) and hence User C gets a score of 2 points for Lead 1.
- Thus, Lead 1 would be distributed to User C. Using the same logic, both Users B and C score 2 points for Lead 3. In this case, between B and C, the user that had gone the longest time without receiving a lead would get Lead 3.
A note about Lead Filters and User Filters. The reason why you are given the opportunity to apply filters at two levels within a single distribution program is so that you can define one set of leads to be distributed. That group of leads will be pulled from every lead in the system, now and going forward. The user and group filters then allow you to define, within that group of leads, which leads will go to which user.