LeadManager: Campaigns: Detailed Review
TOPICS COVERED IN THIS ARTICLE:
- Manager Campaigns
- Adding a Campaign
- Columns on the Manage Campaigns Page
- Share Reports with Providers
ENVIRONMENT:
LeadManager
DETAILS:
Manage Campaigns
Velocify campaigns essentially act as folders in your account, allowing you to organize your leads based on the website, lead provider, or marketing source where the leads came from. Proper campaign management is crucial when setting filters in your distribution programs or priority queues, and campaign organization lets you report on your ROI by lead source as well.
Adding a Campaign
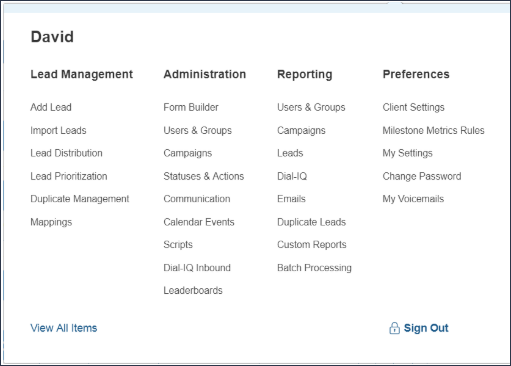
First, access the Menu page by clicking your name in the upper right of the header.

Under Administration, click Campaigns.
Then click the Add New Campaign button at the top of the page.

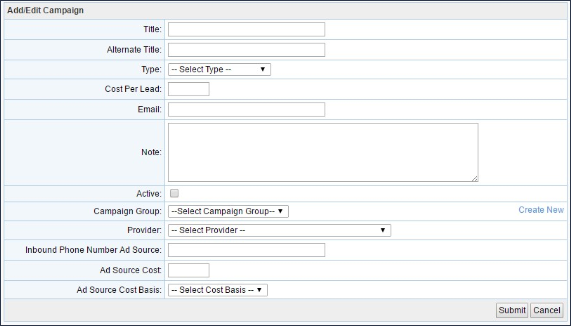
This will bring you to the Campaign Add Edit page, where you can enter the information for your new campaign.
-
Title: This field is required and is the title of your campaign. It is most common to enter the name of the lead source as the campaign title. However, keep in mind that the title of the campaign is visible to all users in your account. If you wish to conceal the source of the leads, give the campaign a title which will not divulge the lead source.
-
Alternate Title: This field is not required and can only be seen by administrators. If you choose not to title the campaign with the name of your lead source, it is best practice to enter the lead source name in this field.
-
Type: This field is required and indicates the type of leads in this campaign. Examples include Direct Mail, Internet (Bought Leads), or Television. The type is used for reference by your administrators and is not accessible via reporting.
-
Cost Per Lead: This field is not required but is important for measuring ROI. If you plan to use the Campaign Cost Assessment report (found at Menu – Reporting – Campaign Reports – Campaign Reports – Campaign Cost Assessment), this field is necessary to view accurate lead pricing in that report.
-
Email: This field is not required but allows you to enter the email address for your contact at this lead source.
-
Note: This field is not required but allows you to add any additional notes related to this campaign or lead source. It may be helpful to add additional contact information for your lead provider, the URL for the website that the leads came from, or any other pertinent information.
-
Active: This field is necessary when adding a new campaign to ensure that leads in this campaign can be worked by your users. If left unchecked, the campaign will be considered Inactive. Leads in inactive campaigns cannot be viewed on the Normal or Priority Views, nor can they be distributed, prioritized, or filtered against.
-
Campaign Group: This field is not required, but it is often best practice to organize your campaigns into campaign groups. As you accumulate more campaigns, groups are helpful to easily set distribution or prioritization filters that references multiple campaigns at once. For more information on Campaign Groups, please reference the related support article.
-
Provider: This field is not required. If you are setting up a campaign for leads that come from a well-known lead provider or Velocify Partner, select the name of the provider from this dropdown. This will help you easily integrate with that provider so they can post leads directly into the campaign. If your lead source or provider is not listed in the dropdown, leave the value as “-- Select Provider –“ and continue to submit your campaign.
-
Share Reports with Provider: Depending on the lead provider you select in the Providerdropdown, a set of radio buttons may appear prompting you to share reports with this provider. If you select Yes and agree to the terms and conditions, your lead provider will have access to details of the leads they send into this campaign. This allows them to track how well their leads are performing. If you choose No, the lead provider will not have access to this information. For more information on Data Sharing, please reference the related support article.
-
Inbound Phone Number Ad Source: This field is not required, but if your campaign holds leads created from an advertisemet it can be used to store the phone number listed on that ad.
-
Ad Source Cost: This field is not required, but it can be used for you to reference the total cost of an advertisement, as opposed to the cost per lead, which may not always be known.
-
Ad Source Cost Basis: This field is not required, but it can be used for you to reference how often you pay for that advertisement, whether on a weekly, monthly, daily, or per-call basis.
Click the Submit button to save your new campaign. Back on the Manage Campaigns page, the new campaign is in the list.
Columns on the Manage Campaigns Page
The Manage Campaigns page provides other information related to each of your campaigns.
-
ID: This is the Campaign ID, a unique identifier associated with each of your campaigns. Campaign IDs are important when generating posting URLs for lead providers to send leads directly into Velocify, and they are an easy way for you to reference your campaigns.
-
Title: This is the title of your campaign.
-
Group: If you selected a Campaign Group when creating your campaigns, the group associated to the campaign is listed here.
-
Response Code: This is a link sending you to a secure web form hosted by www.lendersafe.com. This web form is directly associated to your Velocify account. When you fill out information on this form and select [Submit] at the bottom of the page, the information that you entered will create a new lead in this Velocify campaign. This form is not recommended for external use with your marketing campaigns, and the interface, design, and layout cannot be customized. For that reason, we recommend you use your own web developer to create a custom web form that would meet your company’s needs.
-
Provider: If you selected a lead provider from the Provider dropdown when creating your campaigns, the name of the provider is listed here.
-
Cost Per Lead: If you filled out the cost per lead when creating your campaigns, that value will appear here.
-
Active: This column will show whether the campaign is Active or Inactive.
-
Share Reports: If you did not select a lead provider from the Provider dropdown when creating your campaigns, “N/A” will appear in this column. If you did select a lead provider, this column will show whether you chose to share reports with that lead provider.
-
Options: The Options column allows you to choose other options when managing your campaigns.
-
Delivery Instructions / URL: If you selected a lead provider in the Provider dropdown when creating your campaigns, this link will yield a popup providing you with a posting URL. That URL is the “address” where your lead provider will want to send your lead data. If you did not select a lead provider when creating your campaigns, this link will be grayed out.
-
Edit: This link allows you to edit the details of existing campaigns.
-
Delete: This link allows you to delete existing campaigns. Keep in mind that in order to delete an existing campaign, the campaign must not contain any leads. This includes leads that may have been caught in Duplicate Management or leads assigned to inactive or deleted users.
Share Reports with Providers
The Share Reports with Providers button is located at the top right of the Manage Campaigns page and will send you to the Partner Sharing options.
When adding your campaigns, if you selected a lead provider from the Provider dropdown, this page will provide a quick reference of which providers you chose and whether you are sharing reports with those providers.

The columns on the Partner Sharing page show the following information.
-
Provider: This is the name of the lead provider. When creating your campaigns, each provider you selected in the Provider dropdown will appear on this list.
-
Lead Count: This is a count of leads in campaigns associated with that lead provider. For example, if you select “LeadPoint (Student Loans)” as the provider for one campaign, this column will count the total number of leads in that campaign. However, if you select “LeadPoint (Student Loans)” as the provider for three different campaigns, this column will count the total number of leads in all three campaigns.
-
Share Reports: This column providers a quick reference of whether you chose to share reports with this lead provider.
-
Options: This column contains the Edit When clicked, you have the option to edit your partner sharing preferences with this lead provider and can change whether you would like to share reports.