Document Builder use
Overview
Before you can use the Document Builder, you or your administrator must complete the setup tasks described in the setup sections of this guide. Setup includes Document Builder configuration (as described in Document Builder configuration and designating signers and notaries for your organization (described in Signer and notary role assignment. Signers and notaries must then set up their Document Builder signatures and notary credentials (as described in Notary and signature setup).
From this point on, Simplifile displays the Package List when you log in. You can do the following on this page:
- Add a package. For more information, see Package Shell Creation in the Simplifile eRecording Submission Guide.
- Add documents to a package. For more information, see Document Addition and Removal in the Simplifile eRecording Submission Guide.
- Add documents to a package using a template. For more information, see Document addition using a template.
- eSign and notarize documents. For more information, see eSigning or eNotarizing a document.
This section includes the following topics:
Statuses for packages and template documents
Documents created from a template can have statuses in addition to the statuses described in the Simplifile eRecording Submission Guide. These statuses let people know that the document is being worked on to prepare it for submission.
Template document statuses can include the following:
- The DataEntry status indicates that one or more documents in a package need information on the DataEntry page. You can try to find a reference document from which to extract some of the information.You can also add informationmanually.For more information,see Generated document data editing.
- The Review status indicates that one or more documents is in someone’s review queue. For more information, see Generated document management.
- The Sign status indicates that one or more documents in a package needs a signature. If the county (or jurisdiction) accepts electronic signatures, after you store your signature in Simplifile you can sign the document electronically. For more information on signing documents, see eSigning or eNotarizing a document. For more information about setting up a signature,see Folder setup.
A package containing a document with one of the statuses described above has a Draft status.
Document addition using a template
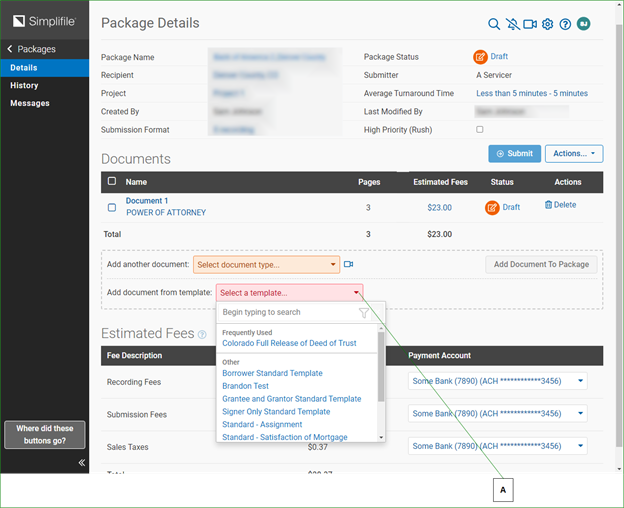
You create packages on the Package Details page. When you add documents to a package, you can choose to use a template to add that document.
| Letter | Description |
|---|---|
| A | Templates can be mapped to the states where you plan to submit your package, or to specific counties (or jurisdictions). |
Simplifile maintains a set of release templates you can use. If you have a different document you would prefer to use as a template, you can provide Simplifile with a Word or PDF copy of that document. Simplifile then creates a template in the system from that document. Simplifile maps each template to a specific document type in each county.
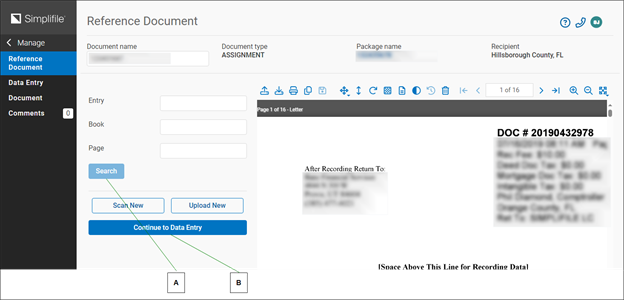
When you add a template document, you may be able to upload a CSV file to automatically complete many of the required fields. In addition, Simplifile gives you the option to search for a reference document. A reference document contains some of the information you need to create the template document, and can automatically complete some of the data entry fields for you.
| Letter | Description |
|---|---|
| A | If Simplifile finds a reference document, select its name in the list to automatically open the document and extract the information it holds that applies to the template document you are creating. |
| B | If Simplifile does not find a reference document, select one of these options to upload or scan the document. You can also simply select to continue to the Data Entry page where you can verify and add necessary information. |
If the legal description of a property is too long for the template, the Data Entry page displays a checkbox you can mark to have the legal description appended as a separate document. This assures that any necessary seals display on the first page.
You must manually complete fields not automatically completed by a reference document. You can refer to the open reference document to find the information you need. Fields vary, depending on the template. Below is an example.

| Letter | Description |
|---|---|
|
A |
Select a sideways arrow or a plus sign to display additional fields. Select a down arrow or a minus sign to hide information or fields. |
|
B |
A name may display in a header. Data may already exist for that name. To see the fields, select the plus sign. Be sure you do not re‑enter information for the first name in the fields that display below it. These fields let you enter data for another entity. |
|
C |
Use the dropdown lists to choose from people at your organization who have been assigned the signer and notary roles (as described in Signer and notary role assignment. |
|
D |
Select here to generate the document, or save your work so you can return and finish later. |
How to add a document from a template
If you have more than one block of information in a category, that block may collapse so that only its header displays. Be sure to select the plus sign (![]() ) in the header to view all of the applicable fees.
) in the header to view all of the applicable fees.
- Do one of the following to add a document placeholder:
- Create a document package. For more information, see Package Creation the Simplifile eRecording Submission Guide.
- Select the name of a package on the Packages page. When the Package Details page displays, choose the type of document that you want to add from the Select a template dropdown list and select Add Template Document.
- If desired, upload a CSV file to automatically provide many of the field values.
- On the Find Reference Document page, complete the fields and select Search. If the reference document you want displays in the Search Results, select it to import the applicable information into your new document.
- To continue with manual data entry, select the Continue To Data Entry
 button.
 - On the Data Entry page, complete any necessary fields.
- When you are ready, select the Generate Document
 button.
Generated document data editing
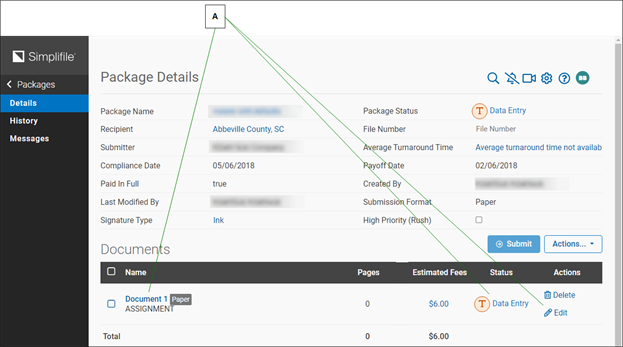
You can generate a document without completing data entry, and completed at an entry at a later time. You can access any unrecorded document to add or edit data. If an unrecorded document has been signed, after you enter or edit the data, you must regenerate the document. A document that has not had all of its information added displays DataEntry as its status.
| Letter | Description |
|---|---|
| A | Select the name of a document with a status of Data Entry or the edit icon for the document to add the information necessary to generate the document. |
A generated document displays in a limited version of Simplifile’s document viewer. The tools you can use may include the following:
- File icons let you scan, download, and print a document. If you have the necessary permission, you can also upload documents or add pages to an existing document.
- Edit Icons let you delete a document. If you have the necessary permission, you can also delete pages without signatures and reorder the pages in a multiple‑page document.
- View icons let you zoom in, zoom out, and fit the image to the window or to letter or legal height.
.
How to edit a document
If you are assigned only to enter data, Simplifile logs you in to the Data Entry page. Complete any necessary fields and select the Generate Document ![]() button. The task is finished.
button. The task is finished.
The Generate Document ![]() button also saves the information you enter so you can return at another time to finish.
button also saves the information you enter so you can return at another time to finish.
- Select the name of the package on the Packages page that has a Data Entry status.
- When the Package Details page displays, select the name of a document with a Data Entry status, or select the edit icon (
 ) for that document.
 - On the Data Entry page, complete any necessary fields.
- To save the information you have entered or to generate the document, select the Generate Document button.
QUICK TIP: If you have more than one block of information in
a category, that block may collapse so that only its
header displays. Be sure to select the plus sign (![]() )
in the header to view all of the applicable fees.
You may enter information for another block (for
example, a second borrower) in the fields under
a collapsed header. Be sure not to re‑enter the
information for the collapsed block.
)
in the header to view all of the applicable fees.
You may enter information for another block (for
example, a second borrower) in the fields under
a collapsed header. Be sure not to re‑enter the
information for the collapsed block.
Generated document management
Sending a document to review removes the document from your work queue and moves it to another person’s review queue. This is helpful when your organization requires another person to verify that a document is ready to sign or submit. Depending on your setup, Simplifile sends documents automatically to review as they are created, or lets you choose when to send each document to review.
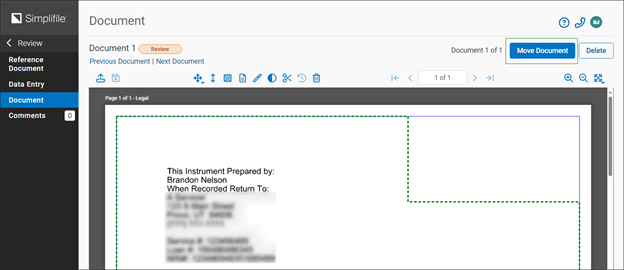
You can mark a template document as ready for review from the document viewer.

The reviewer decides whether to send a document to be signed, to return it for correction, or to reject it. Document return gives the original submitter a chance to make changes to the document data or appearance so that it is ready to be submitted for recording. Document rejection removes the document from the system.
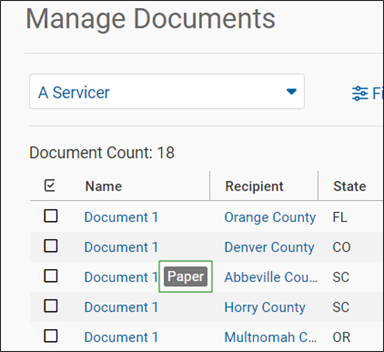
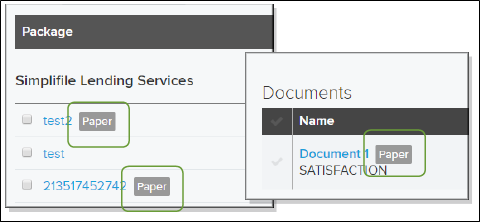
You can create template documents for counties that do not eRecord. Simplifile marks these documents with a Paper label on both the Packages page and the Package Details page for easy identification. You can print these documents, prepare them for submission and submit them manually, and then manually mark them as sent in Simplifile.
When a non‑eRecording county (or jurisdiction) returns documents, you can mark them in Simplifile as rejected or recorded. Rejected documents can be revised and re‑submitted. Recorded documents can be scanned and stored electronically.
This section includes the following topics:
Marking a document for review
A document that is ready for review displays Review as its status on the Package Details page. The package status on the Packages page also displays as Review. People with review permissions view documents from the Signing link.
- Select the name of the package on the Packages page that includes the template document you want to mark for review.
- When the Package Details page displays, select the name of the template document you want to send for review.
- In the left navigation menu, select Document.
- In the upper right corner, select Mark for Review.
- If necessary, use the dropdown list in the Mark for Review window to choose who should review the document.
- Enter any comments in the Comments text box.
- Select the Move button.
Reviewing a document
If you have the necessary permission, you can review template documents A document typically displays in your review list after the document is created and data complete. Document review can help with quality control, as it can require another person to review a document before it is signed and submitted for recording.
When you open a document for review, the document displays in a limited version of Simplifile’s document viewer. The tools you can use may include the following:
- File icons, including options to scan, upload, download, and print a document.
- Edit icons, including options to delete a document and reorder the pages in a multiple‑page document.
- View icons including options to zoom in, zoom out, and fit the image to the window or to letter or legal height.
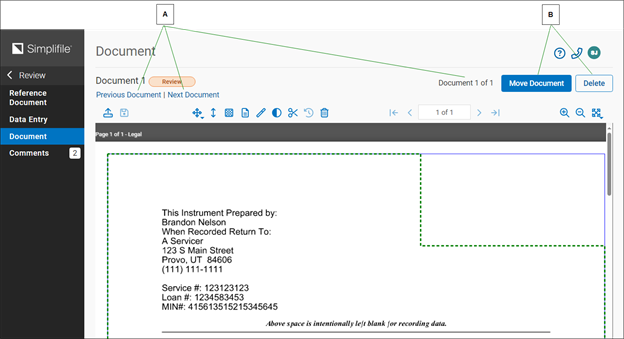
| Letter | Description |
|---|---|
| A | If you mark multiple documents for review, you can use these links to move to the previous document or the next document on the review list. |
| B | Use these options to move, reject, or send a document for correction. |
You can also do the following:
- Move the document to a different folder, typically a signing list. Documents assigned to signers or notaries go directly to the signer or notary. You can enter comments if desired.
- Reject a document. You choose a rejection reason and add explanatory comments. Simplifile removes rejected documents from the system.
- Return a document to the person who sent the document for review so that he or she can correct the document. You enter comments that tell the person what to correct. The comments display at the top of the Data Entry page.
You can choose the columns that display on the Review page table.
This can help you sort the reviewable documents by the trait that is most helpful to you. Initially, items are sorted first by date and second by county (or jurisdiction). The small numbers beside the column names indicate this sort order.
You can also mark boxes in the left column of the table to choose multiple documents. Then you can use the Actions dropdown list to perform the following actions for multiple documents at the same time:
- Reject the documents. You choose a rejection reason and add explanatory comments. A rejected document is deleted. You can view rejected documents in the Package Status report. This lets you see which documents need to be re‑entered and prepared again for submission.
- Send the documents for correction. This returns the documents to the person who added them to Simplifile. Comments you enter display at the top of the Data Entry page.
- Download the documents in a single zipped file in either PDF or TIFF format. You can change the document name, if desired.
- Open the documents in a browser window where you can print or download the document as a PDF.
- Move the documents to a different folder.

| Letter | Description |
|---|---|
| A | If reviewable documents can be placed in more than one folder, select here to choose the folder you want. For information on setting up folders, see Folder setup. |
| B | Select a column name to sort the table by that item type. |
| C | If your list is long, use this field to search for the document you want. |
| D | Select a document name to open the document for review. |
| E | Select a name in the Recipient column to view information about that county (or jurisdiction). |
| F | A number beside a table header indicates the order of sorting. |
| G | Mark the boxes in the left column of the table and select Actions to perform various actions. |
How to review a template document
QUICK TIP: To specify the columns that display in the Review
page table, select Actions and choose Customize
Columns. Then mark the boxes of the columns you
want to display and select the Save ![]() button.
button.
- In the left navigation menu, select Signing.
- If necessary, use the dropdown list to find the folder that contains the documents you want to review.
- Do one of the following:
- To review a single document, select the document name.
- To review one or more documents without having to return to the Review page to open each one, select Review Documents.
- To review specific documents, mark the documents you want in the left column of the document table. Then select Review Selected.
- When a document displays, use the File, Edit, and View tools, as needed.
- When you finish reviewing a document, do one of the following:
- To move the document to a signing list, select Move Document. Then choose the folder where you want to move the document, add any comments, and select Move.
- To send the document back to the person who submitted it for review, select Reject Document. Then choose the reason for the rejection, add comments, and select Reject.
- To send the document back to the person who submitted it to be corrected, select Correct Document. Then explain what needs to be corrected in the Comments box and select Send for Correction.
- To work with one or more documents from the Review page, mark at least one document box. Then select Actions and do any of the following:
- To delete the documents, select Reject, choose the reason for the deletion, add comments, and select Reject.
- To send the document back to the person who submitted it to be corrected, select Correct. Then explain what needs to be corrected in the Comments box and select Send for Correction.
- To download the documents as a single zipped file, select Download, change the file name, if desired. Then choose the file format you want and select Download.
- To print the documents, select Print and use your browser’s print function. You can also download the documents from the browser window.
- To move the document to another folder (typically a signing list), select Move. Then choose the folder where you want to move the document, add any comments, and select Move.
eSigning or eNotarizing a document
If you have the necessary permission and have set up your Click‑Sign Signature, you can electronically sign documents in Simplifile. If you are a notary and have registered your information and stamp within Simplifile, you can notarize documents. Documents typically need signatures and/or notary stamps before they can be recorded.
People who review documents can assign a document to a signing list as soon as the document is approved for recording. For more information, see Reviewing a document. The Simplifile signing list shows you only the documents that have been assigned to you.
When you access a document for signing or notarizing, the document displays in a limited version of Simplifile’s document viewer. The tools you can use may include the following:
- File icons, including options to scan, upload, download, and print a document.
- View icons, including options to zoom in, zoom out, and fit the image to the window or to letter or legal height.
You can also send the document to review.
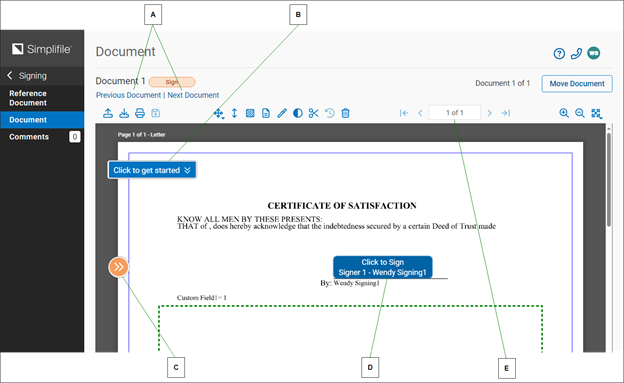
| Letter | Description |
|---|---|
| A | Use these links to move to the previous document or the next document on the signing list without signing the displayed document. |
| B | Select here to begin the signing process. |
| C | Arrows like these indicate a place to sign. |
| D | Select boxes like these to add your signature. |
| E | This display lets you track your progress through your signing list. |
You can choose the columns that display on the Signing page table. This can help you sort the signable documents by the trait that is most helpful to you. Initially, items are sorted first by date and second by county (or jurisdiction). The small numbers beside the column names indicate this sort order.
You can also mark boxes in the left column of the table to choose multiple documents. Then you can use the Actions dropdown list to perform the following actions for multiple documents at the same time:
- Download the documents in a single zipped file in either PDF or TIFF format. You can change the document name, if desired.
- Open the documents in a browser window where you can print or download the document as a PDF.
- Move the documents to a different folder so they can be reviewed.
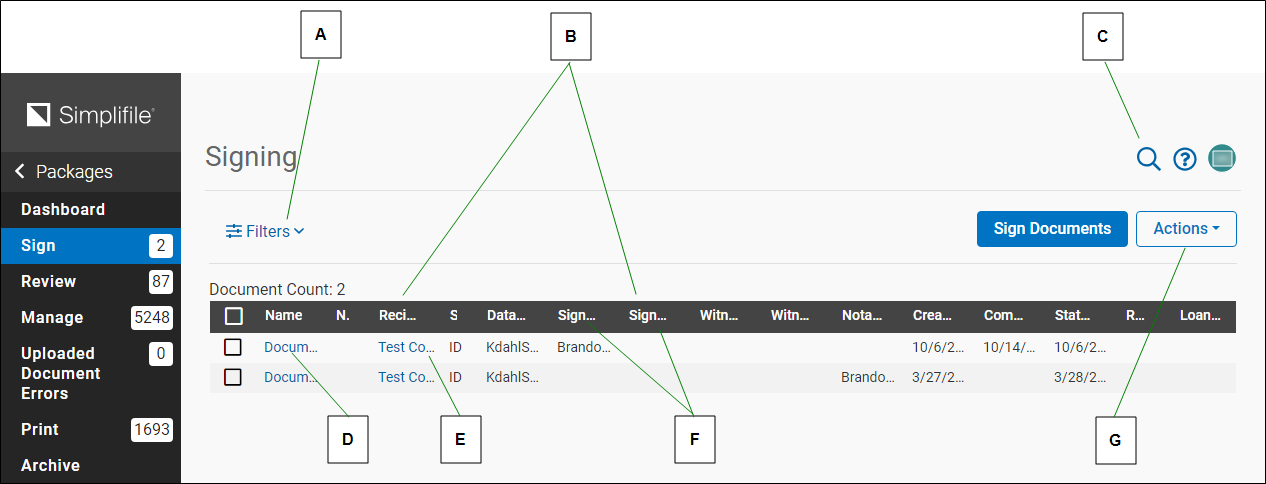
| Letter | Description |
|---|---|
| A | Select here to choose the county (or jurisdiction) whose documents you want to sign. |
| B | Select a column name to sort the table by that item type. |
| C | If your list is long, use this field to search for the document you want. |
| D | Select a document name to open the document. |
| E | Select a name in the Recipient column to view information about that county (or jurisdiction). |
| F | A number beside a table header indicates the order of sorting. |
|
G |
Mark the boxes in the left column of the table and select Actions to perform various actions. |
If you have multiple documents in your signing list, after you sign a document, the next document in the list automatically displays. This lets you sign documents without having to return to the Signing page and open each document one at a time.
How to sign or notarize a document
- You must do the following before you can sign or notarize documents:
- Have the necessary role. For more information, see Signer and notary role assignment.
- Setup a Click-Sign Signature to sign or notarize documents, and add notary credentials and a seal to notarize documents. For more information, see Notary and signature setup.
- On the document viewer, select Mark for Review in the upper right corner.
- On the Signing page, mark the box for one or more documents in the left column of the table and choose Actions > Mark for Review in the upper right corner.
- In the left navigation menu, select Signing.
- If you are affiliated with multiple organizations, choose the one whose documents you want to sign from the Select an organization dropdown list.
- To choose the recording county (or jurisdiction) whose documents you want to sign, select All Recipients.
- Do one of the following:
- To sign a single document, select the name of the document. You can use the Previous Document and Next Document links to display the previous or next document on the signing list.
- To display and sign all documents, one at a time, without returning to the Signing page, leave all boxes unmarked and select Sign Documents.
- Use the File and Edit tools as needed.
- Find and select Click to get started.You can also scroll to the first signature needed indicator (
 ). If the document requires multiple signatures, after you sign in the first location, Next signature displays beside the additional signatures
 - Select the Click to Sign button each time you see the option to sign.
- To work with one or more documents from the Signing page, mark at least one box in the left column. Then do one of the following:
- To sign the documents you marked without viewing them, select Sign Selected.
- To mark the documents for review, choose Actions > Mark for Review.
- To download the documents as a single zipped file, select Download, change the file name, if desired. Then choose the file format you want and select Download.
- To print the documents, select Print and use your browser’s print function. You can also download the documents from the browser window.
QUICK TIP: To specify the columns that display in the Review
page table, select Actions and choose Customize
Columns. Then mark the boxes of only the columns
you want to display and select the Save ![]() button.
button.
Paper recording
You may work with recording jurisdictions that do not accept eRecording. You can use Simplifile to store documents and maintain your paper trail. Documents in Simplifile that require a physical signature display a Paper label on the Packages page and on the Package Details page for easy identification.
You can manually print documents in Simplifile, prepare them for submission, and manually submit them. You should then manually change the status of the package in Simplifile to Sent. After a non‑eRecording county (or jurisdiction) returns documents, you can mark them in Simplifile as recorded or rejected.
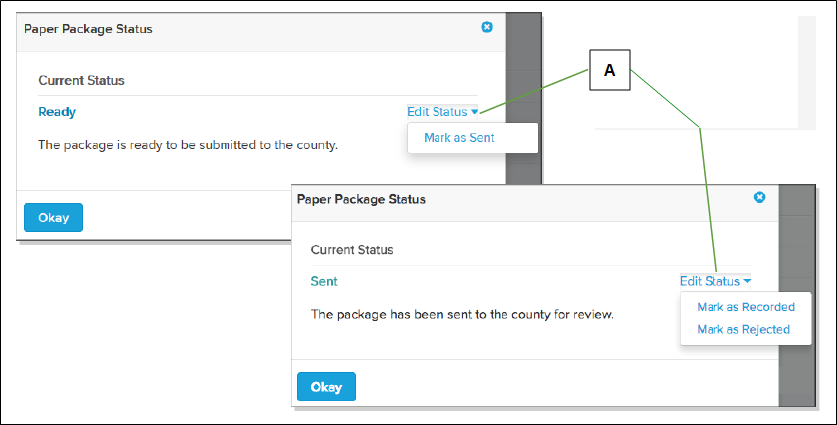
| Letter | Description |
|---|---|
| A | On the Package Details page, select a document status to display the window where you can change the status of a package. |
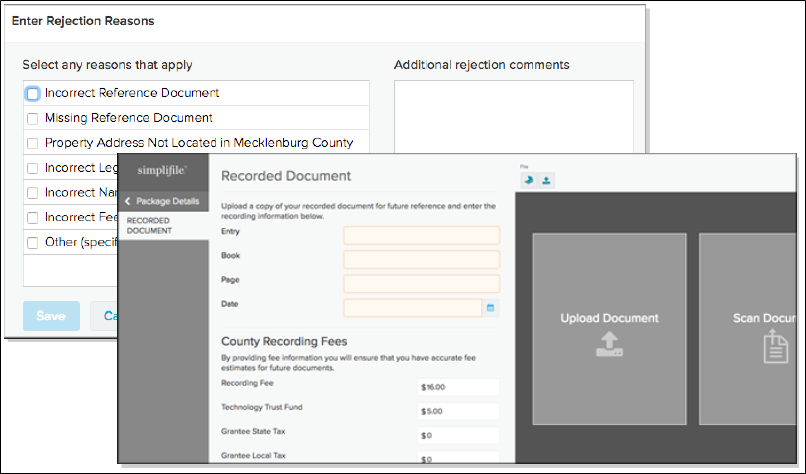
When the Simplifile status is changed to Rejected, you choose or enter rejection reasons. Rejected documents can be revised and re‑submitted. When the Simplifile status is changed to Recorded, you enter the recording information in Simplifile. Recorded documents can be scanned and stored electronically.
How to handle paper recordings in Simplifile
- Create a package with a county that does not accept eRecording as described in Document Builder use.
- When a document is ready for signatures and notarization, print the document from the Packages list or the Package Details page.
- After you send the package to the recording county (or jurisdiction), on the Package Details page, select the document status and change the status to Sent.
- When the recording county (or jurisdiction) returns the package, on the Package Details page in Simplifile, select the document status and do one of the following:
- If the package was rejected:
- Change the document status to Rejected.
- Mark any of the rejection reasons that apply. If necessary, add any comments or additional reasons in the Additional rejection comments section.
- Select the Save
 button.
 - Open the document in the document viewer and make the necessary corrections.
- Resubmit the package.
- Begin again with step two of this task.
- If the package was recorded:
- Change the document status to Recorded.
- Add the recording information to the Recorded Document page.
- If the package was rejected: