Post‑closing
Overview
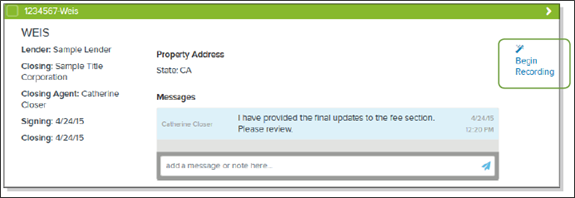
A loan’s status changes to Post‑Close after the loan is successfully closed and funded. You then work with the recording county (or jurisdiction) to have the required documents recorded. A loan card with a Post‑Close status displays the same information as the Pre‑Close loan cards. If you have Simplifile’s eRecording service, they also display a link you can use to begin recording the documents, as shown in the example below.
When you select the Begin Recording button, a window displays asking if you want to eRecord with Simplifile.
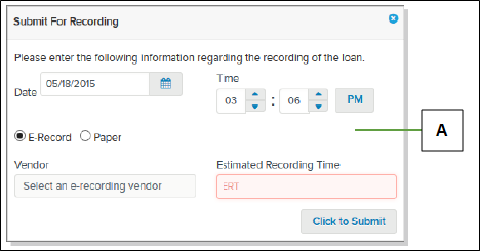
If you select the No button, the following window displays:
| Letter | Description |
|---|---|
| A | Complete the fields. If you choose eRecording, choose an eRecording vendor. |
If you do not use Simplifile for eRecording, you must either manually upload recorded documents to Simplifile on the Documents page so that the system can return them to the lender, or physically return the documents.
After a loan is recorded, you can archive it to store it within Simplifile. This lets you still access the loan information, but prevents the loan from displaying as an active loan.
eRecording with Simplifile
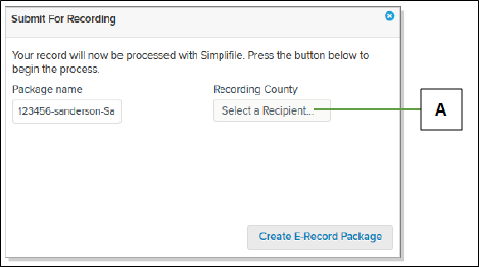
If you choose Simplifile to eRecord the loan documents, the following window displays:
| Letter | Description |
|---|---|
| A | Select here to display the jurisdictions where you can record. Highlight the one you want for this loan. |
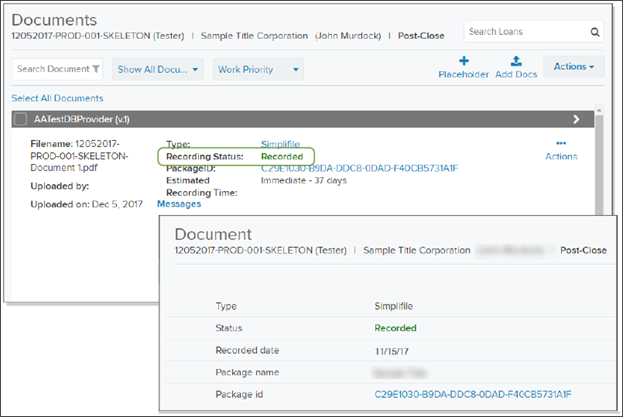
After your loan is submitted for recording, Simplifile can track the progress of each document through the recording process. For example, Document cards display recording process information. You can select the document eRecord link in the left navigation menu to access additional recording information. Below are examples.
Both you and the lender can view the statuses as the loan proceeds through the process.
- Started means that you have begun the eRecording process. This includes creating a package, adding the documents to the package, and verifying that each document is prepared according to the recording county's (or jurisdiction’s) requirements.
- Draft means that your package is being worked on. This can include creating a package, adding the documents to the package, and verifying that each document is prepared according to the recording county's (or jurisdiction’s) requirements.
- Sent indicates that you have sent the package containing the loan documents to the recording county (or jurisdiction).
- Rejected means that the recording county (or jurisdiction) found problems with at least one of your submitted documents. The county (or jurisdiction) should indicate what you need to do to solve the problems. After you do so, you must resubmit the package.
- Recorded means that the loan documents have been recorded. You and the lender can immediately access documents eRecorded through Simplifile. The loan creator can then mark the loan record as Archived.
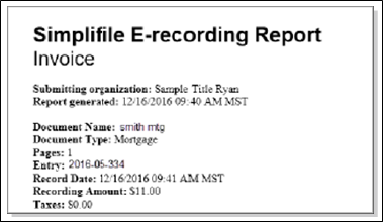
Simplifile creates invoices for each security document that is recorded. This lets recording fees be disbursed and reconciled. Each invoice (one for each recorded document, even if there are multiple recorded documents in the loan package) includes the following information:
- The document name and type
- The number of pages in the document
- The entry number or book and page of the recorded document
- The date the document was recorded
- The fee amount and taxes charged for the recording An example of the invoice displays below.
If you use Simplifile’s eRecording service to record the loan, you can select the Package ID on either the loan card or the Loan Information page, or the package name on the Loan Information page to go directly to the Package Details page in Simplifile’s eRecording service. For more information on eRecording, see Simplifile eRecording Submission Guide.
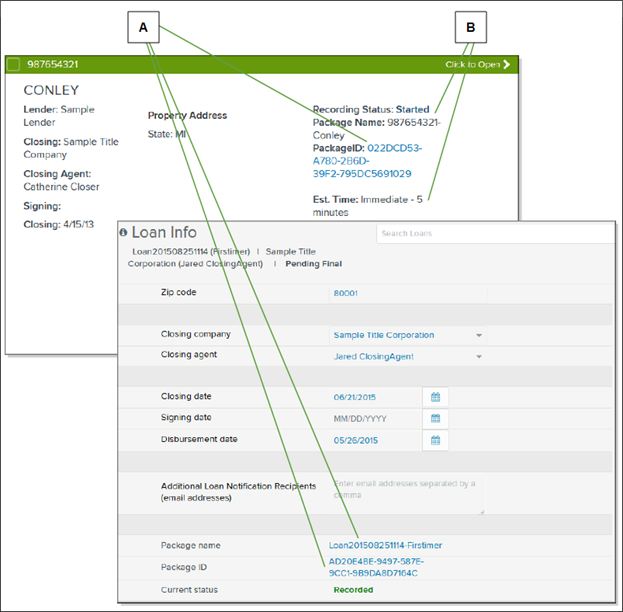
| Letter | Description |
|---|---|
| A | If you use Simplifile’s eRecording service, you can select the various links to open the loan package in Simplifile’s eRecording service and continue the submitting process from within the system. |
| B | Information about the recording status and fees displays at the top of the loan card, including the estimated time until recording, estimated fees, and/ or final fees. |
You can use the eRecord History link in the left navigation menu of a Loan Information page to view details about the eRecording process. You can save these details as a CSV file. Below is an example.
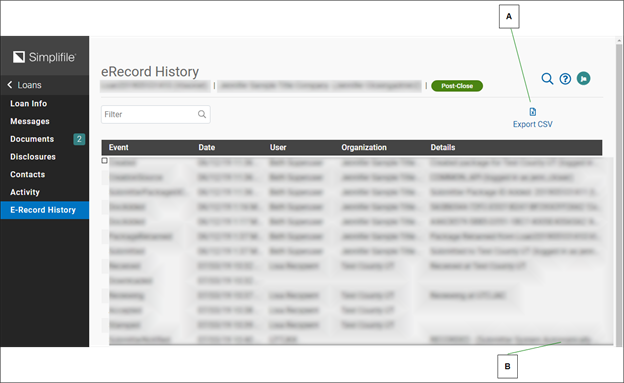
| Letter | Description |
|---|---|
| A | Select here to export the eRecord history as a comma separated values (CSV) file. |
| B | Hover you mouse pointer over any item that does not completely display to show all of the text. |
When all loan documents have been recorded, they are marked as Recorded in Simplifile. You then return the final title policy to the lender. The loan creator can then mark the loan in Simplifile as Archived. The loan information is removed from the active lists but can be reviewed from the Archived link on the left navigation menu, if necessary. The loan card header displays the archive reason.
How to complete post‑closing tasks
- In the left navigation menu, select Post‑Close.
- Find the loan you want to work with.
- Select the Begin Recording button on the right side of the loan card. You can also select the loan name or number and select the Begin Recording button on the Loan Information page.
- Choose whether to eRecord with Simplifile.
- If you chose to eRecord with Simplifile, do the
following:
- Verify the package name.
- From the Recording County dropdown list, choose the recording county (or jurisdiction).
- Select the Create eRecord Package button.
- When the successful package creation
message displays, select the OK
 button.
 - Continue the Simplifile eRecording process. If you need help, see the see Simplifile eRecording Submission Guide.
- If you chose not to eRecord with Simplifile, do the following:
- In the Date and Time fields, choose today’s date and time.
- If you want to eRecord with a vendor other than Simplifile, mark eRecord and choose a vendor from the Vendor dropdown list.
- If you want to deliver paper documents to the recording county (or jurisdiction), mark Paper.
In the Estimated Recording Time field, enter the length of time you think it will take to record the loan documents.
Select the Click to Submit button.
- Do one of the following:
- If you chose to eRecord with a vendor other than Simplifile, follow that vendor’s procedure for eRecording.
- If you chose to record using paper documents, print the documents and follow your recording county's (or jurisdiction’s) procedure for recording.
- When the documents are recorded, select the Documents button and upload the final title to the loan.
Simplifile notifies the lender that the final title is available so that he or she can archive the loan documents.
Loan archiving
When all loan documents have been recorded, they are marked as Recorded in Simplifile. You return the final title policy to the lender. If you created the loan, you can then mark the loan in Simplifile as archived and choose the reason for the archive. For more information about loan creation, see Loan creation.
An archived loan is no longer active. The loan information is removed from the active lists but can be reviewed from the Archived link on the left navigation menu, if necessary. The archive reason displays in the header of the card.
| Letter | Description |
|---|---|
| A | Select this icon when the loan documents have been recorded and returned to you. |
To re‑activate an archived loan and return it to the status it held before it was archived, select the Unarchive button on the Loan Information page. You can also unarchive a loan by updating either the disbursement or closing date to a future date.
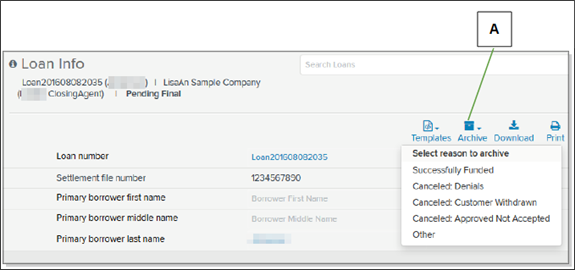
How to archive a loan record
Do step one of this task to view any archived loan.
- Display the Loan Information page of the loan you want to archive.
- Select the Archive
 button and choose the reason for the archive.