New Features in Encompass Investor Connect 20.2 January Service Pack
When the Auto Import functionality is enabled in the Investor Connect Settings for the responses that are returned from partners (investor delivery conditions, shipping details, or funding details), these responses are automatically imported into Encompass. This enables lenders to automatically import the responses sent by partners into Encompass without manual Intervention, resulting in a more streamlined workflow that does not require manual intervention.
When a response is returned, Encompass displays a green message on the Encompass Pipeline and in the Alerts & Message tab within a loan. If a response is not imported successfully, this is known as an auto import exception. Exceptions typically occur when a loan is locked, for example when the responses arrives while a user is working in the loan or has left their desk without closing the loan file.
Three workflow scenarios can occur with an auto import.
-
Scenario 1: All responses are imported successfully, and no manual intervention is required.
-
Scenario 2 and 3: One or more exceptions occurred, and you must import these responses manually:
-
In scenario 2, you clear exceptions by opening individual loans, and manually importing the responses. This option is optimal when you have a small number of loans and you want to review the exceptions for each loan.
-
In scenario 3, all exceptions are viewed and cleared at once via the loan delivery status window. This option is recommended when you have many loans and you want to import all the exceptions quickly and with minimal effort.
-
Scenario 1: All Responses Are Imported Successfully
In this scenario, all responses are imported successfully, and no additional manual efforts are required, but you can review the imported items to view the responses that were returned.
To Review Auto Imported Conditions from the Pipeline
-
When Auto Import is enabled, and a response is auto imported, a different message displays for each response type.
-
Funding Details Auto Imported
-
Shipping Details Auto Imported
-
Conditions Details Auto Imported
For example, if both conditions and funding details have been auto imported, separate messages display for Funding Details Auto Imported and Conditions Details Auto Imported.
-
-
Click the green Message icon on the Alerts & Messages tab in the loan to open the appropriate import window (for investor delivery conditions, funding details, or shipping details).
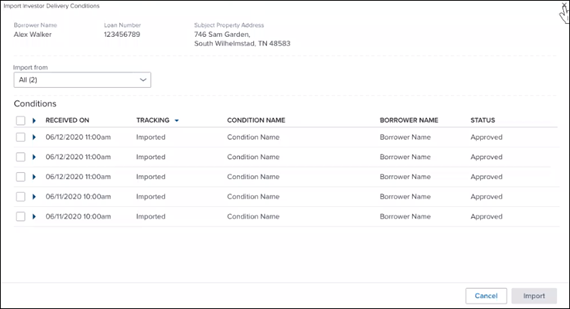
In this example, the Import Investor Delivery Conditions window is shown. Because all the conditions were auto imported, the checkboxes and the Import button are disabled.
In this example, the Import Funding Detail window is shown. Because the funding details were auto imported, the radio button and the Import button are disabled.
-
After reviewing the responses, close the window. The green message disappears when the window closes.
Scenario 2: Exceptions Are Manually Imported from Within a Loan
In this scenario, not all responses are imported successfully, and you will import the responses by opening a loan and clicking the Message icon in the Alerts & Messages tab. When the Auto Import feature is enabled, and a response does not successfully auto import, one of more of the following message display:
-
Error importing Funding details
-
Error importing Shipping details
-
Error importing Condition details
To import Responses
-
Click the green Message icon on the Alerts & Messages tab in the loan to open the appropriate Import window (for investor delivery conditions, funding details, or shipping details).
-
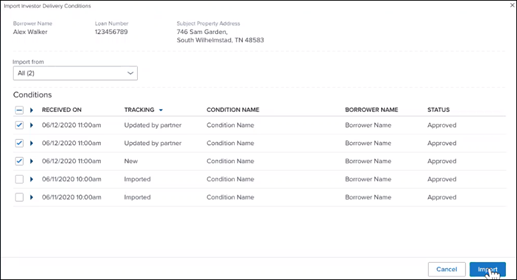
On the Import Investor Delivery Conditions window, imported conditions are indicated in the Tracking Column, the checkboxes are selected by default for the responses with exceptions, and the Import button is enabled.
-
On the Import Funding Details window and Import Shipping Details window, the radio button is selected by default for the response with exceptions, and the Import button is enabled.

-
Click the Import button to import the responses.
-
The window closes, and the green message disappears.
Scenario 3: Some Responses Are Not Auto Imported Successfully and You Import the Responses Manually from the Loan Delivery Status Window
In this scenario, some responses are not auto imported successfully, but instead of importing responses on a loan-by-loan basis, you can click the Loan Delivery Status button on the Encompass Pipeline to open the Loan Delivery status window to clear all the exceptions at once. A new Auto Import Exception button displays on the window and lists the total number of exceptions in parentheses.
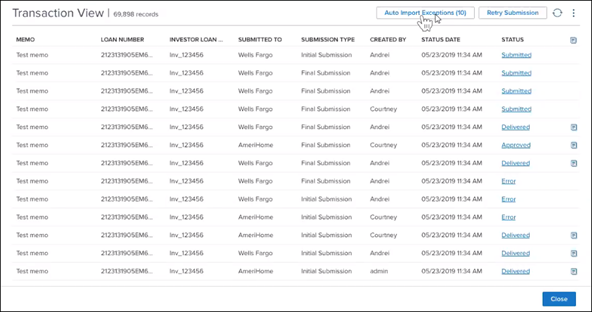
Click the Auto Import Exception button to open the Auto Import Exceptions window.
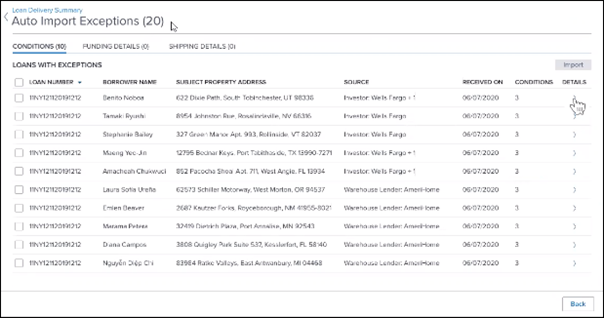
On the Auto Import Exceptions window, the Conditions, Funding Details, and Shipping Details tabs display across the top, based on a user’s persona permissions for these features. When a user has access to a tab, the tab displays even when no conditions are listed on a tab.
The total number of exceptions across all the tabs displays in parentheses in the Auto Import Exception heading at the top of the window. Each tab lists the loans in the appropriate category (Conditions, Funding Details, or Shipping Details) with auto import exceptions. Each tab has a layout in table format with a row for each loan with an exception. The rows on each tab contains columns for:
-
Loan Number
-
Borrower Name
-
Subject Property Address for the loan
-
Source that sent the conditions
-
Received On date for the condition
-
Number of Conditions.
-
Wire Amount (Funding Details tab only)
-
Shipping Carrier (Shipping Details tab only)
On the Funding Details and Shipping Details tab, when a loan has responses from more than one category, the investor’s name displays along with a +1 to indicate that another category is present. Hover over the +1 to display pop-up text with the name of the second category.
You can manually import all the exceptions on each tab directly from the Auto Import Exceptions window by clicking the check at the top of the left column to select all the exceptions on the tab. Or select specific loans to manually import. When one or more checkboxes are selected, the Import button is enabled, and you can click the button to import the selected responses.
To view additional information about each entry, click the Arrow icon in the Details column on the far right. The appropriate import window for investor delivery conditions, funding details, or shipping details will open. You can also import exceptions from these windows.
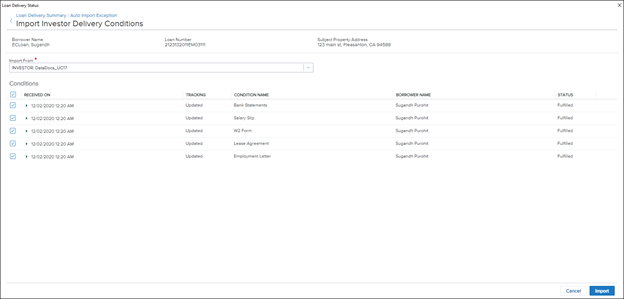
In this example, the window for reviewing and manually importing investor delivery conditions is shown. The most recent investor delivery condition exceptions display at the top of the window. The Import button is enabled by default and checkboxes are selected for the exceptions. Additional responses that have been auto imported may also display on the window below the most recently imported responses.
On the review and import windows for funding details and shipping details, the radio buttons on the far right are selected for the exception. Click the Import button to manually import and clear the exception.

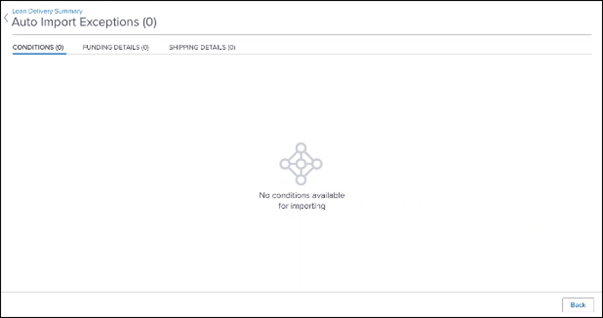
When all responses are cleared, you will be taken back to the Auto Import Exception page and the following message displays, stating that no conditions are available for import.
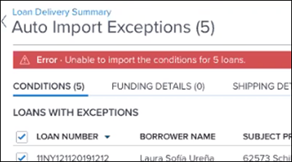
In the rare event that an additional issue prevents the import of the conditions, the following error message displays at the top of the window. You can try to manually import the exceptions later.
Access to the Auto Import Exception Window
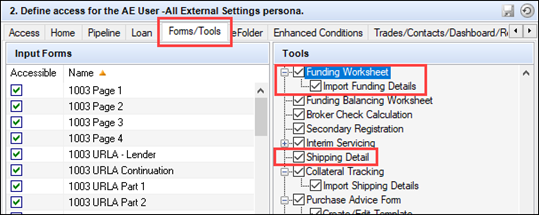
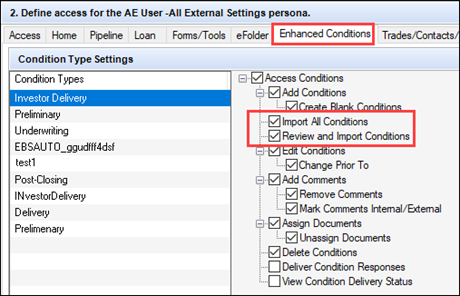
The Auto Imports Exceptions button is active for users who have at least one of the following options selected in the Personas setting:
-
Forms and Tools tab: Funding Details Worksheet and Import Funding Details checkboxes.
-
Forms and Tools tab: Shipping Details checkbox.
-
Enhanced Conditions tab: Import All Conditions and Review and Import checkboxes.
When the Auto Import feature is enabled for Enhanced Conditions, Funding Details, or Shipping Details, the Auto Import Exceptions button displays on the Loan Delivery Status window, even when there are no exceptions. When the Auto import feature is disabled for all three response types, the button is not visible on the Loan Delivery Status window.
DND-9932, DND-9933, DND-9930, DND-10226, DND-10760, DND-10407, DND-10408
Lenders can now view the contents of the ZIP file for a loan package that was sent to a partner. This option is available on the Loan Delivery Status window for packages with a status of Delivered. Lenders can use the viewer to view a list of the files included in loan packages sent over the previous 90 days and to view the PDF files in the package. Lenders are not able to view the content of JSON or data files and are not able to edit the content of files in the package.
To View the Contents of a Package
-
On the Encompass Pipeline, click the Loan Delivery Status button.

-
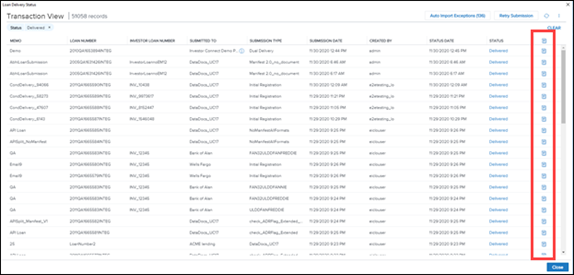
On the Loan Delivery Status window, a Folder icon displays in the far-right column for packages with a status of Delivered or In Review.
-
Place your mouse pointer over the View Loan Package icon to view the package size.
-
Click the icon to open the viewer. Additional information window opens on a new View Files tab that has been added to the window.
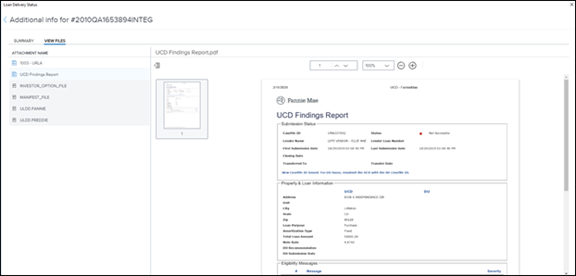
NOTE: You can also open the viewer by clicking a Delivered link on the Loan Delivery Status window. The Additional Information window opens on the Summary tab, and you can then click the View Files tab to access the viewer.
-
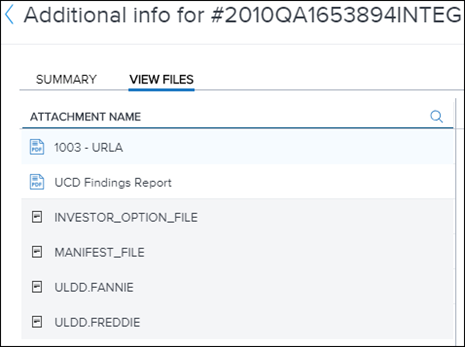
The lender loan # for the package displays at the top of the window, and a list of files displays in the left navigation panel.
-
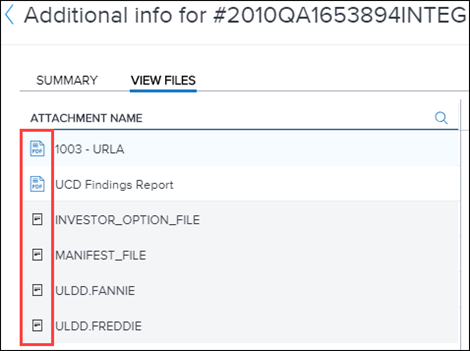
The icons in the left column indicate whether the file is a PDF or a non-viewable file type.
-
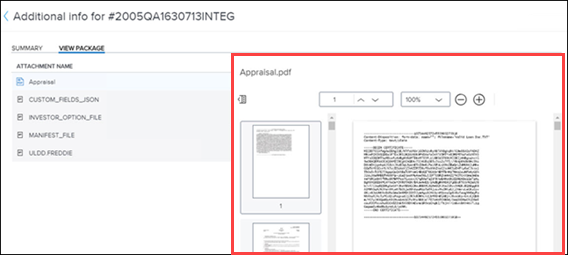
Click a file to open it in the viewing panel on the right.
-
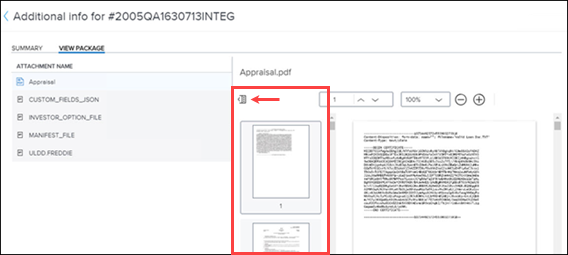
Navigate through the pages by clicking a page on the Thumbnail panel, which can be hidden or viewed by clicking the Thumbnail icon.
-
Or type or select a page number in the page field above the document.
-
Or use the scroll bar on the right edge of the viewer.
-
Adjust the size of the document by selecting a percentage value from the dropdown list or by clicking the Plus or Minus icons.
The viewer can be used to view only PDF files or files that have been converted into PDF format when imported into Encompass, for example image files. The viewer does not display JSON or XML files. When you select a format that is not supported by the viewer, a File format is not supported for viewing message displays.
DND-888, DND-9243, DND-9430
Encompass Investor Connect now supports Enhanced Conditions, which were introduced in November 2020 with the initial Encompass 20.2 major release. Enhanced Conditions enable lenders to define their own conditions and configure the workflow for handling these conditions. The following sections describe new settings and features for Enhanced Conditions that are specific to Encompass Investor Connect.
Before you can use Enhanced conditions, Ellie Mae must enable the Enhance Conditions feature in your company’s environment and your partner must enabled the workflow for sending and receiving conditions. Enhanced Conditions are used for all loan files created after Enhanced Conditions are enabled. Loans created prior to enabling Enhanced Conditions will continue using standard conditions.
New eFolder Interface
After Enhanced Conditions are enabled, a different user interface displays in the eFolder. A single Conditions tab replaces the three tabs previously used for standard conditions (Preliminary, Underwriting, and Post-Closing). All Enhanced Conditions will display on the new Conditions tab.
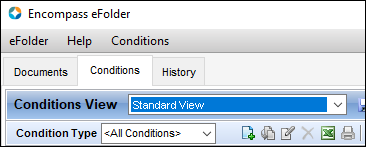
A Deliver Condition Responses button and a Condition Delivery Status button have been added to the Conditions tab to support Enhanced Conditions for Encompass Investor Connect:

These buttons enable users to access the Deliver Condition Responses window and the Conditions Delivery Status window from the conditions tab when working with enhanced conditions.
Additionally, Investor Delivery displays as a filter option for the Condition Type when Enhance Conditions and Encompass Investor Connect are enabled for a lender.

Updates to the Settings
If your company has enabled Enhanced Conditions, a new Investor Delivery condition type is now used for conditions associated with packages sent to partners via Encompass Investor Connect. Options have been added to the eFolder Setup setting and the Personas setting to enable administrators to configure Investor Delivery condition types and to configure persona access to the features used with Investor Delivery condition types. Additionally, a new workflow has been implemented for creating and importing Investor Delivery condition types.
The information in this section describes settings and workflows for Enhanced conditions that are specific to Encompass Investor Connect. For more comprehensive and general information about configuring and using Enhanced Conditions in Encompass, refer to the Working with Enhanced Conditions setup and user guide.
Personas Setting for Investor Delivery Enhanced Condition
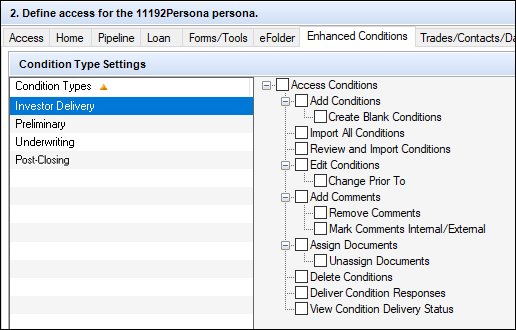
A new Enhanced Conditions tab has been added to the Personas setting to configure a persona’s ability to work with Investor Delivery Enhanced Conditions.
Configure the Personas Setting Options for Investor Delivery Enhanced Conditions
-
On the menu bar, click Encompass, and then click Settings.
-
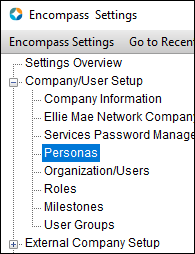
On the left panel, click Company/User Setup, and then click Personas.
-
In the Create a persona section, select a Persona.
-
In the Define access panel on the right, click the Enhanced Conditions tab.
-
In the Condition Types panel on the left, click the Condition Type, and then select the Investor Deliverycheckboxes in the right panel to configure a user’s ability to access, add, edit, and delete conditions and to add comments and assign documents to conditions.
-
When finished, click the Save icon.
The options described above for the Personas setting are also available when an administrator double-clicks a user in the Organization/User setting (Encompass > Settings > Company/User Setup > Organization/User) and the opens the View/Edit Rights window.
eFolder Setup Setting for Investor Delivery Enhanced Conditions
Administrator can configure the Investor Delivery condition type in the Enhanced Conditions setting.
Configure the Investor Delivery Condition Type
-
On the menu bar, click Encompass, and then click Settings.
-
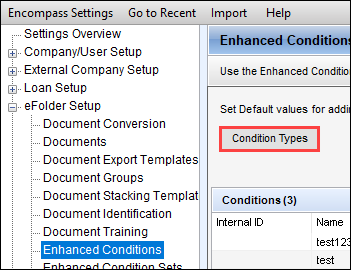
On the left panel, click eFolder Setup, and then click Enhanced Conditions.
-
Click the Condition Types button.
-
The Investor Delivery condition type is prepopulated in the setting by default with a status of Active.
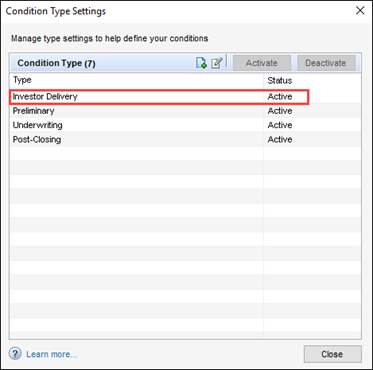
NOTE: The Enhanced Delivery condition type displays only if your company is enabled for both Encompass Investor Connect and Enhanced Conditions.
-
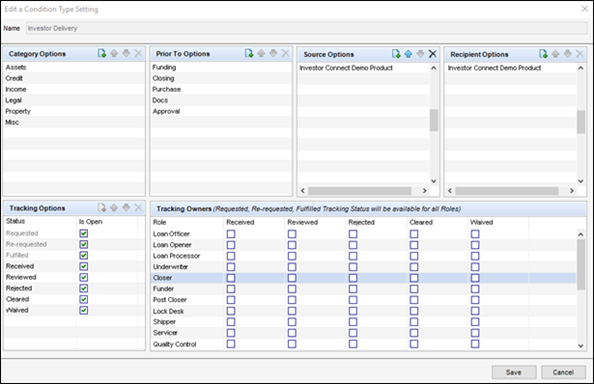
Administrators can select Investor Delivery from the list and then click the Edit icon to edit the setting options for the delivery type.
-
The Add and Delete icons are disabled in the Tracking Options Status section, but administrators can clear or select the five checkboxes that are not disable by default.
-
All other sections are editable:
-
It is recommended that administrators not update the Category Options or Prior To Options. If values are removed from these sections, lenders will not be able to view s from these sections will not be able to view the values returned by partners.
- Preconfigured values have been entered in the Source Options and Recipient Options sections and should not be updated unless you are advised to do so by Ellie Mae or by your partners. New partners may be added to the options lists as they are added to Encompass Investor Connect.
-
-
Administrators can edit the selections in the Tracking Owners section.
Pre-Configured Investor Delivery Conditon Type Values
The following pre-configured values are available on the Edit a Condition Type window for an Investor Delivery condition type.
Category:
-
Asset
-
Credit
-
Income
-
Legal
-
Property
-
Misc
Prior To Options:
-
Funding
-
Approval
-
Closing
-
Purchase
-
Docs
Source:
-
AmeriHome
-
Caliber
-
Chase
-
Colorado Housing & Finance Authority (CHFA)
-
Flagstar
-
Franklin American
-
Home Point Financial
-
MAXEX
-
Mr. Cooper
-
NewRez Correspondent
-
The Money Source
-
Wells Fargo Funding
-
Texas Capital Bank
The Source section contains a list of partners who are currently enabled for your instance of Encompass Investor Connect. When an Investor Delivery condition type is imported into Encompass, the Source is populated with the name of the partner who sent the response. When a user adds an Investor Delivery condition type from the eFolder using the Blank option, the Source selection is blank.
Recipient:
-
AmeriHome
-
Caliber
-
Chase
-
Colorado Housing & Finance Authority (CHFA)
-
Flagstar
-
Franklin American
-
Home Point Financial
-
MAXEX
-
Mr. Cooper
-
NewRez Correspondent
-
The Money Source
-
Wells Fargo Funding
-
Texas Capital Bank
The Recipient section contains a list of partners who are currently enabled for your instance of Encompass Investor Connect. When an Investor Delivery condition type is imported into Encompass, the Recipient is populated with the name of the partner who sent the response. When a user adds an Investor Delivery condition type from the eFolder using the Blank option, the Recipient selection is blank.
Tracking Options Status:
-
Added
-
Fulfilled
-
Requested
-
Re-requested
-
Received
-
Reviewed
-
Rejected
-
Cleared
-
Waived
Limitations on Creating Enhanced Conditions for Investor Delivery
By default, Encompass supports only one Investor Delivery condition type that is used for all conditions associated with packages sent via Encompass Investor Connect. If an administrator tries to create a new condition type named “Investor Delivery”, an error message states that another name must be used because “Investor Delivery” is already reserved for an existing conditions type.
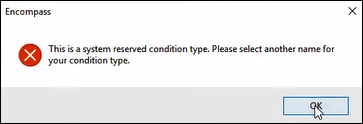
Additionally, custom Enhanced Conditions are not supported for the Investor Delivery type. Conditions received via Encompass Investor connect are in the Investor Delivery condition type only. Condition templates are not supported for Investor Delivery conditions type. For detailed information about condition template, refer to the Working with Enhanced Conditions setup and user guide.
Adding Investor Delivery Conditions to the eFolder
Encompass users who have the appropriate Persona permissions can manually add Investor Delivery conditions to the eFolder by creating new blank conditions from scratch or by importing conditions that were sent from partners.
To Create a New Blank Condition
-
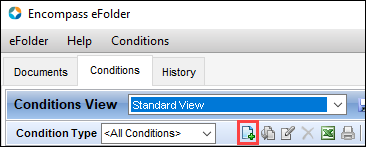
On the Conditions tab in the eFolder, click the Add icon.
-
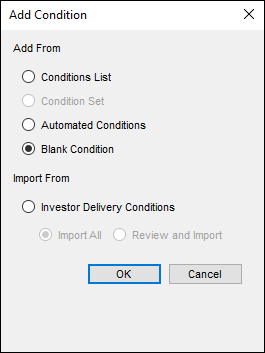
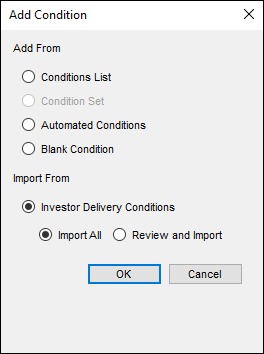
On the Add Condition pop-up window, select the Blank Condition option, and then click OK.
-
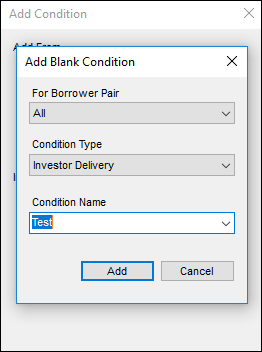
On the Add Blank Condition pop-up window, select the borrower pair the condition applies to, select the Investor Delivery options for the Condition Type, type a name for the condition, and then click Add.
-
When the Condition Details window opens, enter or edit the details for the condition. Refer to the Conditions Details Window section below for additional details.
Importing Investor Delivery Conditions into the eFolder
When the Auto Import setting is not enabled, users who have the appropriate Personas setting permissions can import Investor Delivery conditions to a loan from the Conditions tab in the eFolder. Administrators grant permission by selecting the Import All conditions and the Review and Import Conditions checkboxes on the Enhanced Conditions tab in the Personas setting.
To Import Conditions:
-
On the Conditions tab in the eFolder, click the Add icon.

-
On the Add Condition pop-up window, select the Investor Delivery Conditions option in the Imported From section, and then select Import All or Review and Import.
-
Import All – All unimported conditions are imported into the loan without having to manual review and import the conditions. A spinner displays and disappears as soon as all the conditions are imported.
-
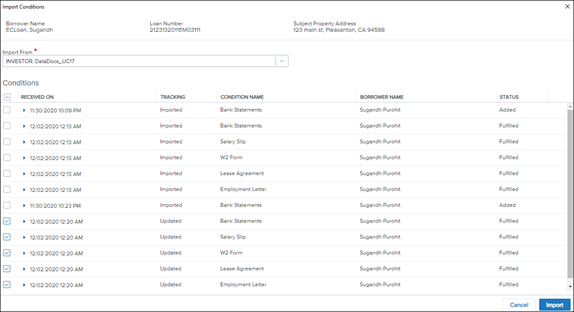
Review and Import – The Import Investor Delivery Conditions window opens. The user can review the conditions, select the checkboxes for conditions to be imported, and then click the Import button to import the conditions.
-
To successfully import all types of conditions, users must have the Import All and Review and Import checkboxes selected for investor Delivery condition types in the Personas settings (Encompass > Settings > Company/User Setup > Personas). Options on the import window will be disabled for users who do not have the appropriate permissions.
Condition Details Window for Investor Delivery Conditions
A new Condition Detail window has been implemented for Enhanced Conditions, as shown below.
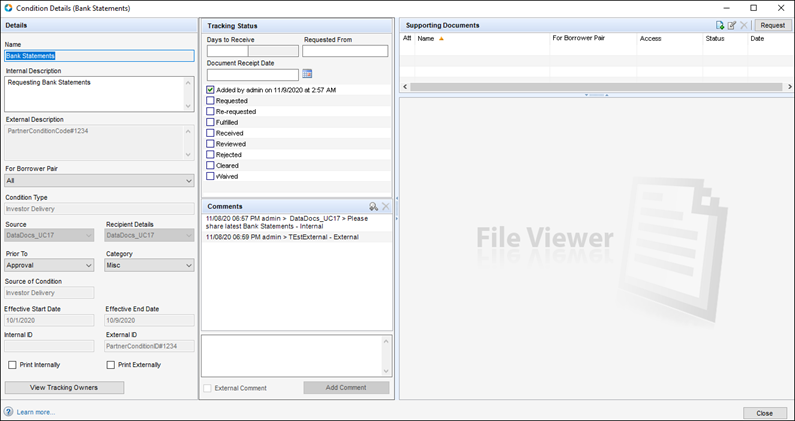
Details for the conditions are recorded in the left panel.
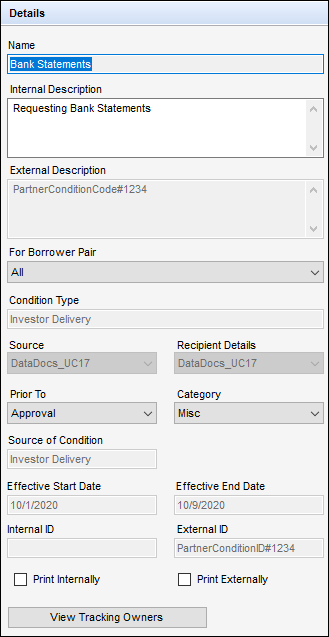
The following characteristics apply to fields in the Details panel for Investor Delivery condition types that are imported from partners:
-
Name - Sent by the partner. Read-only.
-
Internal Description – Condition description sent by partner. Editable.
-
External Description – Condition code sent by partner. Read-only.
-
For Borrower Pair – Borrower information sent by partner. Editable.
-
Condition Type – Always populated with Investor Delivery. Read-only.
-
Source – Name of partner who sent the condition. Read-only.
-
Recipient Details – Name of partner who sent the condition. Read-only.
-
Prior To – Sent by partner or blank. Editable.
-
Category – Sent by partner or blank. Editable.
-
Effective Start Date – Read-only.
-
Effective End Date – Read-only.
-
External ID – Read-only.
-
Source of Condition – Always populated with Investor Delivery. Read-only.
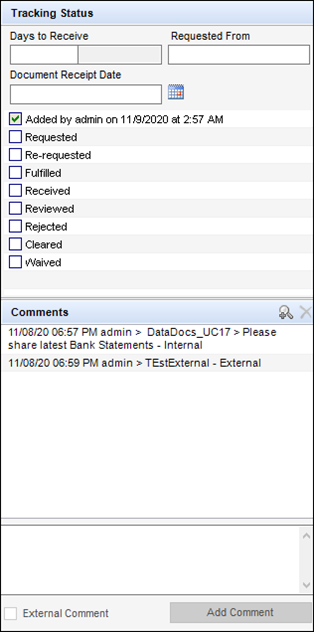
Tracking status and comments are in the center panel.
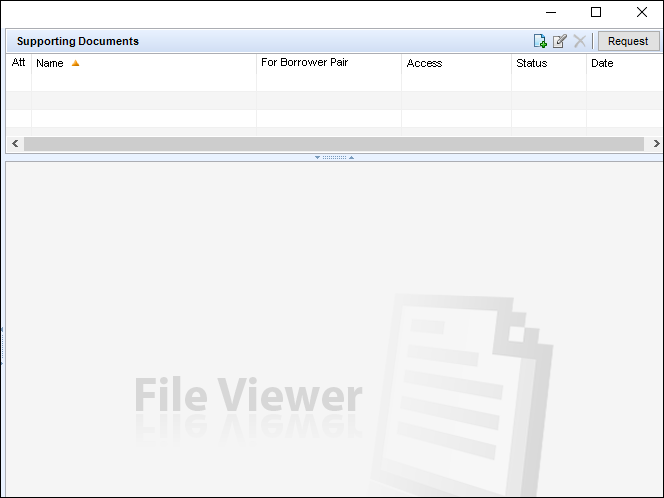
File attachments and the file viewer are in the right panel.
DND-10236, DND-8604, DND-7619, NICE-30407, NICE-30239, DND-10175
Lenders can now use a new dual delivery workflow to send loan packages to two different partners with a single submission. Partners enable the dual delivery workflow by configuring specific Submission Types. When a lender submits a loan package using a dual delivery Submission Type, the loan package is sent to the partner and a secondary loan package is sent to another Encompass Investor Connect partner. For example, an investor may also want to send certain types of loan packages to a due diligence service provider for review. Based on the partner’s configuration, Encompass Investor Connect identifies requests that need dual delivery, sends the primary package, and then sends another package to the appropriate additional partner.
When a lender selects a Submission Type on the Deliver to window that is configured for dual delivery, the packages are sent to the primary partner and to the additional partner who has been configured to receive the package.
From the lender’s perspective, the submission process for the dual delivery workflow is identical to a standard delivery workflow. But after the submission process is complete, entries are created in the Loan Delivery Status window for each of the packages. Lenders can open the Loan Delivery Status window to view the packages and their recipients.
In the Loan Delivery Status window, the delivery transaction for each recipient of the loan package display as a unique row for each of the loan delivery packages sent. The Submitted To column for each entry lists the partner who received the packaged. Place your mouse pointer over the Information icon next to a partner’s name to view all the package recipients. The pop-up window also indicates whether each partner is the primary or secondary recipient.

A secondary loan package will fail, and the following error message will display, when one of the following scenarios occur: a secondary partner is not found or is invalid; a secondary partner submission type is not found or is invalid; a secondary partner requires documents, but the primary partner is data-only; or a secondary partner is not configured in the Encompass Service Password Manager:
-
Additional recipients of the loan are not configured correctly. Please reach out to <primary partner name> for details.
The following error message displays when any other system issue occurs before the secondary partner delivery requests are created:
-
Delivery failed due to system errors. Please try again or contact Ellie Mae support for further details.
DND-8475, DND-9437, DND-9913
Proceed to the Feature Enhancements Page


