Configuration & Installation Guide
Welcome to the configuration guide for the Encompass Connector for Salesforce (Encompass
Connector) app. Through our strategic partnership with Salesforce, we've created a secure
bi-directional connection between the Salesforce and Encompass platforms. The Encompass
Connector for Salesforce allows critical loan data to be synchronized in real time,
empowering lenders to process loans faster with greater visibility into borrower data and
loan statuses.
The first section of this guide discusses the installation of the Encompass Salesforce
package, while the remaining sections walk you through applying permission sets and
completing the Setup Assistant. This guide walks you through configuring your Salesforce
organization in a Lightning Experience environment.
This application is not supported in Salesforce Classic—to use this app, you must
switch to Lightning Experience. If you haven't turned on Lightning for your org, refer
to Verify that Lightning Experience is Turned On.
Learn more
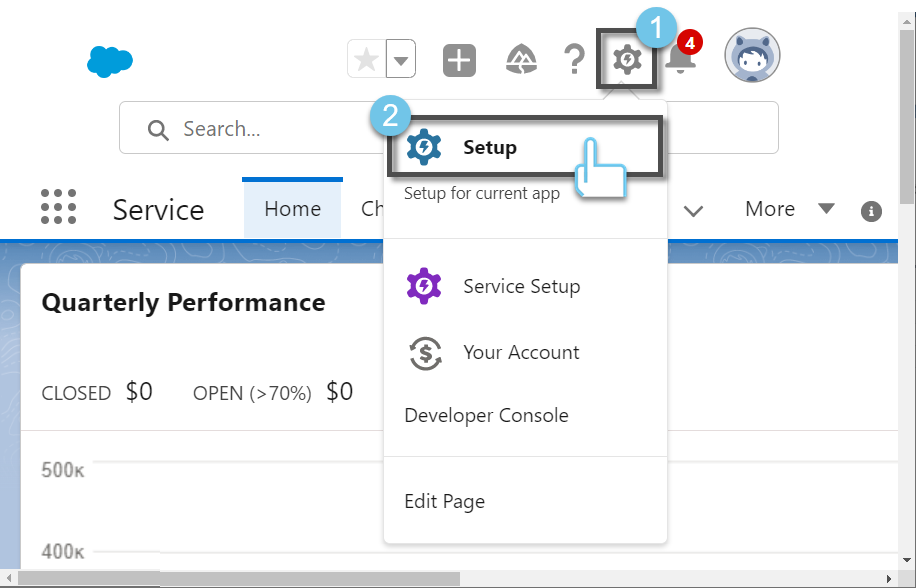
Throughout this guide, you will be instructed to navigate through Salesforce Setup. To
do so, you will need to click the Gear icon located in the top right corner of your
page, and then click Setup. Once in Setup, use the Quick Find box to find
and navigate to the appropriate section.
New in the Encompass Connector App
Starting in 2022, a new standard Encompass object model that provides default data mapping can
be used by default with your Salesforce organization. Previously, the FSC (Financial Service
Cloud) Mortgage Data Model or creating a data model from scratch were the only options provided
when configuring your Salesforce organization. The new Encompass object model also provides a
new Loan Application object that includes employment and residence data objects, along with
custom field data mapping.
If you are already using a Financial Services Cloud or custom object model, you can switch to
the Encompass object model. If considering moving to the new model, it is recommended that you
contact your Encompass relationship manager to discuss a Professional Services engagement to
assist in assessing migration considerations, tips and tricks, and pre-migration checklists.
Existing users utilizing the Financial Services Cloud or custom object model can continue to
use those models. New or existing users who are setting up the Encompass object model for the
first time should use the steps provided in this guide.
Encompass Setup Before Installing Salesforce Object
Encompass User Creation
Before you can establish a connection between Encompass and Salesforce, administrators or other
authorized users must create an ‘integration user' in Encompass.
 Create Encompass User
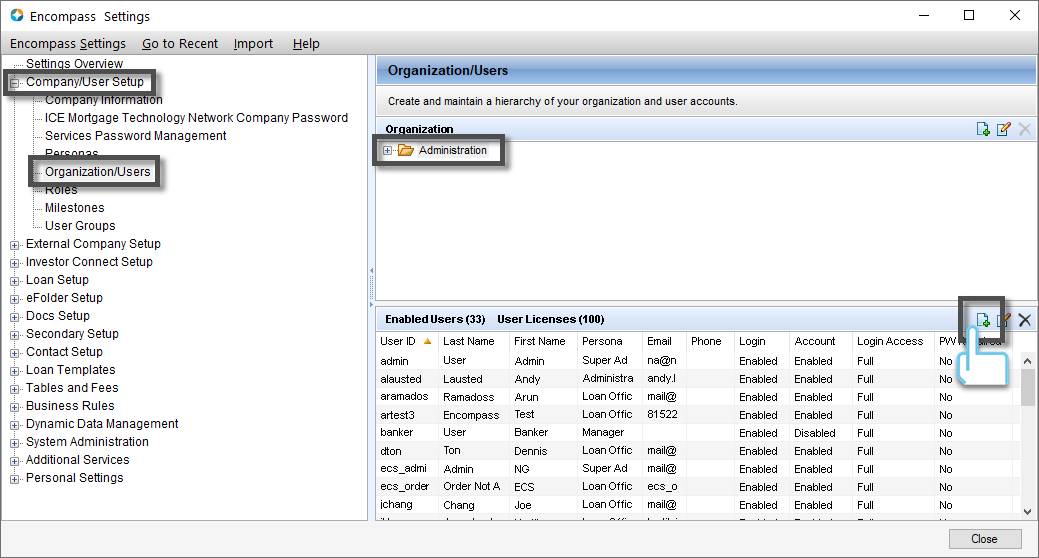
To Create an Encompass User:
-
Log into as an admin user.
-
On the menu bar, click , and then click
Settings. On the left panel, click
Company/User Setup, and then click Organization/Users.
-
Select the appropriate hierarchy folder (i.e., Administration), and then, in
the Enabled Users panel, click the New icon.
-
In the User Details window, complete the following items within each
panel:
Account Information
-
Enter information in the required fields.
-
Select the API User checkbox
-
Enter the API Client ID.
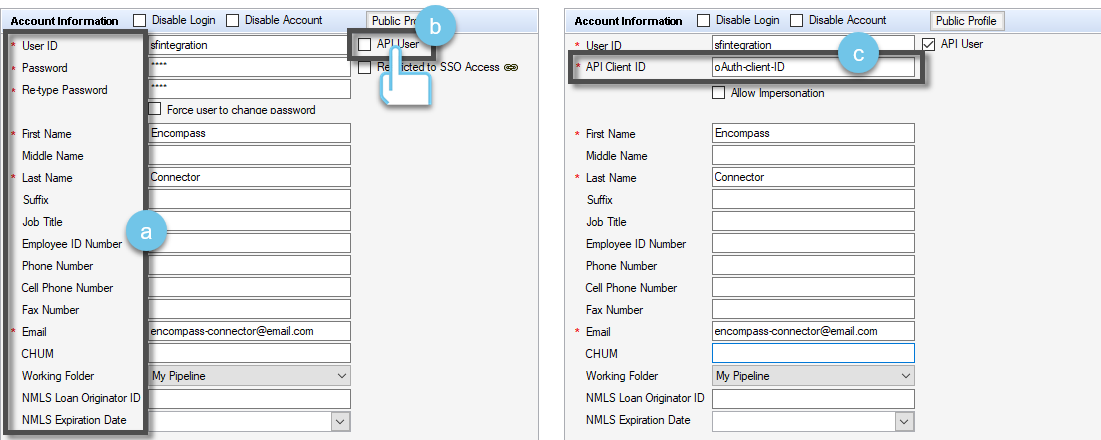
The User ID can be sfintegration. The
API Client ID MUST MATCH the oAuth client ID provided
to you by ICE Mortgage Technology®. If you do not have
this value, contact your Encompass Relationship Manager or
Implementation Consultant. This value will be unique per
environment.
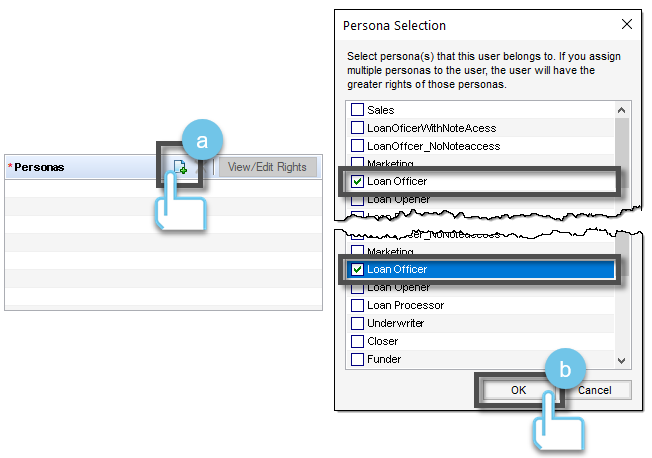
Personas
-
Click the New Icon.
-
In the Persona Selection panel, select the
Loan Officer and Administrator check boxes, and
then click OK.
Access to Subordinates' Loan Panel
Select the following check boxes to ensure that the user has access to
edit loans at the same level and subordinates' loans:
-
Access to all loans in the same level
- Edit Subordinates' Loans
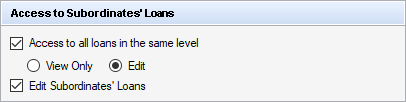
-
Click Save.
Prerequisites
Due to the sophistication of both Encompass and Salesforce, as well as the fact that both are
highly customizable for a customer's specific requirements, meaningful expertise in both
solutions is a requirement to be successful in implementing the Encompass Salesforce app.
Preliminary considerations to evaluate before you proceed with the installation:
-
Anyone attempting to implement the Encompass Salesforce app should first take inventory
of how the Encompass and Salesforce environments they are working with are configured.
-
It is important that you understand, on the Salesforce side, what fields are required,
relationships between objects, customer workflows, processes, flows or code that may be
triggered when data is updated.
-
It is critical to understand these areas to properly configure this app. Most
challenges you encounter will likely be related to one of these items.
Before attempting to install and configure the Encompass Salesforce app, read this document
in its entirety.
Pay special attention to the Tips, Tricks, and Customization section.
View Tips, Tricks, and Customization
Installation in Salesforce
Installing the Encompass Package
Copy and paste the package install URL provided to you by your administrator. If you are not
already logged into the org you wish to install the package into, Salesforce will prompt you to
log in.
For more information on installing packages, refer to the Installing Packages guide.
View Guide
Install for Admins Only
Install for Admins Only is recommended—this option allows for controlling access and
permissions after the package has been installed. Once installed, administrators can
provide permissions to designated personnel.
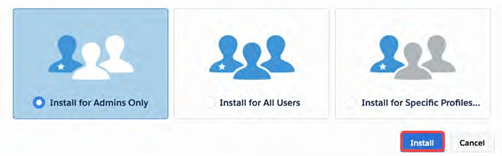
Specifies the following settings on the installing administrator's profile and any profile
with the Customize Application permission.
- Object permissions—Read, Create, Edit, Delete, View All, and Modify All enabled
- Field-level security—set to visible and editable for all fields
- Apex classes—enabled
- Visualforce pages—enabled
- App settings—enabled
- Tab settings—determined by the package creator
- Page layout settings—determined by the package creator
- Record Type settings—determined by the package creator
Install Encompass Package
To Install the Encompass Package:
-
Click Components to view the components provided in the package.
-
Click Upgrade or Install.
-
To start the package installation, in the
Approve Third-Party Access dialog box, select "Yes, grant
access to these third-party websites," and then click
Continue.
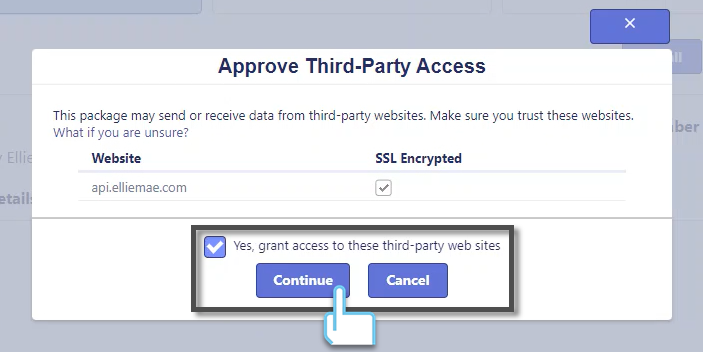
This enables data to be sent back and forth between your
Salesforce org and Encompass.
Encompass Configuration
Permission Sets
The package includes two permission sets:
-
Encompass Admin—must be assigned to the admin user that will use the
Encompass app.
-
Encompass API User—must be cloned and have the “Is Deleted” field enabled
for View and Edit. Then the cloned permission set must be assigned to
users.
Assign Permission Set to Users
To Assign the Permission Set to Users:
-
Go to Setup > User > Permission Sets, and then
select the Encompass Admin permission set.
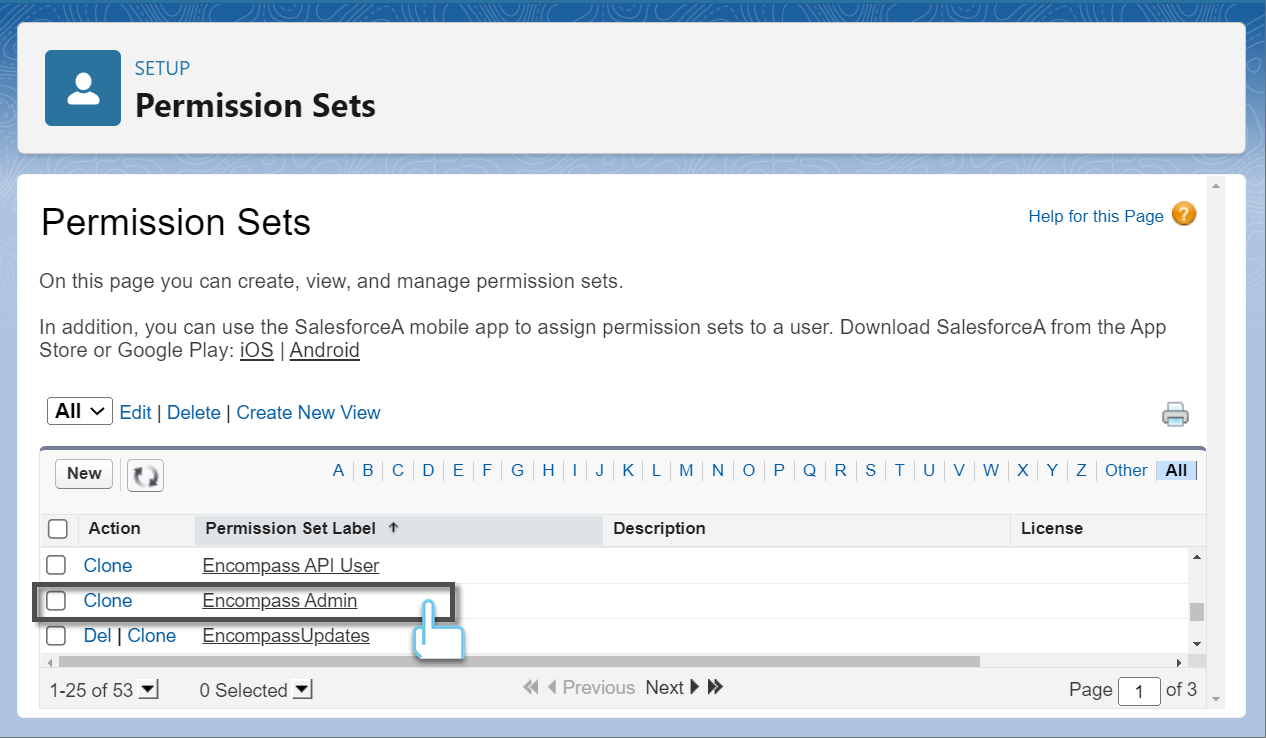
-
From the Permission Set Overview page, click
Manage Assignments, and then click Add Assignments.

-
Select the checkbox next to the user(s) that you would like to assign the
permission set to, and then click Assign.

Assigning of Loan Officer ID
Encompass requires a loan officer be assigned to this user. To assign, you must configure some
page layouts beforehand.
Assign Loan Officer ID
To Assign a Loan Officer ID:
-
Go to Setup > Object Manager, search for the object
User, and then click the object User to select it.
-
From the left panel, select User Page Layouts, click User Layout,
and then drag Encompass User Id into the
Additional Information section.
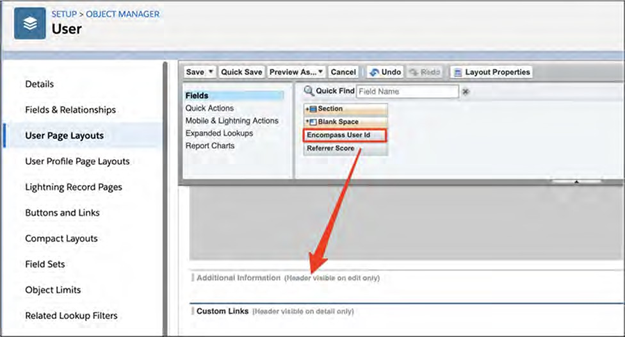
-
Click Save.
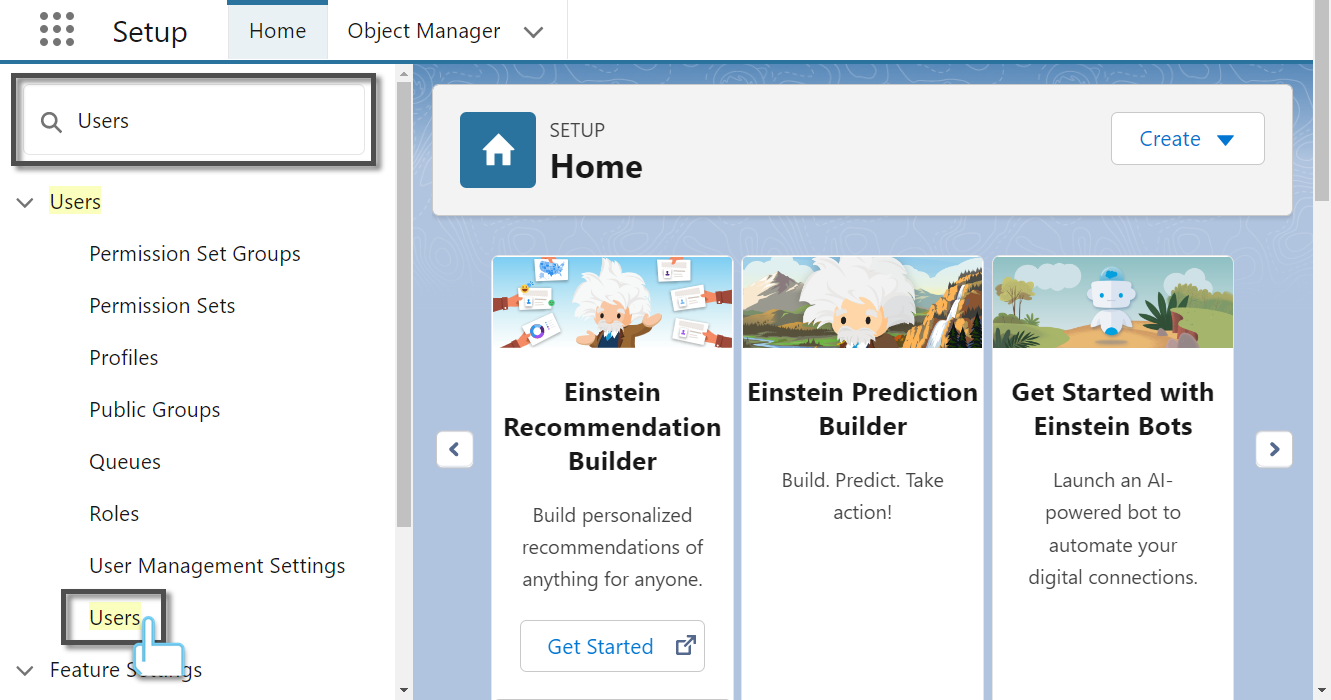
-
Type Users in the search bar, and then select the option for
Users.
-
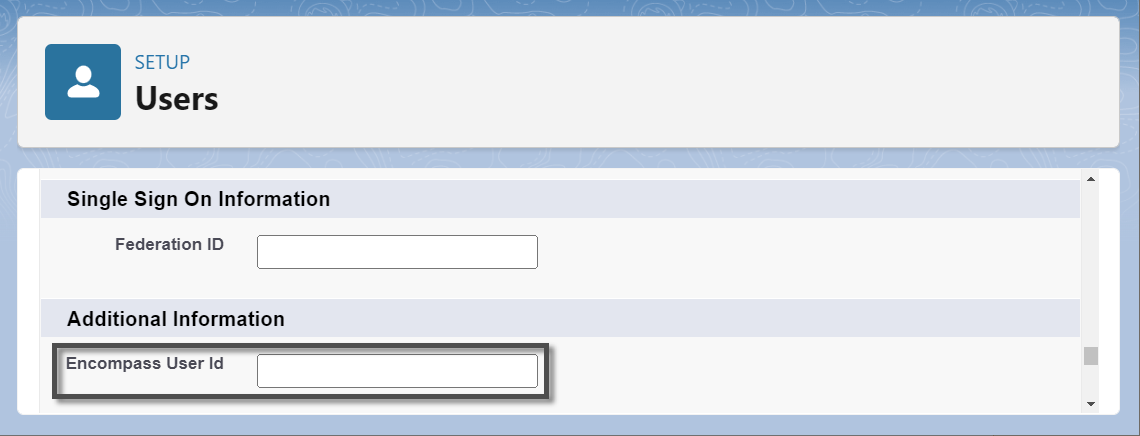
To assign an Encompass user ID to a user, use one of the following options:
-
In the Additional Informationsection, type the associated user's
Encompass user ID in the Encompass User Id field you added to the
Users page. When finished, click Save.
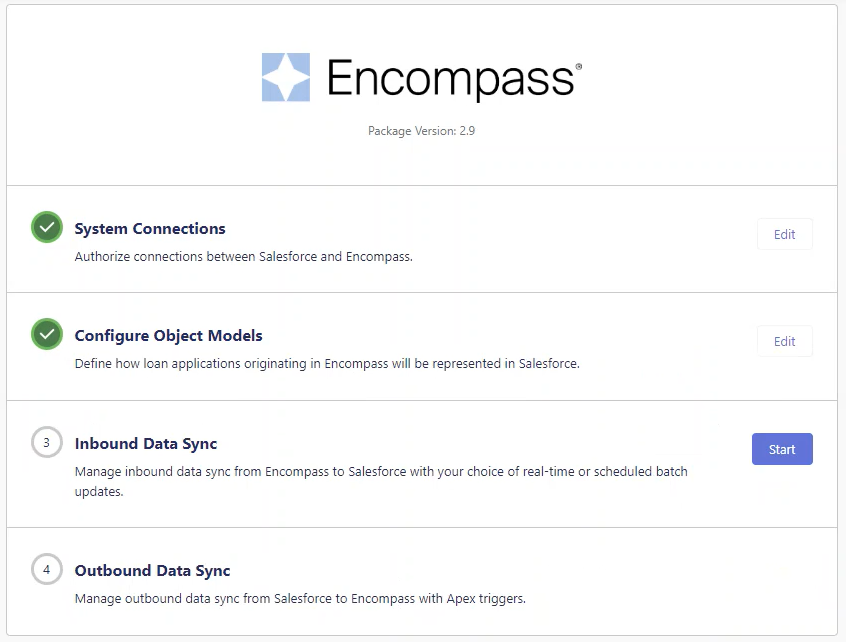
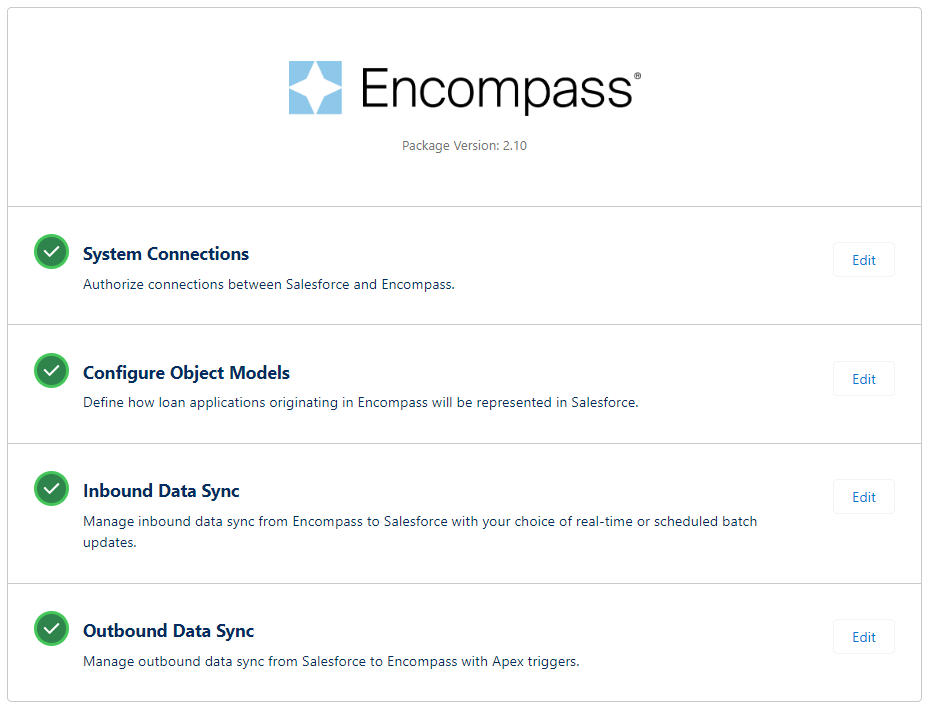
Encompass Setup Assistant
The Encompass Setup assistant (Setup Assistant) will need to be configured to connect your
Salesforce organization to your Encompass account.
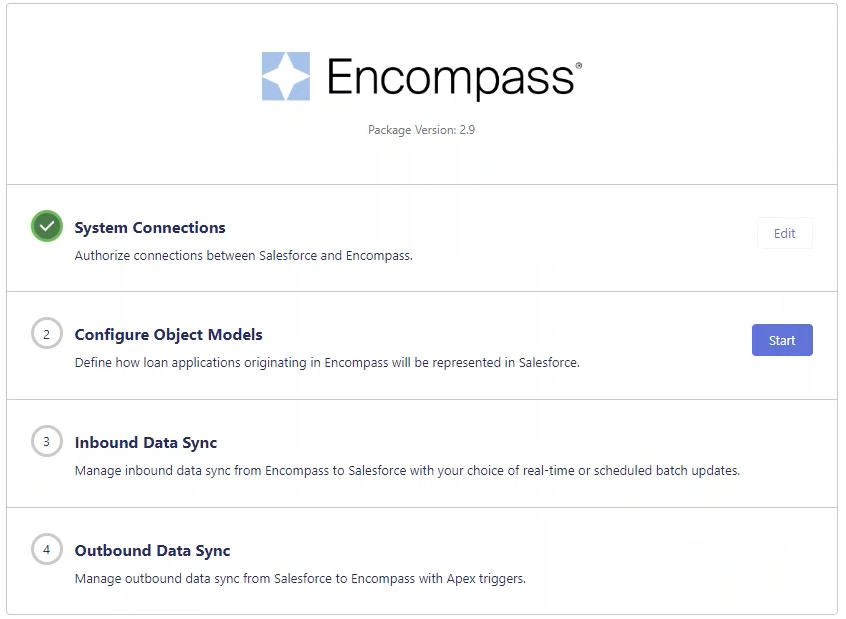
This setup is comprised of four configurations:
-
System Connections—Authorize connections between Salesforce and Encompass.
-
Configure Object Models—Define how loan applications originating in
Encompass will be represented in Salesforce.
-
The setup assistant allows you to define the object model(s) in which the
data exists for Encompass to properly source loan data within your
organization. This process captures the primary “Loan” object, as well as
the family tree of objects related to it. Once the relationships are
established, you will be able to select the fields in Salesforce that
correspond to fields in Encompass.
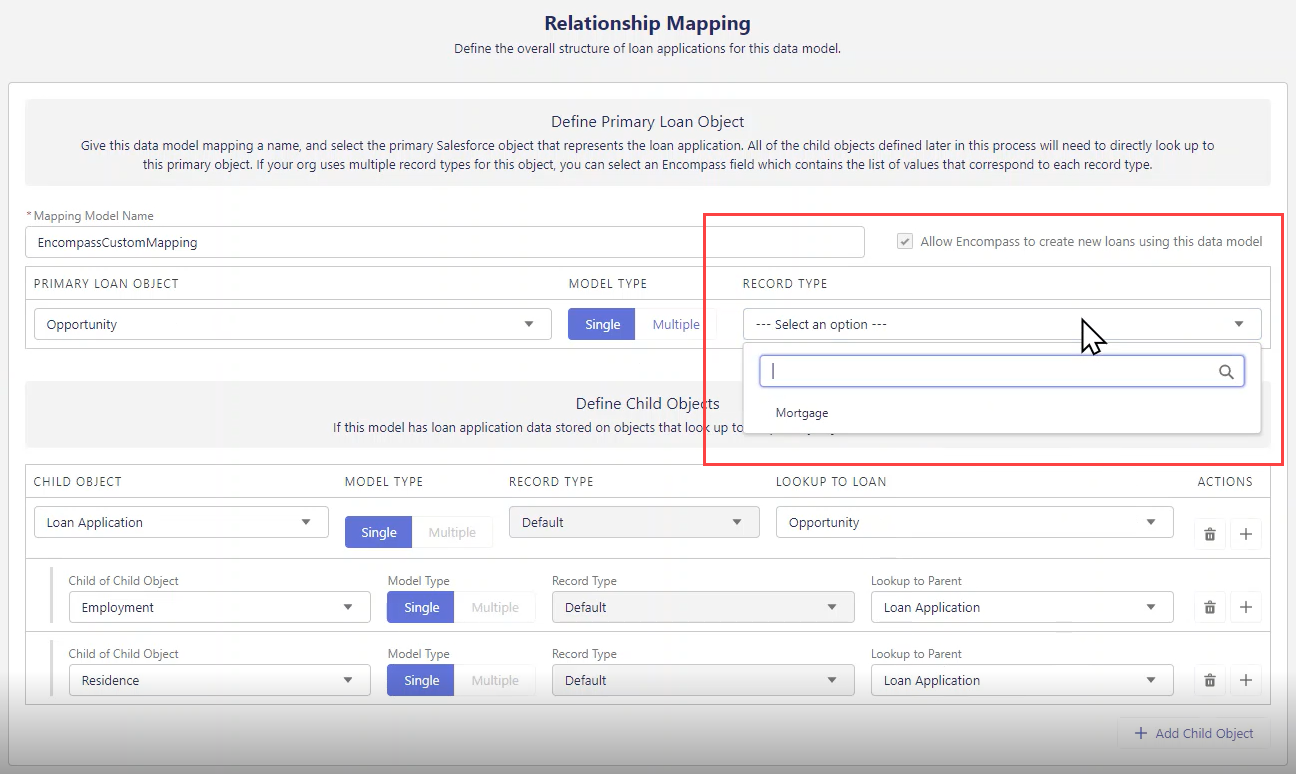
-
All the child objects defined later in this process will need to directly
look up to this primary object. If your org uses multiple record types for
this object, you can select an Encompass field which contains the list of
values that correspond to each record type.
-
Inbound Data Sync—Manage inbound data sync from Encompass to Salesforce with
your choice of real-time or scheduled batch updates.
-
Outbound Data Sync—Manage outbound data sync from Salesforce to Encompass
with Apex triggers.
Configure Encompass Setup Assistant
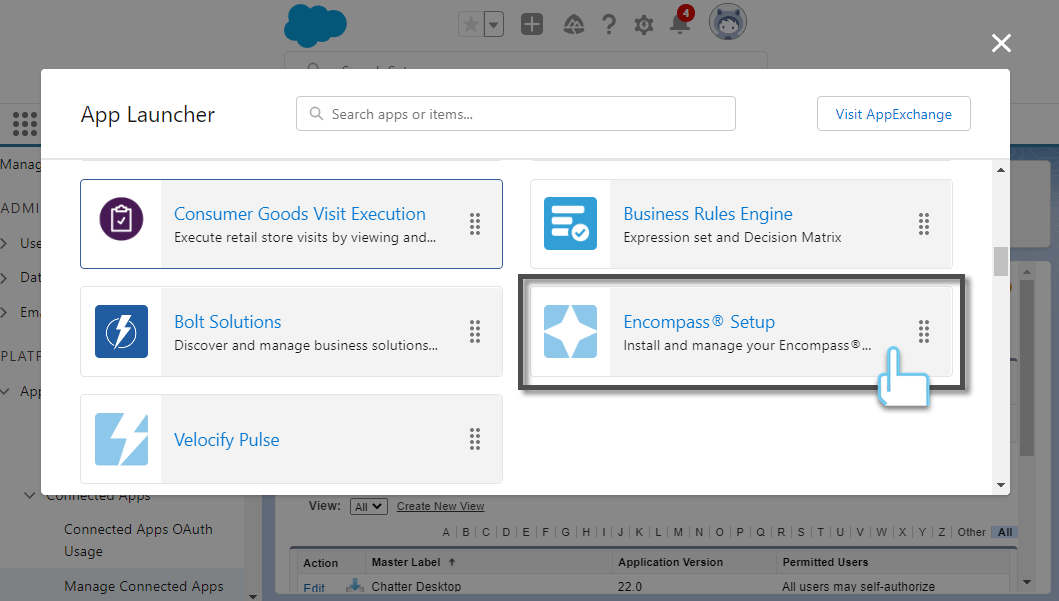
To Configure the Encompass Setup Assistant:
-
Go to the App Launcher, select View All (or search for
Encompass Setup), and then click the Encompass Setup app.
-
When the setup assistant launches, click Get Started.
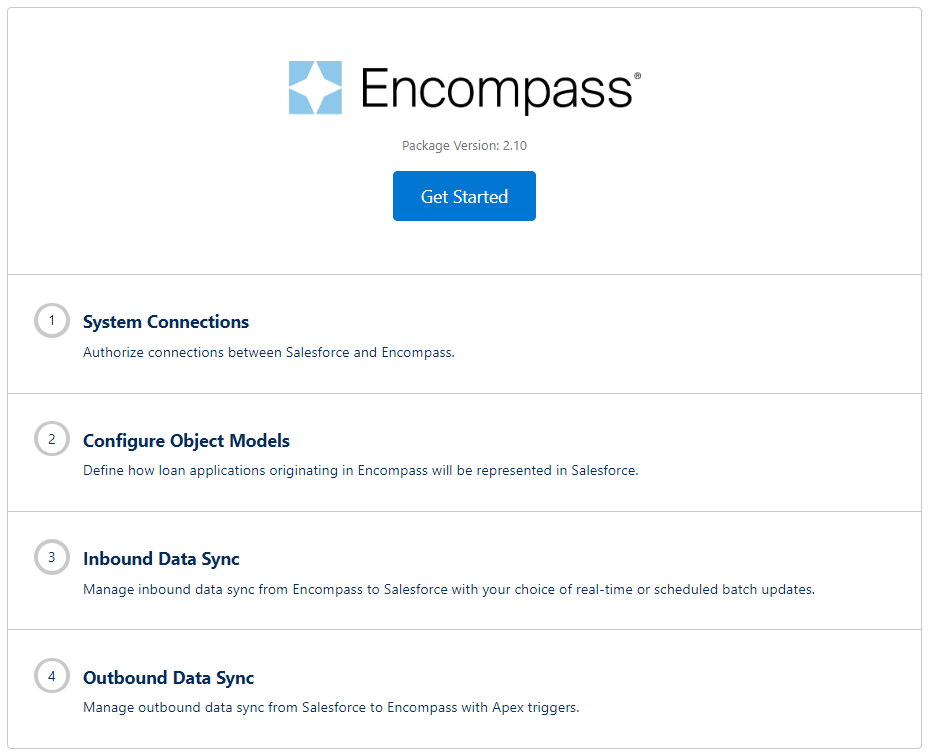
The first setup configuration—System Connections—will start
automatically.
Step 1: System Connections
This step authorizes the connection between Salesforce and Encompass.
To Authorize Connections Between Salesforce and Encompass:
-
In the Connect to Encompass window, enter information in the
following fields, and then click Authorize.
- Instance ID
- Client ID
- Client Secret
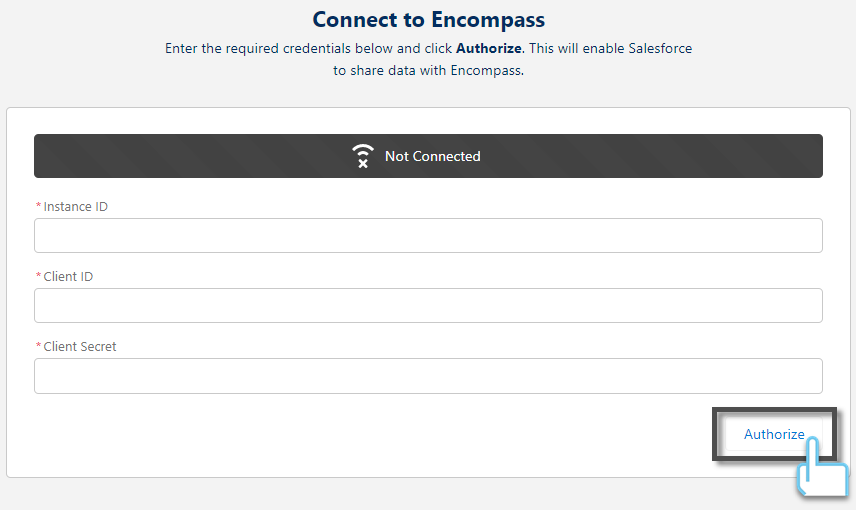
Reach out to your Encompass Relationship Manager if you do not have
this information.
-
Once successfully authorized, click Finish.
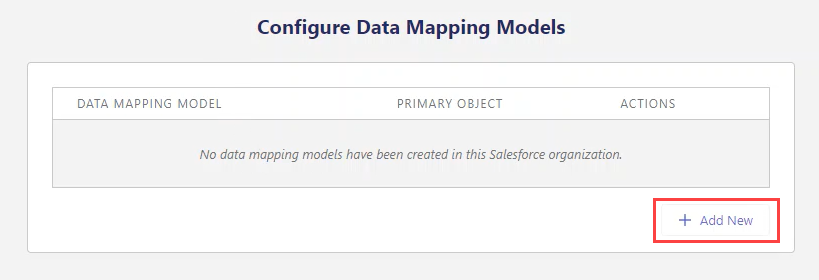
Step 2: Configure Object Models
This step sets up the primary Salesforce object that represents the loan application
and assigns a name to the data model mapping.
To Define How Loan Applications Originating in Encompass will be Represented in
Salesforce:
-
Click Start to begin configuring Object Models.
-
Click Add New.
-
Select Encompass Custom Data Model and then click
Create Model.
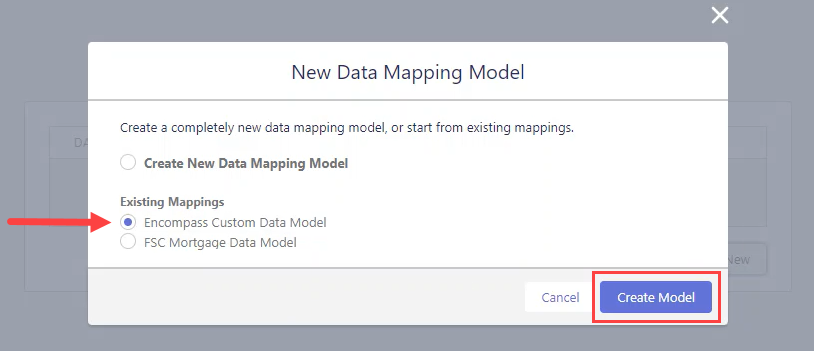
If your company has an FSC (Financial Service Cloud) Mortgage
License, select "FSC Mortgage Data Model" instead.
-
On the Relationship Mapping page, if you'd like the model you're
working on to be the data model Encompass uses to create new loans in
this org, select the
Allow Encompass to create new loans using this model check box.
If only one model is being used by your org, the "Allow Encompass
to create new loans using this data model" check box will be
selected by default.
-
Select Mortgage for the Record Type of the Primary Loan Object,
and then click Next.
-
On the Field Mapping page, you can review (and update if needed)
how data is mapped between Encompass and the Salesforce object. When
finished, click Save.
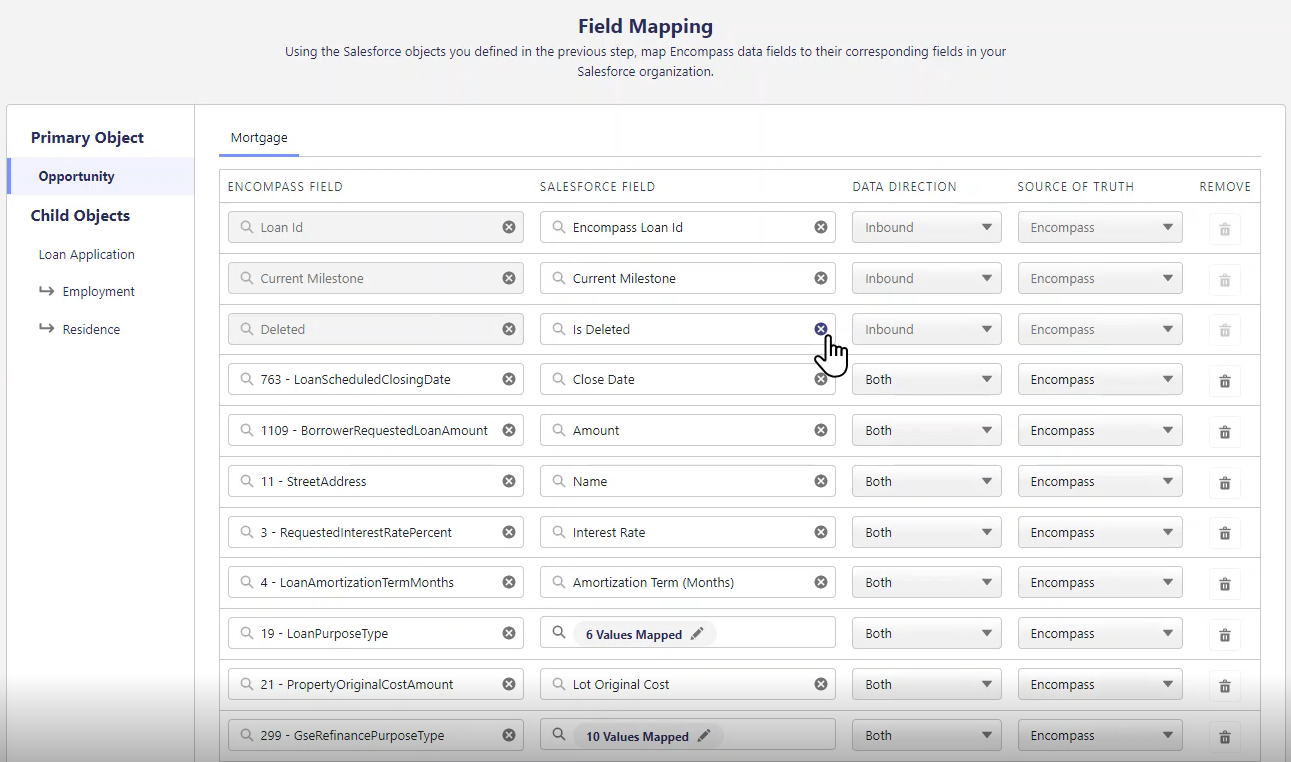
-
Once the new data mapping model is added, click Finish.
Step 3: Inbound Data Sync
This step enables you to manage inbound data sync from Encompass to Salesforce.
Two options are available to enable data sync from Encompass to Salesforce:
To Manage Inbound Data Sync from Encompass to Salesforce Using Real-Time or
Scheduled Batch Updates:
-
Click Start to start configuring the Inbound Data Sync.
-
Select Real Time Data Sync with Webhooks from the available
two options, and then click Next.
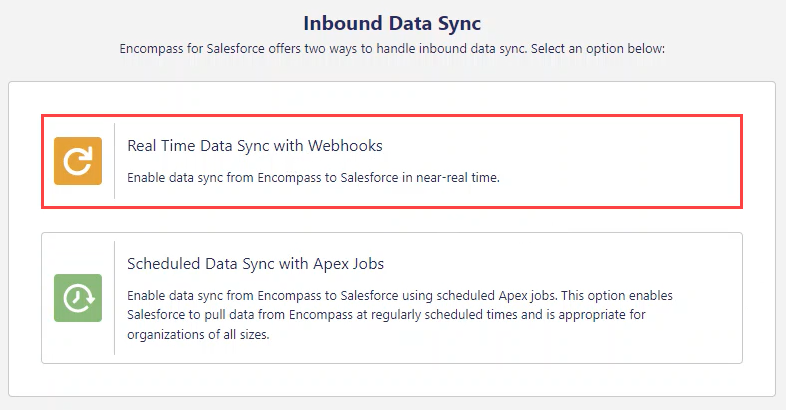
-
Follow the onscreen instructions to set up a Salesforce site.

-
Once configuration is complete, paste the Site URL, and then click
Finish.
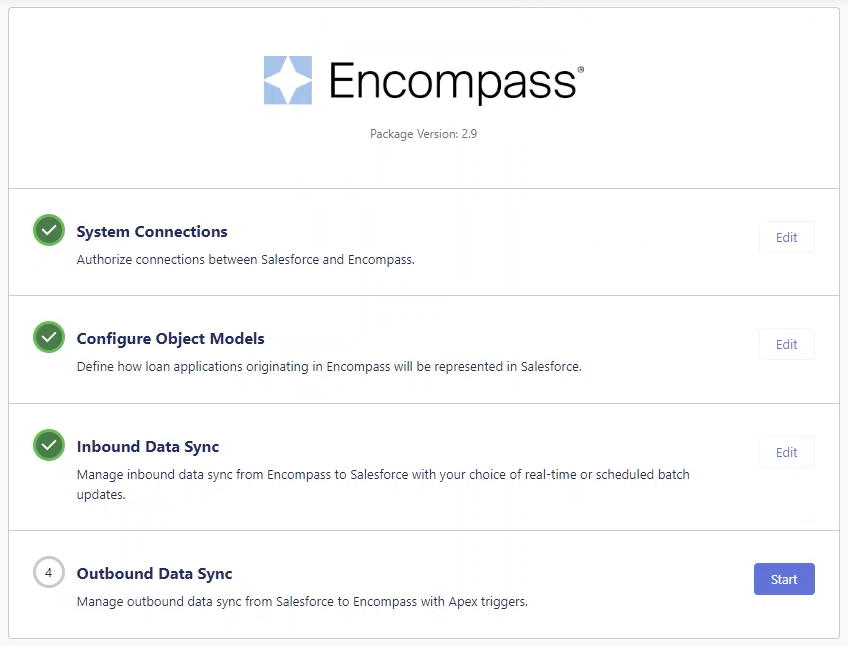
Step 4: Outbound Data Sync
This step enables administrators to manage outbound data sync from Salesforce
to Encompass with Apex triggers.
Two options are available to send data from Salesforce to Encompass for
each Salesforce object:
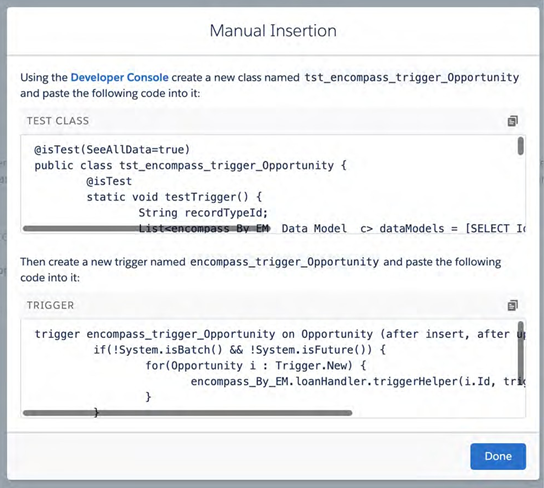
To Manage Outbound Data Sync from Salesforce to Encompass with Apex Triggers:
-
Click Start to start configuring Outbound Data Sync.
Primary loan objects that have mappings attached are displayed
here.
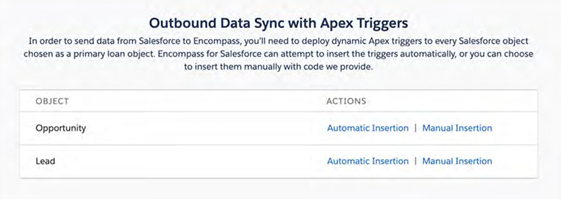
-
Select one of the options below for each of the Salesforce objects
chosen as a primary loan object:
For details on how the trigger code fires a sync to Encompass on inserts and updates, see the Sample Trigger Code.
View Sample Trigger Code
Outbound Data Sync Retry
After setting up the Automatic or Manual Insertion option, the next step is to configure
the Outbound Data Sync Retry job. This is a recurring job that will use the Error Log to
identify any previous Outbound Data Sync failures and attempt to reprocess them. On
successful reprocessing, the Error Log entry is deleted. If the attempt to reprocess fails,
the Error Log remains and will be attempted again on the next Sync Retry.
Outbound Data Sync Retry Frequency
To Setup How Often the Retry Sync Job Checks for Unsynced Integrations and Attempts
to Resent Them:
-
Select an option for Job Frequency and Job Start Time, and
then click Schedule Job.
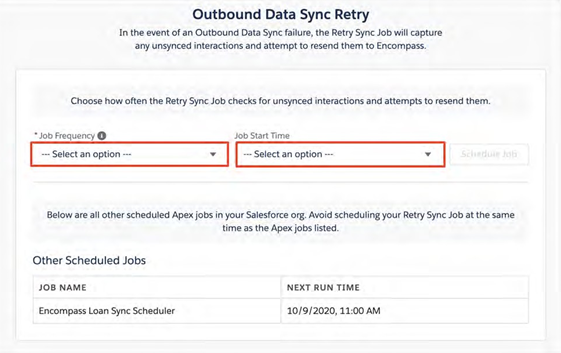
-
Click Finish.
The Encompass Setup is now complete.
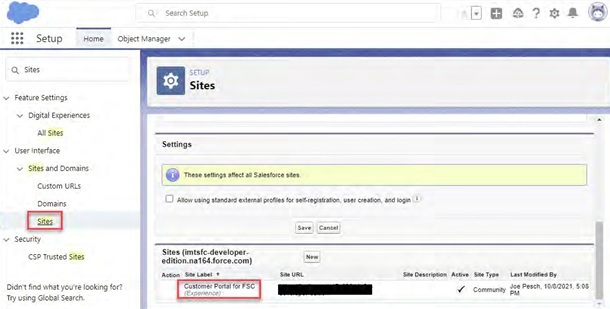
Site User Configuration
The Site User Profile requires security additions to make updates from Encompass. If a field is
included in your mapping, it is important to make sure the Site User Profile has access to edit
these fields.
View and Edit Site User Profile
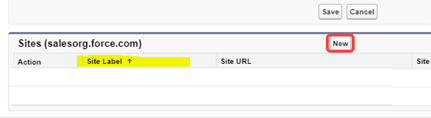
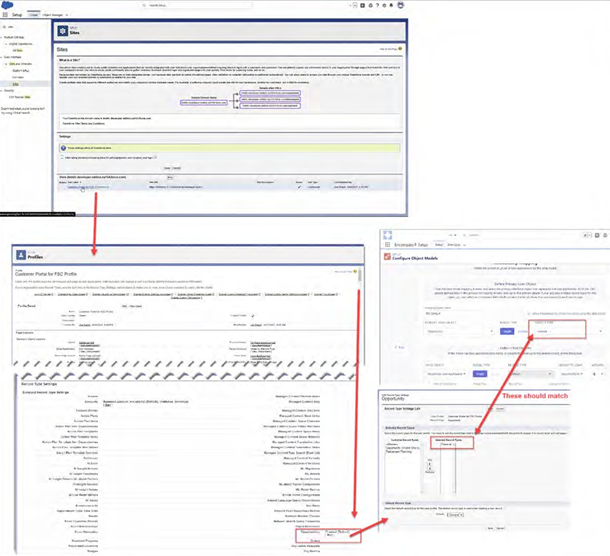
To View and Edit the Site User Profile:
-
Go to Setup > User Interface > Sites and Domains,
and then select Sites (or search for Sites in the Quick Find).
-
Locate the webhook site, and click the Site Label.
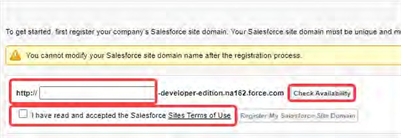
URL Setup
If you do not have a named URL, you will need to add one first.
-
Click New.
-
Type your URL, and then click Check Availability.
-
Provide a unique URL, and then select
I have read and accepted the Salesforce Site Terms of Use check box.
You may need to add two URLs for the Edit button to display.
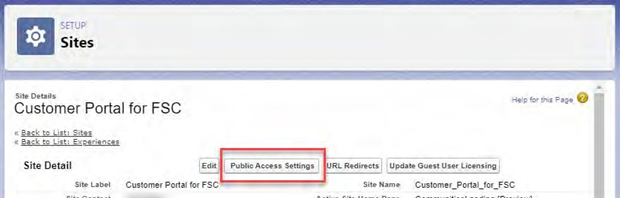
Once you complete this step, you will need to click on the Site
link in the Site Label column to access the site detail
-
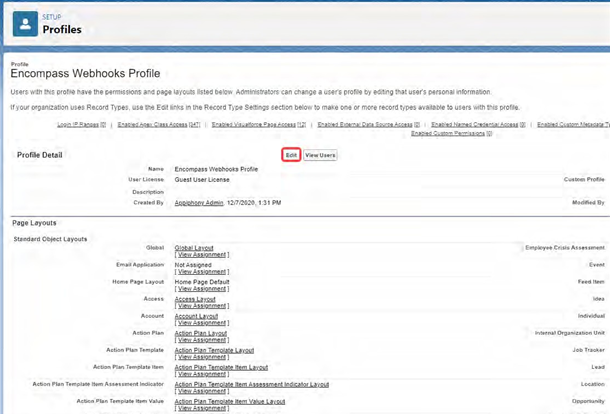
To access the Encompass Webhooks Profile page, click
Public Access Settings under Site Details.
-
To access the Standard Object Permissions page, click Edit in the
Profile Detail section.
-
Locate the primary mapping object or any other objects included in the mapping,
and then ensure that the Read and Create options are selected for
each of these objects:
- Accounts
- Contacts
- Opportunities
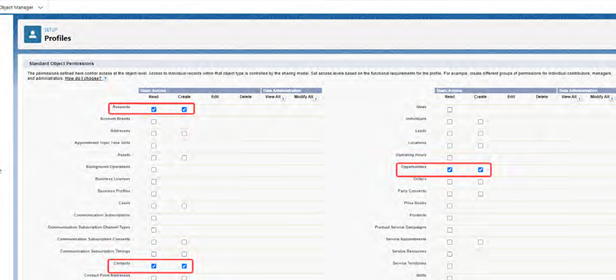
-
Save the profile.
-
Back on the Profile page, scroll down to the
Standard Field Level Security section, locate the Object(s) associated
to your mapping, and then select View.
You only need to grant access to the Primary Objects. You do not need to
grant access to Child Objects.
-
Click the Edit button, and then ensure the Read Access and
Edit Access options are selected for all fields that are included in
your mapping. Once confirmed, click Save, and then return to the Profile
page.

The site user now has access to all the objects and fields they need.
-
Update the Record Type Settings for Opportunity to General.
The type should match the type selected in the Object Model configuration.
Appendix
Sample Trigger Code
This trigger code fires a sync to Encompass on all inserts and updates. Additional lines may be
required to limit trigger activity. The trigger below only fires for records that already have
a Loan ID (which means a user has manually sent the update to Encompass) and the user is not
the Site user.
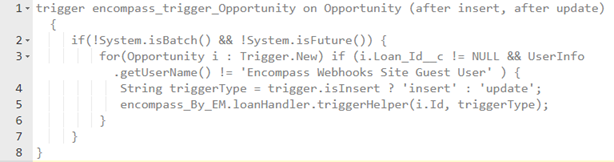
Sending updates for Webhook events are not supported.
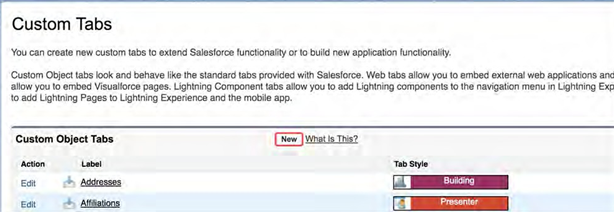
Creating a Custom Tab for Error Log
Encompass administrators have the option to create a custom tab to display error logs.
Add Custom Display Error Logs Tab
To Add a Custom Tab to Display Error Logs:
-
Go to Setup > User Interface, and then select Tabs.
-
On the Custom Tabs page, click New.
-
For “Step 1. Enter the Details”, select the Error Log custom object to
display in the custom tab.
-
Select the Tab Style lookup icon to display the
Tab Style Selector.
-
Select the color scheme and icon for the custom tab.
-
Click Next.
-
For “Step 2. Add to Profiles”, select
Apply one tab visibility to all profiles.
-
Click the drop-down field and select Tab Hidden.

-
Select Apply a different tab visibility for each profile.

-
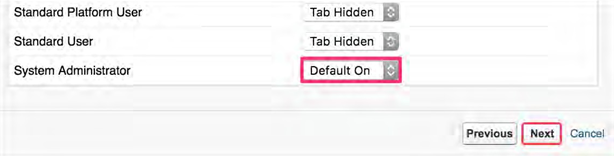
Scroll to the System Administrator profile, select
Default On from the drop-down field, and then click Next.
Visibility should be granted to only those profiles which need
access to manage / view logged errors. If another user profile
needs access to this tab, you must update their tab visibility
access settings.
-
For “Step 3. Add to Custom Apps”, select the Custom Apps for which the
new custom Error Log tab will be available, and then click Save.
Resolving Conflicting Fields
If one or more custom field names are both on the same Salesforce object, specifically on the
Opportunity object, additional steps are required to accommodate the conflict.
The Salesforce flow is able to address both fields independently and can be used to synchronize
data between them outside of the connector itself.
Encompass Custom Mapping
View the Encompass Custom Mapping guide to review Encompass and Salesforce field mappings.
View Mapping Guide
Tips, Tricks, & Customization Options
Person Objects
If your Salesforce org has Person Accounts enabled, change the mapping to use the
Last Name field instead of Name on the Account object. Then, ensure
that the default record types for Account and Contact are set to compatible
record types that don't interfere with person accounts.
To Change the Mapping:
-
Go to App Launcher > Encompass Setup App >
Configure Object Models > Edit > Next, and then
click Account.
-
If Account contains the Name field, change the value to
Last Name.
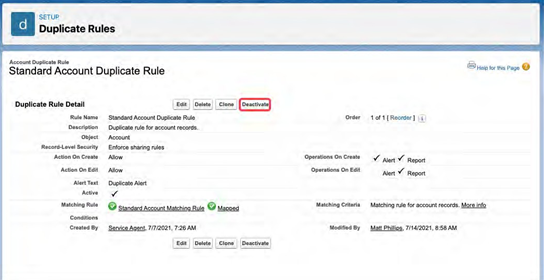
Turn Off Duplicate Rules
To Turn Off Duplicate Rules:
-
Go to Setup > Search Duplicate, and then click
Duplicate Rules.
-
Select each rule that has a check mark in the Active column.
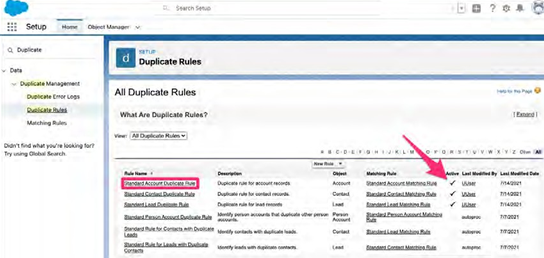
-
Click Deactivate.
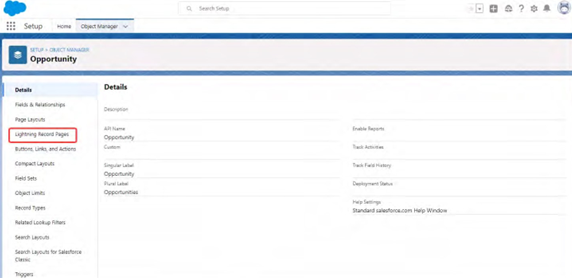
Page Layout
Follow the steps listed below to add Components to the Opportunity in the Lightning Record
Pages.
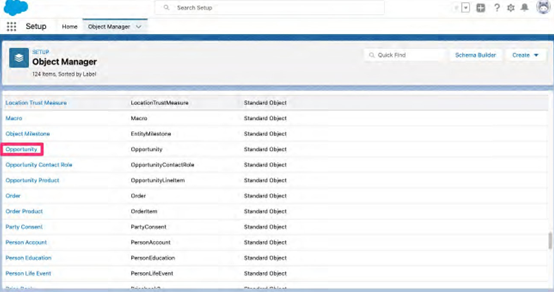
To Add Components to the Opportunity:
-
Go to Setup > Object Manager, and then click
Opportunity.
-
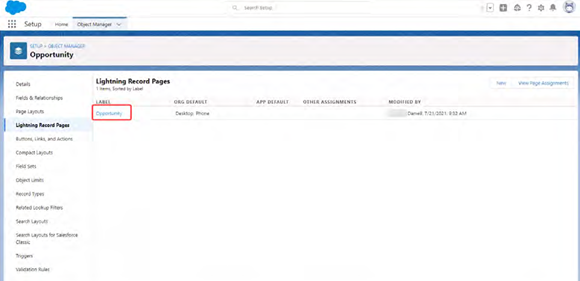
Click Lightning Record Pages.
-
In the Label column on the Lightning Record Pages page, click
Opportunity.
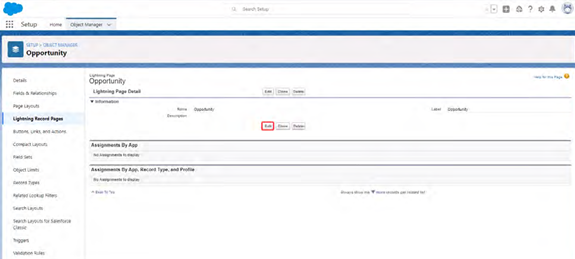
-
In the Lightning Page Detail section, click Edit.
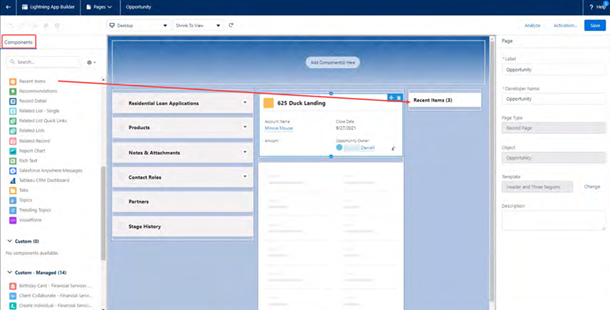
-
Drag and drop items from the Components column into the center panel to
define your Opportunity page layout.
Data Models
If you have the same object and record type combination in a data model multiple times,
this can cause issues with data integrity.
Field Mapping
-
If you don't map required fields for the object chosen during data mapping, the
data sync will fail when updating or creating records in Salesforce. This includes
fields that are required through workflow rules, or validation rules.
-
If there are multiple fields in a model that reference fields of the same element
of a collection in Encompass, two records in either Salesforce or Encompass will be
created instead of just one.
-
You cannot map fields from separate entities in Encompass to the same fields in an
object in Salesforce (for example: borrower, co-borrower). This is because there is
no object-to-object relation in Salesforce and we cannot distinguish the type of
data that is passed in and which record it belongs to.
Trigger Insertion
When automatically deploying triggers, make sure to disable any validation rules or
workflow rules for the objects as they can interfere with test runs on deployment of the
triggers.
Trigger with Updates
-
If you try updating a record in Salesforce to send to Encompass without a loan GUID
referenced, the update will be blocked.
We implemented this to prevent our trigger from being called twice due to other
processes or triggers on the same object. This will prevent duplicates from
getting created in Encompass.
-
If for some reason you need to send a new loan to encompass from a record that has
previously been created but not synced, you can use the manual insertion / update
method with the quick action to get around this.
Invocable Actions
-
If an admin chooses to setup a lightning flow with our invocable action for an
update to a loan, the admin will need to determine how and when to call the
invocable method. When syncing outbound, we update records with external IDs and
this could cause an infinite loop in which the following flows will fail. The admin
will have to prevent this from occurring.
-
For example—The Lead object has a process configured to run on
create or update. Loan Officer creates a loan which triggers this process
and calls our invocable method. The invocable method sends the loan data to
Encompass. Then it parses from the loan the external IDs, stores them in
their respective places in the Salesforce records, and updates them. This
will cause the process to be fired again due to the update on Lead.
-
Multiple application support and swapping borrower and co-borrower data between
applications requires one to many relationships implemented in the data model in
Salesforce between Loan and application otherwise you won't be able to process
multiple applications.
-
Performing extensive removal and swapping of borrower and co-borrower pairs between
applications can cause unexpected behavior. We advise that the removal and swapping
of pairs to be executed in simplified steps.
-
For example—Don't remove a co-borrower and then move in borrower /
co-borrower data from another application to swap. Remove the co-borrower
first, confirm the sync, then swap the pair information and confirm that
the swap was successful in Salesforce.
-
For Inbound Sync we have provided a way for the grandchildren of an object to
reference a field for external ID reference on a grandparent and associate the data
correctly.
-
Borrower and co-borrower dependent data (Employment, Residences, Income, etc.) must
be grouped on the same record as it pertains to a level in the data model.
-
For example—Primary Addresses will have one record for borrower and
co-borrower data instead of two. However, if there is no filter in the JSON
path, or a different field id that allows us to differentiate between the
different data it will cause unexpected behavior during sync and may
generate two records instead of one which can later cause issues for
outbound sync.
-
You can only swap borrower and co-borrower data in Encompass and sync it to
Salesforce only if the required fields that pertain to the associated object in
Salesforce are still populated when the swap occurs. Sometimes if this fails, the
metadata can be corrupted and will need to be fixed as well. For possible
solutions:
-
To account for borrower and co-borrower data grouping on the same record an
external identifier will need to be added for each element inside of the
collection. Then sections can be added to page layouts to separate the data
between the elements in the collection.
-
Invalid data can throw errors at lower levels of the relationship model
during updates or insertions and cause the meta data for processing swaps
and removals to get out of sync. If data gets out of sync during an update,
or movement of borrower and co-borrower data in and between applications,
or even during additions to loan/application data follow these steps below:
-
Revert the change in encompass and anything necessary like external
references in SF that may have been updated at higher relationship
levels.
-
Delete the metadata record for the associated loan.
-
Do an inbound update to resync the loan metadata and loan data.
-
Make changes to fix the data being swapped that were invalid
before.
-
Redo the sync / swap.
If this fails, a full new reimport / resync may be required to fix the error.
Process Builder or Lightning Flow (Optional)
If you do not wish to use the Apex Trigger for outbound syncing, a Process Builder and/or
Lightning Flow can be set up to handle outbound sync.
ICE Mortgage Technology Professional Services offers several default flows for the
Encompass Object model. These models are not included in the Encompass Object setup
package, but they can be installed separately and then modified as needed.
These flows include:
- Record Deletion
- Borrower Pair Swapping
Setup Process Builder
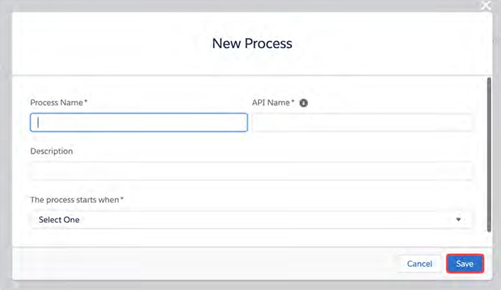
To Use Process Builder:
-
Go to Setup > Process Automation, click
Process Builder, and then click New.

-
Add the required information, and then click Save.
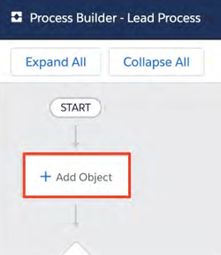
-
Click Add Object.
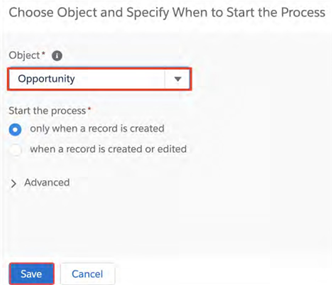
-
From the Object drop-down field, select the object that is used as the
primary object in your mapping, and then click Save.
-
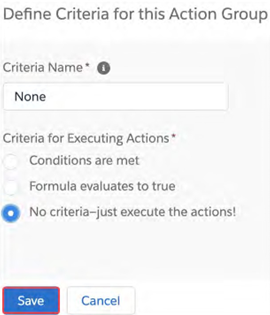
Click Add Criteria.
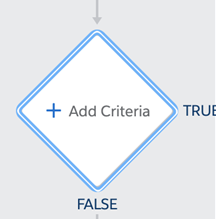
-
Type the Criteria Name of your choice, select
No criteria—just execute the actions!, and then click Save.
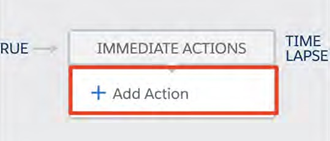
-
Click Add Action.
-
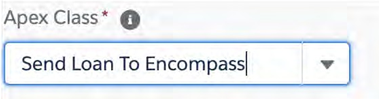
From the Action Type drop-down field, select Apex.

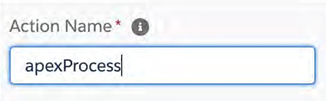
-
Add the Action Name of your choice.
-
From the Apex Class drop-down field, select Send Loan To Encompass.
-
From the Type drop-down field, select Field Reference.

-
Set the Value as Id of the object, and then click Save.

-
Click Activate.

Setup Lightning Flow
To Use Lightning Flow:
-
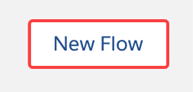
Go to Setup > Process Automation, click Flows, and then
click New Flow.
-
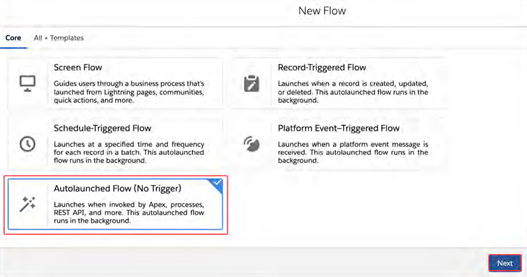
Select Autolaunched Flow (No Trigger), and click Next.
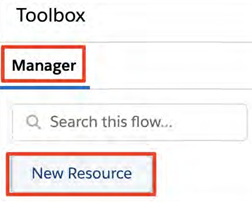
-
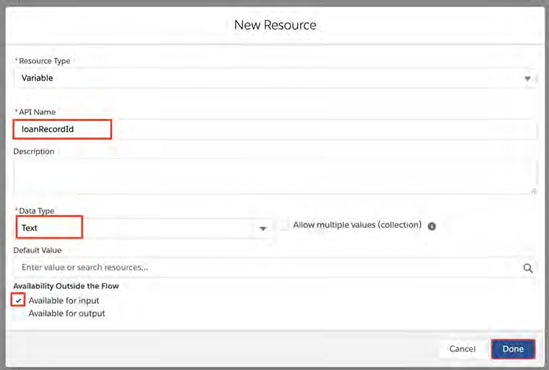
In the Manager section, click New Resource.
-
From the Resource Type drop-down field, select Variable.
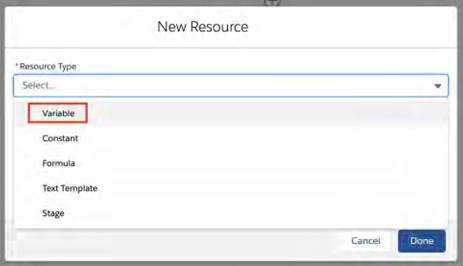
-
In the New Resource window, complete the following fields, and then
click Done.
-
Add the loanRecordID for API Name.
-
Select Text for Data Type.
-
Select Available for input in the Availability Outside the Flow
section.
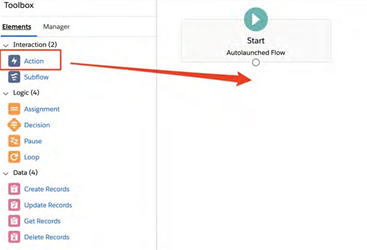
-
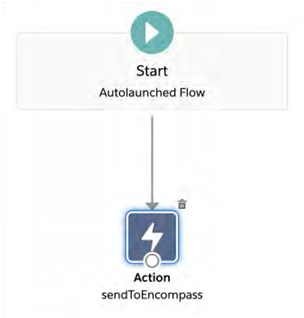
Click and drag the Action element to the page.
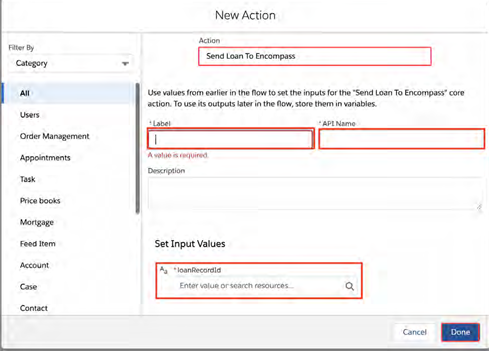
-
Search for Send Loan to Encompass in the Action search field.
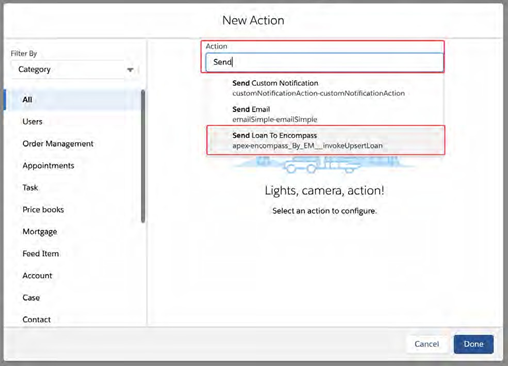
-
Select Send Loan To Encompass, and then update all the required fields.
-
Click and drag the arrow from Start to Action, and then click
Save.
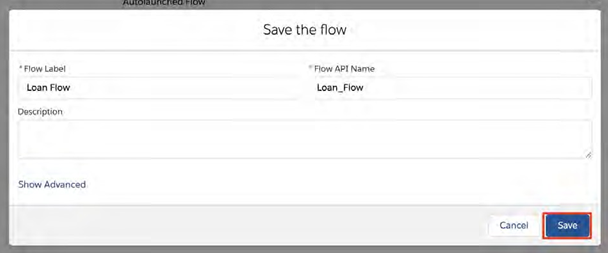
-
In the Save the flow window, name the flow, and then click Save.
-
Click Activate to activate this flow.
This flow can now be called from the Process Builder. You can go back the
Process Builder steps above, and when you Add Action, select
Flows as the Action Type. The activated flow will be available to
select.
Creating a Send to Encompass Quick Action Button (Optional)
A quick action Send to Encompass button can be created for the primary loan object Salesforce
is syncing with Encompass. This will enable your users to manually send loan data to Encompass.
Only the object defined as the primary loan object by the mapper can successfully use the
Send to Encompass quick action button. This button is optional, not required.
Send to Encompass Quick Action Button
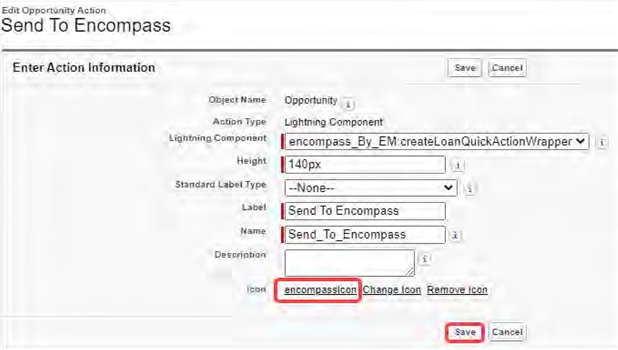
To Create a Send to Encompass Quick Action Button:
-
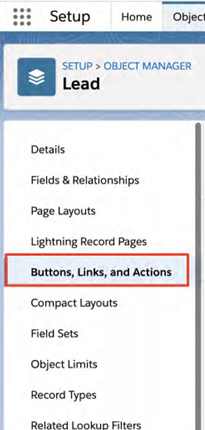
Go to Setup > Object Manager, and then select the object that
is used as your primary object in your mapping.
-
Click Buttons, Links, and Actions, and then click New Action.
-
In the Send to Encompass window, complete the following fields, and then click
Save.
-
Action Type: Select Lightning Component.
-
Lightning Component: encompass_By_EM:... is auto-selected.
-
Height: Set to 140px.
-
Description: Add a description or details about the button (optional).
-
Icon: Click the Change Icon link, and then select
encompassicon.
Add Button to Page
To Add the Button Created To a Page:
-
Return to the Object Manager > Object, and then select
Page Layouts.
-
Select the layout that's assigned to the object.
-
Click Mobile & Lightning Actions.
-
Click the override the predefined actions link.

-
Locate the Send to Encompass button, and then click and drag the button
to the Salesforce Mobile and Lightning Experience Actions section.
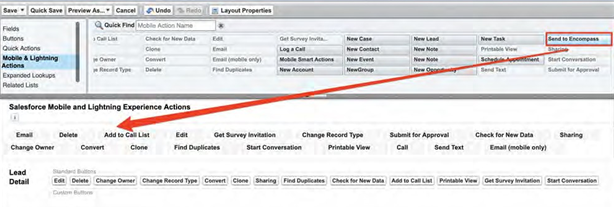
-
Click Save.
This button will now appear on the record page of the object it has been added to.