The Geographies feature is part of our continuing effort to support geocoding-based pricing and qualification. This release provides Client Administrators (Client Admins) the ability to create and manage Geographies in order to condition price adjustments and qualification rules. A geography definition can include states, counties, zip codes, MSAs, census tracts, county codes, and state codes.
Detailed Procedures
 To Access the Geographies Page
-
Log into EPPS as a Client Admin.
-
Click the Admin menu option, and then click the Settings tab.
-
Click the Geographies link at the top of the page.

-
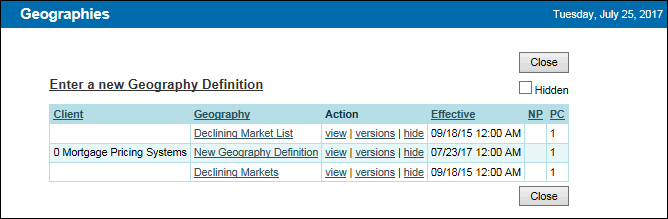
The Geographies Listing page is displayed.
To Create a Geography Definition
- Log into EPPS as a Client Admin.
- Click the Admin menu option, and then click the Settings tab.
- Click the Geographies line at the top of the page.
- The Geographies Listing page is displayed.
- Click the Enter a new Geography Definition link.
-
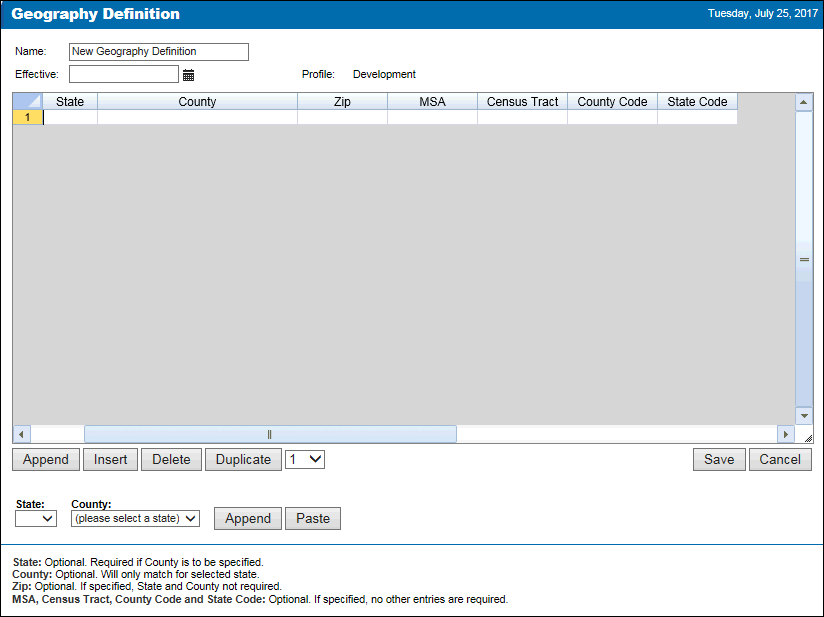
Enter a name for the geography definition, up to fifty characters.
-
Enter an effective date for the geography definition.
- You can click the Calendar icon to display a calendar where you can select an effective date.
-
Click in each column to manually enter data.
- State - Enter the two character state abbreviation or use the drop-down field described in step 9.
- County - Enter a county within the specified state or use the drop-down field described in step 9.
-
Zip - Enter a zip code within the specified state and county. If you enter the Zip, the State and County is not needed.
-
Enter an MSA, Census Tract, County Code, and State Code. If you enter these fields, no other fields are needed.
-
Use the State and Country drop-down fields to populate that data into the grid.
-
Select a State and County, and then click Append to add an entry to the bottom of the grid.
-
Select a State and County, and then click Paste to populate that data into a highlighted row.
If you highlight an existing row, the data in that row will be replaced with this new data.
- To add a row below your current entry, click Append.
- To add a row above your current entry, click Insert.
- To delete a row or rows, highlight them and then click Delete.
- To duplicate an entry, highlight it and then click Duplicate.
-
Use the drop-down field next to the Duplicate button to indicate the number of duplicate entries you want to add.
- When done, click Save.
To Promote a Geography
Once you have created a Geography and successfully tested it, you can use it by promoting it to a Production version.
- Log into EPPS as a Client Admin.
- Click the Admin menu option, and then click the Settings tab.
- Click the Geographies link at the top of the page.
- The Geographies Listing page is displayed.
- Click the versions link next to the Geography you want to promote.
- If there are multiple versions, select the one you want to promote, and then click the promote link.
- When prompted, click OK to confirm the action.
-
The Geography is promoted to Production based on the Geography’s effective date.
To View the Current Production Version of a Geography
- Log into EPPS as a Client Admin.
- Click the Admin menu option, and then click the Settings tab.
- Click the Geographies link at the top of the page.
- The Geographies Listing page is displayed.
- Click the view link next to the Geography you want to view.
To View Versions of a Geography
- Log into EPPS as a Client Admin.
- Click the Admin menu option, and then click the Settings tab.
- Click the Geographies link at the top of the page.
- The Geographies Listing page is displayed.
- Click the versions link next to a Geography.
-
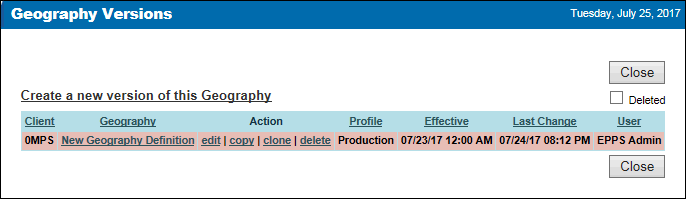
The Geography Versions Listing page is displayed.
-
From this page, you can edit, copy, clone, or delete versions of a Geography.
- Copy – Enables you to create a new Test version by copying a previously created version of a Geography. All parameters of the original Geography are copied except for the effective date and any notes.
This option is useful when you have simple changes to a Geography. Copy a version, edit the copied version to reflect updated geography, and then select an effective date to test and promote.
-
Clone – Enables you to create an entirely new geography definition based on the selected version and definition. All parameters of the original Geography, geography version, and geography definition are cloned except for the effective date and any notes.
This option is useful to reduce the data entry required when you want to create a new geography definition that contains components of an existing geography definition.
To Hide a Geography
- Log into EPPS as a Client Admin.
- Click the Admin menu option, and then click the Settings tab.
- Click the Geographies link at the top of the page.
- The Geographies Listing page is displayed.
-
Click the hide link next to the Geography you want to hide.
-
When prompted, click OK to confirm the action.
To Unhide a Geography Definition
- Log into EPPS as a Client Admin.
- Click the Admin menu option, and then click the Settings tab.
- Click the Geographies link at the top of the page.
- The Geographies Listing page is displayed.
- Select the Hidden check box to display all the hidden geography definitions.
- Click the hide link next to the geography definition you wan to unhide.
- When prompted, click OK to confirm the action.
EPPS-11125, EPPS-11502, EPPS-11509, EPPS-12098
