Feature Enhancements in Version 25.2 June Service Pack
This section discusses the updates and enhancements to existing forms, features, services, or settings that are provided in this release.
Support for Custom Search Pages by Channel
The ability for ICE PPE Client admins to configure Search pages by Channel has been added. If enabled, the appropriate custom Search page will replace the default ICE PPE Search page.
The Encompass TPO Connect (TPO Connect) business rules that define Lock or Float actions are supported when a custom Search page is enabled within TPO Connect.
The No Closing Cost option (located on the ICE PPE Options page under the Settings tab) will not be honored by a custom Search page because custom rules can now be added to an individual field instead of being disabled for all scenarios. However, if a custom Search page is not used, the No Closing Costs option will be honored when using the Encompass Product & Pricing Service integration.
Custom Search Page Setting
A new Custom Search Page setting has been added under the Settings tab. This setting enables you to configure custom Search pages by Channel.

To Configure a Search Page:
-
Log into ICE PPE as a Client admin.
-
Click on the Admin tab, and then click on the Settings tab.
-
Click on the Custom Search Page link.
-
When you select the Info icon, information about the Search page is displayed.
-
The date and time when the Search page was last modified.
-
The user that last modified the Search page.
-
The status of the Search page.
-
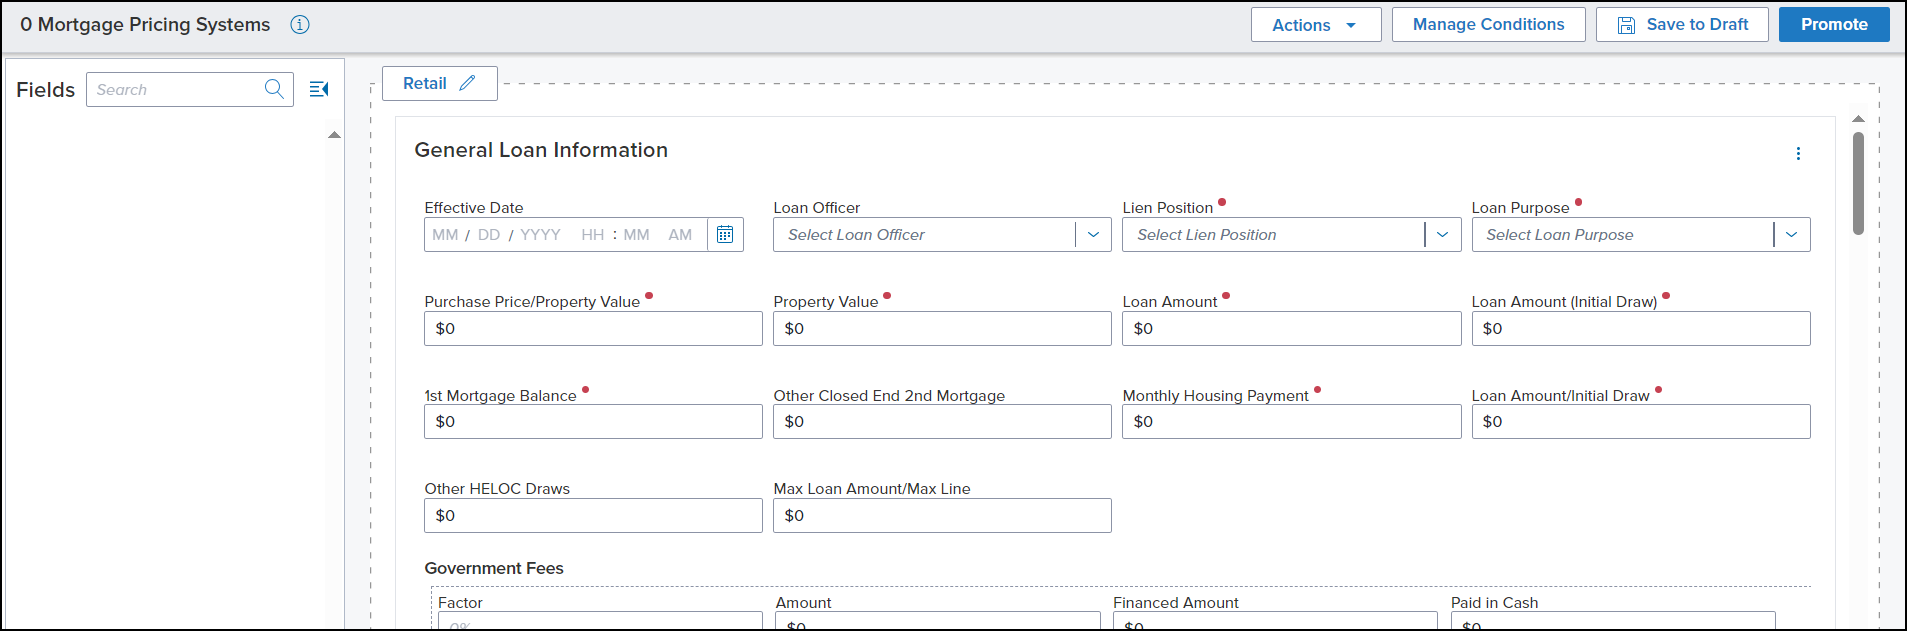
The Fields pane displays the fields that are currently not in use on the Search page.
-
Use the Collapse/Expand (
 ) icon to collapse or expand the left pane.
 -
Use the Search field next to the Fields label to locate a specific field.

-
You can drag and drop fields from this pane to the appropriate section (e.g., General Loan Information, Finance Information, Product Information, etc.) in the center pane.
There is no logic or validations that prevents the removal/deletion of required pricing fields.
-
Details of the selected field will be displayed on the Properties tab of the Settings pane (located on the right side of the page).
-
The center pane displays the sections and fields available on the Search page.

-
Conditions based on the ICE PPE User Roles are supported.
-
Role-based conditions are honored and determine which fields are visible to a user. Use the Channel dropdown field to select a Channel.

-
You can rename each section by selecting the Menu (
 ) icon on the far right and then selecting Rename Section.
 -
You can reorder the sections by selecting the Menu icon, selecting Reorder Sections, and then grab a section by the Handle (
 ) icon and move it up or down.
 -
You can delete a section by selecting the Menu icon and then selecting Delete Section.
-
You can add a Detailed Section Info section (if not already present) by selecting the Menu icon and then selecting Add Detailed Section.
-
You can drag and drop fields from the Fields pane into the Detailed Section Info section.
-
If you want to delete the section, select the Delete (
 ) icon.
-
If available, you can select the Add Section button to add and configure another section.
-
You can drag and drop fields from one section to another section.
-
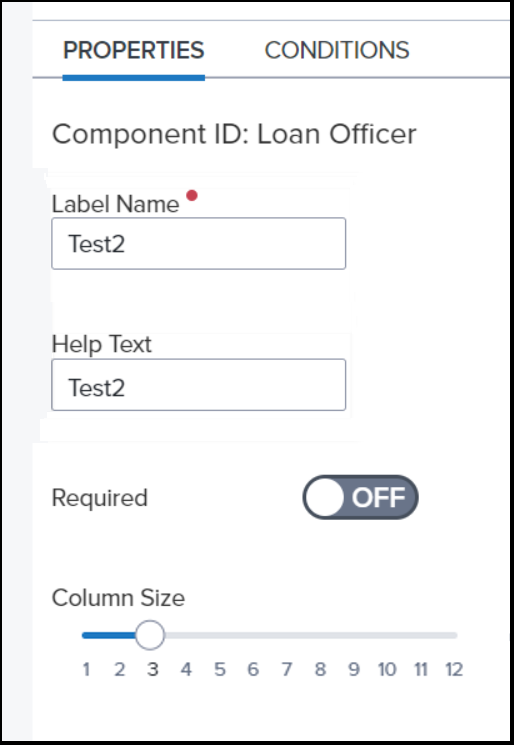
When a field is selected in the Center pane, its details will be displayed on the Properties tab of the Settings pane (located on the right side of the page).
-
You can edit the field label.
-
You can add help text, displayed within the field, to briefly describe the field.
-
You can select whether the field is required or not by using the Required On/Off toggle.
-
You can change the column size by using the Column Size slider. The default size is 4.
-
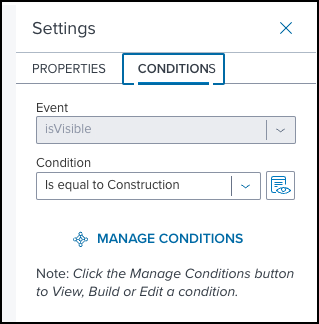
You can assign a condition to a field on the Conditions tab of the Settings pane (located on the right side of the page).
-
Select the condition you want to assign to the field from the Condition dropdown list.
-
The Actions dropdown field provides the actions available to configure the Search page.

-
Import - Enables you to import a JSON file of a custom Search page.
This feature supports transferring configurations from one environment to another environment. For example, from a UAT environment to a Production environment.
-
Once you select Import, you can drag and drop the JSON file into the text box with the label “Drop configuration file or browse Local Drive”. Otherwise, you can click on Local Drive to browse for the commitment letter file, select it, and then click Open.
-
Export - Enables you to export the Search page you are configuring as a JSON file.
-
Reset to Default - Reverts the Search page to the default ICE PPE template.
-
Preview - Enables you to preview the Search page you are configuring.
-
Reset to Production - The current draft Search page will be replaced with the current Production version.
“Production” refers to the Production version of the current environment. For example, if you are in a UAT environment, the Search page will reset to the active settings from that environment and not from the Production environment.
-
This will be an editable draft copy of the active Search page.
- The Save to Draft button saves the Search page as a draft. You can then return to it later and continue configuring the Search page.
-
The Promote button enables you to promote a draft version of a Search page to Production.
“Production” refers to the Production version of the current environment. For example, if you are in a UAT environment, the Search page will be promoted to Production of that environment and not to the Production environment.
-
The Manage Conditions button enables you to create and manage conditions.
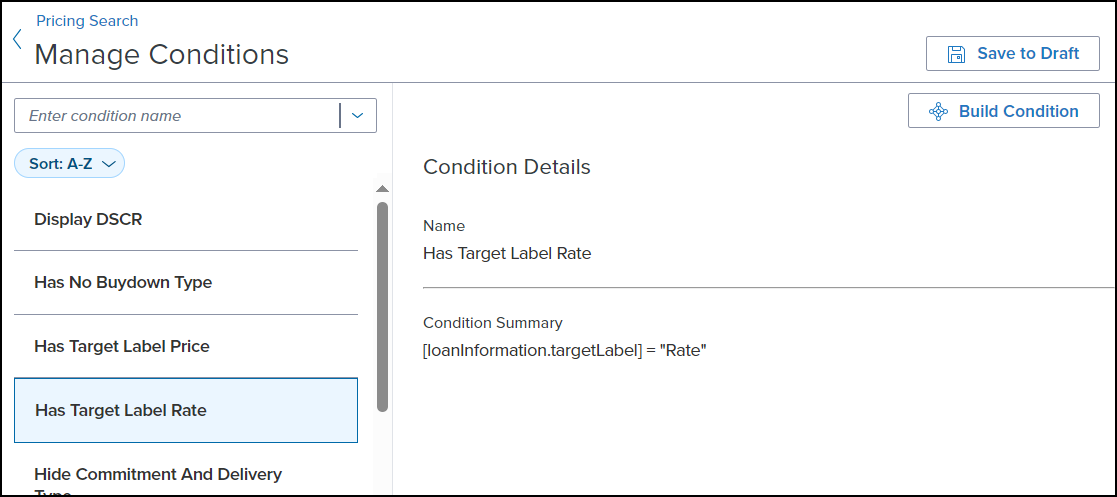
-
The Search on the left enables you to locate a condition either by entering the condition name or using the dropdown list.
To Build a Condition:
-
Select the Build Condition button.
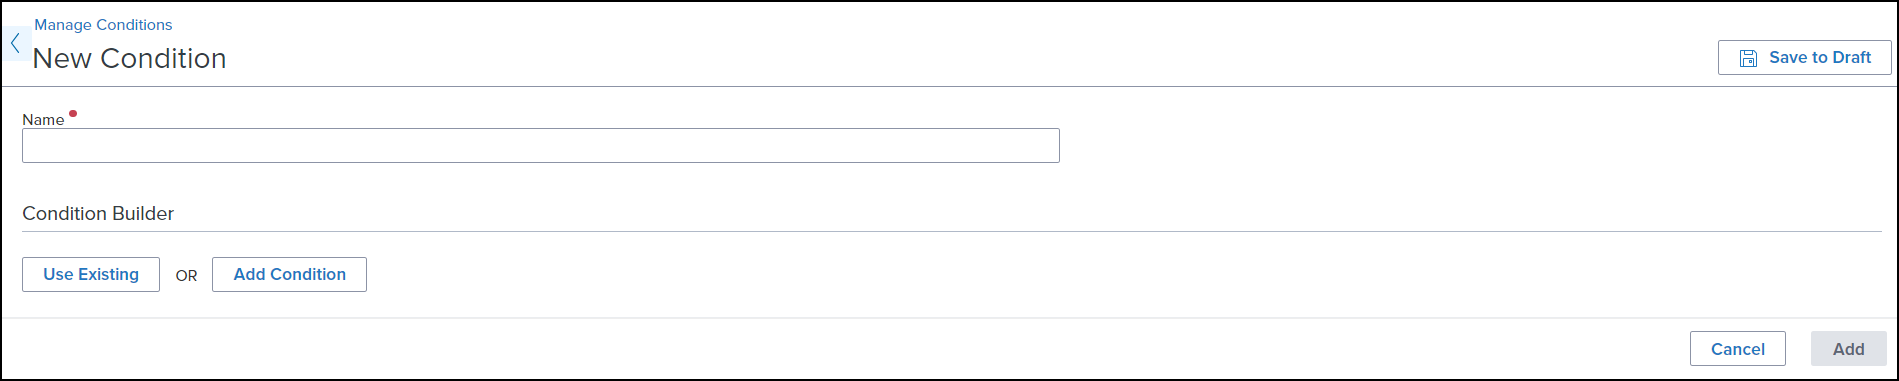
-
Enter a name for the condition in the required Name field.
-
To build a condition, you can either use an existing one or add a new one.
-
If you select the Use Existing button, you will be presented with a dropdown field with a list of available conditions to choose from.
-
If you select the Add Condition button, you will be presented with dropdown fields to create your statement.
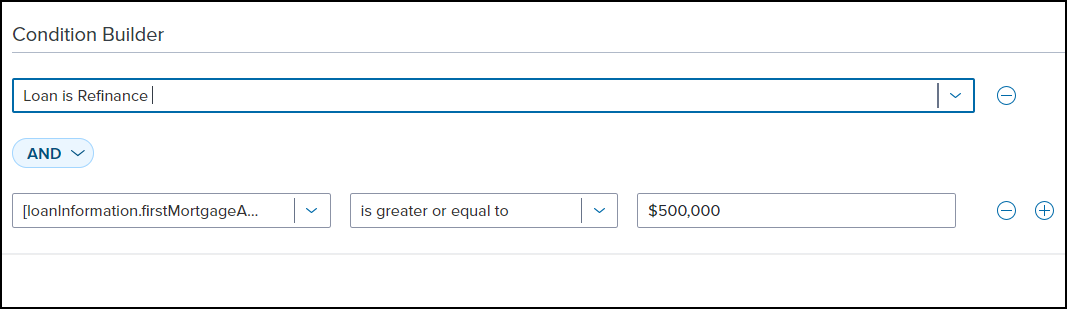
-
Select a non-loan or loan field in the first field. You can enter a word, such as “Amount”, to narrow the available fields.
-
Select an operator in the second field. You can enter a word, such as “Is not”, to narrow the available operators.
-
Complete your statement in the third field (if available).
-
Between each statement, you can select either an “AND” or “OR” operator to combine your statements.
-
Use the minus and plus icons to the right to add another statement or remove a statement.
-
When done, select Add.
Government Fees
The Total Loan Amount calculation on the Lock Request Form has been updated and is based on the Loan Type.
A new Adjust fee factor link has been added to the Search page.

-
If the Factor % matches between Encompass and ICE PPE, the field will be read-only and the Adjust fee factor link will not be displayed.
-
If the Factor % does not match between Encompass and ICE PPE:
-
The field will be populated with the value from Encompass.
-
An Adjust fee factor link will be displayed under the Factor % field.
On the Adjust Fee Factor modal, select the fee factor you want to use for pricing.
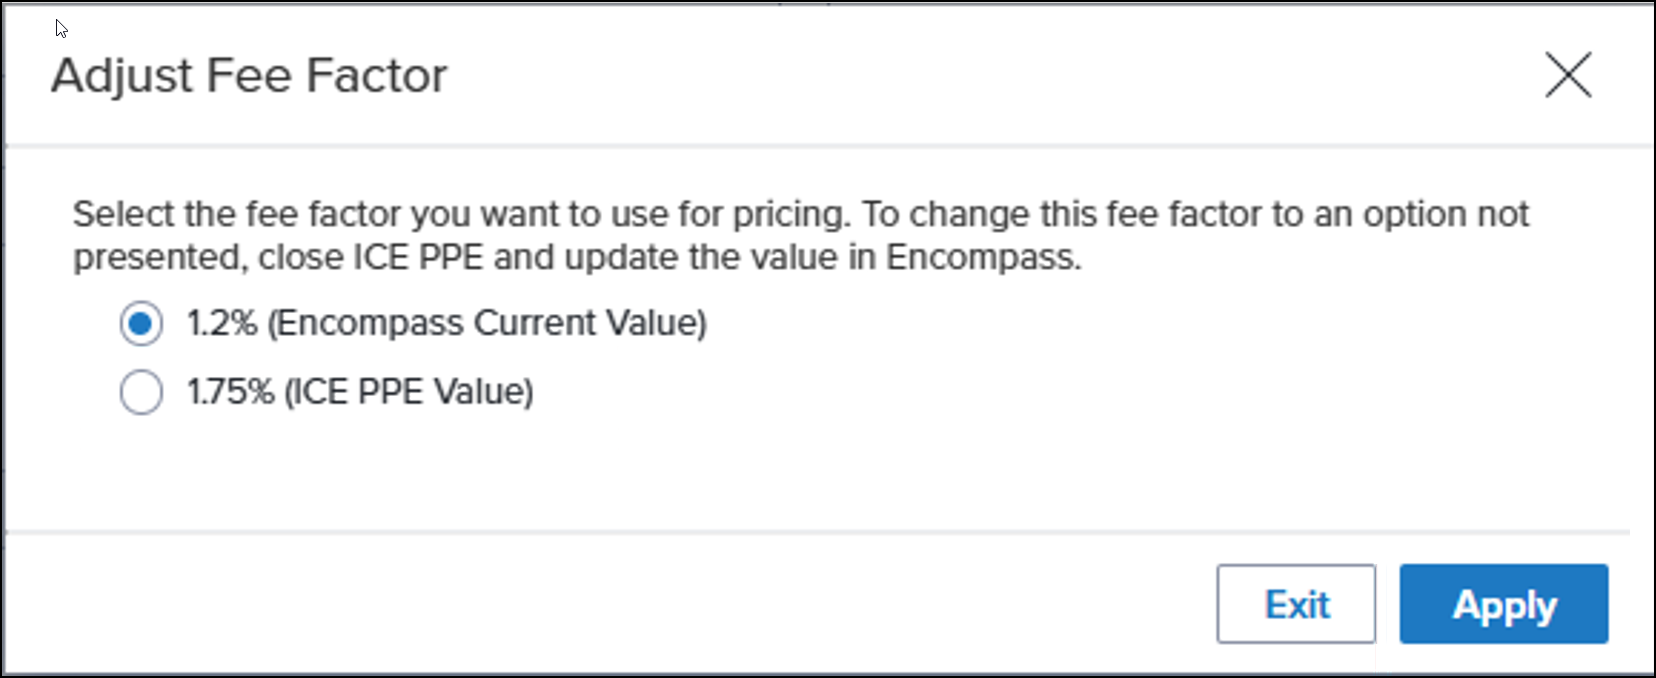
-
To change this fee factor to an option that is not presented, close ICE PPE and update the value in Encompass.
-
The default selection will be the Encompass value
-
If Apply is selected, the selected factor will populate the Factor % field and the Total Fee Amount will be recalculated. The Paid in Cash value, however, will remain the same.
-
The PMI, MIP Financed value will be set to equal the ICE PPE calculated Financed Amount.
Logic for HUD 184 loans has been implemented to ensure accurate funding fees.
If field 1039 is set to "184" on the Encompass FHA Management page:
-
When you open ICE PPE:
-
The Standard Products dropdown field is set to Empty on the Search and Results pages.
-
The Special Products dropdown field is set to “HUD 184”.
-
The Factor % field is set to “1%”.
-
The Encompass value is used first, if defined.
-
All existing rules for Paid in Cash splits are followed.
-
When multiple Program Types are selected, the Funding Fee can be either a VA fee or a HUD 184 fee.
To prevent admins from editing any fields used to calculate the Total Loan Amount, all financed fee fields have been updated.
-
PMI,MIP Financed
-
Display for Conventional loans ONLY
-
Hide for Government loans (FHA, VA, USDA)
-
Field can be edited
-
Factor
-
Display for Government loans (FHA, VA, USDA)
-
Hide for Conventional loans
-
Field is read-only
-
Percent field displays as %0.000000
-
The field displays up to 6 decimal places
-
Used to support USDA recursive fee 1.010101
-
Amount
-
Display for Government loans (FHA, VA, USDA)
-
Hide for Conventional loans
-
Field is read-only
-
Field includes cents
-
The value will be Base Loan Amount * Fee Factor %
-
Example: Base loan amount is 100,000 and Fee Factor is 10.0%, Amount is $10,000
-
Financed Amount
-
Display for Government loans (FHA, VA, USDA)
-
Hide for Conventional loans
-
Field is read-only
-
Field includes cents
-
The value will be = Amount - Paid in Cash
-
Example: Amount is $10.00 and $5.00 is Paid in Cash, Financed Amount is $9995
-
Paid in Cash
-
Display for Government loans (FHA, VA, USDA)
-
Hide for Conventional loans
-
Field can be edited
-
Field is read-only for USDA loans
-
Field includes cents
-
The value will be = Amount - Finance Amount
-
Example: If Amount is $10,000 and Financed Amount is $9995, Paid in Cash is $5.00
-
All Government loans will force remaining cents on Financed Amount to be Paid in Cash
-
Example: If Amount is $5215.25 then Financed Amount is $5215.00 and Paid in Cash is $0.25
When “VA” is selected as a Standard Product and Encompass field 990 is set to “Exempt”:
-
The calculations described in EPPS-70644 will not be performed.
-
All Funding Fee fields will be hidden except the Funding Fee Factor.
-
The Funding Fee Factor will be set to $0.00.
-
Hint text has been added to the Funding Fee Factor stating “Exempt” on all view.
If the Product is updated in ICE PPE and it differs from Encompass, the Fee Factor will be updated to the value in ICE PPE. This will ensure that the loan is priced with the correct Fee Factor for the new Product.
-
If the Product in ICE PPE is updated and then the Product in Encompass is reverted back to the original Product, the Fee Factor is updated to the value in Encompass.
-
For Conventional loans, the Fee Factor value will be $0.00.
-
For Conventional loans, the Base Loan Amount and Total Loan Amount will be the same.
-
For lock, update lock, and Float actions, the ICE PPE values will be passed back to Encompass.
When ICE PPE prices a government loan, the Cash on Hand and Funding Fee values will now be populated in the Lock Request Form. This will ensure the Total Loan Amounts will be accurate on the Initial Disclosures.
-
If the loan is updated with a new Product, the Cash on Hand and Funding Fee values will also be updated.
-
VA loans - The Cash on Hand and Funding Fee value will be $0.00.
Additional Enhancements
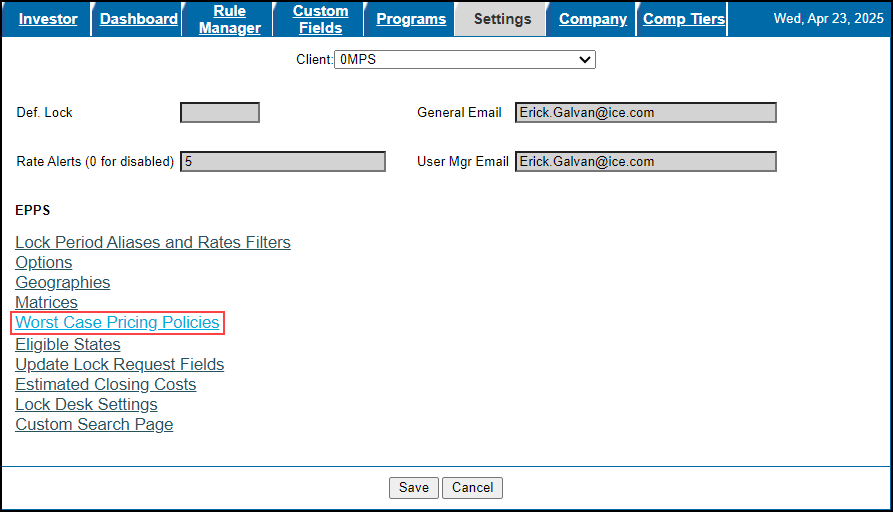
A new Worst Case Pricing (WCP) Policies setting has been added under the Settings tab.
In a future release, this setting will enable your Client admin to manage the policies that define the method used to determine WCP.
The following four Conditions have been added to the Rule Manager.
-
Address Change - True when the subject loan address has changed.
-
Investor Change - True when the investor has changed from any of the selected “From” investors to any of the selected “To” investors.
-
Product Type Change - True when the product type has changed from any of the selected “From” product types to any of the selected “To” product types.
-
Term Change - True when the subject loan amortization term has changed.
When a loan’s program is changed in ICE PPE from a government program (FHA, VA, or USDA) with predefined Upfront fees to a conventional program, the system now writes back a zero value to field 3560 (USDA specific) and field 3044 (FHA and VA).
| Next Section: Fixed Issues | ||
| Previous Section: Introduction |