Encompass Updates and Enhancements to Features - 22.1 Major Release
This section discusses the updates and enhancements to existing forms, features, services, or settings that are provided in this release.
Product Rebrand
As part of the Encompass 22.1 release, Encompass LO Connect is being rebranded to the web version of Encompass. With this update, we’ll begin referring to Encompass as a digital mortgage platform that offers two versions:
-
A desktop version which is installed on your computer - Which you and your teams know as “Encompass” today.
-
And a web version that can be accessed on web browsers from any device - Which you and your teams know as “Encompass LO Connect” today.
A new URL should be used to access the web version of Encompass. This URL will not work until April 9th. The new URL is as follows:
Throughout Encompass 22.1 and in these release notes, labels and references to Encompass LO Connect have been replaced with the web version of Encompass or similar.
User Interface Redesign
A new app launcher has been added as a central location for Encompass applications (Pipeline, Opportunities, etc.) and global custom tools. The App Launcher is located in the website header in the top right corner. This change enables users to access the main features of Encompass at any time.
To Use the App Launcher:
-
From a loan in Encompass, select the App Launcher
 icon.
icon. -
Select an application or custom tool.

Note: Administrators have an additional application labeled Admin that enables them to access the Admin portal for the web version of Encompass.
ENCW-66669
Along with the new App Launcher, the website header has been redesigned to provide more information to the user. The right side of the header contains the new App Launcher, the Exception Inbox for any Automated Service Ordering exceptions, a help icon. and a new icon. Users can also click on the Encompass logo to load the default page (Admin Portal for administrators and Pipeline for all other users). The new navigation options are as follows:
-
Encompass Logo - Returns the user to their default starting page.
-
App Launcher Icon - Navigate to Encompass applications like opportunities or prospects.
-
Exception Inbox - Access any Automated Service Ordering exception notifications.
-
Help - Access online help, video tutorials, training, and technical support. Each option launches in a new browser tab.
-
Profile - Displays the user name, user email address, Encompass Instance ID, About page link, and Logout option.
In addition, the workflow tasks page has been renamed to Tasks and is located on the Pipeline page.

ENCW-65945
Loan team members working in loan files will notice a new look and feel for the left navigation menu and loan workspace. Administrators can now utilize the new Loan Left Navigation setting to tailor the left navigation menu for loan team members' workflows. In the Loan Left Navigation setting, administrators can:
-
Elect to display or hide the Forms, Tools, Documents, Conditions, and Services options in the menu.
-
Add custom menu categories (i.e., “item sets”)
-
Control if the left navigation menu is expanded or collapsed upon initial view
-
Control the users' default initial View upon opening a loan file (for example, Forms - Application View)
-
Control the order of the item sets in the left navigation menu and the order of the options within a menu item set.
Note that the persona access settings set up for forms and tools are still enforced for each loan team member just as in earlier versions of Encompass LO Connect.

To Manage Left Navigation Settings:
-
Log into the web version of Encompass as an administrator.
-
On the default Admin screen, select Company/User Setup, and then select Loan Left Navigation.

-
Allow Customization: The Allow Customization toggle in the top-right corner of the screen determines if loan team members use the default left navigation menu (i.e., the menu provided in previous versions of Encompass LO Connect) or a new customized left navigation menu. By default, this toggle is set to Off. When Off, administrators cannot make any changes to the navigation menu. To start modifying the left navigation menu, set this toggle to On.

-
Note that once you have saved customized settings to the left navigation menu, you can toggle this Allow Customization option between On/Off without losing your customized settings. All saved customizations made in the Item Sets section of this screen are retained for future use, even when the Allow Customization option is set to Off.
-
-
Expanded Left Navigation Panel: Use the Expanded Left Navigation Panel check box to determine if the left navigation menu is expanded or collapsed when a loan team member initially opens a loan file. By default, the left navigation menu is collapsed. Select the Expanded Left Navigation Panel check box to display the expanded view of the left navigation menu in loan files. Loan team members can use the Expand/Collapse icons to expand and collapse the left navigation menu themselves when working in loan files.
Item Sets:
The Item Sets settings determine what is displayed in the left navigation menu, the order in which the item sets are displayed, and the initial item (form or tool) that is displayed when a loan team member opens a loan file.

To Show or Hide Item Sets on the Left Navigation Menu:
By default, the Forms, Documents, Conditions, Services, and Tools item sets are displayed on the left navigation menu. Use the Active toggle options to hide or show these item sets, as well as any custom item sets you have added, in the left navigation menu.
-
To show an item set on the menu, set the toggle to On.
-
To hide an item set from the menu, set the toggle to Off.
Note that when an item set is On (i.e., displayed on the left navigation menu), the persona access settings set up for forms and tools are still enforced for each loan team member. Only authorized loan team members can access the forms and tools provided in these item sets.
To Manage the Order of Item Sets Listed on the Left Navigation Menu:
To change the display order of the item sets on the left navigation menu, select and drag the item set up or down in the list.

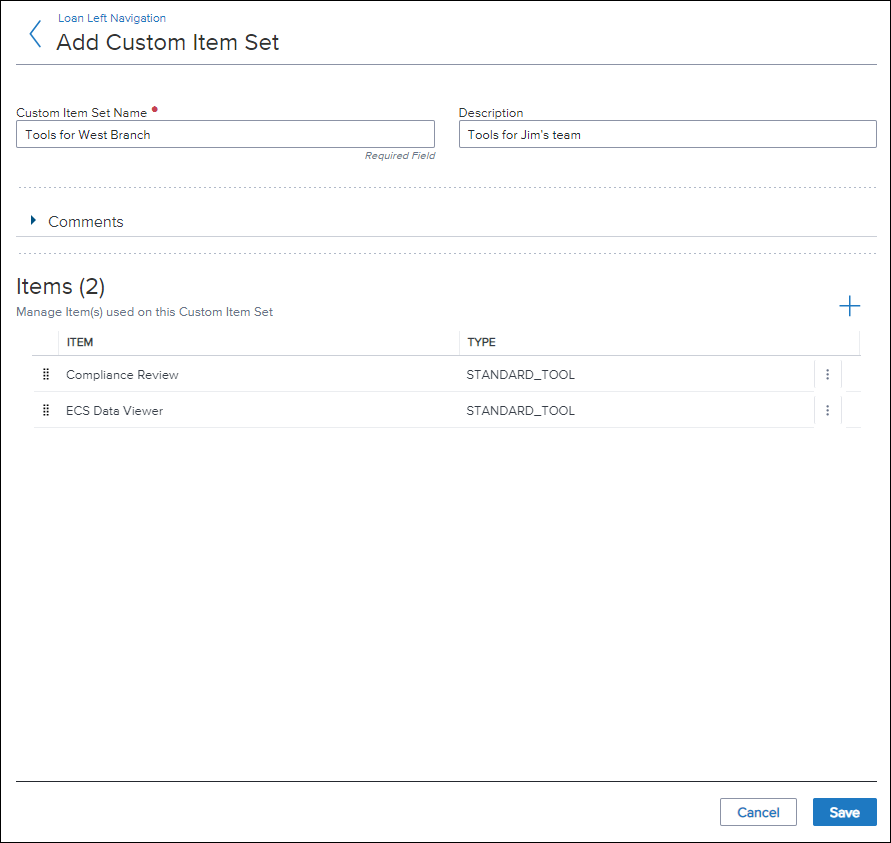
To Add a Custom Item Set:
You can add custom item sets that may contain forms and tools to the left navigation menu.
-
In the top-right of the Item Sets section, select the Add Custom Item Set button.
-
Type a name for the item set (required) and a description (optional).

-
You can add additional details or notes about the item set in the Comments field.
-
Next, select the Add icon in the Items section to add items to the item set.
-
Here you can select the standard and custom forms and tools to add to the item set:
-
Select the down arrow to display the items within that group, and then select the right arrow to add the form or tool to the item set.
-
To return to the main view of the standard and custom forms and tools, select Contents.
-
To remove an item from the Added Contents panel, select the Remove icon (blue X).
-
To remove all items from the Added Contents panel, select Clear All.
-
To change the display order of the items within the item set on the left navigation menu, select and drag the item up or down in the list.
-
When finished, select Done.
-
Select Save to add this item set to the Items Sets list.
-
By default, the new item set is active. Once the administrator saves this custom item set, it will display in the left navigation menu the next time a loan team member logs into Encompass and opens a loan file. If you want to add a new custom set, but you don’t want to display it in the left navigation menu, follow the To Add a Custom Item Set instructions, and then set the Active toggle to Off.
To Manage Custom Item Sets:
-
To edit a custom item set, select the Edit (pencil) icon.
-
To delete a custom item set, select the Delete (trash can) icon.

To Set the Initial Item to Display When a Loan is Opened:
Using the Initial Item setting, you can select a standard or custom form or tool to display when a loan team member opens a loan file.
If you do not select an Initial Item to display, the Application View standard form is displayed when a loan team member opens a loan file.
-
In the Initial Item setting, select the Lookup (magnifying glass) icon.
-
Select a form or tool group to expand its contents, and then select the form or tool to display.

-
Select Apply.
-
All standard and custom forms and tools that are currently stored in the Customization > Custom Forms and the Customization > Custom Tools pages are available to select here. Ensure that the form or tool that you select is Enabled (on the Custom Forms or Custom Tools pages). If the form or tool you select for the initial item is not Enabled, then the Application View standard form is displayed for the loan team member.
-
If a loan team member does not have access to the form or tool (based on their persona permissions), then the Application View standard form is displayed for them.
To Save a Customization Setting:
To save a custom change to the Loan Left Navigation settings, select the Save button located at the bottom of the screen. No custom changes, including changing the Allow Customization toggle from Off to On (or vice versa), are saved until you select this Save button.
Select the Cancel button to remove all un-saved changes from the Loan Left Navigation page.

New Customized Left Navigation Menu:
When a custom left navigation menu is turned on by the administrator, the loan team members will experience the new menu. When the loan team member selects an item set, its contents displays below the item set as shown here:

By default, the Loan Summary bar is provided at the top of all loans to enable loan team members to see pertinent loan information at a glance. Users can see loan details like the mid-FICO, subject property address, estimated value, net price, note rate, and more at a glance. In this Encompass 22.1 release, the Loan Summary Bar setting that the administrator users to determine if the Loan Summary bar is displayed or not has been enhanced with additional options. Administrators can now create and manage custom Loan Summary bars, control the information that is displayed in each Loan Summary bar, and control which Loan Summary bar is displayed based on loan channel conditions.

To Manage Loan Summary Bar Settings:
-
Log into the web version of Encompass as an administrator.
-
On the default Admin screen, select Company/User Setup, and then select Loan Summary Bar.

To Display a Custom Loan Summary Bar in the Loan View:
The On/Off toggle at the top of the Loan Summary Bar page is used to display and hide the customized loan summary bar you have created and activated. When configuring custom loan summary bars, you can indicate which bar to display based on the loan channel. However, the loan summary bar will only display if this On/Off toggle is On and the bar has been activated. More information about activating the loan summary bar is provided below.

The Default Summary Bar is provided with the web version of Encompass out-of-the-box. This bar cannot be deleted or modified. This loan summary bar is provided in the loan view for loan team members if no other loan summary bars have been created, if no other loan summary bars are active, and when active loan summary bars do not meet the loan channel conditions configured by the administrator.

Creating a New Loan Summary Bar
There are two methods for creating a new loan summary bar: add a new loan summary bar and set the conditions or copy the Default Summary Bar (or a different loan summary bar) and then modify the conditions.
To Add a New Loan Summary Bar:
-
In the loan summary bar template section, select the Add icon.

-
Provide a name for the loan summary bar.
-
The Activate this Summary Bar for selected Channel(s) check box is selected by default. Clear this check box only if you want to deactivate this loan summary bar.

-
In the Channels section, select the loan channel(s) that will be associated with this loan summary bar.
-
Select No Channel if you want to apply this loan summary bar when the loan file does not have a loan channel selected. (Note that the other conditions configured for this bar must also be met in order for it to be applied.)
-

-
In the Summary Bar Panels section, the six panels displayed there are active by default, which means they will be displayed in the custom loan summary bar. To hide any of these panels, set the Active toggle to Off.
-
To add additional panels to the loan summary bar, select the New Custom Panel button in the Custom Panels section.

-
Provide a name and description for the panel.

-
Next, select the loan fields for the panel. The values in these fields will display in the panel in the loan summary bar. To select fields, select the Add icon in the List of Fields section.

-
Select the Standard Fields tab to search for and apply standard fields or the Custom Fields tab to search for and apply custom fields.
-
The standard and custom input fields available to apply are listed on these respective tabs. Select the fields to add to the panel, and then select Apply.
-
Use the Search bar to search for fields in this list. Only fields matching the search criteria will be listed here. To return to the complete list, clear the search terms and then select the Search icon.
-
You can select a maximum of five (5) fields to apply to the panel.

-
Back in the List of Fields section, you can change the display order of the fields within the panel by selecting and dragging the field up or down in the list. To edit or delete a field from the list, select the Edit menu to the right of the field, and then select the Edit or Delete icons.

-
Select the Save button at the bottom of the screen to save these settings for the custom panel.
-
Repeat steps 6 – 11 to add additional custom panels.
-
In the Custom Panels section, you can change the display order of the panels within the loan summary bar by selecting and dragging the panel up or down in the list. To edit or delete a panel from the list, select the Edit menu to the right of the field, and then select the Edit or Delete icons.
-
By default, the custom panel is active. To hide a custom panel from the loan summary bar, set the Active toggle to Off.
-
To save the settings for the custom loan summary bar, select the Save button at the bottom of the screen.

NGENY-26841
Form & Tool Enhancements
Support for the Property Information Form has been added to the web version of Encompass. Use the Property Information form to enter basic and preliminary property information prior to ordering closing documents. This form enables users to enter information about the subject property, including flood zone information, title information, manufactured housing details, and more.

ENCW-66912
The Encompass Compliance Service Compliance Review tool is now available in the web version of Encompass. When working in a loan file, the Compliance Review tool is provided in the Tools menu.
- Use this tool to perform a loan check (i.e., order a compliance report) at any point during the loan process.
- During a loan check, loans are reviewed for compliance issues based on Truth in Lending (TIL), Home Ownership and Equity Protection Act (HOEPA), and other industry regulations and mandates.
- The tool displays automatically for all users. The types of reviews that are run and user access to order a compliance review is controlled by the settings and permissions configured by the administrator in the Compliance Review Setup tool in Encompass (desktop version).

Functionality remains the same between the web and desktop versions of Encompass; however there are certain features that are currently not provided in the web version of Encompass. The list below provides a side-by-side comparison of the user experience and feature availability.
| Feature | Encompass (desktop version) | Web Version of Encompass (previously LO Connect) |
|---|---|---|
| Page Thumbnails |
|
|
| Button |

|

|

|

|
|

|

|
|
|
|
Currently Not Available  |
|

|

|
|
| Navigation |

|

|
| Automatic Ordering |
Options include:
|
Currently Not Available |
| Jump to Section Links | Available | Currently Not Available |
| XML Location |
C:\Users\[username]\AppData\Local\Temp\EncompassSC\[session GUID]
|
|
 Availability depends on the version of Adobe installed on your local machine.
 Built into UI
Additional enhancements for the web version of Encompass will be made available in future releases.
ENCW-68244, CE-41695
A new option has been added to enable users to locate a field based on its field ID. This feature is designed to bring similar functionality from the desktop version of Encompass into the web version of Encompass. Users can select the Search located in the top navigation bar when in a loan file to quickly view every form, tool, or custom form that the field resides on. This feature works only for loans using the URLA 2020 forms.
To Find a Field:
-
With a loan open, select the Search
icon. -
Type a field ID, and then press enter.
-
A list of field locations displays. Select a location from the list to view the field location.

-
If there is only one location where the field resides, the form or tool with this field is displayed. Once the field location is displayed, the field is highlighted.

-
-
To navigate to another form or tool, select the form or tool from the search results. Alternatively, you can select the Down Arrow
 to move to the next item in the search results or the Up Arrow
 to move to the previous item.
 -
To clear the search results, select the x in the search window.
If there are multiple instances of a field on a form or tool, all instances of the field are highlighted when viewing the field from the search results.
Note: If a user attempts to view a field that they don't have access to due to a business rule, they receive the following notification:
ENCW-58363
Updates have been made to support iLAD loan file imports. When the following values are imported from an iLAD file, the values are retained and are not overwritten by the calculated values that Encompass typically populates to the fields.
Note: This behavior is dependent on the FMNA Loan Import option in the Encompass Admin Tools. If the option has been set to Keep Calculated Values, the behavior described above is applied. If the option has been set to Use Encompass Calcs, the imported values are overwritten by the Encompass calculations.
Additionally, Lock icons have been added (as indicated below) for any fields that previously did not have a Lock icon. Encompass users can click the Lock icons to trigger a calculation that replaces the imported value.
-
Borrower Other Incomes (field ID URLA.X42)
-
Co-Borrower Other Incomes (field ID URLA.X43)
-
Total Proposed Monthly Housing Expenses (field ID 912) – Lock icon added
-
Total Mortgage Loans (I + J) (field ID URLA.X148) – Lock icon added
-
Other Credits (field ID URLA.X149) – Lock icon added
-
Total Credits (Total of L and M) (field ID URLA.X152) – Lock icon added
-
Total Due from Borrower(s) (Line H) (field ID 1073) – Lock icon added
-
Borrower FHA Closing Costs (field ID 1132)
-
Residual Income (field ID 1325)
-
Projected Reserves (field ID CASASRN.X78)
-
Total Subordinate Financing (field ID URLA.X230)
Note: If the field is unlocked after an import, Encompass recalculates the value of this field.
ENCW-68592, ENCW-68051
A new Average Representative Credit Score field (field id 4752) has been added to the Borrower Summary - Origination and Borrower Summary - Processing forms to provide visibility into the average representative credit score rating that has been implemented by Fannie Mae DU (Desktop Underwriter).

The field is populated with a calculated value based on the credit scores of the first four borrowers in the loan only. A borrower with no credit score is excluded from the calculation, which is then based on the credit scores of the remainder of the original four borrowers. A recalculation of the value is triggered when any of the credit scores are updated for the original four borrowers. Click the Lock icon to overwrite the value if needed.
The value in this field is not directly integrated with Fannie Mae DU submissions, but it enables lenders to perform eligibility screening prior to a submission to identify whether a loan falls under the eligibility criteria for Fannie Mae DU.
ENCW-67919
To accurately capture the cash to close for a HELOC loan, the HELOC Initial Draw amount (field ID 1888) rather than Total Loan Amount (field ID 2) is now used on the Application View/Qualifying the Borrower form for purposes of calculating the cash to or cash from the borrower.
To support this change, when HELOC is selected for the Loan Type (field ID 1172), The following changes are applied to the loan:
-
The Loan Amount field (field ID 2) is replaced with the HELOC Initial Draw at Closing field (field ID 1888) on the Qualifying the Borrower form.
-
In the second row on line I, the label for the Loan Amount Excluding Financed Mortgage Insurance (or Mortgage Insurance Equivalent) is changed to HELOC Total Credit Limit.

ENCW-63511
o bring Encompass into alignment with the DTI calculations used by Fannie Mae Desktop Underwriter (DU) and Freddie Mac Loan Prospector (LP), updates have been made to calculations in the Verification of Mortgage records for the subject property for loans using the new URLA forms. The updates were implemented because DU and LP are pulling housing expenses and net rental income from the Verification of Mortgage (VOM) record which resulted in discrepancies when the current mortgage payment associated with the subject property was different from the proposed payment.
The following logic now applies to calculations on the VOM when the VOM’s Subject Property check box (field ID FM0028) is selected:
-
When Primary is selected from the Loan Occupancy drop-down list (field ID 1811), the Mortgage Payment (field ID FM0016) is now the Qualifying Payment First Mortgage P&I plus the Qualifying Payment Subordinate P&I.
-
When Primary is not selected from the Loan Occupancy drop-down list, the Mortgage Payment is now the Proposed Monthly First Payment P&I plus the Proposed Monthly Subordinate Liens P&I.
-
The Taxes, Ins, Expense (field ID FM0021) calculation is now the combine total of the proposed monthly hazard Insurance (field ID 230), supplemental insurance (field ID URLA.X144), property taxes (field ID 1405), mortgage insurance (field ID 232), association/project dues (field ID 233), and other expenses (field ID 234).
Additionally, when the VOM’s Subject Property check box (field ID FM0028) is selected, the field for Taxes, Ins, Expenses (field ID FM0021) is a calculated field with a Lock icon. Click the Lock icon to edit the field. If the Subject Property check box is not selected, the field for Taxes, Ins, Expenses (field ID FM0021) is a free-entry field with no Lock Icon.
Note: The calculations used for Mortgage Payment (field ID FM0016) and Taxes, Ins, Expenses (field ID FM0021) changes when the Subject Property check box is selected or cleared.
ENCW-65832
Workflow Automation Enhancements
A new High Priority option has been added for Workflow Rules. This feature enables administrators to define rules as a higher priority for automation to enable those rules to be processed sooner when triggered. Rules should only be marked as high priority if the user is going to be waiting for the results of an action before proceeding. For example, if a user is completing a task and another task is created as a result of this action, then the rule would be a good candidate for high priority.
Note: Users are only able to have 150 high priority rules at a time. Workflow Rules utilizing the Loan Updated triggering event can not be marked as high priority.
To Set a Workflow Rule as High Priority
-
From the Encompass Admin Portal, select Process Automation and then select Workflow Rules.
-
Select New Rule, or edit an existing rule.
-
In the Priority field, select High to indicate that the rule is high priority.
ENCW-67342, ENCW-67341
A new active rule and high priority rule count has been added to the Workflow Rules list to help administrators quickly assess their workflow rules setup. This change assists administrators in identifying the total number of active rules and the total number of those active rules that are marked as high priority.

ENCW-67809

A change has been made to the rule export feature to reduce the need to manage multiple files when exporting and then importing rules. Previously, when an administrator exported multiple workflow rules, each rule was downloaded as an individual file. Now, when an administrator exports multiple rules, they are downloaded as one .xml file. This change streamlines the process of moving rules from one environment to another.
Note: The Workflow Rules import option has been updated to support uploading one file with multiple rules.
ENCW-65995
Task Framework Enhancements
A change has been made to the Add Content page for workspaces to make it easier to find the correct form or tool. The Standard forms, custom forms, and custom tools section now displays in alphabetical order. Previously, only the Documents section was listed in alphabetical order. This change only affects the list of forms and tools on the left side of the page, and you can still order the added content in the way that makes sense for your workspace.

ENCW-60760
The Workflow Tasks tool on loan files has been updated for administrators to default to the All Tasks view. Previously, this page defaulted to the My Tasks view. This has been changed as loan tasks are not often assigned to administrators.
To Change the Tasks View:
-
From a loan, select Tools.
-
Select Workflow Tasks.
-
On the Workflow Tasks tool, select the Tasks drop down filter and then select My Tasks to view tasks assigned to you or All Tasks to view all tasks on the loan.
ENCW-54613
The Workflow Tasks tool is now provided on the Tools tab on loans in the desktop version of Encompass. This initial release enables users to view workflow tasks on the loan, see who the tasks is assigned to, and comment on the tasks. In a future release, the ability to open the tasks and complete the task will be available in the desktop version of Encompass.
NICE-37657
Services Updates
The Services Landing Page has been redesigned to align the user interface with other parts of the web version of Encompass. This change updates the Services Landing Page from the card style layout to a layout similar to the Pipeline page. The Services Landing Page now displays the information users are familiar with.
Only service categories with an active service setup configured by the administrator are displayed. Users will also see categories where an order for the loan exists, even if the user is not authorized to place an order in that category.
The Services Landing Page is a central location for all current and future services in Encompass. Users are able to order services from this page. Users can also view information about any services that have already been ordered for the loan.
To Order a New Service:
-
From a loan, select Services.
-
Select All Services.
-
To place a one-click order, select Easy Order. The order is placed and the status can be viewed by expanding the category section on the Services Landing Page
-
Note: If a one-click service setup has been configured for more than one provider, a Place a new order screen displays, enabling the user to select the desired provider before completing the order request.

-
-
To place a manual order, select Order Service on the Services Landing Page.
-
On the Place a new order screen, select the service category and then select the provider for that category.
-
Select Next.
-
Review and enter any required information for the partner order, and then select Submit.
-
Note: This page is controlled by the partner that the request is being made to. Any questions regarding the information or credentials required for completing the order should be directed to the partner.
-
To View Order Details:
Once an order is placed, users can view details about the order on the Services Landing Page. Users can view the status, borrower(s) on the order, who ordered the services, view documents, and more.
-
From a loan, select Services.
-
Select All Services.
-
Select a category to view order details for that category.
-
To search by a column, select the search
 icon on the column header and enter the search criteria.
 -
To sort by a column, tap the column header to sort loans in ascending order. Tap the column header again to sort in descending order.
-
To view order documents, select the number in the Document
 column, and then select the document name.
-
To view the order status details, select the View Details
 button. The View Details button launches the partner's integration in the web version of Encompass.
A new slide-out information panel is also available to provide more information about the order, such as credit scores and AUS Results, and any documents for previous orders submitted to the same partner. For credit orders, users can also import liabilities to the loan file by selecting the Import Liabilities button.
To View the Slide-Out Information Panel:
-
On the Services Landing Page, select a category where an order has been placed.
-
Select the order entry. The slide out panel displays:

-
To view documents, select Documents and then select the document to view.
-
To view the order status details, select the View Details. The partner's integration launches in the web version of Encompass.
-
To view an activity log detailing what happened on the order, select Activity Details.
-
For credit orders, select Import Liabilities to start the liability import process.
Example of Credit Order Slide Out Panel:

ASO-7168
The Advanced Conditions Query Builder has been added to the services management order options pages for manual, one-click, and automated order setups. The query builder enables administrators to create readiness conditions using a point and click interface to build conditions. With the new Query Builder, users can build conditions without extensive knowledge of the .NET programming language.
To Use the Query Builder
-
On a new service order setup, navigate to the Readiness Conditions section.
-
Select Query Builder.
-
Enter or search for a field. For this initial release, users can only search for an exact match of a field ID. Partial field search support will be added in a future release.
-
Select an operator for your query from the list. The available options are based on the format of the field you entered/selected.
-
Enter the value to complete this query.
-
Once the query is completed, select Apply to apply the query to the rule. The code is copied to the Code Editor.
As you build the query, the related code is displayed in the Output section.
To add additional lines to the query:
-
Select the first Menu
 icon, and then the middle icon (
 ) to add another query.
 -
Repeat the process detailed starting with step 5 above to configure the query.
-
If there is more than one query, select the second Menu
option to indicate whether to use the AND condition or the OR condition with your queries. -
If you need to delete a query, you can select the first Menu
icon , and then the left icon ( ) to remove the query line.
 -
To change the order of the queries, select the Handle
 at the front of the row.
To create nested queries, select the first menu and then select the right icon ( )
)
ENCW-64436
Administrators can now configure Automated Service Order (ASO) configurations for the Title & Closing category. For information on adding new service management setups for manual, one-click, or ASO configurations click here.
The new Encompass Partner Connect Integrations allow for lenders to leverage new powerful and intelligent service ordering workflows from service partners with benefits like automated service ordering, more streamlined workflows, and better user experiences. Visit the Marketplace to see which partners are available today to get set up. Be sure to check back as the Encompass Partner Connect Integrations Marketplace is regularly updated with the latest enhanced integrations from partners.
To view the existing integrations, visit the Encompass Partner Connect Integrations Marketplace.
Underwriting Center: Rep and Warrant Tracker
Updates to the Rep and Warrant Tracker display in the Underwriting Center, including but not limited to the following, are available with this release:
-
New Back button added to the bottom right corner of Rep & Warrant Tracker
-
New column header to reflect EST time for when services are ordered
-
Repositioning the Rep and Warrant Tracker Results button (used to access Rep and Warrant data)
-
Updated Loan Snapshot Back button
-
Updated Cancel button in the Quick Entry window
-
Fannie Mae Solution Summary column name updated to Fannie Mae Submission Statuses
-
Freddie Mac Solution Summary column name updated to Freddie Mac Submission Statuses
-
Rep and Warrant Loan Summary Status header updated to Rep and Warrant Status
The following mapping updates are included with this release:
-
Fannie Mae: New fields for the following have been added to Encompass and is now included in the mapping:
-
Rep and Warrant Status
-
Verification of Employment
-
Income Verification
-
-
Fannie Mae EarlyCheck: Borrower and Co-Borrower new fields for Fannie Mae Status Date (field IDs TQL.X114, TQL.X115) have been added to Encompass and is now included in the mapping
-
Fannie Mae DU: Support for Multiple Borrower Pairs
-
Freddie Mac: New fields including but not limited to the following have been added with the Encompass 22.1 release, and included in the mapping:
-
LPA Risk Class Date
-
LPA Purchase Eligibility Date
-
LQA Risk Assessment Date
-
Mapping for new fields is supported in Encompass 22.1 and later versions. For mapping details, see the Rep and Warrant Tracker Mapping Document (downloadable MS Excel file).
Enhanced Conditions Updates
Communications
A new Chat feature has been added to the Communications Panel In Encompass. Previously, this Communications Panel was only used for tracking phone calls through our Prospect Engagement feature. This new feature provides a central location for communications sent between the LO and potential borrowers. With this new feature, loan officers can quickly and easily communicate with their borrowers through live chat. The Live Chat feature is available when this feature is enabled in Encompass Consumer Connect (ECC), and when a Loan Officer has received their first chat message from an ECC user. Loan officers can quickly see any pending messages they have from borrowers, and they can respond and chat with borrowers in real time. In addition, the chat messages move from one loan officer to another if the loan officer on file changes. Loan officers are also able to chat with multiple borrowers and can switch between conversations quickly.
For information on how this feature is enabled and used in ECC, see the Encompass Consumer Connect 22.1 release notes.
To Access And Use The Communications Panel:
The Chats view for the communications panel displays a list the most recent 30 conversations with borrowers. Users have the ability to scroll to the bottom to load the next 30 conversations by selecting the Load More button. Each conversation on the list displays the borrower's name, a preview of the most recent message, and a timestamp of when the message was received.
-
From the Pipeline, select the Communications
 icon.
icon. -
To view a chat, select it from the menu.

-
To send a message, enter in your message at the bottom and then select Send
 .
.Note: Each sent message had a limit of 250 characters.
-
To switch between Chats and Calls, Select the drop down menu next to Chats, and then select the option you want to view.

Chat Message Details
The chat bubbles display the date and time that messages were sent, as well as the entire chat history between the borrower and loan officer. Borrower messages are displayed in white, and loan officer messages are in blue. Messages are grouped by date, and display from the oldest messages on top to the newest messages display at the bottom. Users can scroll up to the top of the message panel and select the Load More button to retrieve the next set of messages from the message history.

Loan Officers can access loan information, view notifications, and close chats from the Communication Panel.
-
To access related links, such as the incomplete application or lead associated with the loan, select the Menu
located in the top right corner of the chat window. -
To close the chat, select the X in the top right corner of the chat window.
-
When a conversation contains an unread message from the borrower, a blue circle displays next to the chat indicator
 and next to the chat in the communications panel.
LOC-143, LOC-147, LOC-144
Fixed Issues
Why we made these updates: The following issues were fixed to improve usability and to help ensure the web version of Encompass and the Web Input Form Builder is operating as expected. The issues that are chosen to be fixed are based on the severity of their impact to clients and client feedback.
When working with Hyperlink and Label elements in the form designer, an issue occurred with the Remove Top Row property. When the Device Type option in the Properties panel was set to Mobile, the Remove Top Row option was set to No by default and could not be changed to Yes. This issue has been resolved and this option can now be changed to Yes for hyperlinks and labels. Use this option to remove the top row for the selected element.

NGENY-26087
| Next Section: Change Log | ||
| Previous Section: Introduction |